We may receive a commission when you use our affiliate links. However, this does not impact our recommendations.
I better start off with a warning. If you haven’t already figured it out, I’m kind of a nut about patterns. Long before I owned a CNC, I made hundreds of them. As a furniture maker, I really use and rely on them. The rule in my shop is that if you need to make two of anything or if there’s even the slightest chance you might make something again, I make a pattern. I’ve found that patterns are critical for accurate and efficient furniture making. But, they can be much more than a template that you use for shaping parts; particularly if you use a CNC to make them. By adding precision details and other important information to the patterns they become invaluable for project organization, smart workflow and, bonus: they help prevent you from making mistakes.
If you want to make patterns better, add precision alignment.
Accurate markers really help. As your parts acquire more shape or have no straight lines and are curved in every direction, markers are even more important. Once you enter the world of CNC cut patterns with everything accurate to .001 or better, you can use precision for much more than just an outside shape. So, why not add information to improve the accuracy of your setups and layout?
When I started getting my patterns cut on a CNC by a service, I began to add critical details and alignment marks. For example, when working with oddly shaped parts, it’s a challenge align to the blank wood to the pattern. So, I add reference points as an aid to square up parts and patterns. These also come in handy for aligning groups of parts for final assembly. The point is that you’re already using the precision of the CNC to make a pattern, so you should also include key positions and intersections as aids.
Adding these details and alignment marks make patterns much more useful. For example, if you have an oddly shaped pattern, it can be a challenge to align the blank wood part to the pattern. So, putting in reference points will help you square up or line up part and pattern. Adding in other position points also helps align groups, paired or adjoining parts during final assembly. The point here is to use the precision of the CNC in every way you can. Add key positions, intersections and alignment aids to your patterns before milling.
What to add
If you deal with curved shapes, accurate reference points really help to keep everything lined up. First, I make sure I add a center point on every symmetrical part. For example, if a part is a semicircle shape, I place a marker where the center line is located. Now, I have a reference point for alignment. Next, for any joinery position or attachment point, I put in a centerline marker at the joint location. If two parts are to be joined — say for a mortise and tenon joint, there’s a matching centerline on the second part as well. And, if a hole or other detail like a plug, mount point, inlay, etc. are needed, markers are added to those locations. How? I always do this by CNCing .250” holes in these locations.
Why .250” holes?
Three reasons. That’s the size of the bit I specify for the CNC service to use for cutting my patterns. Using one bit makes the outsourced pattern job simpler. The size is small enough for adequate detailing on my patterns and it works perfectly for the holes I use for markers on my patterns. If the hole was smaller, then that would require a bit change, and therefore more machine time which I’d be paying for. The hole could be bigger, but I prefer the simplicity and consistency of the using the same size bit everywhere on my patterns. Finally, one more trick. When using the actual pattern on the blank part, I use a .250” machinist transfer punch, tapped with a small hammer to transfer the position to the wood below. The punch that just fits inside the .250” hole in the pattern and therefore the mark it makes on the wood below is dead center.
These .250” markers are simply drawn circles you make at the locations needed for the individual pattern using vector-based drawing or CAD software. The CNC drills a hole in these locations. If you should try this, make sure your holes are precisely .250” in diameter. If you’re off a little bit, say .249″, the CNC will ignore the hole and move on because it’s too small for the bit. You can get away with a little over, but if your hole is way too big, it’s harder for parts to align. I find that .250” holes work just perfect. So, be precise.
Your joints will align with your finished parts if you first align them with your drawings and patterns.
These markers must be accurately placed and if two parts need to align — like a table leg and apron mortise and tenon, they must be perfectly located and tested in your drawings prior to machining. The way to do this is either with guidelines in drawing software such as Illustrator or the free program, Inkscape or by using various snap-to-line or alignment features that are commonly available in CAD software. This is easier than it sounds. Essentially, you’re testing a joint fit in your drawing to make sure it will come together and line up at joint locations before you have the pattern machined.
One more trick. In my drawings, I always color my .250” holes and put them on their own drawing layer. Usually, I choose red so that I can spot them easily. Using colors and layers, I keep track of these holes and turn them on and off in drawing layers as needed. This also prevents me from moving them ever so slightly by accident and causing big problems later. And, the CNC operator can also use these drawing aids I’ve included to organize and program the CNC for machining.
Back at the shop
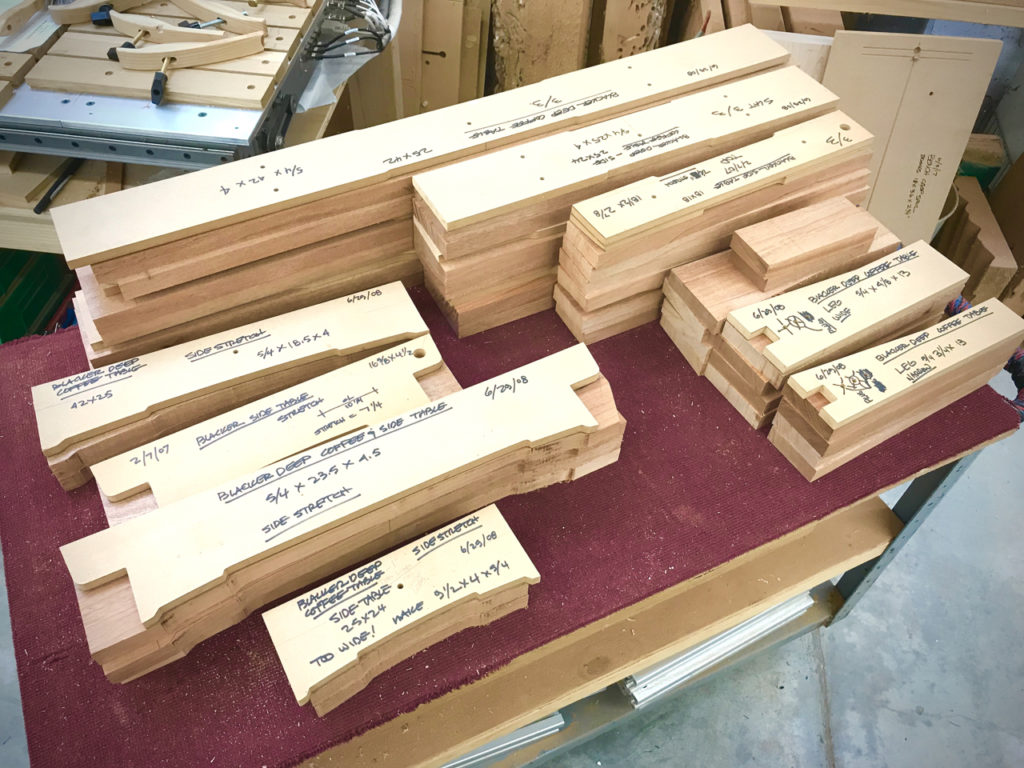
When I teach furniture classes, students always ask me about plans and instructions for my furniture. They expect to see the usual printed out drawings with pages of instructions. I tell them that I don’t have any plans or instructions because I never use them. It’s true. Unlike other professional woodworkers, I keep no notes, notebooks, story sticks on anything I build. The reason is that every detail I need to build a particular part is written onto my full-size patterns. By the time I’m done tweaking them, each pattern has become an advanced story stick. Besides the final shape, all the information I need is written on my patterns. To me, this is essential. My main furniture line consists of over one hundred-fifty different pieces, each with a minimum of a dozen parts. That’s a lot of patterns. The patterns, notes and key positions are how I keep my work organized and accurate.
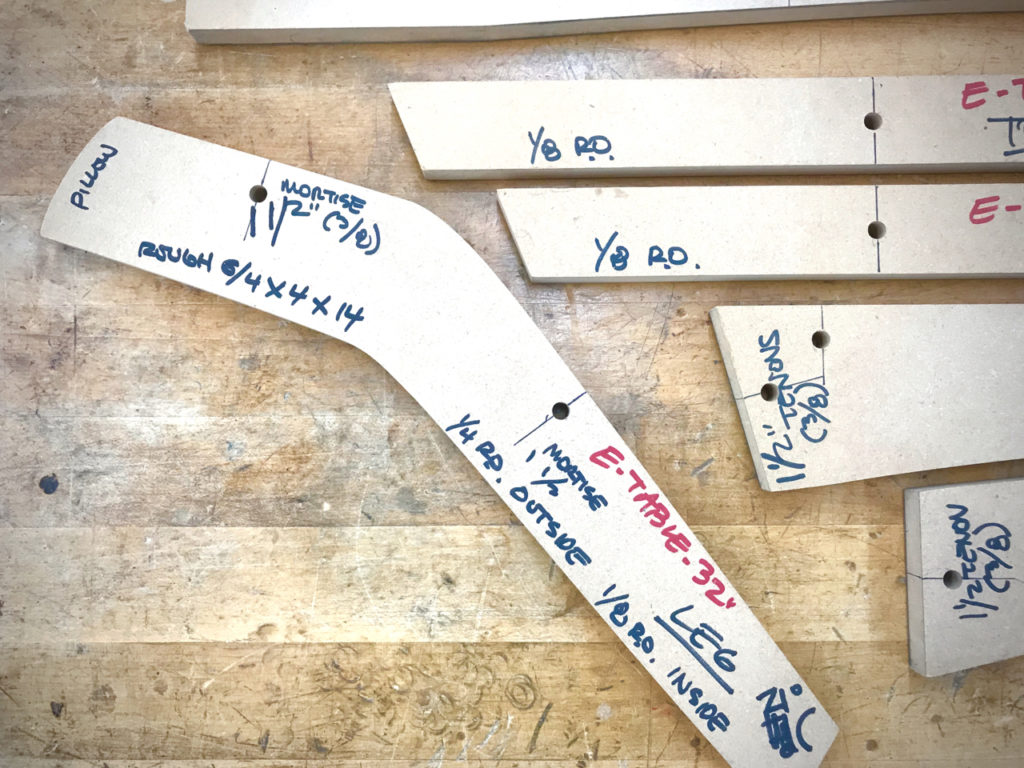
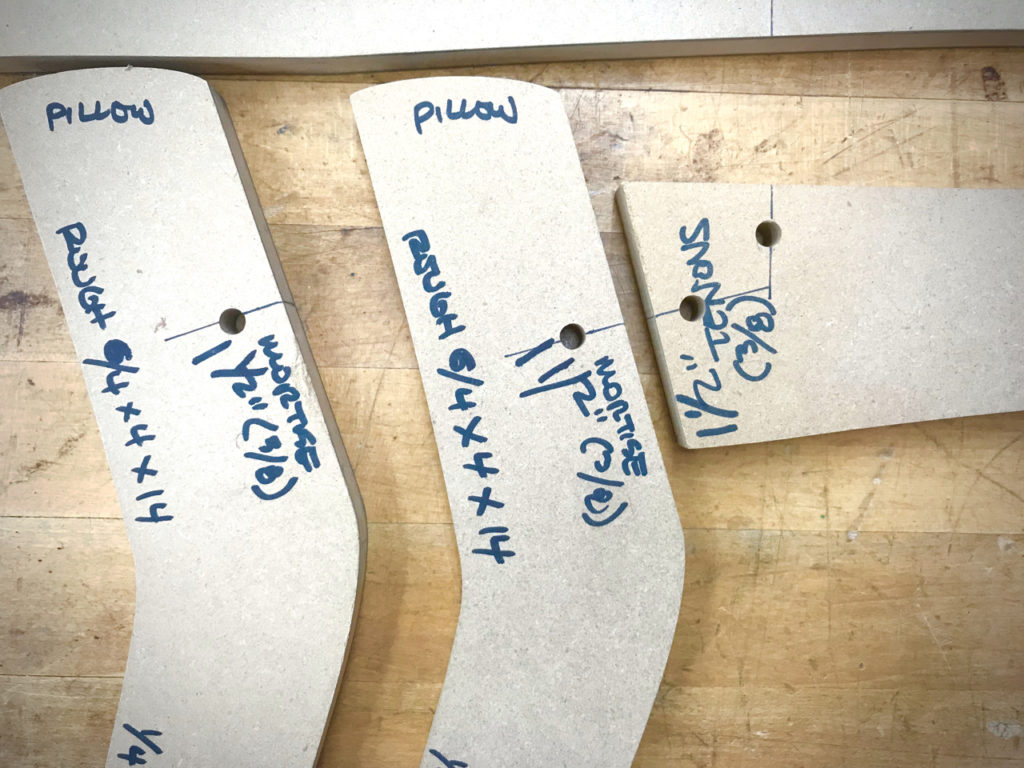
Notes and details on your patterns are important. Blank stock, joinery details, round overs, angled trim cuts and handwork such as pillowing are noted on this leg.
Back at my shop, I add specific details to each pattern. I do this immediately after I get home from the CNC service and double check against the original drawings to make sure everything is correctly milled. Once everything checks out, it’s time to detail my patterns.
Smart Patterns are the ultimate story sticks
Using Sharpie markers, I include the name of the furniture piece, the part and the function the pattern is intended for, the rough and final dimensions of the blank material — this is what I make up my cut lists from. I add the date the pattern was made in case they are variations of the design or series. If there’s a total pattern count for a given piece of furniture I include it and assign a number to each pattern so I can spot if one is missing. If there are subgroups of patterns or sets, such as parts for a table top, each pattern is identified individually and where it fits in sequence. Next, I use a square and a fine marker to take any alignment or centering line from the center of my .250” marker holes out to the edge and wrap them around the edge of the pattern with a hip square.
BTW, I always design my patterns final size without any added length for joinery. I include notes on the pattern on how much to add for tenons at each joint intersection and any other joinery information I need at the locations for mortises, dovetails and any other joinery. There are a few exceptions to the final size and shape rule when occasionally I add extra length on a chair leg for registration pins that might be held down on a fixture for multi-sided shaping.
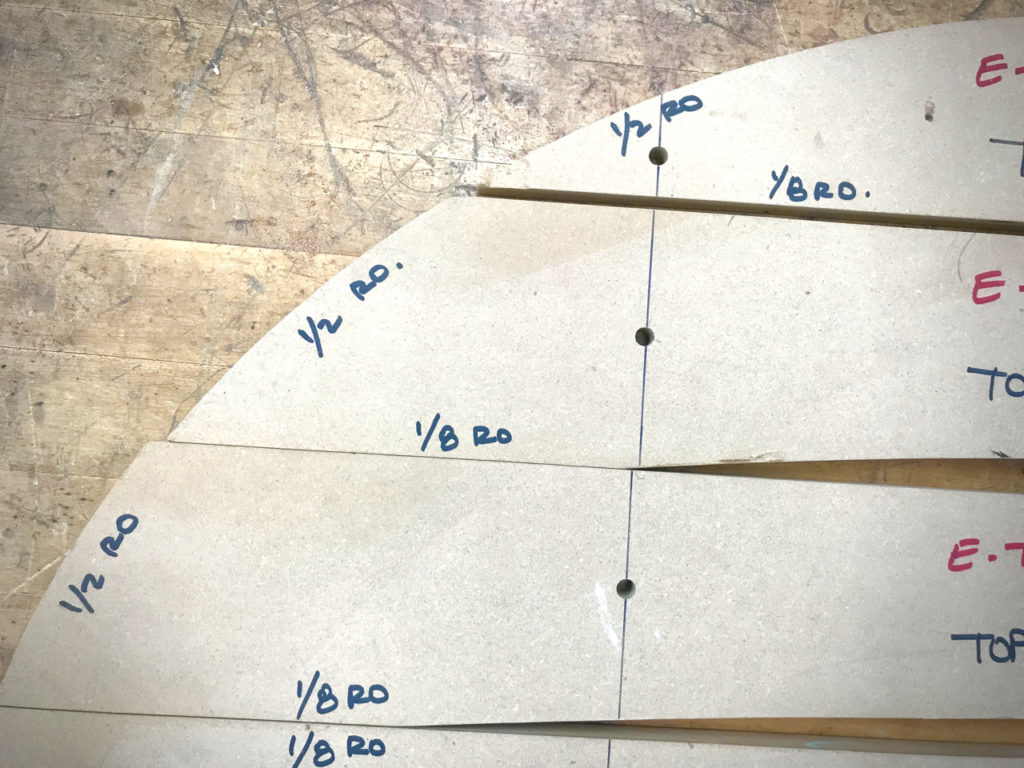
Extra details such as round overs or chamfer edge detailing are noted at the appropriate locations on the pattern. Special blank stock alignment points are added to odd shaped parts. I’m careful to note any 90-degree locations when confusing angles are nearby. Any special trim angles that will be cut with a saw later, are noted. Finally, I make add information about any “gotcha’s” that might come up during construction. Warning signs, based on past experiences, if you will.
Smart Patterns = Good practices
Some final notes. This series is not just about patterns. Taking in all of the above and you’ll see that this article is really about good practices in woodworking. Besides good patterns, it’s important to be as disciplined about your rough stock as you are about your final shaped part. If you have four table legs to make, then make all four blanks the same size. I always cut my stock to the dimensions I’ve marked on my patterns and mill and cut the parts accurately. The result is a crisp stack of parts to be shaped. This is particularly helpful if there are flat or square edges to align the pattern to for transferring the pattern shape with a pencil line for rough cutting on a bandsaw. Consistency and reference points make it easier to position the pattern on the blank piece. And, if the blanks for a given part are all the same size, you have a last minute option to reassign them to a different position. If the grain direction of one leg doesn’t quite match its mate, you can move it to another location.
Another pro tip: If you have multiple parts to mark up, don’t make the mistake of transferring the marks from your patterns to your parts, one at a time. Align all of the blank parts together with the pattern, square up the stack, clamp everything together and transfer all important details like joint locations or centerlines to the entire group all at once. If you take the path of marking up one part at a time, I guarantee you that you will make mistakes.
Keep your patterns with your parts throughout your project.
Finally, one more tip. Using patterns doesn’t stop once the parts are shaped. They can continue to keep your project organized throughout the entire building process. I always stack up my parts with the appropriate pattern sitting on top of the stack. They stay with the parts all the way through final assembly. At any time, I can refer to the pattern with its critical information and the stack of parts below. This way you can scan and see where you are in the project or if something is missing or out of place just by glancing at a stack. Using enhanced patterns throughout the building process is a technique to keep you from making mistakes.
Good practices = Better woodworking
Being a professional is more than just the obvious focus on efficiency and speed. It’s about having methods and procedures in place like these that minimize errors, improve accuracy and maximize workplace safety. As I have told students, it’s these techniques that separate professionals from hobbyists. Be as passionate about your practices and how you work as you are about your skills and equipment.
These tips are for everyone. Practices and procedures like working with precision patterns are just as valuable for a hobbyist woodworker; who between work and family obligations may have little time to dedicate to their craft. Using accurate and enhanced patterns as a super story stick is just another way to work smart. Getting them made for you by a CNC service is step one. Adding precision details is the second step. Keeping your parts, patterns and projects organized is step three.
As I said in a previous post, that of all the digital woodworking recommendations I’ve made to Popular Woodworking readers, getting your patterns CNC milled for you and souping them up is top of the list. It’s smart, cheap, and makes your woodworking better and more accurate. For myself, this technique has been invaluable. What’s more, you don’t have to be a digital expert to do this. You just have to make simple digital drawings — which is easier than you might think.
A dedicated hybrid or hand tool woodworker can get all the benefits and remain true to their chosen path by having a CNC service produce your patterns. You’ll still get to use the tools and skills of your choice to build your project. Everybody woodworker wins by using precision where it’s needed most. This is the perfect place. Turning patterns into super story sticks is a solid technique for better woodworking. It’s a giant step beyond the old adage, “measure twice, cut once”. I belive it’s best to not measure at all. Use super story sticks.
Additional Resources
- All posts on Easy Entry Digital Woodworking, click here.
- Additional Digital Woodworking videos click here.
Here are some supplies and tools we find essential in our everyday work around the shop. We may receive a commission from sales referred by our links; however, we have carefully selected these products for their usefulness and quality.