We may receive a commission when you use our affiliate links. However, this does not impact our recommendations.

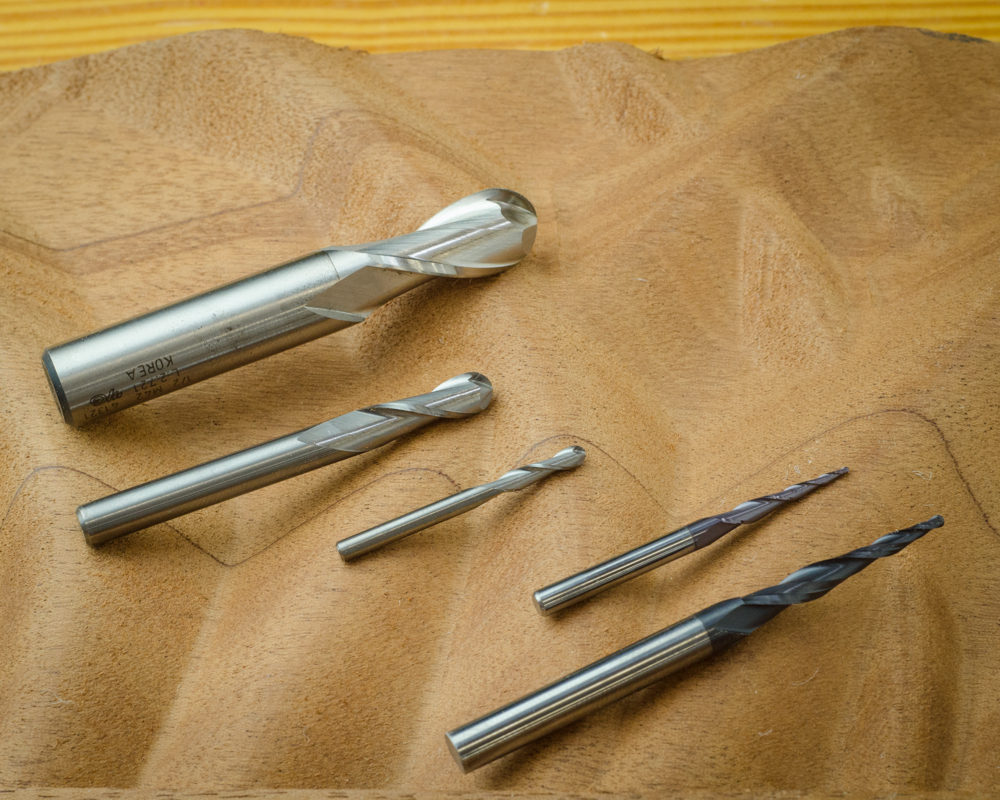
CNC mills for 3D carving are round on the bottom. They’re called ball mills. From top down, shown are .500, .250, .125 ball mills and tapered mills of .125 x .5mm radius and .250 x 1mm radius. The ones I most often use are the top two.
Cutting parts with a CNC is a 2.5D process. It’s not quite 3D and a bit more than 2D. When you’re cutting parts, the third axis on a CNC —the Z axis, just needs to cut at selected depths. You can start with two-dimensional drawings and add tool path instructions for how deep the router or spindle needs to cut.
After cutting parts on a CNC, nearly everyone interested in digital woodworking wants to explore the world of 3D carving. When you add a third dimension to your work, the mills you work with have a new set of requirements. They must be able to reach into curves and create geometry that is not possible with flat end mills. For 3D carving, the CNC mills are round on the bottom. These are called ball mills.
Why round? With a ball mill, the contact area can be anywhere on the hemispherical bottom of the ball or even along the sides. With that variable contact area, the ball mill can touch the surface of the material you’re cutting over the entire radius of the ball, thus giving the CNC operator the ability to carve intricate and smooth 3D shapes at most any angle. How intricate? Within the diameter of the ball itself, any shape you can create using 3D CAD software that can be cut on a 3-axis CNC. Armed with a good 3D CAM program to define the tool paths, your imagination and the material you’re cutting become your only limitations.
Mill for 3D Carving
Like earlier suggestions for mills for cutting wood, I recommend that you stick to 2 flute ball mills with a moderate helix angle of 30 degrees or a little less. At normal cutting speeds (IPM or inches per minute) on the level of CNCs that might be found in most digital woodworkers’ shops, this configuration gives the mills enough time to efficiently cut and eject waste before the bit overheats. As previously recommended, there’s value in getting mills that are made out of carbide. I regularly do 3D carving runs for several hours at a time and have found carbide adds to longevity and is worth the extra cost.
Which ball mills
I primarily use just two ball mills for 3D work. A two flute carbide .500” ball mill and a .250” carbide ball mill. On larger pieces, I sometimes use a .500” flat mill for hogging out the majority of material before final 3D carving, but often I’ll just use a .500” ball mill for the roughing pass. If the shapes I cut are close to flat — say a very gentle sloping 3D shape, I might make my second, detailed and final passes with the same .500 ball mill. But, the majority of the time, my final passes which are made with .250” ball mills.
For steep-sided work, for example, sign carving there are special ball mills called tapered ball mills, sometimes called V Carve bits. These can get into tiny areas and cut along the sides of steep-sloped areas for intricate work, like letters in signs for example. I have various sizes of these, but most often I turn to a .250 x 1mm radius tapered mill.
Here’s my list of ball mills that digital workers should consider for a 3D carving kit. As always, small mills break easily so make sure you have spares of your smallest bits around.
- .500 two flute ball mill for major 3D carving
- .250 two flute ball mill for detail 3D carving and finish work
- .125 two flute ball mill around for tiny detailed work.
- .250 x 1mm radius tapered ball mill for detail work and steep slope work
To see the entire series on CNC Tooling Basics, click here.
Here are some supplies and tools we find essential in our everyday work around the shop. We may receive a commission from sales referred by our links; however, we have carefully selected these products for their usefulness and quality.


