


We may receive a commission when you use our affiliate links. However, this does not impact our recommendations.
 Every step of making this dugout chair has been a little weird. Fastening its seat in place was no different.
After cutting the seat to shape using using the help of ticking sticks, I rasped the rim of the seat until I could wedge it inside the trunk and get it level. I usually use a 6” spirit level for this task, but I left it at home. So I used the bubble level in my combination square – a first!
Then I traced the shape of the seat on the inside of the tree trunk, both along the top of the seat and below the seat. This gave me two lines indicating the location of the seat. I decided to secure the seat using eight 5/8” maple dowels left over from another project. The plan was to drive them through the trunk and into the seat. Here’s how I did that.
I chucked a long 5/8” auger into a corded drill and drilled eight holes through the trunk. I began drilling the holes from inside the trunk and took pains not to splinter out the exit hole. Then I wedged the seat in place and used a 5/8” spade bit (with an extension) to drill into the seat from the outside of trunk, going as deep as I dared.
 Then I drove the maple dowels in place. No glue. I cut them to length so about 3/8” sticks out. If this solution doesn’t work I want to be able to pull the dowels out; 3/8” is enough to get ahold of with pliers.
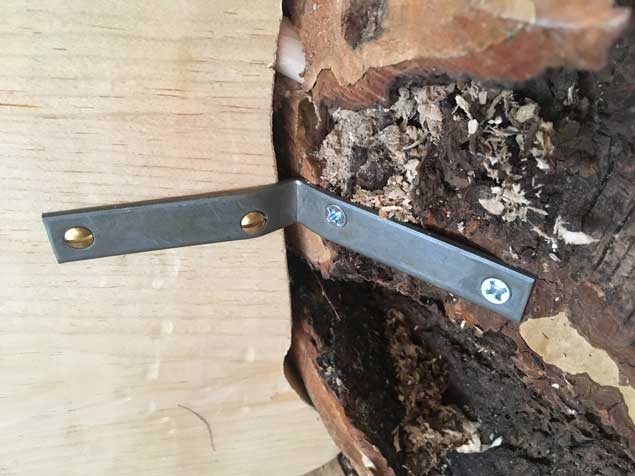
Then I turned the chair over (more easily written than done) and added a few steel L-brackets, fastening the underside of the seat to the tree trunk. (Every wacko project needs a few L-brackets.) Note that the steel screws in the photo will be replaced with brass as soon as I can get to the hardware store.
The Result
Then I turned the chair back over and gave it a sit.
It sits quite well. This is no surprise because I used the same angles I use for other chairs. The difference was I had to adjust the angles on this chair with a chainsaw. The only thing I couldn’t really address was lumbar support. The inside of the tree trunk curves away right where I would rather it curve inward. A good bolster pillow should remedy that.
Now comes the fun part: Detailing the chair, applying the oil finish and adding a few pieces of flair that my wife, Lucy, and I have dreamed up. And then onto something a bit more serious.
— Christopher Schwarz
Here are some supplies and tools we find essential in our everyday work around the shop. We may receive a commission from sales referred by our links; however, we have carefully selected these products for their usefulness and quality.


I have question. What kind of wood movement would you expect from the chair? A expansion/contraction that follows the perimeter of the stump?
What’s this hammer I see?
I’m not certain if posting a link is verboten on this site but my intentions are good. It follows that this project would be “something a bit more serious”
http://assets.vancouverisawesome.com/wp-content/uploads/2012/09/TreeStumpHouse-ca1910.jpg
…”Now comes the fun part: Detailing the chair…”
Did you ever consider turning Mr. Follansbee Loose on it? Bet it woul look REALLY cool.
Chris,
Quick question on the steel L-bracket using brass screws – there is a galvanic corrosion potential here that can be avoided using similar metals. The brass will tend to induce corrosion on the steel along with the steel acting as a conductor to the “wet” “stump-body” of the chair. suggest coated L-brackets and similarly coated screws or stainless… (it is likely you had those laying around and used them, but I know you make everything to last forever and a day and hope you don’t mind my suggesting the change.
Steel L brackets, really? It’s your chair, but to me you reduced the cool factor by adding the steel L brackets. Using brass screws isn’t going to give that much extra support to hold the seat up. If you’re concerned about the strength of the dowels maybe you should add one more between the two on each side making sure the grain of the dowel runs vertical and glue the dowels into the seat, but not the dugout chair frame to allow for movement. Gluing the dowels into the seat would add some strength. If that isn’t enough to support the seat you may be better served getting rid of the L brackets and placing some vertically mounted wooden support cleats glued and attached to the frame with larger screws evenly spaced under the seat (no screws into the seat itself to again allow for movement). These brackets could be somewhat rustic looking to blend in with the overall look of the chair. That said, this is a totally cool project and you have executed it well. The chair looks awesome, you make me want to hunt down the right log and build one of these things myself. Way to go!
Chris, what’s the idea of the unfinished chair on a table in the background of the first picture? Also, we’re starting to get an idea of the scale of the dugout chair, but now would be a good time to show a pic of you or someone sitting in it to provide scale.
You still clock em even on a steel L bracket eh? 😉