


We may receive a commission when you use our affiliate links. However, this does not impact our recommendations.

A name stamp is a great investment to mark your tools as your own, especially if you attend woodworking classes or work in a shop with others. It’s also a good way to stamp your finished workpieces for posterity.
Most woodworkers, however, approach the task like Thor might. They raise their hammer high and swing a mighty blow against the stamp to do the deed in one whack. And they are sad when the mark is crooked or too deep or shallow on one side.
After 20-something years of stamping my work and tools, here’s how I approach the task so I always get a crisp and clear mark.
Practice: Before you start marking your expensive tools or work, make a few practice marks on the end grain of different species of wood. Here’s the technique.
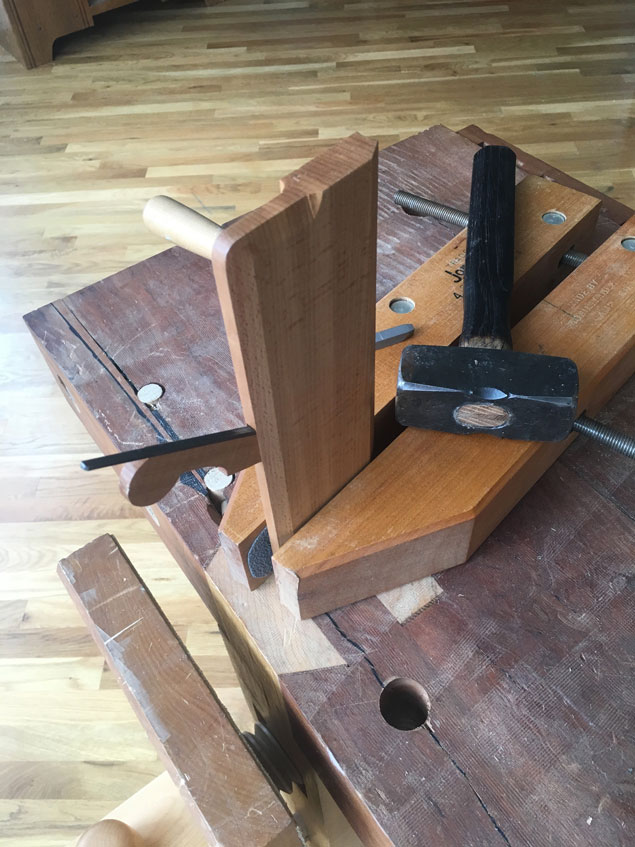
Secure the workpiece: No matter what I am marking, I use clamps to hold the work upright and over a solid surface, such as a floor joist or the leg of my workbench. Handscrews are usually a great way to do this. Clamping the work lets you use two hands for the next step.
Use a heavy metal mallet: A wimpy wooden mallet is not the right tool. Nor is your 16 oz. hammer (usually). The best tool is a small sledge. I use one that is about 2-1/2 lb. (1 kg.).

Settle the stamp: With your off-hand, hold the stamp on the work (I like to stamp end grain). And move your fingers until the stamp is stabilized on the work and your fingers are comfortable.
Tap low and slow: Raise the sledge a few inches and tap the stamp repeatedly. Your blows will be far more accurate and less glancing this way. And listen. The impact of the sledge on the stamp will sound different when the stamp bottoms out – it’s a dull thunk.
There are lots of good places to get stamps made. I get mine from Infinity Stamps.
— Christopher Schwarz
Here are some supplies and tools we find essential in our everyday work around the shop. We may receive a commission from sales referred by our links; however, we have carefully selected these products for their usefulness and quality.


Great Article. I always wondered how people did that. There’s so much to learn with woodworking. I feel like I learn something new everyday.
No…you Char it in…that way you can SEE it…this would be the best way
Chris,
I looked at the site for infinity tools. Very comprehensive. The stamp you show seems a bit small for marking your work so I assume you have a few different sizes. Small for tools- large for pieces for customers? Also I would guess that you are marking metal and wood with different stamps. Could you show a few pictures that feature your different size stamps. I’d love to see the mark you would leave on a commission chair for example … or a metal shoulder plane?
Sorry. I meant to say “tools”.
What do you finish your plans with? Danish oil, shellac? Looks real nice