


We may receive a commission when you use our affiliate links. However, this does not impact our recommendations.
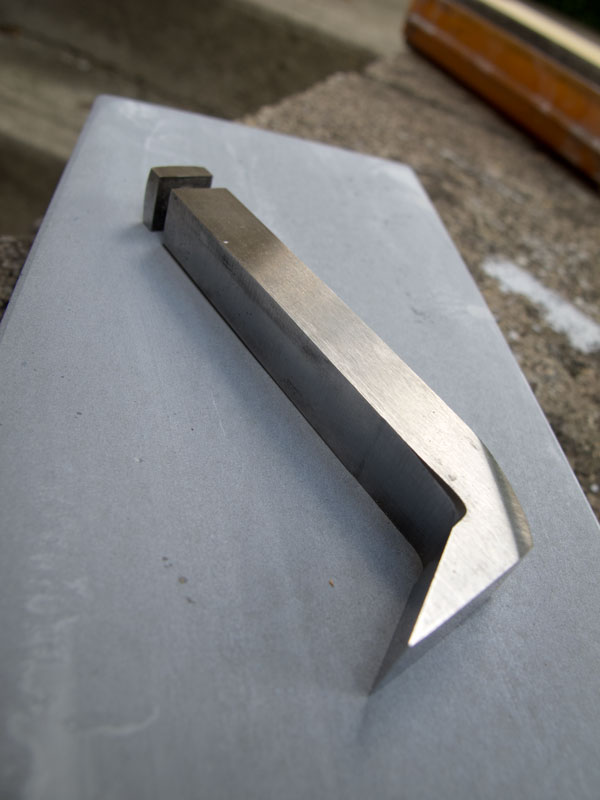
Sharpening router plane blades can be no fun.
For years now, I’ve made things easier for myself by honing the flat back of the iron through the grits and then removing the “burr” from the bevel with a polishing stone. This is way faster than trying to hone and polish the bevel while it is balanced on the edge of a stone.
Several months ago I started using a steel ruler from David Charlesworth’s “ruler trick” fame to hone the iron.
What’s different about this approach is that I use the ruler through the entire sharpening process. With the ruler on the stone, I hone a small bevel on the back with a 1,000- and then 5,000-grit stone. Then I remove the burr from the bevel on my 5,000-grit stone.
This upside-down thinking makes it easy to get a keen edge on a sometimes-tricky tool.
If you can’t visualize this idea, check out the video below.
I’ve done this about seven times on my large router plane, and the process doesn’t cause any problems with the tool in use. It doesn’t violate clearance angles, cause sunspots or interfere with finishing.
Give it a try if you like.
— Christopher Schwarz
Want to learn a lot more about sharpening? I recommend Ron Hock’s book “The Perfect Edge.” I also have a DVD on the process: “The Last Word on Sharpening.” Both are available in ShopWoodworking.com.
Here are some supplies and tools we find essential in our everyday work around the shop. We may receive a commission from sales referred by our links; however, we have carefully selected these products for their usefulness and quality.


I think a more appropriate name for The Anarchist Tool Chest would have been “The Anachronist Tool Chest”.
That’s interesting Chris. I can see why you would prefer this method on the LN router plane blades as they have a short primary bevel. This does make them trickier to balance up-side-down on a waterstone. By contrast, the Lee Valley blades have a lot more clearance between the shaft and the primary bevel. See here: http://www.leevalley.com/us/wood/page.aspx?p=67484&cat=1,41182,41192
The Stanley blades are the same as the LV. Here is a LV and a Stanley:
http://www.inthewoodshop.com/ToolReviews/The%20Veritas%20Router%20Plane_html_5c1b008b.jpg
Your method, while preferred for the LN, would not be my choice for the LV or Stanley.
What I do is add a gentle hollow grind to the primary bevel of the LV primary bevel faces, either with a Dremel wheel or a Tormek (the 1/2″ wide blades are removable from the shaft, and then may be easily honed this way). Once you have a hollow grind, it is a simple matter to hone the bevel face. Further resharpening is simple. And no extra tools needed – just swipe the hollow and remove the bur on a flat back.
http://i13.photobucket.com/albums/a262/Derek50/Sharpening/Router%20irons/Routerironhoning1.jpg
http://i13.photobucket.com/albums/a262/Derek50/Sharpening/Router%20irons/A4.jpg
Sharp is always better when working with any hand tool. Very sharp is best.
Regards from Perth
Derek
Thanks for another great tip Chris! I noticed the crack in your 5000 stone — has cracking been a problem with this brand?
This is nothing short of amazing. Logic would suggest that the back angle would have to be greater than 90 degrees for this the tool to actually be able to cut after this treatment but apparently not so.
My wife makes the world’s greatest grilled cheese sandwiches, but it is an extremely tedious and laborious process. Do you think you could provide a video that might help simplify her life? Thanks.
Great tip! It’s the simple little tricks that are the best.
Thank you!