We may receive a commission when you use our affiliate links. However, this does not impact our recommendations.
In my previous post about making the BARN workbench vise chop, I shared the basic CAD design work for the project. In Rhino3D, I created the curved 2D design – the chop and a simple box representing the blank stock it’s milled from. The chop profile is a simple curved shape. But, when it comes to design, don’t take “simple” for granted. Managing simplicity is a key skill for good design. That curve is a core design component of the entire project. Along with the basic shape and a few additional key elements that’ll be covered over the next few posts, we’ll have gathered together everything we need to set up the project’s “design space” — a master CAD drawing where the design elements and visual tools all come together for creating new vice chop designs.
I had one task I wanted to get out of the way early – I needed to design and create a dedicated jig to help me machine the vise chop blanks through several CNC operations on both sides of the board. The goal is to make it possible to flip a blank over and back so that milling and carving routines can be run on both sides of the part. The jig also needs to align the part, register the blank stock both top and bottom and one last thing … hold the part. Yeah, that’s a lot to do. Amazingly, it can be done with one very simple jig.

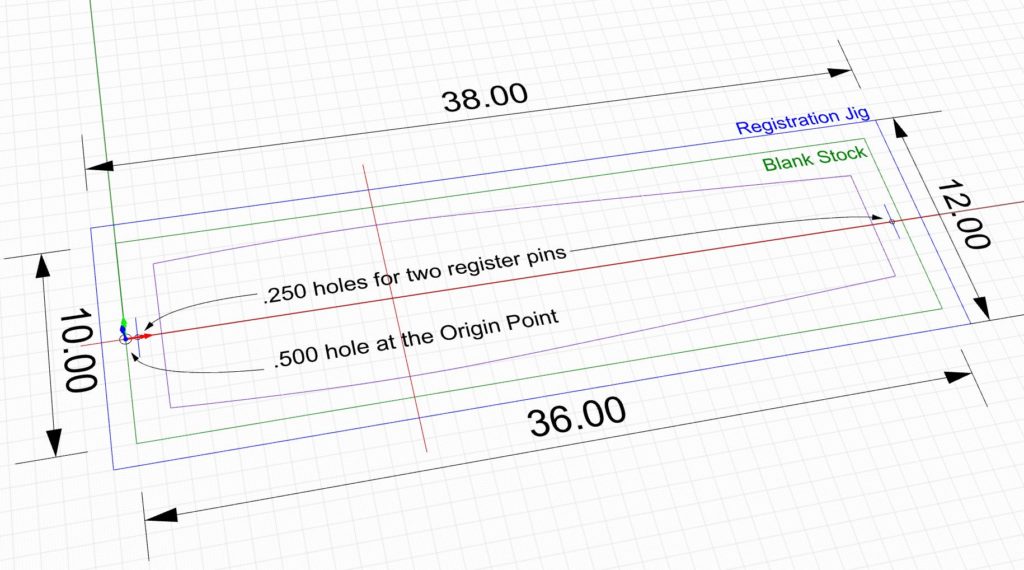
I’ve added holes for registration pins to the drawing. And, a hole to verify the origin point.
Building the flip milling jig
In the CAD drawing for the vise chop, we need to add a few more things. I drew a box around the 36″ x 10″ basic box space that is 1” larger on all sides. That size is 38″ x 12″. Also, that makes it 1″ larger than the vise chop blank stock. Perfect. Let’s build one.
For my spoil board/jig, I cut a piece of leftover 3/4” MDF on my table saw to that dimension. Now, it’s back to the computer for a little more CAD work and the CNC machining of the spoil board that comes next. We need to locate two registration pins for the project. These are located on the center guide line along the long, X axis. I need two .25” holes for stainless steel dowel/registration pins. Once you have matching holes in the blank stock, it will register the part into position on the jig.
Picking a location for the pins is tricky. I need to make sure that the metal pins are out of the way of any machining operation – I don’t want to hit one with an expensive CNC mill. So, I placed them 1/2” in from the ends of the 36” x 10” blank stock. This is one of the reasons I made my blank stock bigger than the final cut vise chop.

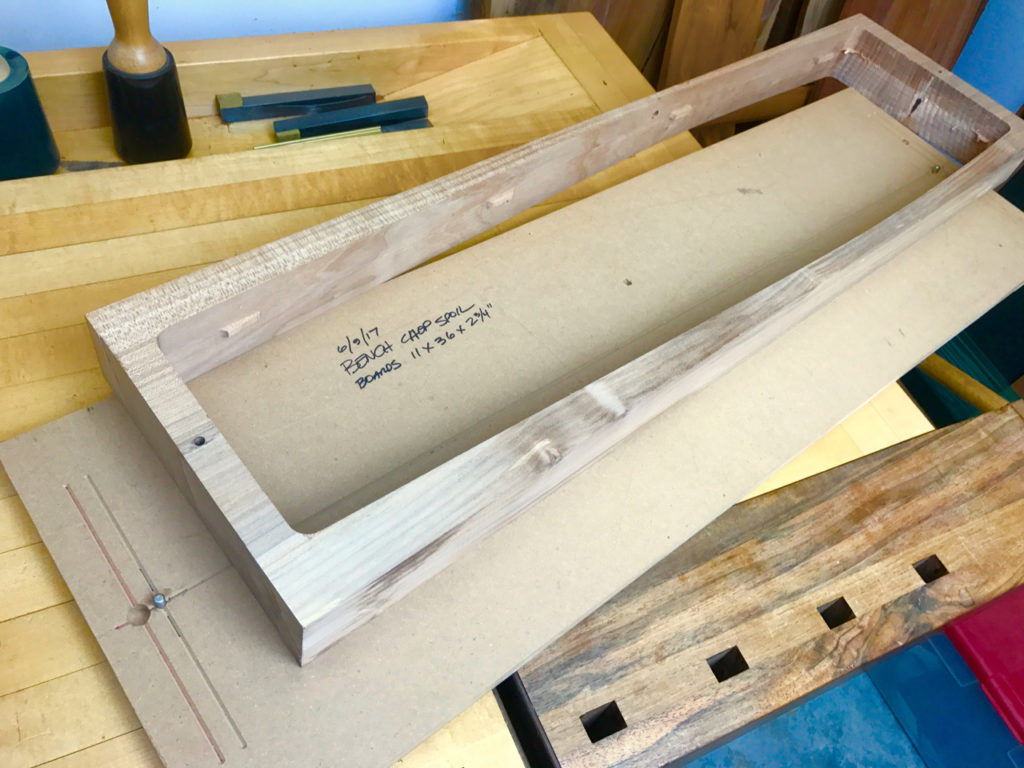
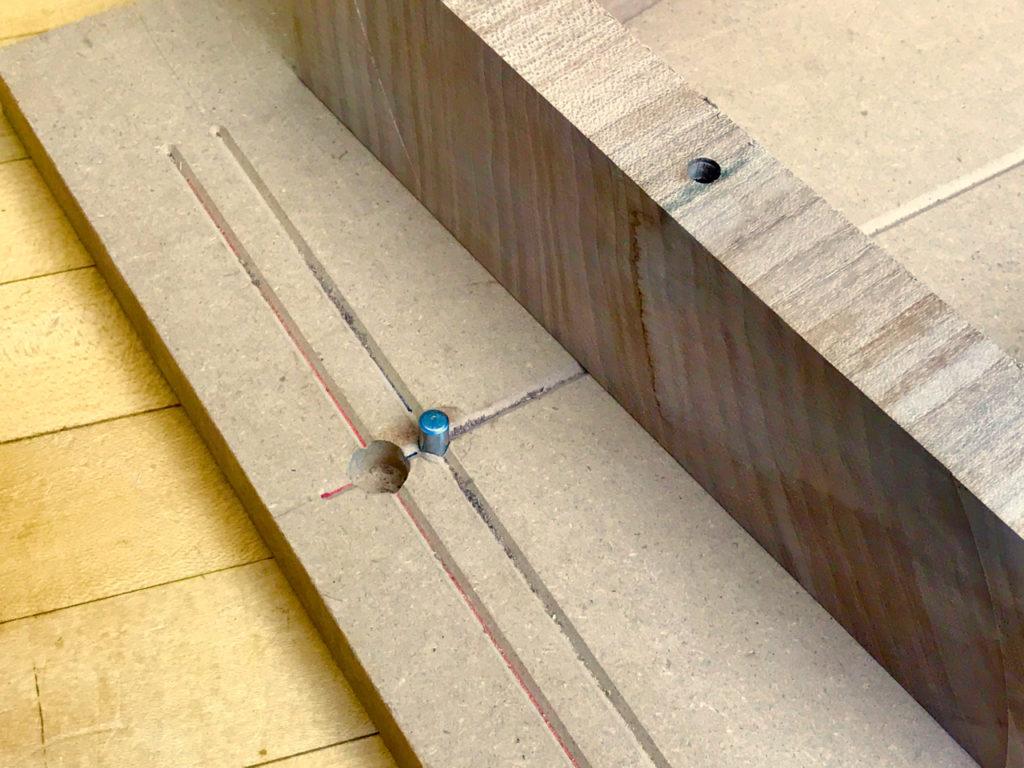
Simple jigs are always the best. A piece of MDF, holes for registration pins and lines to keep everything on track. Note the registration pins in the MDF jig and the holes in the vise chop stock.
A visual aid to check your work before you start cutting
I try to be illustrative when it comes to showing intent on a jig that will be used several times on a project like this. So, to check the position of the part being milled, I cut shallow V grooves thru critical axis and alignment lines on the MDF board. I like to see how everything lines up as I drop my blank stock into place on the jig. The lines were cut with a simple engraving routine in RhinoCAM software.
These grooves have no effect on the mechanical function of the jig. They’re just another way to double check blank stock alignment and registration. On this project, I made 11 vises and flipped every board at least five times during over 60 hours of machining and managed not to make any mistakes. There’s a lesson here: any tool or good habit or improved workflow method that you create that keeps you from making mistakes is a good thing — especially in the precise, non-forgiving world of digital woodworking.
Finally, with the CNC, I drilled a .5” hole right at the origin point. This is so I could use my spindle to verify the CNC’s alignment to the jig. Between milling sessions, I can install a .500” registration pin or mill on my spindle to verify that it drops cleanly into the hole at the origin point. I didn’t use this trick every time, but it’s there when I need to check accuracy. If the origin point is off a little off either the X or Y direction, I make adjustments and reset my origin point. On particularly complex, two sided or multifaceted projects like this, registration verification between the jig and CNC can be handy at times. I just move the spindle until the pin fits and then reset my CNC settings to X=0, Y=0 and I’m good to go.
None of these holes go all the way through the MDF. They just need to be deep enough to hold the small metal pins. Once the drawing of the base is done, I set the MDF onto the bed of the CNC, aligned to the center of the board on the long axis, machined the grooves cut and the two .25” and one .500 holes at .500 depth and we’re ready to go.
The jig does its job
How does this simple jig work accomplish all the goals on our list? The registration and alignment of blank parts onto the dowel pins are obvious. If the part is in perfect alignment on both sides of the blank stock, then the jig is doing its most important job. The bonus is the pins really help to hold the part laterally — which on a big, thick piece of hardwood stock can be quite challenging at times. Preventing lateral movement on the X/Y axis is one of a digital woodworker’s major challenges. CNCs are powerful machines that can easily move the piece you’re cutting if you don’t have it tightly secured. Trust me, holding parts is harder than it seems.
For the most part, Z or vertical hold down is pretty easy — if, and only if the bottom of the part being cut and the jig is perfectly flat. Otherwise, something could slip. Those little pins do most of the critical X/Y axis holding work. Once the jig is positioned, aligned and secured to the CNC bed, place the blank part on the pins, tighten the clamps and you’re ready to go. Easy, accurate and secure.
Because the jig is just one inch larger than the blank stock, I’m able to easily move clamps into an optimal close-in position for final hold down and still, keep them out of the way of the spindle during machining. I just add clamps to the four corners of the part for final hold down and I’m done.

I used .250 stainless pins for registration. These are high precision pins designed for this kind of task. The .500 hole is at the X=0, Y=0 origin point. The grooves are a visual check for position before machining.
The jig is ready to go. Now it’s time to build out the 3D design elements of the vise chop in CAD. We’ll do that in my next entry.
Additional Resources
- All posts on the BARN workbench click here.
- Photos of the BARN workbench chops click here.
- A video about how the chops were made click here
- Additional Digital Woodworking videos click here.
Here are some supplies and tools we find essential in our everyday work around the shop. We may receive a commission from sales referred by our links; however, we have carefully selected these products for their usefulness and quality.


