


We may receive a commission when you use our affiliate links. However, this does not impact our recommendations.
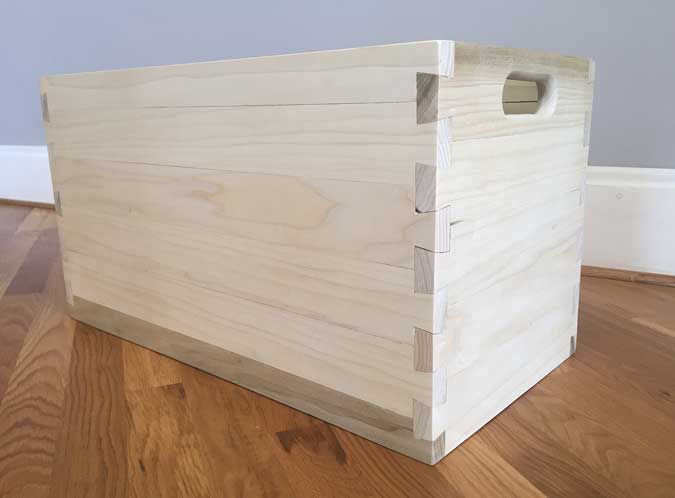
Eric Brown’s all-tails poplar box.
I was hanging out at the Lost Art Press open house last weekend, and Dayton-area woodworking and tool collector Eric Brown brought down a crazy box to show Christopher Schwarz and me. It’s made with the same sort of dovetails you may have seen on the Single Brothers’ Workshop at Old Salem, or other Germanic timber structures.
These dovetails, constructed solely of tails, weren’t meant for small-scale work…but there’s a way to do it. And there’s a way to make it even more complicated, but a lot lighter, by mortising out the strips of wood from which the box is composed. It’s a cool joint and a fun challenge – if not terribly practical in furniture making – so I asked Eric if we could share it here.
Dovetail Challenge
 While through-dovetails look nice enough, I’ve never liked how the pin side looks. So I usually use a half-blind dovetail instead. Looking through my woodworking books, I could find nothing that was a better solution than covering them up. Then I found it. It’s a joint used for log cabin-type structures. It is all tails, no pins. Based on the pictures I found it is a very old joint. So why wasn’t it in my cabinet joinery books? I would soon find out.
Evaluating the different designs and how the joints are oriented, I realized that a traditional dovetail is strong in the up-and-down direction and the front-to-back direction, and weakest in the left-to-right direction. In other words, it is weakest in the direction it was put together.
The log cabin dovetail is weakest in the up-and-down direction, but perhaps it could still be used in a small box. And I figured that one advantage to this joint is that narrow boards must be used. Mess one up and it’s no big deal. Time to try out the idea and see if it works!
 The project began by deciding to make a box, about 12″ wide x 14″ deep x 24” long. I had some poplar on hand and used that to make a bunch of boards about 2-1/4″ wide and 1/4″ thick.
I cut them to length using my miter box, then ripped to width on a band saw.
I handplaned all the edges until they would fit into my dovetailing fixture; it’s made from hard maple and has a stopped mortise to slide on top of the board ends. The fixture is marked with the necessary dovetail angles, which I then cut with a handsaw.
This little fixture (made cutting all the dovetails easy. (Note that it took me two attempts to find the right angles; I used the inner kerfs shown here to cut the tails).
 I then simply cut off the waste on either side of the tail with a saw – no chisels necessary.
To make the box stronger, I decided to use tongue-and-groove joints along the long edges, as well as for the boards that compose the box bottom. I cut these with a Fulton handplane that cuts a 5/16”-wide groove and matching tongue (it’s similar to the Stanley No. 48).
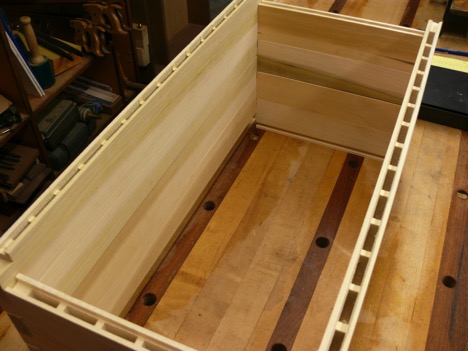
 Perhaps the best way to describe the construction process is “synchronized joinery.” The dovetails, and the tongues and grooves, have to close up at the same time. I started the build at the bottom of the sides and built up one layer at a time, fitting the next row, and – as many times as necessary took things back apart to adjust the lower boards. Eventually, I got all the rows built up – a box was taking shape!
Then I took it back apart, because I realized that I could cut grooves deeper to make the boards lighter. To reduce weight but retain strength, I using a mortising machine with a 5/16″ bit to cut 14 mortises in each long board, and six in the shorter ones for the ends; the mortises are about 1-1/4″ long (four bit widths), with 5/16″ of solid wood (one bit width) in between each. I weighed each board before and after mortising; the average weight reduction ranged from 20 to 25 percent.
I left the top and bottom boards on the ends solid, though, for strength.
After all the boards were fit, I cut and faired oval handle slots in the two top ends board (with a Forstner bit, saw and rasp).
I then glued up a row at a time. If the tongue-and-groove joints remain together, the corners cannot come apart – and the tongue-and-groove joints have a lot long-grain to long-grain glue area.
I cleaned up all glue drips on the inside of the box while it was still accessible from the top and bottom.
Next came the bottom. As I mentioned above, all the joinery for the bottom is tongue-and-groove – and it is seated in grooves in the box front and back bottom boards.
How is that possible with the carcase already glued up? The trick is gluing one of the bottom side boards in first and letting it cure. Next. I slid the center board in place, but with a couple of rubber “panel barrels” (from Lee Valley Tools) inserted in the deepened grooves on each side. I then slid in the final board and flexed it into position. The panel barrels allow the boards to compress enough to provide clearance. The center board gets no glue, and floats between the other two.

I then sanded the exterior smooth; I’m still deciding on a finish. I’m also considering rounding the dovetails – so I tried that out on a test piece.
This has turned into a very nice box, but unless it is made by machine, I think the log-cabin dovetail proves to be too inefficient for a cabinetmaker to produce in a reasonable time compared to traditional dovetails. Still, it’s a fun exercise to explore something different.
I have used the term “log cabin dovetails” to describe this joint, because I’ve not come across a better or more accurate term.
The only book* I have that (probably) talks about this joint is “Colonial Living” by Edwin Tunis. On page 100, in a discussion of “The Eighteenth Century, Pennsylvania, German Houses,” Tunis writes, “The German log houses came to be better built than the original Swedish ones that they copied. The first improvement was to hew the tops and bottoms of the logs flat, for closer fit. Later they used square timbers as logs. For a neater appearance, they trimmed off the projecting ends of the logs at the corners of the house and went on to form tighter joints there, where log rested on log, angling the cuts of the joints so that water would run out of them. It’s possible that these people brought the knowledge of how to do this with them to this country, for hewn-log houses existed in parts of Germany.”
— Eric Brown
Note: I also studied the books below, none of which describe this type of dovetail – which leads me to believe it is most often used in building structures, no casework. But if you know of any joinery books in which it’s covered, please let me know in the comment section.
“The Complete Dovetail” – Ian Kirby (Handmade Furniture’s Signature Joint)
“The Joint Book” – Terrie Noll (The Complete Guide to Wood Joinery)
“Good Wood Joints” – Albert Jackson & David Day
“The Complete Illustrated Guide to Joinery” – Gary Rogowski
“Treasure Chests” – Lon Schleining (The Legacy of Extraordinary Boxes)
“The Toolbox Book” – Jim Tolpin
“The Woodworker – The Charles Hayward Years” (Lost Art Press four-volume set)
Other joinery titles published by Lost Art Press (Anarchist, Roubo, etc.)
“The Practical Woodworker” – Bernard E. Jones (Popular Woodworking, four-volume set)
“Carpentry & Joinery Illustrated” – Edited by Paul Hasluck
Here are some supplies and tools we find essential in our everyday work around the shop. We may receive a commission from sales referred by our links; however, we have carefully selected these products for their usefulness and quality.


Roy Underhill had something similar (but different) to this double tailed dove tail on his show.
ref: S34 Ep6: Daring Diagonal Dovetails
Interesting idea. Just one observation, how did you cut a 5/16 inch tongue and groove joint on 1/4 inch thick (aka 4/16 ) pieces of wood?
Is the 1/4 inch thickness of the boards correct? Seems it should be 1/2 or 3/4 inch.
One thing that stands out, the log cabin is never going to be picked up and moved (unless the wood builder guys on TV come and disassemble and move it, or make it into something else using the reclaimed material, or a tornado picks it up and moves it to from Kansas to OZ) is that the interlock will keep the cabin together through generations, but a small piece of case work is going to be moved around and abused and this type of joint will not stand up to that kind of use or abuse! Still very appealing to the eye!
I would direct you to look at a program on the DIY channel called “Barnwood Builders”, there you will see an incredible group of craftsmen working on old log cabins that were built with joints exactly like the ones you are using on your box. There is also a website https://www.barnwoodliving.com/ which describes some pf the projects this group have worked on. Their work is centered in West Virginia.
Al Limiero
alimiero@gmail.com
“…So if I understand you correctly, what I have done is not a log cabin dovetail?…Then what is it?…”
Eric…!!!…LOVE this box!…Awesome job!
To both your questions…it very much is a traditional log architecture corner joint.
It maybe one of the more simplistic modalities…but it is a form of one nonetheless…
To point of reference, there are (at rough count off the top of my head) well over 100 plus versions of these different Corner Joint system employed in Log Architecture. Many (not all) are in the Dovetail family found in both Eastern European, Middle Eastern, and Asian systems of Log Architecture assembly. Some are extremely complicated and shed water more efficiently than others…Not all do this well (as found in some early Appalachian examples) at all and rely on decay resistance and other design features to mitigate this challenge.
Again, great job on this box…!
Log cabin dovetails use no compound angles.
The top surface of each “pintail” slopes downward to the outer side of its log, and is square to the end of the log.
The bottom surface of each pintail slopes down toward the end of the log, and is square to the sides of the log.
This ensures that rain is shed away from the joint, rather than into it, since every upper surface slopes to the outside of the corner joint.
I have to say that these joints are fantastically absurd. Kudos to Eric for twisting my brain in a knot.