We may receive a commission when you use our affiliate links. However, this does not impact our recommendations.

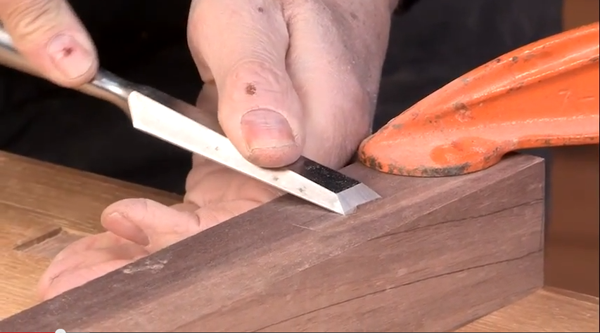
Proper control of a chisel is vital to its effective use. Here, in a screenshot from “Using the Versatile Chisel,” Jeff Miller shows you how to quickly and efficiently use chisels to cut an accurate mortise.
In April, the good folks at Lie-Nielsen came to our offices for one of their hand tool events, bearing planes, chisels and other great tools.
Getting to try sharp, well-made tools was a revelation to me. As a beginning woodworker, I had a set of chisels, but I never had very good results. Perhaps it had something to do with the fact that I paid less than $10 for a set of five. So when I finally pushed a sharp chisel into a piece of wood using the proper technique, it felt amazing.
I left the event with a high-quality 3/8″ bevel-edge chisel (yes, I paid full retail — between Lie-Nielsen and Lost Art Press, my wallet was considerably lighter at the end of the day) and some insight into how useful a good chisel could be.
As with most things woodworking, I finally have learned enough to understand how much I don’t know about the care and feeding of chisels. Luckily, I have good teachers – including noted woodworker, author and designer Jeff Miller’s new video, “Using The Versatile Chisel.”
“The chisel is really the simplest of woodworking tools; it’s just a sharp wedge. But take that sharp wedge, some knowledge of how it interacts with the wood and other tools, and practice its use a little bit and you’ve taken a key step to improving your woodworking,” Jeff said. “Chisel skills will help all of your other hand-tool joinery, from dovetails, to mortise-and-tenon joints and even to some simple shaping.”
In his new video, Jeff teaches you:
- The specific function of a variety of chisels
- Techniques for fast and effective sharpening
- How to cut accurate dovetails
- Effective clamping and setup techniques for getting a clean chop
- The behavior of grain direction and the influence the chisel has on the cut
- How to properly square a hole
“Chisels work quickly and can be very accurate – and the skills are straightforward and easy to practice,” Jeff added.
Here’s a sample from the video, with Jeff demonstrating his techniques for chopping a mortise with chisels.
Jeff’s furniture has been shown in galleries and shows nationwide and is included in the Decorative Arts Collection of the Chicago History Museum. In September, Jeff will speak at Woodworking In America, offering sessions on bent lamination and chair design, as well as approaches to curved work.
P.S. You can read more about Jeff and his work here.
Here are some supplies and tools we find essential in our everyday work around the shop. We may receive a commission from sales referred by our links; however, we have carefully selected these products for their usefulness and quality.


John, I passed along your question to Jeff Miller, and here’s his reply:
There are a couple of ways to approach the chopping, much as there are for almost everything else in woodworking (pins first or tails first anyone?). This is what I learned, and what I’ve had success with both for myself and for students.
I assume that the reader is talking about creating a “valley” in the center of the mortise, as opposed to leaving a hill. Both work, and it may be worth experimenting to see if one is decidedly easier than the other for you. But as with dovetails, it’s not the specifics of the method that matter as much as the skills with and mastery of the tools. If you can’t hold the chisel square (or don’t position your body so you can see what square is) or lever the waste out without damaging the sidewalls, neither method will work very well. Practicing will help to improve skills; far more than worrying about the specifics of the method.
thanks,
Jeff
This initial mortice paring Jeff does is essentially a knife wall for the mortice. I get that. But his chopping routine is nearly exactly backwards from some others’ methods. So where does that come from? Are there different schools of mortice chopping out there or is he sui generis?
john