We may receive a commission when you use our affiliate links. However, this does not impact our recommendations.
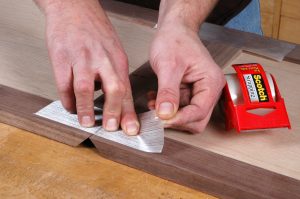
I started using stringed packing tape to glue up mitered joints on small jewelry boxes years ago. To glue up mitered boxes you just tape the points of the miters tight and add glue to the joint. Because you tape up all four joints and then roll up the box, it’s a tight assembly. Just check for square, adjust as necessary and let it dry. None of the frustrations of clamping. And much better results.
After wrestling with band clamps, awkward criss-crossing-bar-clamps and cawls, I tried using stringed tape on picture frames as well. A big mess of clamps or four pieces of tape that deliver better results? It was an easy decision.
Then I started using stringed tape on mitered frame-tabletops, and just about any angled joint I encountered. It can be removed or repositioned for adjustments with no trouble, and this flexibility allows you to square up assemblies easily. Stringed packing tape also works well for attaching trim in various arrangements, or any instance where you might need a large number of small clamps. Having put it through it’s paces, I’m convinced that in many situations it works better than any clamping arrangement you can devise.
For a few years I’ve been making dining tables with bases that are curved and join at odd angles. Each joint is joined with six loose tenons, and I came up with some creative clamping jigs for putting them together. I eventually found a clamping method that worked, but it was still cumbersome and a race against the clock, especially with yellow glue. I knew there had to be a better way, but I bet I glued up fifty of these joints before I got up the nerve to try simply taping the joint together.
Eventually I smartened up. I now glue up the joint with epoxy, which allows a longer open time, and close up the joint using stringed packing tape. I just slap the tape on one workpiece, pull the joint tight and press the tape onto the other workpiece. I attach one piece of tape on either end of the joint and on both faces, which allows me to reposition the tape unitl the joint closes up and sits flat. It takes a fraction of the time it took with clamps. Better yet, because there is no tendency to over-tighten the joint, it seldom gets tweaked to the wrong angle (which also opens up the joint). And there is no need for cauls. Or cussing. . . boy, it really has changed the way I work.
Here are some supplies and tools we find essential in our everyday work around the shop. We may receive a commission from sales referred by our links; however, we have carefully selected these products for their usefulness and quality.


I’ve used the string version as well, and it has been effective. Look forward to your upcoming article.
I’ve used tape before for small projects, but string tape…sounds like it’s worth a try. And bonus, it’s ready for shipping without an extra step too.
Great tip.
I’d like to see photos, Matt, of the various applications.
–Bill
I too have found for small boxes and frame miters, it can’t be beat.
And, you are right, the stringed version is the best, least it not rip and shred just at the wrong moment.
Good tip Matt.