We may receive a commission when you use our affiliate links. However, this does not impact our recommendations.
 The magic of CNCs lies in the bits… bits determine whether the final result is just okay, or if it’s perfect!
 The magic of CNCs lies in the bits… bits determine whether the final result is just okay, or if it’s perfect!
CNCs are simply routers controlled by a computer. The electronics tell the router the exact tool path to take, how deep to cut, the speed of the spindle, etc. On the other hand, the bit determines the type of cut that can be made, the quality of the surface left over, the type of material that can be machined, how the chips are removed, and much more. Knowing the differences in CNC router bits will help you achieve the best results possible at your CNC.
How Router Bits Cut
Before we get started discussing CNC bits, it’s important to understand how router bits cut. Unlike a drill bit that has a cutting tip and flutes that draw the chips up and away from the cutting edge, router bits are designed to cut laterally. The tip will cut, like a drill, but the fluting (whether straight cutters or spiral) will have the edges sharp and at the correct angle to cut. If you’ve ever tried to “wallow out” a hole with a drill bit, you’ll know that the drill bit flutes simply don’t cut. You can see this action in the drawing to the right.
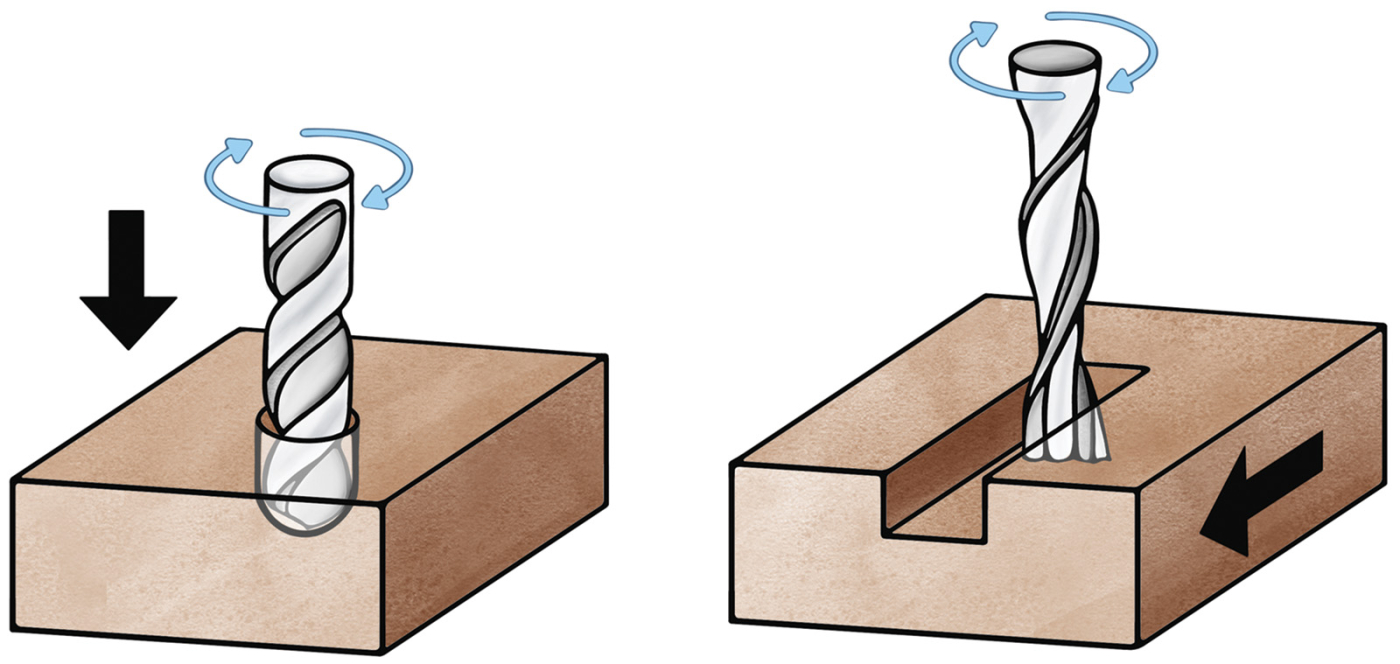
Drill Bits (left): The cutting end of the drill bit means once they start boring a hole, they will continue on that path. CNC/Router Bites (right): These bits have a cutting tip as well as an edge so that they can move laterally through the material, making use of the entire cutting length, not just the tip.
Router Bit Anatomy
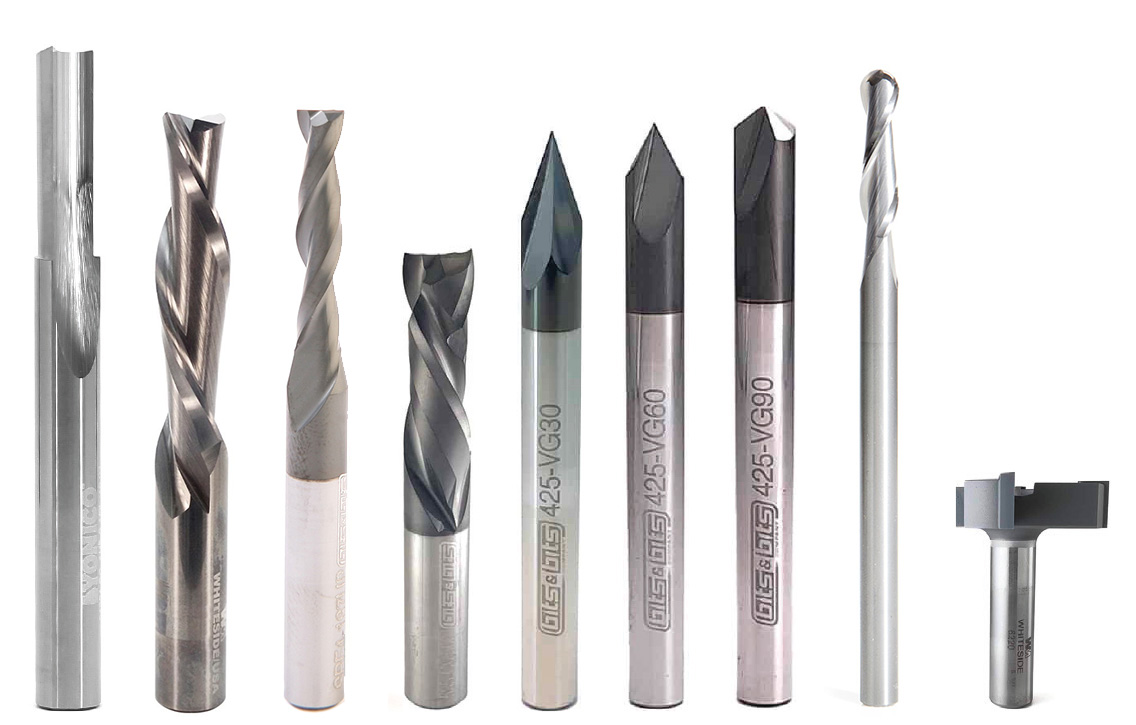
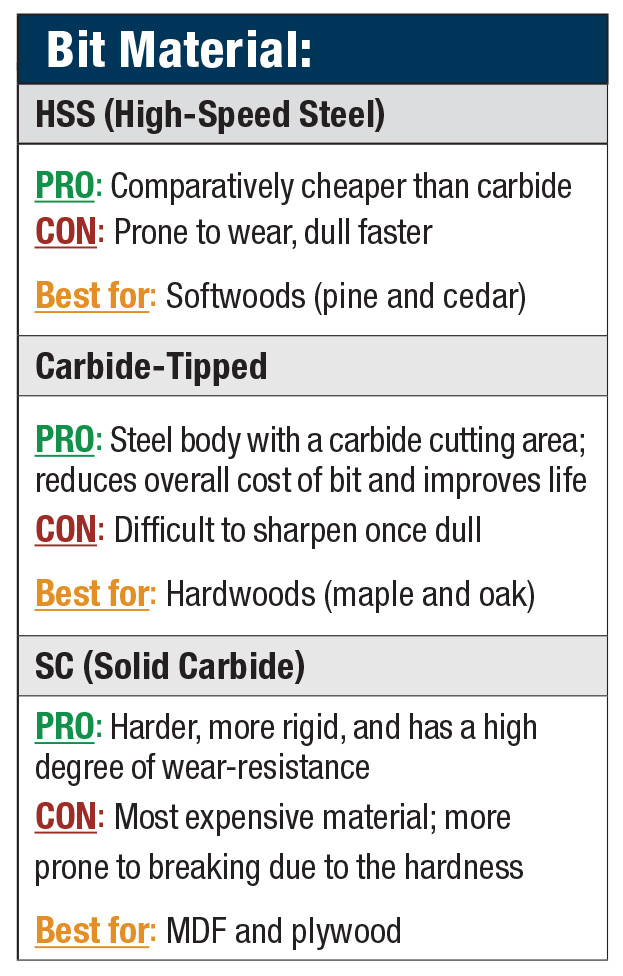
Just like any other tool in the shop, there are features of router bits that you need to understand in order to pick the right one for you project. Choosing the right bit will influence how a CNC will behave and its cutting possibilities. Some of these features include type or shape of the bit, the number of flutes, the bit material, and shank diameter. We’ll talk about the majority of these features in the charts on the next few pages, but first we need to talk about two details that may separate bits from those you may already have and use in your hand-held router.
 Quality is king:
I know that we’re all guilty of buying “budget bits” from the big-box stores. And that’s okay in some instances. However, with a CNC bit, quality is king. A lower quality bit is going to dull much faster, be prone to breaking, and leave a rougher surface. With a hand-held router, you get the tactile feedback of a bit getting dull, or how hard you can push it. With a CNC, you can hear how the bit is cutting and see the surface left, but a bit may reach the breaking point long before you realize it’s on its last leg.
Shank diameter:
Before selecting a bit, you must know what size collet your CNC uses. Making sure you have a properly sized shank will reduce the likely hood of collet wear and bits breaking prematurely. The collet size on your CNC may be different than your handheld router. If you have a dedicated CNC spindle, it may use an ER collet which can accept a large variety of bits with different inserts. The most common ER collets are ER-16 and ER-20, which will grip between 1/32“–3/8“ and 1/16“–1/2“ respectively. Your hand-held router is probably limited to 1/4“ and 1/2“ shanks. If your CNC uses a router motor as the spindle, you’ll probably be limited to one of those two sizes.
Spiral Bits vs Straight Bits:
Spiral bits generally cut faster than the equivalent straight bits. How? The curved flutes of spiral bits create a shearing cut that more efficiently removes the material, with a much cleaner cut.
Using Bit Features to Select the Best Bit
So, we’ve identified that the bits you use in your router may or may not work for your CNC. Now, we can really start to identify what style of bit your project will require.
Ask yourself 3 questions:
1. What kind of shapes do want? Are you cutting simple 2D shapes like patterns, or are you doing relief carving, such as carving a sign?
2. What kind of material will you be cutting?
3. What are your goals in terms of performance and surface finish?
Bit Shape Overview

Straight Flute: General Purpose
Pros:
- Best for slotting and straight contours
- More material on the bit, therefore stronger than a spiral bit
- Removes material quickly
Cons:
- Straight flutes leave a rougher edge
- Can have more vibration, more tearout and heat build up (causing burns, tear out and lower accuracy)
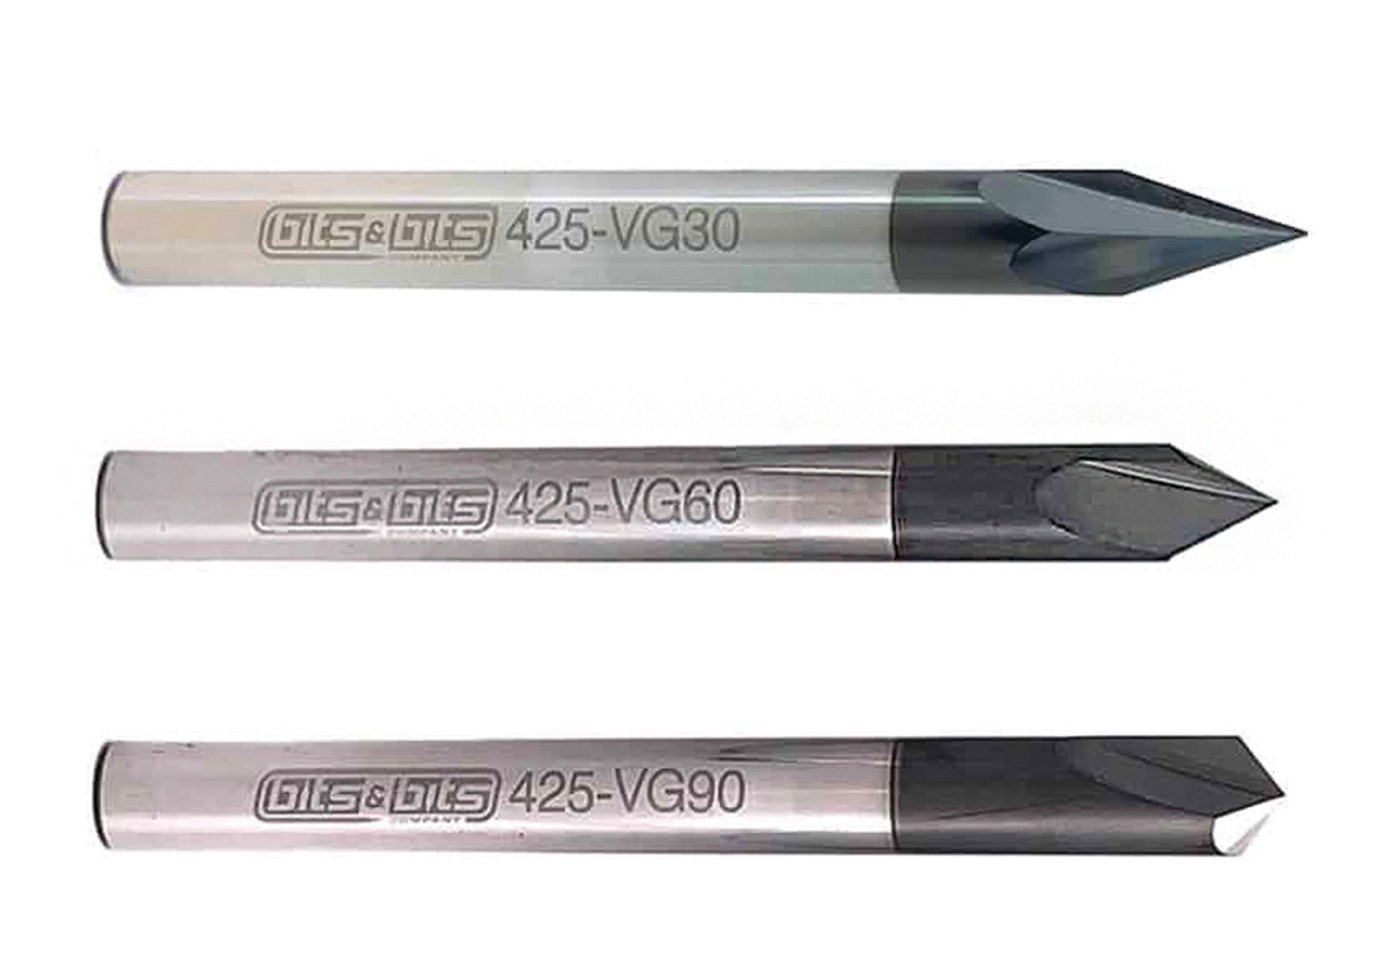
V-Bits: Common sizes 30°, 60°, 90°
Pros:
- Great for chamfering, deburring edges, letter engraving, and fine details
- The smaller the bit angle the finer details that it can carve
Cons:
- Can dull quickly
- The detail tip of these bits is not great for large waste removal and doesn’t leave a flat bottom
\
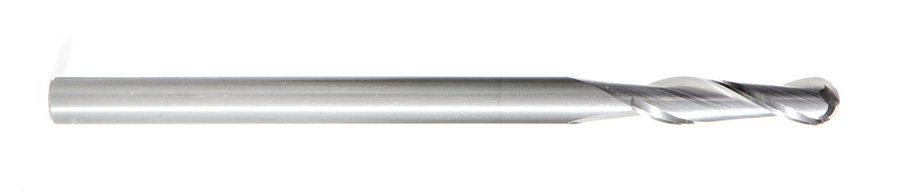
Ball Nose: Rounded tips
Pros:
- Excel at creating curvature or detail-rich 3D shapes
Cons:
- Not for removing large amounts of material
- Due to the round tip, this bit is not for creating flat surfaces
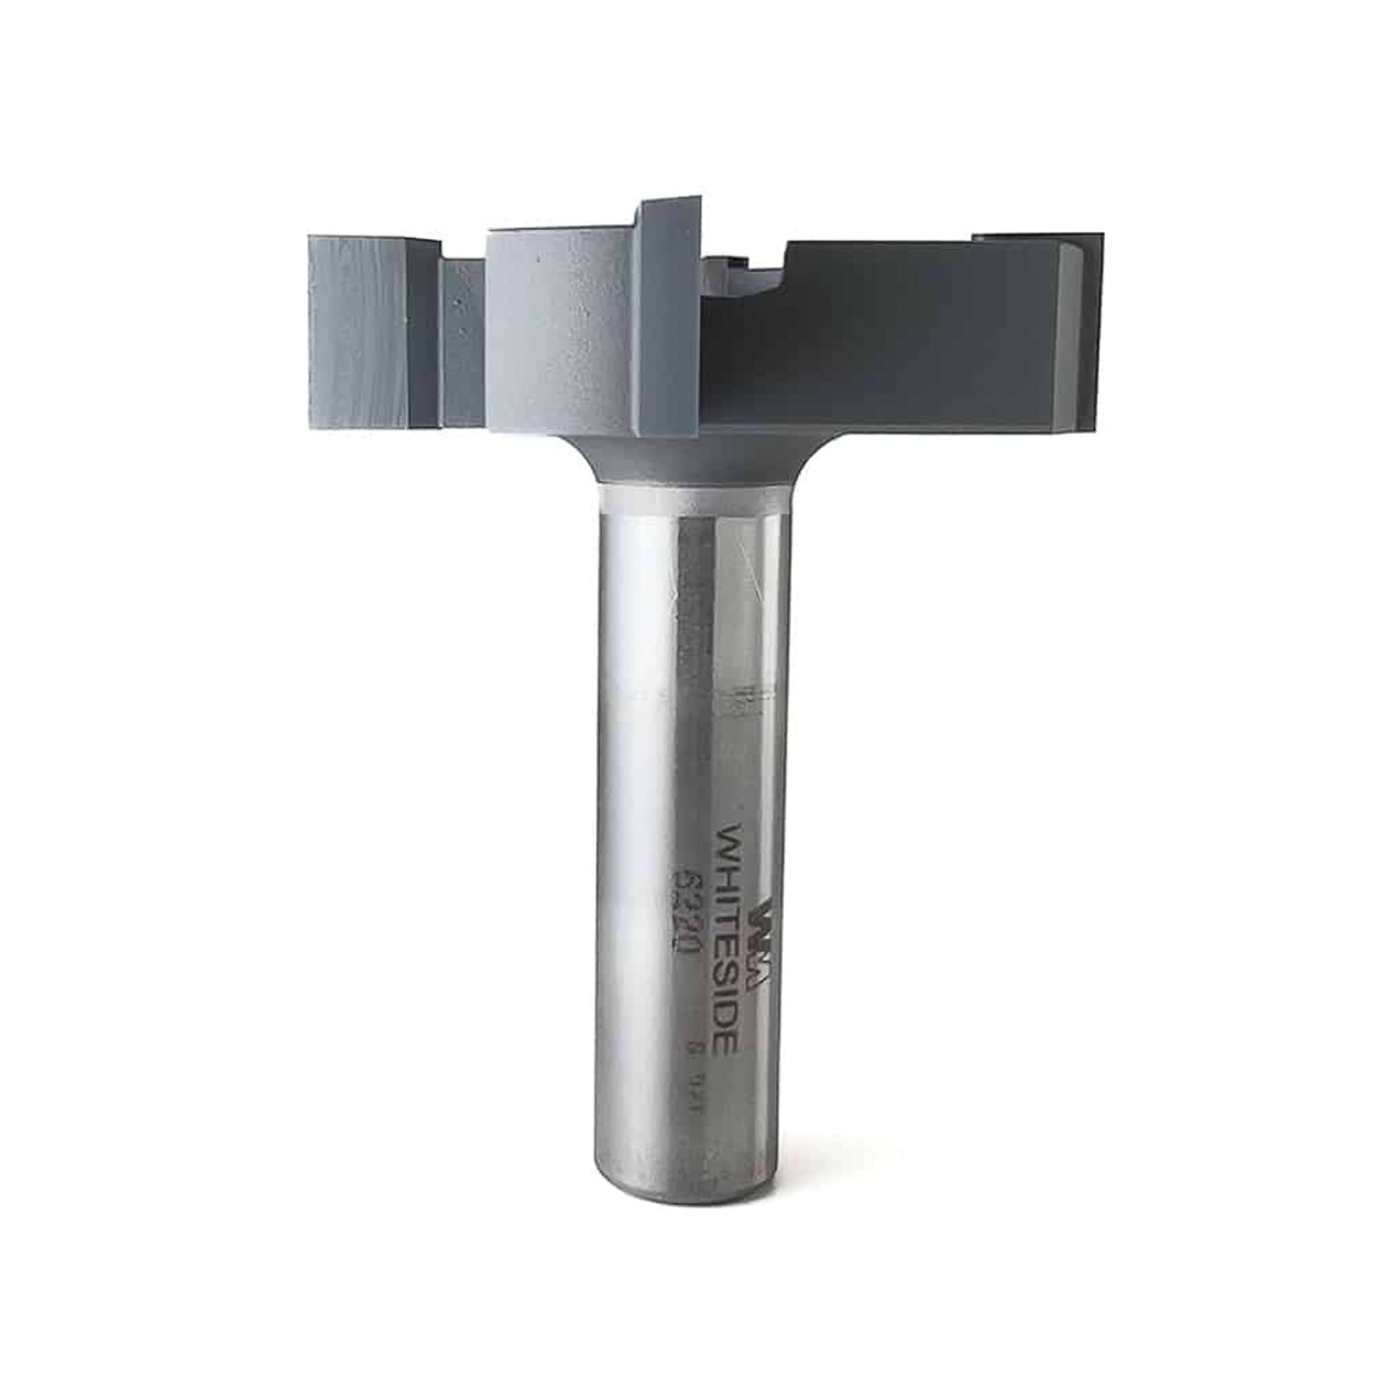
Spoil Board: Best for Roughing and Surfacing
Pros:
- Creates shallow, wide cuts across large area
- Great for spoil board resurfacing
- Little to no vibration
Cons:
- Leaves a surface that can have chatter marks depending on the depth of cut
General Spiral Bit Pros and Cons
Pros:
- Cleat cuts when cutting with the grain
- Can cut with higher feed speed and lower RPMS = less friction and heat
Cons:
- Cutting against the grain can be a rough cut
- Spiral bits can chip plywood
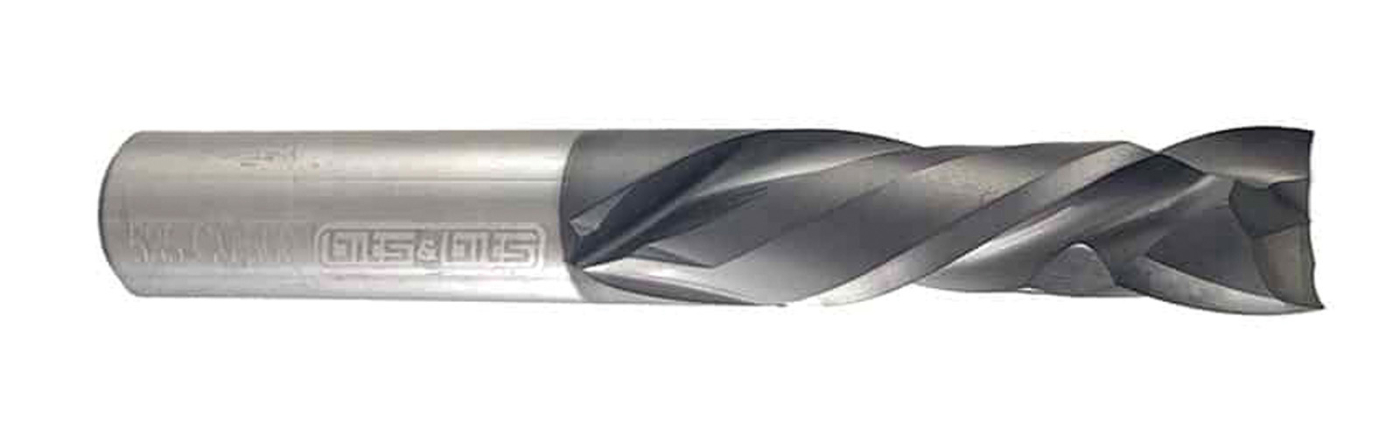
 Upcut Spiral: Good for Deep Slots
Pros:
- Upcut flutes act like drill flutes, pulling chips out of the cut
- Keeps the path clear of chips
- Provides a chip-free bottom
Cons:
- Can chip the veneered edge of plywood
- Creates a fuzzy top edge
 Downcut Spiral: Great for cutting thin material
Pros:
- Downcut bits push the chips down into the cut
- Chips can help to support thinner materials as the cut is completed
Cons:
- Creates a fuzzy bottom
- Chips can easily get packed into cuts (solution: run cut again to loosen the chips then vacuum out)
Combo Spiral: Best for plywood, laminate, and composites
Pros:
- Combo or compression bits combine a downcut bit with a tip of an upcut
- The top is pushed down while the bottom is pulled up
Cons:
- Not good at boring holes (Why? Once the bit goes beyond the direction change, chips get compressed with no room to escape causing friction and excessive heat.)
 Example: Small Serving Tray
I want to machine a pocket and a contour on oak. If I’m making a batch of 10, I want to optimize the machining time. What bit do I need?
This is a 2 step, 2 bit project. First I want to hollow out the pocket for the tray. Then I want to refine that pocket so it has a contoured bottom edge.
The first bit I’ll need is one that cuts a flat bottom and will remove a lot of material. If the inside pocket is large and round, a large bit won’t effect the final shape. In this case, I’ll use a flat-end, straight flute bit with an 8mm cut diameter. It will leave the surface a little rough, but the surface will be refined with my second bit.
Next, I want to add a contour to the pocket and refine the surface. For this bit, I need one that is able to handle the dense oak, so a carbide bit would be ideal. I also need to keep it at a higher feed rate since I am using a hardwood (to reduce burning). I can use this to my advantage though. With a higher feed rate, I can increase the number of flutes and still achieve a smooth surface. Next, I need to consider the required cutting depth. With a shallow pocket, I can use a short cutting length which allows chips to evacuate more easily, decreasing the possibility of heat build up. The short length also reduces the odds of tool deflection. Finally, I can consider a higher helix angle to give the surface the best possible resolution allowing me to spend very little time hand finishing. Therefore I will want a carbide-tipped, 30mm long, 3-fluted, 45° helix, down-cut spiral bit.
Starter Bit Set
In conclusion, here’s a list of recommended CNC router bits to get you started.
1/4“ Compression bit for cutting out pieces on hard and soft woods (especially plywood)
1/8“ Down-cut spiral bit for crisp edges on a pocket
1/4“ Up-cut spiral bit for basic pocket and profile cuts
1/2“ Straight flute bit for quick profile work
60°, 90° V-bit for engraving and fine details
21/2“ Spoil Board Bit bit for flattening spoilboard or wasteboard
Just remember, CNCs may rely on a computer for its precision, but the magic truly lies in the bit selection.
Here are some supplies and tools we find essential in our everyday work around the shop. We may receive a commission from sales referred by our links; however, we have carefully selected these products for their usefulness and quality.