


We may receive a commission when you use our affiliate links. However, this does not impact our recommendations.

A better sharpening method? A recent discovery and collaboration on the woodcentral.com forums led to a new method of sharpening that helps chisel edges last longer. Plus, it’s easy to achieve and touch up.
A simple sharpening technique for unbelievably sharp edges that are tough and long-lasting.
By David Weaver, Winston Chang, and William Tindal
Nothing slices, chops or pares through wood like a freshly sharpened chisel, but sharp edges don’t last forever. Frequent sharpening is a must, particularly for tools that are subjected to punishing tasks like chopping and aggressive paring, as in the preparation of dovetails. Ideally, we’d all like to be able to produce long-lasting, super-sharp edges quickly and easily. Now we can.
On the WoodCentral.com Hand Tools forum, several members have been developing and refining a sharpening technique that David Weaver, the originator, has since nicknamed “Unicorning,” since the odds of his discovering a superior and nearly effortless technique seemed about as likely as stumbling upon a Unicorn, a mythical creature symbolic of things that are too good to be true. The name has stuck.
By selectively buffing just the very tip of a nominally sharpened blade on an abrasive-loaded buffing wheel for a few seconds, Weaver produced a tiny convex bevel that transformed the edge dramatically, making it exceedingly sharp and more resistant to failure from hard use, without changing how easily the edge penetrates the wood.
With this simple buffing step, he found that the edges of less expensive softer steel chisels can be made to stay as sharp as harder premium chisels. Plane blades and many other edge tools, including kitchen knives, can be made sharper and more durable with this technique.
How Edges Dull
All edge tools eventually lose their sharpness to the abrasive action of wood. Chisels used for chopping and cross-grain paring are subjected to even greater stresses. The best chisels optimize hardness and toughness to resist chipping or deforming in hard use. Most moderately-priced chisels are tempered to yield a softer steel that is more easily sharpened. These tools will deform or fold at the tip, while the harder Japanese chisels are more prone to chipping.
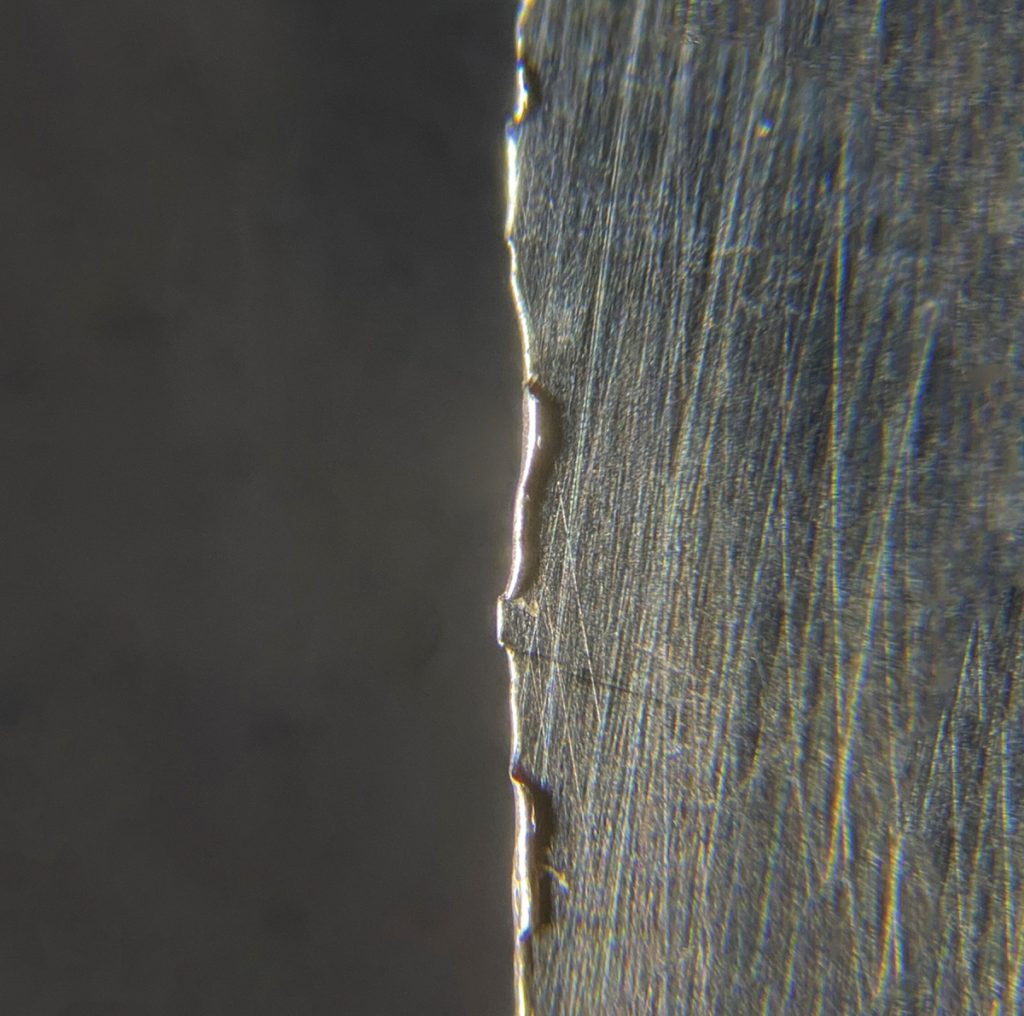
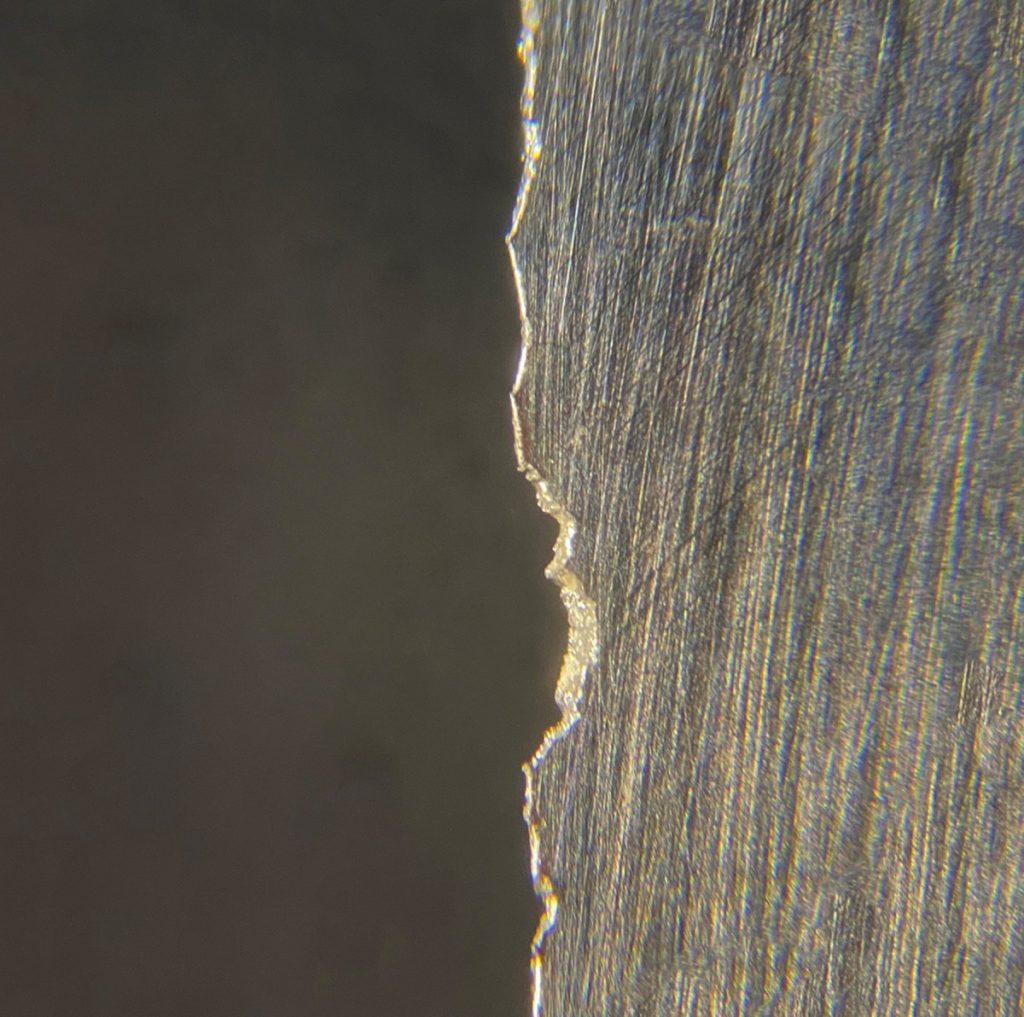
A freshly sharpened edge can quickly become unusable if it becomes deformed (top) or chipped (bottom) by chopping or cross-grain paring, particularly in hard or abrasive woods.
Cutting Edge Geometry
Traditional cutting edges are formed by the intersection of two flat planes —the bevel and the back of the chisel or plane iron. When sharpening, the back is usually polished, and the bevel is honed on some sequence of sharpening stones of progressively finer grit. Sharpness is determined by the last and finest grit in the sequence. For most chisels and plane irons, the primary bevel is typically around 25° to 30°, occasionally with a secondary bevel that adds a few degrees at the edge.
Since the Unicorn buffing step increases the effective angle at the cutting edge, you can start the process with a lower primary bevel, making chopping and paring noticeably easier
Excessive preliminary honing isn’t necessary if you plan to Unicorn the edge; we’ve found that a 1000 grit stone is adequate to produce excellent results. Finer grits yield only fractionally better results. And, since the convex profile increases the cutting angle at the tip, it reinforces the edge; so you can begin with a more acute primary bevel—as low as 20°—even on chisels made of mediocre steel. This sharper primary bevel enables noticeably better chisel penetration when chopping and paring, while the convex bevel at the tip helps resist edge damage.
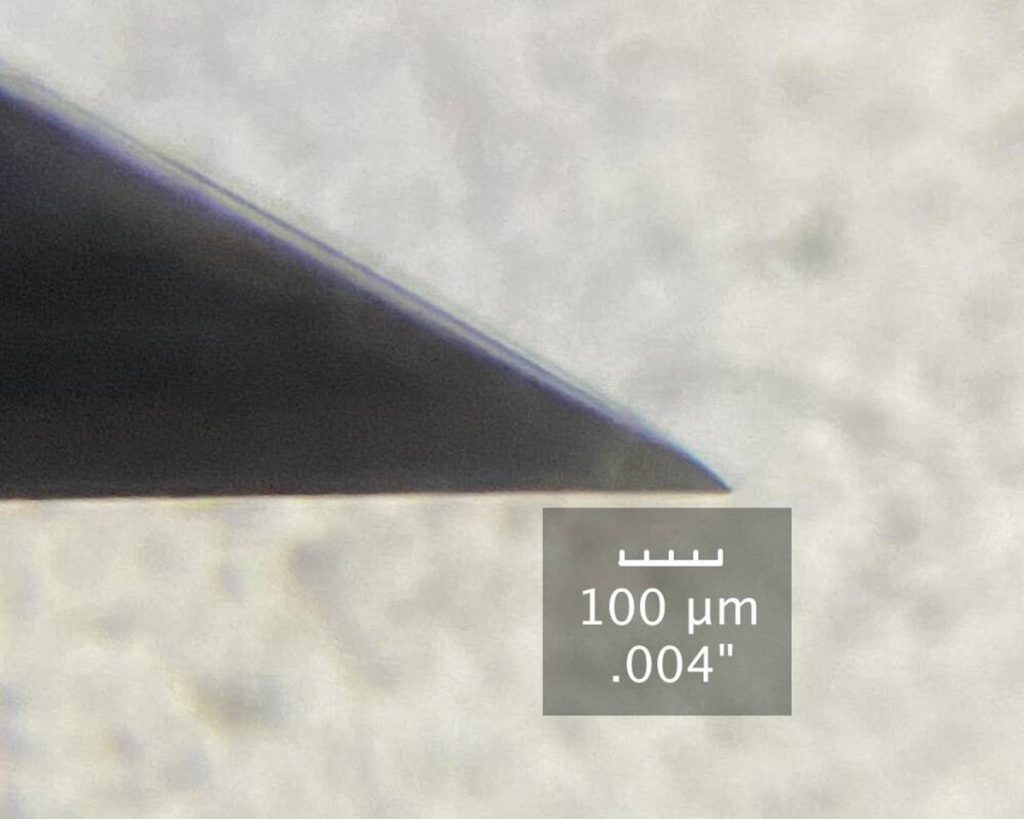
The crowned bevel produced by buffing only needs to be a few thousandths of an inch long to dramatically improve sharpness and toughness.
Resharpening a Unicorned edge is also fast and easy. Because the convex bevel is only a few thousandths of an inch long, it takes very little time to hone it flat again and re-buff to create the Unicorned edge. Re-honing assures that the convex bevel doesn’t grow over time.
Buffing the Edge
Once you’ve finished preliminary sharpening and honing to at least 1000 grit, it’s time for the actual buffing—the “Unicorning”—of the edge.
This can be accomplished in a number of ways, and in our tests, they all produced excellent results.
The fastest buffing setup we found was a 6“ diameter, medium-density cloth buffing wheel on a 3,600-rpm stationary bench grinder or buffer; but we also had success with 4“ diameter wheels mounted on drill presses, powered hand drills and even a lathe. The density of the buffing wheel is important; loose wheels aren’t stiff enough and felt wheels are too hard. The ideal wheel for optimum stiffness is at least 1/2“ thick and stitched to within 1/2“ to 3/4“ of the circumference.
The buffing/honing compounds we used included several commonly available white, green or yellow varieties, although any alumina buffing compound under 5 microns should work well (see above).
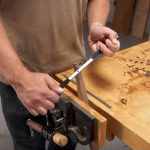
The basic Unicorn buffing technique is to present the tip of the tool to the buffing wheel at roughly a 45° angle. As the tool edge is pushed into the wheel for several seconds, the wheel deforms around the edge. The shape of this deformation seems ideal for establishing the desired profile at the tool tip. You will want to experiment to find the pressure and timing that works best for your particular tools and buffing gear.
Whichever buffing method you use, the edge should be presented at approximately 45° to the wheel, with the rotation moving away from you.
As an alternative to buffing, one of our team members produced acceptable results by rocking the tip of the chisel while pulling it across a fine sharpening stone and following up with a few rocking strokes on a leather strop charged with honing compound. Whichever technique you use, if you’ve done it right you will see a thin, bright band of reflected light along the very tip of the chisel.
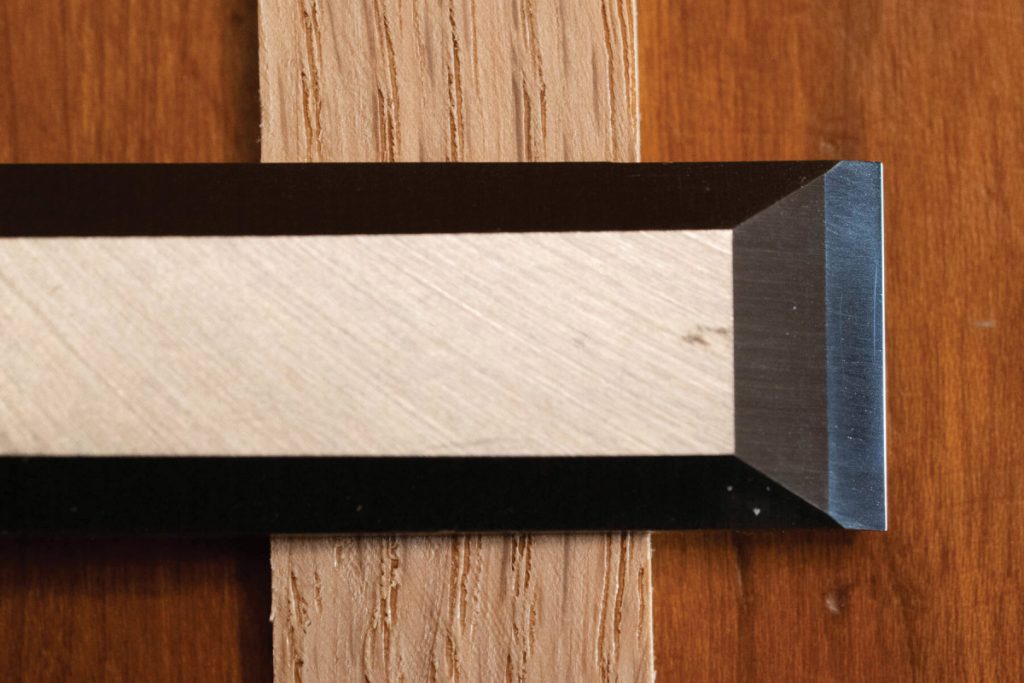
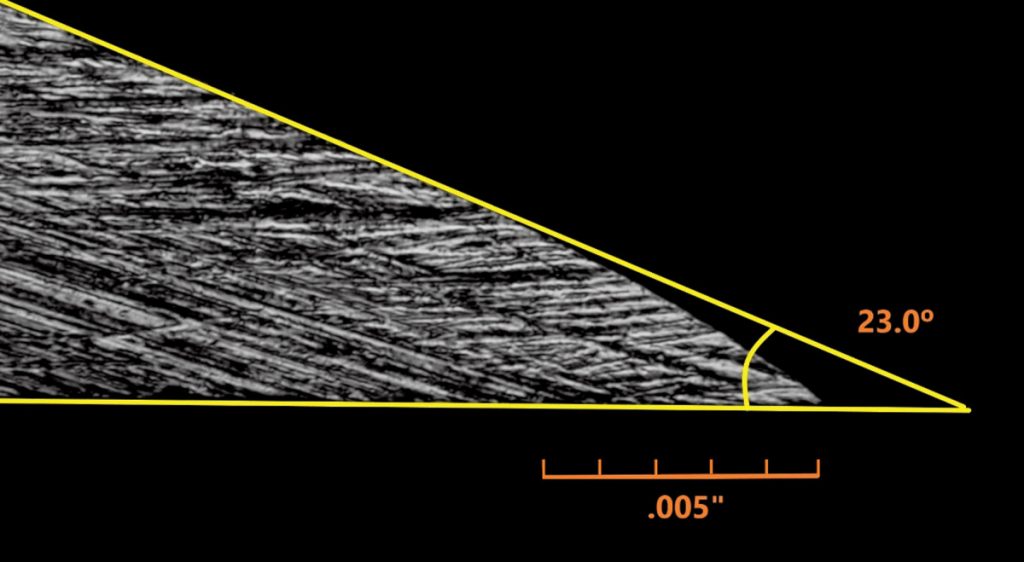
A properly buffed Unicorn edge is evidenced by a thin polished line at the very tip of the chisel. This chisel is sharpened to 20° and the medium gray area behind the Unicorned edge is a 23° secondary bevel.
Once you’ve learned the Unicorn technique, you may never again return to the tedium of sharpening your edge tools on traditional stones. The difference in sharpness is immediately noticeable and the edge life is dramatically improved by the addition of this tiny convex bevel – of all of this from a process that takes only seconds and is much easier and less expensive than sharpening with traditional stones. Not all Unicorns are too good to be true.
The Proof is in the Pounding
We could detect how much sharper a Unicorned edge is by comparing photomicrographs and subjectively evaluating paring performance and plane shavings, but how much tougher is it than a traditionally sharpened edge? We conducted some real world trials, including repeatedly chopping 1/16” slices off the end of a 3/4” thick strip of soft maple with a chisel and mallet, to simulate chopping dovetail waste.
For our tests, we chose an inexpensive Buck Bros. chisel from the big box store and a premium Lee Valley PM-V11 chisel. We tested them with both traditional and Unicorn sharpening methods. Both chisels were first sharpened to a 30° bevel using a honing guide and finished on a 12,000 grit Shapton stone. In both chisels, we found that the Unicorn edge treatment provided a remarkable improvement in edge durability. We concluded that the convex profile not only strengthens the tip but also it aids the wedging action to reduce the stress that can damage the edge, especially in hard use.
 For a more detailed discussion and more photos, visit Winston Chang’s website: https://chisel-test.netlify.app/
Here are some supplies and tools we find essential in our everyday work around the shop. We may receive a commission from sales referred by our links; however, we have carefully selected these products for their usefulness and quality.


![How To Sharpen A Gouge [Video]](https://www.popularwoodworking.com/wp-content/uploads/bfi_thumb/dummy-transparent-olcy6s63it1p9yp7uhusjas7c8kahafrhg9su7q9i0.png)

Thanks for the great article. Super clear and concise. Do you follow the same procedure for plane blades? If not what do you do different?
Hi, Paul – you can buff plane irons, but there is a consideration. Clearance (the angle between the bottom of the bevel and the board). I do buff the bevel sometimes and sometimes the bevel and the back, but since plane irons usually fail with wear instead of chipping or folding of edges, there’s not as much to gain unless you encounter something that’s chipping or folding edges (like silica in mahogany, cocobolo, etc).
My suggestion if you want to try it is to do almost what you normally do and then buff both the face (flat) side of the iron across the wheel flat and then the bevel flat. The buffer will buff both sides of the bevel lightly then without angling the edge in, and see what you come up with. Then you can buff harder with there. If you buff really hard on the bevel side to start, you may have a tip angle greater than the plane bed angle and things go downhill from there.
But short answer, yes, I do it sometimes, and sometimes beyond that, I do it for difficult wood that normally dents plane iron edges as something like cocobolo is rumored to need a very hard iron, but it really just needs the very fragile apex removed.
I posted a video (note, I don’t get revenue from youtube) that you can search called “unicorn makes junk plane irons pearls” or something like that.
I found this article(and the others linked therein) to be thoroughly enjoyable and immediately applicable to woodworkers of almost any skill level or discipline. I particularly appreciate the scientific approach to reporting the results of this method while still emphasizing the importance of empirical data. It is made plain that your experience in your shop with your tools is the most important data to consider. I am left curious, however, about how this method may be applied to traditional turning tools. I will be testing this in my shop as I have the means and motivation to do so. I want to thank the authors, David in particular, for freely and truthfully sharing their knowledge and experiences. Beyond that, I appreciate the disruptive nature of an experiment like this and what the results represent. Keep it up.
Yes, you can buff the tips of turning tools, but it does modify the geometry at the edge, so if you’re using something like a rouging gouge or anything where the bevel angle is relatively steep, it will change things a little. The most handy place for it is if you use something like a skew – instead of going to the grinder often, you can just hand hone both sides and then buff the edge lightly (on both sides) and it will be strong and free of burrs/wire and create a very bright surface without much or any follow up sanding.
Just remember if you buff something on two sides, the increase in edge angle is doubled, so a heavy hand can create a blunt tool – a lighter touch is all that’s needed on each side to get the effect of a heavier touch on tools that only have one bevel.
And if you want to just use the buffer more as a finisher or strop, just light buffing and maybe on the corner of the wheel instead of the front.
Buffing the edge of sharpened tools is not a new idea. My wood design professor in college, Bob Allenson, taught us to do that back in 1970. He learned it working in the furniture industry in Scandanavia prior to returning to the US and teaching in college. He explained it by telling us that even the finest stone sharpened edge has microscopic roughness that can drag on the wood fibers as you use the tool. Buffing (we went to the jewelry studio and used jeweler’s rouge) polishes away a lot of that roughness and reduces drag as the tool cuts resulting in a longer-lasting edge.
It’s not new – carvers have been buffing tools probably as long as there’s been a buff. The one thing in this article that’s important is the geometry and the buffer’s ability are a combination. You can use one or the other (you can round over the very tip of an edge) and that’s fine, but together, both work better.
I never found good published information talking about this combination, but that means I didn’t find it, not that it hasn’t been published. There’s plenty out there talking about using a buff for carving tools or just buffing already sharpened chisels without paying extra attention to geometry and that works OK, but it’s nice to have something that works better.
For as much as one thing is said decades ago, and then is lost, it’s always kind of odd how something that works well and is cheap falls by the wayside for someone to discover in their shop and then refine or define, only to come around again.
I want to give this method a try. Do you have a link to a buffing wheel you could recommend?
Thanks, Jim
You can actually check out the exact equipment the article authors are using here: https://chisel-test.netlify.app/#equipment
Thanks for posting that. The link is still accurate (either the white wheel or “shellac” foreign wheel, or both, are fine). The wheel just needs to have stitching for much of the diameter, nothing harsh (no muslin) and a finger’s width or some fraction of unsupported material after the last stitch.
Over time, if the soft outer radius gets loaded, a worn out file or something can be fed (corner) into the wheel and the swarf will be flung off.
I find the buffer far easier to get good results with (more wheel speed and
your hands are free), but get the desire for some not to spend $75 on a buffer to get started.
David, I have read/watched and thoroughly enjoyed several articles and YouTube videos on the Unicorn sharpening method that have been authored (or contributed to) by you, most recently the very detailed Searching For Unicorns In A Field Of Abrasives And Wood, on the Wood Central website. Thank you for the time that you’ve invested in the research and development of these easy steps to achieve the amazing results, as well as your MANY detailed responses to the comments that have been submitted all over the Internet. The woodworking community is fortunate to have skilled and inquisitive people like you who are willing and able to share their knowledge so freely. Thank you.
I am the president of a Pittsburgh-based woodworkers club (the Western Pennsylvania Woodworkers) and as such I, in conjunction with our two Program Directors, am always looking for program content for our monthly meetings. The Unicorn method fits the bill for such content incredibly well, but I have been unable to find contact info to reach you to seek permission to use some of the graphics that appear in the articles (as requested at the end of the article cited above) to use in one of our monthly meetings. Our club takes intellectual property rights seriously and wishes to seek approval for use of the material. Additionally, if you’re interested, we have a paid-speakers budget to bring in outside speakers, and we’d be very interested in having you as a presenter at a future club meeting.
If you’re still reading comments for this thread, please private message me at Bill@JamesWoodWorks.com, or call me at 412-612-9074, so that we might have a conversation regarding IP rights and/or having you speak/demonstrate for our club. Regards, Bill James.
Enjoyed this article because it verified the results I’ve received from the bailey line road course. Not exactly the same approach, but very similar.
https://baileylineroad.com/course-library/razor-sharp-learn-to-quickly-sharpen-tools-like-youve-never-seen-before/