We may receive a commission when you use our affiliate links. However, this does not impact our recommendations.
 Why you’re better off to look this gift horse in the mouth.
 Why you’re better off to look this gift horse in the mouth.
There is a trap lurking within the pages of our magazine. It is also in most woodworking magazines, and many books. It is called the cutlist, and while it poses as your helpful friend, you’re better off to ignore it and make your own. A published cutlist can keep you from learning some of the most important skills in woodworking – and if you’re convinced that you can’t make your own, you can and you should.
Making a cutlist may not be the most enjoyable part of building, but it is a critical step and a fundamental skill. The good news is, it isn’t difficult. The bad news is, it can be tedious and it involves arithmetic.
In theory, a cutlist speeds the building process. You cut all the parts for your project to size in one step and put them together in the next. What could be more straightforward than that? For that theory to work, you must cut all the parts exactly. That means right on the money for every dimension, each piece perfectly straight and absolutely square.
Unless your project contains only one piece of wood, any deviation in one part affects some, if not all, the other parts. If your logic tells you that a bunch of small errors will cancel each other out, you don’t have much experience in building. Small errors accumulate and seem to gather at the most visible point possible.
The most important item missing from the typical cutlist is something it can’t possibly have if made by someone other than yourself. That is a knowledge of how you work, the tolerances that are important to you and the tolerances you are capable of reaching.
Some woodworkers operate by thinking, “Hey it’s wood; close is close enough” while others measure everything they can with a precision straightedge and a .001″ feeler gauge. Yet the thinking rarely matches the skill level. A lot of woodworkers in the “close is close enough” camp cut airtight joints and piston-fit drawers. At the same time there are über-engineers who can’t make a square cut, or who are never really sure if something is square or not. Most of us are in between, and if you want to be successful at making things from wood, it pays to be aware of where you are on the spectrum.
It’s easy to think that someone else’s cutlist will enable you to avoid the difficult parts of building. But to get from a pile of wood to a finished piece of furniture is a complex process, and when you build you must go through the entire process, whether you want to or not. It’s like a game of chess. If you don’t have a strategy, don’t have a way to defend against the unexpected, or don’t think beyond the next simple step, your opponent will win.
In chess you lose your queen and then the game, and in woodworking you have to remake an important part and toss hours of work into the kindling pile. Or worse yet, you’ll spend the rest of your life looking at something you made that isn’t quite right, knowing you could have done better. Thinking through the process before you start to build ensures success. And the best way to do that is to make your own cutlist, or at least closely scrutinize a published one.
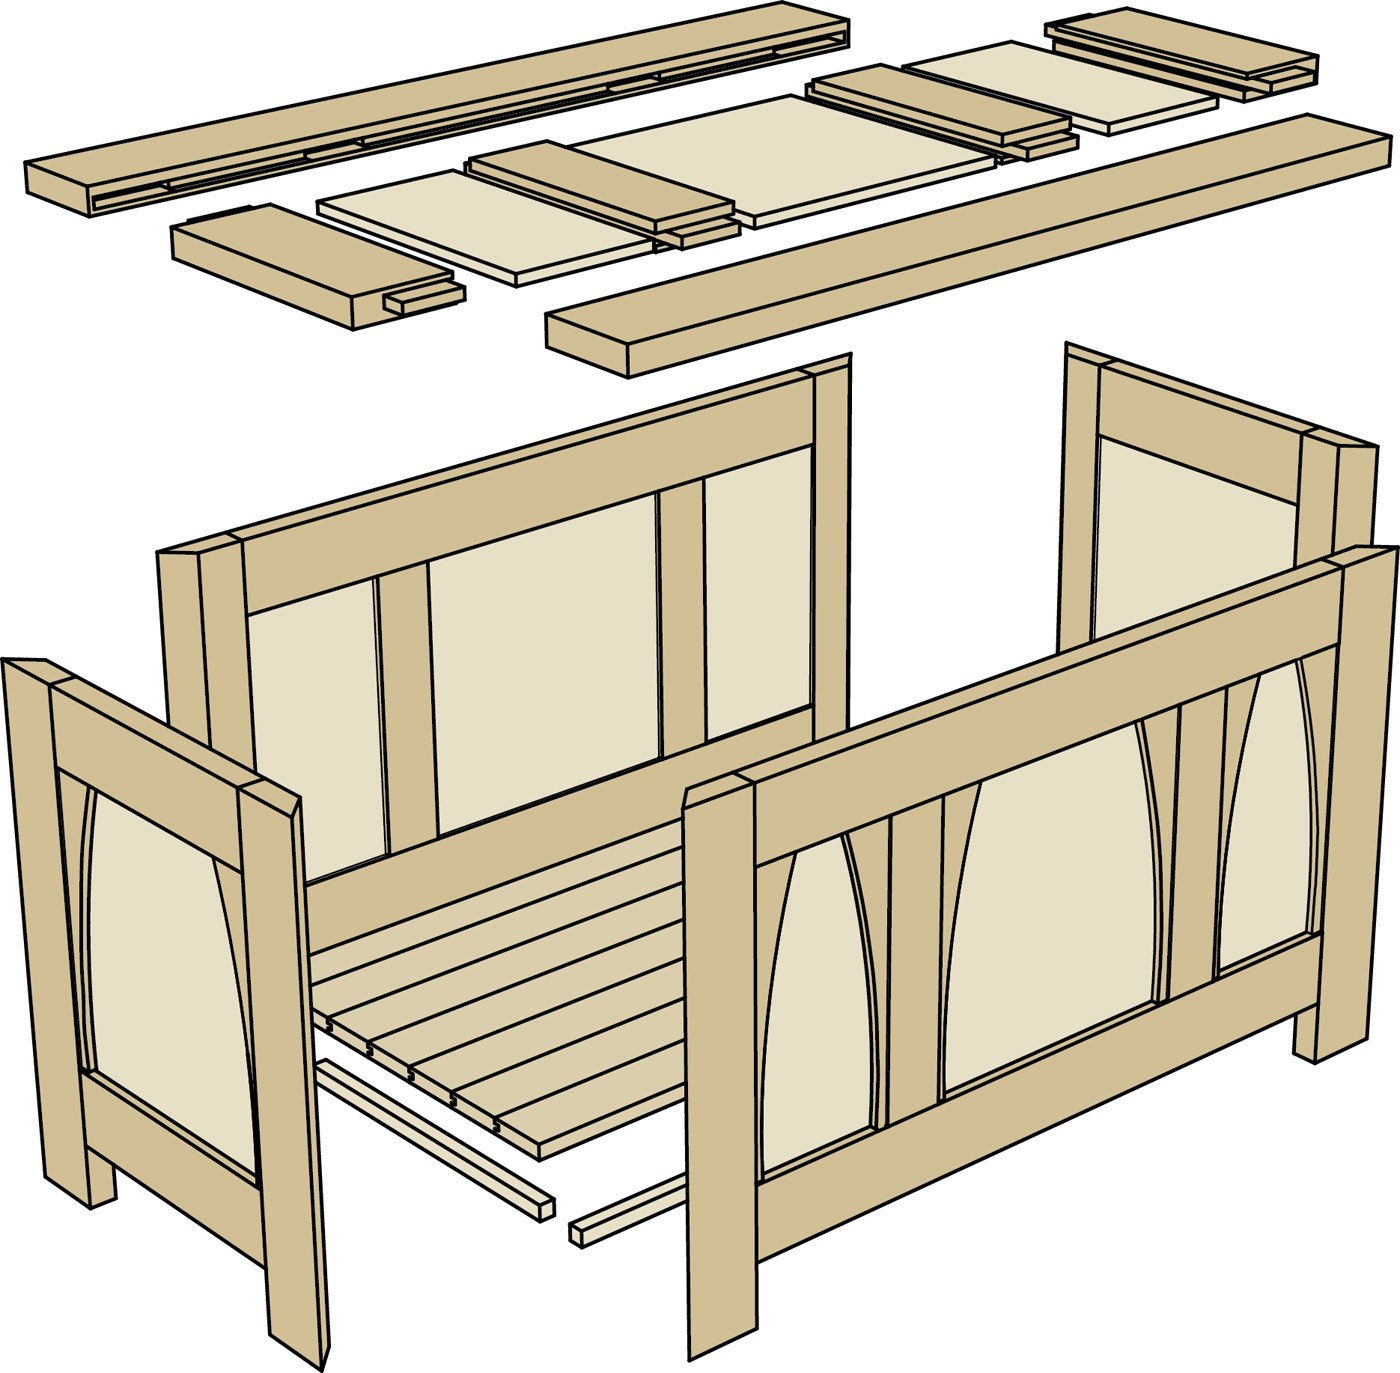
It’s just a box. No matter how complex a project may appear at first glance, think of it as a simple box. List the major components, then the parts that make them up.
Think Inside the Box
One of the planning strategies that I use is to think of everything as a simple box. Building a box is easy: There will be two sides, a front and a back, and a top and a bottom. Even the most complex pieces fit this idea, and it’s helpful in many ways. First, it organizes the parts. The side of a case piece may be a simple slab of wood or it may be a complicated assembly of stiles, rails, panels and legs. Define the size of the assembly, then determine the size of the parts.
This also helps to plan a building strategy. Connecting two assembled sides with a front and a back is easier than trying to assemble an entire case in one shot.
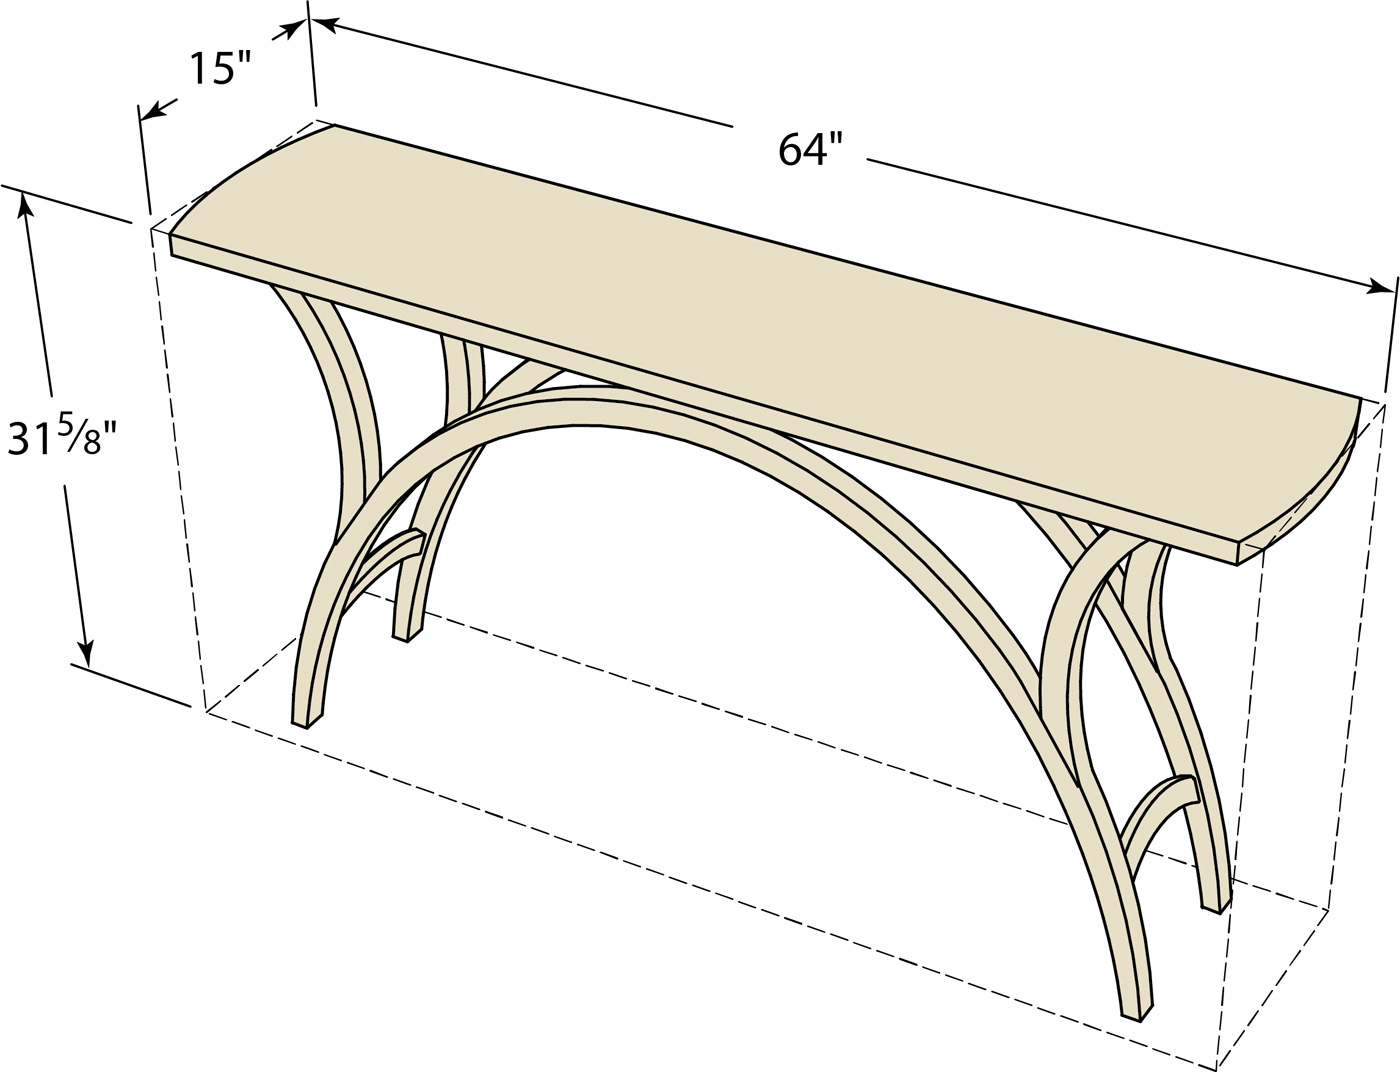
This is a box, too. Even if the parts aren’t box-like (as here in Jeff Miller’s Arch Table), imagine a box that contains them to organize the way you think of planning and building.
Most of the work of planning is a series of if/then questions, working backward from assemblies to the parts that make up those assemblies. When I look at a measured drawing, I list the major parts, along with their overall sizes, leaving room to list the component parts below each major entry. A good drawing doesn’t necessarily give you the exact size of every part; it gives you the information you need to figure out the size of each part when you understand the relationship of the parts to each other.
Section drawings take some study to understand, but they are the best source of information about a project. A section is an imaginary slice that lets you see the inside of an object, and the relationships between the parts and the openings they fit into. If a section doesn’t seem to make sense at first, compare it to the elevations that show the outside.
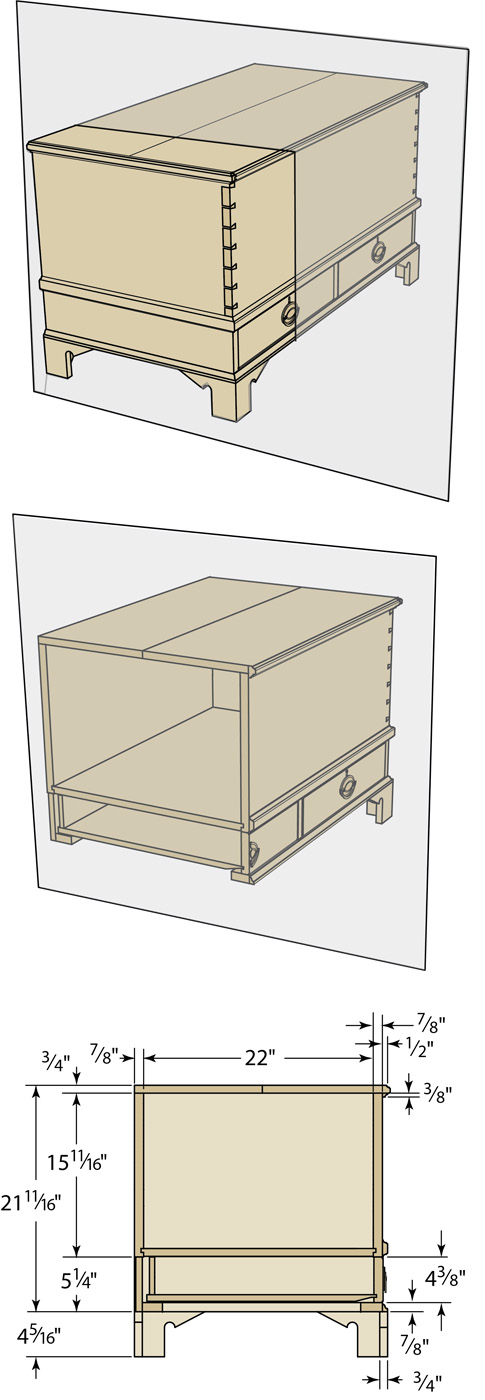
Slice of life. Section views are generated by making an imaginary cut through an object, revealing the secrets of what is contained inside, and how all the parts fit together.
A good drawing leaves out some numbers so that the person working from the drawing will have to do some math and look at all the given views. This serves as a safeguard in a couple of ways. If there is an error in the listed dimensions it will be found before parts are cut. It also ensures that the person doing the building spends time looking through the drawings to understand them.
Build it in Your Head
When I make a drawing, whether I use a three-dimensional computer modeling program or a pencil on paper, the underlying process is the same. I’m working through the steps of the build mentally before cutting any wood.
When I look at someone else’s drawings and make a cutlist, I’m doing the same thing – pretending to build it so that the real building will be easier. If I’m planning to build a project that already contains a cutlist, I don’t do anything different, except that I check the math instead of work the math.
When I’m satisfied that the numbers are good on the cutlist, I can go ahead and cut everything, can’t I? The answer to that depends on a number of things: More if/then questions based on how I work, how well I know my work habits and capabilities, and how much of a risk I’m willing to take.
To minimize the risks, I need a sense of which numbers on the list are critical, and which are likely to vary. My strategy is to mill pieces to thickness and width, but to leave extra length until the last possible moment. If the project includes tenons, for example, it will be nice to have extra material the exact size of the real parts to make test cuts. Leaving parts too long initially provides exactly what I need during the build.
What Could go Wrong?
Lengths are also the most likely things to change during the project, followed by widths. When I rip material to width, I keep in mind that the size on the drawing (which I copied to my list) is a finished dimension after all the parts are assembled. If the piece I’m building has a 2″-wide face frame, I cut those parts 1⁄32“–1⁄16“ wider than the finished dimension. I do that so that I can remove the saw marks with a handplane, a pass over the jointer or by ganging the parts together and running them through the planer.
At some point in the project, I have to decide which method to use and how much material to remove. I also need to be prepared for the consequences if I remove a bit too much. I gain control over the process by choosing when to make my choices. Every time I make a cut, the number of available options decreases.
I, for one, make better design and procedural decisions when I’m away from the shop. If I wait until I’m in the shop with a pile of wood, a list and a table saw, I’m likely to go ahead and cut. If I cut everything first, then remember I have to take the saw marks out, my decisions are now limited to how to deal with parts that are smaller than planned.
A good cutlist also helps when choosing what piece of available lumber goes where in the project, provided that both the cutlist and the lumber are available. I work my way through the stack of lumber and make rough marks with chalk or a crayon on the boards to indicate the cuts I’ll need to make.
I work through the lumber stack looking for the largest, most attractive pieces first, while noting what smaller, less visible parts can come from the remainder. This process is part art, part science and a large part luck. The more lumber at hand when I do this, the luckier I will be. This is another part of the process that I can’t avoid, but I can control when and where to do it.
I can do this as I buy the lumber, and maybe save some money, or I can buy more lumber than I need and perhaps save both time and money. The only thing certain is that I will have to buy more lumber than the actual board-foot measure of the finished parts. How much it costs depends on what random sizes of lumber are available at the time, if I’m buying it in bulk and how picky I am about the appearance of the finished piece.
When Guessing is Good
You can use the numbers from a cutlist to figure how much lumber you need in board feet (bf). For each individual part, round the thickness up to the next quarter-inch, multiply the thickness by the width by the length of the part (all in inches) and divide the result by 144, the cubic inches in a board foot.
So far, so good, but the result is the volume of the finished part, not the volume of the piece of wood you need to make the part. You may get lucky and find rough lumber just slightly bigger than what you need, but the chances of that are slim.
Calculating the exact board feet in each and every piece takes time, and the result isn’t very useful. You need some factor to account for the inevitable waste. If you’re frugal, and your lumber dealer doesn’t mind, you can pick through his stack and likely come within 20 percent or so of your original estimate.
If you’re trying to get an estimate of what the lumber will cost, and how much to buy, quick and dirty is just as good and only takes a fraction of the time.
Go back to the earlier discussion of thinking of a piece of furniture as a box. Take a cabinet or chest of drawers, for example. Look at each side of the box, round the dimensions up to the nearest foot and multiply. A chest of drawers 21″ deep x 42″ wide x 46″ high would have sides that are about 8 square feet each, a top and bottom of about 8 square feet each, and a front and back of about 20 square feet each. Add those together and you get about 72 square feet.
If the material is all from 4/4 rough stock, 72 board feet is a good starting point. I add a waste factor of 50 percent to that, meaning I want to buy about 108 bf for the carcase.
Calculating the individual parts might get me to a more precise number, say 62.75 bf. I still need to add a healthy waste factor; using 50 percent would get me to 94.125. That might save some money, but it might leave me short. In either case, the amount I need is close to 100 bf, and at most places that quantity merits a discount.
If wood were a liquid, like concrete, we could just order the volume we need and be done with it. Wood being the way it is, making a guess and guessing high is faster, better and often cheaper. The most expensive piece of wood is the one you need to go get in the middle of a project.
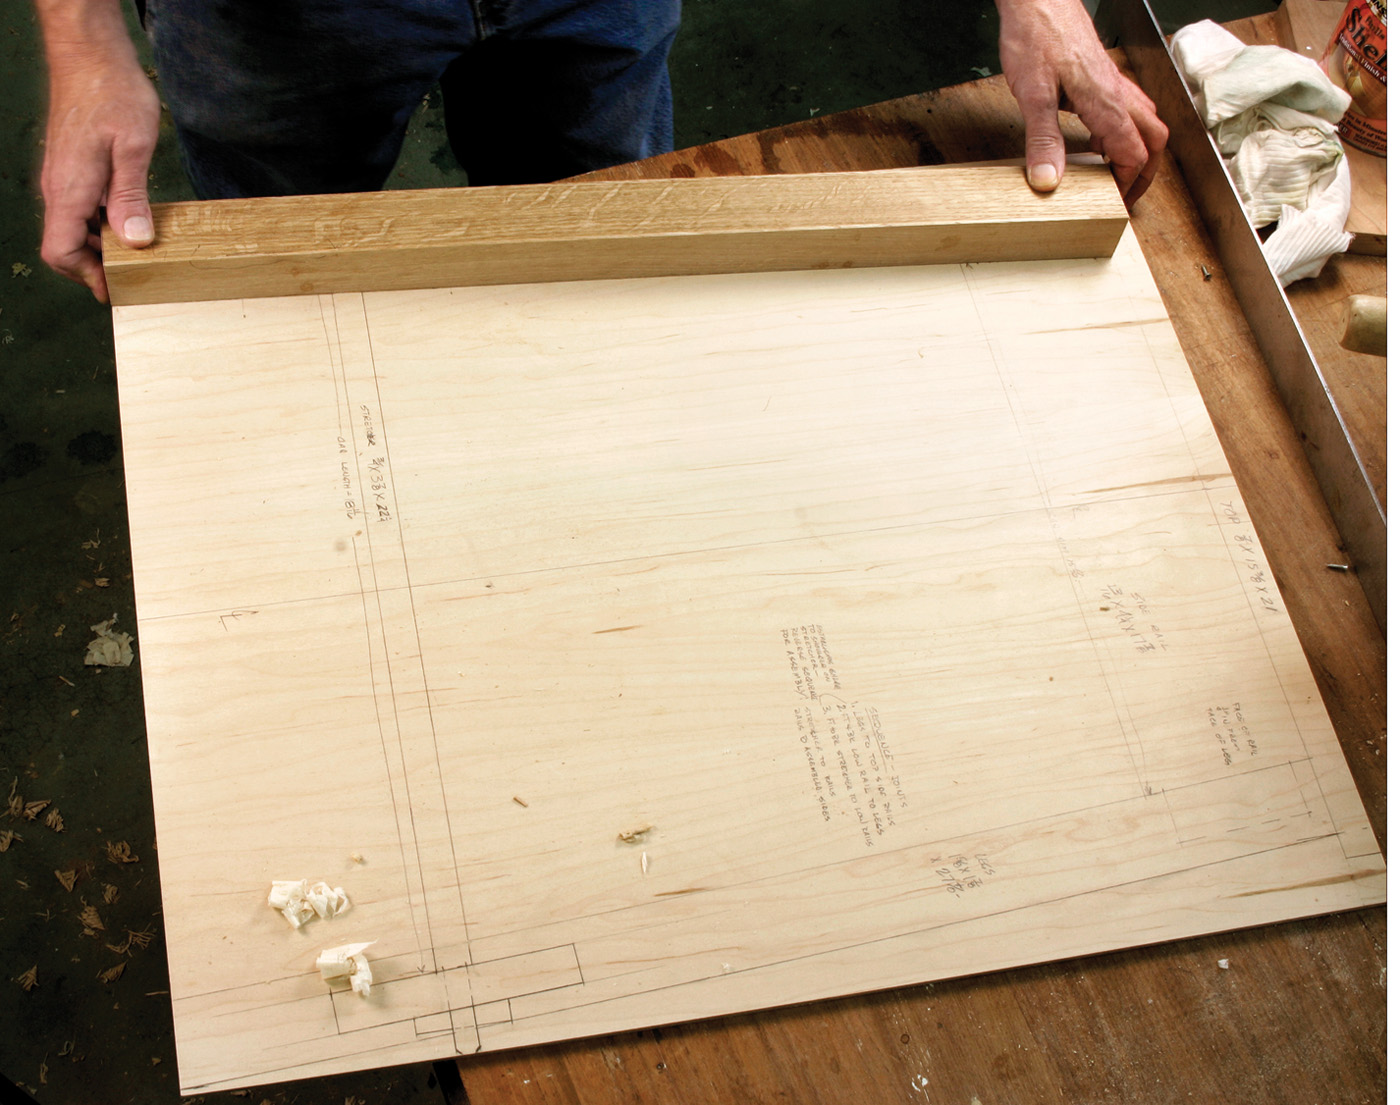
The big picture. A full-size layout when you need it is a great resource that minimizes the risks of building. Use it for a reference throughout the project, and as a place to record your plans.
When Guessing is Bad
A published drawing and cutlist is similar to a road map. Unfortunately, the scale used to fit the printed page isn’t always the best. Making a story stick or full-size layout of the important parts of a project is an excellent way to better understand how all the bits and pieces fit together, and most important it provides a physical reference to lay out the real parts and check your work as you go.
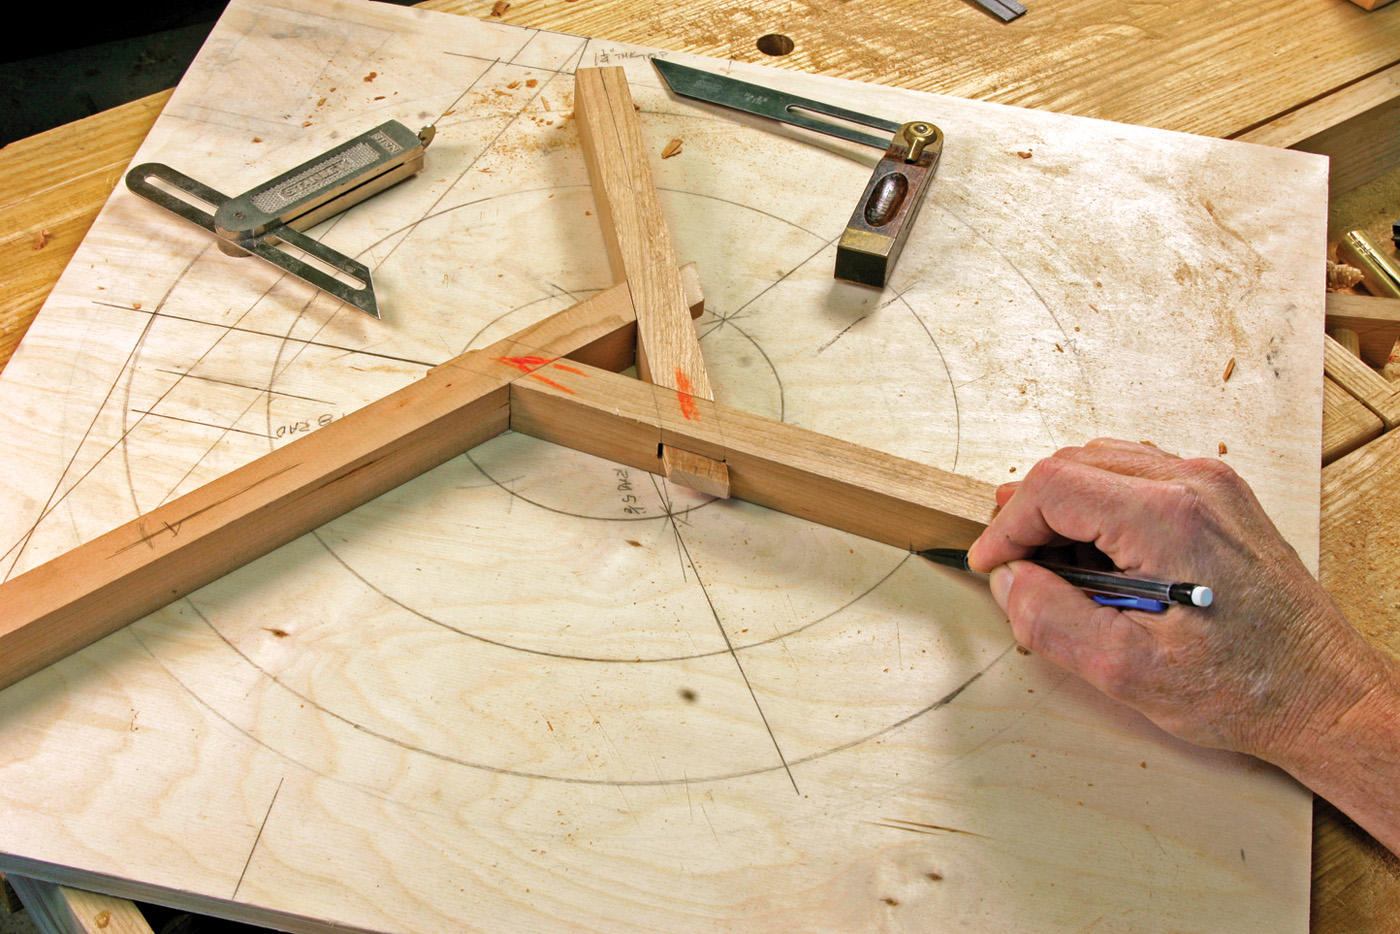
Try it for size. Odd sizes and shapes (such as the stretchers for a stool) are tricky to measure, but easy to compare to a full-size layout. The time spent making a layout speeds the entire building process.
When a piece contains odd angles or unusual shapes, this is far better than trying to rely on numbers or calculations. Every time I make or transfer a measurement is an opportunity to make a costly mistake. Preparing the full-size layout is one more chance to build mentally, and it vastly reduces the chances of making an error, or repeating an error that found its way in to print.
Numbers in cutlists and dimensions in drawings are part of the language of building. As with any use of language, things can get lost in translation. If I want to guarantee that the building process is enjoyable instead of frustrating, the best thing I can do is to make sure I understand things before I start to cut and assemble. It’s a lot more fun to say “OK, this is the next step” than it is to say, “Ouch, wish I had thought of that.”
Here are some supplies and tools we find essential in our everyday work around the shop. We may receive a commission from sales referred by our links; however, we have carefully selected these products for their usefulness and quality.