We may receive a commission when you use our affiliate links. However, this does not impact our recommendations.
 Perhaps woodturners should sell naming rights. The field has never standardized the names of woodturning tools (or measurements of their widths or how to describe their angles), so they often go by different names. One tool stands out in this regard: Whether it’s called a spindle gouge, detail gouge, shallow-fluted gouge, fingernail gouge, lady-fingernail gouge, contour gouge, forming gouge, long-and-strong gouge or just plain “gouge,” no other woodturning tool has as many names. To avoid confusion in my woodturning classes, I call this essential tool the detail/spindle gouge because those are the two most commonly used names. In some cases, a detail gouge may be slightly thicker under the flute than a spindle gouge, but essentially they’re the same tool.
This little gouge is hands-down the best choice for cutting coves (concave shapes), rolling beads (convex shapes) and shaping ogee curves (“S” shapes—which combine cove and bead cuts) in long-grain turning (when the stock is mounted so the grain runs parallel to the lathe’s bed).
This little gouge is used primarily for long-grain turning (when the stock is mounted so the grain runs parallel to the lathe’s bed). For this application, it’s hands-down the best choice for cutting coves (concave shapes). It’s also excellent for rolling beads (convex shapes) and shaping ogee curves, which combine concave and convex cuts.
However, the features that make a detail/spindle gouge perfect for these cuts also make it a poor choice for roughing, shaping cylinders or making other straight-line cuts, such as tapers. In essence, this little giant is great for cutting details in all types of turning—even on a face-grain bowl (when the blank is mounted with its face grain against the lathe’s faceplate), where it’s a fine choice for working the bowl’s rims and the underside of its base—especially its feet.
A distinctive shape

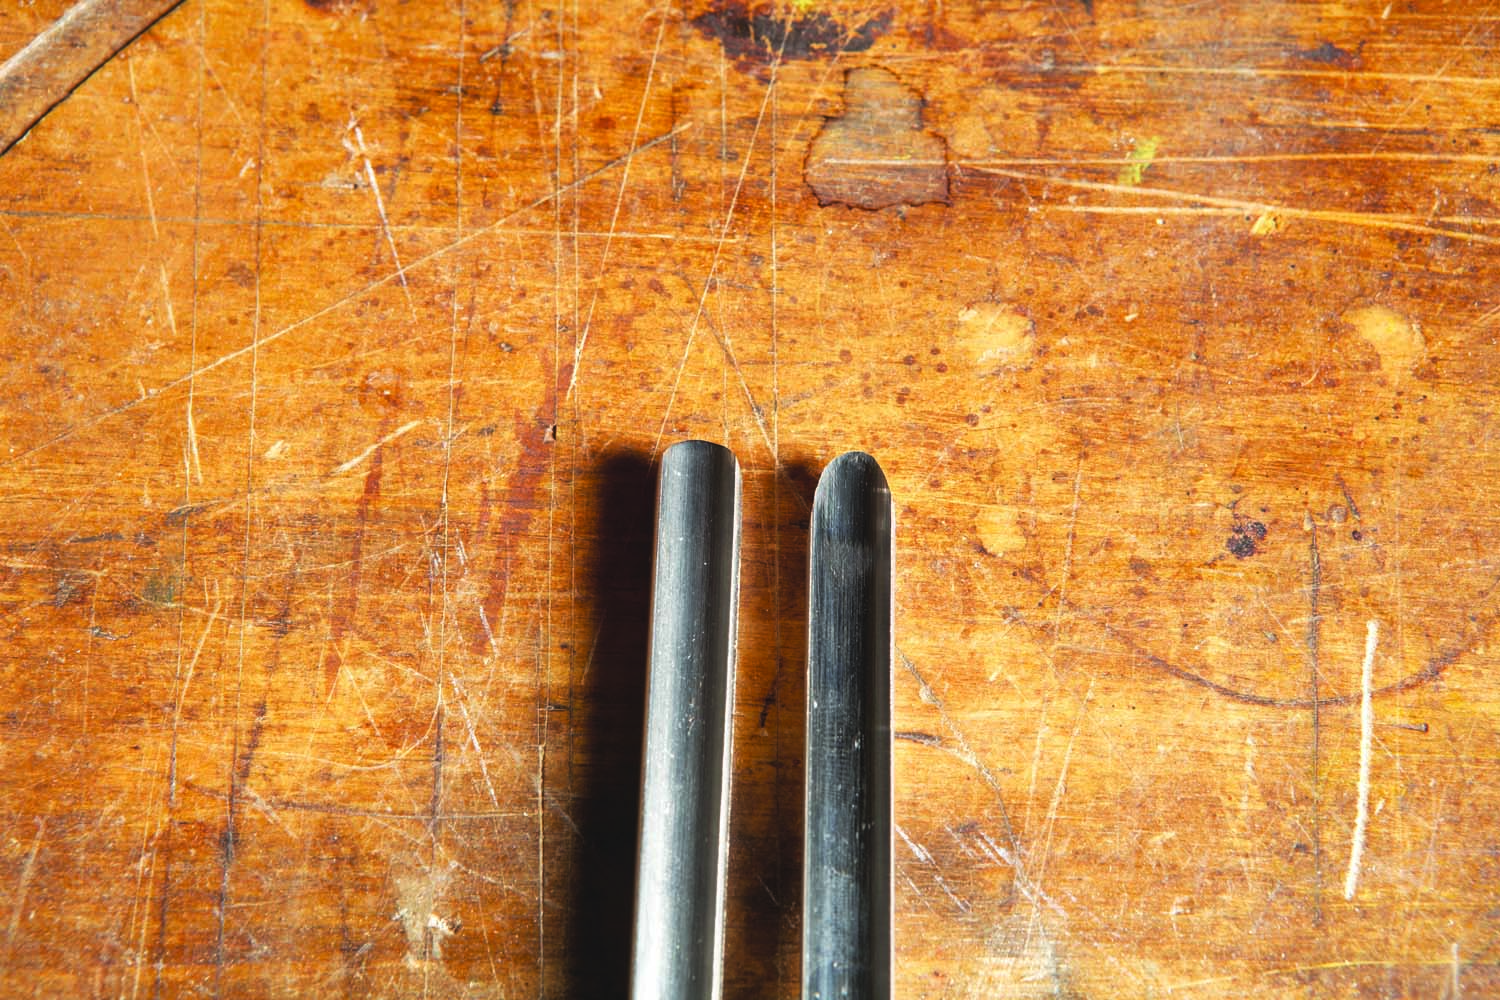
1. A shallow flute distinguishes a detail/spindle gouge from the other two types of gouges that woodturners commonly use.
The detail/spindle gouge is distinctively different than the other two types of gouges that turners typically use, because it has a shallow flute (Photo 1). Although the flute’s radius and the metal’s thickness below it can vary, the overall design of this gouge remains shallow when compared to the other two types. Detail/spindle gouges typically range from 1/4″ to 1″ in width. For the scale in which I most commonly work, I prefer the 3/8″ and 1/2″ sizes.
The bowl gouge is a heavy tool, with a heavy round tang and a deep flute—it’s sometimes called a “deep fluted gouge”. This gouge is the norm for turning bowls and vessels. It’s great for roughing out, shaping and finishing operations in such turnings.
The spindle-roughing gouge has a flat tang and a wide flute—it’s sometimes called a “half-circle gouge.” Its uses include removing the corners from blanks in long-grain turning and creating cylinders, tapers and shallow concave and slightly domed convex shapes. It isn’t a detailing tool and it shouldn’t be used for turning face-grain bowls (the tang is weak and can break or bend).
2. Reshape the factory edge. An elliptical profile increases the cutting surface and allows cutting on both sides, which is much better for creating details with concave and convex shapes.
In addition to a shallow flute, other basic design element of the detail/spindle gouge is an elliptical cutting edge (Photo 2). This profile allows cutting with the sides of the tool, which is especially useful for shaping coves and rolling beads: One each side, the more sharply-curved portion of the ellipse neatly cuts coves, while the more broadly-curved portion flows wonderfully over convex shapes. This profile also helps to reduce mishaps such as runbacks and dig-ins because the edge trails away, rather than ending abruptly. It also provides more cutting surface to work with.
Detail/spindle gouges seldom come from the factory with an elliptical edge: It’s much more likely to be straight, slightly domed or even pointed like a spear. That means a new tool typically requires reshaping.
Sharpening
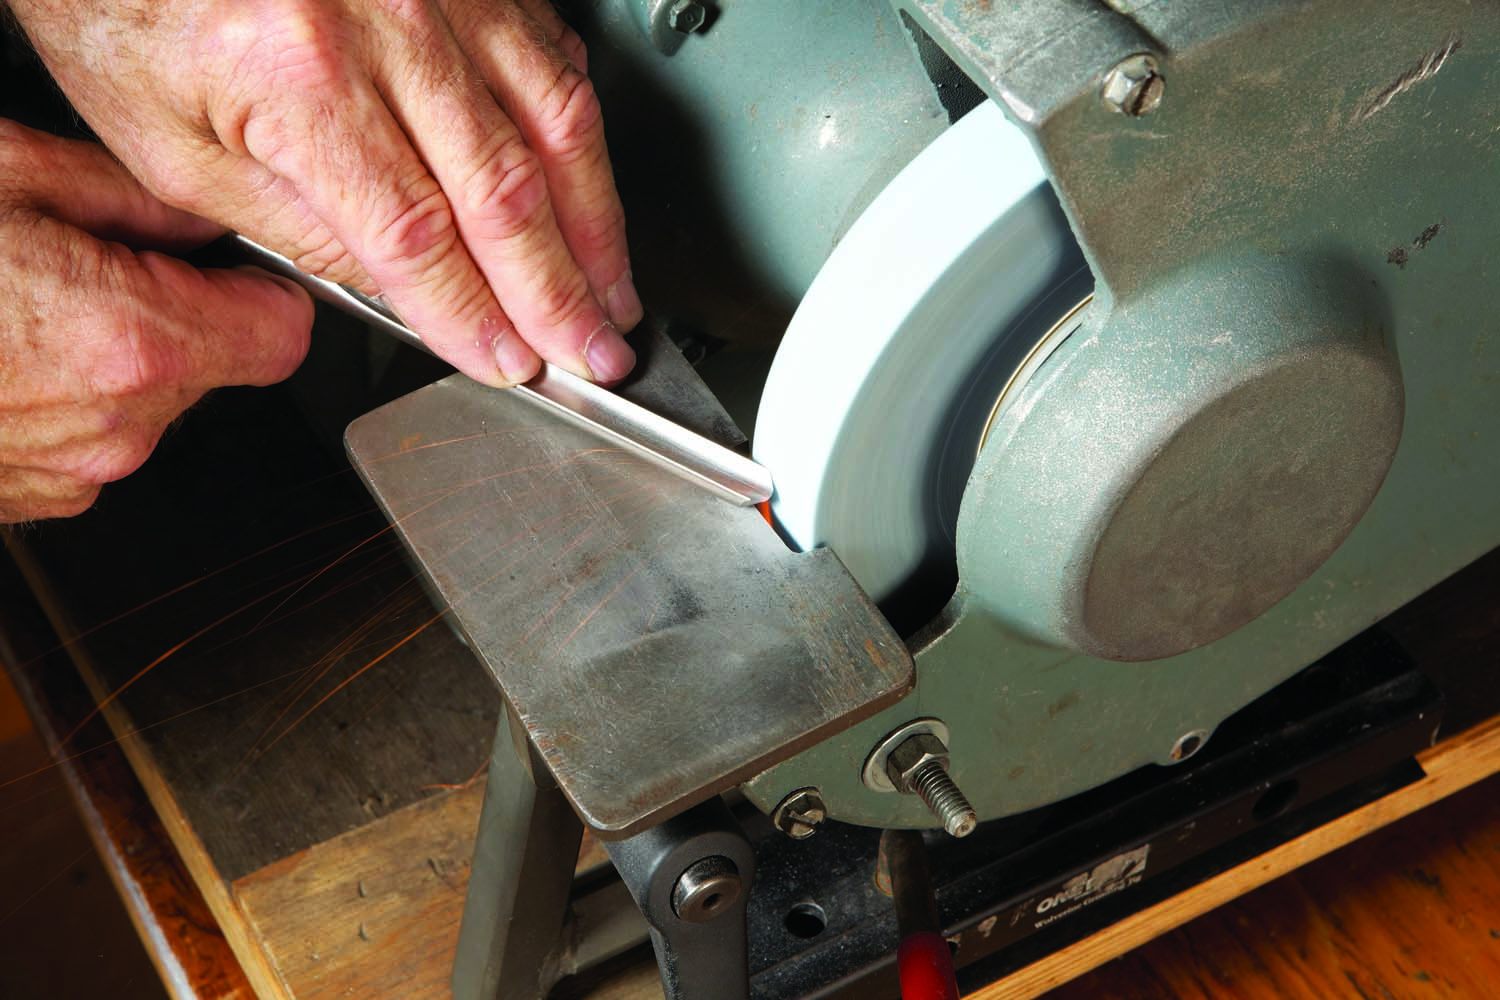
3. Grind the edge to an elliptical shape by swinging the gouge through an arc after setting the tool rest set at 90°.
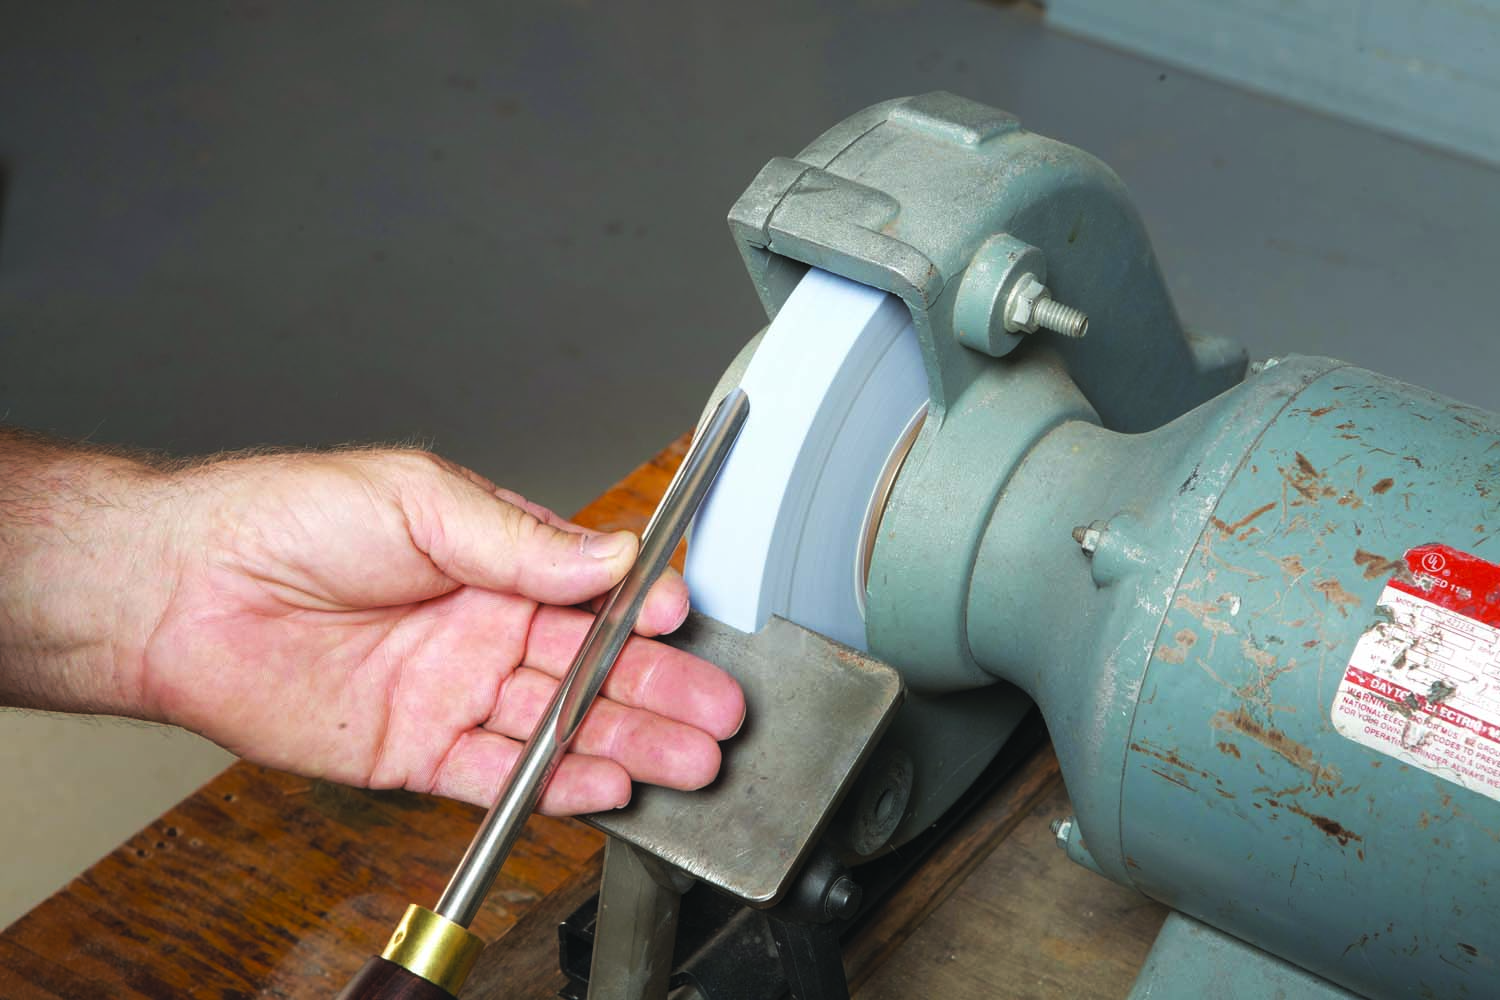
Sharpening includes three separate operations: Shaping, producing a sharp edge, and honing. Shaping includes two grinding actions: One to shape the elliptical edge (Photo 3) and another to create the bevel that supports the edge. If considerable material must be removed during these roughing operations, use a 46 or 60 grit wheel. Make sure there’s virtually no gap between the tool rest and the wheel and always wear eye protection and a dust mask when grinding.
How far back you grind the elliptical shape is a question of creating access for side-cutting operations. For the gouge shown here, bringing the sides back between 3/8″ and 1/2″ is usually more than adequate. For tight places, a longer, narrower ellipse might be better. The bevel angle is usually between 25° and 35°. This is considerably lower than the 45° and 55° bevel angles commonly found on spindle roughing gouges and bowl gouges, respectively. The edges on these tools require much more support.
Producing a bevel with a sharp edge that follows the shape you’ve created is the hard part. Most of these tools tend to be thick at the center, but very thin at the sides. This makes it easy to over-grind the sides and loose the elliptical shape. Another challenge is to create a smooth bevel—a bevel with multiple facets leaves an inconsistent edge that will be impossible to hone.
4. Form the bevel and sharpen the elliptical edge one side at a time, using a corkscrew motion. Rotate the gouge to follow the edge as you move it up the wheel; reverse the action as you move it back down.
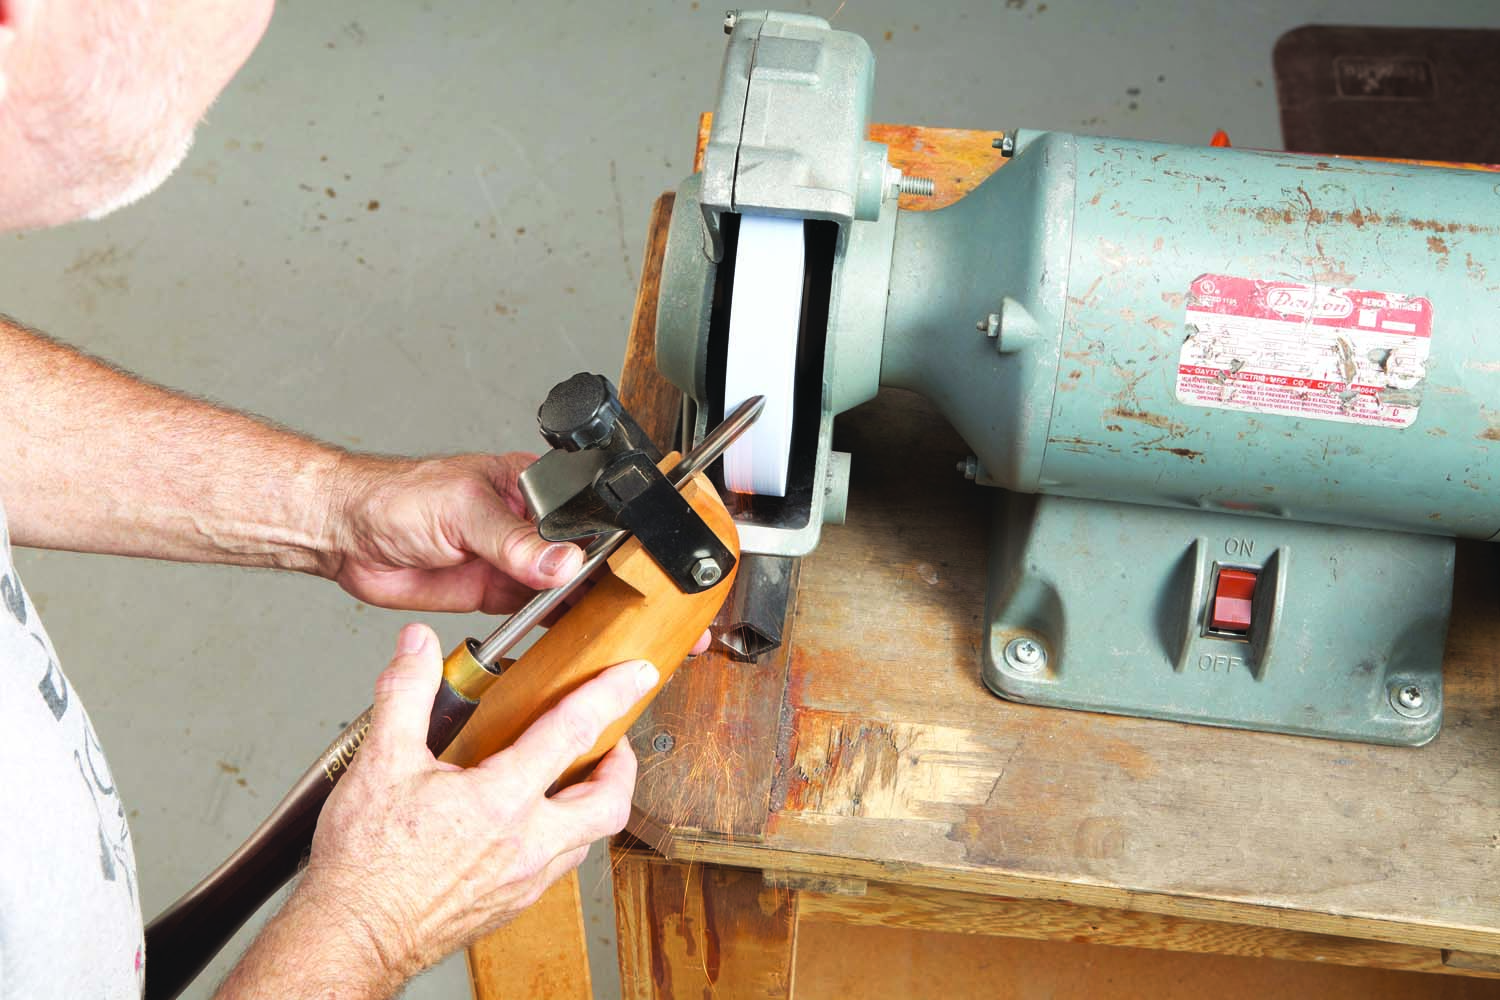
To form a sharp edge on almost any woodturning tool you usually have two choices: do it freehand (using a tool rest, of course) or use a clamping jig. To freehand the edge, slightly elevate the tool rest to make it comfortable to hold the tool at the bevel angle you choose (Photo 4). Visually divide the tool into three sections: the center, the left half and the right half, and plan to grind one side at a time. Begin by lightly resting the tool on the wheel (called the home position). Then simultaneously push and twist the tool up and onto its side while holding its edge against the wheel at the same angle. Reverse the action to return to the home position. Then repeat the process on the other side. Repeat the process on both sides until the bevel is fully formed. Finish with one or two large sweeps that connect all three sections.
TIP: Slow down and watch closely when the bevel is nearly complete. As soon as sparks start to consistently come over the top of the edge along its full length, it’s time to stop: The edge is sharp.
5. Forming the bevel and sharpening an edge with a jig is easier because it automatically sets the angle and makes a wide sweeping motion that follows the elliptical shape of the edge.
If grinding freehand seems too daunting, use a clamping jig instead (Photo 5; Sources, page xx). Many are available and they all work well. With either method, be careful not to over-grind, as doing so with ruin the elliptical shape (Photo 6).
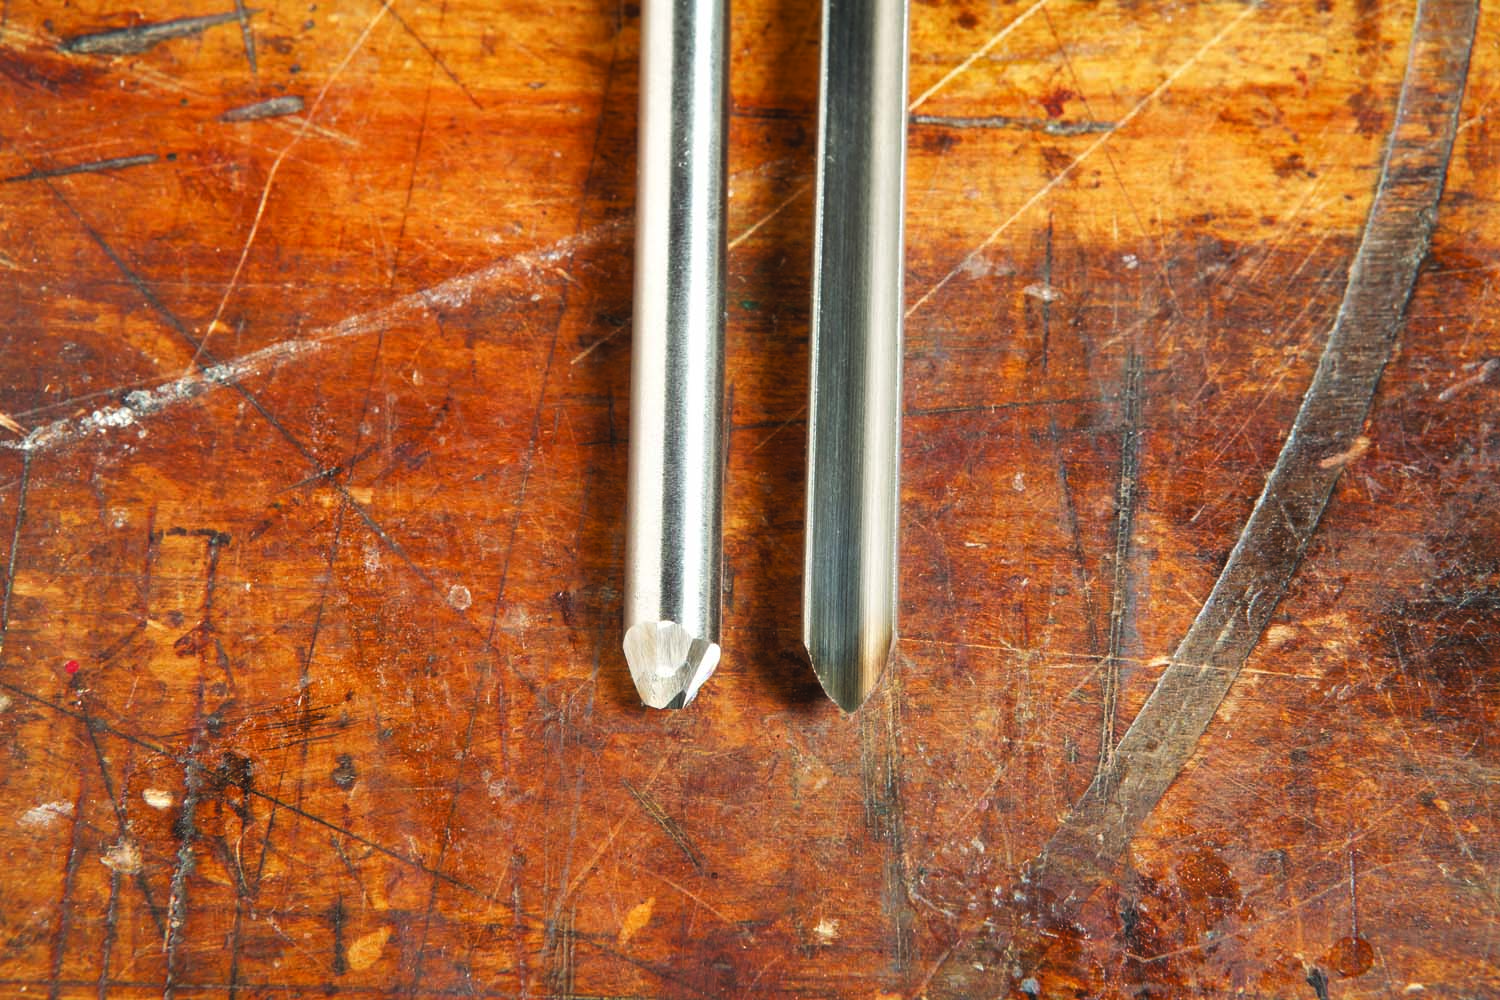
6. Avoid creating a spear-pointed edge (left), caused by overgrinding the sides of the tool’s elliptical edge, and creating a faceted bevel, caused by changing the angle as you rotate the tool.
Honing
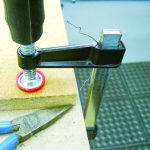
The process of refining and maintaining a sharp edge (called “honing”) is accomplished with a flat hone for the outside bevel, followed by using a rounded hone to “slip” the inside edge (see Sources). For modern high-speed-steel tools, diamond honing tools work best.
To hone the bevel, hold the gouge securely and move the hone back and forth along the edge—concentrate on touching the back of the bevel to just below the cutting edge. To hone the inside, hold the curved hone flat in the flute and follow the edge all the way around, again with a back-and-forth motion.
Making concave cuts
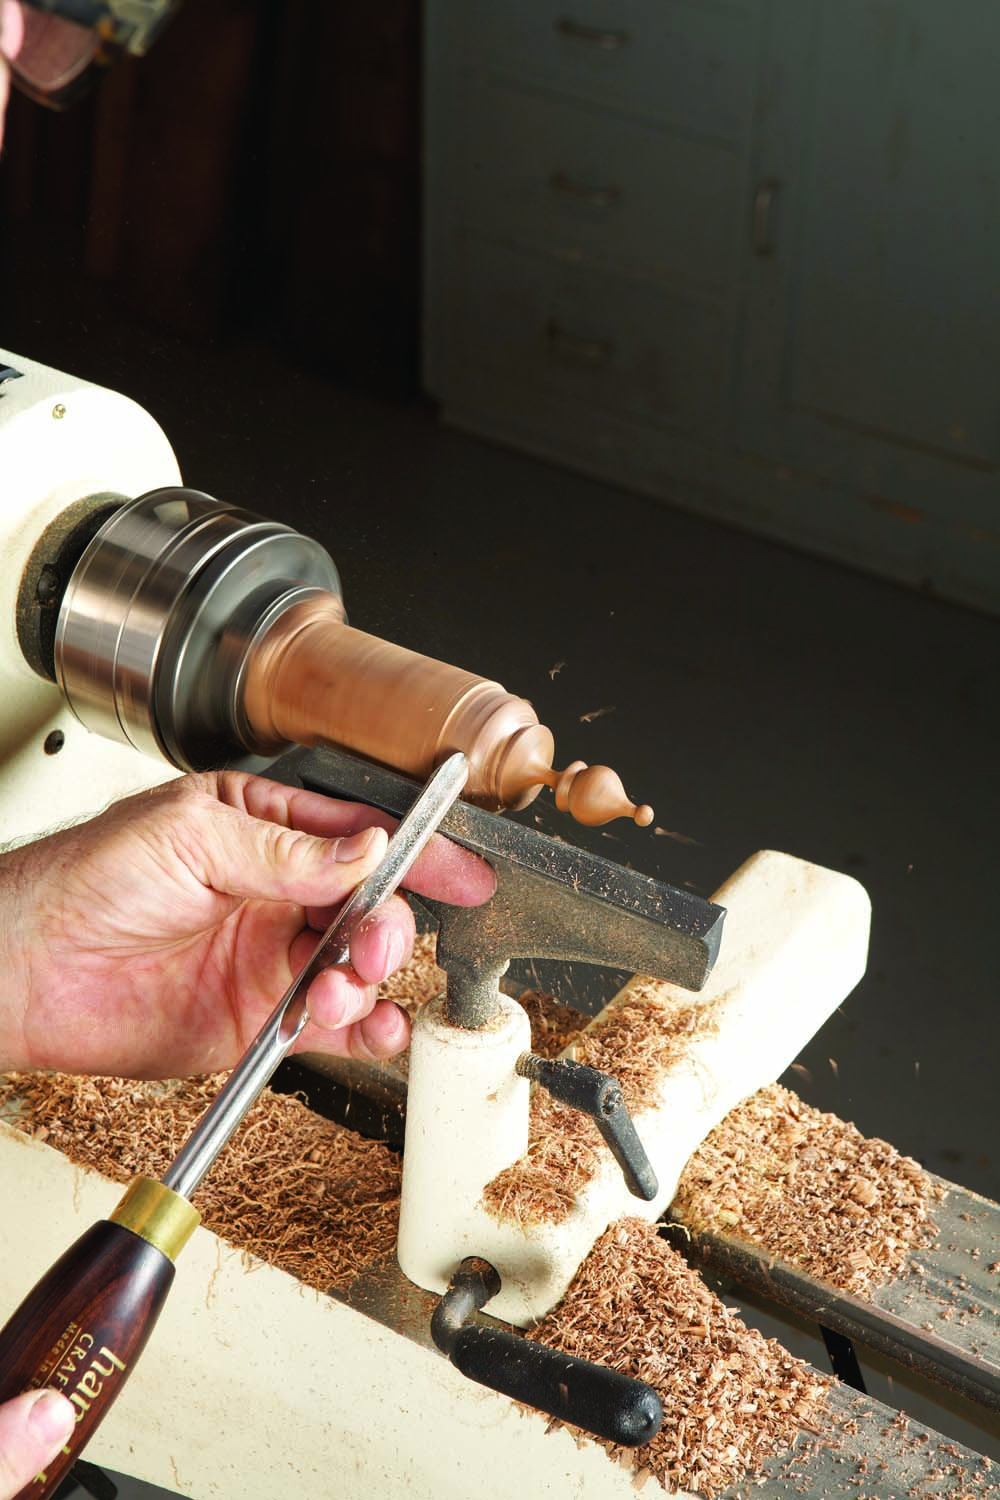
7. Create a cove by cutting mirror-image concave profiles. First, cut a groove to establish the depth at the center. Then make a shallow knife cut at one edge, just deep enough to create a shoulder that will support the tool. Next, push in the gouge while riding its bevel against the shoulder and gradually turning it face-up. Complete the shape by cutting a series of incrementally deeper and wider concave profiles on both sides of the groove.
A detail/spindle gouge is most adept at cutting coves and other concave shapes (Photo 7). When cutting a cove, the goal is to cut a pair of mirror-image concave shapes that meet in the center. This requires a sharp tool, good technique and close observation of the shape as it is being formed—done by watching the horizon (the top edge of the blank) as you cut.
These tools work best when they can “move into air,” so practice cutting concave shapes on the ends of a cylinder or by cutting into a groove that you’ve cut with a parting tool. Position the gouge at a right angle to the blank, with its flute facing the direction of cut, and score the wood to create a small recess that will support the tool’s bevel. Then begin a light and slow twisting cut with the gouge, while keeping the bevel against the wood.
8. Run-back occurs instantly. If the knife cuts in at anything less than a 90° angle, the knife will skate backwards. The solution is to push the back end of the handle towards the cove until the gouge cuts in at an angle of 90° or more.
The greatest obstacle when cutting a cove is overcoming the tendency of the tool to skate across the wood (or “run back”) when you start the cut (Photo 8). The underlying cause is the tool’s sharp edge engaging the wood at the wrong angle, so there’s no support for the bevel. This immediately pushes the tool backwards across the surface.
Cutting convex profiles
9. Create a bead by cutting mirror-image convex profiles. Rest the gouge on the blank while holding its flute face-up (left). Lift and roll the handle so the gouge “rides the bevel” until its edge starts cutting (center). Continue the rolling action while pushing in until the gouge rolls completely onto its side (right). Refine and complete the shape by making several shallow cuts on each side.
To create a bead, you cut a pair of mirror-mage convex shapes (Photo 9). The process is similar to creating a cove, but different. Here the challenge is to produce fully rounded surfaces with no flats. Begin with the flute upright, with the bevel resting on the wood and the back of the handle held low. Gently lift the gouge until it begins to cut. Then turn the flute in the direction of the cut and gradually roll over the gouge as you continue to cut in. Aim to have the flute fully on its side at the bottom of the cut. A corkscrew motion that smoothly combines rolling and advancing is critical (Photo 10).

10. A flat “V” shape results instead of a nicely rounded curve if your pushing and rolling motions aren’t well coordinated.
Develop your skills
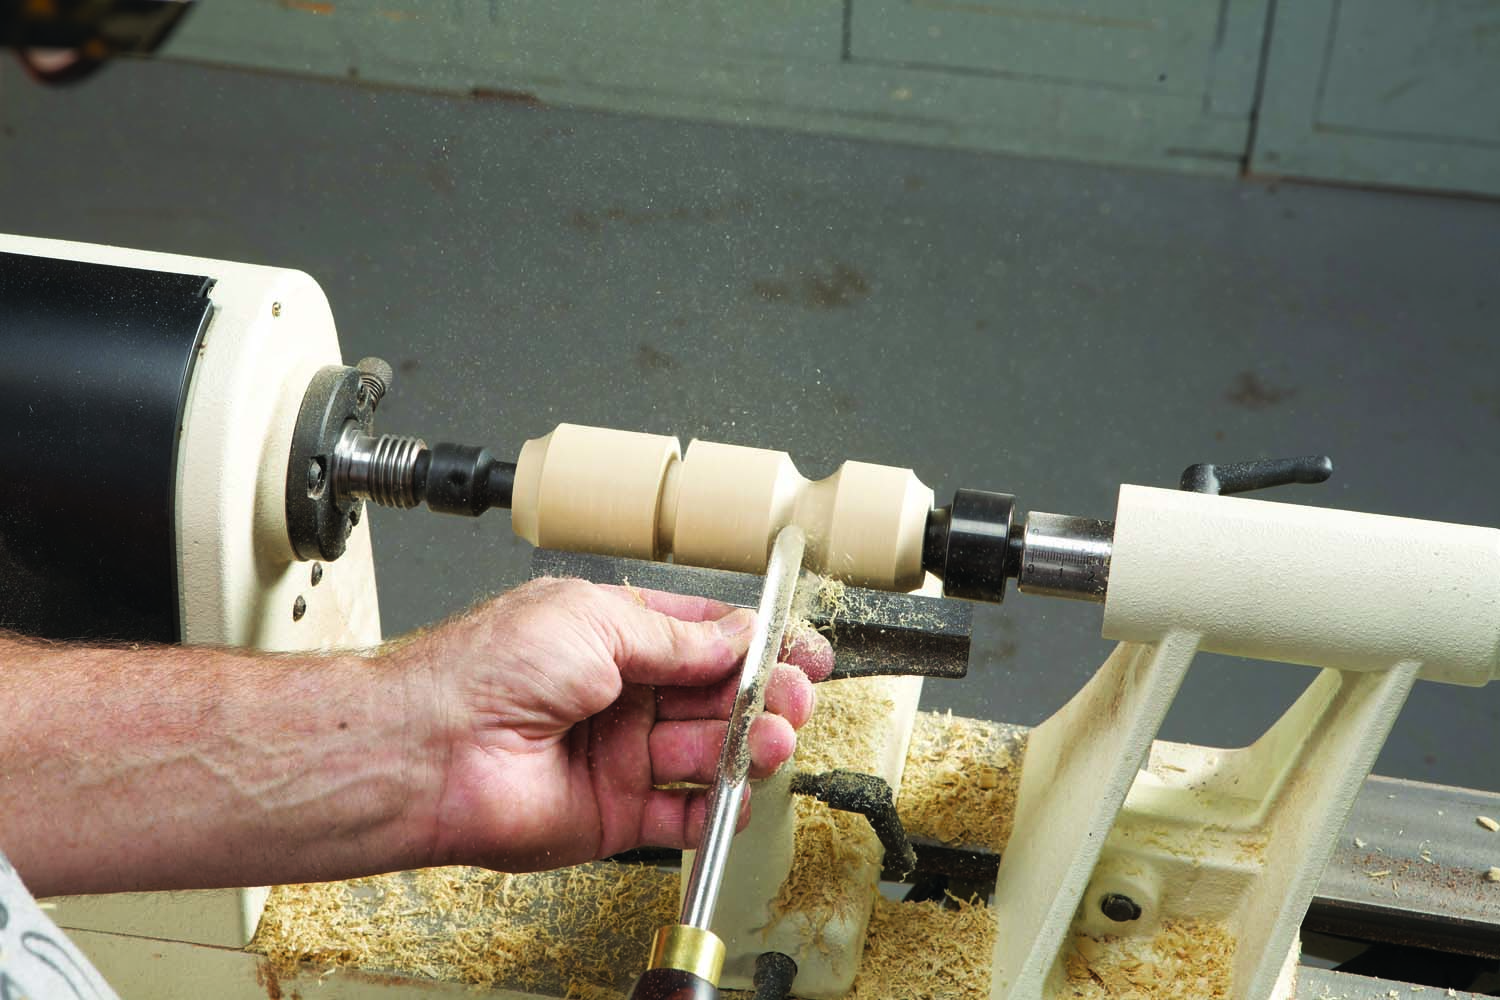
Mastering this tool requires practice, so use a spindle roughing gouge to create a bunch of 1-3/4″ dia. x 7″ long cylinders made from softer woods such as poplar, pine or alder and use them to practice cutting convex and concave shapes that curve smoothly and continuously from top to bottom. You’ll probably find that cutting one side of either or both profiles is more difficult than the other, so devote an entire cylinder to practicing that shape. As you practice, the initial cuts and turning/rolling moves will start to make sense.
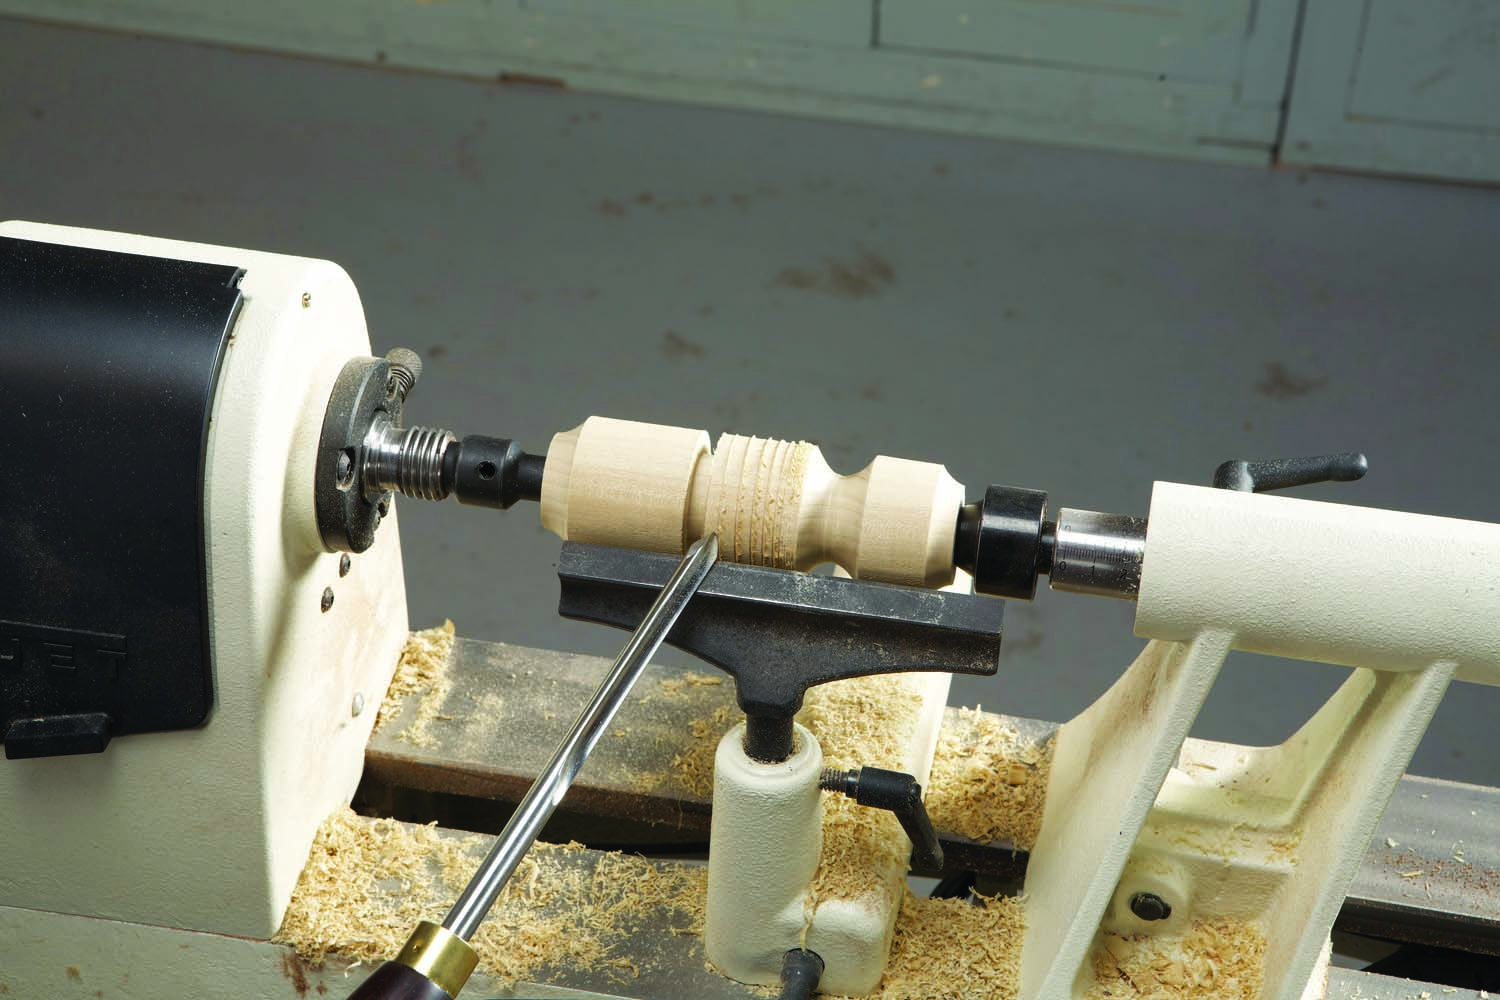
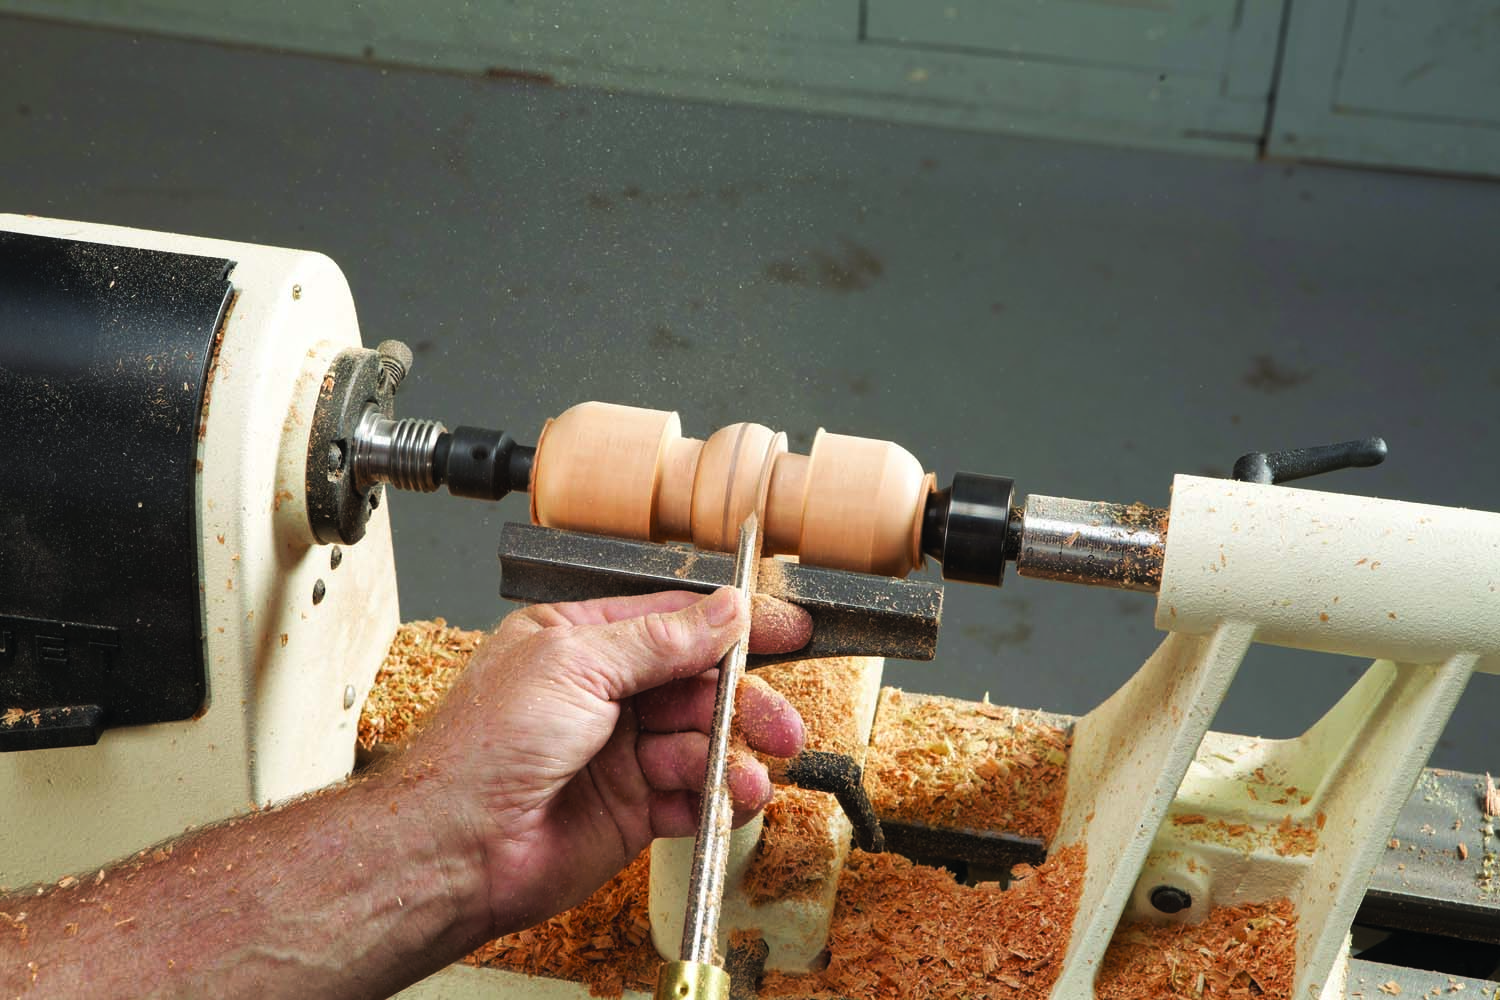
It’s a good idea to practice cutting coves and beads of different sizes. Lay out a series of coves that gradually get smaller, (or more shallow, or both) on one or more of the cylinders. Start with a 1-1/4″ wide cove and reduce the width by 1/8″ until you reach a cove that’s only 1/4″ wide. Then strive to cut fully rounded, mirror-image concave shapes on every cove (Photo 11). You’ll discover the size and shape of the gouge determines how narrow a cove can become.
11. Practice cutting coves (and beads) of different widths and depths to master the nuances of this extraordinary tool.
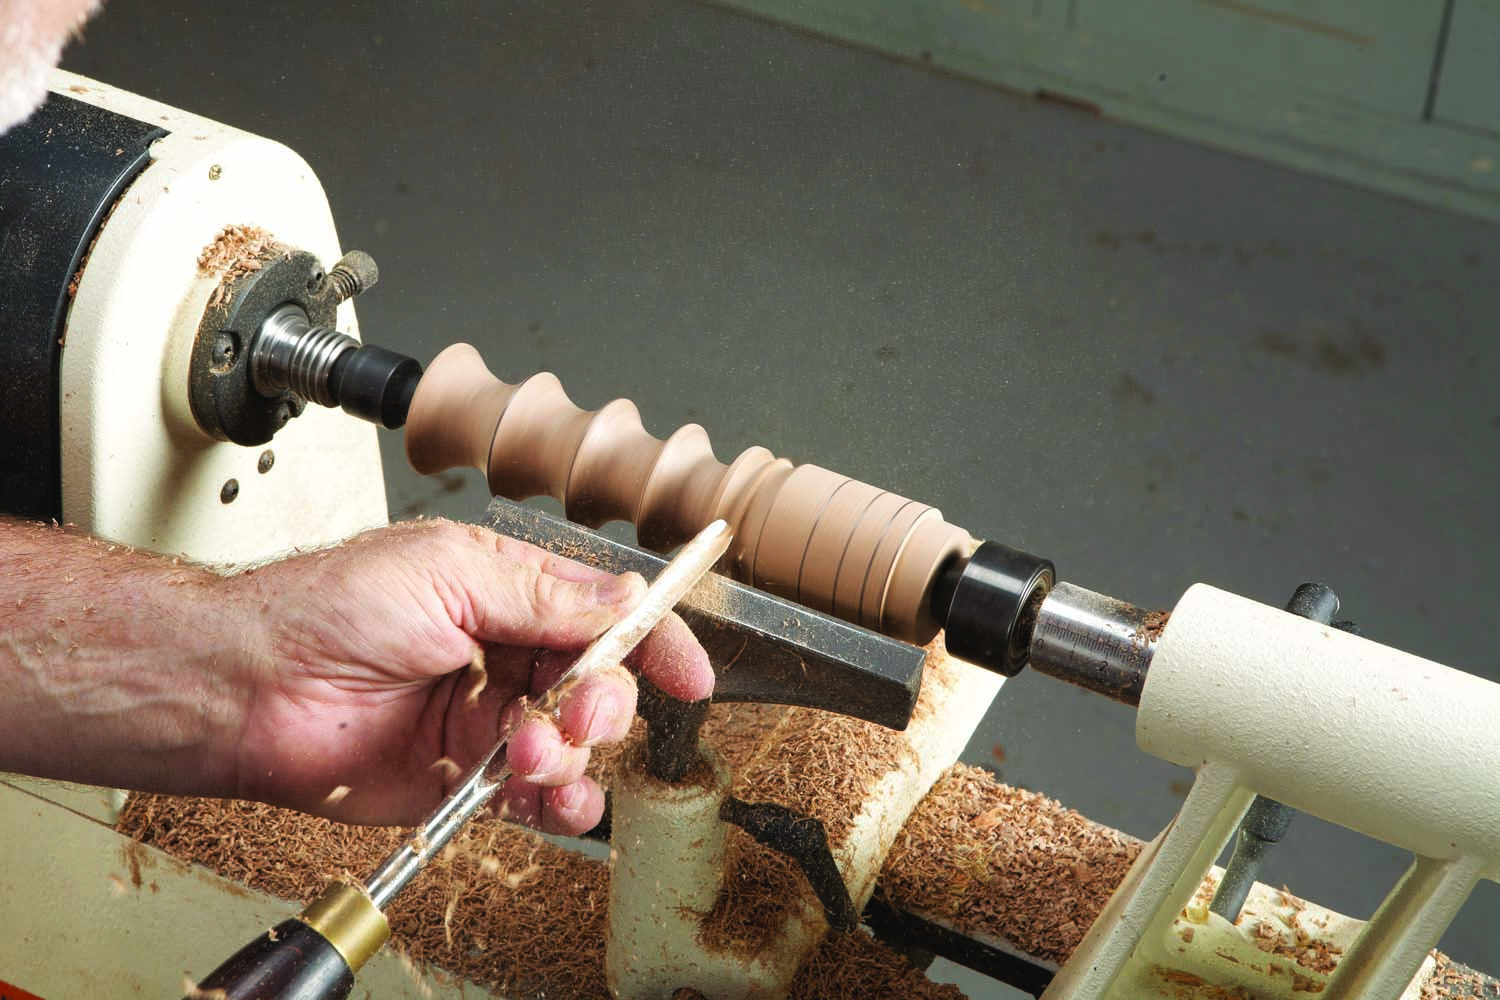
To practice cutting beads, prepare longer (1-3/4″ dia. x 10″) practice cylinders. Use a parting tool to lay out beads from 1-1/4″ wide down to 1/4″ wide. Parting down to different depths dramatically changes the look of the bead. Learning how to handle the gouge accordingly is part of the exercise.
Bio:
Alan lacer is a turner, writer, demonstrator and instructor living near River Falls, WI. For more information, visit alanlacer.com
Here are some supplies and tools we find essential in our everyday work around the shop. We may receive a commission from sales referred by our links; however, we have carefully selected these products for their usefulness and quality.