


We may receive a commission when you use our affiliate links. However, this does not impact our recommendations.
 Set your bandsaw up for accurate resawing by following these simple setup tips.
A bandsaw is a versatile tool. In fact, I know many woodworkers that use a bandsaw as their primary saw in their shop. It can cut curves, joinery, rip parts to width. It’s my belief however, that the bandsaw’s most valuable and unique skill set is one of it’s least used—and that’s resawing.
Resawing—splitting material into several thinner pieces, may be done for several reasons. First—you can stretch expensive material further. You can resaw your own veneers, resulting in a series of matched veneers for projects. And one over looked aspect is that, often times, it’s faster to resaw material down rather than planing it away. No matter what way you cut it (har har), when you resaw, you’re asking a lot out of your saw. Every little thing needs to be right for you to get the best possible results. Here, I’ll walk you through the steps I take when I set up my bandsaw
for resawing.
Before we jump in, I want to point out that every bandsaw can perform some level of resawing tasks. Bigger, more powerful saws will handle larger material. That’s not to say you need a 2,000lb, 36“ bandsaw for resawing like I have. If you want one though, who am I to stop you. Heck, I’ll provide your significant other a doctor’s note saying you need one.

1 My preferred blade is a wide, aggressive Resaw King with carbide teeth.
Blade First
Choosing the right blade is one of the most critical aspects of having a good resawing experience. For resawing, the rule of thumb is that you want the widest blade with the most aggressive teeth that your saw will handle. Here, I’ve loaded my saw up with a Laguna Resaw King. It’s carbide-tipped, 1“ wide, and has variable teeth spacing. In my mind, it’s the best resaw blade on the market. They’re not cheap, but for most of us, one carbide-tipped blade will last a lifetime. They can also be re-sharpened, which is worth it. If it’s too rich for your blood, the Wood Slicer from Highland is a close second in performance.
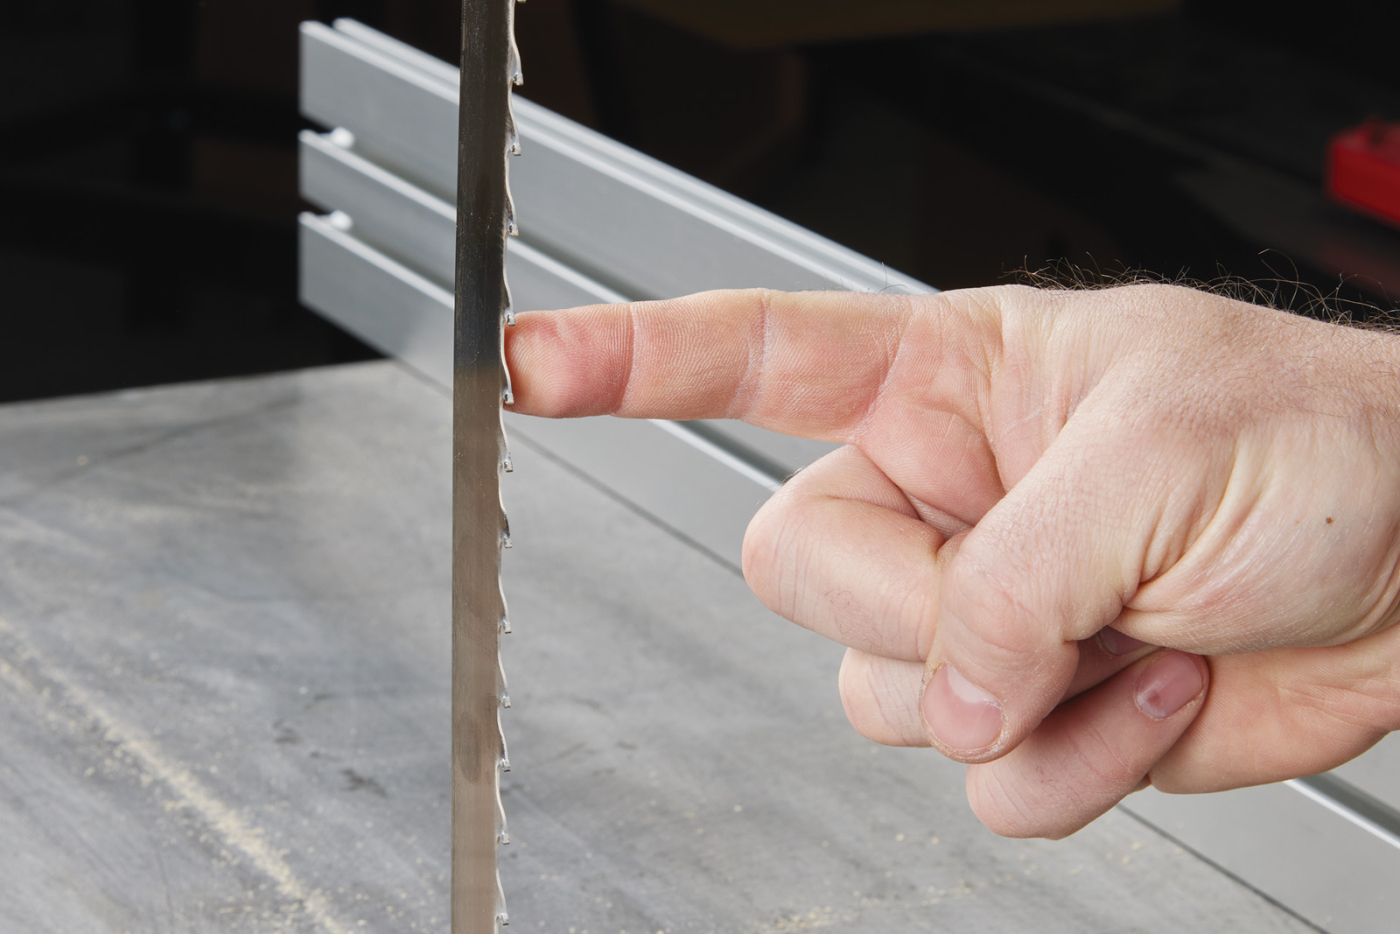
2 Set tension by feel. I tension until the blade stops fluttering as the saw runs.
I’m not going to go super in-depth on tuning up your bandsaw. But there are a few things that you need to make sure to get right. First, check that your blade tension is correct. Most modern saws have a tension gauge—just use this is a quick reference. I set my tension for resawing where I can barely deflect the blade about 1/4“ before my finger buckles. Make sure to move the guides out of the way when you’re checking this. I will also carefully run the saw with the left and right blade guards off (between the wheels) to see if there’s any blade flutter. If there is, I apply more tension. I won’t suggest you do this, but it’s what I do.

3 Make sure the blade is square to the table.
With the tension set, check the table for square. You’ll want to use a square that you trust—we can dial it in a bit later after some test cuts, but start off on a good foot here. Make sure the throat plate in the saw is at or below the table surface as well, otherwise it can throw off your squareness.

4 Set the blade guides close but not touching.
Finally, while we’re onto set up, check the blade guides. Your adjustments will be different depending if you had pads (like mine here) or ball bearings. But, the principle is the same. The idea is that the blade guides are like bumpers on a bowling alley—they’re simply there to bump the blade back on course if it drifts a little. The blade should ride completely free of the blade guides as the saw runs. I like to use a folded piece of paper to space mine out. The same goes with the thrust bearing—it should be as close to the blade as possible without touching. Notice how my guides ride right behind the gullet—you want the guides to be as close as possible to the gullet without the possibility of the teeth being pinched between the guides. Doing this will cause the teeth to lose set (or break if they’re carbide) and the blade won’t cut well, if at all.
Now the Fence
After the blade’s chosen and set up, it’s time to address the fence. Most modern saws come with a perfectly acceptable fence. My vintage Crescent saw has a stubby fence—and it’s to the right of the blade. I actually love this—it’s more natural for me to push material with my dominant (right) hand while holding it against the fence with my left. Whether right or left handed fences, the next step is the same.
For years, I’ve followed Alex Snodgrass’s bandsaw setup, and have found that I agree with his teaching that drift doesn’t need to be corrected on a correctly set up saw. With a well-tuned saw, the set of the teeth (however minor that may be) is wide enough to let the tail of the blade do what it wants regardless of “blade drift”. With that said, I haven’t been able to get this Crescent as tuned up as I’d like. I think the wheels need a bit more crown ground in them, but that’s a different problem. Here, I correct for a bit of bandsaw drift. You can see this in Photos 5 and 6 below. I start with a piece of scrap with a straight edge, and mark a line parallel to that edge. Then, being very diligent, I cut along the line the best I can. My goal here is to cut several inches, as straight as possible. Then, I stop the saw and position the blade centered within the kerf on my workpiece.

5 To set drift, use a scrap piece with a straight edge. Mark a line parallel to the straight side and cut along it, making sure to stay on the line.

6 Adjust the fence so that the fence angle matches the edge of the workpiece you just cut.
Now, bring the fence up along the straight edge of your workpiece. More than likely, it’s not going to line up perfectly. Depending on the type of saw and fence that you have, you’ll need to adjust the angle of the fence. For my crescent, it’s a pair of bolts that hold the fence rail in place on the bottom of the table. I adjust the fence so that it follows the edge of the workpiece and tighten it down. On a saw like this Crescent, I also add an auxiliary fence. I like the extra length I get on this Woodpeckers Auxiliary Rip Fence. It’s straight, and easy to remove if needed.

7 Auxiliary fences can help guide long or tall pieces as you’re resawing them.
Testing The Cut
At this point, your saw is ready to make a few cuts to see if any further adjustments are necessary. No matter what you’re resawing, start with a milled piece of lumber. The face against the fence and the edge against the table should be square to each other, so spend a minute at the jointer cleaning them up. Now, set the fence to your desired thickness. I have done it both ways—with my “good” face against the fence or with my good face peeling away from the blade. Either way works. For ultra-precise work, I’d probably set my good face against the fence.

8 Set the blade guide just above the workpiece.
Now, fire up the saw and start to cut. There’s a technique here. Use one hand to keep the jointed face flat up against the fence. The workpiece, as long as it’s square, should sit nicely along the fence. Then, your other hand is the gas that will drive the workpiece. Steady constant feed pressure will help ensure a smooth cut.
As I mentioned, resawing is a big task for a saw. But, it shouldn’t be a lot of work for either you or your saw. I you have to push really hard, something’s out of wack. Check the blade sharpness followed by the drift. Sometimes, the workpiece can create a wedging action against the fence if it’s out of wack. Likewise, if your saw is sounding like it’s bogging down, slow down your feed rate. You’re not racing through these cuts as fast as possible. The wider the piece, the slower you want to go. I’ve found that a good way to judge if you’re feeding at the right rate is by the amount of dust escaping around the saw. Your blade’s gullet and dust collector should keep up with the sawing rate. If you notice excess dust coming out, you’re probably feeding too fast and not letting the saw gullet carry away the dust.

9 Use a push pad to keep your fingers clear of the blade as you exit the cut.
As you get to the end of the cut, make sure you have a push pad close at hand. I like to grab it for the last few inches. Ideally, your push pad will have a “heel” on it to grab the workpiece. If you’re doing thin veneers, you may be better off with a flat push pad.

10 While using a micrometer may seem silly, having the actual measurements tell the story of how the saw is cutting, and help you make adjustments.
Now comes the inspection. How does the resawn piece look? It will have saw marks, but it should not have excessive chatter (this is where the carbide teeth of the Resaw King really shine). Is it a uniform thickness across the piece? Often, I’ll grab a set of micrometers to check and see how close I am (especially for super expensive material). As you can see in the photo on the next page, these are the measurements of each of the corners. Each corner is within a couple of thou of each other. I don’t think you could ask for much more when it comes to woodworking. However, they do tell a story. The top edge of my veneer is slightly thinner than the bottom—both on the lead edge as well as the tail. This means that the top needs to tilt toward the blade ever so slightly. For this 6“ wide piece, I wouldn’t mess with it. However, on a taller piece it would become more noticeable.
Likewise, the tail end is a hair fat, and the fence could use adjusted slightly towards the blade. For small adjustments like this, I would just slightly loosen the appropriate knobs or bolts and tap the table and fence a bit with a dead-blow mallet. Then, make another test cut. It may seem like a tedious process, but once you have your saw dialed in, you’ll find that resawing may just become your favorite way to use your bandsaw.
Here are some supplies and tools we find essential in our everyday work around the shop. We may receive a commission from sales referred by our links; however, we have carefully selected these products for their usefulness and quality.


