We may receive a commission when you use our affiliate links. However, this does not impact our recommendations.
There are lots of excuses for not using dovetails; cutting them by hand takes time, patience, and lots of practice. A dovetail jig is relatively fool proof, but if you don’t use it regularly, be prepared for an hour or so of re-learning each time you use it. Also, dovetail jigs are expensive; particularly those that are capable of cutting dovetails with variable spacing, to give a hand-cut look.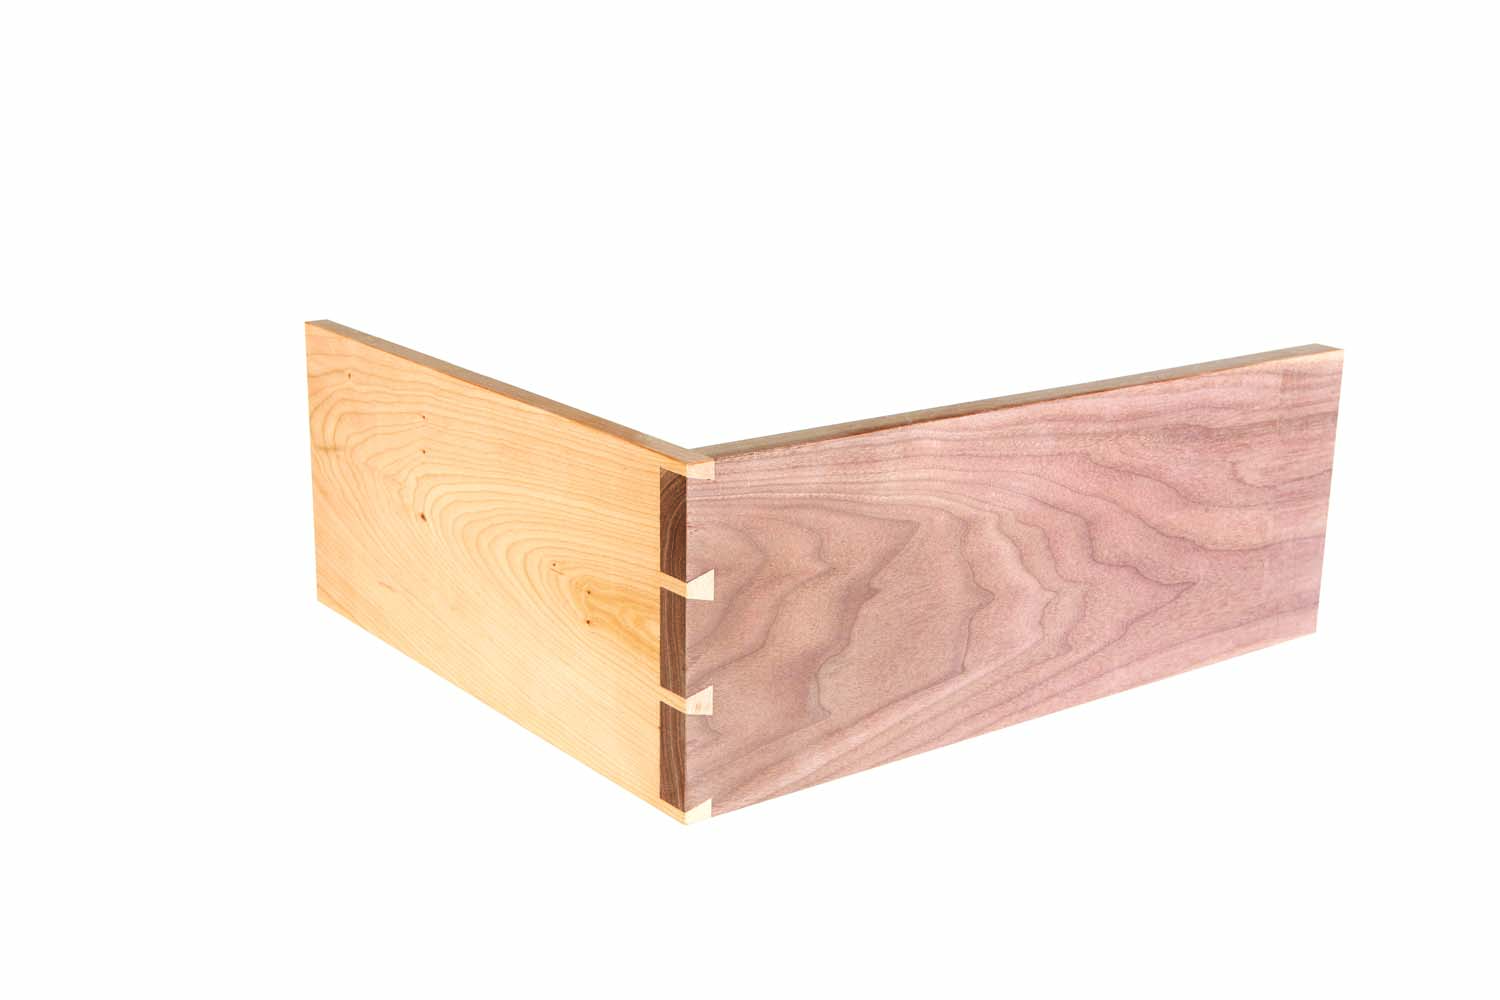
This router table method lays waste to all the excuses; it’s easy, accurate, and inexpensive. All you need are two router bits, and two sleds for your router table. Layout and cutting is straight forward, and you can cut variably-spaced dovetails!
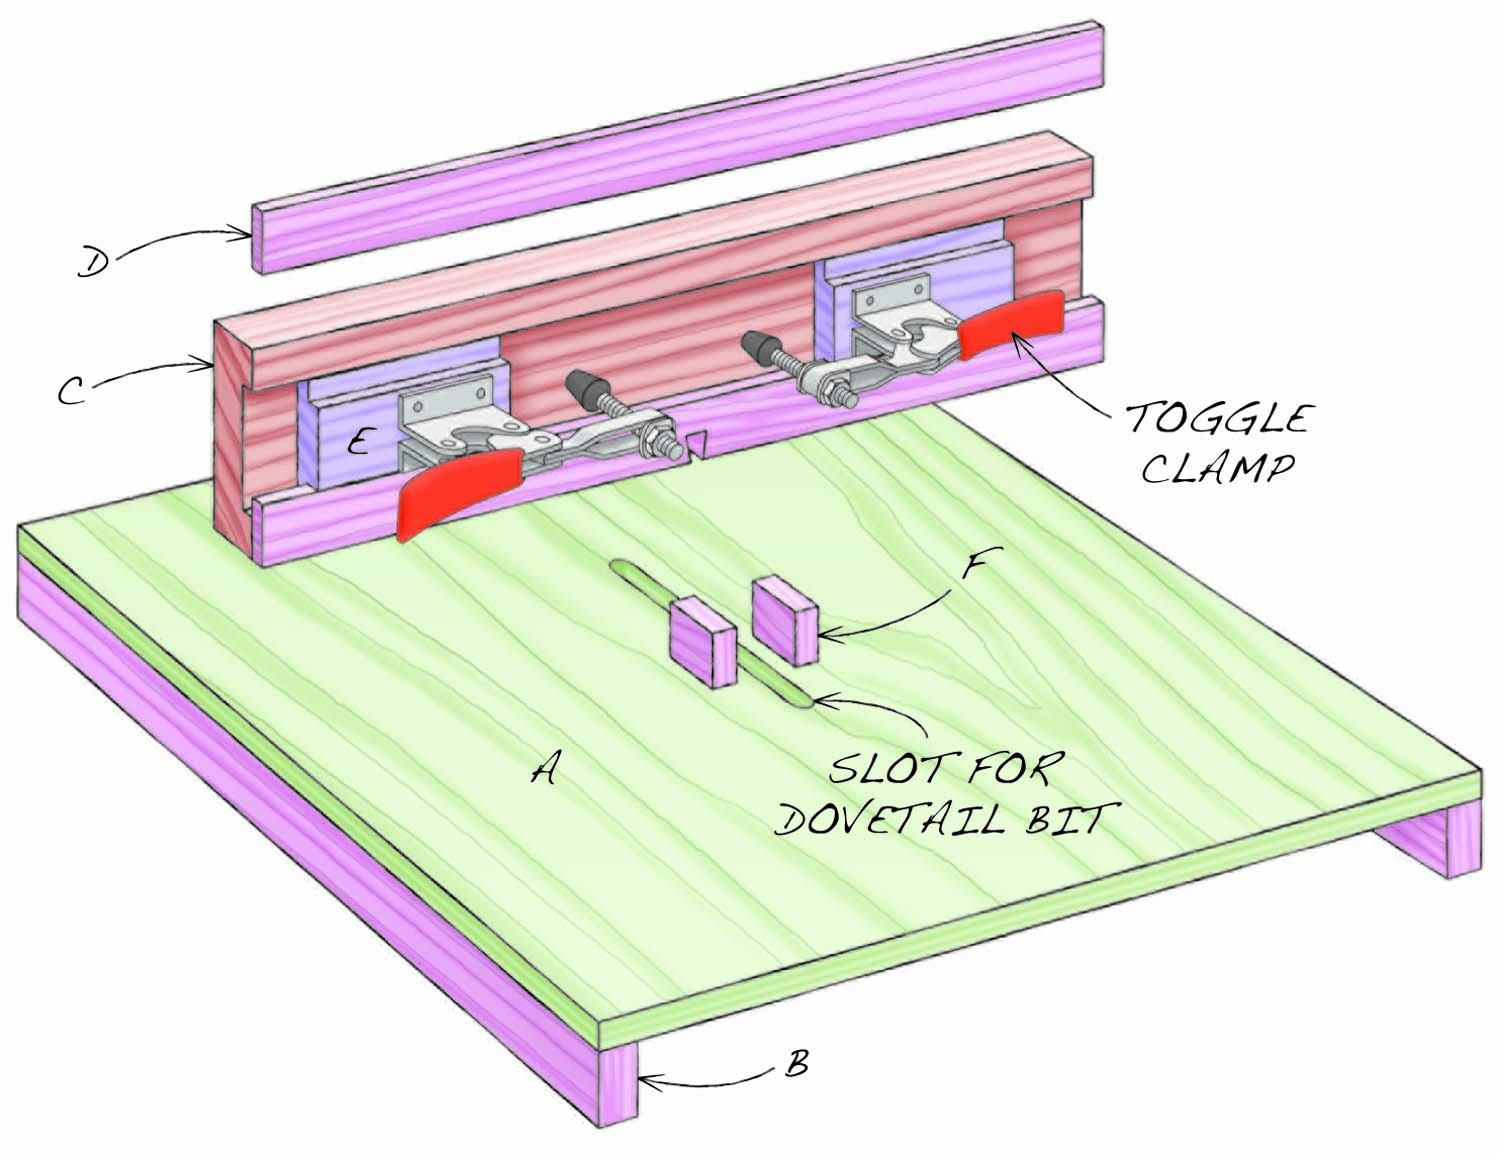
Fig. A. Tail Sled

Fig. B. Pin Sled
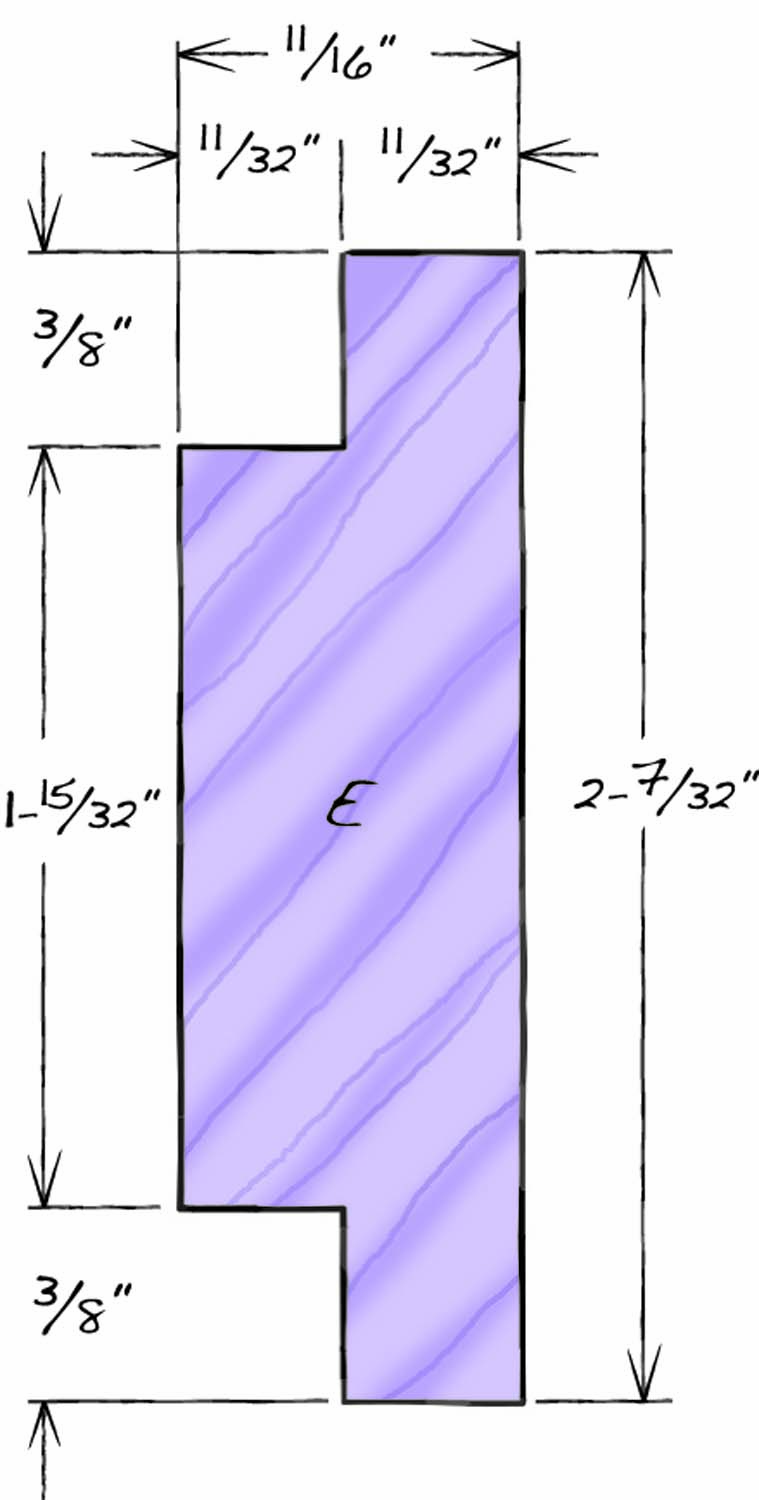
Fig. C. Sliding Clamp Block Detail
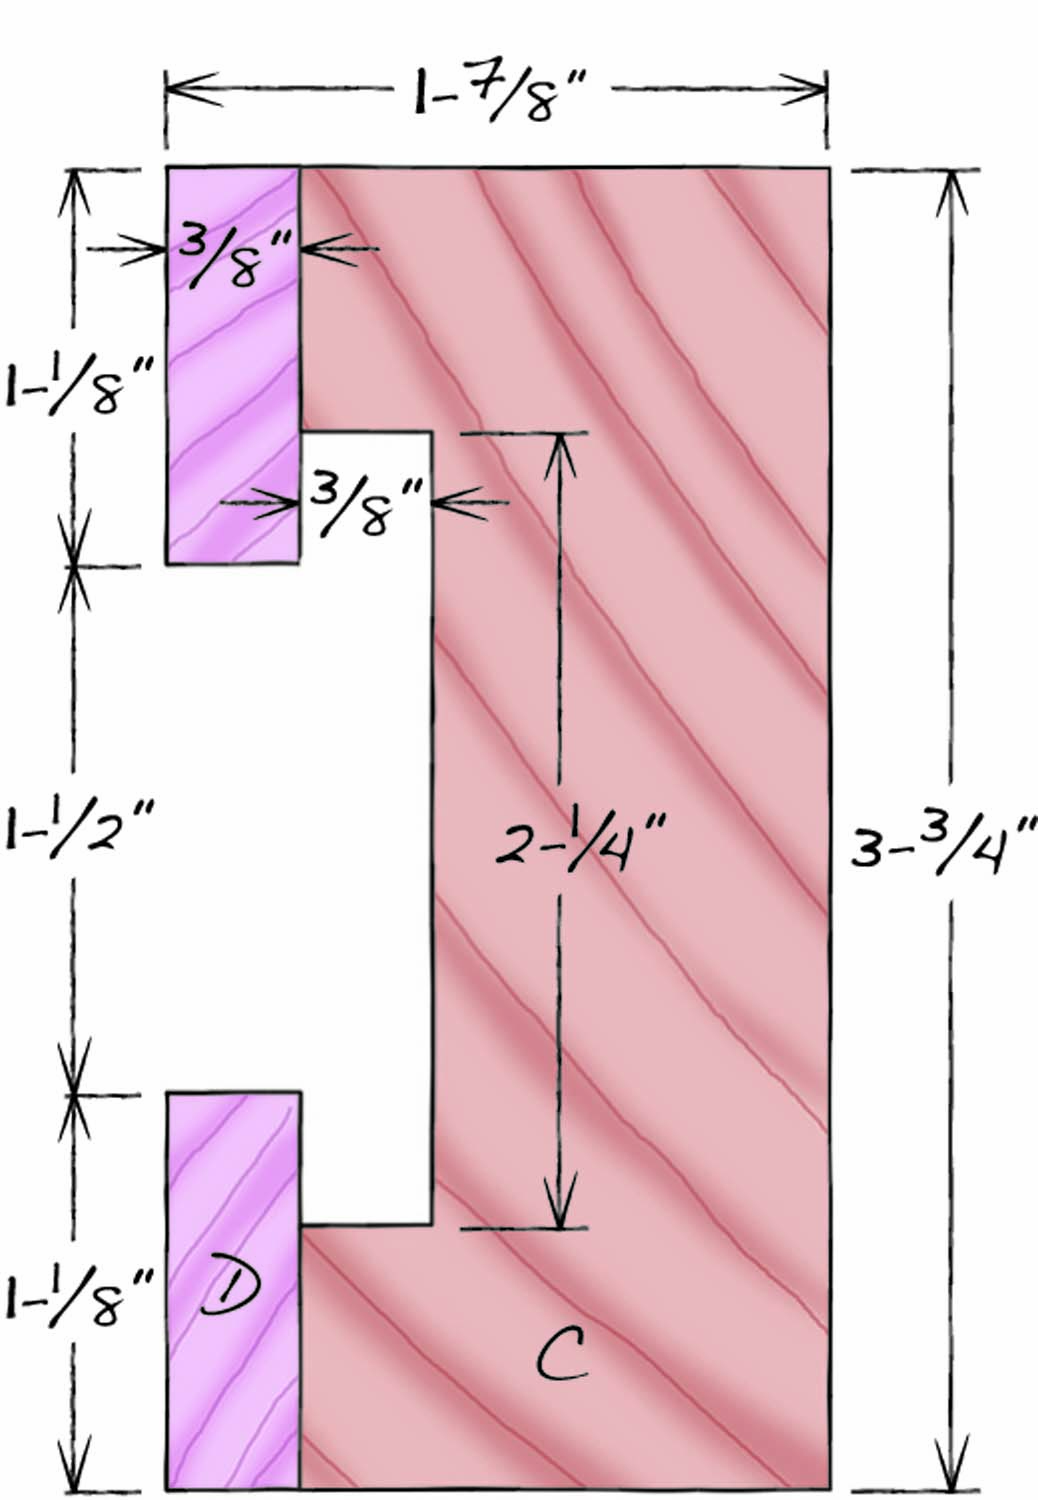
Fig. D. Fence Detail
Make Two Sleds
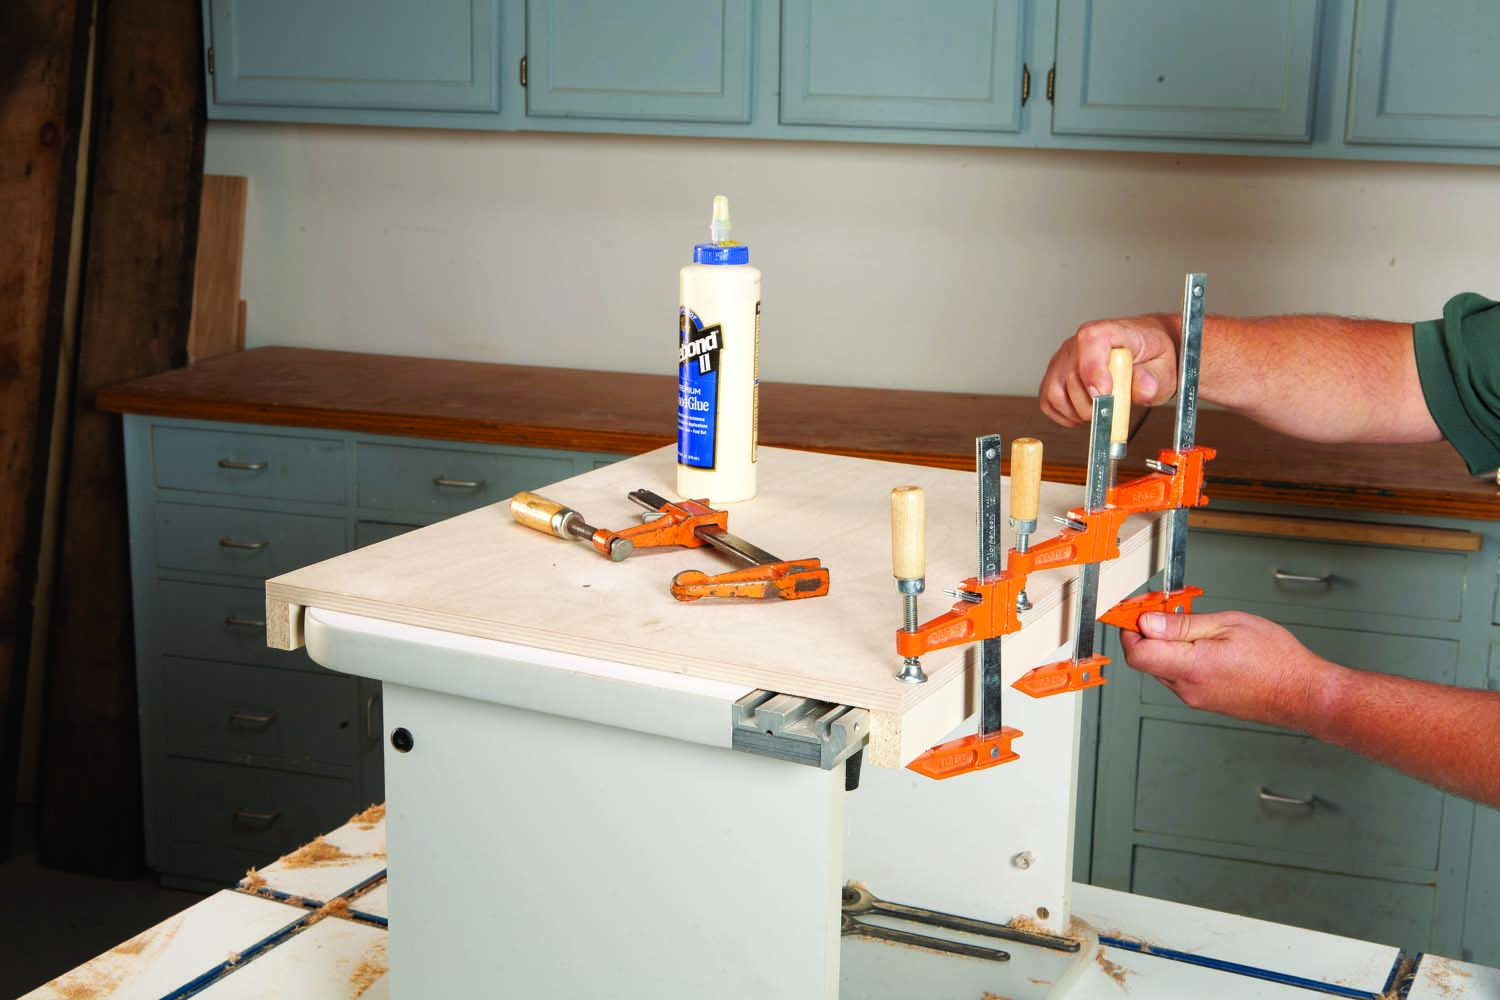
Photo 1. Attach side rails to both bases. These rails allow the sleds to slide on the router table without any side-play.
The two sleds (Fig. A & B) must be custom fit to your router table, so use the cutting list as more of a parts index. As long as your router table has two parallel sides, you’re good to go. Cut the bases (A) the same length as and 1-1/2″ wider than your router table’s top. The extra width allows you to attach the rails (B) to the underside of each base. When you attach the rails, squeeze them against the sides of your router table slightly (Photo 1). They should be snug enough to eliminate any play, but still allow the sled to move easily.
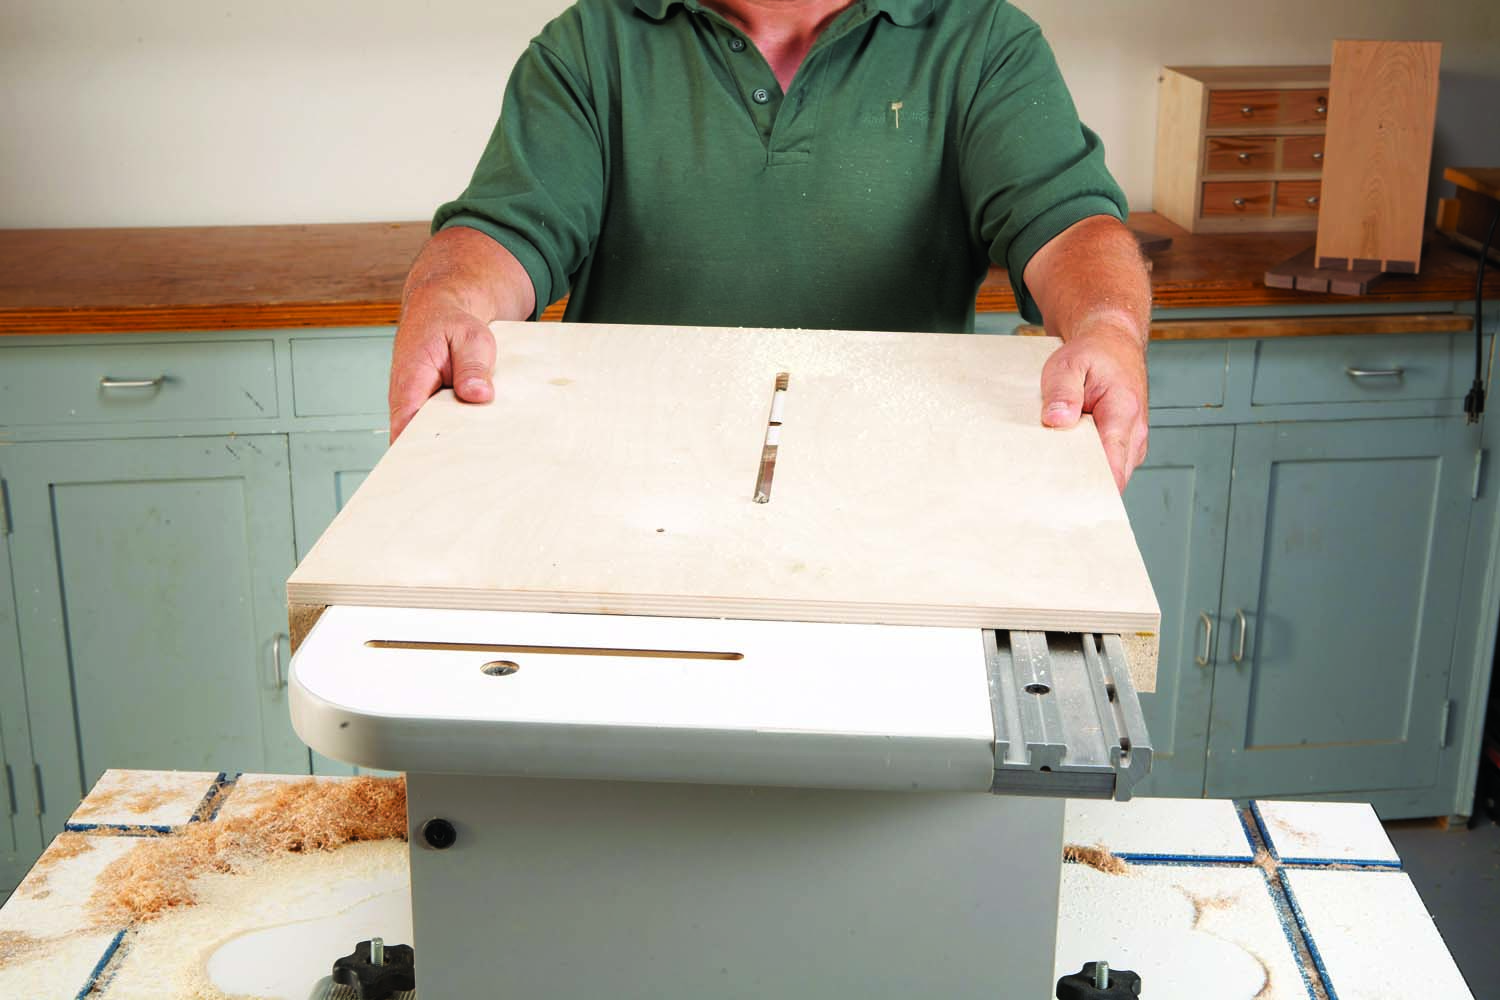
Photo 2. Rout the pin sled’s slot with the bit you’ll use for routing the pins. Rout the tail sled’s slot wide enough to allow clearance for the dovetail bit’s flared end.
Use your router table to cut a slot in each sled (Photo 2). For the tail sled (that’s the one you’ll use with the dovetail bit), make the slot wide enough for the flared end of your dovetail bit to pass through the slot. For the pin sled (that’s the one you’ll use with a straight bit), cut the slot using the same bit you’ll use for cutting the pins. This slot is really the key to the accuracy of this method because it shows exactly where the bit will cut.
Make the fences
These fences are just giant wooden T-tracks. You’ll need three of them. Use a dado set or router to cut the wide groove in the fence body (C and Fig. C) and then glue on the keeper rails (D). When the glue is dry, check to make sure the fences are flat and square. If they’re not, take the time to true them up on your jointer.
Next, mill one long board for the sliding clamp blocks (E and Fig. D) and cut both blocks from it. Attach a toggle clamp to each block. You only need two clamp blocks. Just move them from fence to fence as you work.
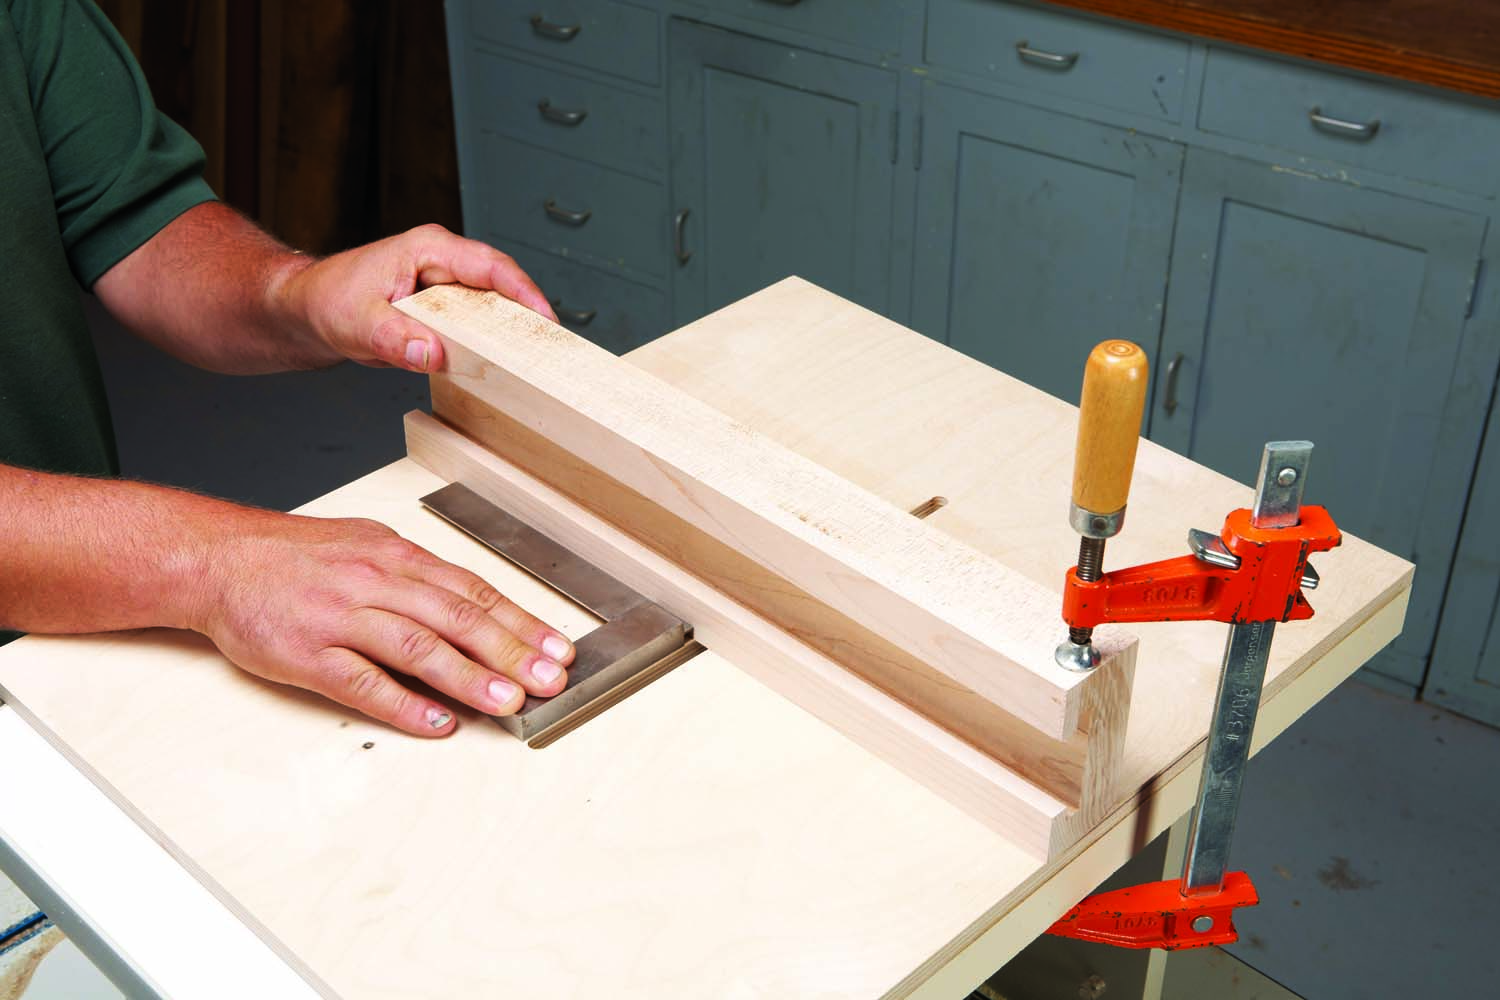
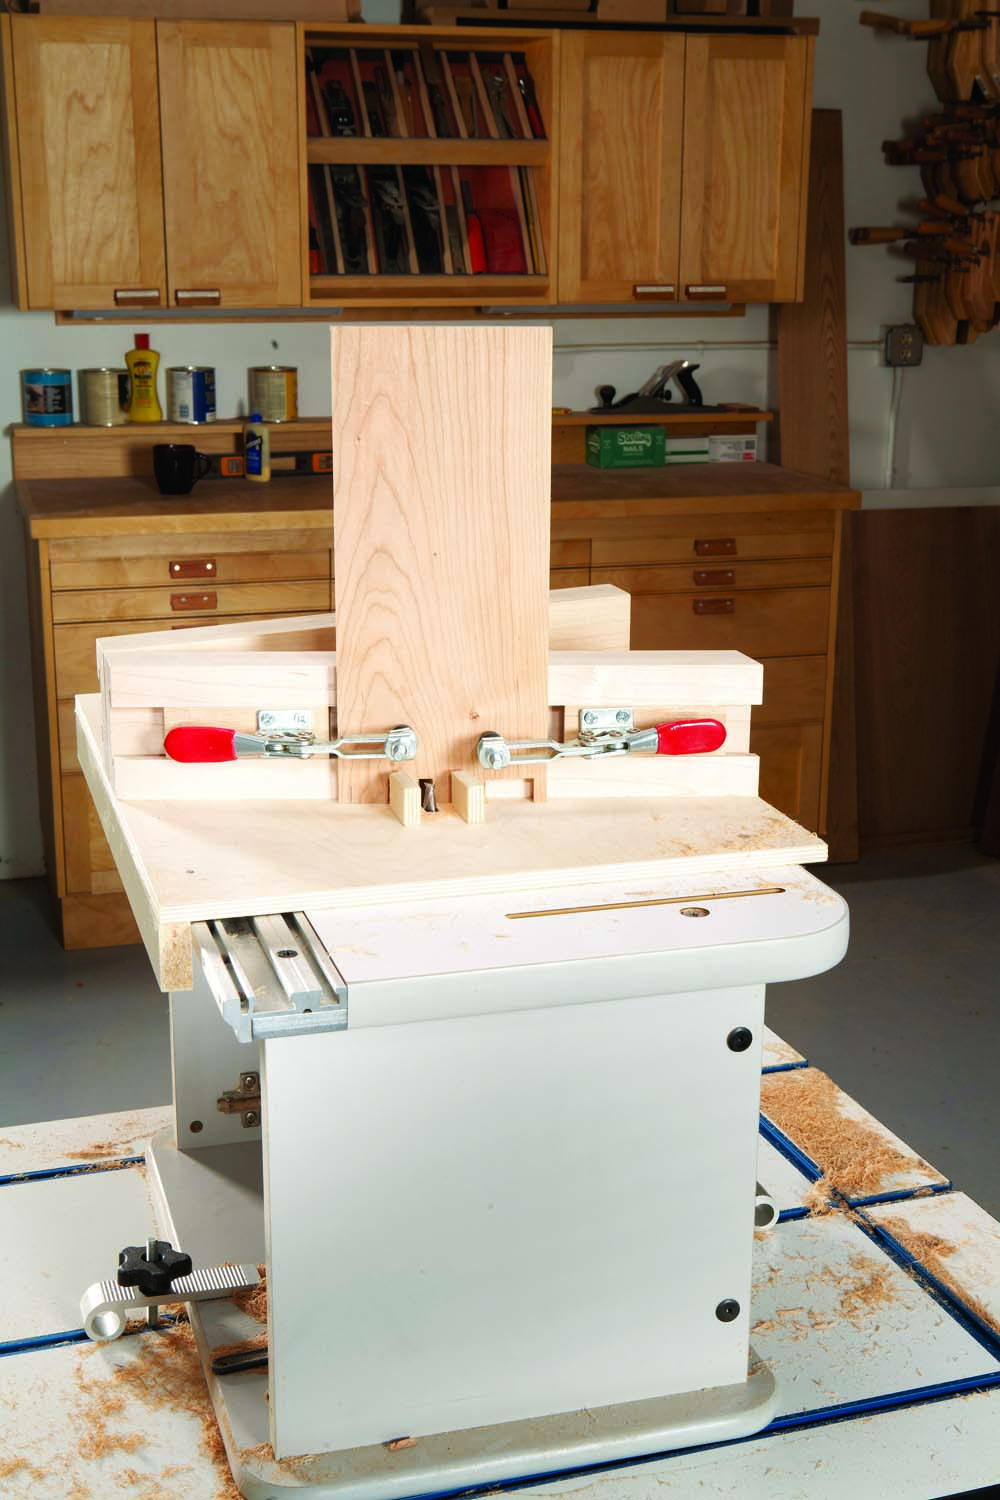
Photo 3. Square the tail sled’s fence to the slot. Clamp it in place, and then attach it from underneath using screws.
Loosely clamp one fence to the tail sled. Use a square to align the fence exactly perpendicular to the sled’s slot, and then tighten the clamps (Photo 3). Turn the sled upside down and screw the fence in place. Don’t use glue, just in case you need to make adjustments.
The pin sled uses two fences, both set at the same angle as your dovetail bit. You can use any dovetail bit you like. A shallow angle – anywhere from 6°-8° – looks the most like hand-cut dovetails. I used a 14° bit, because that’s what I had on hand.
I used the rise over run method to mark the angles on my sled, as it’s more accurate than a small protractor. If you don’t know how to convert an angle to rise over run, use this handy calculator at http://www.blocklayer.com/riserun.aspx.
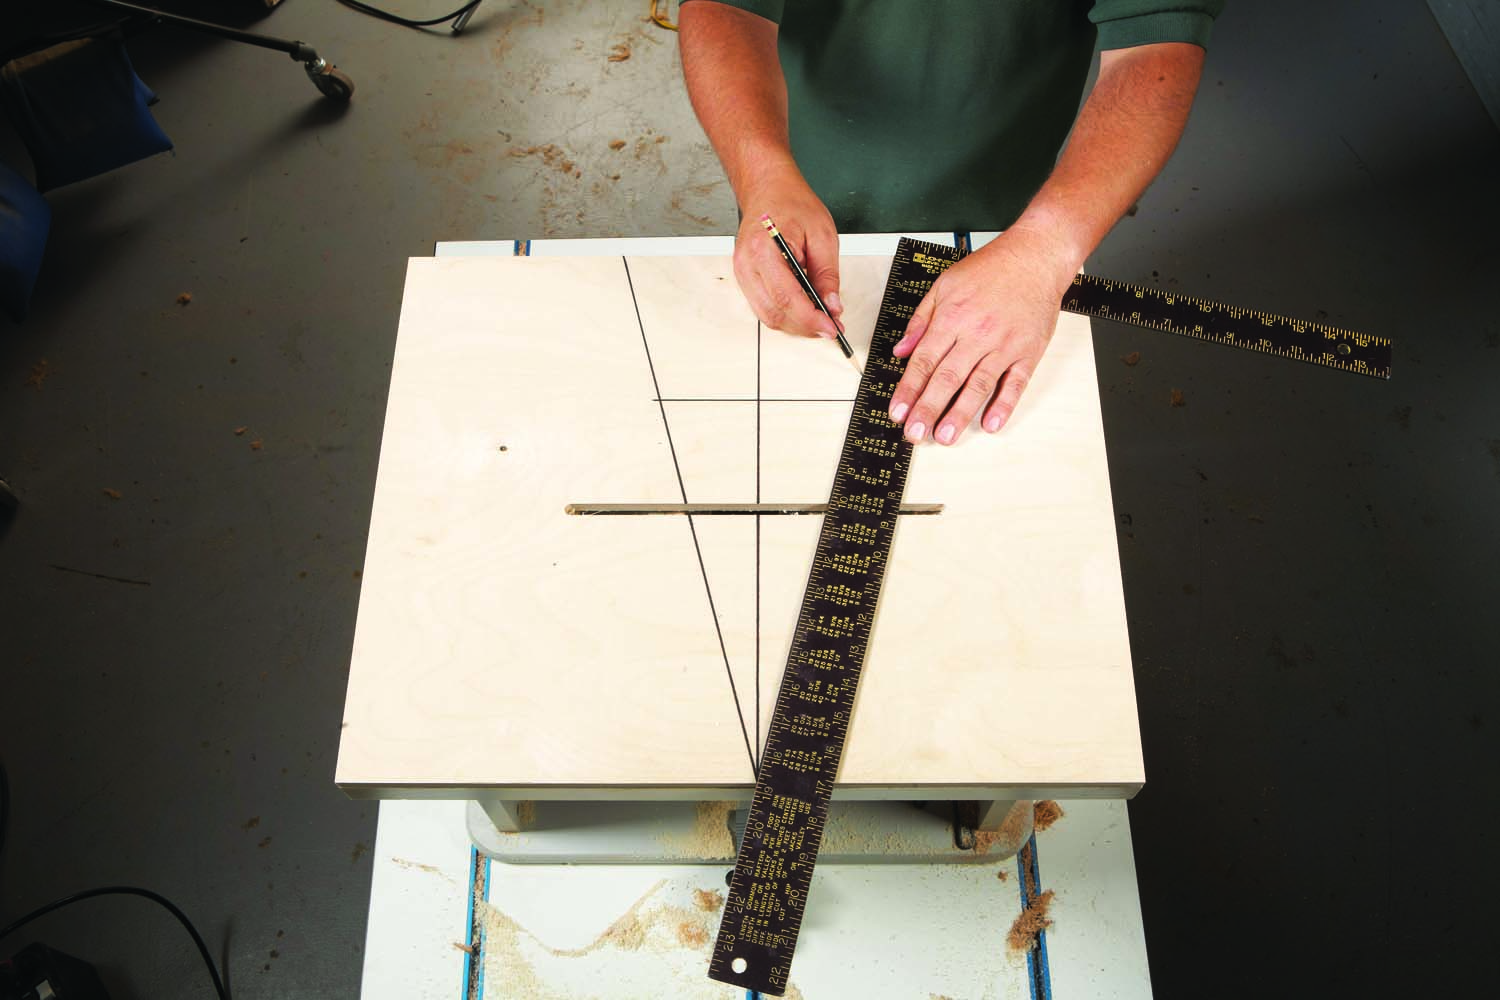
Photo 4. Lay out the pin sled’s fence angles, matching the angle of each fence to your dovetail bit’s angle. In this case, 3″ of rise over 12″ of run equals 14°.
To use your rise over run figures, mark a center line across the sled, 90° to the slot. Make a mark on the center line 12″ from the sled’s edge. Make another mark 3″ out from this point, 90° from the center line. Connect that mark with the end of the center line for a perfect 14° angle (Photo 4).
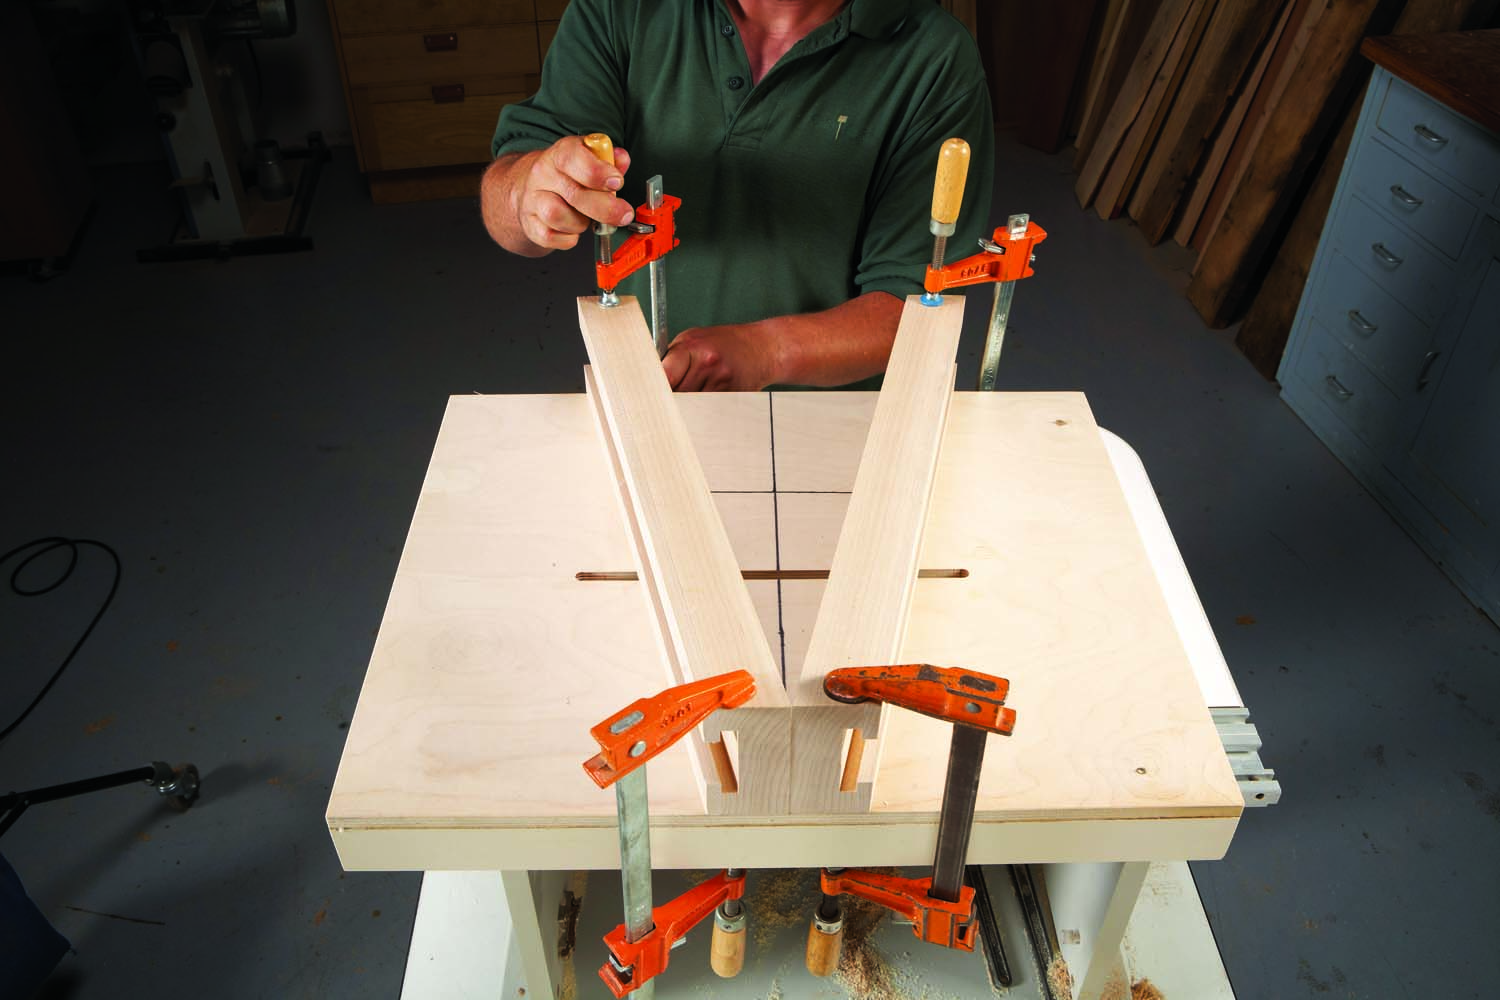
Photo 5. Clamp the fences on the layout lines and attach them with screws.
Cut the fences to length and clamp them to the base; one on each angled line. Attach the fences with screws, like you did the tail sled’s fence (Photo 5). Glue bit guards (F) to both sleds in front of each fence, on both sides of the slots. Leave enough clearance between the fences and the bit guards for your stock. The bit guards add a small degree of safety, but they’re mainly a reminder to keep your fingers out of the danger zone.
Cut the tails
Install your dovetail bit and place the tail sled on your router table. In order to raise the bit sufficiently beyond the sled, you probably won’t be able to bottom out the bit in your router’s collet.
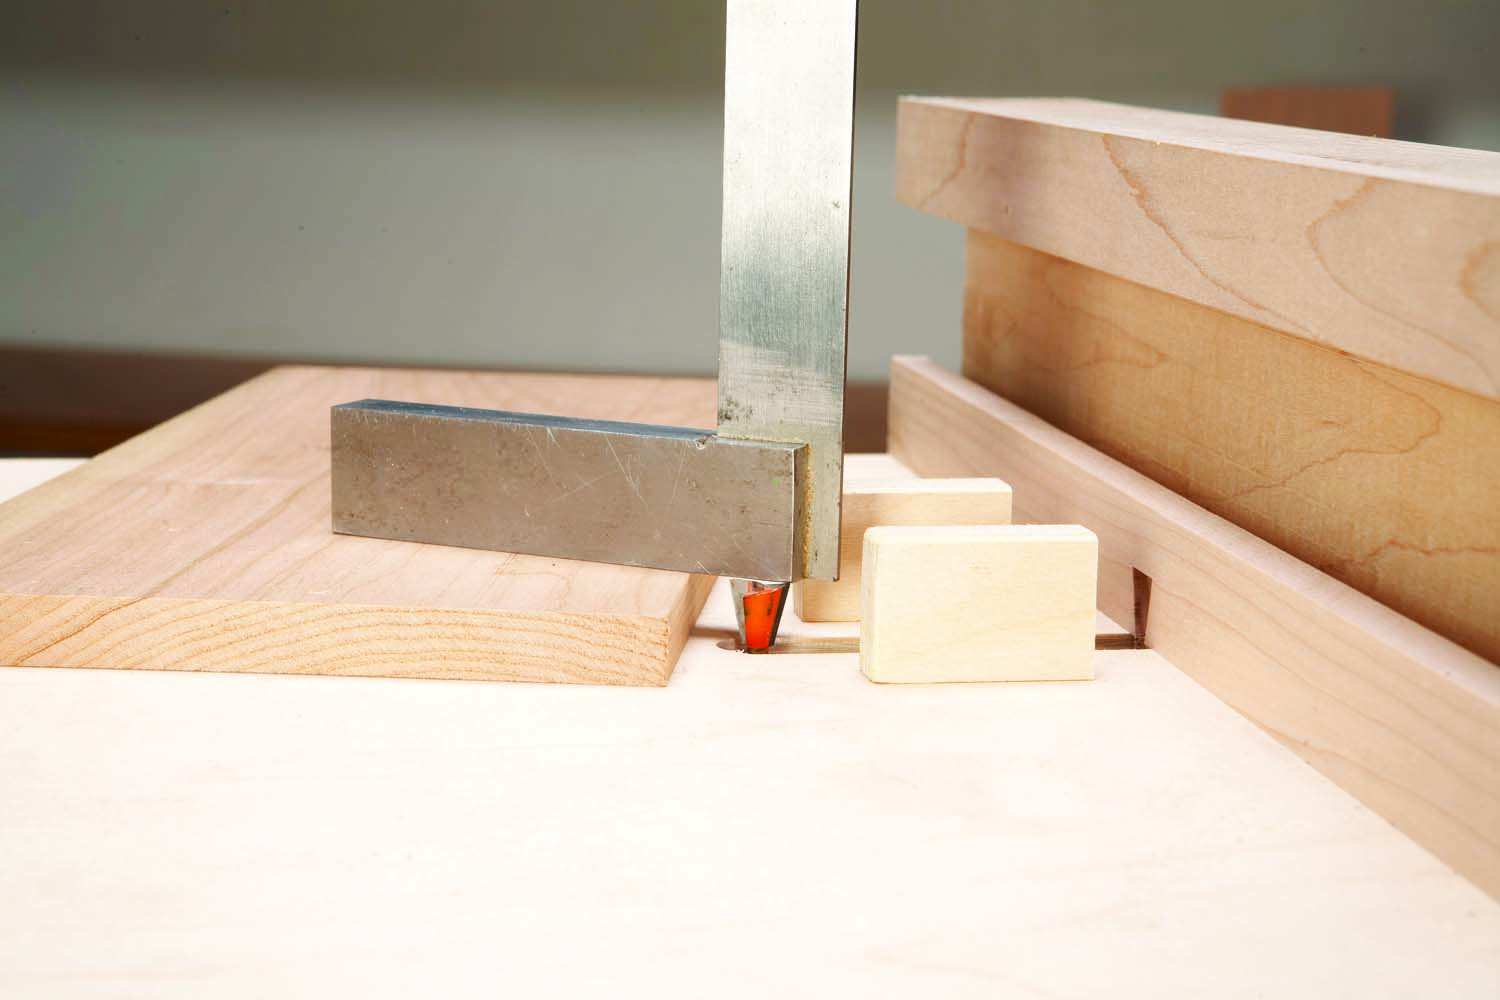
Photo 6. Set the dovetail bit’s height to match the thickness of the pin board.
Set the bit’s height to your stock’s thickness using a straight edge (Photo 6). If your pin board and tail board are different thicknesses, set the bit’s height to the thickness of the pin board. That’s it; you’re ready to start routing tails.
The beauty of this method is that you can space the tails out however you wish. You don’t have to mark the tails on the board, but I like to sketch them in so I know what the finished joint will look like.
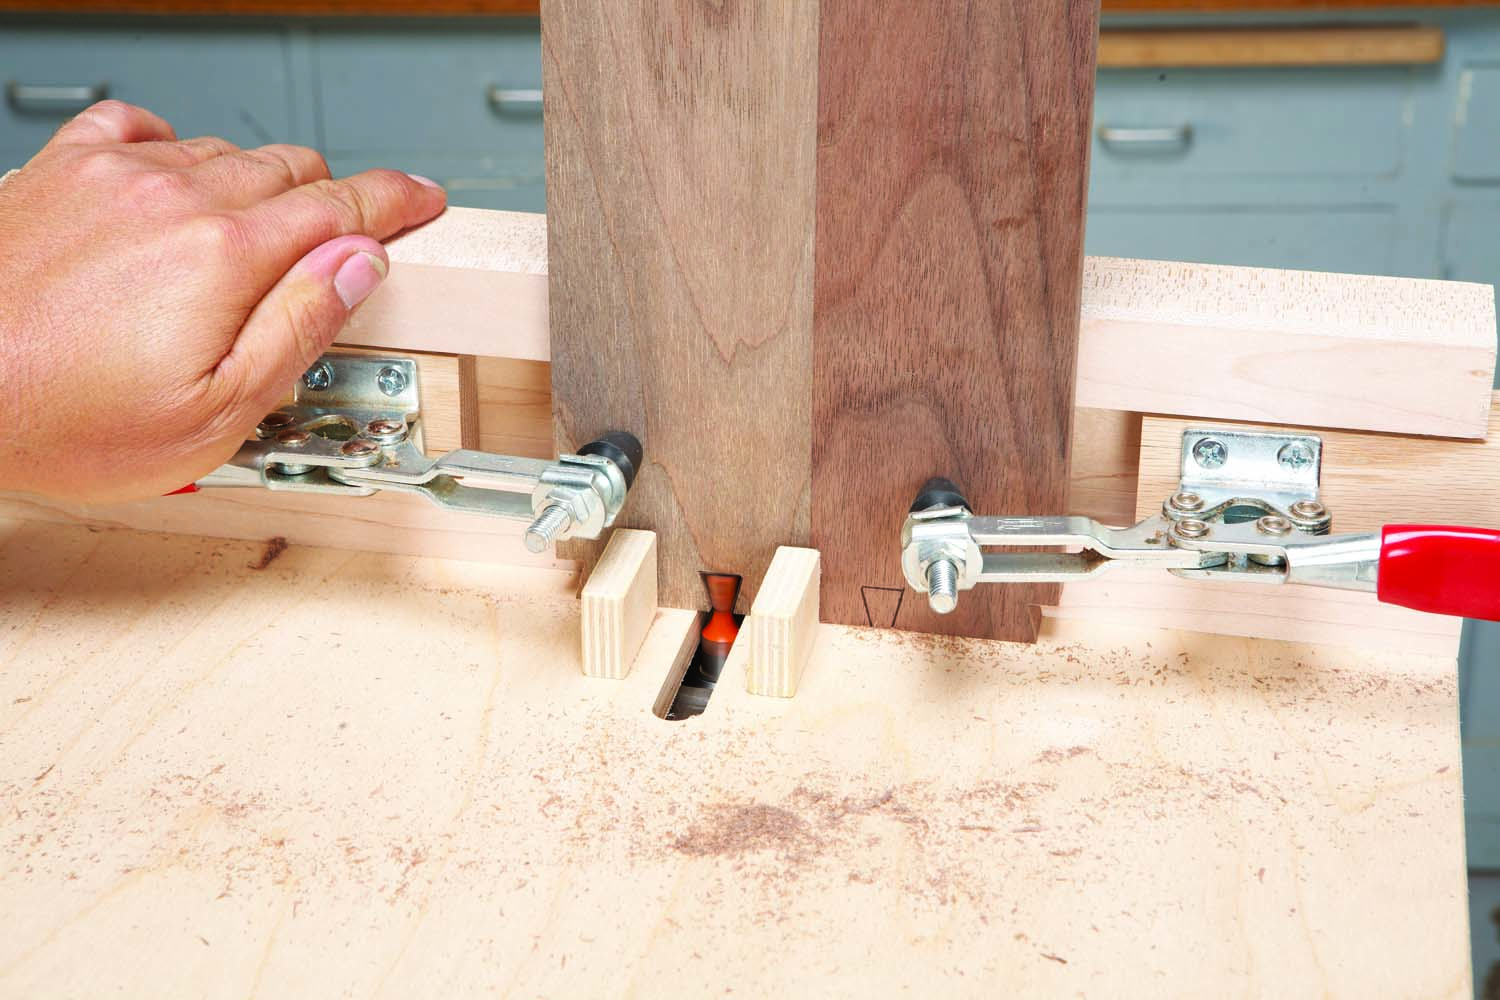
Photo 7. Rout the tails using whatever spacing you wish. It’s helpful to sketch the layout on the board first.
I cut the outer half-pin spaces first, and then the interior pin spaces, but the order isn’t important. Position your tail board, clamp it to the fence and rout each pin space to create the tails (Photo 7).
Cut the pins
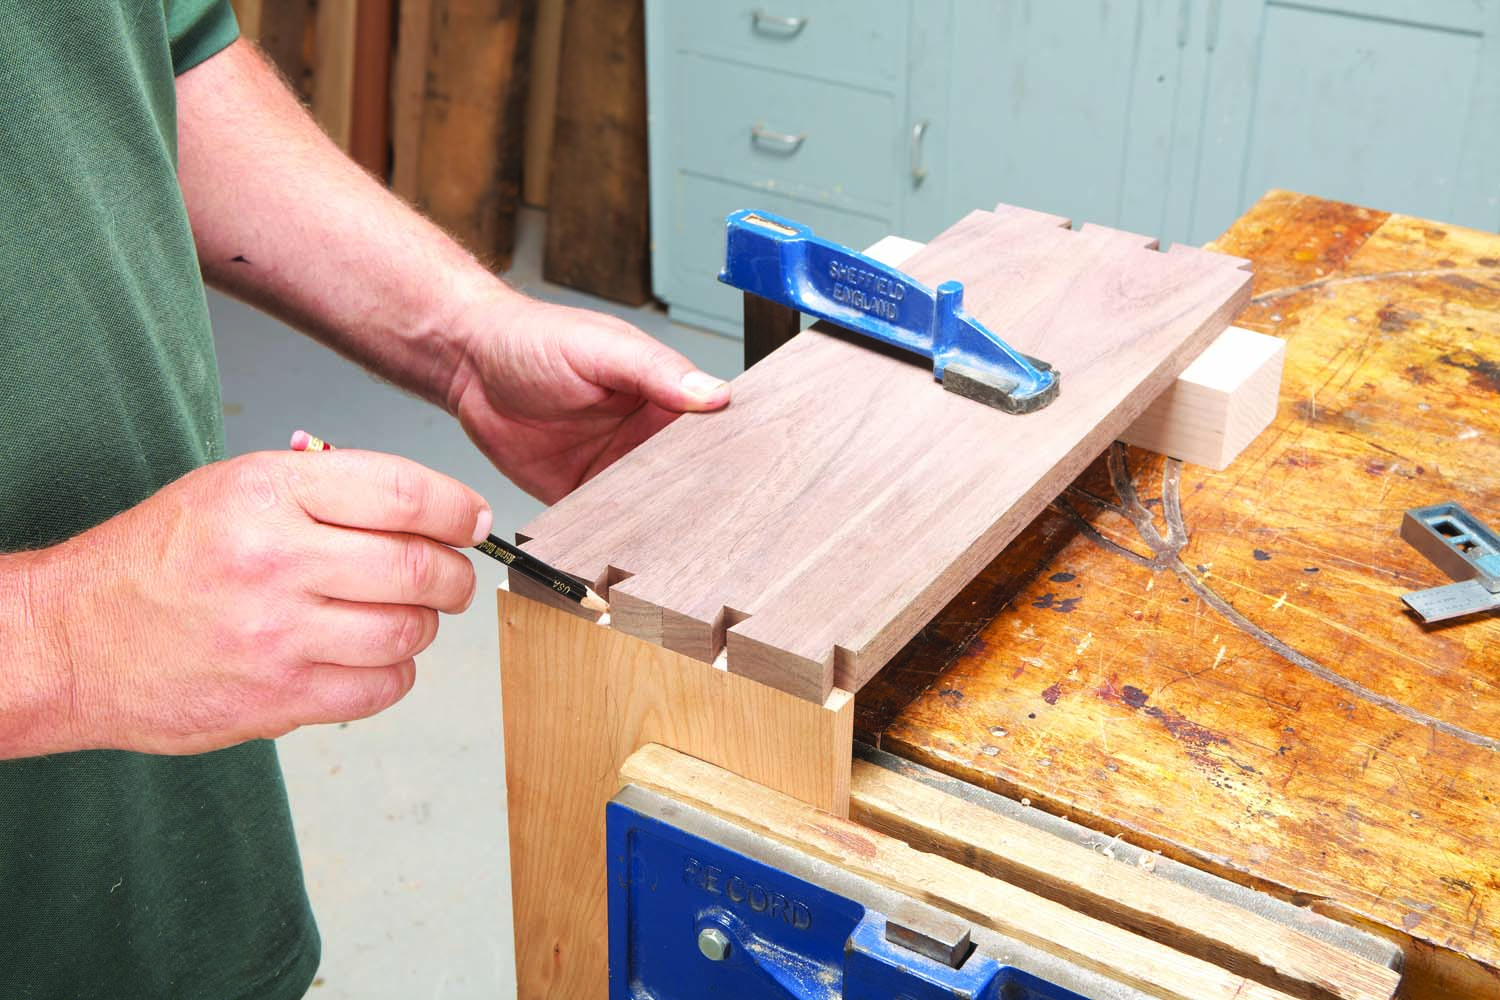
Photo 8. Mark the tails on the pin board’s end. These marks are just a handy visual reference, as it’s easy to get confused when you’re routing the pins.
Clamp the tail board in a vise with its end extending above the bench’s top the same height as a spacer block. Slide the spacer block to the pin board’s end, clamp the pin board near its center, and mark the dovetails on the pin board’s end (Photo 8). Strictly speaking, these marks aren’t necessary, but they’re nice to have as a reference when you’re orienting the pin board on the sled. Make a mark on each board to indicate its outer face.

Photo 9. Extend lines from the edges of each tail onto the pin board’s outer face. These are your layout marks for routing.
With the pin board and tail board clamped in place, transfer the edges of the dovetails to the pin board’s outer face (Photo 9).
Pro Tip 1
Traditionally, dovetails were cut slightly proud and then planed flush after assembly. This isn’t necessary here, so when you’re marking the pin board, clamp its face flush with the tail board’s end. This way, you can use a square to transfer your marks directly from the tails.
Install the bit you used to cut the pin sled’s slot, and swap the tail sled for the pin sled. Set the bit’s height to the tail board’s thickness.
Pro Tip 2
A spiral up-cut bit is perfect for this application. Because of the direction the cutters spiral around the bit, it actually pulls the workpiece towards the router’s base which, in this case, is down.
Since you only mark pin board’s outer side, that’s the side you’ll have facing out. Draw an orientation mark on the sled so you always know on which side of the slot to position the pins. If the pin is to the left of the slot on one fence, it’ll be to the right of the slot on the other fence.
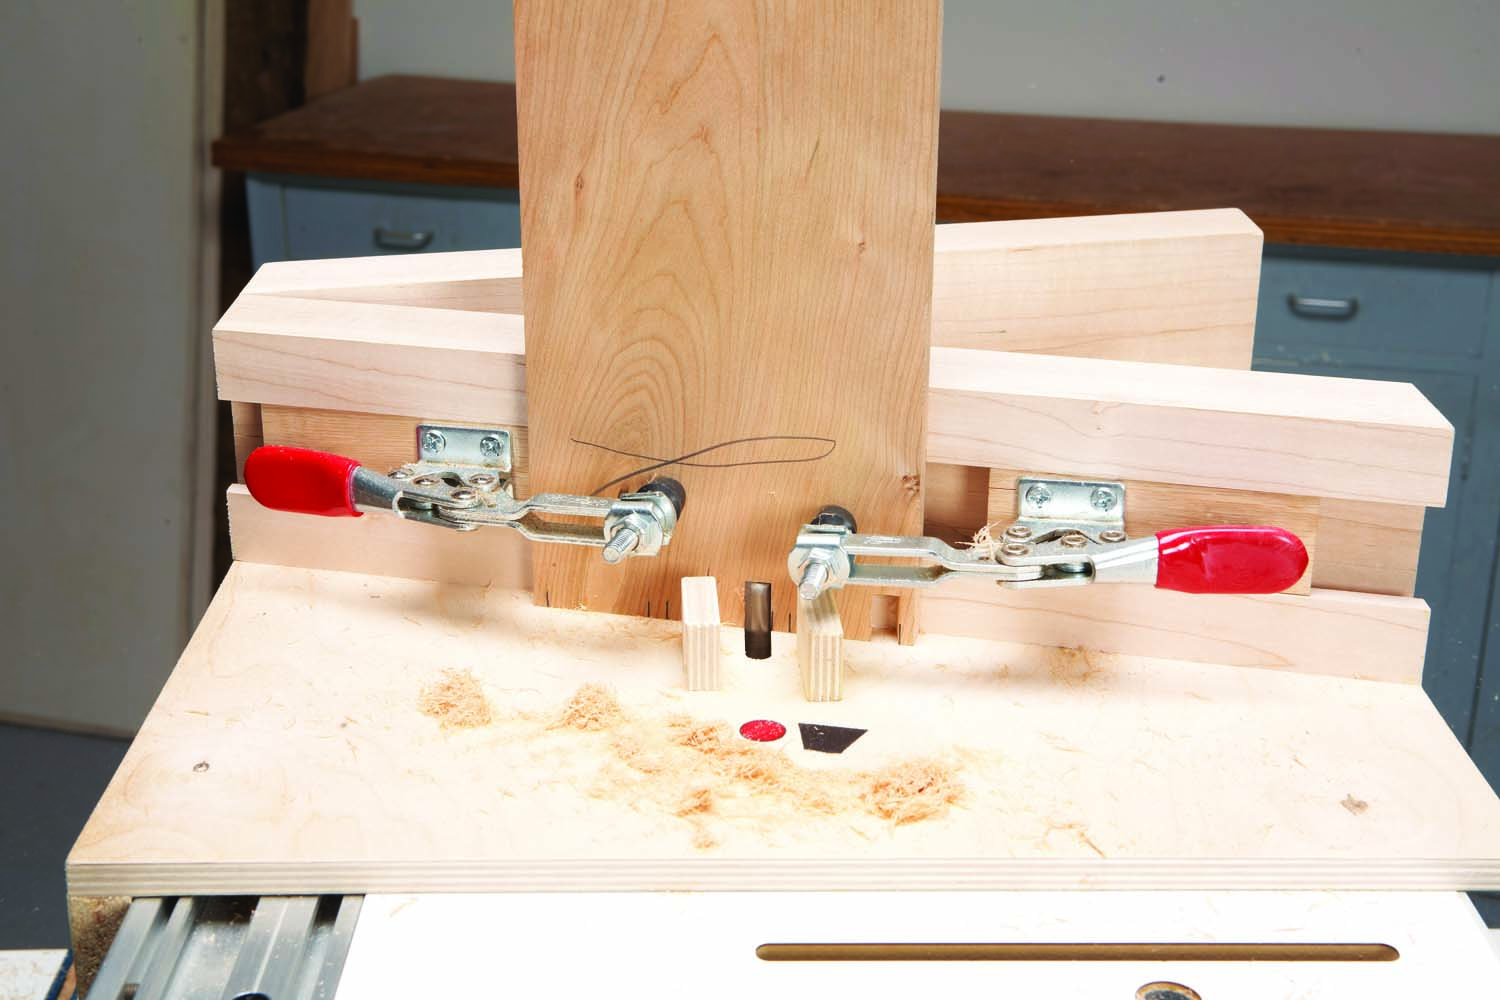
Photo 10. Align the layout marks with the slot’s edge and rout one side of each pin. Mark the pin/bit relationship in front of each fence to ensure that you rout on the correct side of the pins.
Starting on either fence, align each pin’s edge mark with the edge of the slot and rout one pass (Photo 10). To start with, cut a little wide of the mark and sneak up on the line. Check the cut against your tail board after each cut. After you rout a couple pins, eyeballing their alignment with the tails, you’ll quickly learn whether to leave your layout marks visible, cut them off, or split them. A perfect fit is the goal, so leaving the pins slightly large is okay.

Photo 11. Check your cuts against your reference marks on the pin board’s end to make sure everything is correct.
After routing the first side of all the pins, check to make sure everything is oriented correctly (Photo 11). Now move to the opposite fence and rout each pin’s other side. Rout out any remaining waste by repositioning the pin board and routing another pass, repeating until all the waste is cleaned out (Photo 12).
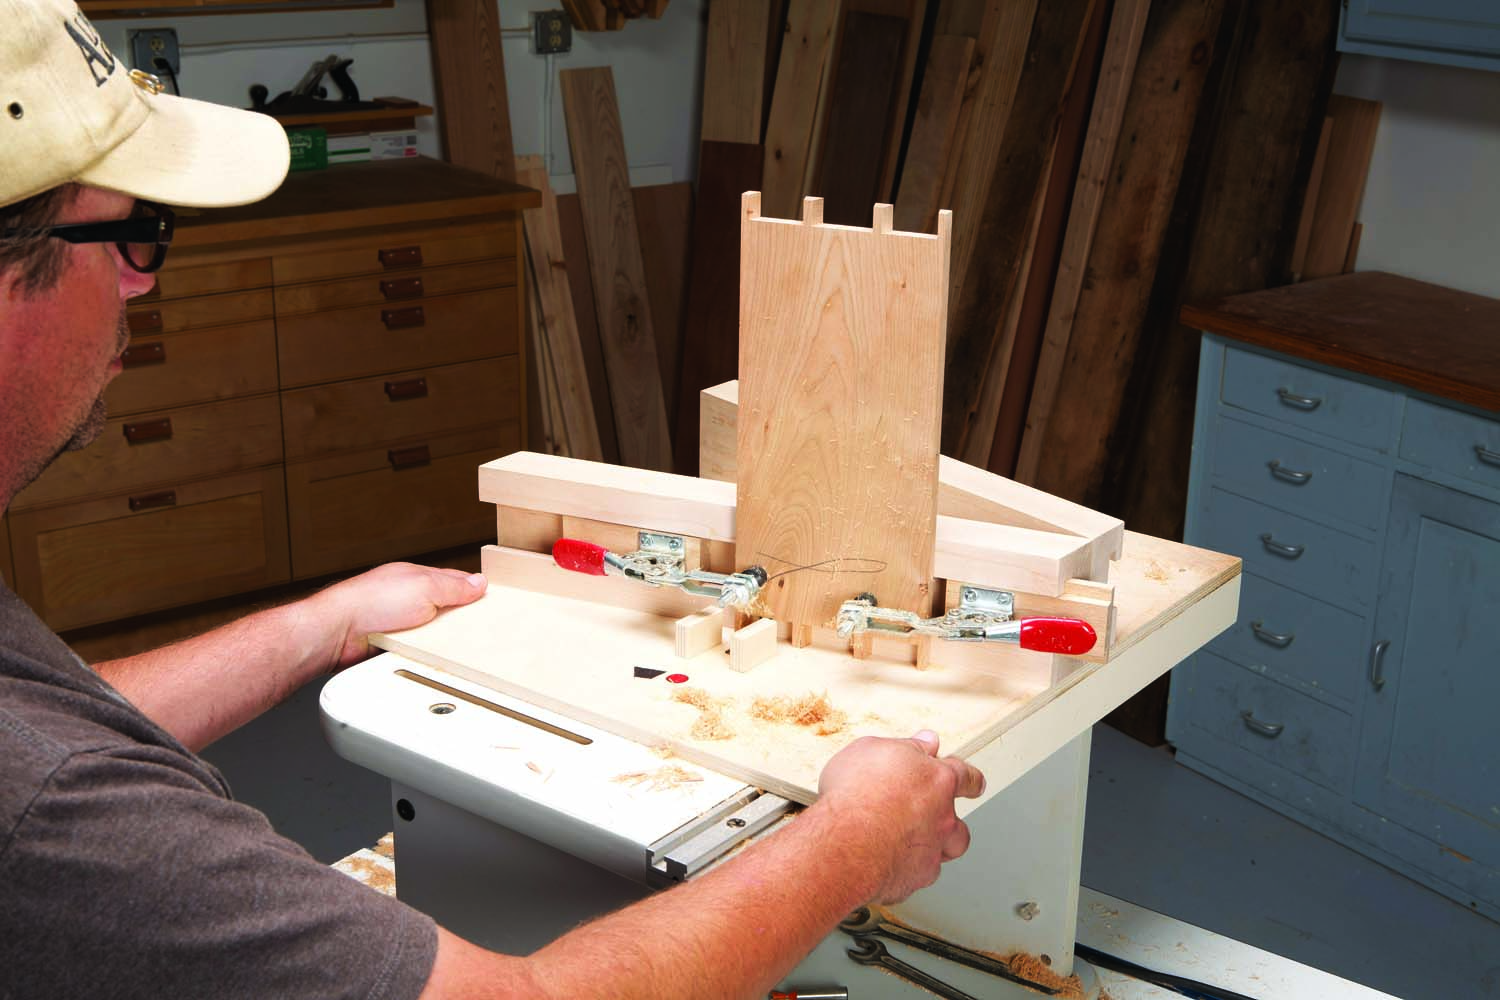
Photo 12. Rout the other side of each pin and clean out the rest of the waste using the sled’s opposite fence.
Assemble the joint
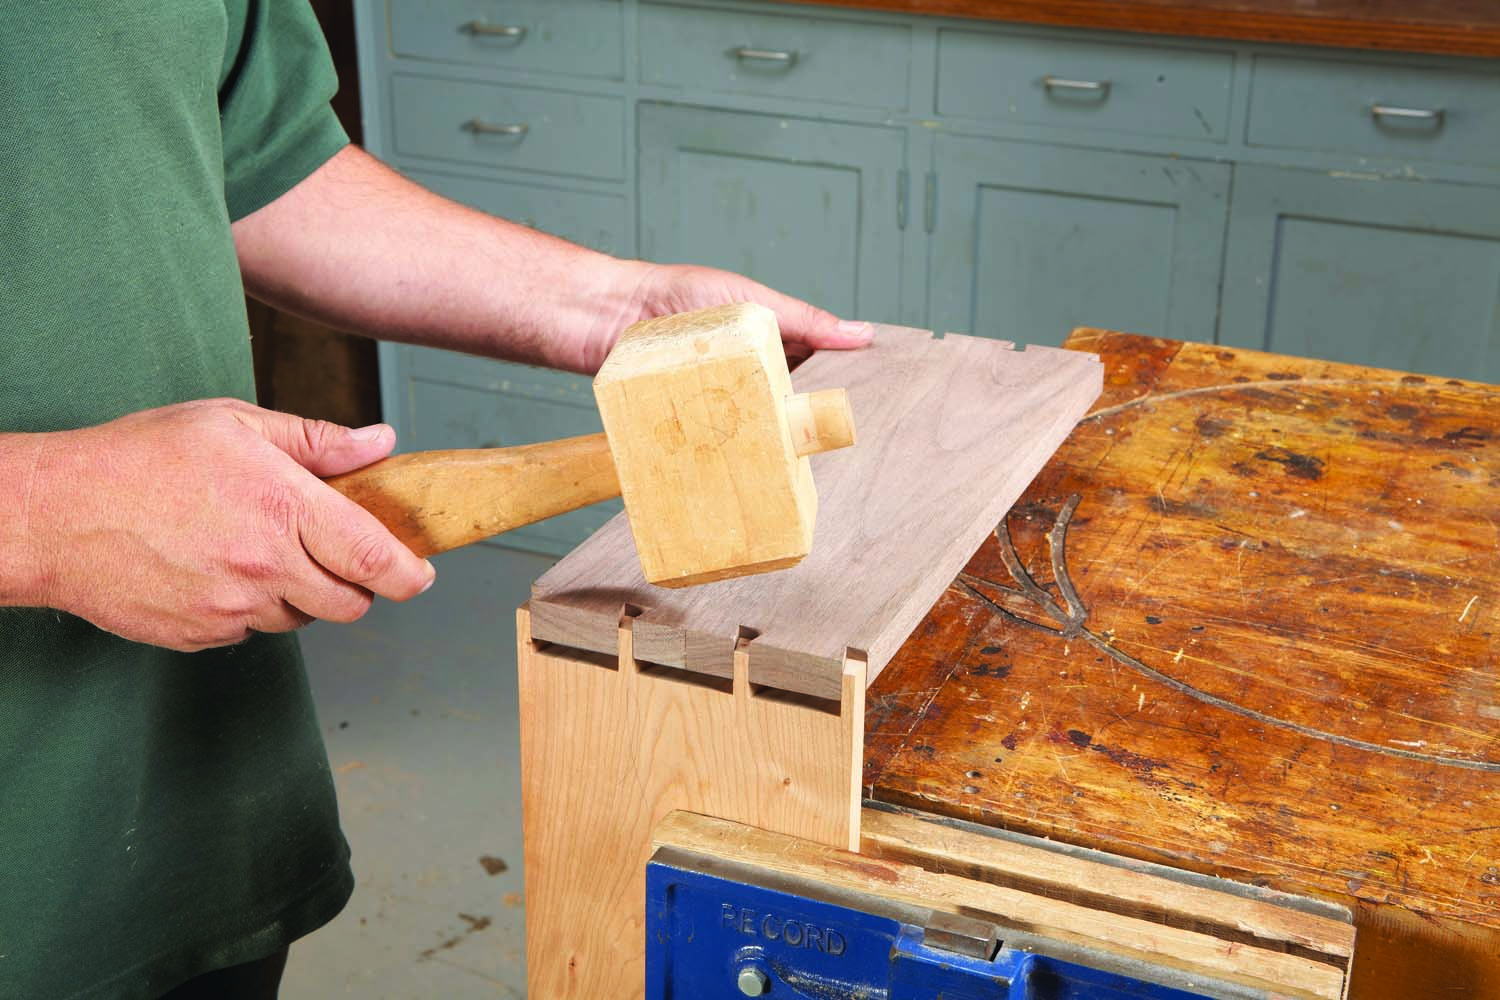
Photo 13. Tap the joint together. It should go together with a few light taps. If it’s too tight, mark the tight spots and trim the pins where needed.
The joint should fit with a few light mallet taps (Photo 13). If you were cautious, cutting the pins just slightly oversize, you’ll have to trim a couple of them. When you test the fit, mark the pins that need trimming. Because of the “zero-clearance effect” of the bit’s slot, you can easily shave off just a whisker for a perfect fit. As you gain experience, you’ll spend less time trimming to fit.
Here are some supplies and tools we find essential in our everyday work around the shop. We may receive a commission from sales referred by our links; however, we have carefully selected these products for their usefulness and quality.