


We may receive a commission when you use our affiliate links. However, this does not impact our recommendations.
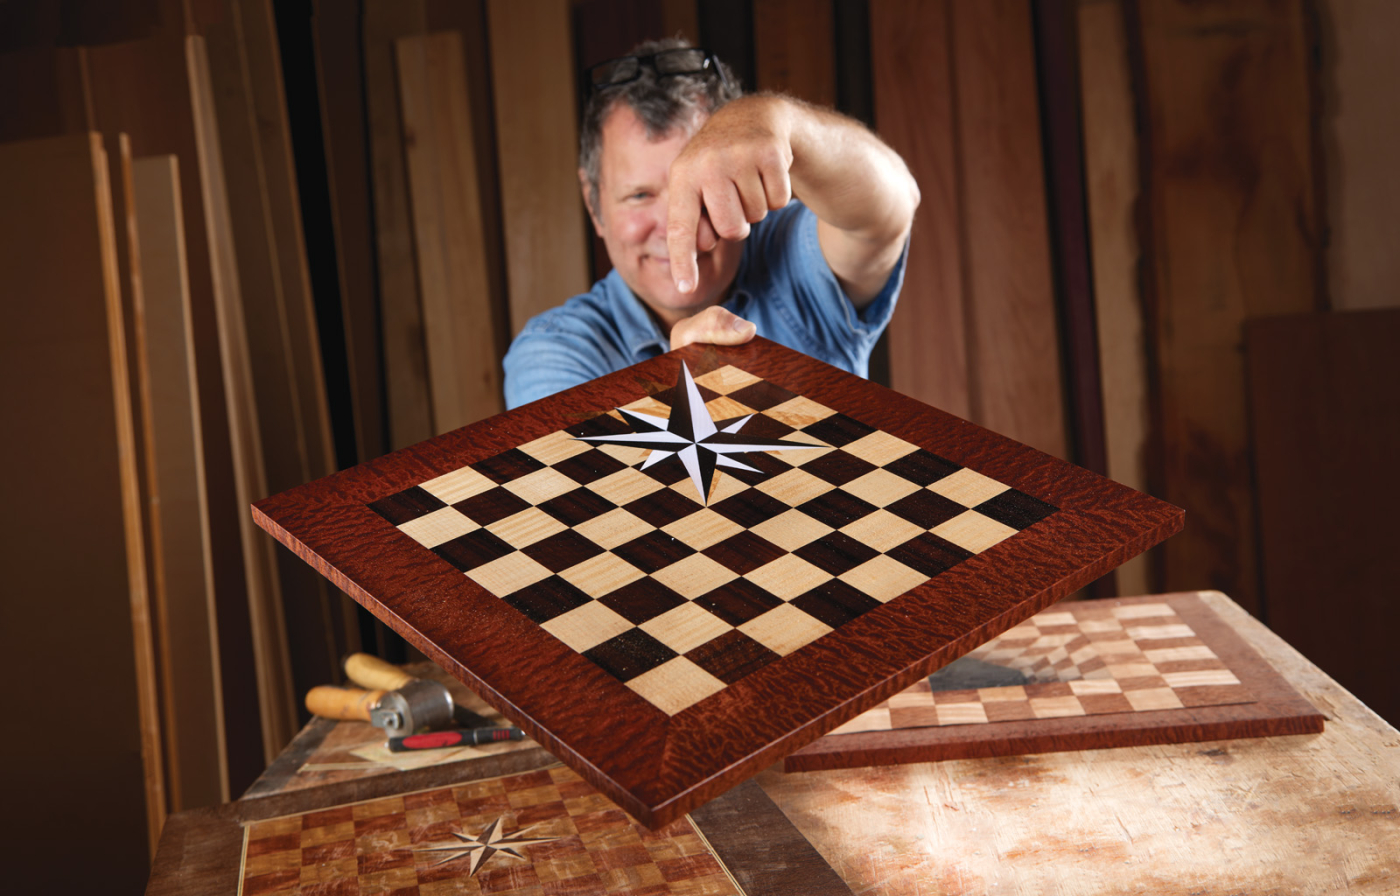
Creating a Nautilus Star Inlay is a great way to add detail to your woodworking projects, big and small.
Online Extras: Download a PDF of the Nautilus Star layout instructions
A nautilus star, also known as a compass rose, is a motif used in ancient as well as current cultures; it’s seen on maps and fine furniture alike. It’s a symbol of location, direction, accuracy, and a universal compass which many people recognize. Its design is derived from the magnetic compass that was refined in Italy circa 1200 AD.
Typically, the star has eight points: four major axes (cardinal directions) indicating at North (0°), South (180°), East (90°), and West (270°) respectively; and four minor points (ordinal directions) at 45° between the major axes. On maps, a fleur-de-lis is primarily on the top of the North axis.
I’ve tried a lot of techniques over the years, including a template and a square, but this method of inlaying a nautilus star is the most precise way I’ve found. It’s easy to do with a few tools like a compass, an X-acto knife, and a straightedge, and by following the steps in this article, you can create a very precise inlay for the touch of fine woodworking that everyone loves.
Layout Overview
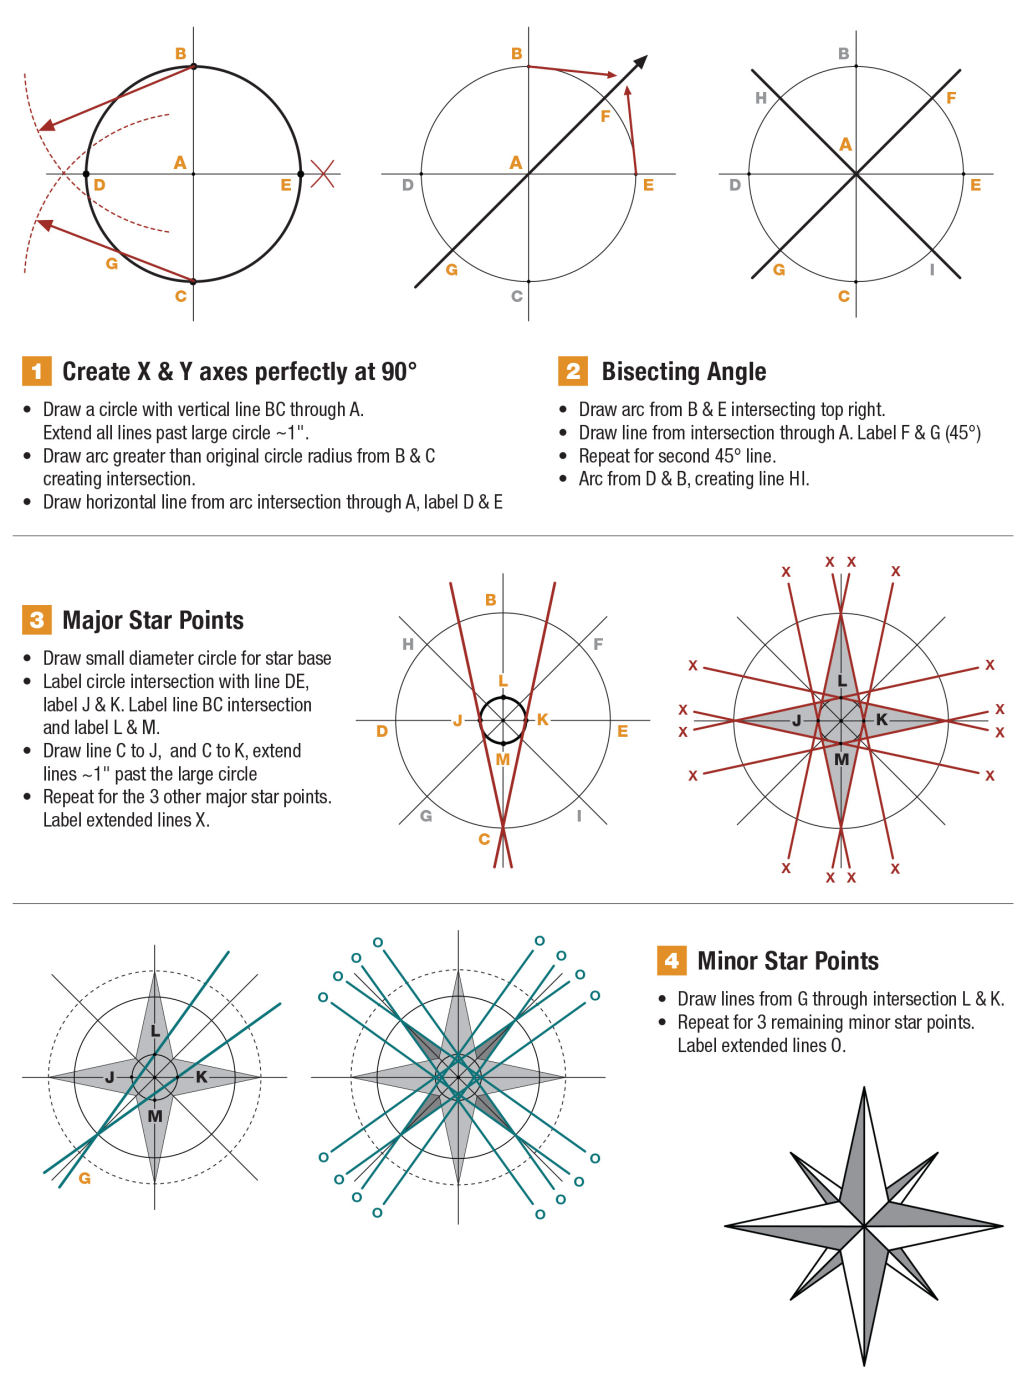
Creating the Major & Minor Center Lines (Axes)
To start this project, be sure to use a sharp pencil lead (I use a mechanical pencil). Use a compass to draw an 8“ diameter circle on a roughly 12“ x 12” piece of MDF. This circle represents the outermost tips of the major star points. Label the center A. Then, using a straightedge, draw a vertical line through the center point. Label the top intersection B and bottom C.

1 Draw a vertical line through center of the circle.

2 With the compass set to a radius larger than the circle, draw an arc roughly 90° to one side from the bottom point C.
Note that ALL straight lines should extend past the circle at least one inch. Place your compass point precisely on any point or intersection and set the compass radius larger than your first circle. Place your compass point on B, and draw an arc to the left and right of the circle. Then, place your compass point on C and draw arcs on the left and right again.

3 Draw another arc from point B that intersects the previous arc.
Place your straightedge on the arc intersections and draw the horizontal line. Label the horizontal intersection D and E.

4 Draw a horizontal line from the intersecting arc through the center. This is precisely 90° to the vertical BC line.
For the 45° angles, put your compass point on B and draw an arc to the right. Next, put the point on E and draw an arc to the top, crossing the previous arc. These arcs intersect at a 45° angle. Lay your straightedge on the intersection and the center of the circle A and draw a line through the circle. Label the upper right circle intersection F and the lower left G.

5 Repeat the angle bisection to create a 45° angle.
Start with your compass point on D and E, follow the same steps, and label the intersections H and I.
Creating Major Star Points
Place your compass point on A and draw a smaller circle (1“ dia.) within the one you have already drawn. There is no rule of thumb to this dimension; use what feels right to you.

6 Mark the tips of the minor points with the compass.

7 Draw a minor circle for the base.
Label the intersections of your horizontal and vertical lines within the smaller circle as J, K and L, M. Take your straight edge and create a line from C to J (CJ), then draw CK. This is your first major star point. Continue drawing lines BJ, BK, DL, FL, FM. Remember to extend the lines past the large circle. Label each one of these extended lines X on each end.

8 Create major points and extend lines past the tips by at least 1″.
Creating the Minor Star Points
Take your straightedge and create lines GL and GK. This is your first minor star point. Draw lines FJ, FM, HK, HM, IL, IJ. Label each one of these extended lines O on each end. The X’s and O’s will help you identify which line is which when cutting the veneer in the next steps.

9 Draw the minor points from the major point axis to the tip drawn in Photo 6.
Creating the Veneer Star
First, select two contrasting veneers that also complement the surrounding veneer field. For this project I chose black-dyed boxwood and bleached maple veneer for their plain nondescript grain, flatness, and ease of cutting. It will also look great against the redwood burl background field (seen later in the article). See my Veneered Chessboard article for more about selecting and conditioning veneer.
Your material size depends on the dimensions of your overall star and width of the points. For this project, you’ll need at least 5“ wide by 3“ long of each color of veneer.

10 Cut 8 strips each of contrasting colored veneers slightly wider and longer than your star points.
Take your light and dark veneer and crosscut it to length; make the pieces about an inch longer than your star points. Cut them into vertical strips with a straightedge that is a little wider than the base of the star. You will need 8 strips of each color. Be sure to cut the long edge straight.

11 Tape two contrasting veneer strips together with light-tack masking tape.

12 Fold open veneer and apply white glue to the seam.

13 Flatten the piece down and scrape off excess glue.

14 Apply weight to keep the veneer flat during drying.
Now, tape one of the light and dark colors flat together with lite-tack painter’s masking tape and keep the seams nice and tight. First, fold the seam open and add a little strip of white glue to the seam. Then, close the pieces back flat and scrape off any excess glue with a putty knife. Repeat this for all remaining pairs. Set them under a board to dry flat for about 15 minutes. Lastly, remove the painter’s tape.
Cutting the Tips
On the layout board, place one glued set over the first major axis. Align the seam with center axis and tape it in place. Next, align a straightedge with the extended angled lines and cut the two long side of the point. This is where the X and O marks can help you keep track of which line to use. Cut down-grain toward the point and be sure that the center seam lines up perfectly with the star tip.

15 Lay your second veneer set and align it to the set below.
Tape another set on the opposite side. Be sure to keep the light and dark orientation opposite and cut the long sides as above; it’s okay if they overlap. Now align the straightedge to the minor 45° venter axis and cut the overlapped veneer. Do this on both axes.

16 Cut the 45° seam with a straight edge, cutting through both layers of veneer.

17 Check 45° seam and check alignment of the center seam.

18 Cut the second 45° seam.
Repeat this process for the next two major star points and mark (register) them with a pencil to the corresponding location on the layout board. Tape the four major points together and set aside.

19 Align the cut pieces to the layout and tape in place at the tips.

20 Slide the second set under the first cut set, align and cut the 45° angles. Follow the cut veneer edges as a guide.

21 Test the fit and alignment of the center seams.

22 Tape all four major points in place at the tips.
TIP: Register your pieces with a pencil mark to help with realignment when you’re ready to inlay.
Repeat this cutting process for the minor point on the long sides only and set each pair aside as you go. Then re-tape the entire major star group back to the board and register the center seams to the X, Y axis.
Fitting the Minor Tips
Next, slide and align the minor set under the major veneer set and cut the inside angle using the veneer as a guide. I often do this free hand or use a card scraper as a firm straightedge. Do this for the remaining minor points, taping them to the group as you go with masking tape. Flip the star over and tape all the pieces together with veneer tape. (See the chessboard article once again for more information.)

23 Slide the minor point set under the major group, align the tip and center seams, and tape in place.

24 Cut the inside corners.

25 After all points are taped together with masking tape, inspect the opposite face.

26 Tape all seams together with veneer tape and set glue with iron.
This cutting approach, working directly on a layout board, ensures all the points are perfectly aligned to the X, Y, and 45° axes.
Inlaying the Star
To inlay the star into the a field of veneer, tape it in place and add a registration mark on one point to help orient the star when it is ready to be inlaid.

27 Tape the star in place complete over field veneer.

28 Cut the star perimeter. Use a card scraper to guide the cuts and to not shave off any of the star veneer.

29 If any of the inside or outside corners are not cut all the way, now’s the time to finish them.
Mark all the tips on the veneer field with a line perpendicular to the center seam with a pencil (you can see these white marks on photo 30). This mark shows where to stop your cut in the next step. Place a card scraper over the star and align it to the veneer edge. Cut through the bottom field veneer and stop at the marked top line.

30 Install the star. Be sure to reference your orientation so that it’s the same way you cut it out.

31 Tape in place with veneer tape.

32 Flip the veneer over to check the back side for seam alignments.
Once all the edges are cut, remove the star and inspect the cuts. Typically, the inside and outside corners need attention, so make sure they are cut completely through and remove the waste from the field. Place the star in the void using your registration mark for correct orientation, press it flush with a hard block or roller, and tape it in place with veneer tape. Flip the veneer over and inspect the bottom for the fit and aesthetic.
Completing the Project
Once your nautilus star is inlaid into your veneer, you’re ready to place the field onto your core and into your press. I’ve found the best core to be MDF, because it is stable and won’t move. Now it’s time to go shoot for the stars!
Here are some supplies and tools we find essential in our everyday work around the shop. We may receive a commission from sales referred by our links; however, we have carefully selected these products for their usefulness and quality.


