We may receive a commission when you use our affiliate links. However, this does not impact our recommendations.

Get a handle on multiples. Turning multiples is not difficult and can be a satisfying accomplishment. You can learn to turn multiples as quickly (and very nearly as accurately) by hand as you could with mechanical duplicators. I once made 175 of these gavels for a client.
Sometimes, unique is exactly what you want to avoid when turning.
If you turn, sooner or later you are going to find yourself facing some project that requires several (or many) duplicate turnings. You may feel a brief rush of mild panic, most likely followed by a powerful urge to check your catalog shelf (or browser bookmarks) in search of duplicating equipment that will fit your lathe.
Resist the urge. There may be situations that call for machine duplicators, but in more than 20 years of turning for a living, I have yet to encounter one. Chances are good you can do as well or better without such devices.
With the knowledge of a few basic techniques (and, of course, some practice), you can learn to turn multiple, matching items by hand more quickly than with mechanical duplicators. If you need only to make a few items, you’ll save yourself the expense and trouble of buying and fiddling with the device (Rube Goldberg would have loved some of them); if you will be making many copies, your speed and effectiveness will quickly improve anyway.
Matching Needn’t Mean Identical
There are usually two primary concerns in turning a batch of matching items. One is, of course, making them match. But be aware that in most cases, this doesn’t mean they must be perfectly identical, as if turned by machine. They just have to look the same. If you were to check out some classic hand-built furniture in a museum (with a tape, caliper and profile gauge) you would probably be surprised to find that there is a fair amount of variation from one spindle to another. And when used in an assembled piece, turnings that are reasonably similar – but not necessarily identical – look fine, if not indistinguishable.
The second concern is speed. If you are turning for pleasure, this may not matter to you at all. However, if you have a fair number of items to produce, you will probably want to be efficient. After all, beyond getting these pieces done, you most likely have other things you want to get to in what may be limited time in the shop.
Beyond an ongoing cultivation of basic turning skills, the key is to set up the job in a way that makes repetition simple and minimizes unnecessary actions. Whether you are reproducing an existing item (chair rungs, stair spindles, etc.) or designing something from scratch, turn a few prototypes. Don’t worry about matching them exactly, or how many more you’ll make, or about how fast you are going. At this point, you just want to pay attention to developing a logical sequence of cuts, and to get the overall feel of making the object. Time spent here will more than pay off later. The better you understand the job, the easier it will be to increase the speed of making each item.
First, do it right. Then, do it faster. Soon you’ll wonder why you ever thought you needed a mechanical helper. And you’ll be a better turner, which, as always, will pay off handsomely on your next project.
A Simple Layout Technique
 Marking the toolrest is an efficient way to lay out a simple turning.
Once you set it up correctly, you need only cut a few key diameters after rounding the workpiece, and you can finish turning the piece without further measuring (after some practice, of course).
Develop a system that makes sense to you for these markings. My own convention is this: The ends are marked with a line all the way across the toolrest, small beads with short double lines, and other critical diameters with arrows or short lines (for the first toolrest position, these are on the forward half of the rest; for the second, on the back half). For the gavel head, where the toolrest doesn’t have to be moved, I mark only the ends and the location of the beads.
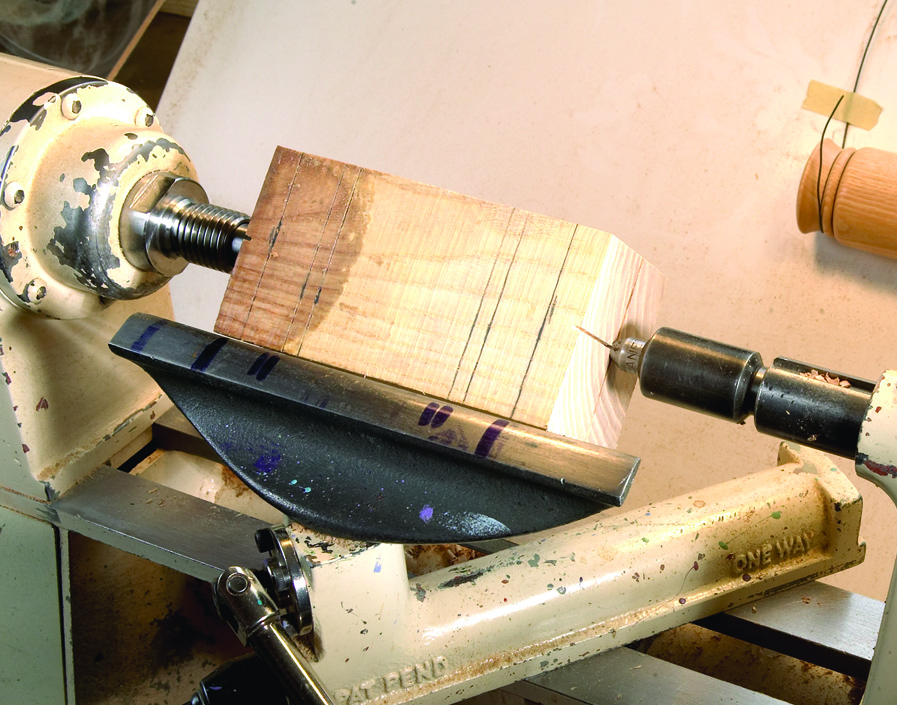
In real life (for a large production run, not for just a handful of duplicates) I would actually file tiny notches into the edges of the rest for the key markings; they won’t wear off like pen marks (you can see the remnants of one of these on the lower edge of the toolrest, near the right end). The toolrest is filed down to remove the notches after the job is done. This saves time overall; removing the marks later is far quicker than the total time it would take to continually hold up a measuring stick or template to a fresh workpiece every time I need to mark a location.
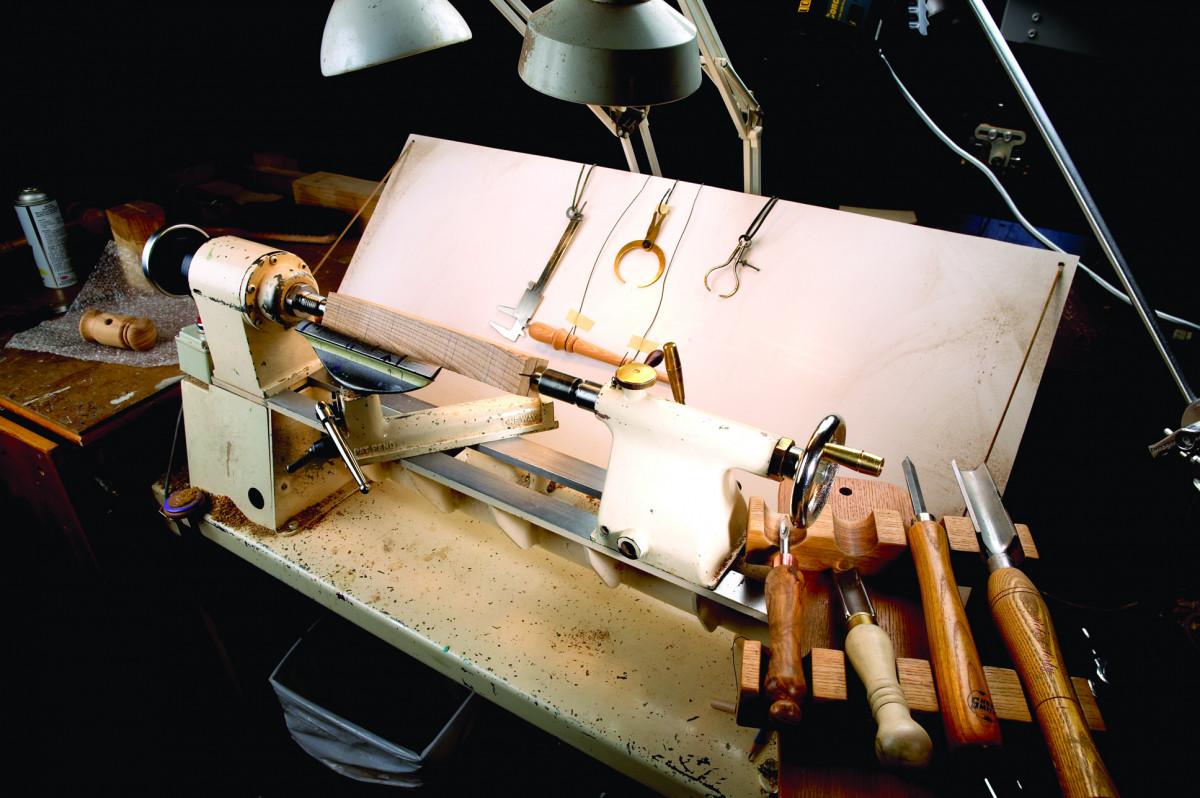
1. A good setup to turn multiples. Set the calipers to the key diameters and hang them in the proper order. The prototype is easy to see against the backboard.
2. Begin by rounding off the workpiece. A large roughing (spindle) gouge is quick and effective. Cut on the low side of the gouge, and from larger to smaller diameter.
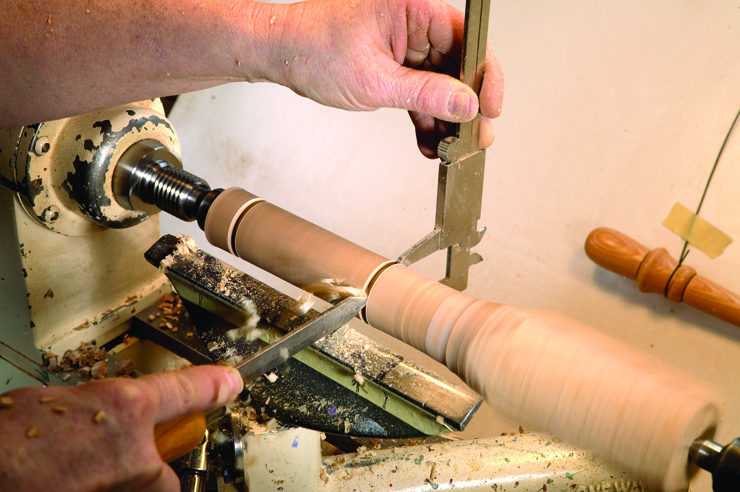
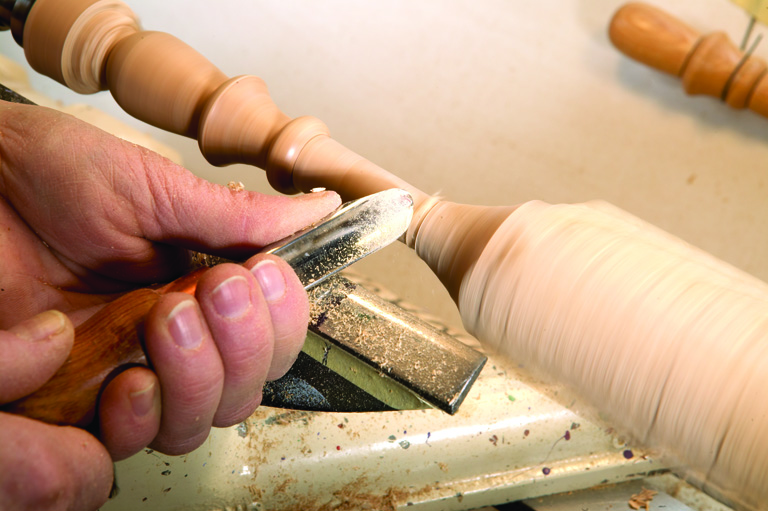
3. Part about halfway into the center on the left end. This will be the end of the finished piece. Then mark the diameter of the first key location (in this case, the diameter to the right of the first decorative cove and bead). If you aren’t comfortable with the one-handed cut shown, just make the cut and stop the lathe frequently to check the diameter until it’s correct.
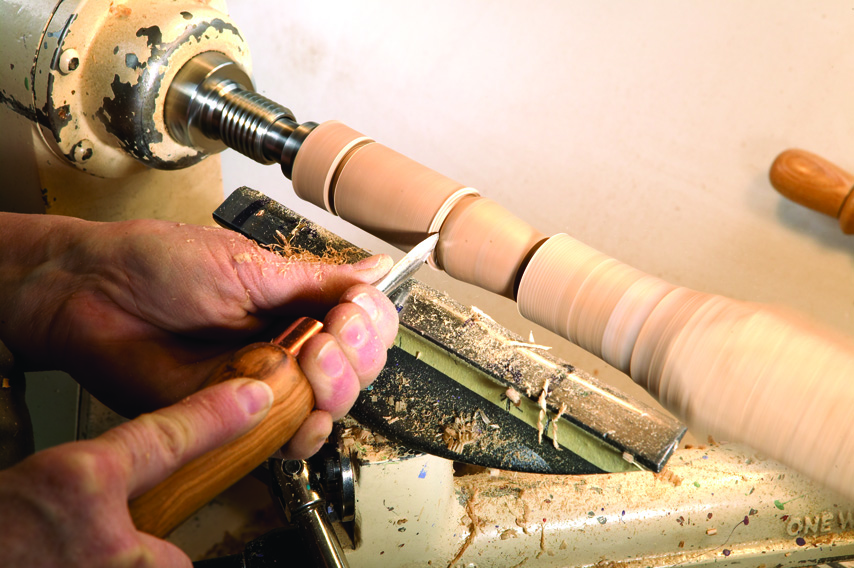
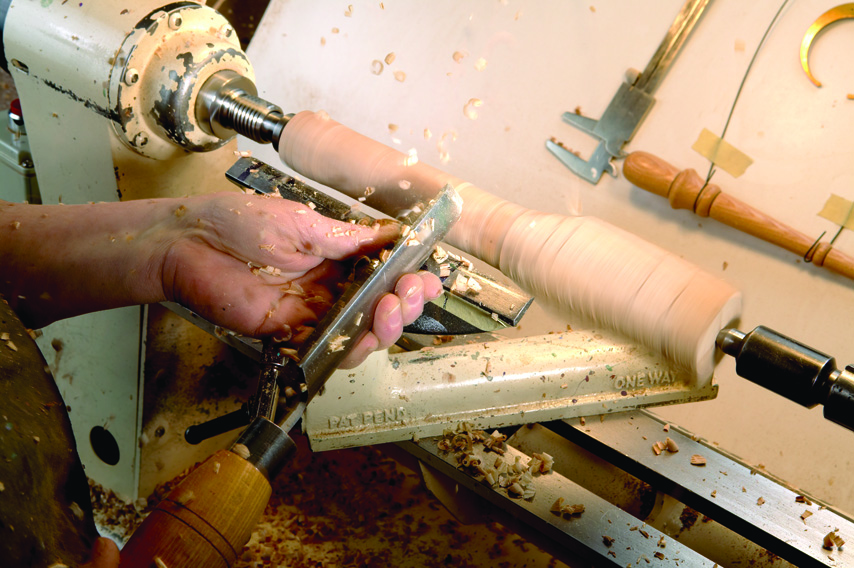
4. Begin shaping the details as per your prototype. Here I am using my favorite long fingernail-grind detail gouge. The long edge will cut very nearly as clean as any skew, and the long tip will allow you to cut very tight detail.
5. Round the end of the handle, but don’t cut too far in yet. You’ll need the support on this end when you rough in the other half of the handle.
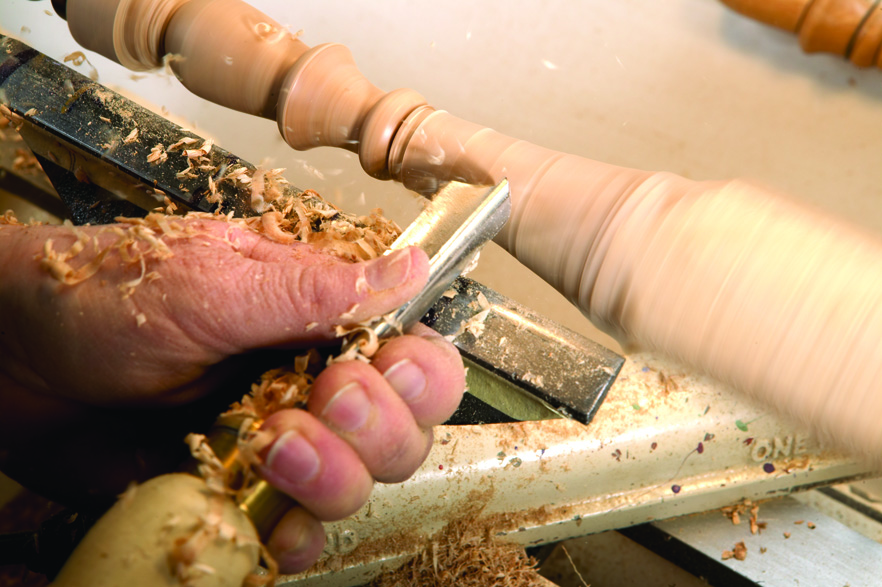
6. Finish turning the details, and begin working down the excess stock on the long taper. A wider (roughing) gouge works best here.
7. Clean up the taper, turning downhill (large to small diameter). Stop cutting just before you get to the waste remaining on the right; if you push the gouge uphill, it will catch badly.
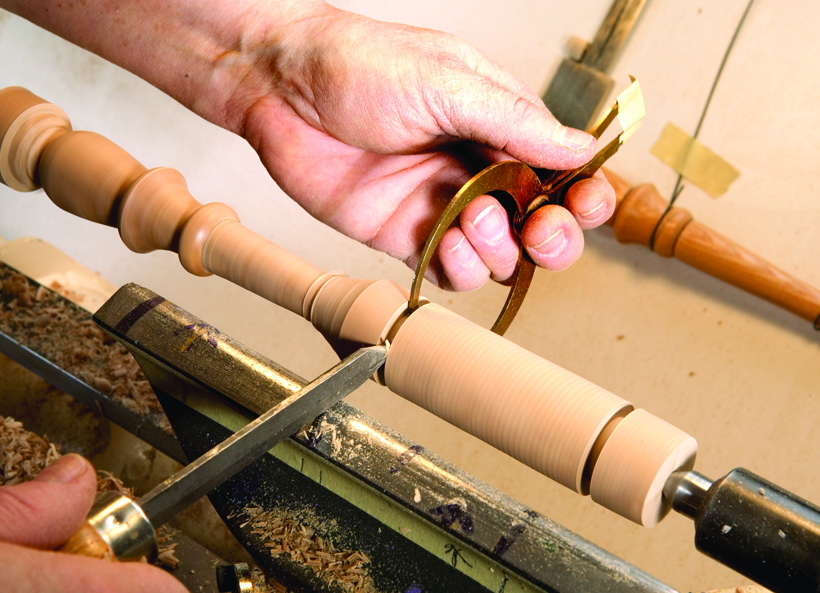
8. With the parting tool, cut to the diameter of the bead on the long taper. The parting cut on the right end of the handle is where the end of the handle will be.
9. Finish cleaning up the taper, and turn the bead. As the narrowest part gets smaller, vibrations will increase. Take lighter cuts; push into the cut, not toward the workpiece.

10. Continue the taper on toward the end. To fit properly into the 1⁄2″ mortise that will be drilled into the gavel head, the diameter should taper slightly from just over to just under 1⁄2″ at about 1″ from the finished end. Leave it a bit thick to allow for sanding.

11. Sand the handle to your satisfaction, with the toolrest moved out of the way. I have made decorative burn marks to set off the details (see #21 on page 79).

12. Apply and buff the finish (I used a hard wax). Don’t finish the small end where it will be glued into the head; glue won’t stick to wax.

13. Cut in at the end of the handle, but don’t part off all the way – the piece will twist and fly off. Cutting off the excess at the band saw or with a small backsaw is safer.

14. Here the piece has been remounted in a chuck (no need to use padding if you make sure that only the part that will be inside the mortise in the gavel head is being gripped by the chuck jaws). At a slow speed, and with tailstock support, turn the round end down very close, but not quite all the way.

15. To sand and finish the end, turn the lathe speed down very slow and support the turning with your left hand. This can be dangerous if you aren’t very careful, as the centrifugal force can pull the handle loose and flip it out of your hand or even out of the chuck. You may want to do this final sanding with the piece off the lathe.

16. Ready to turn the head. I don’t need calipers for this; after rounding the stock (which all starts out at about the same size), I’ll just part in about 1⁄2″ (gauged by watching how deep the parting tool is) at the locations of the beads. Then mark the ends, and just turn the rest by eye.

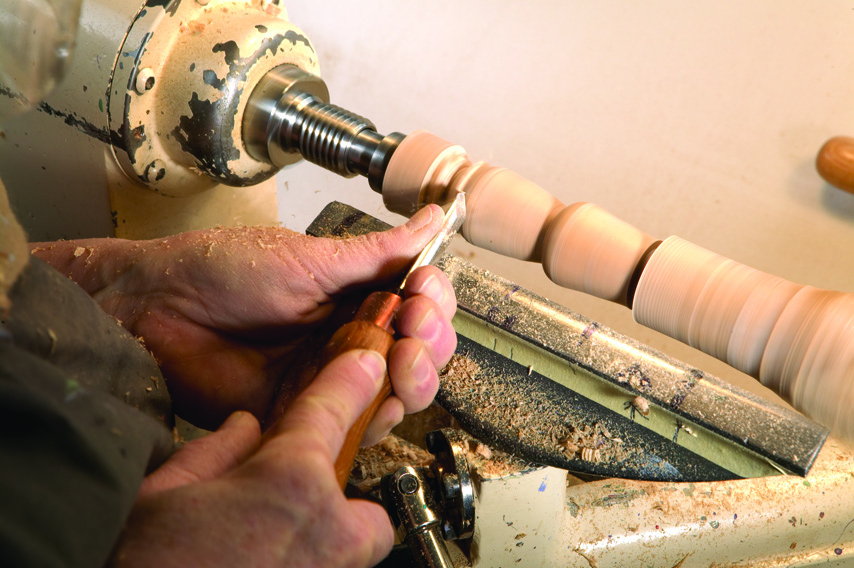
17. After rounding the stock and smoothing the cylinder, shape the round shoulders of the center section, next to the bead.

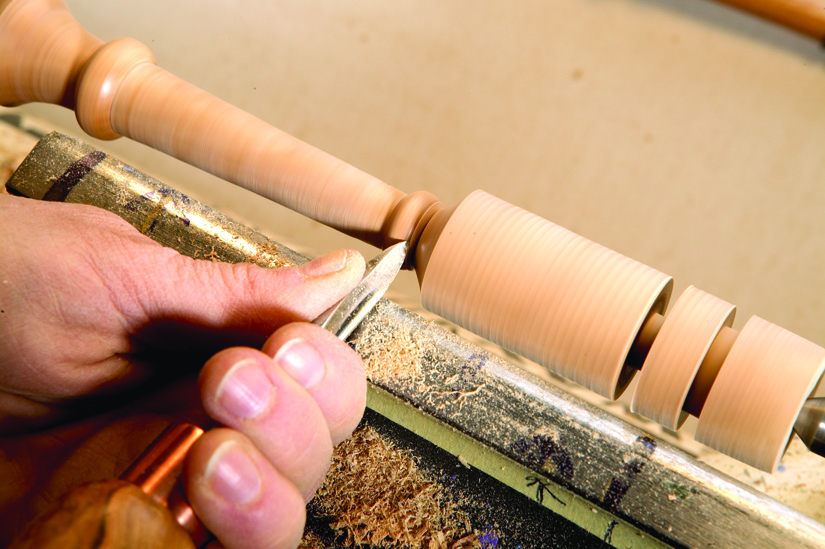
18. Turn the bead. The long, narrow tip of the detail gouge is ideal for this kind of tight detail. It fits right down into the crease, and isn’t very likely to kick back.

19. Turn the cove down to the bead. Don’t try to take off all the excess at once; turn it off in stages so the last cut can be clean. Trying to take off too much of the wood at once will cause tear-out or even splitting.

20. Finish up the detail on the bead where it meets the cove. Reduce the diameter at the ends, but leave an even waste stub for mounting in a chuck to turn the ends.

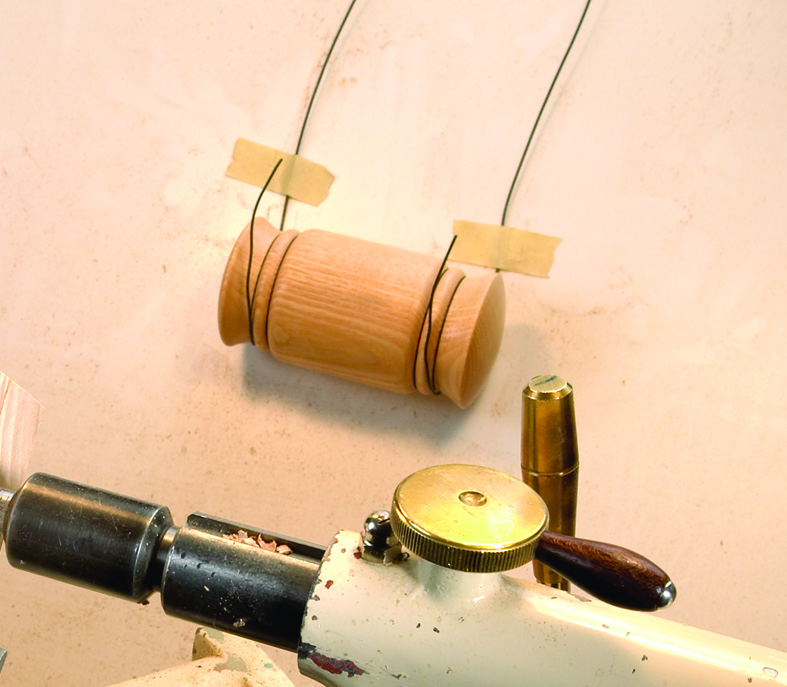
21. To make the burn marks, attach steel wire to a couple short lengths of dowel. With the lathe on, hold the dowels (not the wire itself) to apply pressure until the friction burns the wood.

22. I mount the piece in a chuck to turn the faces. Note the leather pieces glued inside the jaws to cushion the piece. This remount allows me to get a clean cut and smooth curve on the end grain of the gavel faces. Doing the sanding and finishing on the lathe (albeit at slow speed) gives a better result than if done off the lathe and it’s faster.

23. You must use tailstock support to remove the waste wood. Turn very nearly all the way in, as with the end of the handle, then sand and finish.

24. For items that need to be very close to identical, you may want to use a gauge of some kind to check the profile of the pieces as you turn them. I’m holding a profile gauge, often used to transfer moulding profiles. On the lathe bed is a simple template cut from a piece of thin plywood.
Here are some supplies and tools we find essential in our everyday work around the shop. We may receive a commission from sales referred by our links; however, we have carefully selected these products for their usefulness and quality.