We may receive a commission when you use our affiliate links. However, this does not impact our recommendations.
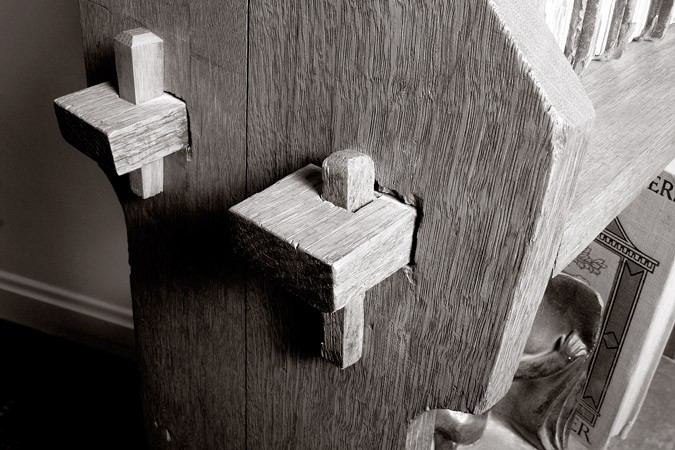
The torn grain, gaps and general loose fit around these through-mortises are unacceptable to the modern
woodworker – though these defects were once common. This is an Arts & Crafts bookcase that once graced a church library in Lexington, Ky.
Woodworkers expect this joint to be tidy and tight, not ragged and gappy. We explore the best ways to make this sometimes-vexing hole.
by Christopher Schwarz
from the Winter 2008 issue of Woodworking Magazine
The history of the through-mortise begins with a joint that was necessary because of the tools and technology of the day, and it ends with a joint that flaunts the skills of the modern woodworker like a prize chicken at a county fair.
A through-mortise – which is where the joint passes entirely through a leg or stile – is rarely structurally necessary in modern furniture thanks to high-strength glues and machine-cut joinery surfaces that maximize the amount of wood-to-wood contact.
But they are sometimes necessary for other reasons: They are a hallmark of certain furniture styles, including some early American and European pieces, Arts & Crafts furniture and stick chairs, such as Windsors and Welsh chairs.

This through-mortise on the lower leg of a Gustav Stickley rocker would not pass modern muster. The ends of the mortise were left round and the tenon was square. On other joints in this chair you can see tearing left from the boring machine.
And in contemporary work, through-mortises are often used as the calling card for a handmade piece of furniture. Few furniture factories go to the trouble of making this joint, so individual makers use it to differentiate their work from the fiberboard garbage that clogs our stores, homes and landfills.
The reason the through-mortise is a poster child for handmade furniture is that it is a challenge to make well – much like the dovetail joint. People’s eyes are drawn to expressed joints like this, and small gaps make big impressions.
I’ve spent years investigating various techniques for making this joint tidy and show-worthy. The following story is the result of my trials and occasional revelations.
Real-world Through-mortises
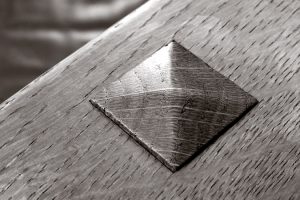
This through-tenon on an arm of a Charles Stickley side chair shows what good work looks like in a highly visible area. The joint isn’t airtight, but it’s quite good considering the 100 years that have passed since its making.
Through-mortises appear in the earliest extant furniture. Egyptian beds and stools typically used the through-mortise to join their legs and rails. Exactly why this joint was employed isn’t known, but we can guess. With a lack of reliable glues, a through-mortise joint allows lots of wood-to-wood contact – friction if you will – that will keep the joint together. Sometimes these joints were even lashed together, and the tenon passing through the mortise allowed this.
As furniture evolved through the 18th and 19th centuries, it became much more the norm to obscure joinery rather than show it off. Furniture craftsmen avoided the problem of unreliable glues by cutting a blind mortise (which is open only on one end) and then driving a peg through the finished mortise and tenon to mechanically lock the pieces.
However, in the world of the workers who fitted out houses with doors and window sash, the through-mortise remained a staple of the trade. When joining the rails and stiles of windows and doors, through-mortises are typical even in houses built at the dawn of the 20th century.
The reason for that is two-fold. Doors and windows are made up of heavier pieces that need to take more abuse than a piece of fine furniture. Plus, a through-mortise has other advantages. It can be cut using fewer jobsite tools (a chisel and a mallet is all that is needed) and you don’t have to take the time to clean the bottom of the mortise. It can be assembled and wedged with fewer clamps – you can put one clamp on the joint, wedge it from the outside and immediately remove the clamp. And things can be more easily dismantled for repair – dig out the wedges and pull the joint apart.
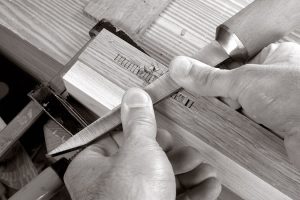
On the show side of a mortise, the edges must be crisp and not rounded over by the tool. Make lots of light cuts, then sweep the first bits of waste away using your chisel’s edge flat on your work.
And because the result was usually hidden by paint or by its location on the edges of doors or in a window casing, the joint didn’t have to look perfect. It just had to hold things together.
That’s how things stood until the furniture factories came along. Some of the earliest factory machinery was designed to cut mortises and tenons. But in an effort to make less-expensive furniture for the masses, factories began using less-reliable joints – such as dowels – that could be made quickly and cheaply with precision machinery.
From the outside of the furniture, the results looked the same. A blind tenon and a doweled joint are indistinguishable from the exterior of a piece. And I’ve even seen doweled pieces that have a fake exterior peg, which implies there is a tenon in there instead of two skimpy bits of dowel.
Some furniture consumers were unhappy with this mass-produced flimsy furniture coming out of the factories. And from this discontent rose the Arts & Crafts movement. At its best, the Arts & Crafts movement celebrated stout joinery. High-quality pieces used through-mortises as a way to show the consumer how the joint was made. (Let’s ignore, for a moment, the Arts & Crafts shysters that would nail on a fake through-tenon to fool the customer.)
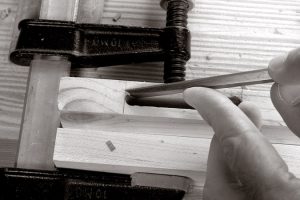
In router-cut mortises like this, the corners are tough to square up without botching them. You can score your layout lines with deep knife cuts, which helps. Ultimately, if you take this path you are going to have to get good with a chisel.
These visible joints were put in visible places – on the tops of chair arms, on the fronts and ends of casework pieces, on legs. However, making these visible joints must have proved to be a challenge. They appear on only the best pieces. And they don’t always look tidy (especially the ones that are close to the floor).
And then the through-mortise began to disappear again from furniture as the popular styles began to change to favor surface ornamentation to structural honesty.
Today the through-mortise joint is used when you are reproducing certain furniture styles or are attempting to display your craftsmanship. No matter why you make this joint, the standards for what is acceptable have changed. Gaps between a through-mortise and its tenon aren’t acceptable in good work.
Two Kinds of Through-mortises
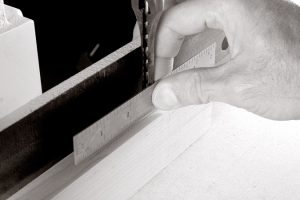
Press and hold a ruler to a flat face of your hollow chisel. Compare the ruler to your layout lines to see if the chisel is twisted. This trick is remarkably accurate.
So the imperative is to make this joint look perfect, and the tolerances are tough to hit. Where do you begin? First, it’s helpful to know there are two kinds of through-mortises, each of which requires a different strategy.
The first kind of through-mortise has an opening that is skinny and long – for example, 1⁄4″ wide x 3″ long. This is the kind of through-mortise you would see when you join a side rail on a Morris chair with the chair’s front leg. It also is common to see this mortise where a shelf intersects the side of the carcase.
The other kind of through-mortise is simply larger – it can be either rectangular or square. This is the kind of through-mortise you would see when you join a chair leg to an arm.
Let’s walk through some of the techniques for cutting each of these.
Skinny and Long: Use Square Tooling
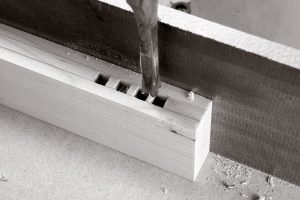
I’m in the habit of using the leap-frog method of mortising. Skip a space with every hole, then clean up between the holes. Other craftsmen I respect say the holes should overlap slightly to improve chisel cutting. Try both and decide.
For any through-mortise, you can use a mortise chisel and a mallet. And if I have four or fewer to do, that is typically how I’ll proceed. You lay out the mortise opening on both sides of the joint and then begin the banging. When I make my layout marks, I score them as deeply as possible on the face of the joint that will be visible. Deep score lines help you remove waste cleanly.
This is particularly important if the long axis of the mortise runs across the grain (like it does in the bookshelf in this issue). When you chisel out a mortise across the grain, it has a tendency to tear out around the joint, particularly in woods such as oak and ash.
Begin chopping out the side that will be obscured. Working from this side first allows you to get your chisel skills warmed up. If the chisel is cutting true, I’ll drive down beyond the halfway point. Though removing waste is more difficult in deep cavities, it’s more important to get the two ends of the mortise to meet. So don’t stop if things are going well.
Then flip the work and make a light cut on the face that will be visible. Some people will chop up the surface of the mortise with tight cuts then sweep the waste off the top of the mortise using the shaft of the chisel.
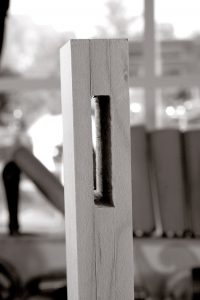
Here you can see the result of accurate machine setup and careful layout. The mortise goes clear through, and the rim of the mortise is crisp enough for close inspection.
Once the initial opening is cut, you can drive more deeply. Just be certain not to lever the chisel against the ends of the mortise when prying out the waste. This pry-bar action rounds over the rim of the exit wound.
If you are not going to cut the through-mortise by hand, two other common options are to use a hollow-chisel mortiser or a plunge router with a straight bit and an edge guide.
I almost always choose the hollow-chisel mortiser. Here’s why: The router method is slow. Through-mortises that are shaped this way (long and skinny) are typically in thick material – 3″ thick is not uncommon. That can be a lot to ask of a 1⁄4″-diameter router bit. In fact, I’ve snapped off quite a few in deep cuts. If you go the router route, take little bites. It slows you down, but it’s easier on the tooling.
You also have to square up the ends of these router cuts (unless you want to make an authentic and gappy Gustav Stickley-style joint). This is a lot to ask of a hand-held chisel in thick material. You have to take care and take smaller bites so your tool doesn’t go astray.
The hollow-chisel mortiser is fast and can make a clean cut if you set up the machine with care. Let’s begin there. You need sharp tooling. File the cutter of the auger-bit part of the tooling and stone the inside and outside of the hollow chisel. For complete details on choosing the right bit and sharpening it, read our story on hollow-chisel tooling in the Spring 2007 issue.
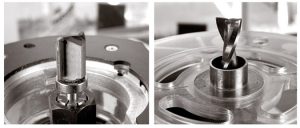
The pattern-cutting bit (left) seems simpler (just make a pattern that is the correct size), but you have to set things so the bearing rides the pattern and there is enough cutter showing to do the job. Bushing-guided patterns simply require a slightly oversized pattern.
You need to have your hollow chisel set dead parallel to the machine’s fence. You can get there by trial-and-error. But here’s how to make it there with less error. Lay out a sample mortise on some test scrap. Bring the hollow chisel close to your layout lines. Now press a 6″-long ruler against the hollow chisel and compare it to your layout line. The ruler will exaggerate any twist in the chisel and allow you to fine-tune it in the bushing of your hollow-chisel mortiser.
Now make a sample mortise to confirm that you are cutting where you want to cut and that the chisel is parallel to the fence. Now get ready to prepare your live stock. Normally, most instructions assume that your project parts are square. When making through-mortises, your parts have to be as square as possible. Double-check each part after you square it up and before you make your mortises. Small errors make joints that won’t go together. I’ve found that it pays to have the part’s jointed face against the mortiser’s fence.
To bore the mortise, first work halfway through on one side. Then flip the work over and do the same thing on the other. If the machine is set up well, this work is extremely fast and clean.
Bigger Joints Require Different Tools
The rules change when the through-mortises get bigger. Once your joints are wider than 1⁄2″, then hollow-chisel mortisers become difficult to use. When your mortises are wider than 1⁄2″, you have to shift your work both left-to-right and back-to-front to clean out the mortise. That’s not always a simple thing to do with accuracy. And you really need an X-and-Y sliding table. (Side note: I’m aware there are bigger bits available for hollow-chisel mortisers, but they don’t work on the common benchtop machines.)
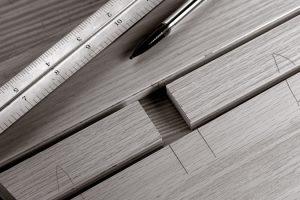
Here you can see how a pattern was assembled for a through-mortise. I use only glue on the edges to join the parts – no biscuits or dowels. With plywood, there’s always enough long grain at the edges to make this panel plenty strong.
Here’s the other thing that changes: Usually with larger through-mortises, you are working on thinner stock, typically 3⁄4″- to 7⁄8″-thick stuff.
So a new strategy is in order: router templates. Because your stock is thinner, the 1″-long straight bits have no problem cutting these joints with ease. Plus, as you’ll soon see, the routing template can also be a chiseling template for squaring up the corners.
You can make these router templates to use either a pattern-guided straight bit or a bushing installed in your router’s baseplate. The templates for pattern-guided bits are simpler to make (no math), but it’s tricky to get your bit’s bearing and the thickness of your pattern all playing nice together.
On the other hand, the templates for bushing-guided bits require a little math (addition – plus its tricky friend, subtraction). But you’re fooling around a lot less trying to match your bit and the thickness of the material out of which you are making your pattern. So really it’s a wash as to which method is faster.
No matter which path you choose, you need to make a pattern out of plywood (or solid wood) that has an opening with perfectly sharp corners. Making that pattern is fairly simple: I saw up bits of plywood (typically 1⁄2″ in thickness) and reassemble them as a panel that has the right-sized hole for my routing pattern.
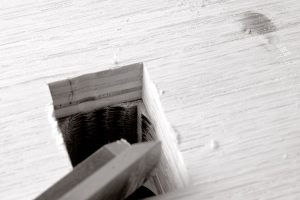
Take little bites with the chisel. If you try to remove the entire corner in one whack, bad things can happen. The template can shift. Or the chisel will steer itself outside the template – but below the surface of your work.
Remove as much of the waste as you can with a Forstner bit, then clamp the router template in place. Be sure to secure the template to the outside face of your work. Rout out the rest of the waste but don’t remove the template because its job isn’t over. You can use its sharp corners to guide your chisel to square up the rounded corners.
This technique yields nice crisp corners on the outside of your work and ragged, torn-out corners on the inside surface (because there was no template to guide your chisel). This isn’t a problem as long as the tearing isn’t too severe.
Once you get the mortise cut, the tenons are easy. I cut them close on my power equipment, then trim them to a snug fit with a shoulder plane, which also removes the marks left by the power tooling.
Get all 16 issue of Woodworking Magazine on CD or as a download.
For in-depth joinery instruction, download the “Joinery Master Class” video by Frank Klausz (7+ hours of instruction!)
Here are some supplies and tools we find essential in our everyday work around the shop. We may receive a commission from sales referred by our links; however, we have carefully selected these products for their usefulness and quality.


