We may receive a commission when you use our affiliate links. However, this does not impact our recommendations.
 Sliding dovetail joints are peculiar—sometimes, the two parts are meant to travel past one another; other times, they’re glued together. Whatever their purpose, making these joints is craftsmanship at its best. You need decent tools, an eye for precision, and practice.
In this article, you’ll learn a surefire method for getting fantastic results. I’ll describe the general principles involved, show you how to set up your machines and point out where you might get into trouble—and how to avoid it. If you haven’t made a sliding dovetail joint before, this is a perfect place to start.
Set the table
For this exercise, start by milling a clear piece of wood 1″ x 1-1/2″ x 36″. You’ll be routing this piece from end to end in both directions; to avoid tearout, the wood’s grain should be straight and parallel to the piece’s edges.
Your stock must be absolutely straight and flat, so it’s best to mill it about 1/8″ to 1/4″ oversize in thickness and width first. Set it aside a few days to bend or twist, then flatten it again and mill it to final dimension. Crosscut the stock into three pieces 12″ long.
One of these pieces will be the “socket” half of the joint—you’ll make this one first. The other two pieces will be used to make the “dovetail” half of the joint. Of course, you’ll only need one dovetail piece, so why make two? One is for test cuts; trust me, you’ll need it.
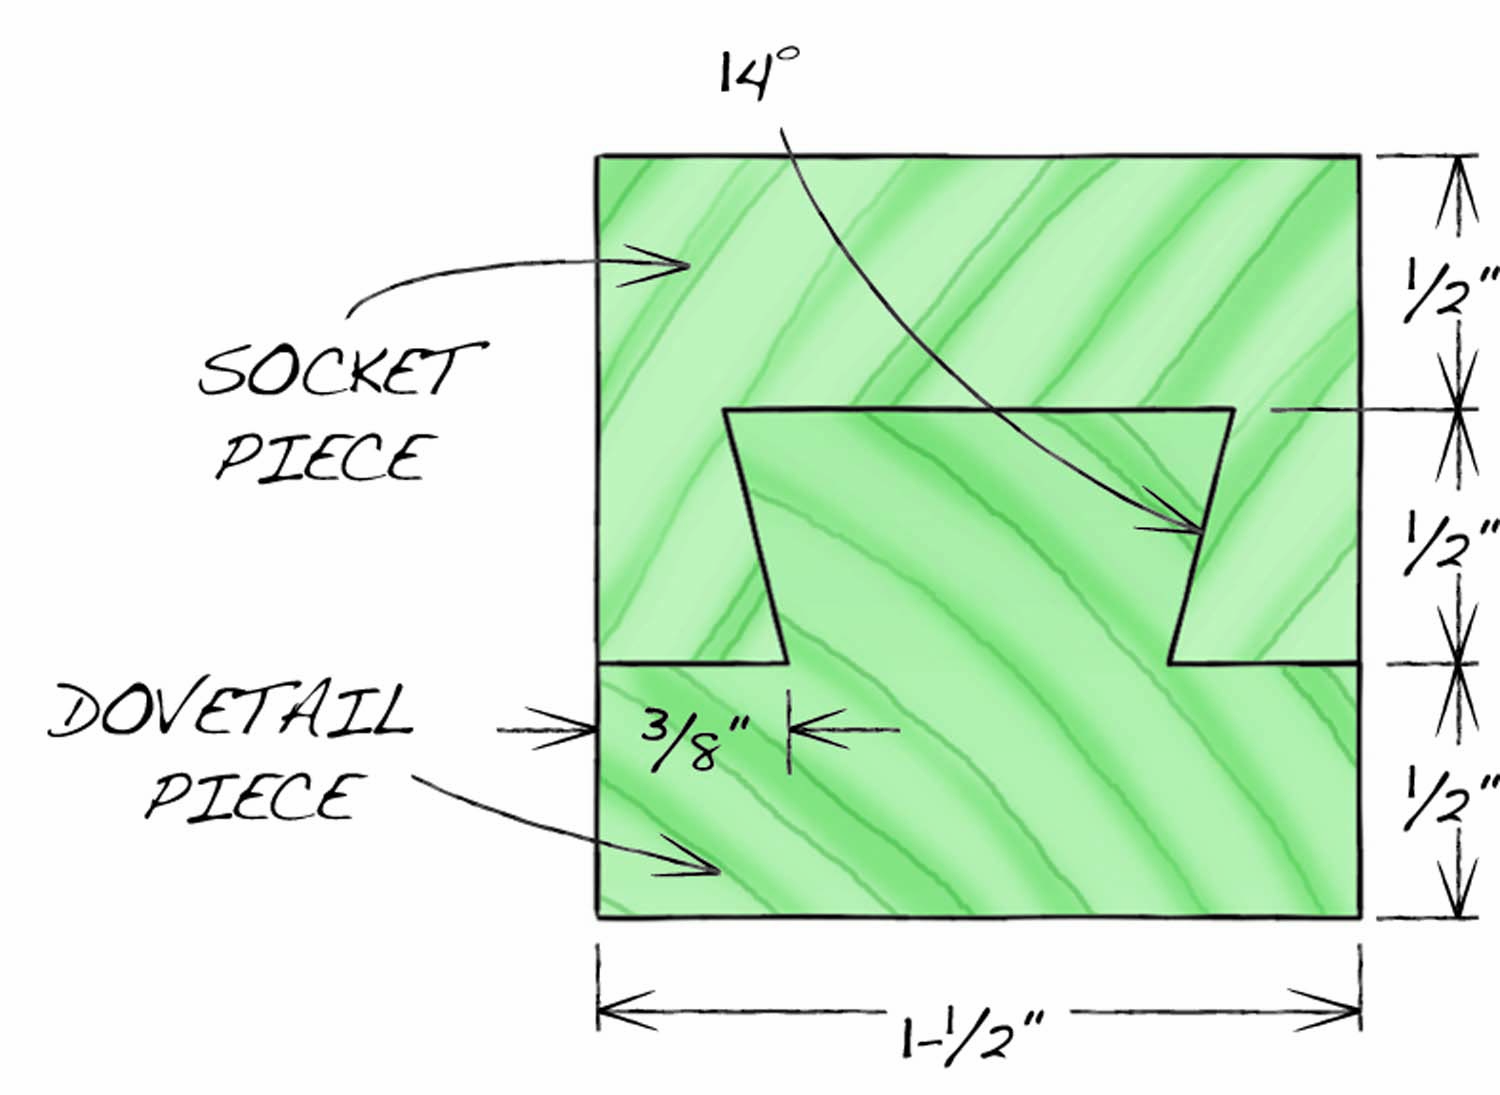
Fig. 1
Whenever you make sliding dovetails, it’s a good idea to draw the joint full size first in order to work out its proportions (Fig. 01). Proportions are primarily a matter of taste, but here are a few practical considerations:
- Don’t make the narrowest sections too thin and weak. Determine their width, using your best judgment, based on the strength of the wood and the amount of stress the joint will face.
- Know the angle of your bit. Angles range from 7° to 14°. (I used a 14°, 1/2″ wide bit, the standard for half-blind dovetail jigs. The smaller the angle, the more precise the fit must be.
- Make the base of the dovetail piece fairly wide, if you can. If the dovetail is too narrow, balancing the piece on the router table is difficult. A wider dovetail offers more support.
Make the socket
Draw the socket on the end of one of your pieces. Usually, there’s a lot of waste to remove in making a socket, so I prefer to start on the tablesaw. Sawing is much faster than routing and very easy to set up. This method also results in less wear on the dovetail bit; the sharper the bit, the easier it is to get a good fit.
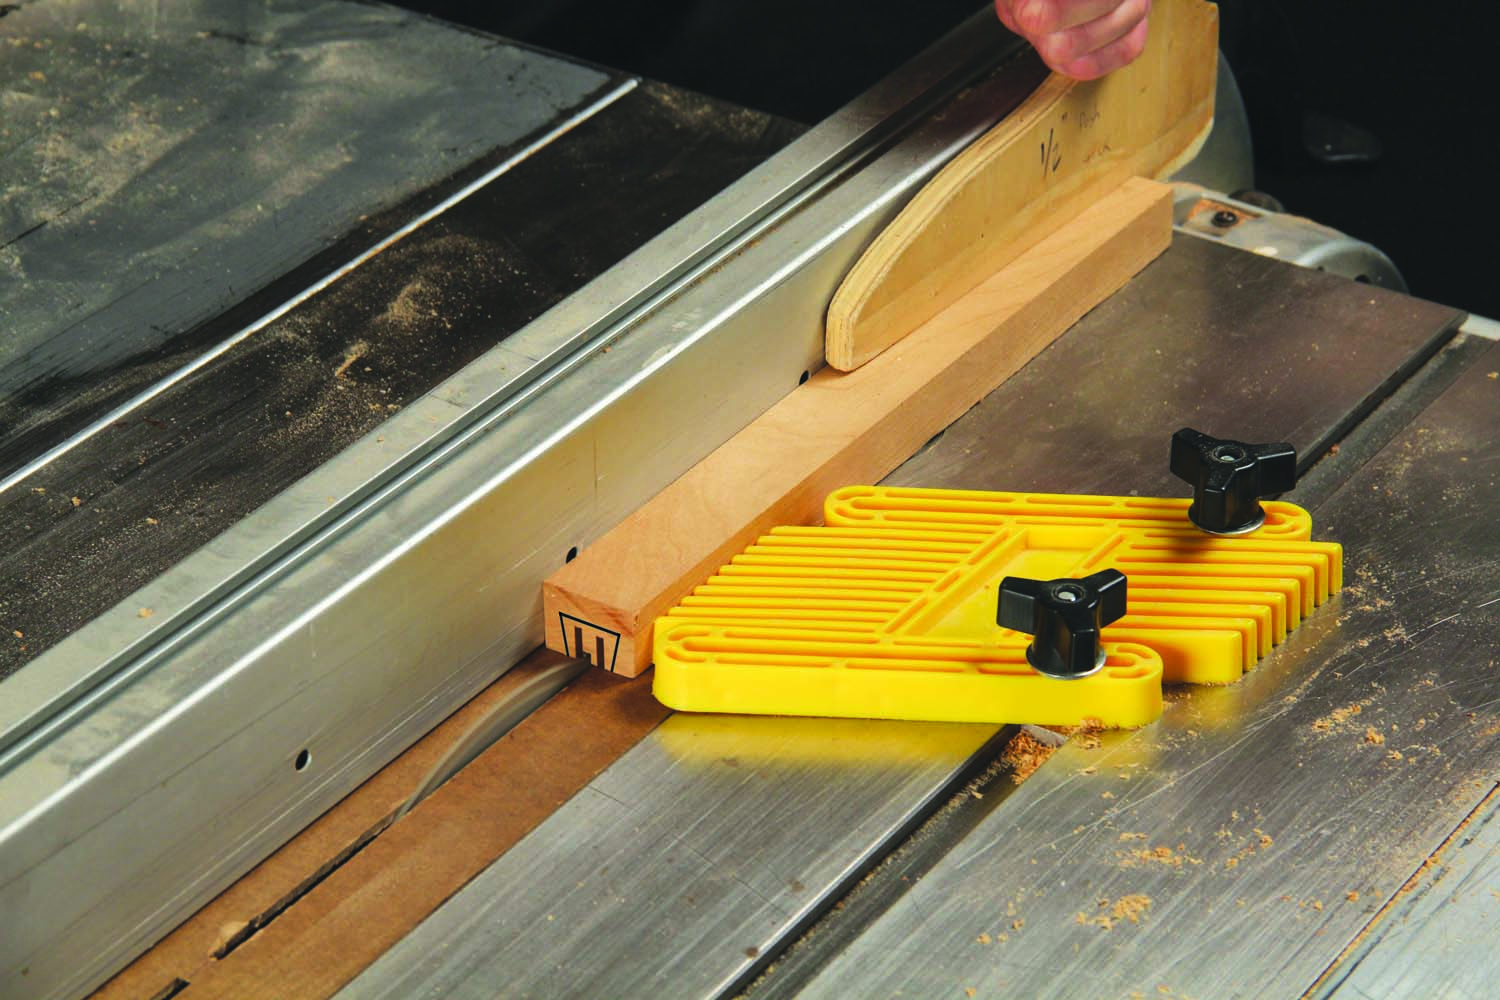
1. Start with the socket piece. Remove most of the waste on the tablesaw, using a standard blade or a dado set.
Adjust the saw’s blade and fence to cut 1/32″ to 1/16″ inside the outline of the socket (Photo 1; Fig. 01, Step 1). This joint is centered on the workpiece, which makes all the cutting and routing operations more efficient. Each fence setting is a twofer: After making one cut, rotate the piece and make another cut. Move the fence a couple of times, making overlapping cuts, until the groove is complete.
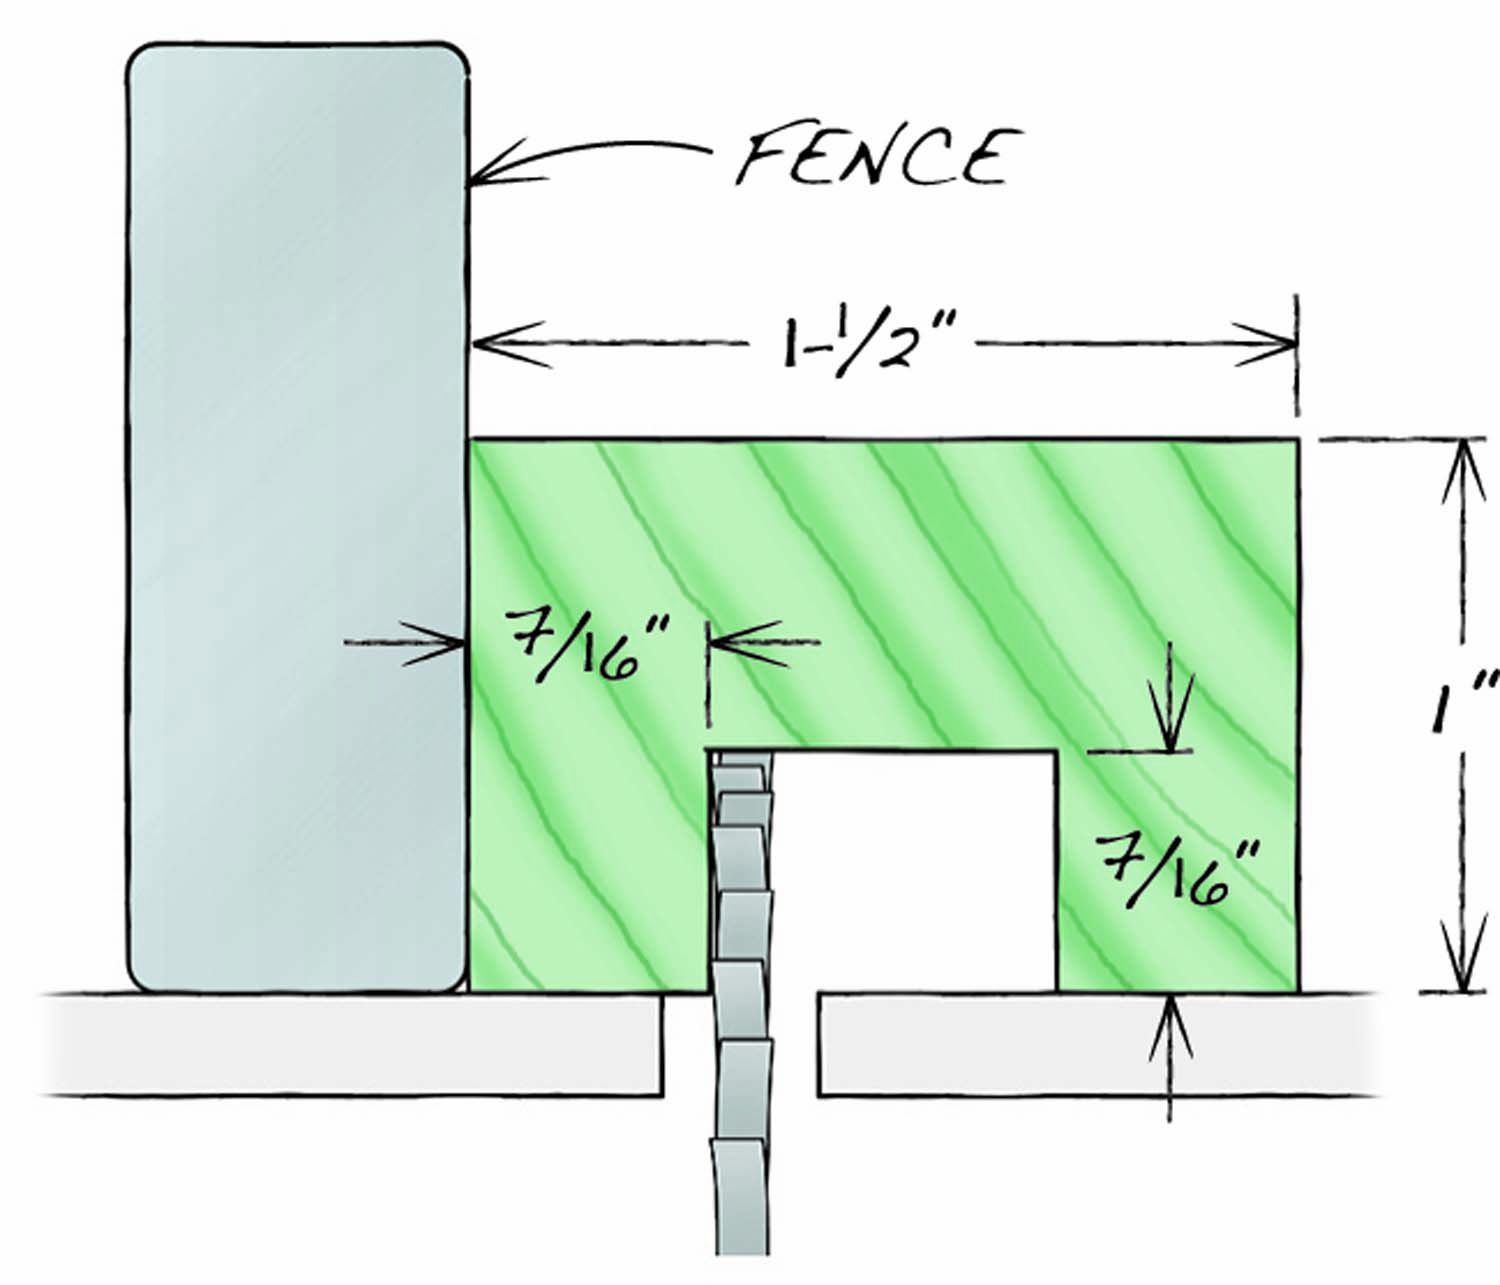
Fig. 2
Next, set up the router table with the dovetail bit (Photo 2, Fig 02, Step 2). I’ll bet you’ll be tempted, as I was at first, to position the fence close to the bit—but you’ll be rewarded with an unpleasant surprise. If you’re not careful, the bit will jerk your workpiece forward. Why? Well, take a look at the bit’s rotation: The side that’s doing all the cutting is pulling the workpiece. (Imagine feeding a tablesaw from the backside—not!) The solution is simple. Adjust the fence so that the bit is cutting the opposite side of the socket; this way, the bit pushes against the workpiece as you feed it across the router table.
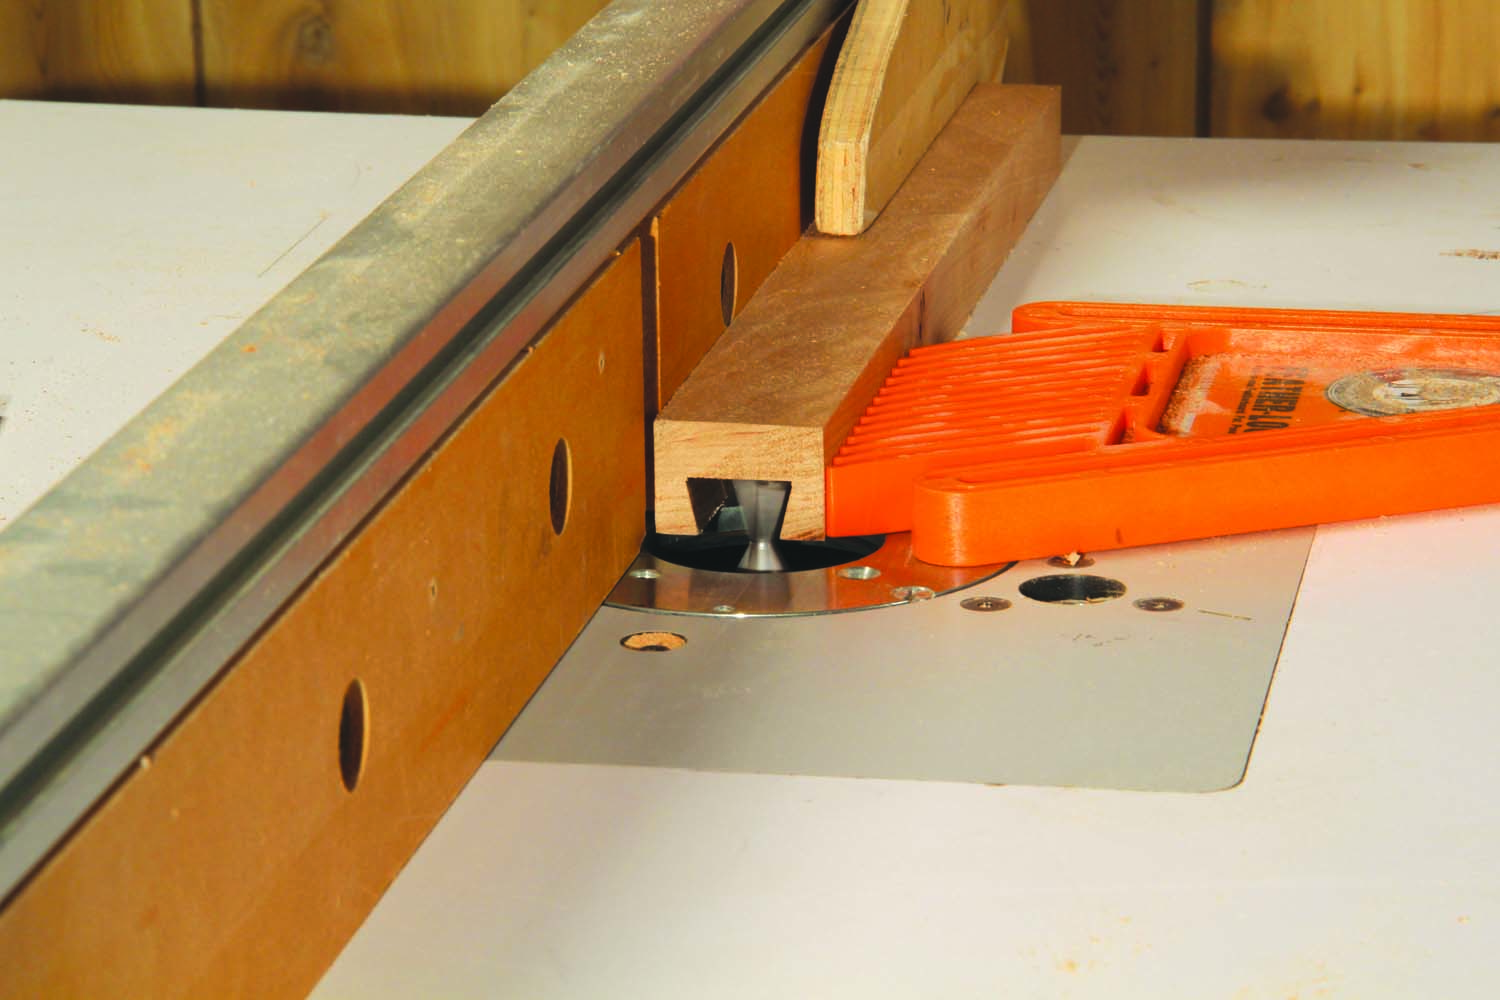
2. Rout the socket. To prevent the workpiece from being yanked forward by the bit’s rotation, position the fence so the side of the bit cuts only the near side of the socket, as shown. Flip the workpiece around to cut both sides.
Thanks to the tablesaw work, you’re removing very little wood in this operation. Go right for the lines you drew. After making one cut, turn the piece around to complete the socket.
Make the dovetail
Mark one of your dovetail pieces as “Test,” then stand it on end in a vise. Place the socket piece on top of it and trace the socket, as best you can, on the end of the test piece—this is just a rough guide. Back on the tablesaw, remove most of the waste on the test piece and on the “real” piece (Photo 3 and Fig 02, Step 4.)
3. Remove most of the waste from the mating piece. Use a subfence so you can position the blade right at the edge of the workpiece, creating a rabbet.
It’s time to go back to the router table, but hang on a sec. Tearout above the bit, resulting in a raggedy edge on the side of the joint, is a common problem when routing the dovetail. If this surface will show on whatever you’re making, it’s best to score the wood first. There are two ways you can do this. One option is to use a cutting gauge (a marking gauge with a knife-like cutter) to incise a deep line where the dovetail’s shoulder will be. Alternatively, adjust the router table’s fence so the bit makes a cut that’s only 1/16″ or so deep.
After the scoring cut, adjust the router table’s fence to make the dovetail full-depth. Don’t go for it on one shot, however. The iron rule for this setup is to start fat and finish lean. That is, make the dovetail extra-wide at first, then reduce the dovetail’s width by a series of light cuts until you get the fit you want. When you get close, a few thousandths of an inch matter—it’s that fussy!
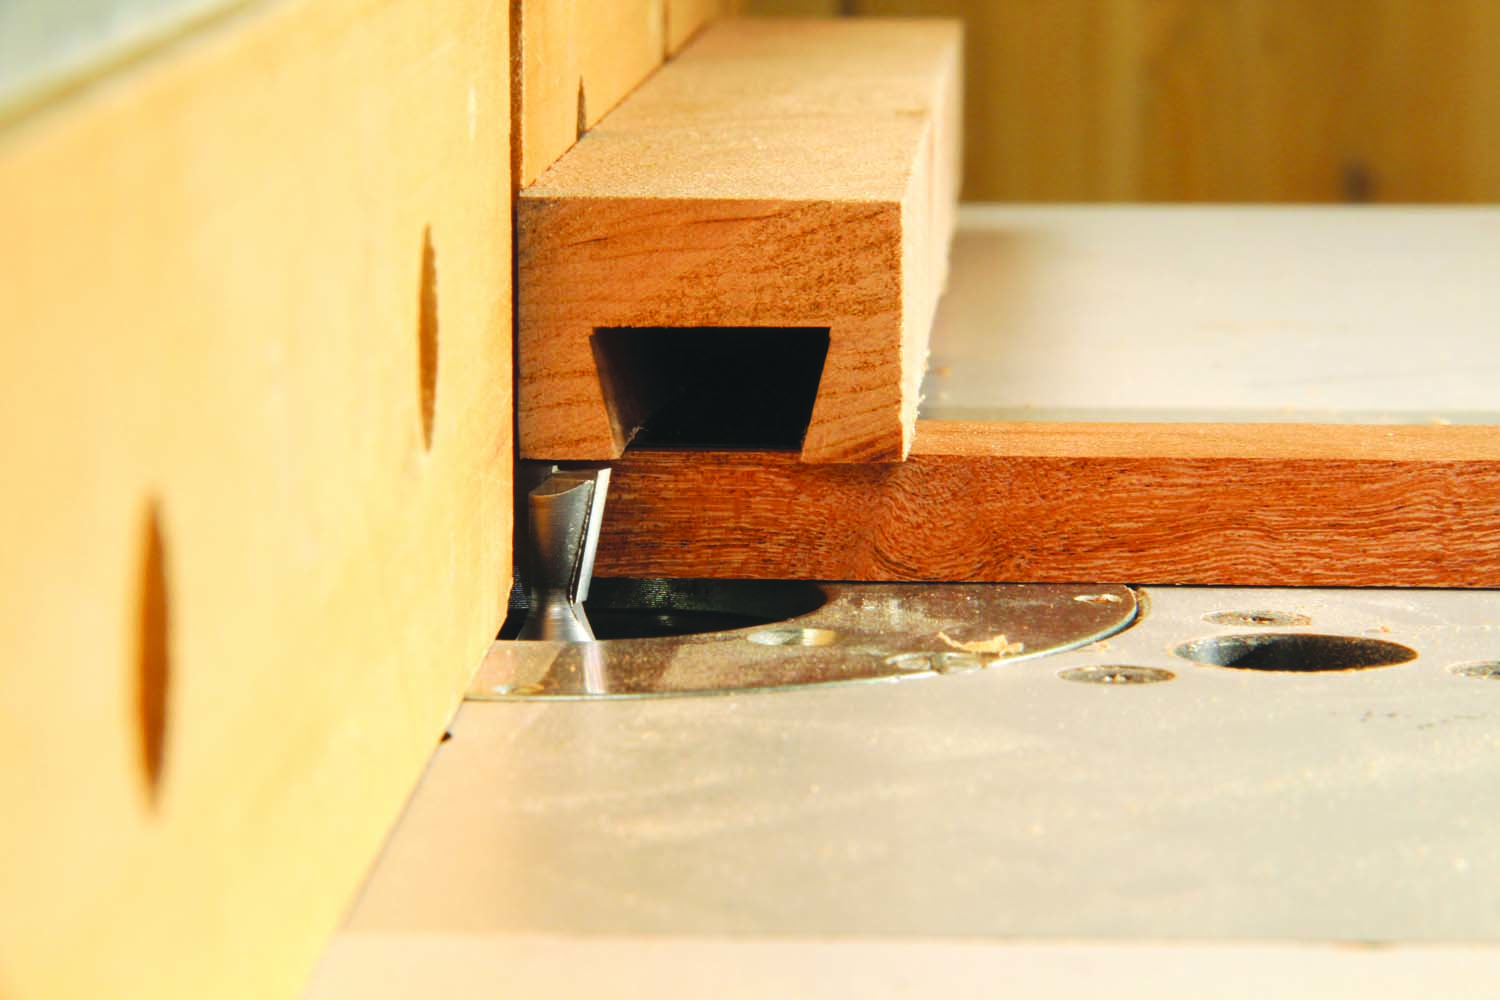
4. Set up the router table for cutting the dovetail. Use the socket piece to position the fence. Support the piece on a board whose thickness equals the height of the bit.
Without changing the height of the bit, use the socket piece to position the fence. Place this piece directly above the bit, then move the fence so that the bit’s tip extends 1/32″ to 1/16″ short of the portion of the socket immediately above it (Photo 4). Rout both sides of the test piece, then try fitting it into the socket—if all is well, it shouldn’t go. (Note: To guarantee a smooth cut, use a featherboard.) Rout both sides of the second dovetail piece.
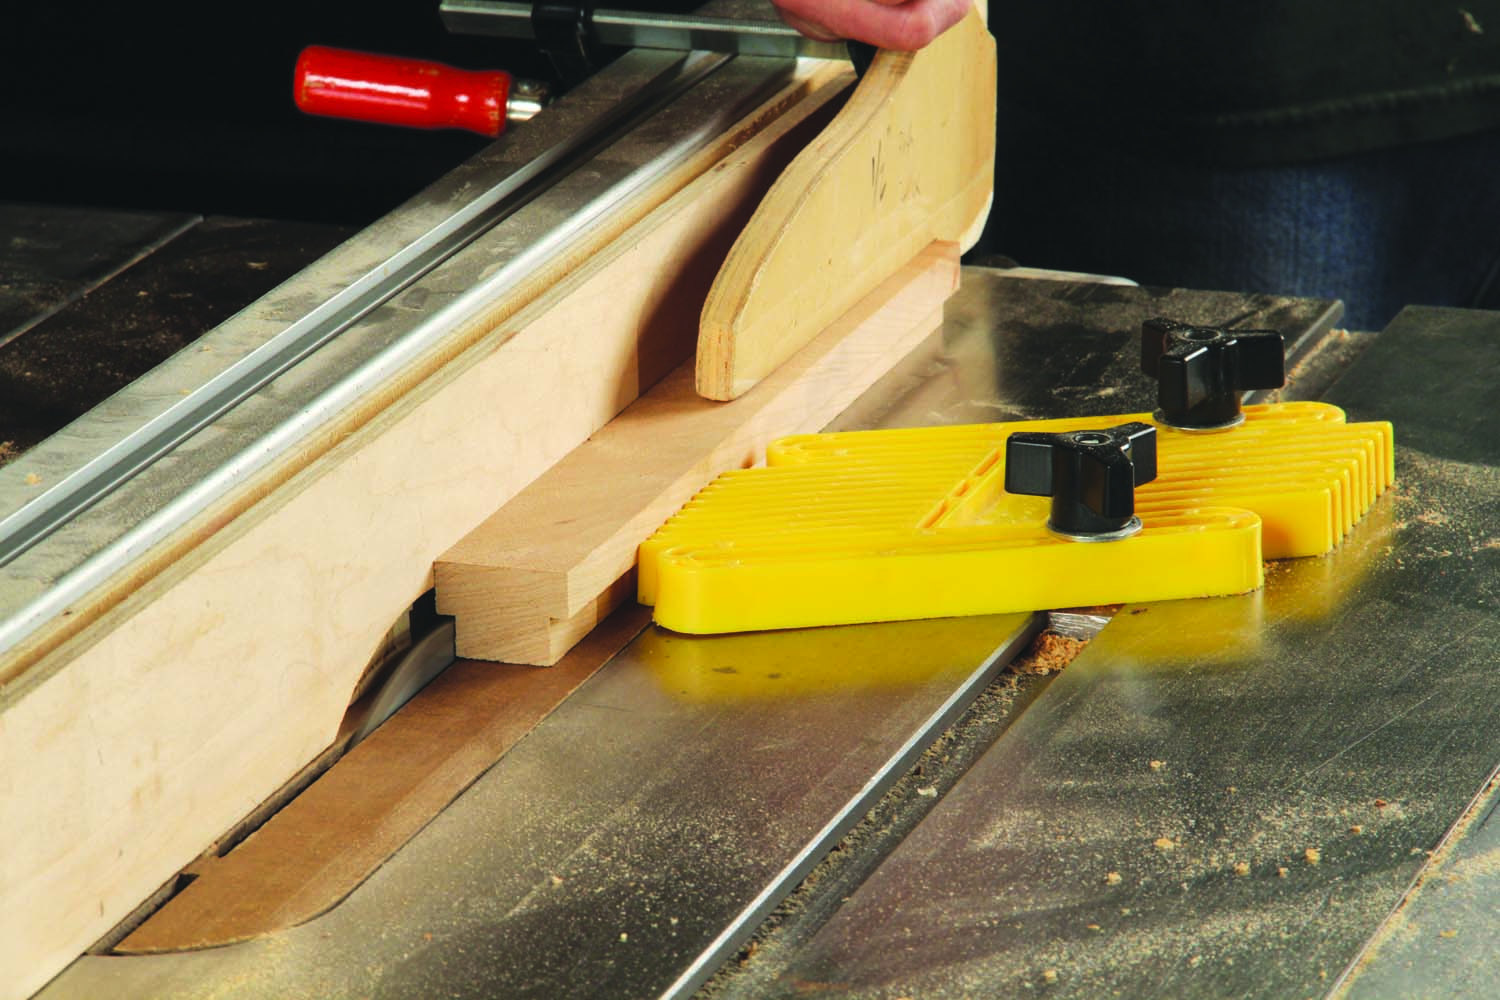
5. Rout the dovetail. Don’t go for the perfect fit on the first pass; start oversize, then move the fence back in small increments to make the dovetail narrower. Place several shims between a stop block and the fence. Remove one shim, and reposition the fence, after each pair of passes.
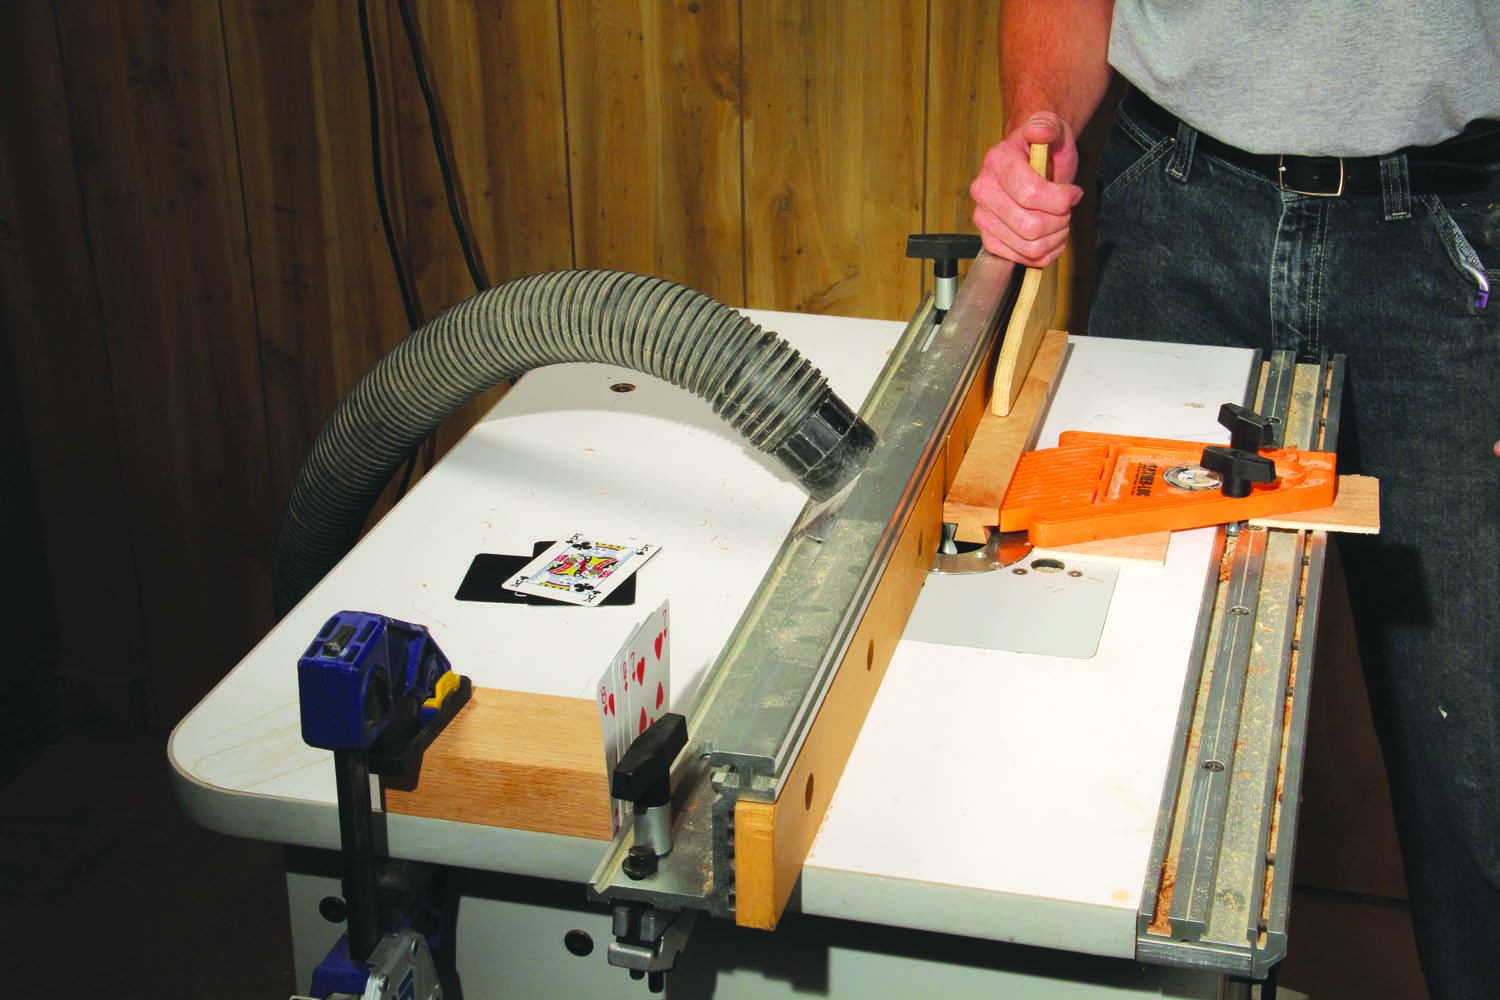
To make the dovetail smaller, gradually adjust the fence back from the bit. I use a micro-adjust system that’s dirt simple (Photo 5). There’s nothing to fabricate—you just need a clamp, a block, ten playing cards and a couple of small pieces of paper. Place the cards and paper behind the fence; they’ll act as shims. Push the block against the stack of cards and paper, then clamp the block to the router table.
To set up the next test cut, remove one or two cards, then loosen the fence and push it against the remaining cards. Tighten the fence. Rout one side of the test piece and try fitting the piece into the socket; if the dovetail is still too large (and it should be), rout the other side and try again. If it doesn’t fit, fine—you’re good to rout the second, “real” piece.
Continue in this fashion until the fit is just about right; at this point, you should only be removing one card at a time. When you get extremely close, take even lighter cuts by removing the pieces of paper, one at a time. Just remember to rout the pieces in tandem; do the test piece first, try it out, then do the real piece. Be patient. Eventually, the socket and dovetail pieces will slide together perfectly.
To minimize friction between the two pieces, plane or joint the bottom of the dovetail piece (Photo 6).
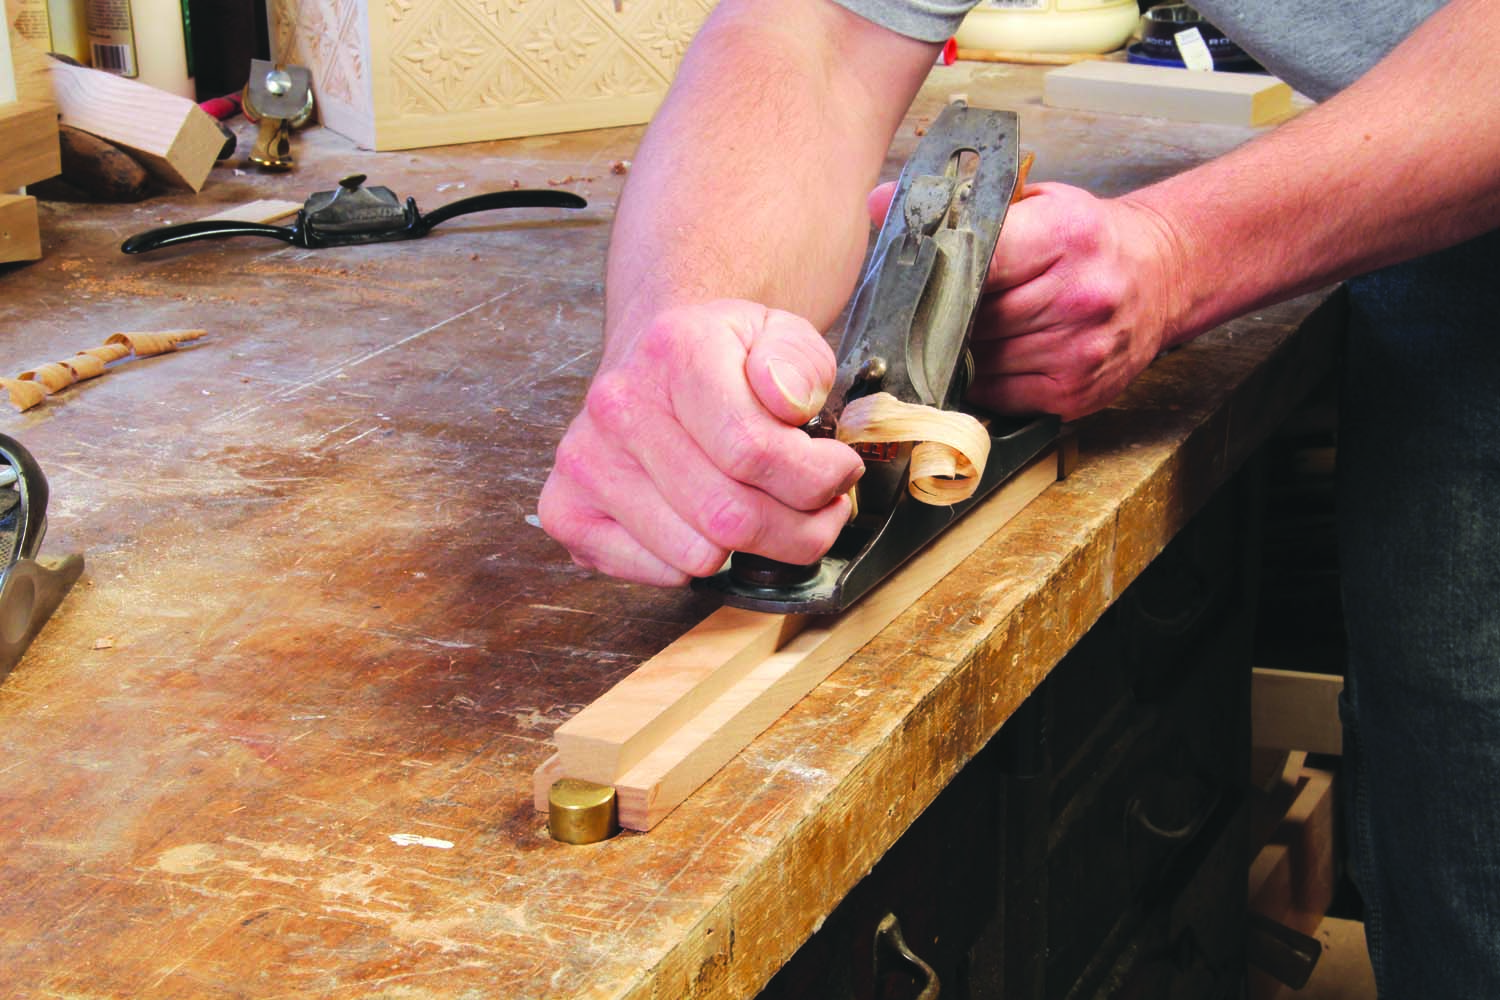
6. Plane a few shavings off the bottom of the dovetail. This creates a clearance between the two halves of the joint, making it easier for them to slide past one another.
Once you’re done, hang on to the sliding dovetail pieces. They’ll be good to refer to later, when you need to make an actual joint, or you can turn them into a useful and clever project.
Here are some supplies and tools we find essential in our everyday work around the shop. We may receive a commission from sales referred by our links; however, we have carefully selected these products for their usefulness and quality.