We may receive a commission when you use our affiliate links. However, this does not impact our recommendations.
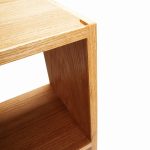
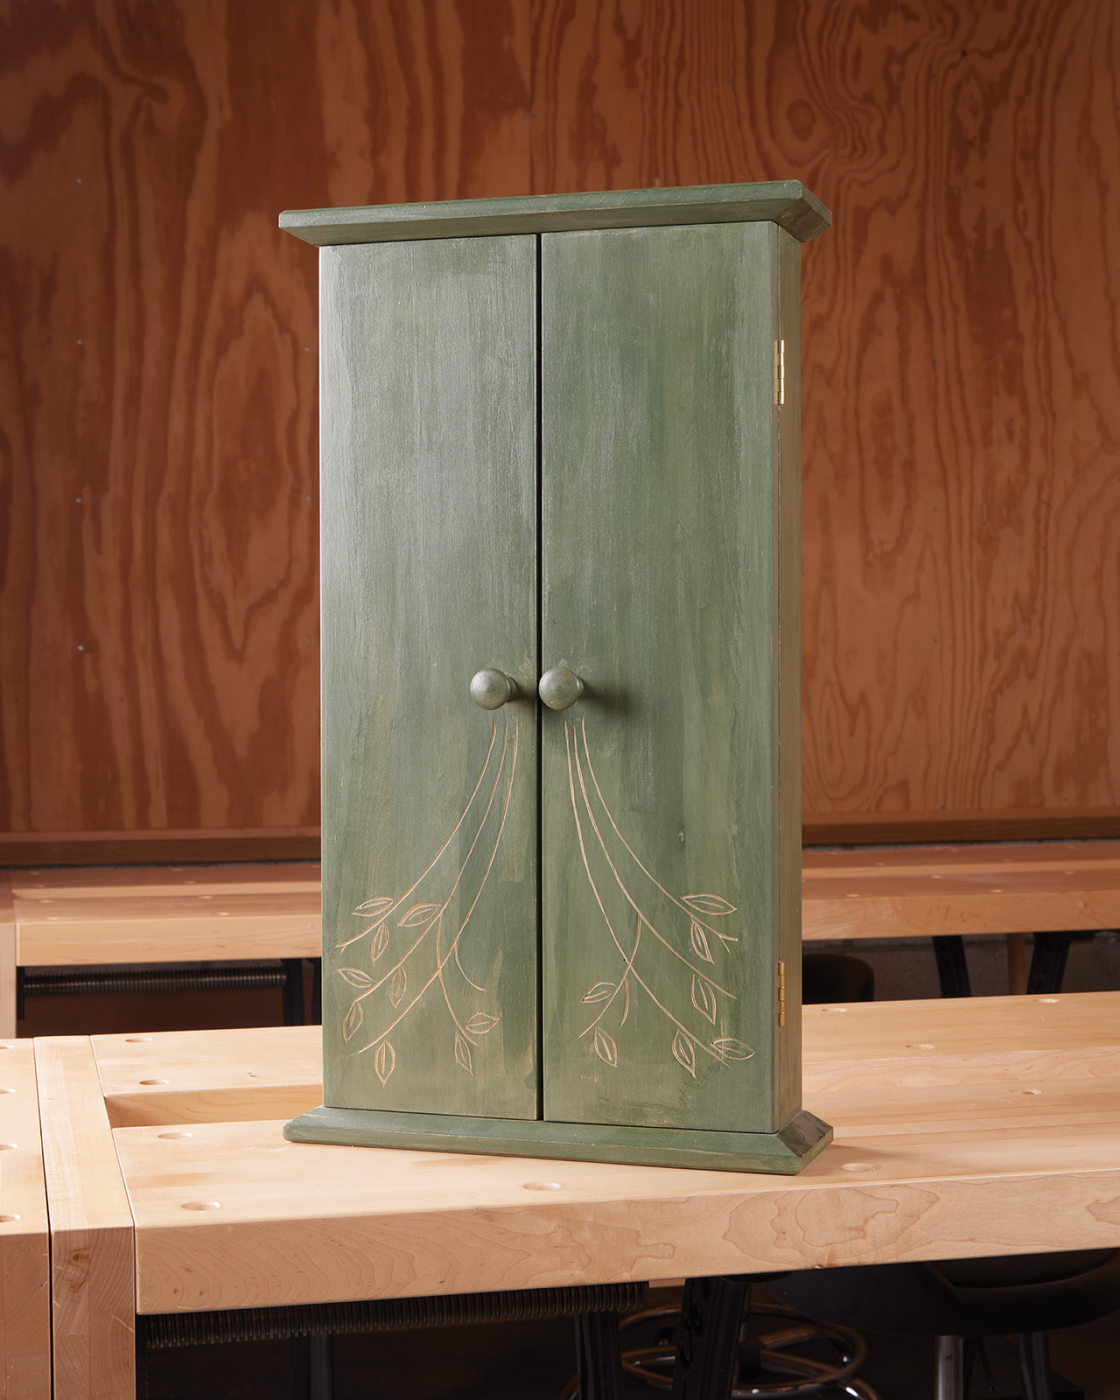
 Simple construction and elegant design make this cabinet a welcome addition to any decor.
 Simple construction and elegant design make this cabinet a welcome addition to any decor.
Project #2403 • Skill Level: Intermediate • Time: 2 days • Cost: $100
Ever work much with dowels? Many artisans would shy away from the use of dowels having had experience with broken down old chairs where they were pushed by industry beyond their best use. In making small cabinets, however, I’m reminded of the work of James Krenov and his use of them in lighter applications than in making chairs. Chairs are regularly torqued in the wrong direction. Small cabinets rarely face such abuse.
On the other hand, dowels find a great use in this small basswood cabinet, attaching the top and bottom to the sides. Of course, you might use biscuits, dominoes, mortise and tenon joints, or even pocket screws in building this small cabinet and have great, lasting results. However, dowels are a cheap alternative, requiring only a drill, a doweling jig, and a drill press or other means of drilling vertically into a piece of wood. While I sized this cabinet to hold kitchen spices in their usual jar sizes, it can be easily modified for a variety of uses. You can add shelf support holes to make the shelves adjustable for a variety of objects or easily make it deeper by simply using wider stock.
Other features of this cabinet may be more noticeable than the means used to attach parts. For instance, it has a milk paint finish that’s been carved through freehand with a simple “v” gouge adding a simple botanical accent to each door. The door pulls are turned in a shaker style. You can turn your own on the lathe as I did or find knobs of suitable style from a store or online. Less noticeable is how easy it is to hang or equally remove for cleaning or in the event it’s to be moved or the room must receive fresh paint. The French cleat hanging system assures mounting is easy.
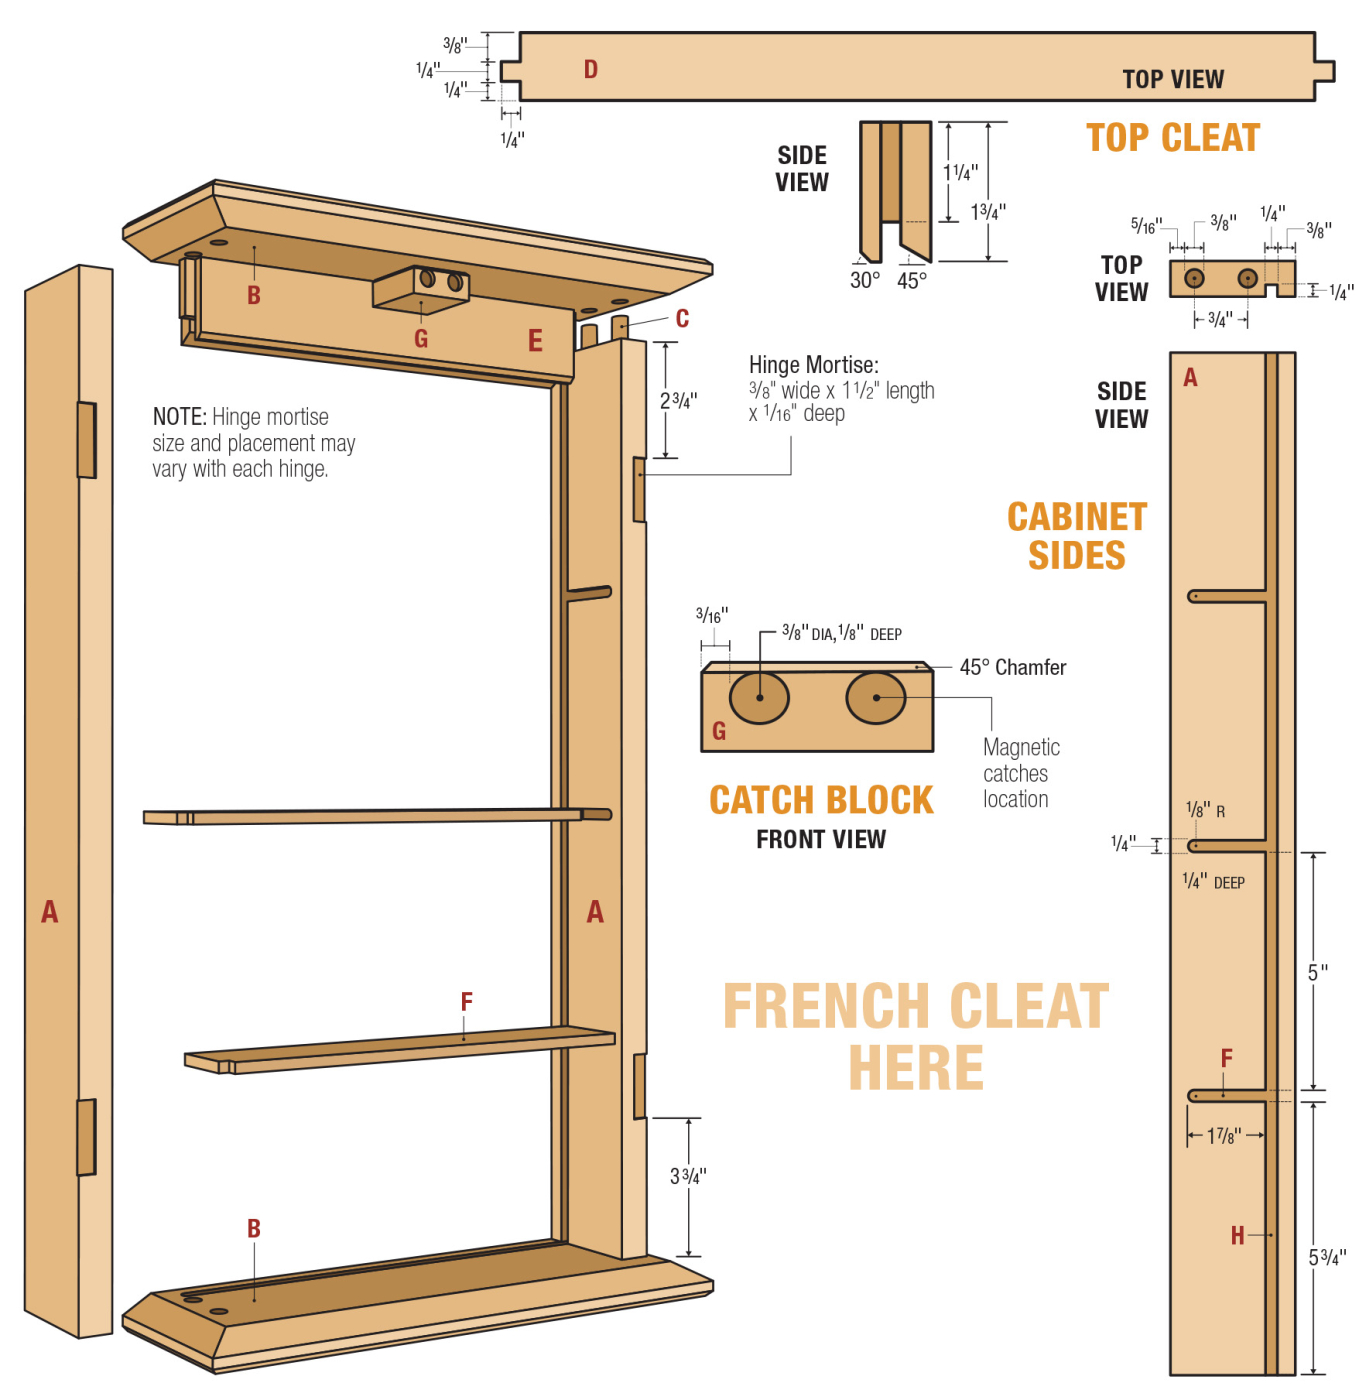
Cutlist and Diagrams

 Let’s Start Building
 Let’s Start Building
After milling the various parts to thickness and size, I start with my trusty model #59 doweling jig, a tool in my shop since the 1970’s. I wore the depth stop out and never missed it, as a block of wood drilled through from one end to the other with a drill sized to fit the diameter of the dowel choice is better and more reliable in the first place. With the block of wood shortening the length of the drill, simply adjust the drill in the chuck so the necessary length will protrude through the jig.
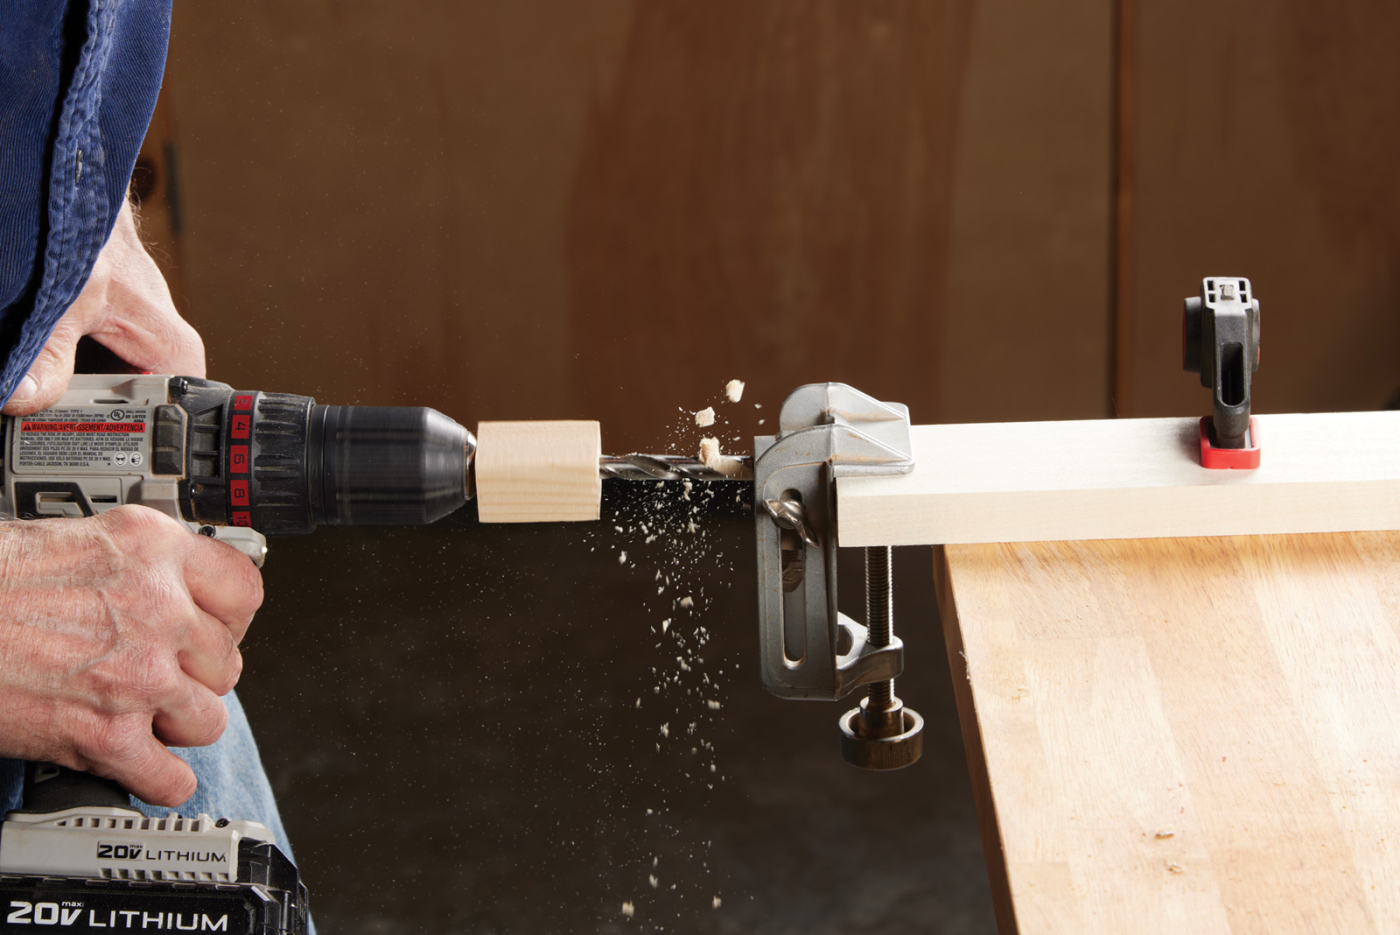
1 A block on the drill bit is a good way to set the depth.
Clamp the cabinet sides firmly on the workbench, align the doweling jig with marks you’ve made on the ends, and drill. I position the dowel holes, keeping in mind to leave room for the location of the back panel.
Mark Locations & Drill
An easy way to locate where matching holes must be drilled in the top and bottom of the cabinet is to use dowel centers. Dowel centers are small pieces of metal designed to fit in holes of various sizes. They have a point at one end that’s used to mark the opposite piece.
You can also mark and measure the holes, but the dowel centers offer an alternative that can compensate for errors that might have accrued in drilling the dowel holes in the cabinet sides. After woodworking for a while or as long as I have, you know that not all goes exactly as planned.
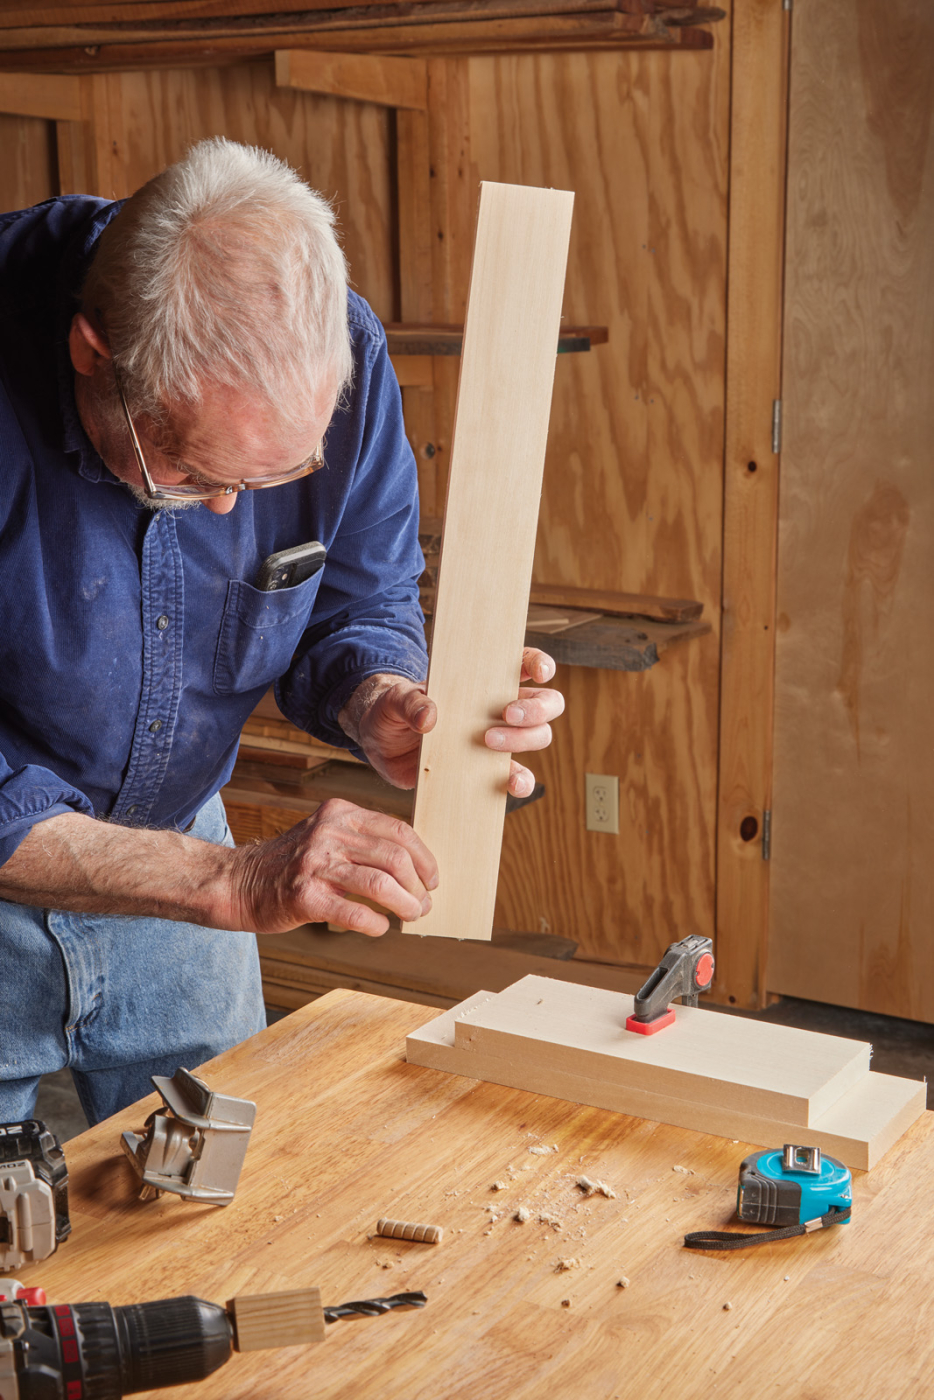
2 Use a piece of scrap to position the sides.
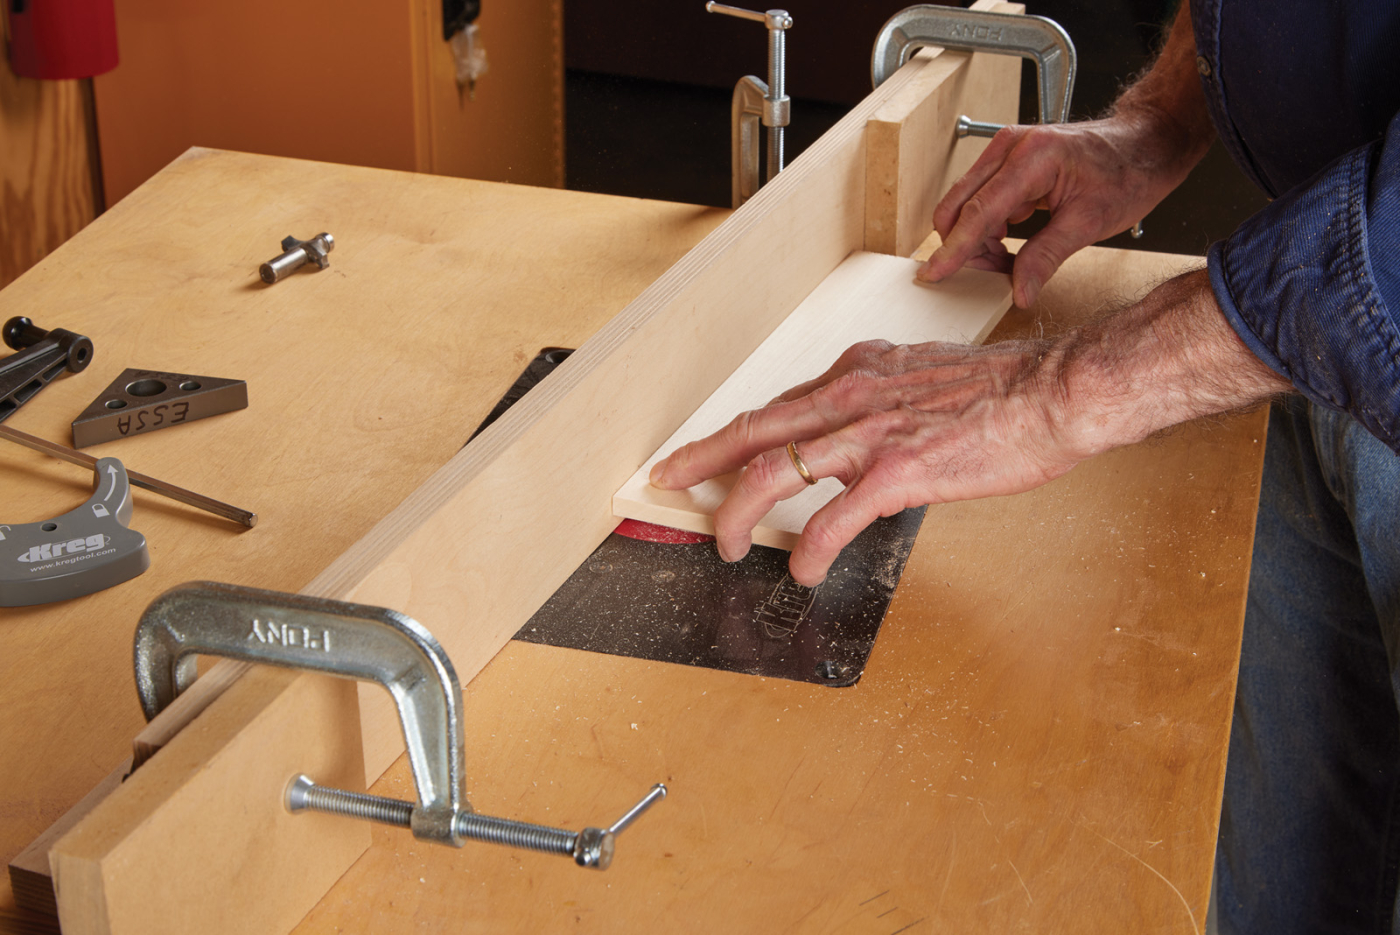
To make certain that the dowel centers mark exactly in the right location, I used a spacer block centered in position on the base and top of the cabinet. Cut the space block to represent the inside space measured from one side to the other. Mark the spacer’s centerline and align that mark with a centerline you mark on the top and bottom pieces. Then with the spacer clamped in place, insert the dowel centers in the dowel holes in one end of the cabinet sides, hold the cabinet side in position and lightly tap on the end to drive the tips of the dowel centers into the wood. Do this same operation with each of the sides. Note that the sides will need to be positioned parallel to the back edges of the base and top parts of the cabinet. The spacer block will assist in holding the cabinet sides accurately in place.
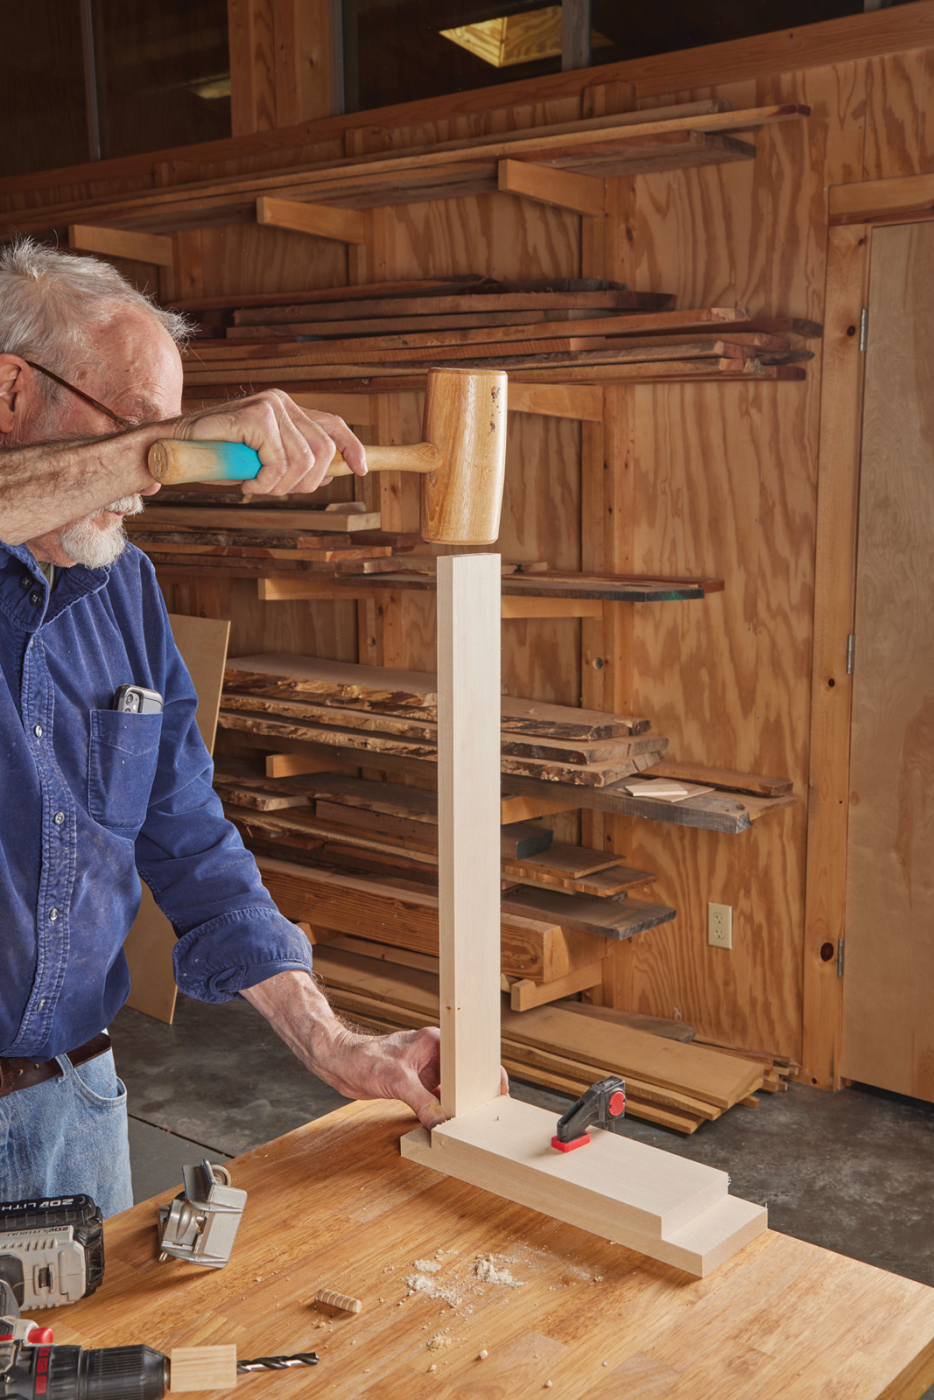
3 Tapping the sides with a mallet will transfer the dowel locations via dowel centers.
With the top and bottom of the cabinet marked for drilling, use the drill press to drill the holes for the dowels.
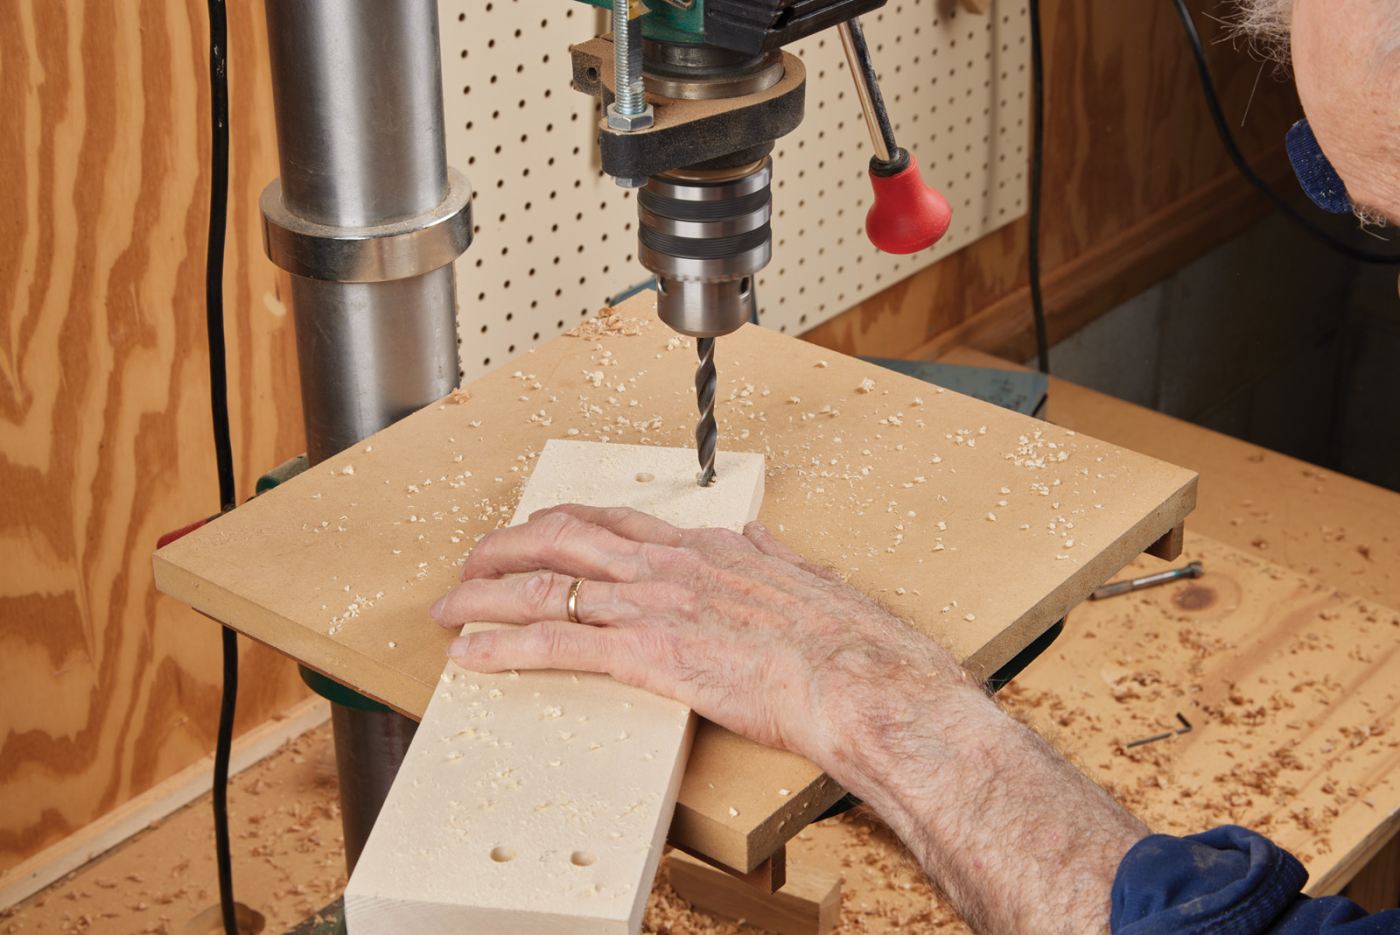
4 Drill the dowel holes in the top and bottom at the drill press.
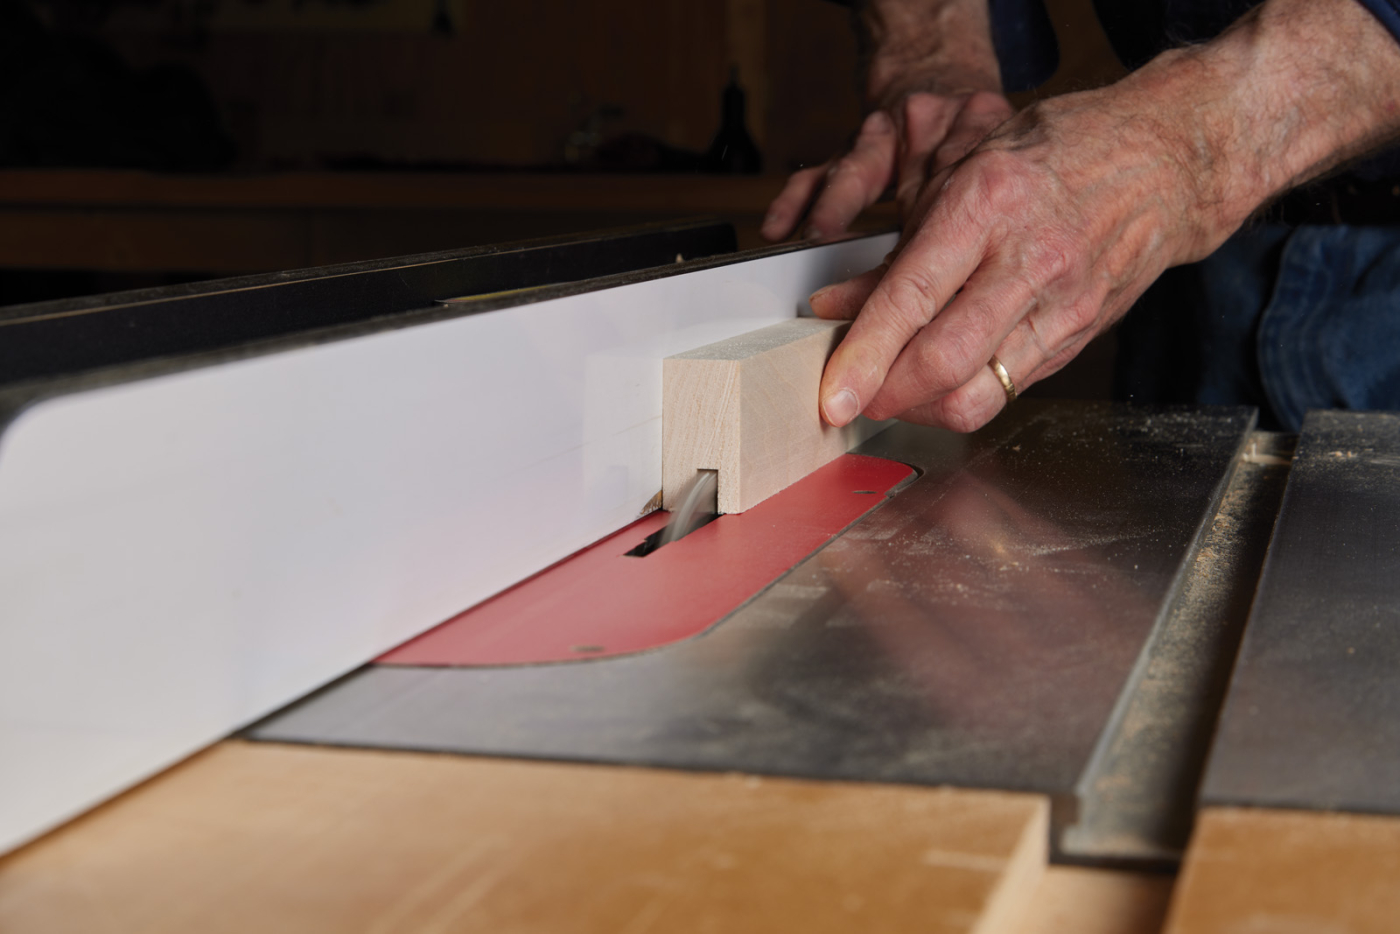
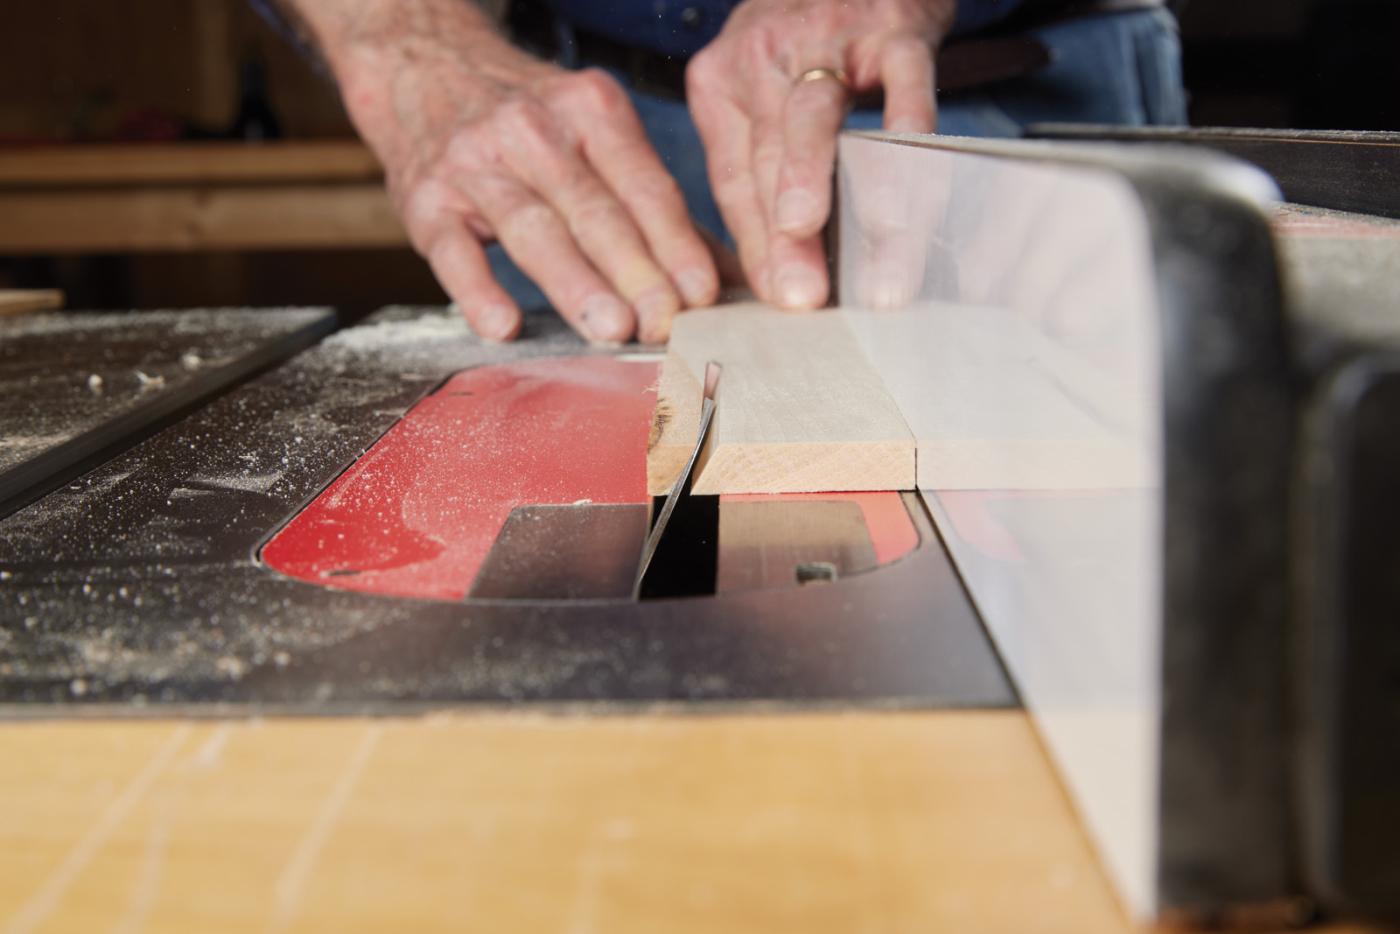
Angle Cuts
A feature that I like in this cabinet is the angle cuts made along the ends and fronts of the top and bottom. That must be completed before the cabinet is assembled. Set the table saw blade angle to 30°. I use a sliding jig to carry the stock along the fence, finding that safer and more comfortable than simply using the fence. The guide helps to hold the stock square to the top of the saw. Setting the distance between the jig and blade is critical, as the angle must not intrude on the space required for the cabinet side. Cut the ends first. Then make the same cuts along the front edges of the top and bottom.
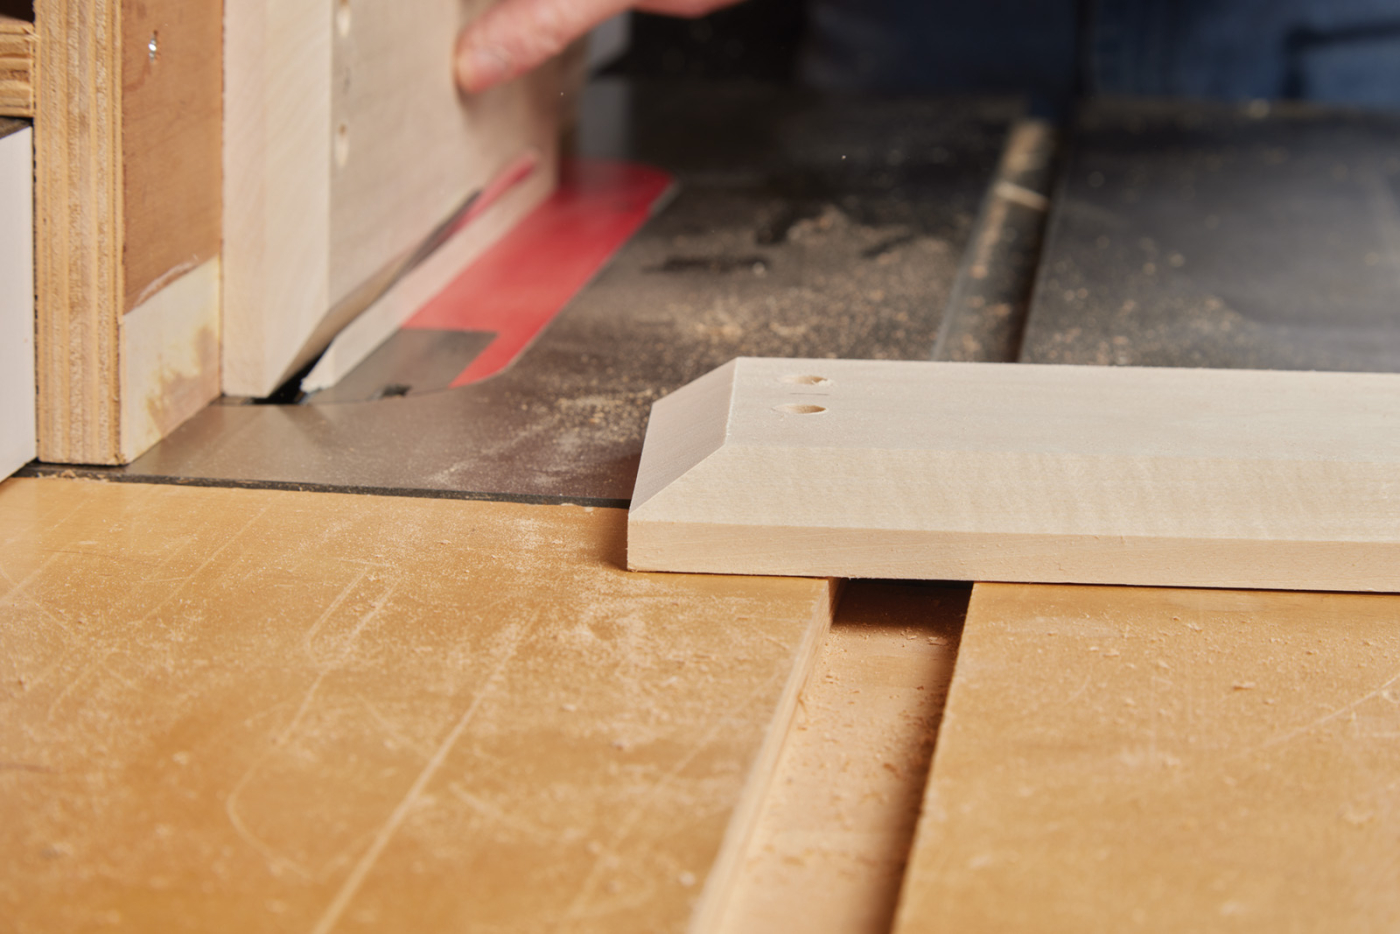
5 Rip a chamfer along the ends and front of the top and bottom.
The Cabinet Back
Use a 1/4“ spiral up-cut router bit in the router table to rout the groove in the bottom of the cabinet for a 1/4“ Baltic birch plywood back to fit. Use stop clamps to the router table fence to control the length of the groove, making sure that it will not be exposed in the finished cabinet. To allow for the French cleat, the space between the fence and the router bit must be 3/8“ and the height above the surface of the router table should be 1/4“. Then use the table saw to make matching grooves in the cabinet sides. I used a stacking dado for this operation, cutting a 1/4“ width of cut, 3/8“ from the edge of the stock and a depth of 1/4“.
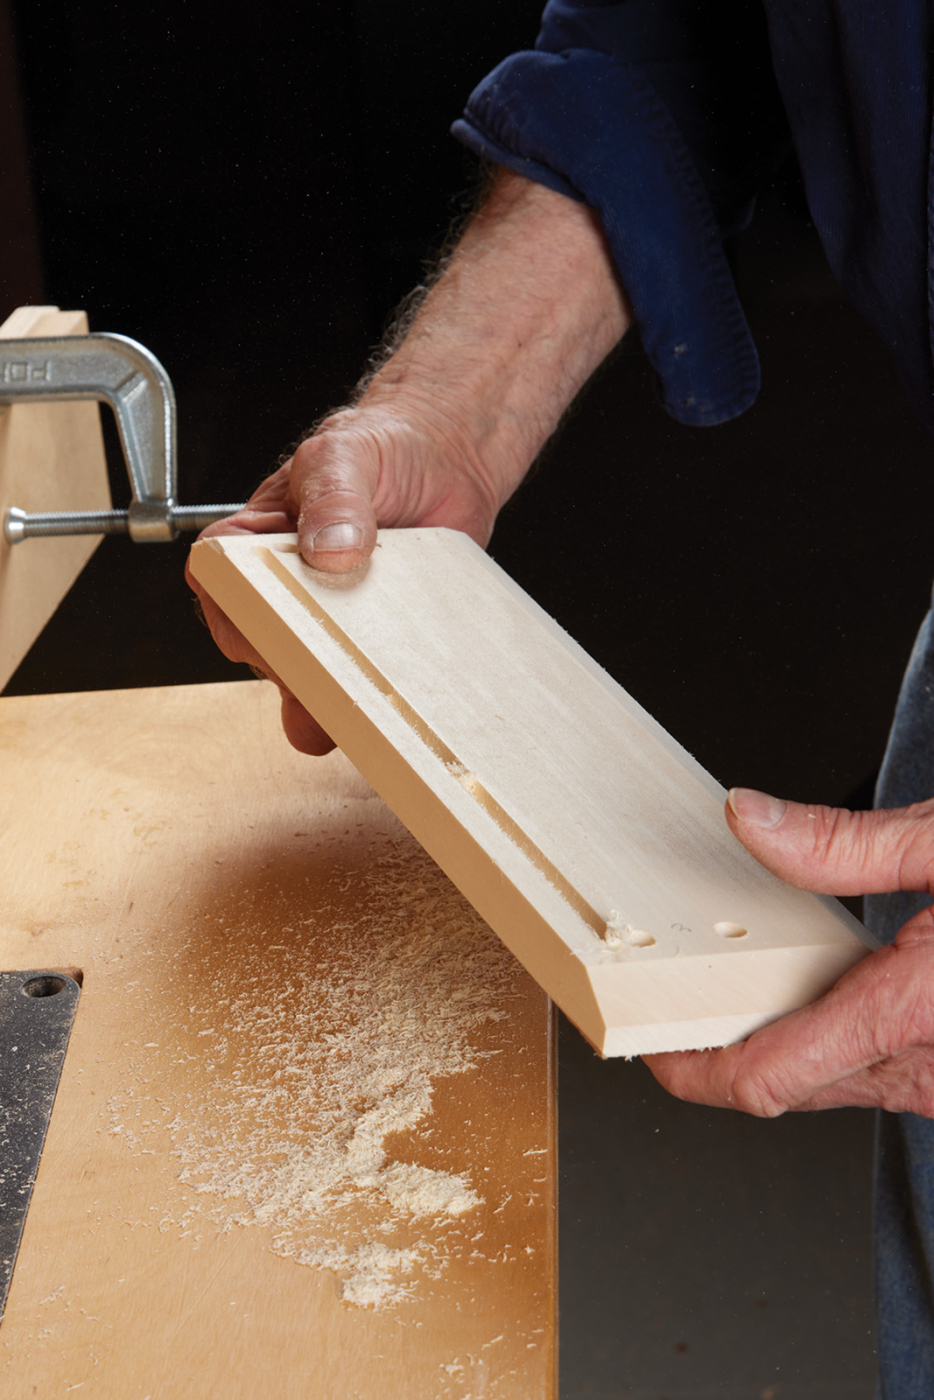
6-7 Rout a stopped groove in the bottom. This is for the back panel.
8 With a dado blade, cut a groove in the side panels.
Make the French Cleat
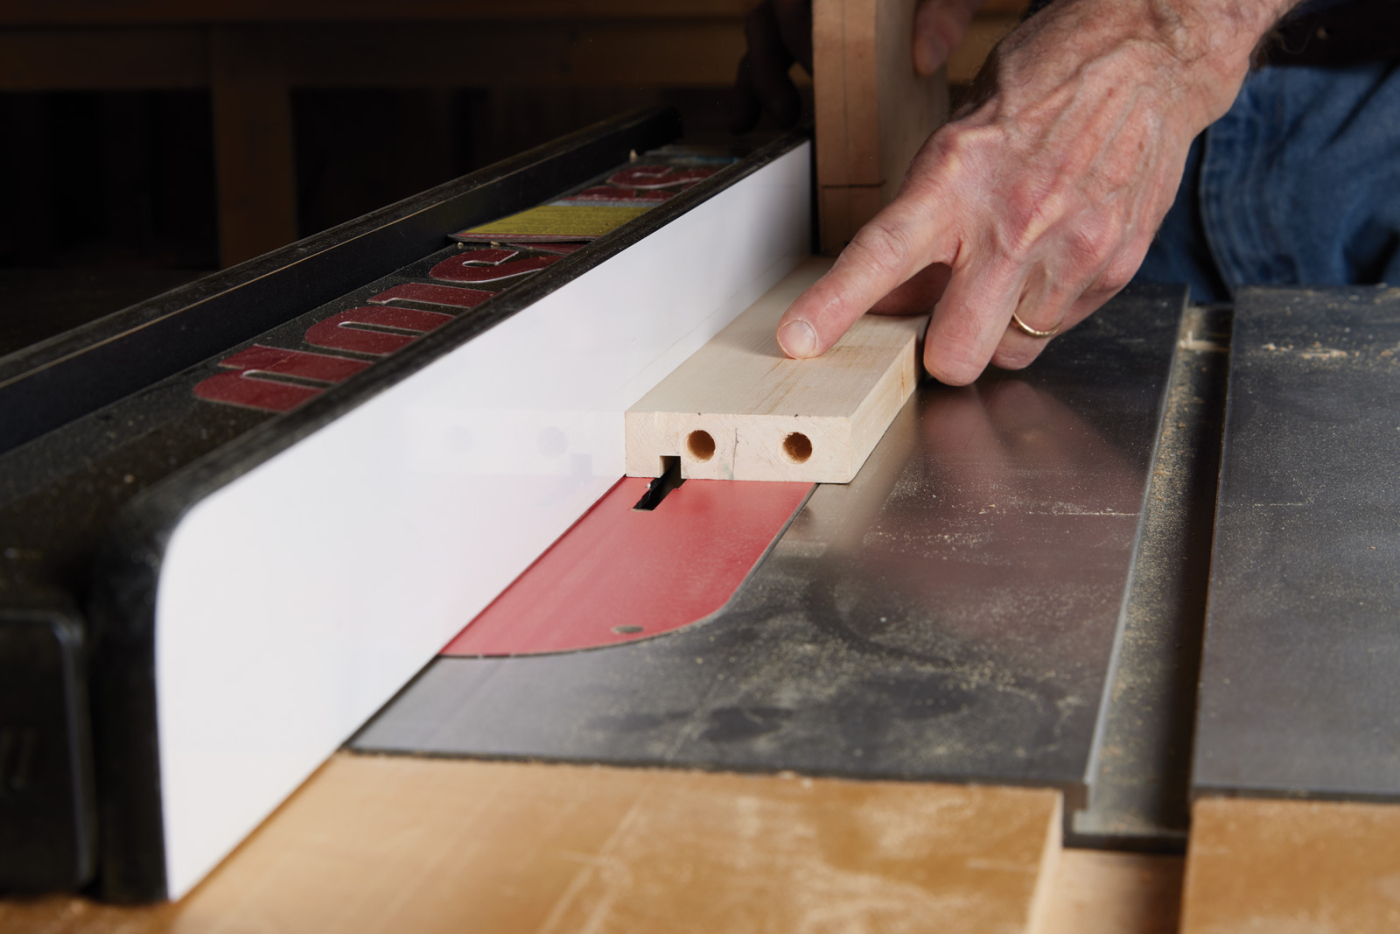
The next step is the most complicated in building this cabinet, as it involves making the French cleat that also serves as the cross stretcher when glued in place to square the cabinet and give it additional hanging strength. With the dado blade still in the saw, raise the cutting height to 1/2“. This is to allow for the angle cut for the French cleat, that it can be made while still securing the Baltic birch back panel. After making this cut, form the ends of the hanger to fit into the dado cuts made in the cabinet sides. Set the blade height to 1/4“ for this operation. I use the jig that slides along the table saw fence to hold the stock vertical, removing 3/8“ from one side of the hanger pieces and 1/4“ from the other, leaving a 1/4“ x 1/4“ tongue on each end that can be glued into the cabinet sides during assembly.
9 This will become the integral cleat that the cabinet is hung on.


10-11 Use a vertical jig at the table saw to form a tenon on the ends of the cleat. These fit into the groove that was cut in the sides.

12 Tilt the tablesaw blade and rip a bevel along one edge of the cleat.
13 Create the other half of the French cleat by bevel-ripping a piece of stock that will be attached to the wall.
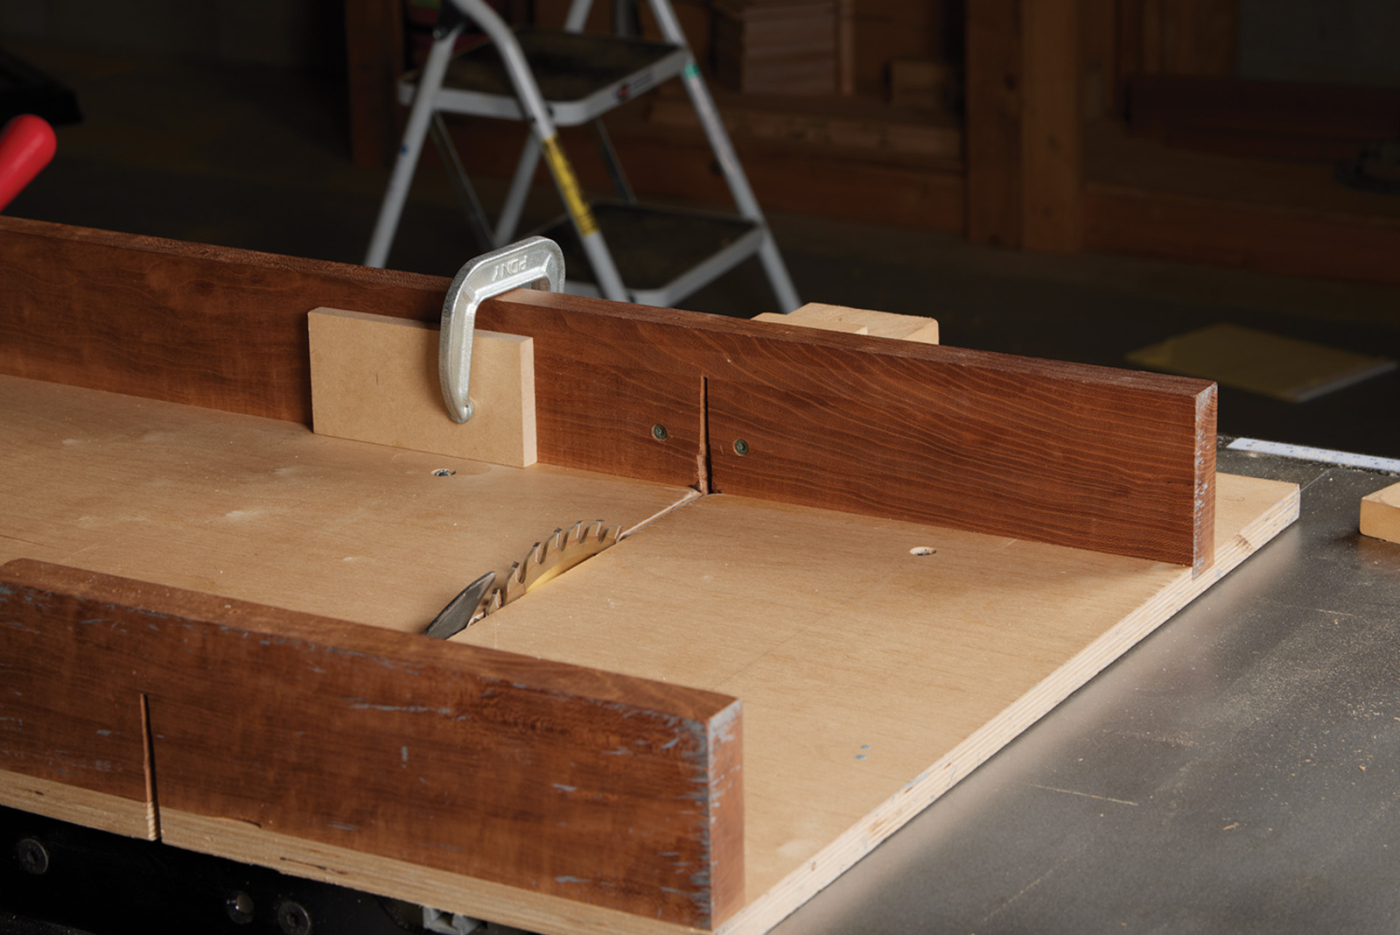
Put the combination blade back in the table saw and tilt the blade angle to 30°. Then make the cut along the back edge of the hanger to form the angle cut to match the French cleat. Cutting the French cleat comes next. Refer to the project rendering at the top of this article for the French cleat dimensions.
Fitting the Shelves
To fit the shelves in the cabinet, rout grooves for them to fit. I use a guide block clamped in place with the two cabinet sides held secure, side by side so I can make certain that the grooves on the opposite sides are aligned. Use a plunge router and 1/4“ spiral up-cut bit, and carefully mark stopping points for router travel. Be sure you move the router from right to left against the guide, as that makes certain the router’s cut is pulling into the guide rather than pushing away and needlessly widening the cut.
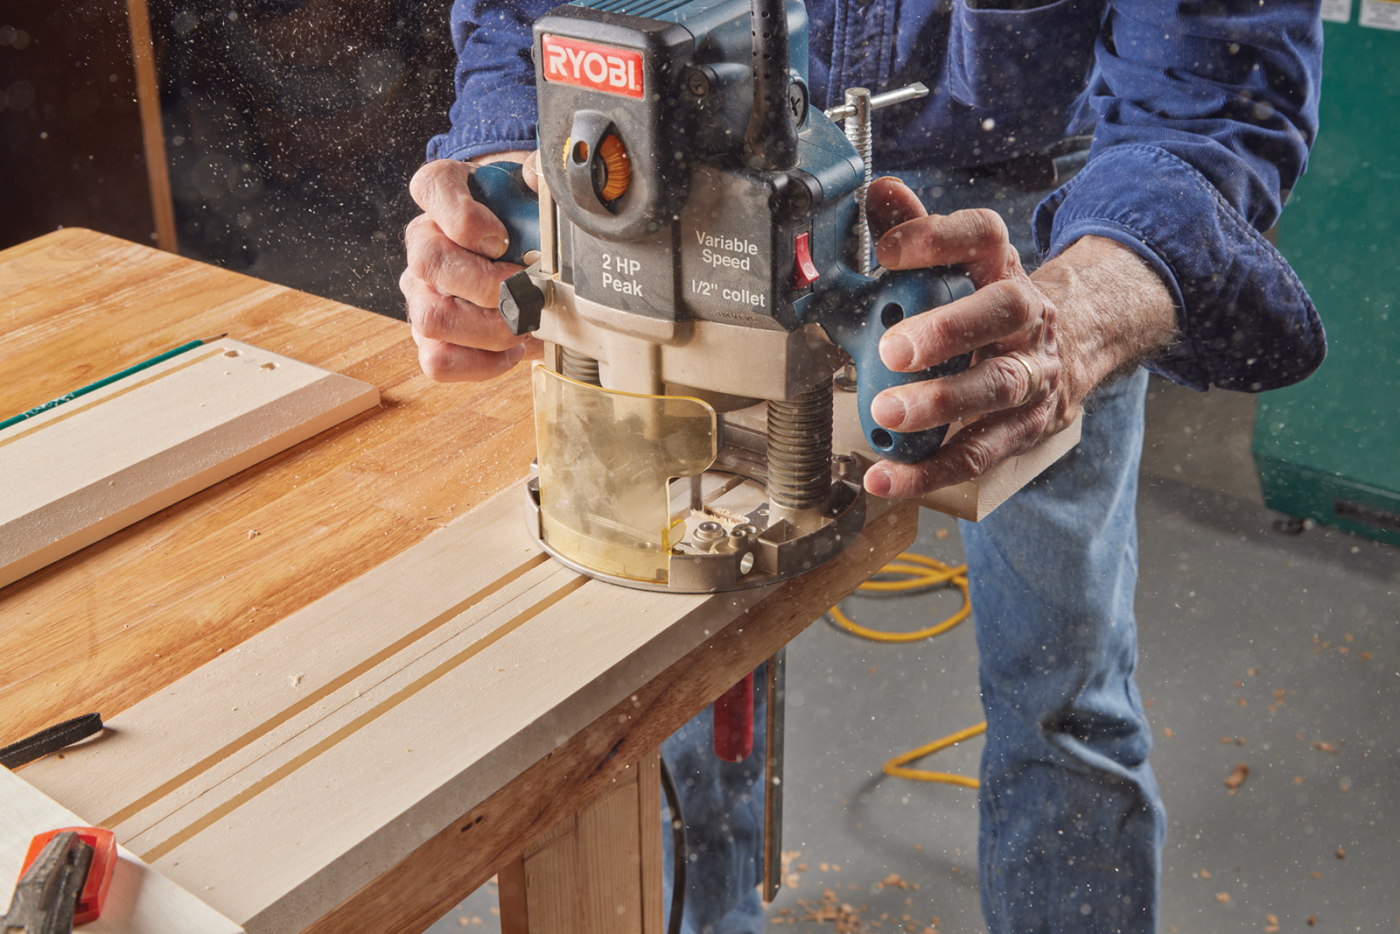
14-15 Use a piece of scrap as a fence to guide your router to form stopped dadoes in the shelf sides.
In making the shelves to fit, I make notches at the front edge to cover the stopping points of router travel. This provides a cleaner look provided the notches are properly placed. Because the ends of the router travel are hidden from view, absolute precision in start and stop points of the router is are critical.
Cut the shelves to length and then notch the ends using the table saw sled. A sled and stop block work perfectly for this operation.
Final Touches Before Assembly
Before assembly, use a 45° chamfering bit to rout a small chamfer on the ends and fronts of the top and bottom. Then thoroughly sand all the surfaces that will be inside the cabinet and the cabinet sides as they will also be difficult to sand following assembly. Gently ease the front edges of the shelves using a sanding block. Also, before assembly cut the back panel to fit and sand it on both sides.
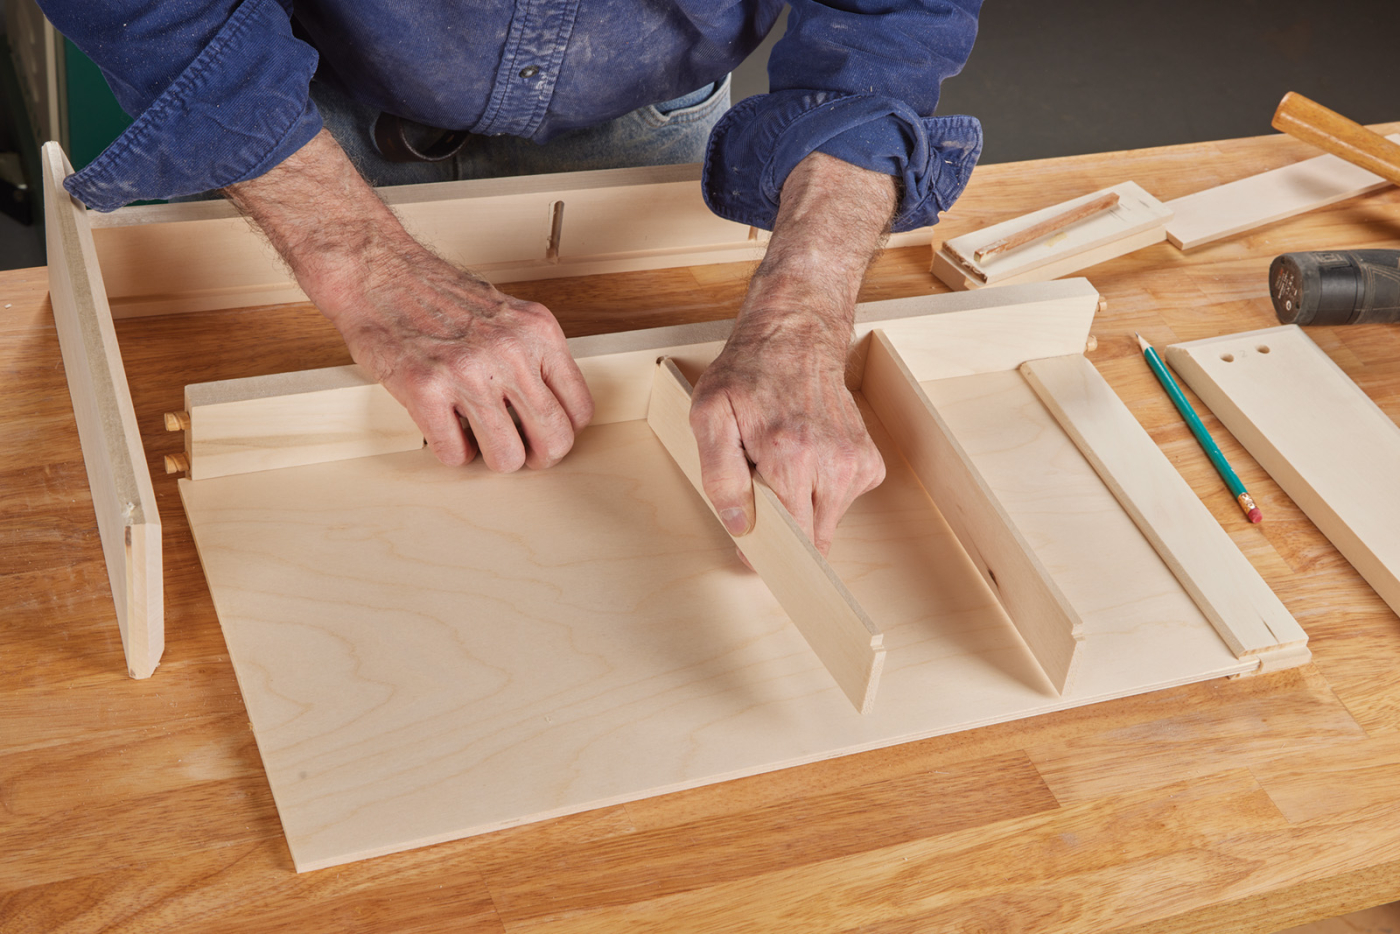
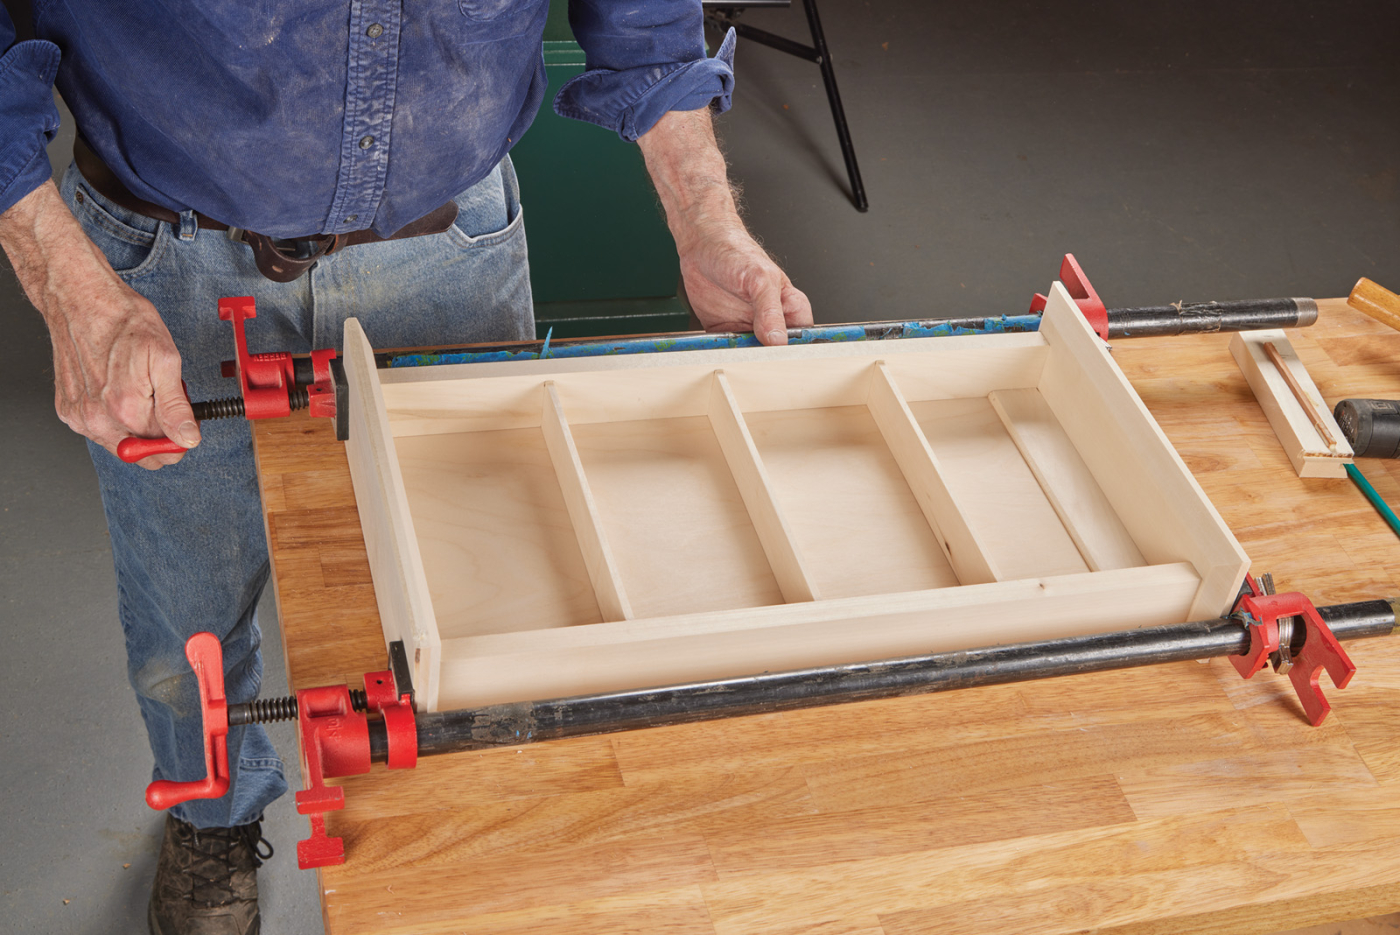
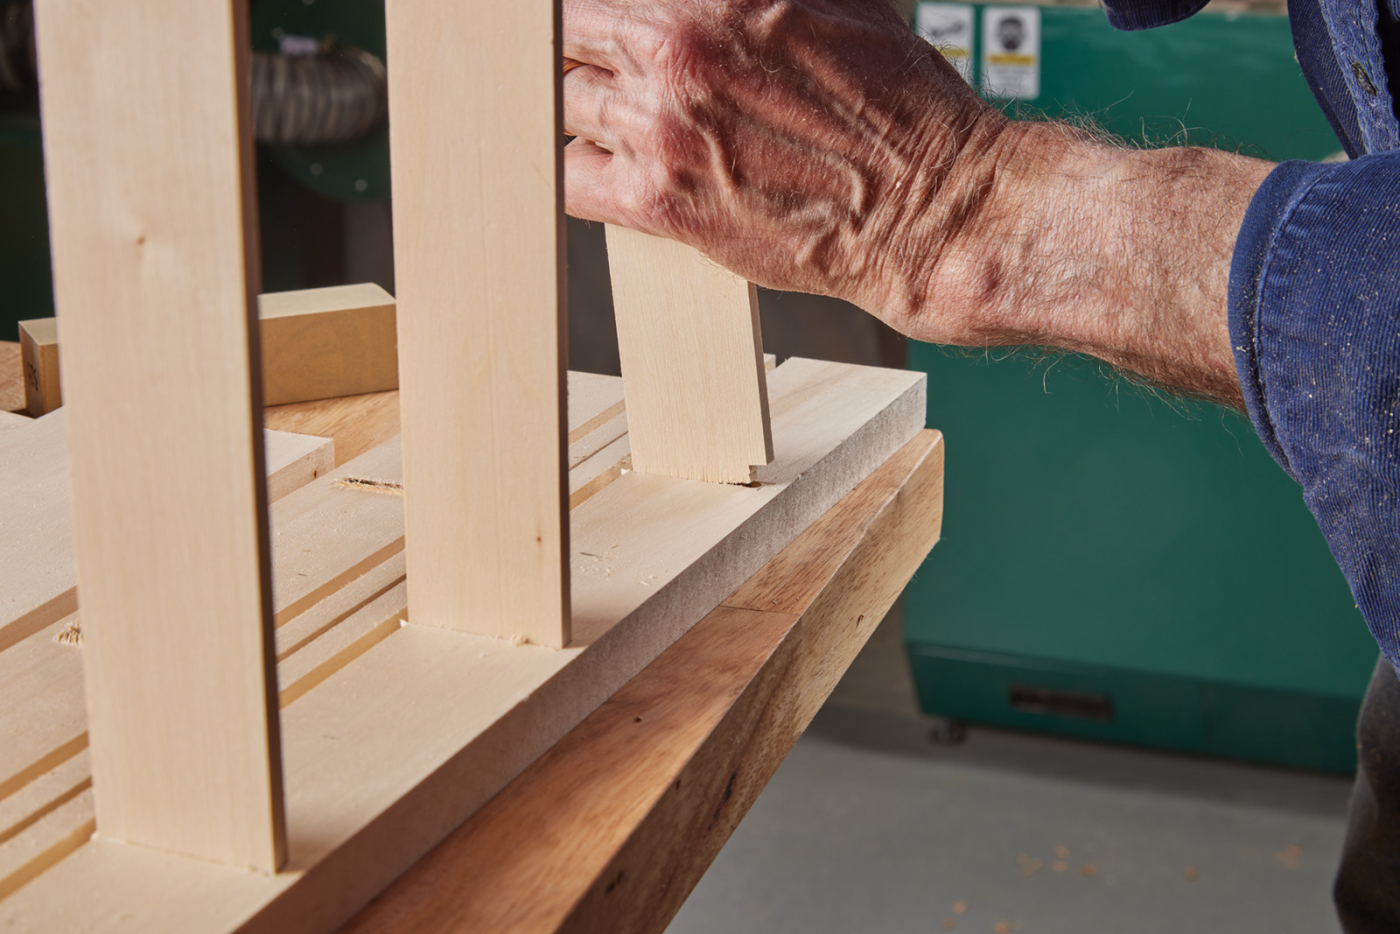
16-17 Assemble the shelf. The shelves are glued into the dadoes, and the top and bottom are glued on with dowels. Don’t forget to slip the back in place before you put the clamps on.
Cabinet Assembly
To assemble the cabinet, apply glue on the sides of the dowel holes in the cabinet sides, then use a small dowel or skewer to spread the glue inside. Tape the dowels in place. Next put the cabinet back and top stretcher/hanger in place. You need not glue the back panel in place but a touch of glue at each end will help establish a rigid structure. Put the shelves in place before adding the second side to the assembly. Then put glue into the dowel holes in the top and bottom and clamp those parts in place. It is particularly important at this time to make certain the assembly is square.
After the cabinet is glued together, it’s time to rout mortises for the door hinges to fit. The best way to do so is by building your own routing jig.
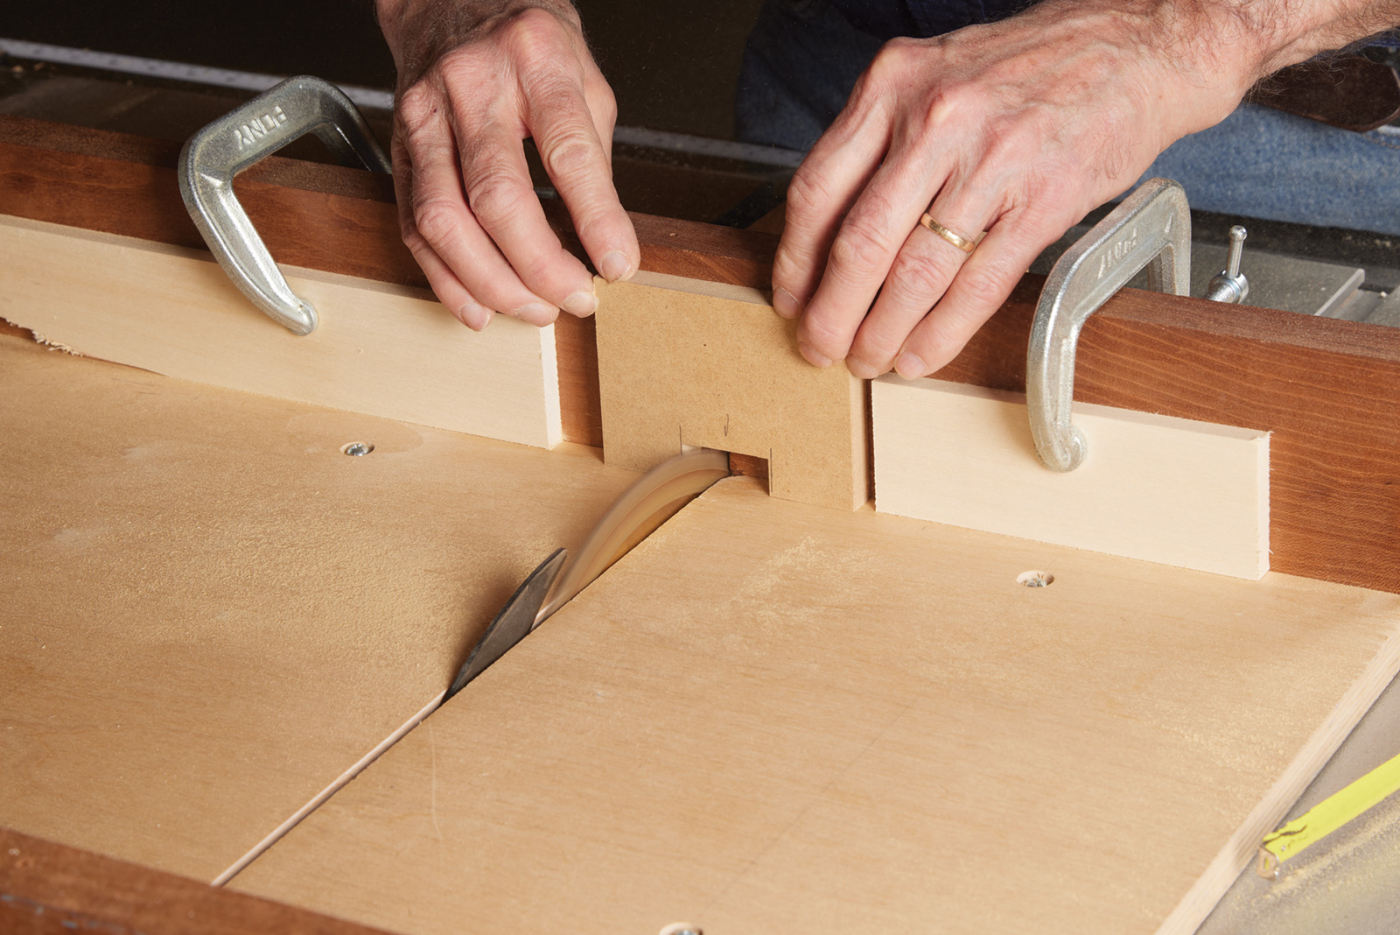
Door Hinge Routing Jig
1. Select your cabinet hinges.
2. Gather your stock.
You’ll need a 1/2” thick piece of plywood or MDF that is cut to 3″ x 4″ and a guide piece of 1/2” stock that will be clamped along one edge.
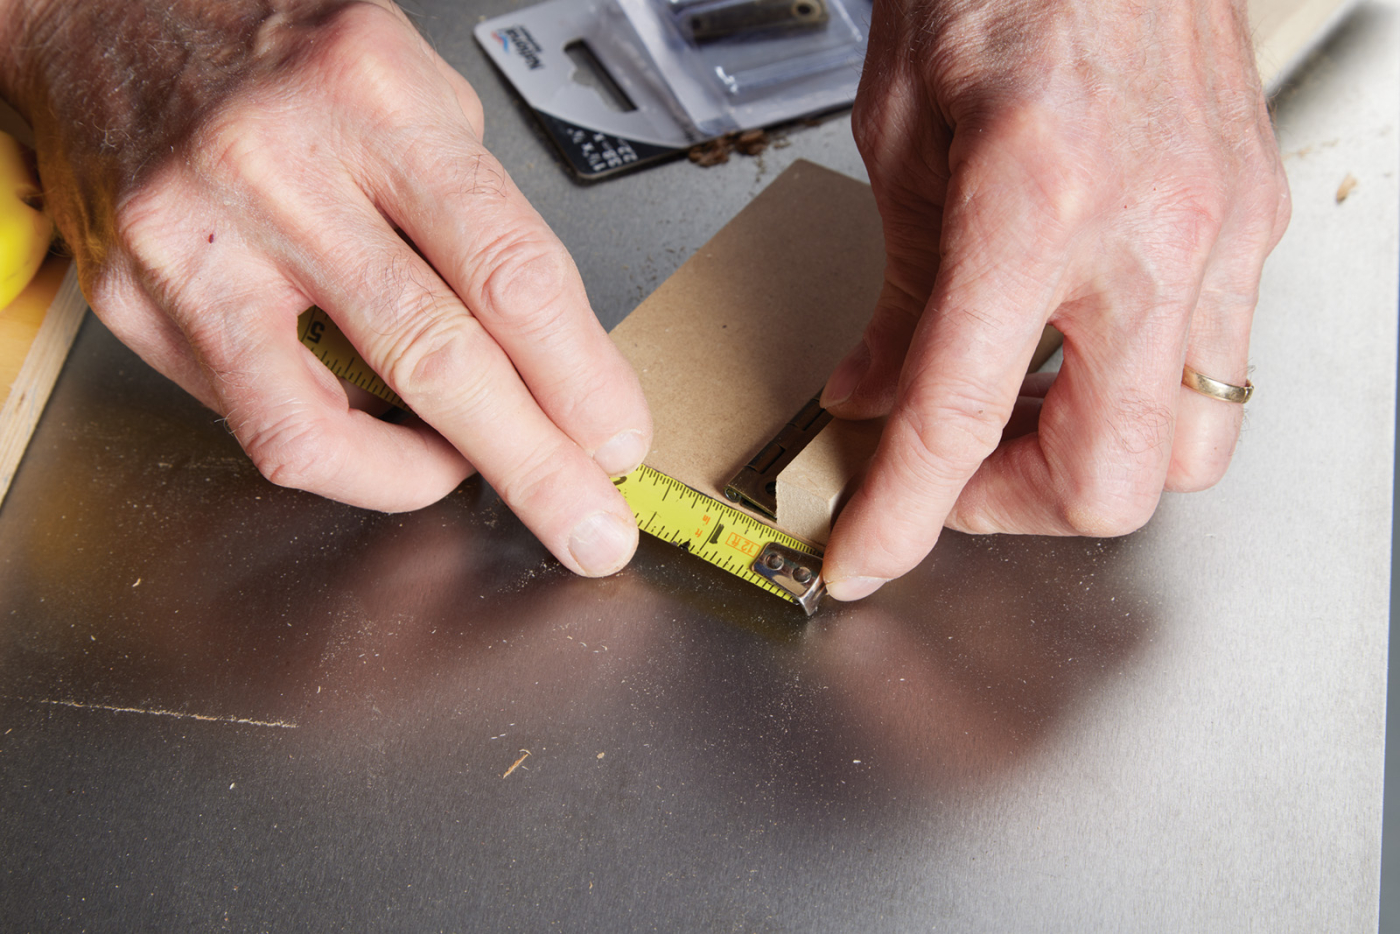
18 Carefully measure your hinge dimensions.
3. Determine the depth of cut.
I use the table saw to hollow out the necessary space for a mortise clean out bit to follow, but first you must determine the depth of the cut required. This is determined by measuring the thickness of the guide piece and add it to the width of the portion of the hinge that’s to be mortised. I want the hinge barrel to protrude. By carefully observing and measuring, and with this particular hinge, I learned that setting the table saw height between 7/8” minimum and 1″ maximum would work. NOTE: Using a thicker or thinner guide piece would change the range of acceptable depths.
19 Set a stop block on your table saw sled or miter gauge.
20 Nibble away an opening the same size as your hinges.
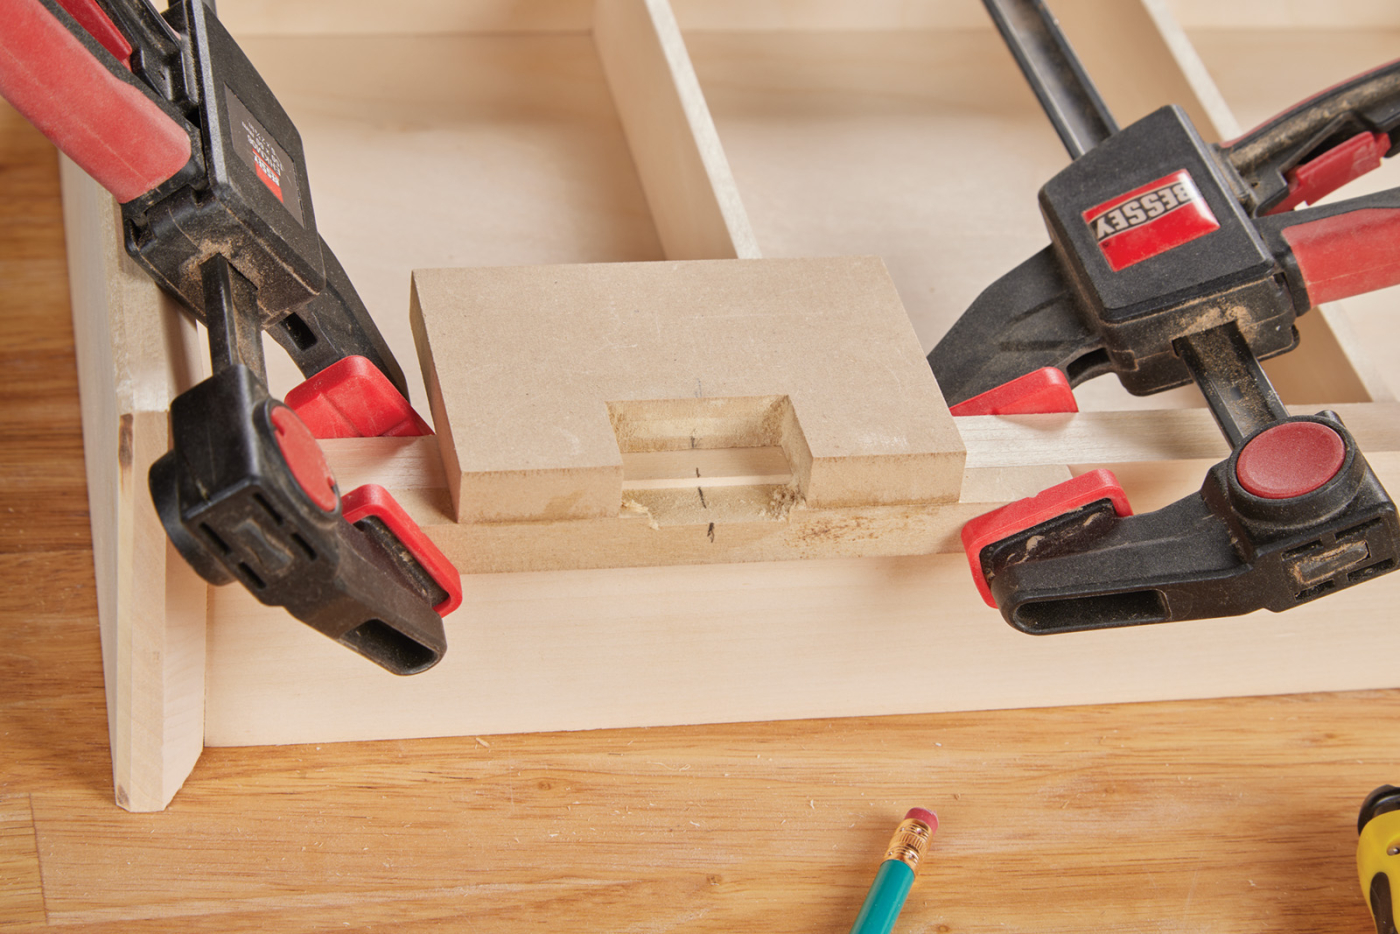
4. Cut the recess in the jig.
Use the table saw with the sled to cut the recess in the jig representing the hinge mortise. Using two stops, one on each side, allows the space to be hollowed out either by making repeat cuts side by side or by moving the work piece side by side as the sled is gradually moved into the cut. The stop blocks must be set so that the hinge fits snug into the block. This is usually a trial-and-error process. I start by making the space slightly undersized and then gradually widen the cut until I have a perfect fit.
5. Glue guide piece in place.
Then clamp it and leave it to rest for approximately 45 minutes before use.
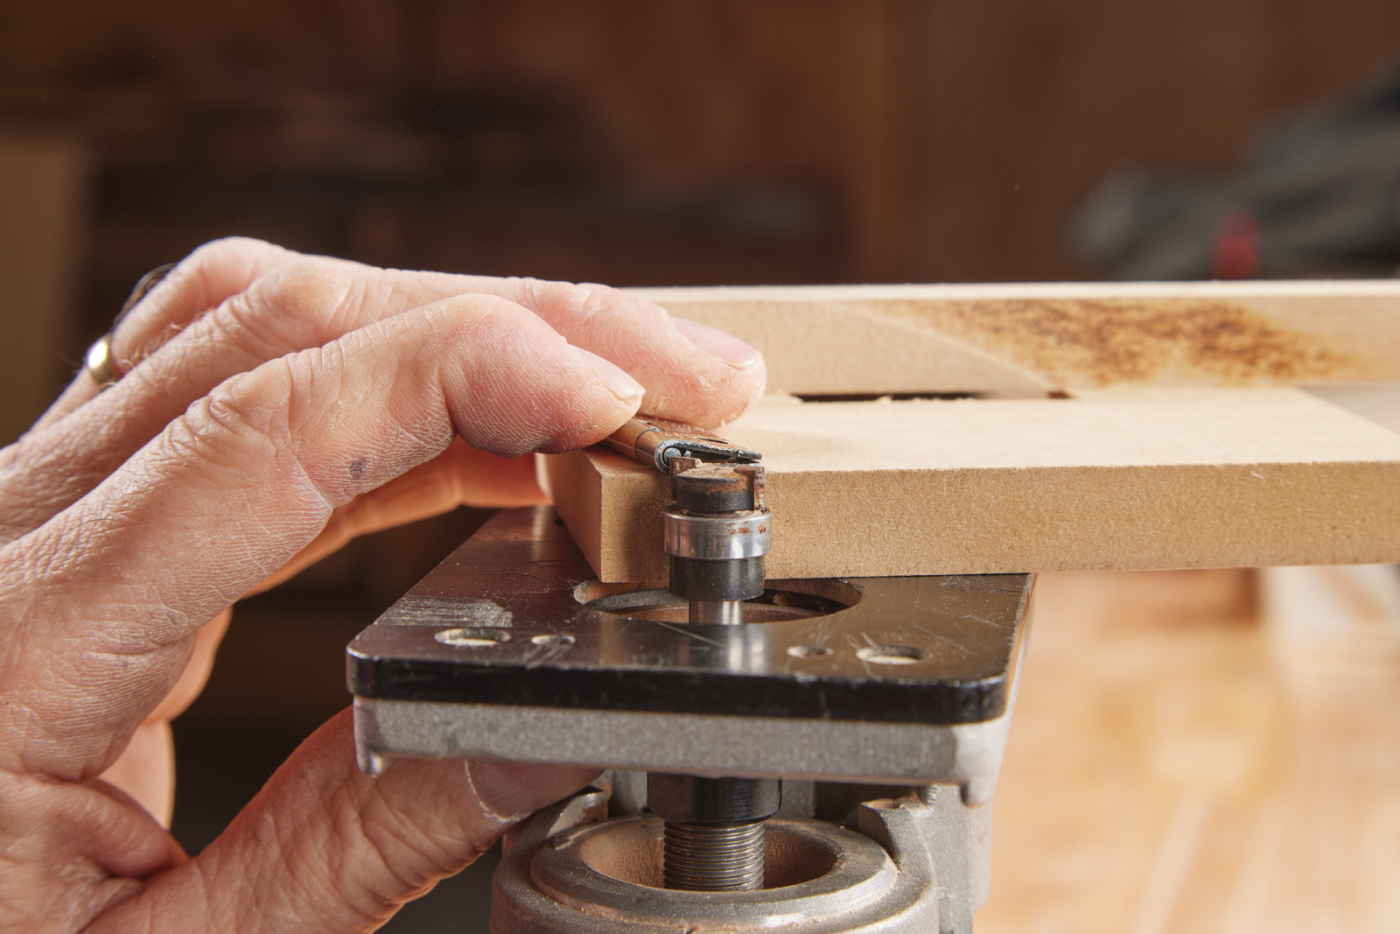
loaded in the router, set the height of your bit to cut exactly in the center of the hinge pin.
6. Set the router depth.
The router depth must be set just right. If it’s not deep enough there will be too much space between the cabinet doors and cabinet sides. If too deep, the doors will bind at the hinge and not close properly. The photo shows my attempt to align the router bit with the center of the hinge barrel. Slightly below the center seems to work best, as it is worse to have the door bind than for there to be a slight space.
Routing the Hinge
Mark the centerlines of the hinge locations on the doors and cabinet sides. To avoid measurement issues, I cut the door panels to be the same length as the opening at the front of the cabinet, so the same hinge location marks can be made on each. Trimming the doors to final length to provide clearance can come later. The first time I use the jig will be in scrap stock. This will allow me to check the fit of the hinge. By making two test cuts in scrap and putting them together helps assure me that I have set the router for the right depth. After the first use, you can find and mark the centerline of the jig on the guide strip, allowing it to be set in perfect alignment with the hinge centerline marks you’ve made in the cabinet and in the doors.
22 Line up the center line of the jig with the center of your hinge location.
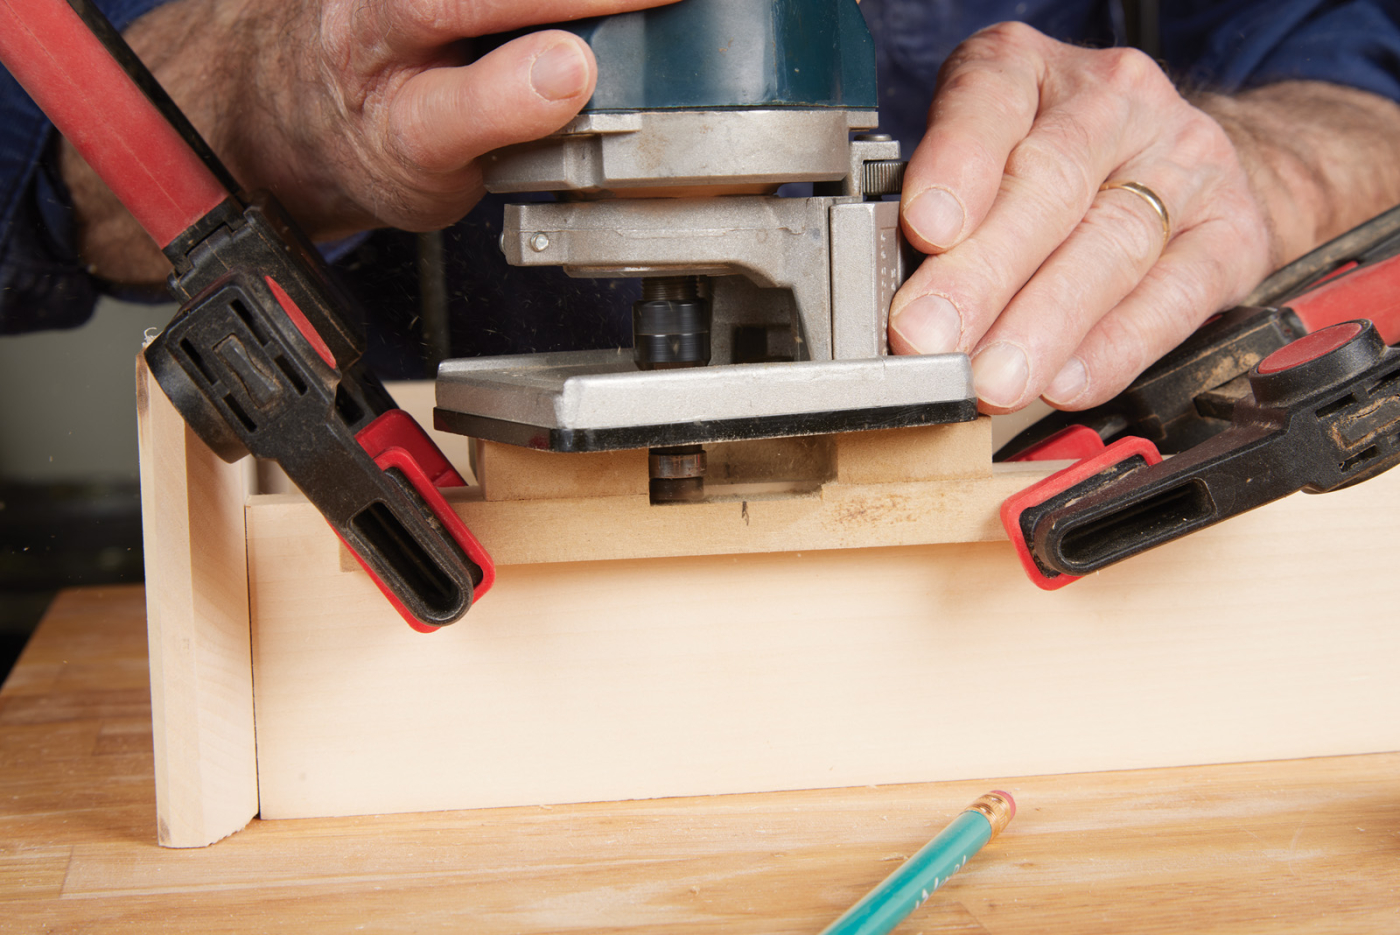
23 Rout the pocket for the hinge, using the bearing to guide the bit around the inside of the jig.
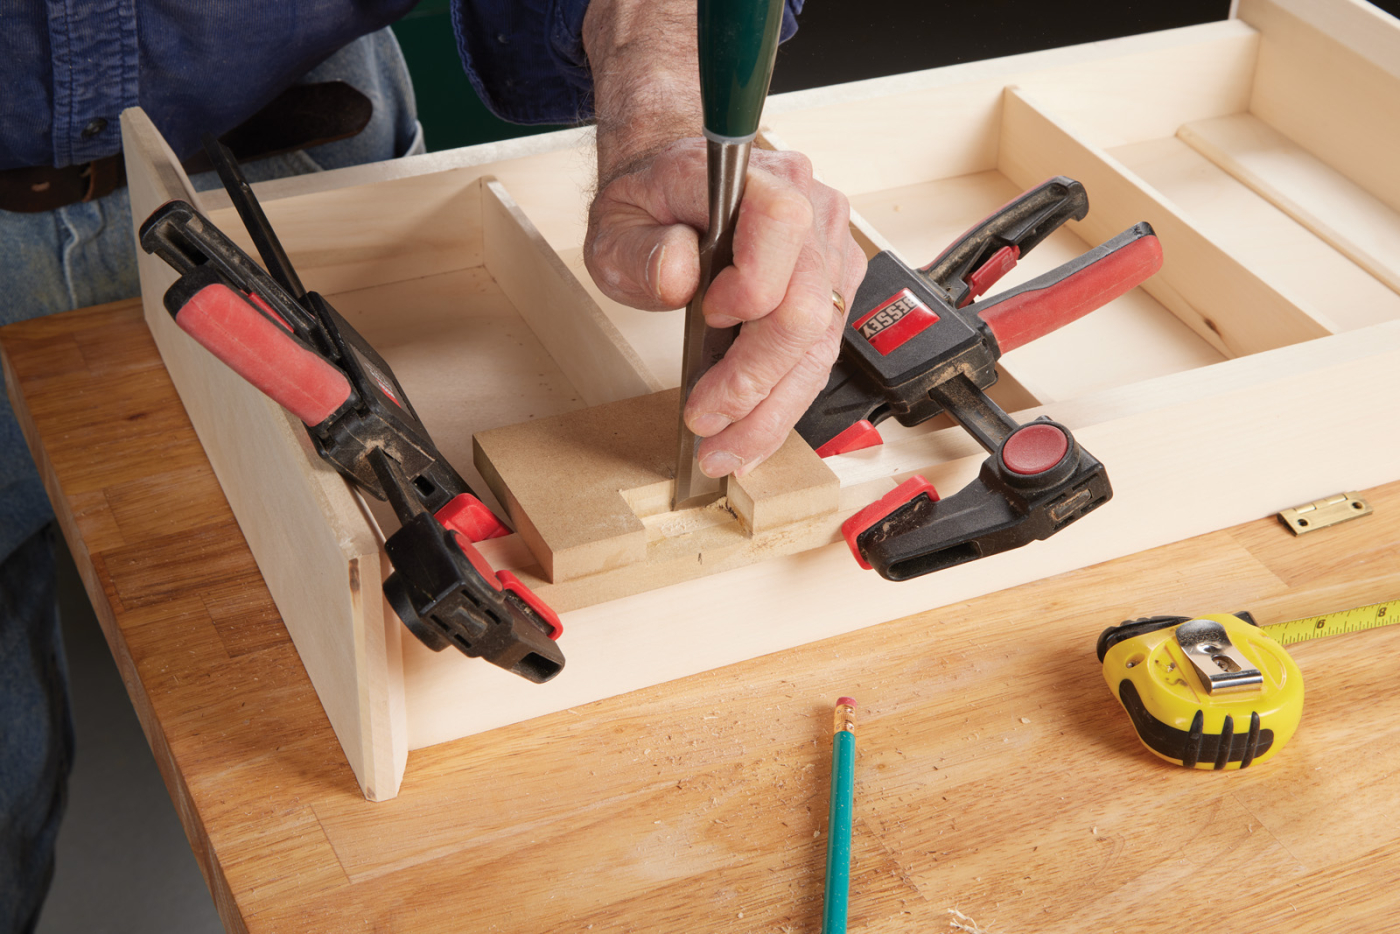
24 Chisel the corners square using the template as a guide.
After routing the hinge mortises and before removing the jig, use a straight chisel to square the mortise. Then move on to the next being sure to rout both the doors and the cabinet sides. To install the hinges, I use a Vix bit and then use a small cordless screwdriver to put in the screws. Before installing the doors trim them very slightly at the top and bottom to provide clearance for opening.
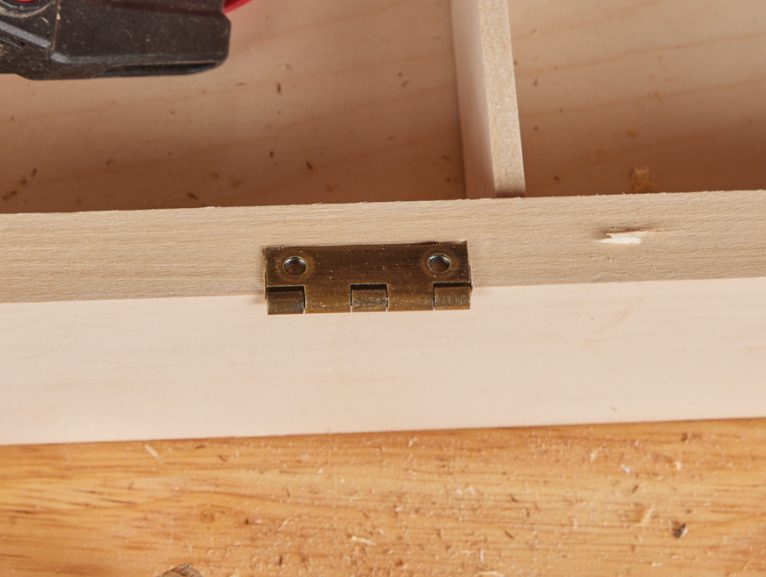
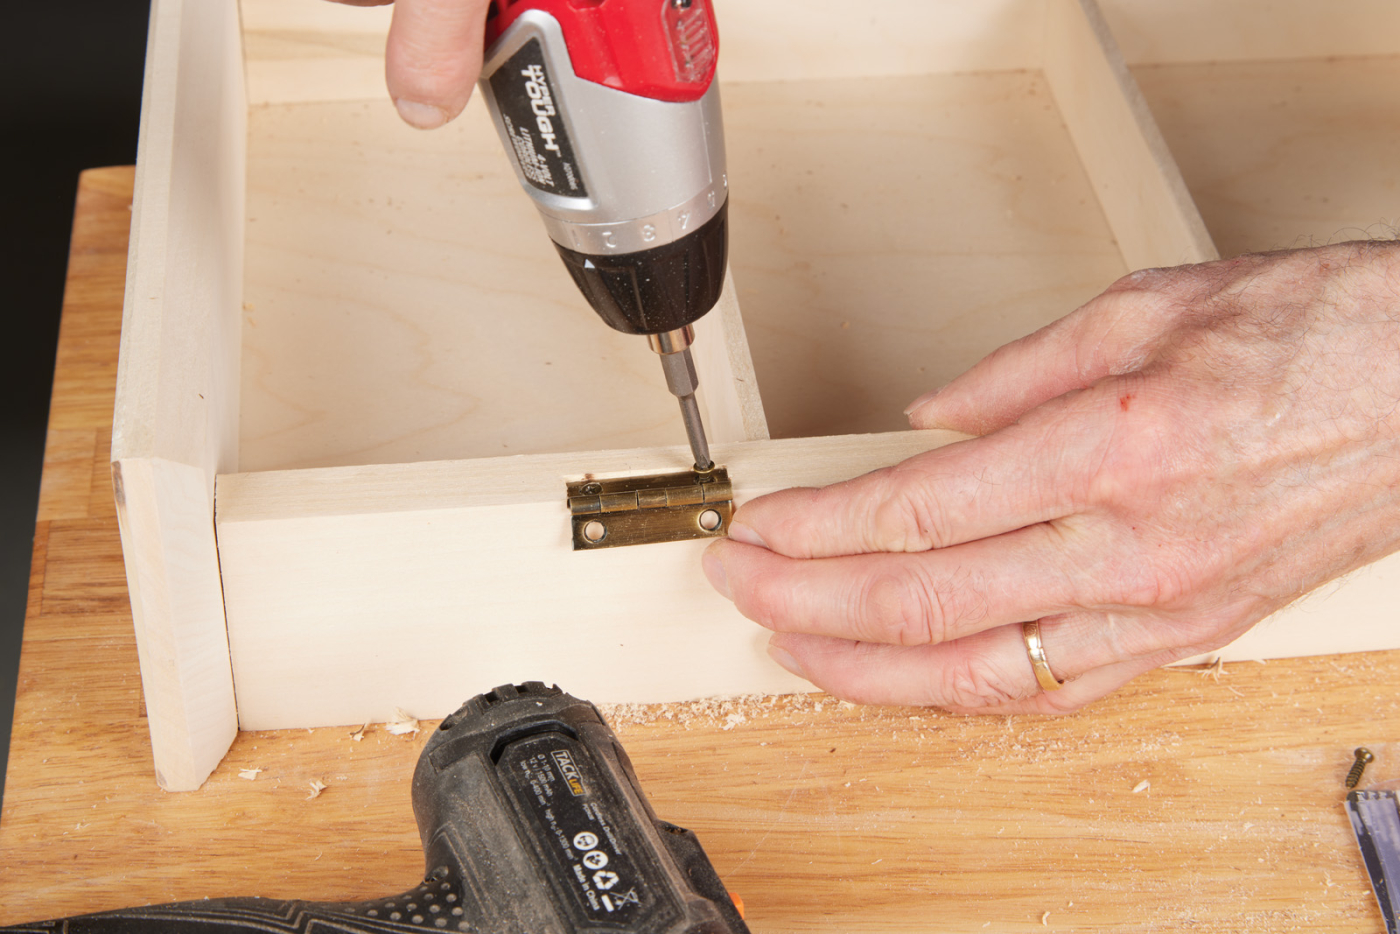
25-26 Test fit the hinge and install the screws.
To provide a firm closure to the cabinet, I chose magnetic catches. Cut a block of wood just long enough for the doors to come to a full close against it. I milled the stock so that the wood grain will run parallel to the wood in the top of the cabinet so that the block can be simply glued in place. Drill holes for the magnets to fit. Then glue and clamp the block in place at the top center of the cabinet. Small steel catch plates are then mounted on the doors. I buy magnetic catches (stock no. R622CS-N) for small doors from KJMagnetic.com. Don’t forget to also purchase the necessary steel counter sunk washers (stock no. NSW62).
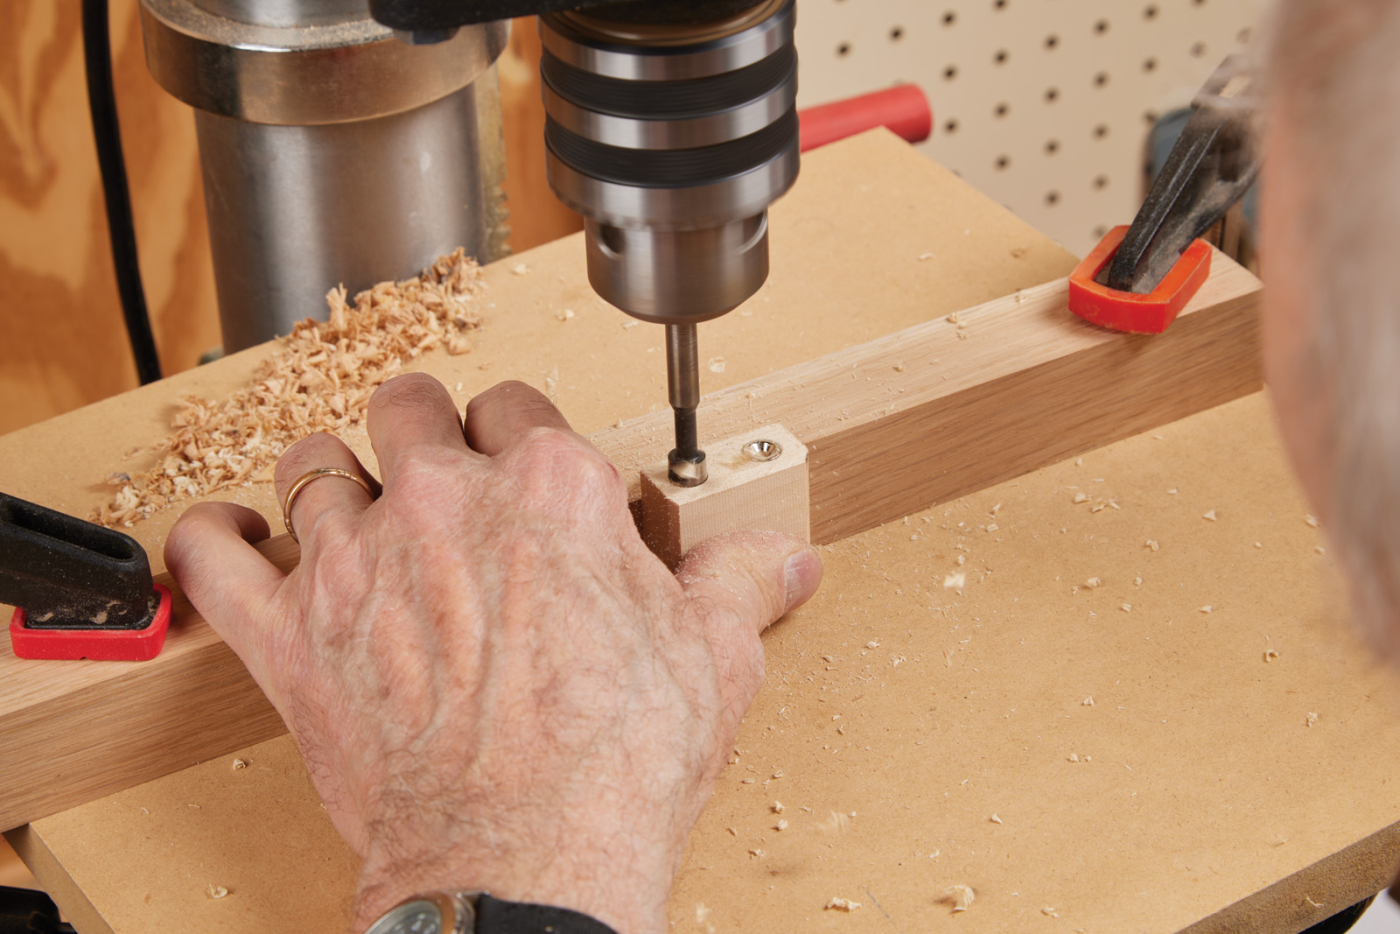
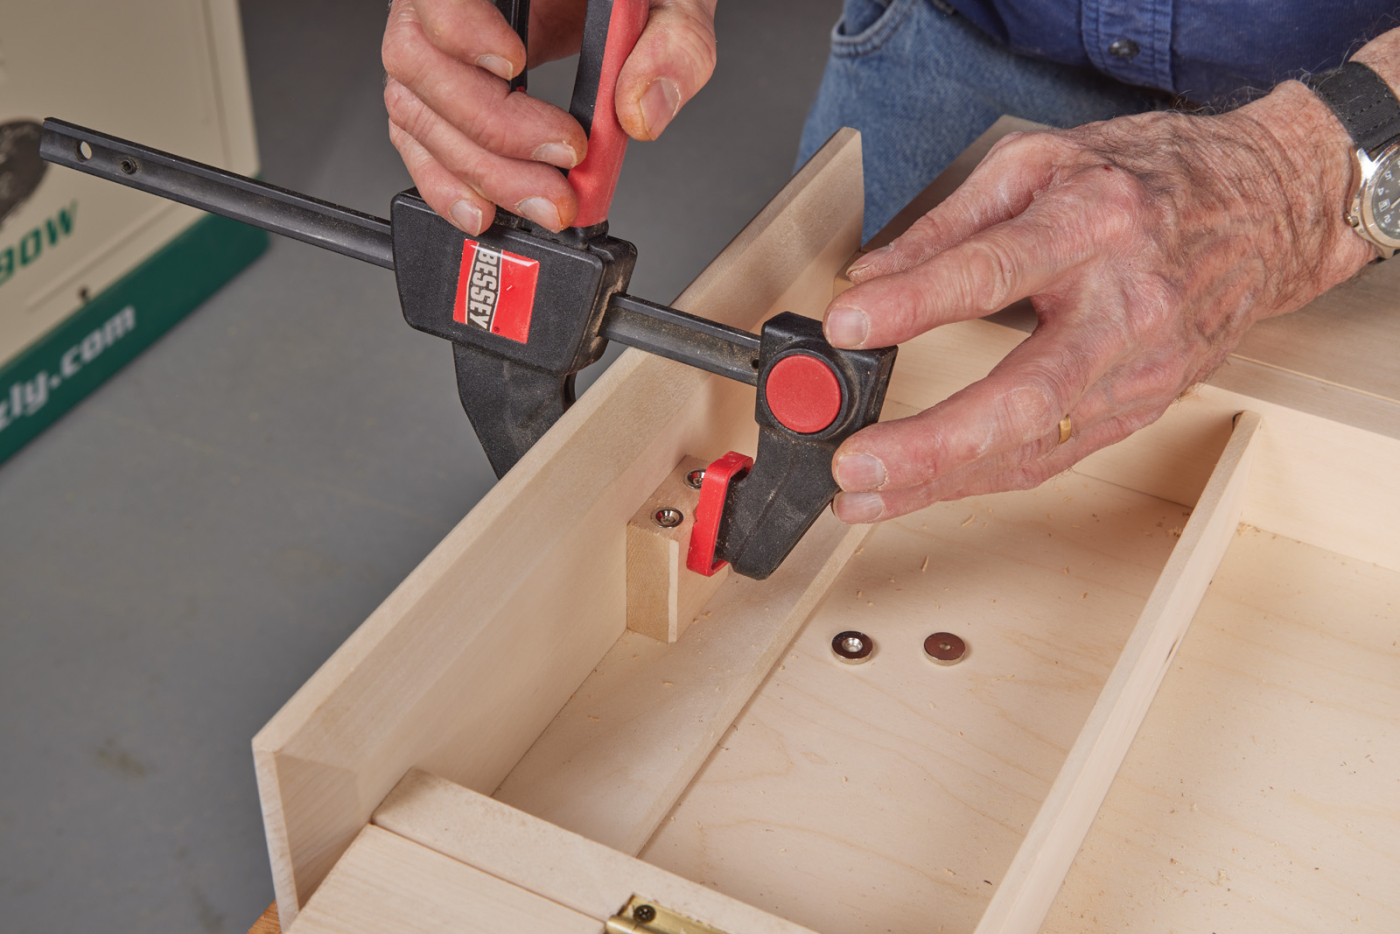
27-28 At the drill press, drill recesses for cup magnets. After installing them, you can glue the block inside of the cabinet.
To complete this cabinet, I finished with milk paint and then carved the simple pattern on the cabinet front. I worked this design freehand with a v-gouge cutting through the finish to reveal the natural wood beneath. After the bit of carving was complete, I used a clear acrylic to provide lasting protection. Mounting the cabinet can be done by attaching the French cleat to the wall, and setting the cabinet over it, catching on the beveled cleat at the top of the cabinet.
Here are some supplies and tools we find essential in our everyday work around the shop. We may receive a commission from sales referred by our links; however, we have carefully selected these products for their usefulness and quality.