We may receive a commission when you use our affiliate links. However, this does not impact our recommendations.
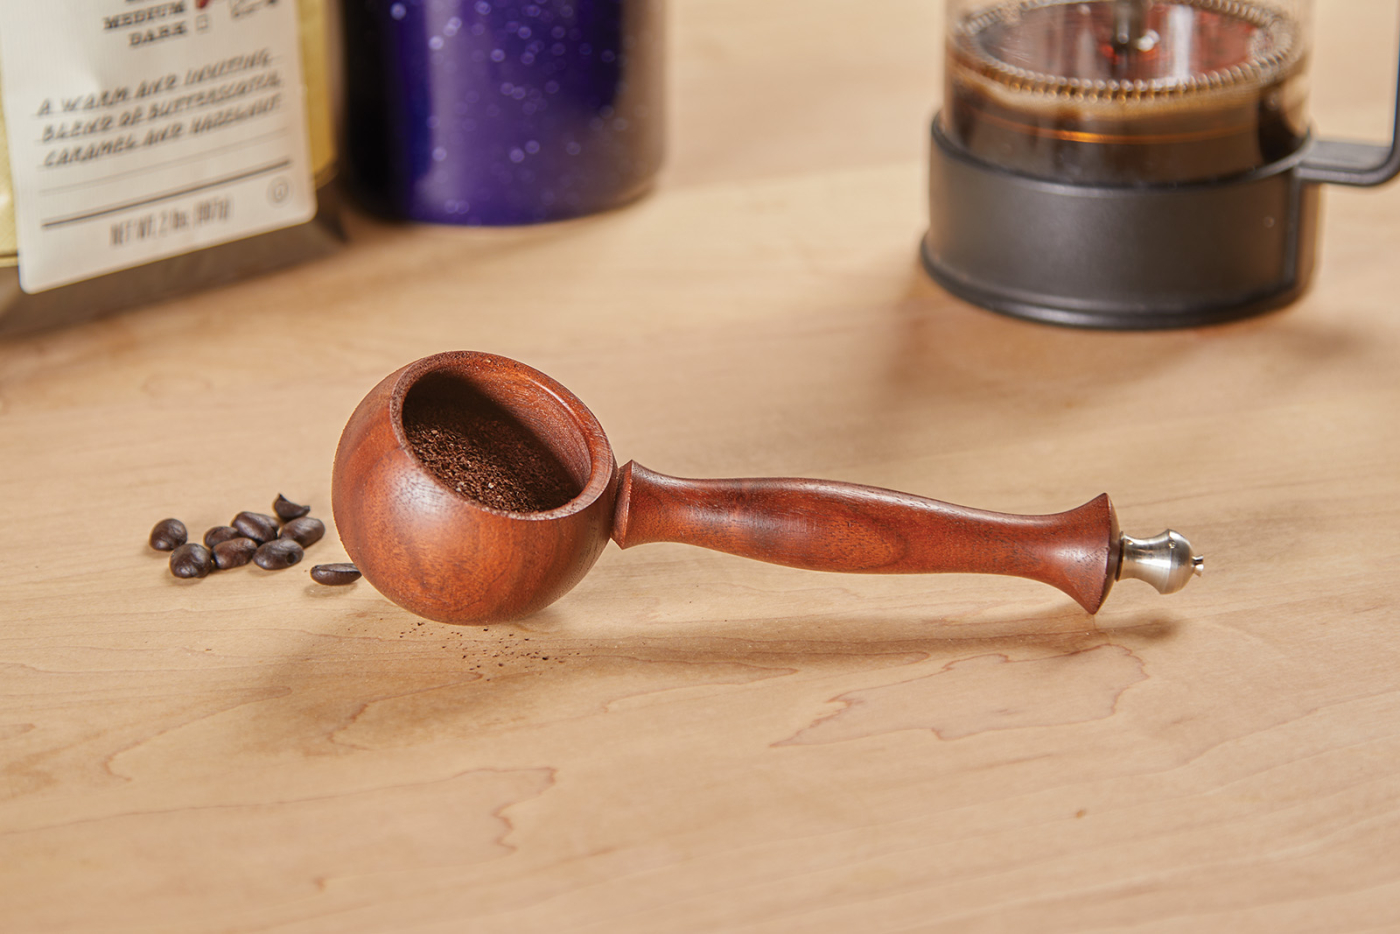
Combine spindle turning skills with a special chucking method to make this utilitarian scoop.
Project #2304 • Skill Level: Advanced • Time: 3 Hours • Cost: $20
One of the most popular projects of my woodturning classes here in Las Vegas is a turned scoop with a pewter finial. These scoops provide practice for hollowing end grain, making jigs, and using pewter to add unique details. Additionally, you’ll end up with a beautiful custom-turned scoop for any application and it’s easily adjusted for different sizes or designs.
Preparing the Blank
The wood that you use for this project isn’t super important. I used walnut here, as it works well with the pewter. What is important, however, is to make sure that the blank is free of any hairline fractures. Once you start to hollow out the scoop, any small crack can cause the scoop to break apart as you turn it. When mounting the rough blank, I prefer a ring drive or PSI super drive and a live revolving ring center.

1 Turn a spindle blank round and cut a dovetail on it for mounting in a chuck.
Using a spindle roughing gouge, turn the blank just to the round and then use a 1/8“ parting tool to square up both ends. With the same tool cut a tenon to fit into the jaws of your chuck. I use the Vicmarc VM 120 chuck. Make sure that the tenon is as long as possible, approximately 3/8“ long, for maximum grip. However, you’ll also want to make sure the tenon is not too long and bottoming out in the chuck. If it is too long, you will not have the extra support needed from the face of the jaws.
Take the blank out of the centers and remount it in the chuck, with the tailstock in place for additional support. With a 1/8“ parting tool, make a cut into the blank at the tailstock end, stopping before hitting the revolving center. This will act as a support for the scoop whilst turning and prevent the scoop from having a hole in the center at the end when finished.
Turning Scoop & Handle
Measure the diameter of the blank using calipers and then from the tailstock end, mark a pencil line into the blank using the diameter measurement. This will be the scoop size. Use a 1/8“ parting tool to relieve the wood about a 1/2“ diameter to the left of the line. This gives me the clearance to start to form the scoop. The outside of the scoop is basically just a large bead or sphere. The whole process is easier if you manage to cut it perfectly round, as it will ensure an even wall thickness when hollowing out the scoop. To do this, use a 3/8“ spindle gouge. Be assured that this will test your spindle turning ability. If necessary, a template would also make this part easier.

2 Measure the diameter with calipers.

3 Transfer the diameter measurement to the face of the blank.

4 Now, divide the “scoop end” into half with dividers.

5 With a parting tool, define the end of the scoop.

6 To make a perfect sphere, start by making facets on the ends of the scoop. As you create more facets, cut the previous facets in half.

7 As you continue to make facets, you’ll be working the scoop end into a sphere.
After forming the sphere on one end, continue turning the handle of the scoop using a 3/8“ spindle gouge. When this tool is used correctly with the bevel floating behind the cuts, the result will be a surface that needs little sanding. At the end of the handle, use a 1/8“ parting tool to cut a small tenon 1/4“ long and 1/8“ diameter, to which the pewter finial will be attached.

8

9

10 After the sphere has been turned, shape the handle of the scoop.

11 I chose to add a pewter finial to this scoop, so I turned a small tenon.
The finish from your tool work will dictate which grade of abrasive is needed to start sanding. When sanding, I tend to slow down the speed of the lathe, as I can feel the abrasive is more effective than at faster speeds. I started with 240 grit followed by 320 and 400 grits. When it comes to finishing my turnings, I stay simple. First, I apply a thin coat of Zinnser’s clear coat shellac, which is thinned down 25% with denatured alcohol. After it is completely dry, I then cut back the finish with #0000 steel wool and apply a thin coat of Danish oil. The oil will really “pop” the grain. Be sure to wipe off any excess oil and buff to a satin sheen.

12 Sand the scoop completely.

13 Apply finish to the scoop, and in particular the sphere portion.
Lastly, use a pull saw to cut the scoop away from the waste wood leaving the 1/4“ tenon.

14 Use a small pull saw to cut the tenon off of the waste, freeing the scoop.
Onto the Pewter Finial
After mounting a small square corner-to-corner in the jaws of the chuck, turn the blank to round. Now, drill a hole in the end using a 3/8“ forstner bit placed in a drill chuck. Drill the hole long enough so that after casting you have enough pewter left in the mold to hold it whilst turning.

15 A scrap piece of wood is turned into a mold for the finial.

16 A bit in a Jacob’s chuck forms the hole to pour the pewter.
Remove the chuck with the mold from the lathe and lay it down on a flat surface. Use a cast iron ladle or something similar to melt the pewter. I use my late father-in-law’s cast iron ladle which he used to cast fishing weights many years ago. The pewter I use is called Britannia pewter, which contains no lead and is available form Amazon. The price varies depending on the stock market. I purchase it in a 2-pound ingot. Pewter melts at a low temperature, so a propane gas torch is more than adequate. The pewter will stay liquid for several minutes after pouring. Be patient and allow it to completely cool.

17

18 After heating the pewter with a MAPP gas torch, it can be poured into the mold.
After remounting the chuck with the pewter set in the mold, drill a 1/8“ hole in which the tenon of the scoop will be glued. This is easier as it is supported in the mold. After drilling the hole, I turned away the waste wood around the pewter to reveal a small bar which could be held in pin jaws. If you do not have pin jaws, you could glue the bar into a scrap piece of wood to help support it while you turn the pewter.

19 Before popping the finial out, drill a hole to match the tenon on the scoop.
Now onto turning the pewter itself, which turns very easily with standard woodturning steels. Just sharpen your tools and turn it using the same techniques as in woodturning. It will scrape or cut, and is a pleasure to work with. With the pewter bar placed in small pin jaws, use a 3/8“ spindle gouge and proceed to turn the bar to the finial shape desired. I also use my cone revolving live center located in the hole in which the tenon will be glued for extra support.

20 After cutting the pewter out of the mold, hold it in small jaws and start to shape it.

21

22 Standard turning tools will turn the soft pewter.

23 As you get close to the shape you want, you can use a shear scrape or cut to get a mirror-like finish.

24 Sneak in with a parting tool to cut the finial free of the waste.
Once the pewter finial is shaped, I simply use steel wool to finish the pewter. Be careful that the steel wool does not wrap around the finial, just as in woodturning. Lastly, release the finial using a 1/8“ parting tool.
Make a Hollowing Jig
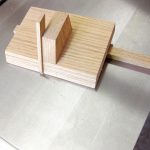
In order to hollow and finish off the scoop, we need to make a jig using a 3“ x 3“ x 3“ cube of wood. Mark the center on each side of end grain for mounting between centers. Then mark and draw a line down the center of one of the faces. Drill a series of holes with a Forstner bit about 1-1/2“ in length and 1-1/4“ deep. Lastly, remove the corners of the holes with a wood chisel. This procedure is much easier to complete when the blank is square rather than turned round! This gap will allow the handle to protrude through the side of the jig whilst hollowing out the scoop.

25 A scrap block is predrilled to hold the handle of the scoop.
Mount the blank between centers and use a spindle roughing out gouge to turn the blank round. Then use a parting tool to cut a tenon to hold the jig in a chuck for hollowing. With the jig now held on the tenon in the chuck, we can measure and mark the end grain in preparation for hollowing.
I use calipers to measure the outside diameter of the scoop and then transfer the measurement to a pair of dividers. Holding the dividers pointing downwards in a trailing fashion, scribe a line in the end grain with the left leg, and if it matches the right leg, you will have the exact diameter you need to get started on hollowing.

26

27 The diameter of the scoop sphere is measured and transferred to the end of the jig, after it’s been turned round and mounted in a chuck.
To begin to hollow the jig and the project itself, use whichever tool you feel comfortable with. I prefer to use my Mate #1 hollowing tool, which cuts the wood (not scrapes it) and its very forgiving. You’re aiming to create a hollow to hold the scoop. When the hollowing is completed, it should sit nicely into the jig with the handle protruding through the overlapping holes you drilled previously.

28 Now, hollow a bowl in the end of the jig that matches the scoop sphere.
Use a hot melt glue gun to glue the scoop into the jig. Apply a small amount of glue at the base of the jig, then place the scoop into it. Add a “weld” of glue around the outside edge of the scoop and the jig. You can change the angle of the handle before the glue sets, but remember that the steeper the angle you choose, the less room you have for following and avoid ‘clipping’ your hand or fingers!

29 Check your fit and glue scoop in place when it fits snugly.
Hollow and Assemble
Again, using a template for the inside hollowing of the scoop will help with accuracy and avoid making the inside larger than the outside. In other words, hollowing through the bottom or sides of the scoop.

30 Use a bowl gouge to start forming the scoop’s opening.

31 Switching to a Mate hollowing tool, I hollow out the rest of the scoop bowl.

32 Because you can’t check the wall thickness, be sure to go slowly and aim carefully.
When the hollowing is complete, carefully sand and finish the inside of the scoop. To release the scoop from the jig simply take the jig with the attached scoop out of the chuck and pop it in a microwave for 30 seconds. This will soften the glue and allow you to gently remove the scoop.
There may be some glue left on the scoop, but it will peel off. Plus, the outside of the scoop can be cleaned up and refinished if necessary.
The final step is to attach the pewter finial. Use a glue super glue such as one available from Starbond and apply a small amount in the hole. Then spray the tenon on the scoop with accelerator and assemble the pieces. The accelerator will act and set almost instantly, firmly attaching the finial to the scoop.
Here are some supplies and tools we find essential in our everyday work around the shop. We may receive a commission from sales referred by our links; however, we have carefully selected these products for their usefulness and quality.