We may receive a commission when you use our affiliate links. However, this does not impact our recommendations.
Modify a skew chisel to bend a curl; then leave the shavings attached.
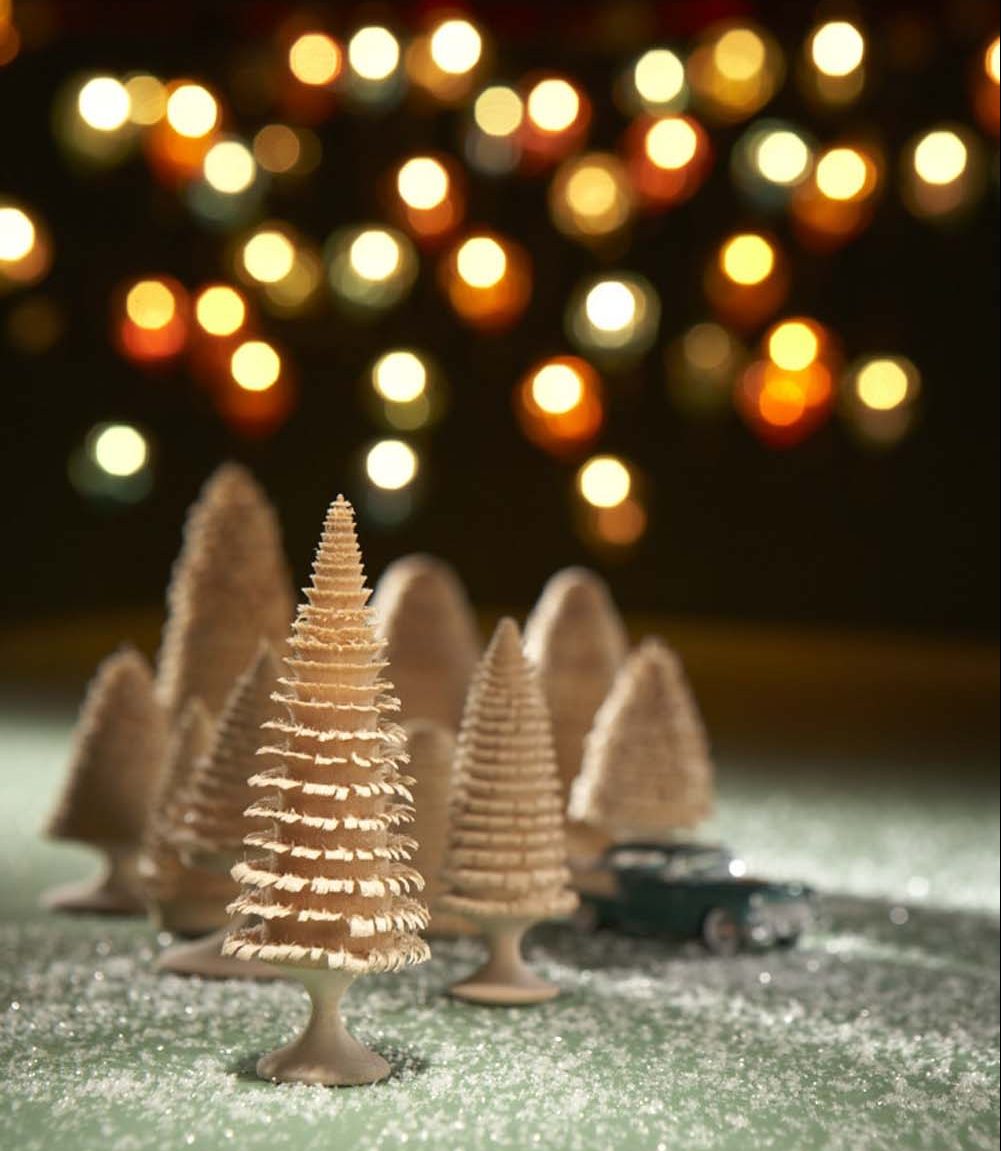
These trees come all the way from the Erzgebirge (‘erts-gə-bir-gə). Actually, I made them in Wisconsin, but the unique curl-turning technique I used evolved in that mountainous region of Germany, which borders the Czech Republic*. With an understanding of this technique and a bit of practice, you can have some real fun making trees in a variety of shapes and sizes as stand-alone decorations, parts of a scene or hanging ornaments. You can also make flowers (See Sidebar, near bottom).
What may look simple, however, is actually a bit tricky. Skills with a skew chisel—and a modified one at that, the right amount of pressure and depth of cut, the right feed rate and just the right wood are all factors in this style of turning. The key to success—being able to consistently turn attractive, lifelike trees—is practice.
Use Wet Basswood
Basswood is one of the most desirable woods for this method, due to its “stringy” quality. The best stock has straight grain (riven stock is preferred as a general rule) and on the wet side—15% to 18% moisture content. Green basswood is an excellent choice. Pine, spruce and fir tend to give a coarser look than basswood, but are certainly worth experimenting with.
If only air or kiln dried wood is available, try soaking the blanks in a bucket of water for a day or two, using rocks or metal to keep them submerged. I use 5″ long blanks that are either 1-3/4″ square or 1″ square.
As you may have guessed, the completed trees don’t require finishing, but they could be colored with spray paints or by spraying or dipping them in water based dye. Their exposed trunks and bases could also be hand painted, for a more realistic appearance.
Modify an Old Skew
You’ll need to grind a hook on a 3/4″ to 1″ skew chisel to facilitate the process (Photo 1). While a “normal” skew will work to some extent, this modification definitely helps to roll the curls into position with more control and less breakage of the fibers. Also, with a normal skew, even when leading with the short point in the wood, it’s far too easy to unintentionally cut off the curl—as would be the intention when making a planing cut with the skew.
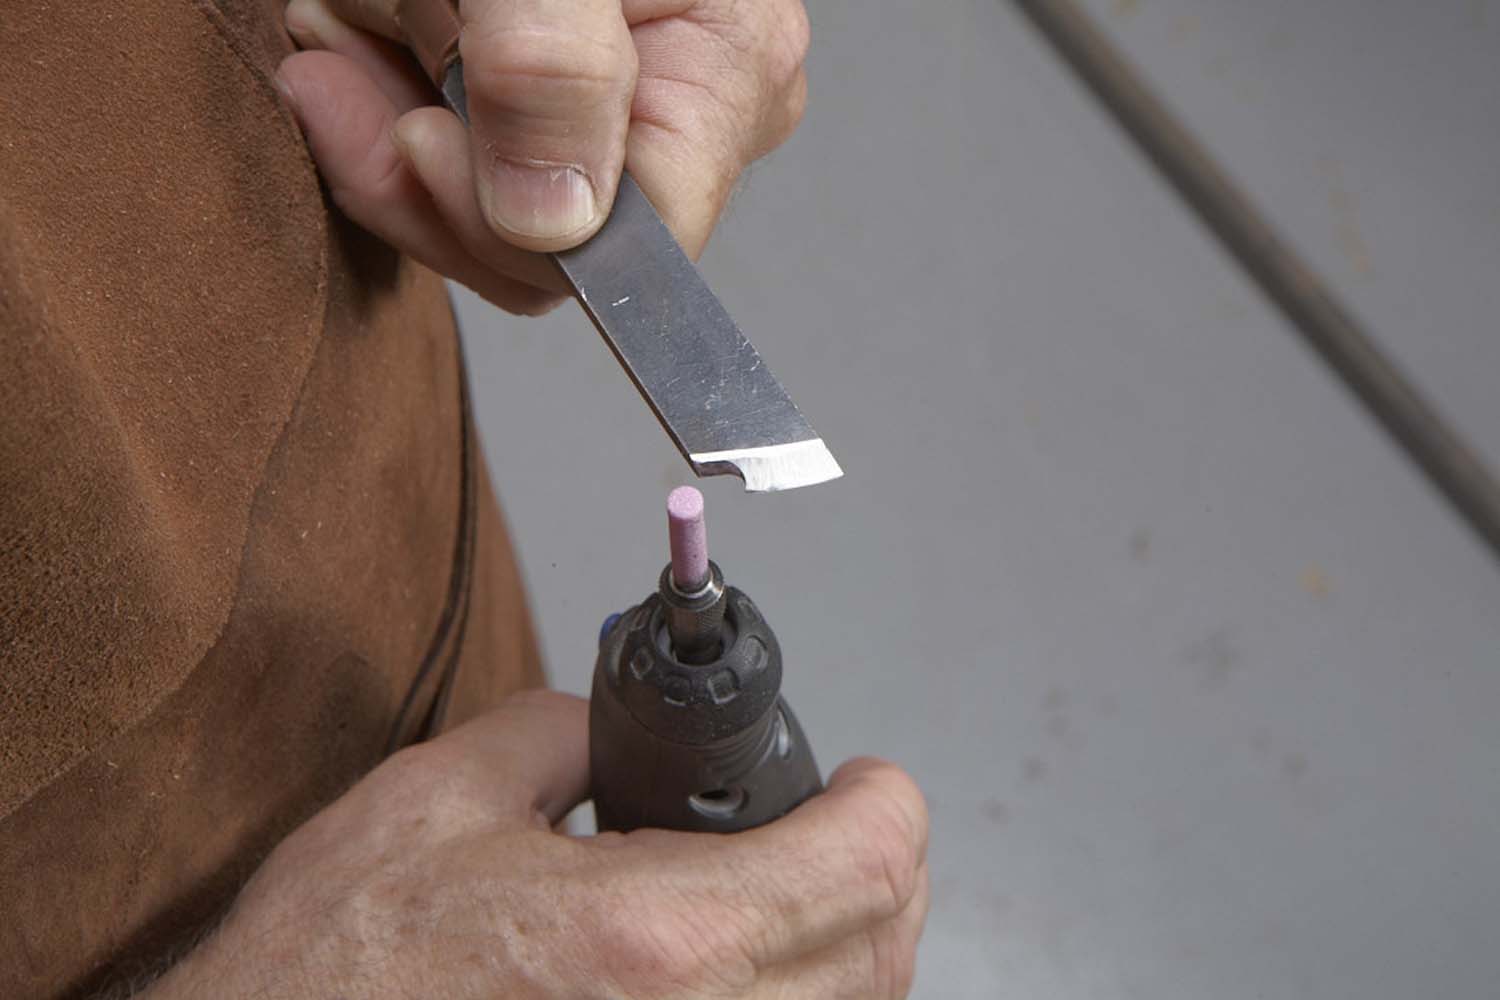
Photo 1. Modify the short point of a skew chisel to create a hook, so you can roll shavings into curls. Round over all the edges of the hook’s throat.
Of course, this modification permanently dedicates the tool to rolling curls. There’s no turning back (other than grinding away a lot of metal), so plan to modify an inexpensive skew or (even a woodturning scraper) rather than your pride and joy.
Starting at the bottom of the skew, grind the area behind and below the short point into a slight concave shape (the “hook”). Then soften all of the hook’s sharp edges. In German this type of turning is referred to as “sharp and soft turning,” because the hook’s sharp point and softened edges are both used to form and control the curl. So, make sure that the hook region is beveled back on all sides and the shape is as smooth and polished as you can make it. After grinding with the round stone, work the hook with a slipstone or round abrasive rod.
Sharpen the skew’s edge in the normal fashion—angled approximately 70° from long point to short point and with the length of the bevel about 1-1/2 times the thickness of the steel. And, be absolutely certain that the short point is razor sharp.
Outfit your lathe with a scroll chuck with standard jaws for the 1-3/4″ blanks or spigot jaws for the 1″ blanks. You’ll also need a few regular spindle turning tools: a roughing gouge, a 1/4″ or 3/8″ detail/spindle gouge, a 1/2″ or larger “normal” skew and a parting tool.
Practice, Practice, Practice
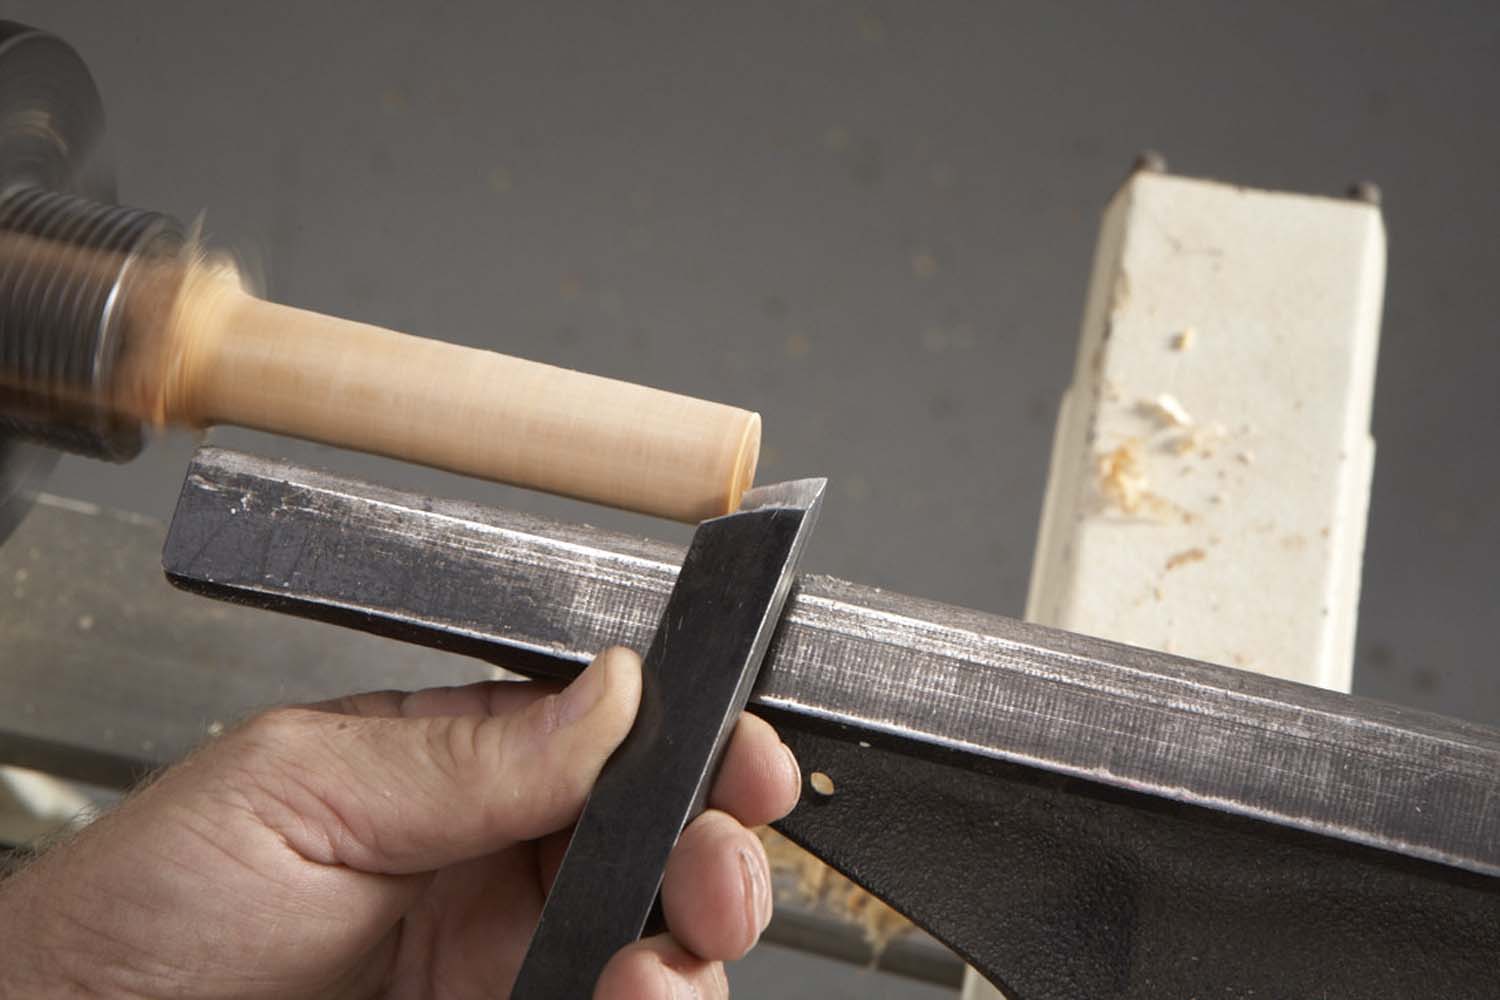
Photo 2. Use the modified skew to practice rolling shavings on a scrap block of green wood turned to a cylinder. Start by positioning the point of the hook at a low entry level.
Start by practicing on 1″ diameter round stock, held in the scroll chuck with small jaws (Photo 2). Understanding how to handle a skew chisel—and especially how to make the planing cut—will be essential for learning this process.
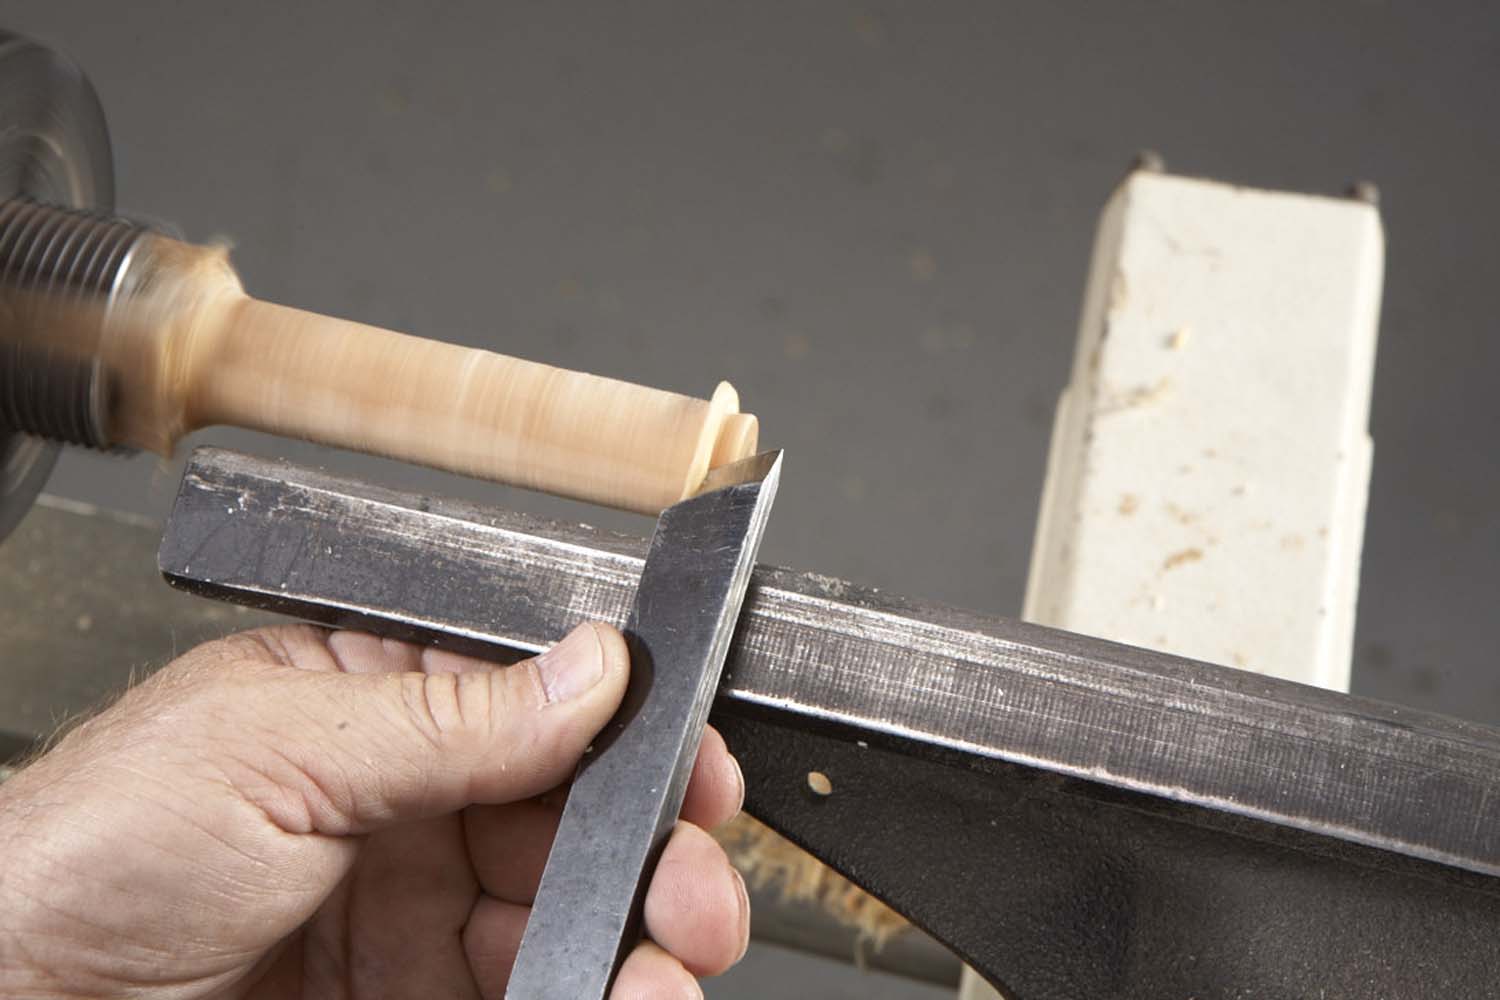
Photo 3. Make a planing cut using only the point. The hook’s curved throat helps to bend the shaving into a curl.
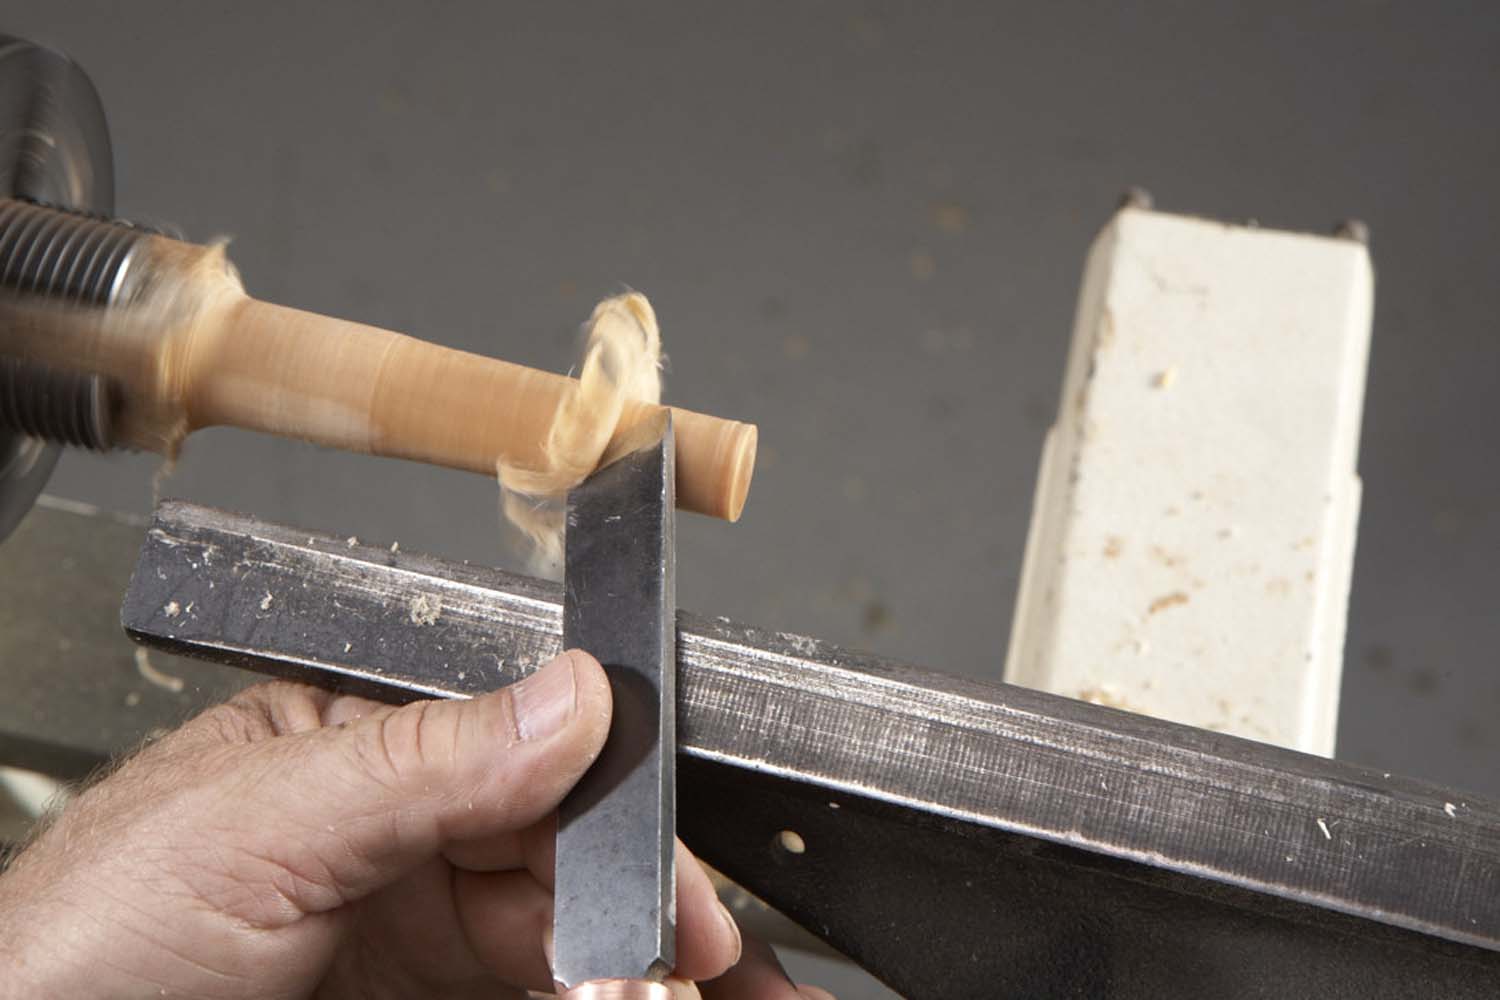
Photo 4. Practice extending the curl by continuing the cut for approximately 1″. Experiment with shorter and deeper cuts as well as varying the angle of approach.
Hook the short point into the wood at a low entry level, lightly raising or fluffing up the wood into a curl (Photo 3). Experiment with the entry angle, depth of cut, feed rate and speed of the lathe. (I run the lathe between 1500 and 2000 rpm for this style of turning.) See how far you can roll the curl without breaking it or cutting it off (Photo 4). Roll some curls tight against the preceding ones, while others should be left with a gap of about 1/8″ or so between curls (Photo 5).
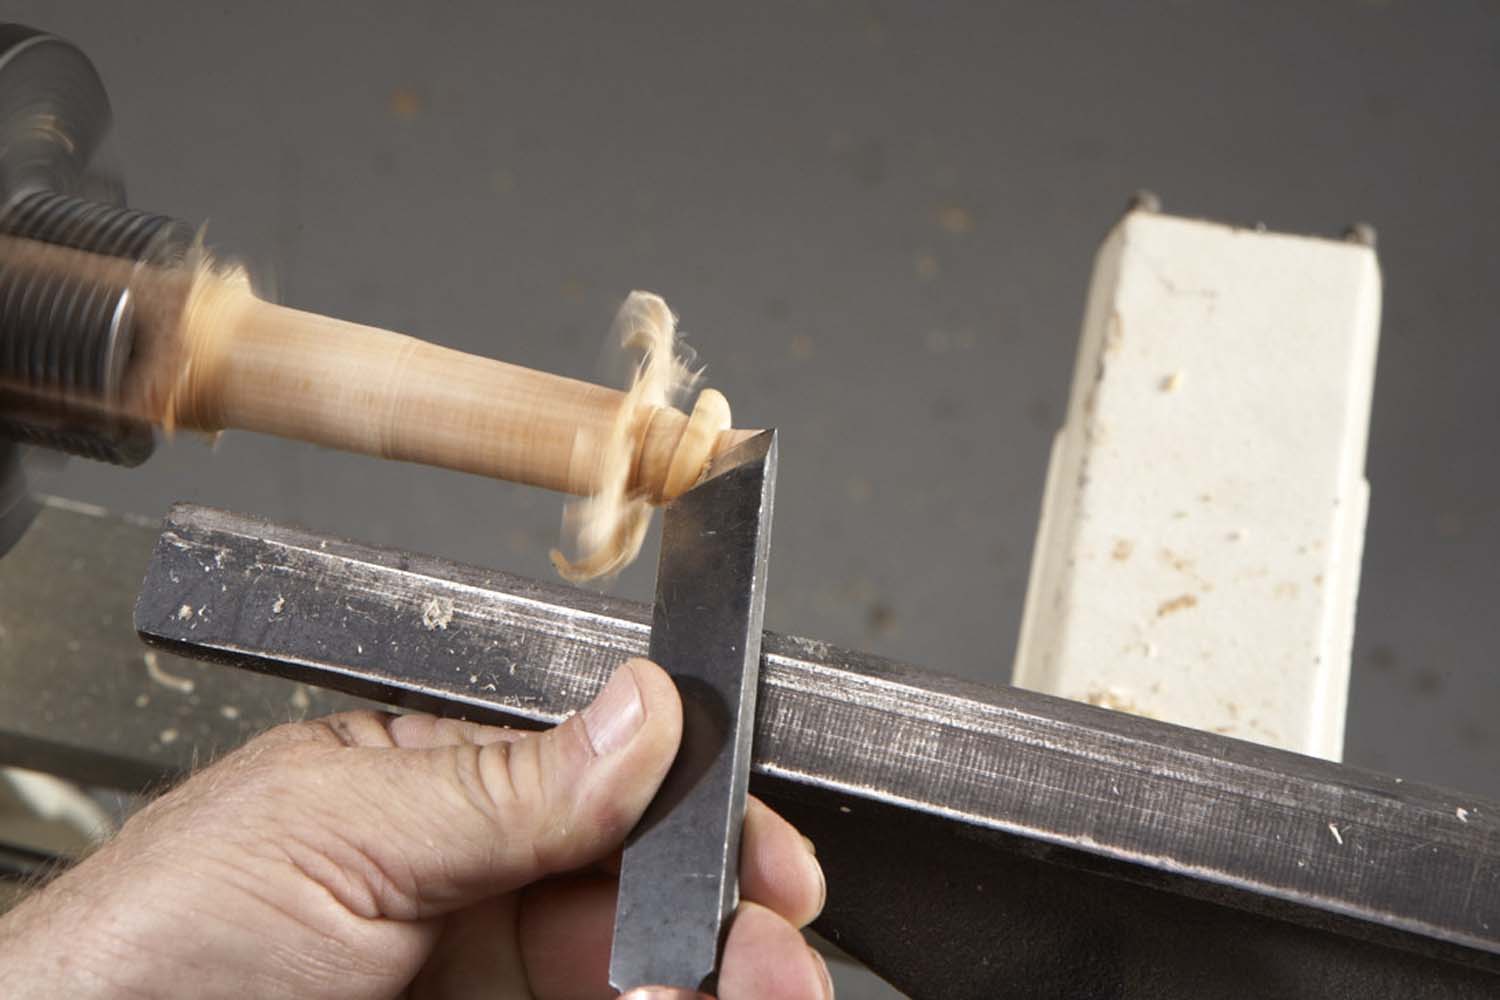
Photo 5. Pull another curl. The finished tree consists of multiple curls that become progressively shorter, so practice controlling the length of each curl while leaving even spacing in between. Periodically plane off the curls and roll new ones.
Turn off the curls. Then use a roughing gouge or a regular skew chisel to taper the blank down to a point at the tailstock end.

Photo 6. Apply the skills you’ve just learned to practice creating long curls on a tapered, cone-shaped blank. On this shape, you must work from smaller to larger diameter while drawing the tool toward you.
Starting about 3″ from the end, roll a curl for approximately 1″ (Photo 6). During this exercise you will be doing the opposite of normal practice, which is “follow the grain” by turning downhill, from a larger to a smaller diameter. In this case, you cut uphill, from a smaller to a larger diameter. Roll a second curl, stopping about 1/8″ from the previous. Then roll additional progressively shorter curls until you have nothing but a small point.
Showtime
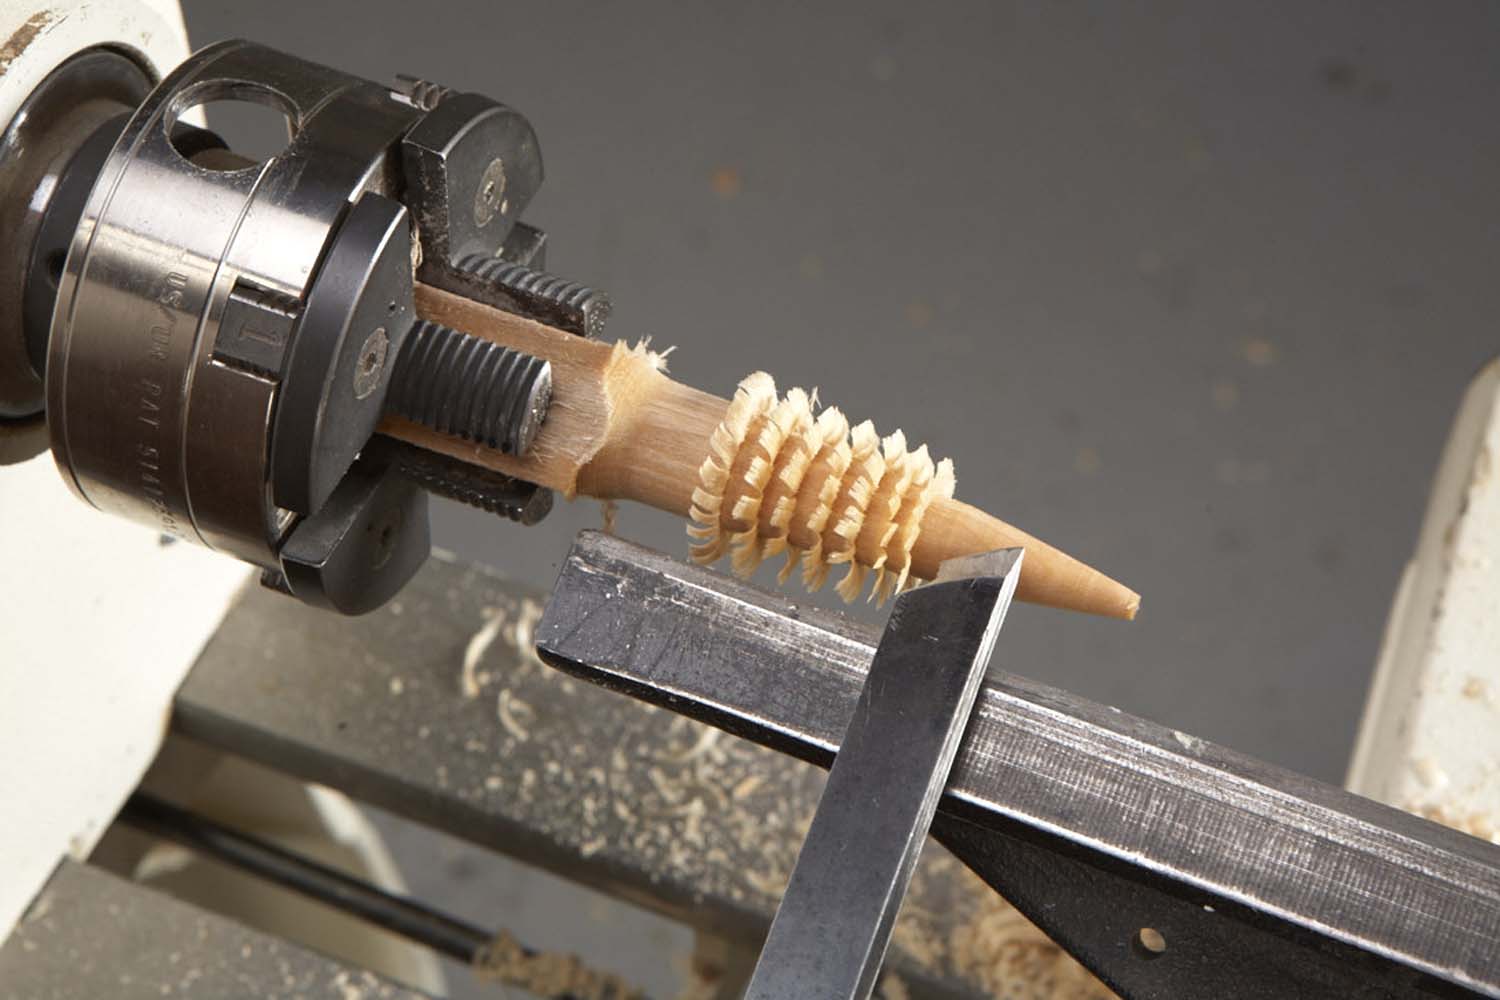
Photo 7. Create a series of evenly spaced curls to perfect your technique. Make each curl slightly shorter than the previous one to mimic a Christmas tree’s form and the shape of its branches.
Begin by making a small tree. Plan ahead for the overall height and base section—either the curls go all the way to the bottom, so the trunk doesn’t show, or a turned section below the bottom curl forms a trunk and base. Much of this will be a repeat of the practice sections, with tight curls that touch each other or looser curls that stand slightly apart. One subtle move is to vary how much you roll over the shape of an individual curl: more for the lower branches and steadily decreasing as you reach the top (Photo 7). As you approach the top of the tree you may need to re-turn the taper to maintain the desired shape (Photo 8).
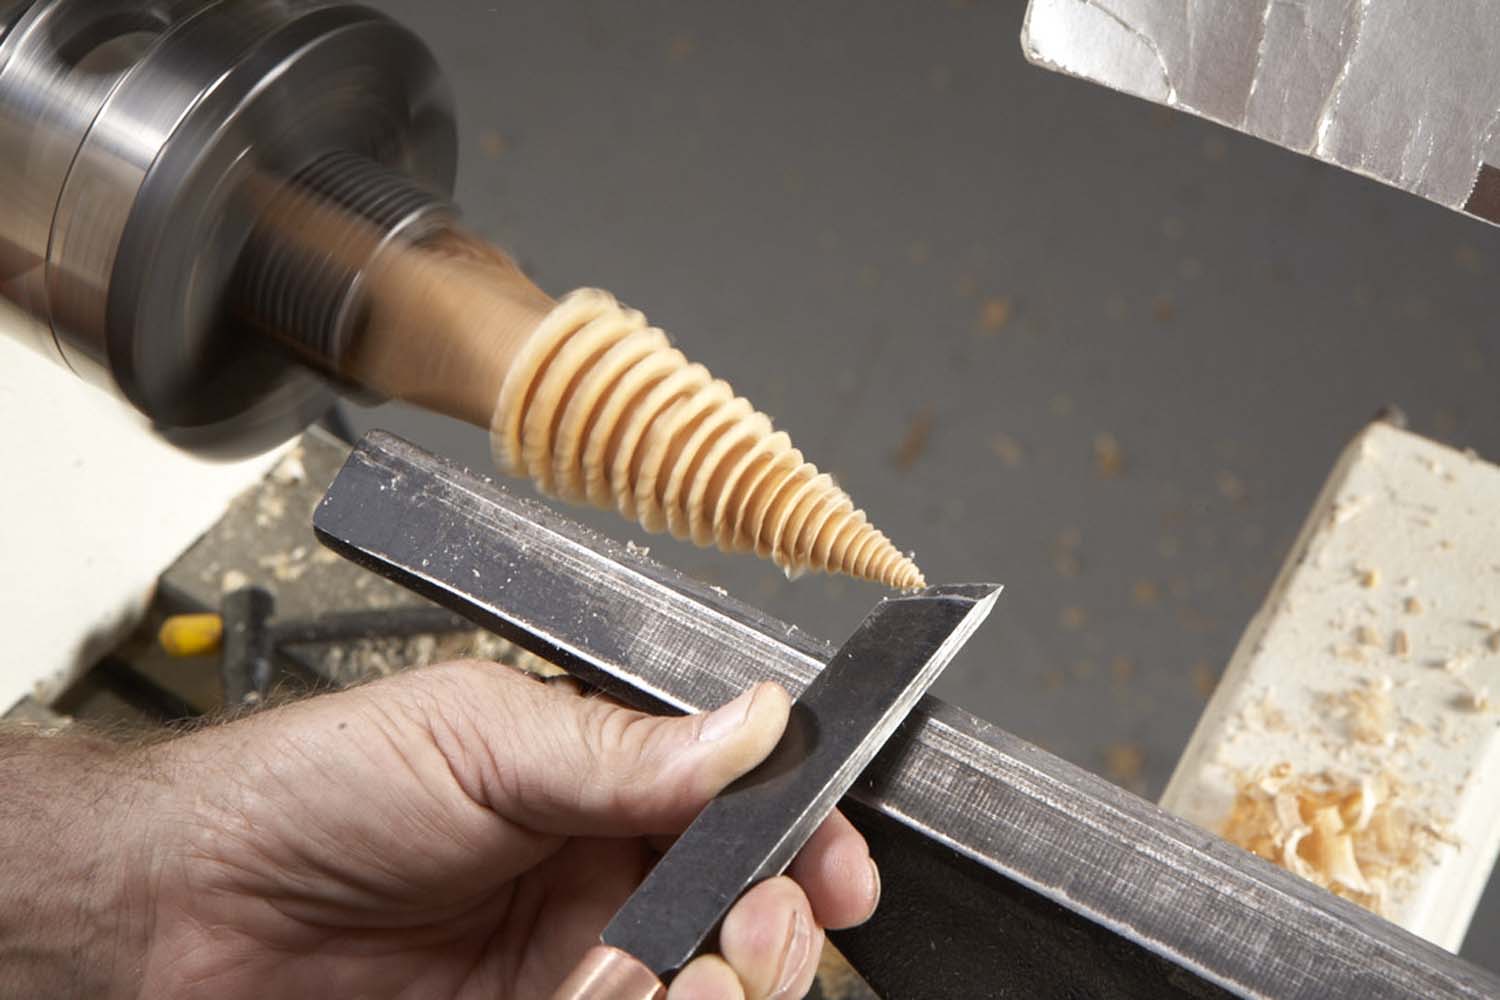
Photo 8. Finish shaping the tree by using successively shorter curls to taper its top end to a point. This is tricky, because you have to leave enough material at the tip to create the last few curls.
If you’ve decided on an exposed trunk and base, turn it now, using a 1/4″ or 3/8″ detail/spindle gouge (Photo 9). Then use a regular or thin-kerf parting tool to cut the finished tree from the blank.
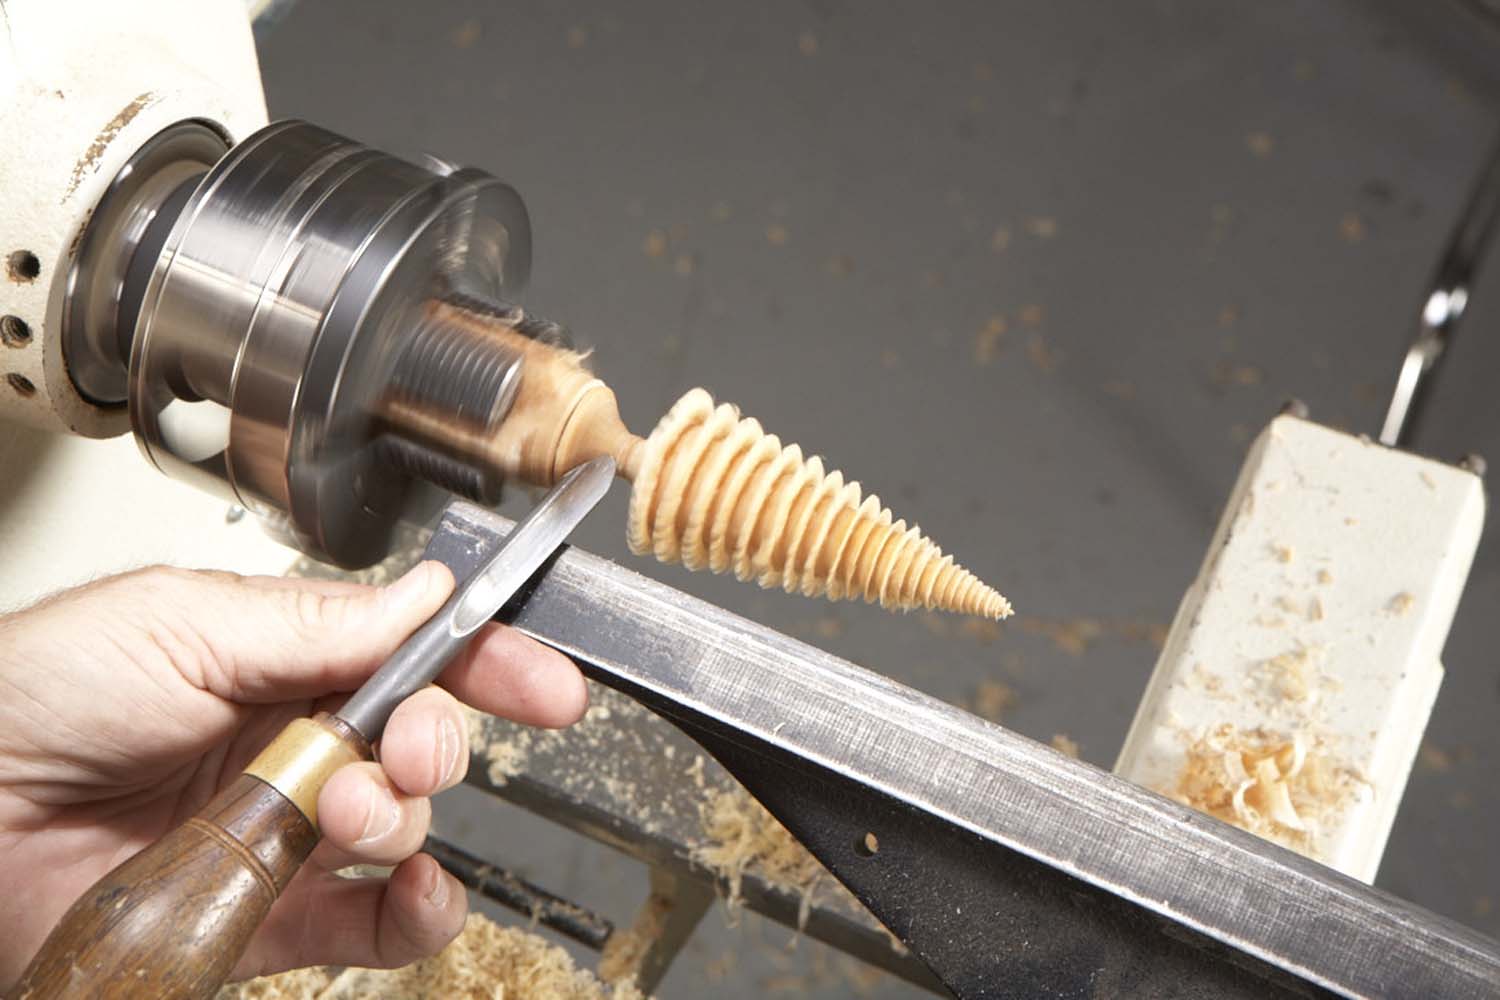
Photo 9. Shape the trunk and create the base using the detail/spindle gouge. Then use a parting tool to separate the completed tree from the waste.
Curling Dry Wood
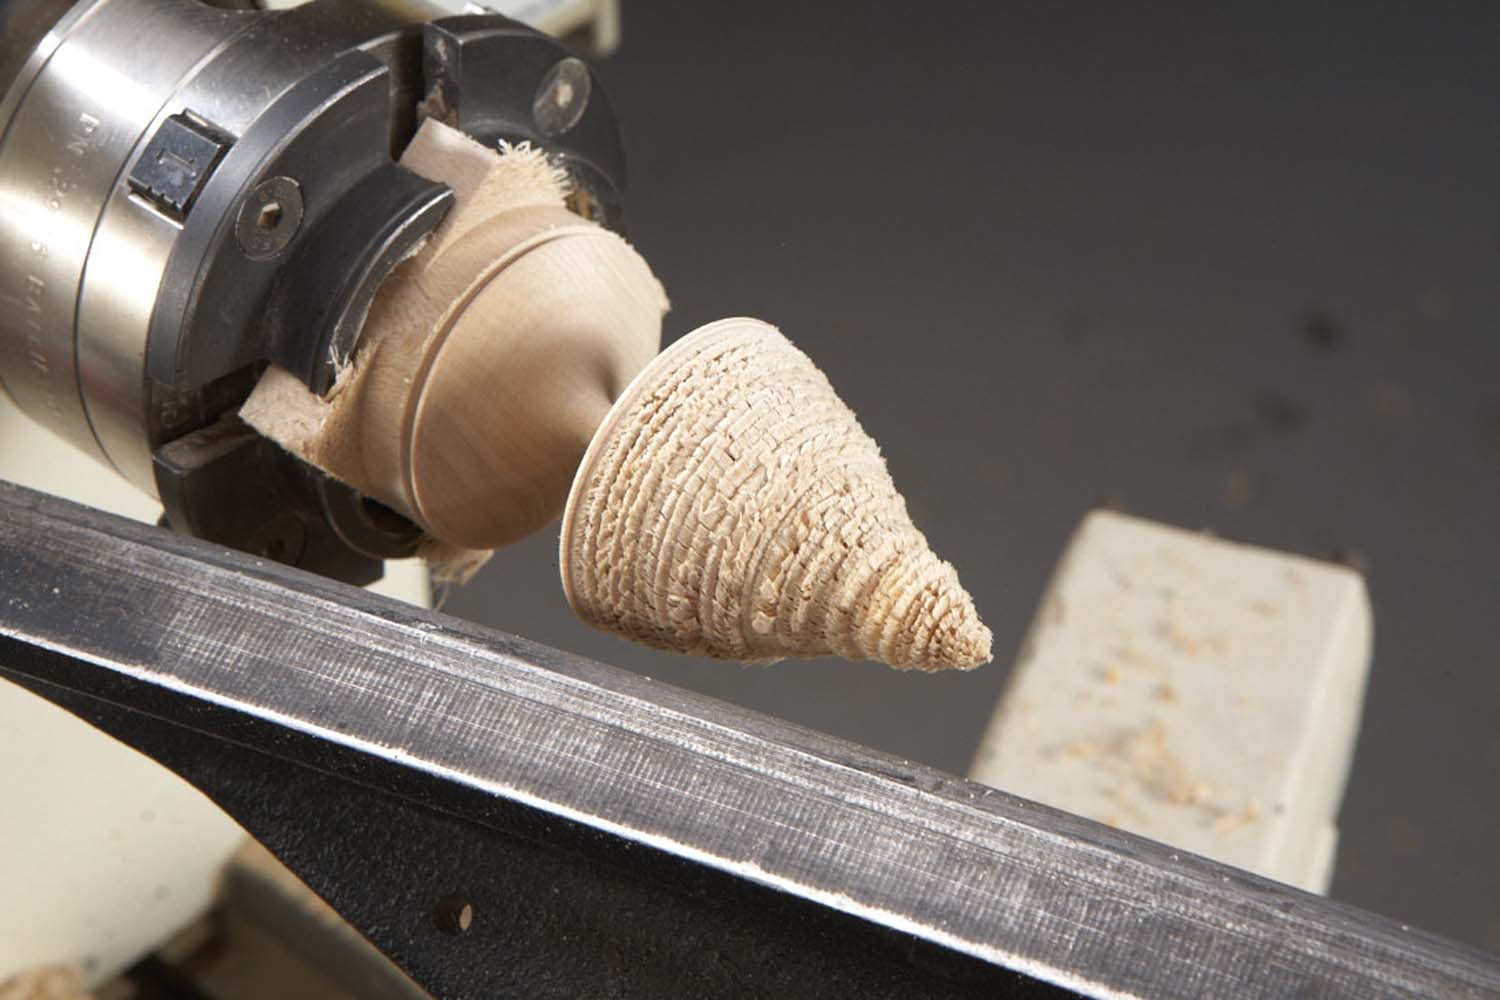
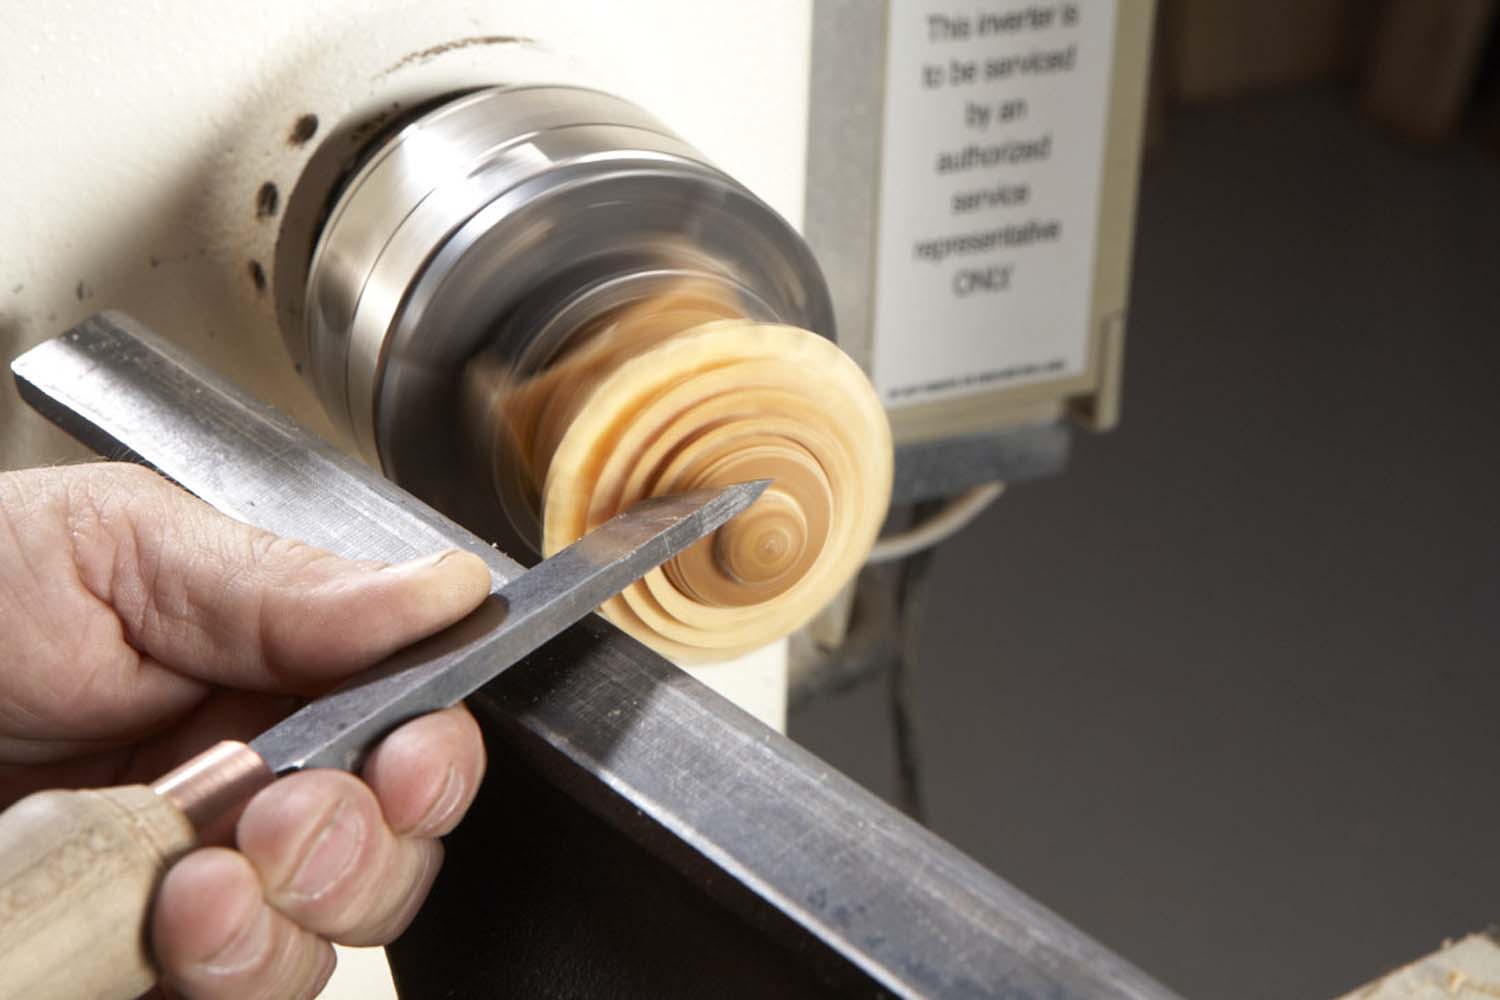
Photo 10. With dry wood the look is completely different, because the curls roll under rather than flaring out. You can stack these tight curls right on top of each other or leave spaces between them.
Using dry stock creates an equally attractive but significantly different look because the curls lack the flared, open shape that you can achieve with wet stock (Photo 10). Generally speaking, dry stock produces tighter curls, so they must be shorter and more closely spaced.
Sidebar: Turn a Flower
 Think of a flower as a short, wide tree. Mount a 1-3/4″ blank in the chuck and turn it to a cylinder. You don’t want the flower to be too long, so work only the very end of the blank (see Photo, above). Start at the outside edge and roll the first curl to the left for about 3/4″ to 1″. Then, pull up a second curl that just touches the first. Next, use a peeling approach with the long point of the skew to cut shallow steps that incrementally reduce the diameter of the material to the right of the curls. Then roll four or five short curls on each step. Complete the flower by shaping its rounded center as a half-beed form, using a normal downhill move with the detail/spindle gouge.
Use about 1″ of the blank to turn a flower. Create a series of steps with diminishing diameters after rolling the first few outside curls. Then roll several short curls on each step. Shape the center last, after rolling all the curls.
For variations, try pulling the curls on a slight taper or on a slightly domed surface. As with the trees, pulling curls on these shapes requires working from smaller to larger diameters, the opposite of normal turning practice. I’ve also had good luck curling a series of stepped, short diameters, and leaving plenty of material towards the tailstock to complete the center section of the flower.
Another interesting variation is to insert a wood of contrasting color for the flower’s center. Drill out the center with a Jacobs style chuck in the tailstock, followed by inserting a short round section of contrasting wood. Then finish the center in the same fashion described earlier.
It’s easy to turn a flower into a brooch. Just glue a pin or clasp to the back. Attach metal wires as stems to create a bouquet or place a single flower in a weed pot as a decorative item.
*Historically, the Erzgebirge (also known as the Ore mountains) was relatively isolated, so its craftsmen, mainly those centered around the town of Seiffen, developed a number of unique techniques and products, including curl turning, ring or hoop turning (where multiple pieces—usually small toy animals—are cut as slices from one single turned ring), smoking men (incense burners) and their own interpretation of the nutcracker.
Here are some supplies and tools we find essential in our everyday work around the shop. We may receive a commission from sales referred by our links; however, we have carefully selected these products for their usefulness and quality.