


We may receive a commission when you use our affiliate links. However, this does not impact our recommendations.
 This table design is reminiscent of suspension style bridges, and is easy to build in a weekend.
 This table design is reminiscent of suspension style bridges, and is easy to build in a weekend.
 Project #2413 • Skill Level: Intermediate • Time: 2 Day • Cost: $150
I built the first of these “torsion tables” for my book “Making Elegant Custom Tables,” and it wasn’t until years later that I realized that the engineering is unique, leading me to revisit. One of the things I like about this design is that it is visually light and airy while actually being quite strong and stable.
I named this particular table a “torsion table” due to the resemblance between the way its various parts are given stability and the suspension on my mother’s old ’62 Volkswagon that relied on torsion rods in place of springs to cushion its ride. That may be a stretch, but then the way this table gets its strength is unique and deserves a name. It has none of the parts you would normally associate with a table other than legs and a top.
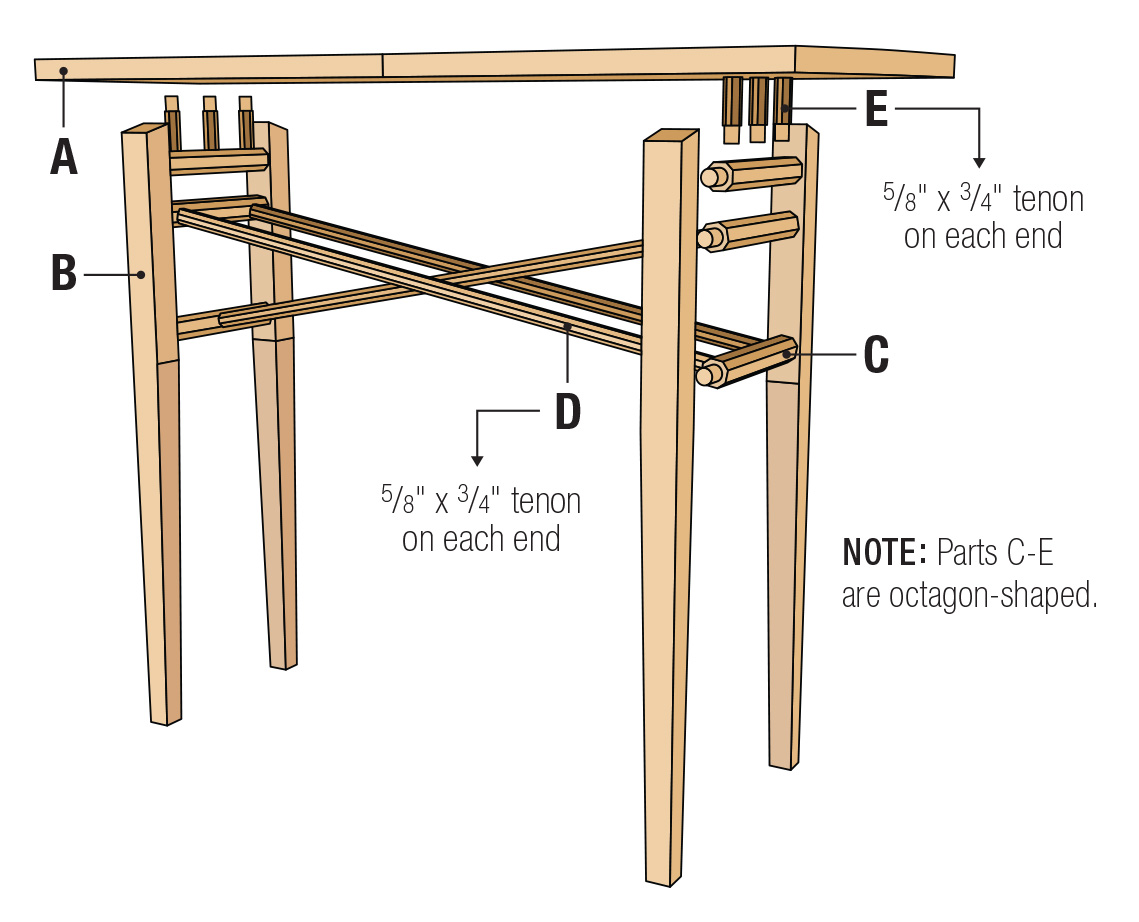
 Making the table involves making front-to-back cross pieces with round tenons on each end. The legs are mortised for those tenons to fit and torsion rods connect the front-to-back pieces together. Short tenoned pieces connect the top and elevate it over the table’s structure, allowing it to float while also allowing the underlying structure to be seen and admired. This is a great project for a woodworker who, in addition to the common shop tools, has access to a lathe.

1 At the drill press, drill a series of holes in what will become the stretchers.
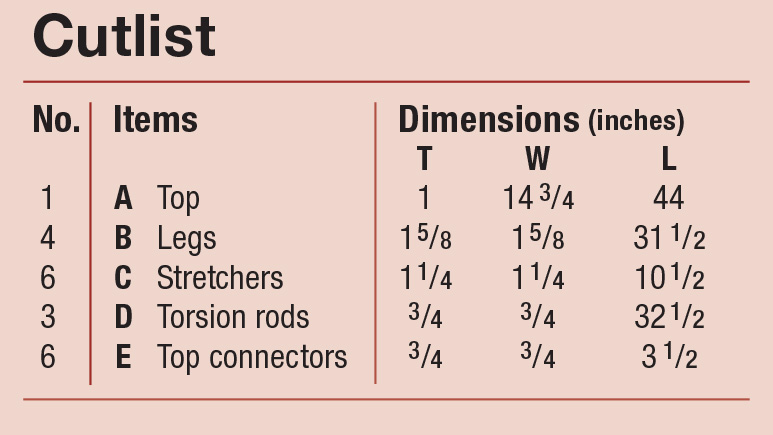
Cutlist and Diagrams


 Front-To-Back Stretchers
 Front-To-Back Stretchers
The first step is to mill the parts. Then using a drill press and 5/8“ Forstner bit, drill holes in the front-to-back stretchers for the torsion rods to fit. Drill the holes 1“ deep, centered in the stock and using the drawing as your guide. There are 6 total front-to-back stretchers. The top front-to-back stretchers receive holes for the 3 tenoned pieces that connect to the top. The other 4 stretchers receive the torsion rods. Two of these stretchers receive two mortises spaced about 3“ from the end and the other two receive holes dead center measured from one end to the other. To drill these holes, I place a fence on the drill press and use a stop block to make certain the various holes are drilled to their precise locations.

2 Turn the parts into octagons by nipping off the corners.

3
Next, use the table saw to cut the square stock into octagonal stock by making table saw cuts. The octagonal stock will be easy to mount in the lathe and will provide a head start on turning the tenons on the lathe. If you’ve tried to turn square stock on the lathe, you’ll have already noted the reason for it.

4 Two stretchers have two holes, two have one.
Mount the stretcher stock in the lathe and turn 3/4“ tenons 11/8“ long on each end. I use a 3/4“ open-end wrench to check the size of the tenon as I proceed. When the wrench slips onto the tenon, it’s time to stop, so stop the lathe regularly and check when you start to get close. After forming the tenon on one end, reverse the stock to form a tenon on the other side. If you like, you can turn the whole piece round from one end to the other for a slight variation.

5 At the lathe, turn tenons on the ends of the stretchers.
Onto the Legs
After cutting a 1-3/4“ white oak stock to length, I tapered the legs first, from a point 12“ from the top down to 1-1/4“ square at the bottom. This was done to lighten the look of the table adding to the idea of the floating top.

6 After tapering the legs, drill the holes for the stretchers.
Next, you’ll need to mortise the leg. Carefully mark the locations for the various mortises and use a 3/4“ Forstner bit to drill the holes. I use a drill press to make certain that the holes are vertical and aligned and a stop block to make certain the holes are aligned from one leg to another. Each leg will require three mortises. An easy mistake to make at this point is to lose track of how the legs are to be arranged with each other. Put them together in pairs, remembering that the tapers are to be on the inside of the legs, not the outside. It is easy to get them mixed up and end up with one leg out of sync with the taper on the outside, not the inside.

7 Cut a bevel on the top of the leg
You will notice in the photos that I cut an angle at the top of each leg. This is because with the top floating above the frame, the angle provides a more finished look. Use a chamfering bit in the router table to chamfer all the edges of the leg.

8 A chamfer bit run along all the edges creates a nice detail.

9
Torsion Rods
After the mortises in the legs are formed, it’s time to make the torsion rods. Use the table saw to turn 3/4“ square stock into octagonal stock as shown in forming the front-to-back stretchers. Cut the stock to length as described in the illustration and cut list and then use a Veritas 5/8″ round tenoner to form 3/4“ long tenons on each end. Make enough extra stock for making the pieces that connect the base to the top. Form tenons to those parts as well. I have a simple way to make sure the Veritas tenoner cuts only tenons of a set length. Cut a short dowel to put inside the tenon cutter. This will restrict its depth, allowing it to cut no further than you desire.

10 A tenon cutter in a drill forms the tenons on the end of the rods.
Begin Assembly
Sand all the parts prior to assembly, then after putting a dab of glue in the mortises of the front-to-back stretchers, spread the glue with a dowel and insert the torsion rods. The round joints in this table can allow parts to go together while twisted, so use a flat surface to make sure that the front-to-back stretchers are parallel, and both flat to the table as the glue sets.

11 Test fit all of the parts so that there are no surprises when you start to assemble.

12
I used Gorilla glue to attach the front-to-back stretchers to the legs to provide a bit more open time for adjusting the parts. I can rotate the round tenons in their mortises so adjusting things and keeping things in a just-so position as the glue sets is important.
Spread Gorilla glue in the joint and use a damp paper towel to dampen the tenons. Just a bit of moisture activates the glue. Take your time in assembly. Check carefully to see that the leg’s tapers are to the inside. Assemble either the front or the back and then begin adding the additional legs. Make sure the top front-to-back stretchers have their tenons pointing straight up.

13 Glue the stretchers into the legs.

14 Polyurethane glue requires moisture to activate.

15 Assemble the torsion rods laying flat to ensure alignment.
Use a carpenter’s square to make certain that the legs stand straight up. And then once you are assured of that, temporarily insert the pieces that connect the table base to the top making certain they are also pointed straight up. An easy way to do this is with the use of a short level. When the glue has set holding the legs, stretchers, and torsion rods in a rigid form, attach the tenoned part for holding the top to the structure. Glue them in the upper front-to-back stretchers. Once dry, turn the base upside down on the top.

16

17 Carefully drive the remaining leg in place.

18 Flip the assembly upside down and check the legs for square.
To locate where you must drill holes connecting the base to the top, requires positioning the base upside down on the top and marking with the pencil where the holes must be drilled. The holes must be drilled exactly vertical using a Forstner bit. Do so with care to avoid going all the way through. A drill press set to the right depth is the best and safest option.

19 Line up the top connectors and mark their location.

20 A drill guide helps drill plumb holes in the top.
You have noticed the unusual shape of the top… the gentle rounding of the ends and that the front is recessed in the middle. This is not only to create a more distinctive design, but one that welcomes you to step forward and to engage with it. The underside is chamfered to thin the visual edge, lightening the appearance without loss of strength. The top surface is chamfered only lightly to ease the touch.
Here are some supplies and tools we find essential in our everyday work around the shop. We may receive a commission from sales referred by our links; however, we have carefully selected these products for their usefulness and quality.


