We may receive a commission when you use our affiliate links. However, this does not impact our recommendations.
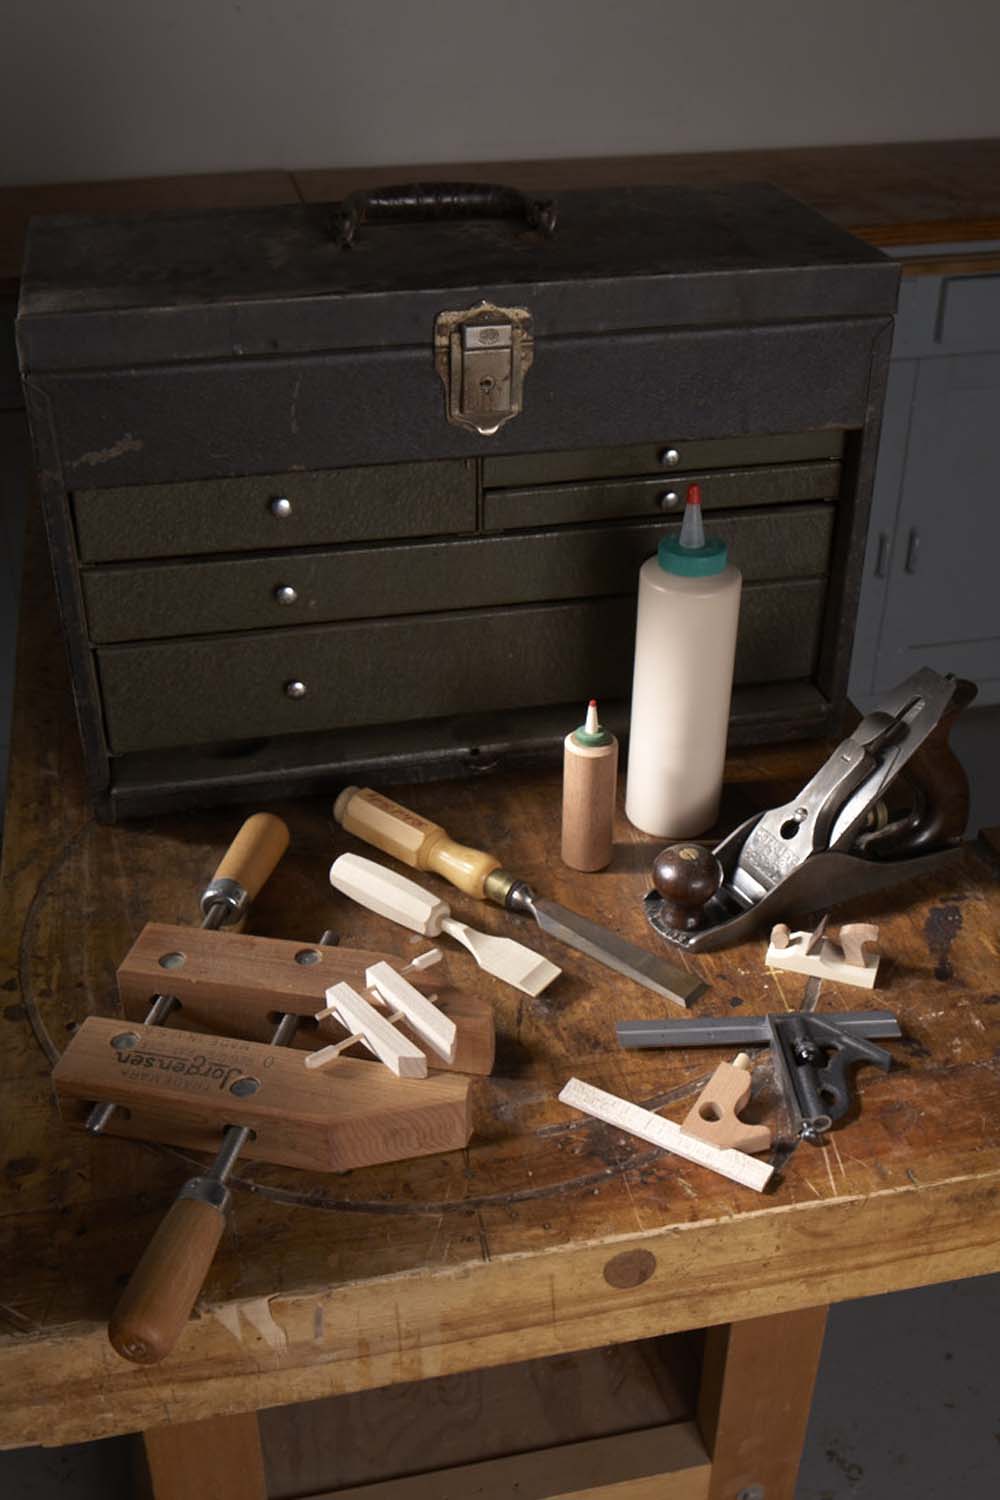 Here’s a clever way to give all your friends genuine handmade woodworking tools. The materials for these little gems cost next to nothing and they don’t take long to make, because they’re designed for producing in small production runs.
Working with small pieces can be tricky, so it’s a good idea to follow the methods and jigs shown here. The tools are ordered to show each jig or method only once, because several of them are shared. That means if you decide to make the hand plane, you’ll still have to read about the handscrew. So you might as well make a batch of handscrews, too.
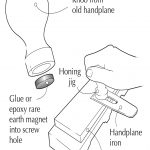
One more thing; it’s easy to transform these tools into ornaments. The chisel, hand plane and glue bottle require drilling a hole, but a piece of ribbon is all you need for the handscrew and combination square. Be careful when you drill the glue bottle hole, so the glue doesn’t drain out.
Handscrew
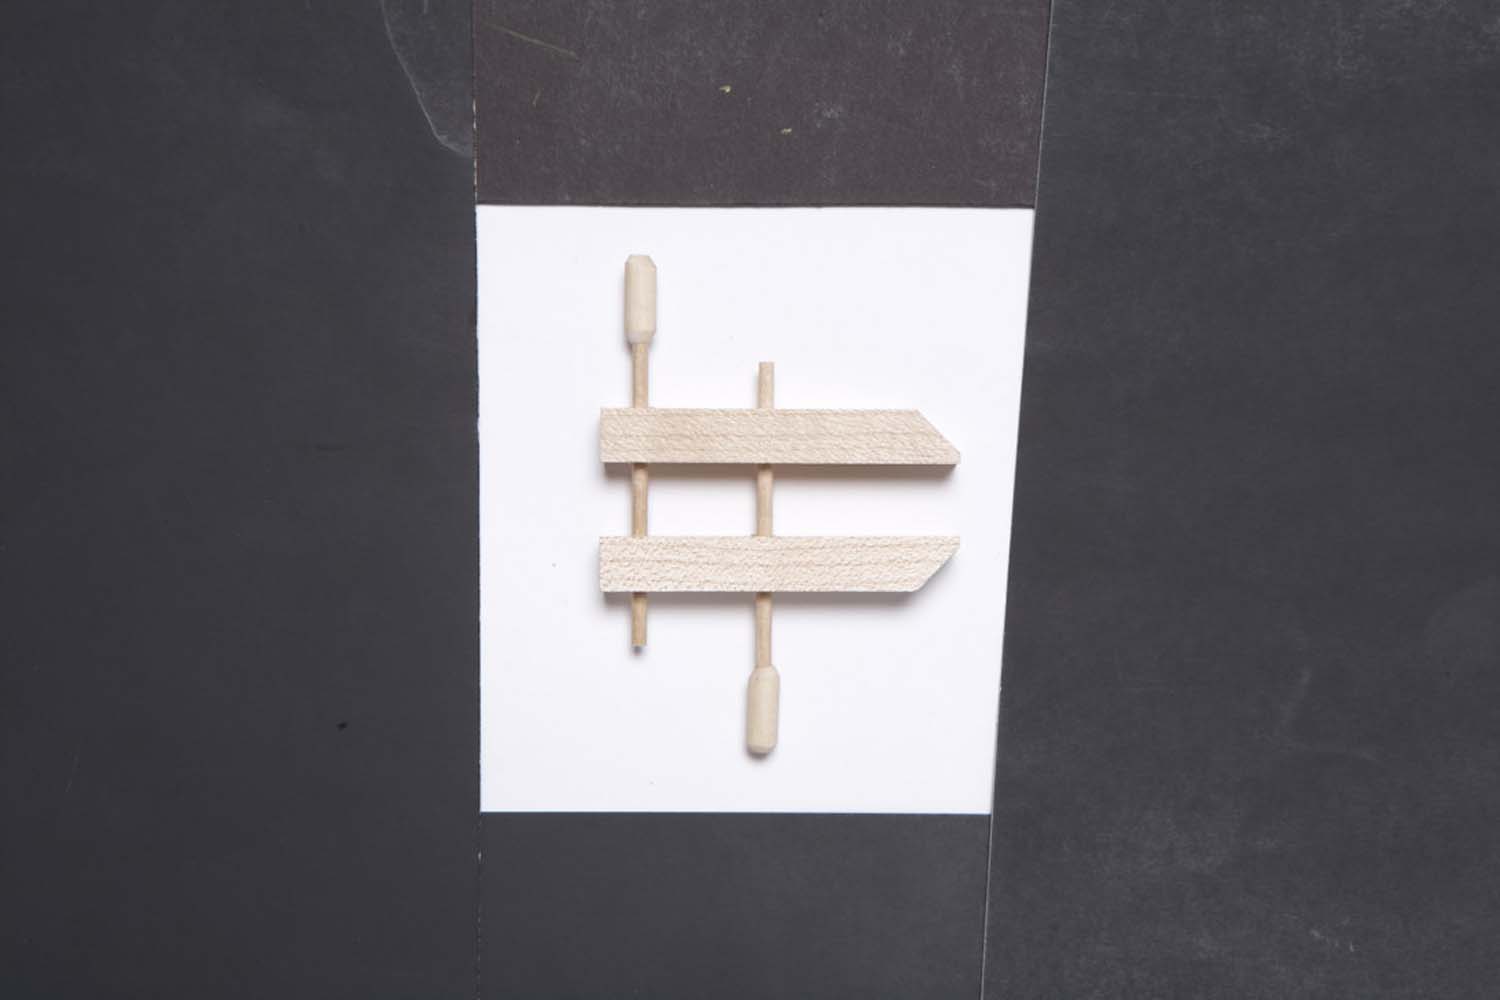
Fig. A: Handscrew Dimensions
Jaws
- Cut a 3/8″ x 1/2″ x 12″ hard maple blank into 2-3/4″ lengths (Fig. A) using a pull saw and a miter box (Photo 1). To make the miter box, cut a hardwood block at 90° and 45° and then glue the three pieces onto a hardwood base, using a piece of 1/4″ MDF as a temporary fence and the pull saw as a spacer to create super-thin kerfs.
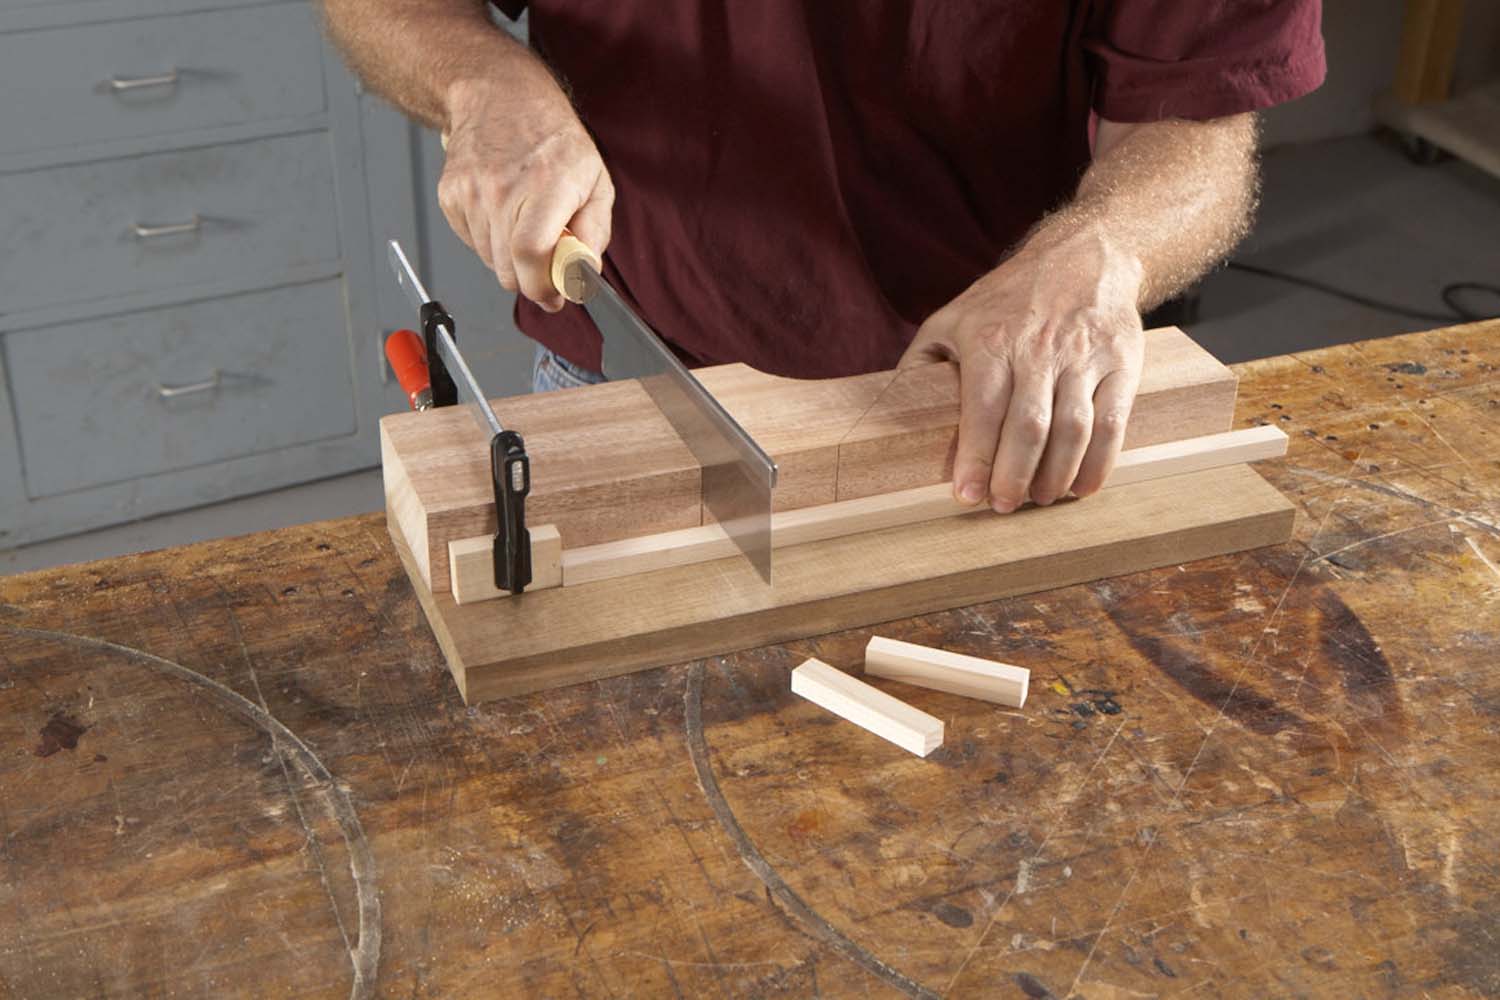
Photo 1. Cut blanks for handscrew jaws using a pull saw and a shop-made miter box.
Start by cutting a 1″ x 8-1/2″ notch in the back of a 1-3/4″ x 3-1/2″ x 16″ hardwood block. Then use a tablesaw or miter box to cut the block 45° and 90°.
Clamp or nail a 1/4″ x 2-1/2″ x 16″ temporary fence on top of a 3/4″ x 6″ x 16″ base, flush at the front. Position the first 90° block against the fence and fasten it to the base with glue and brad nails.
Position the second 90° block against the first—with a spacer that’s exactly the same thickness as the pull saw in between to create the kerf. Make sure this piece is flush against the fence; then fasten it. Repeat the process to install the remaining block and create the 45° miter slot. Then remove the fence and check to make sure the front faces of all three blocks are flush.
- Use the pull saw and miter box to chamfer one end of each maple blank at 45°.
- Drill 1/8″ dia. holes and 9/16″ dia. holes in opposite locations to create the top and bottom jaws.
Handles
- Chamfer the end of a 1/4″ birch dowel freehand, using a disc sander.
- Cut a 5/8″ long handle from the chamfered dowel, using the pull saw and miter box. Repeat the process to create a second handle.
- Drill a 1/8″ dia. x 1/4″ deep hole in the chamfered end of each handle (Photo 2). To make a jig to hold the parts for drilling, mill a pair of 3/8″ x 3/8″ sticks and chop a shallow V-groove in each one. Glue one stick on a 1/2″ x 5″ x 12″ base and fasten the other next to it with a screw at one end to form pincers.
- Glue a 1/8″ birch dowel into each handle to simulate its threaded shaft. Cut each assembly to 3″ length and then chamfer top end of each handle freehand, using the disc sander.
- Assemble the handscrew. Clamp the top and bottom jaws together and then install each handle by passing it through the larger hole and pressing it through the 1/8″ hole until it protrudes by 3/8″. Gluing isn’t necessary, but you may need a hammer to tap the dowels home. When both handles are installed, the handscrew will open and close.
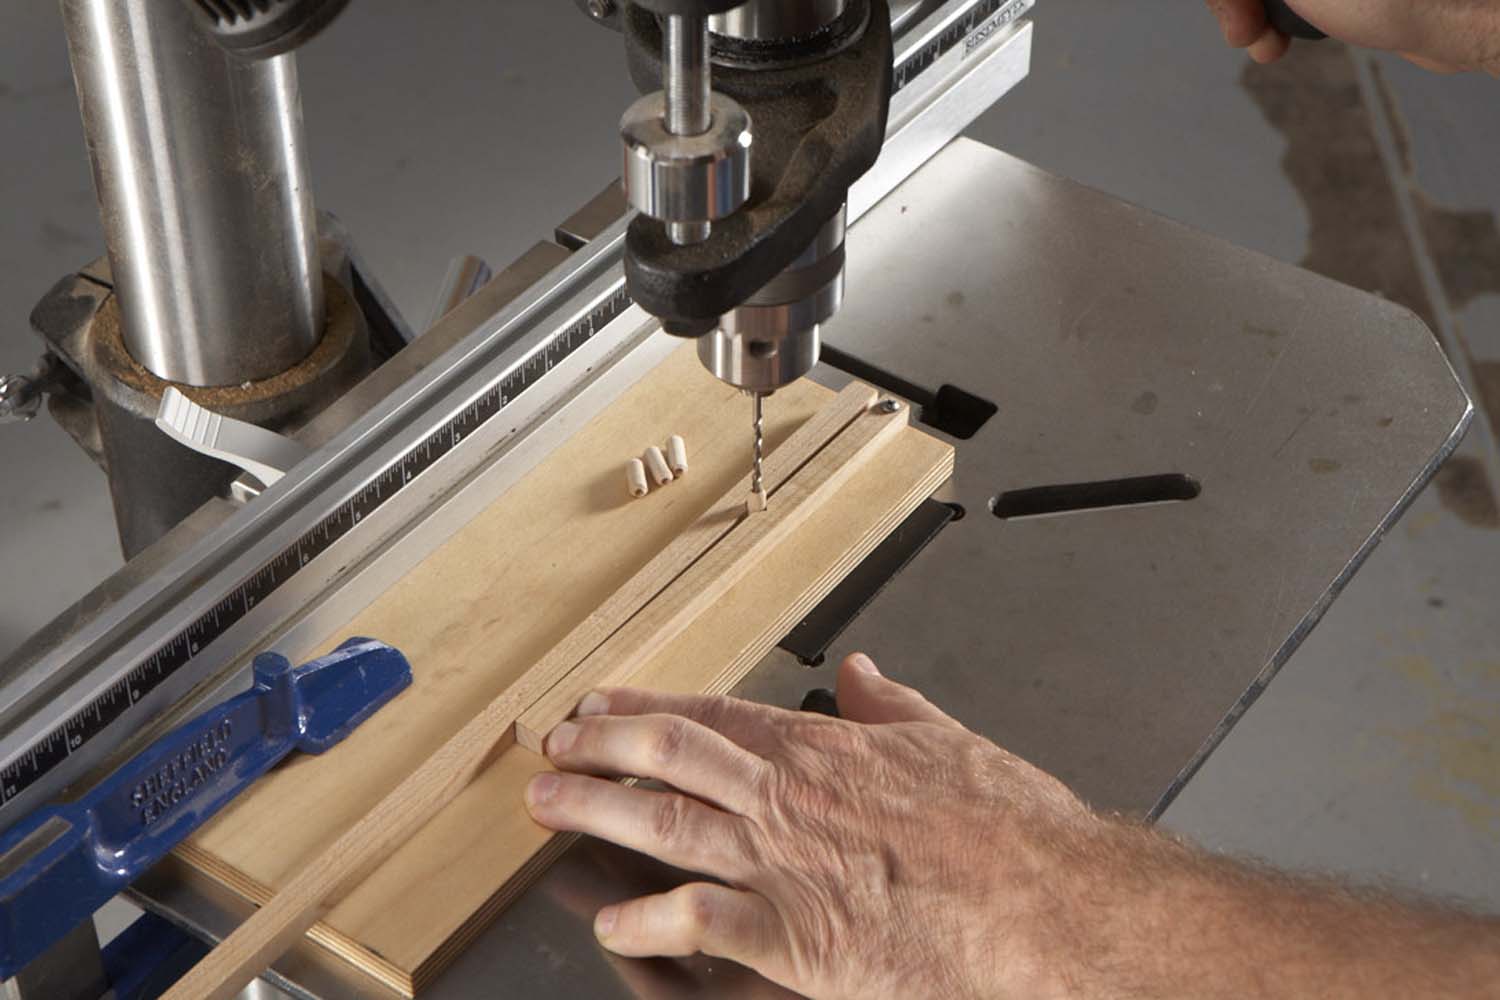
Photo 2. Drill a centered hole in the chamfered end of each handle, using a jig with a pincer and a brad point drill bit.
Glue Bottle

Fig. B: Glue Bottle Dimensions
Fig. C1: Chamfering jig for 1-1/4″ dowels for bottle.
Fig. C2: Chamfering jig for 3/4″ dowels for cap.
Fig. C3: Chamfering jig for 1/4″ dowels for tip.
Bottle
- Cut a 1-1/4″ mahogany or cherry dowel into 3-1/2″ lengths (Fig. B) using a pull saw and miter box.
- Chamfer both ends of the dowel, using a disc sander (Photo 3). To make a chamfering jig (Fig. C), drill a stopped 1-3/16″ dia. hole near one end of a 1-3/4″ x 1-3/4″ x 12″ block. (Most 1-1/4″ dowels are undersized.) Miter the end of the block at 45° to expose the corner of the dowel. Use a dowel that spins freely in the jig. Dowel diameters aren’t consistent, so take the jig along when you shop for dowels and test-fit each one.
- Clamp the jig to the sander with the miter parallel to the disc and positioned to create a 1/8″ chamfer. Make sure the disc rotates down toward the jig, from the top to the bottom.
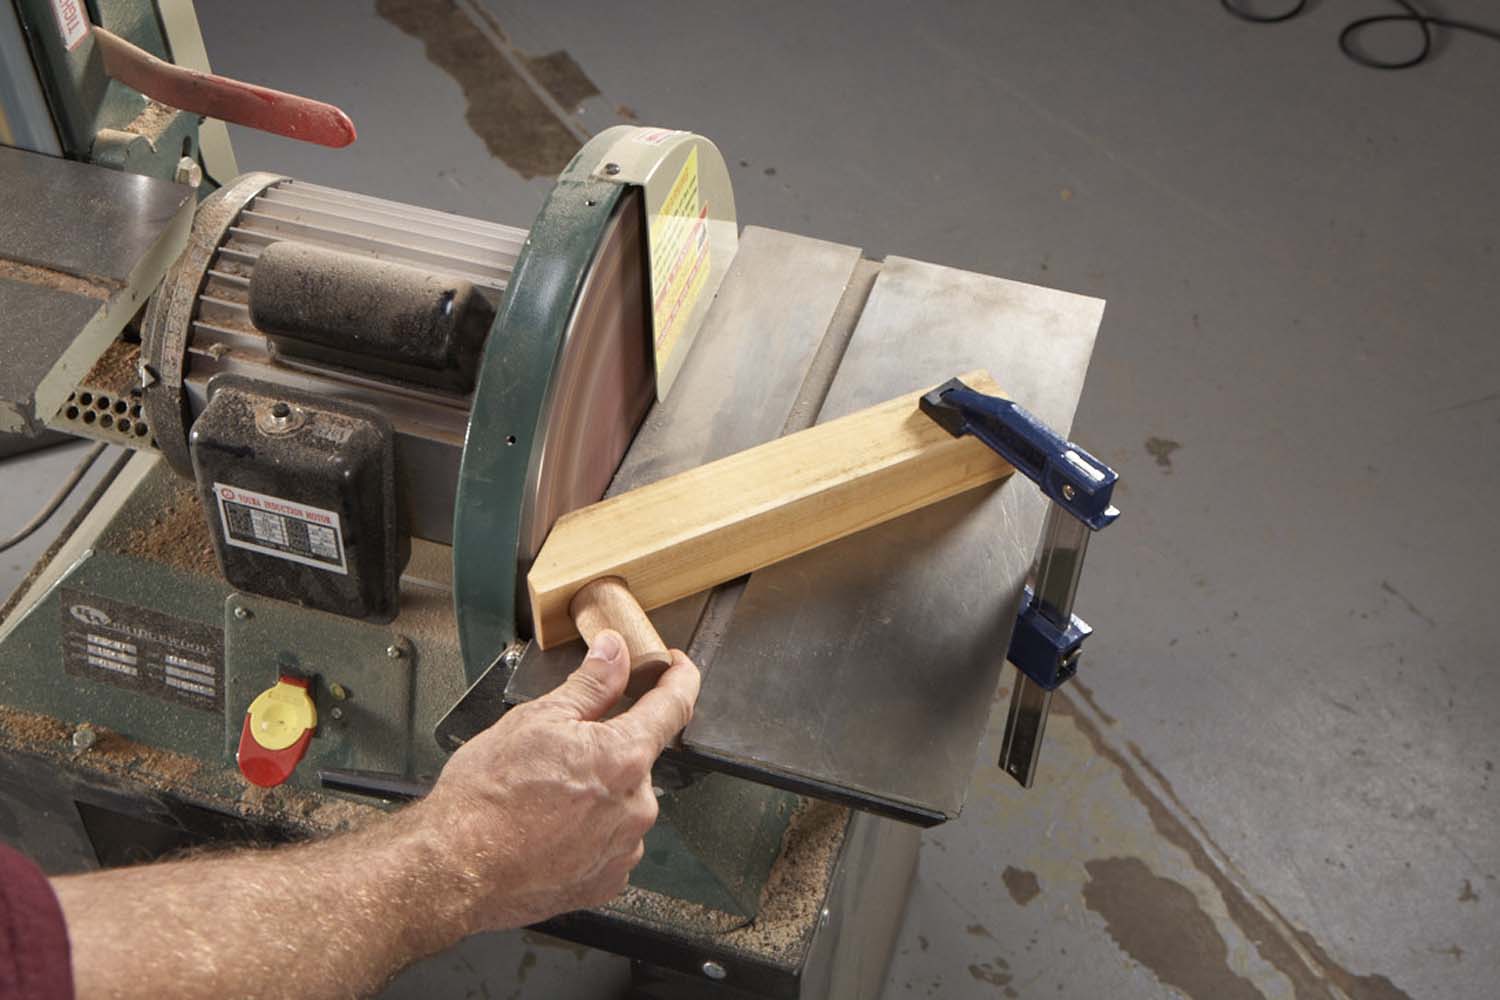
Photo 3. Chamfer both ends of the bottle using the disc sander and a shop-made jig.
Cap
- Chamfer the end of a 3/4″ birch dowel using a similar jig. Then use a pull saw and miter box to cut off a 1/4″ thick slice.
- Cut ribs into the edge of the cap using a jig and a milled tooth flat cut file (Photo 4). Make the jig by cutting a 1/4″ wide x 5/8″ deep slot in a scrap board. Insert the cap and then run the file over its edge.
- Glue the cap on the bottle

Photo 4. Cut ribs in the edge of the cap by rolling it with a milled-tooth flat cut file. Groove a board to hold the cap and roll it one full rotation.
Tip
- Taper a 5/16″ birch dowel using the disc sander and another chamfering jig (Photo 5). This time, miter the jig’s corner at 5° and leave the center of the stopped hole, so the point of the dowel has a bearing surface to rotate on during the tapering process.
- Use a pull saw and miter box to cut off the tapered end of the dowel to create the 1″ long tip. Glue the tip on the cap.
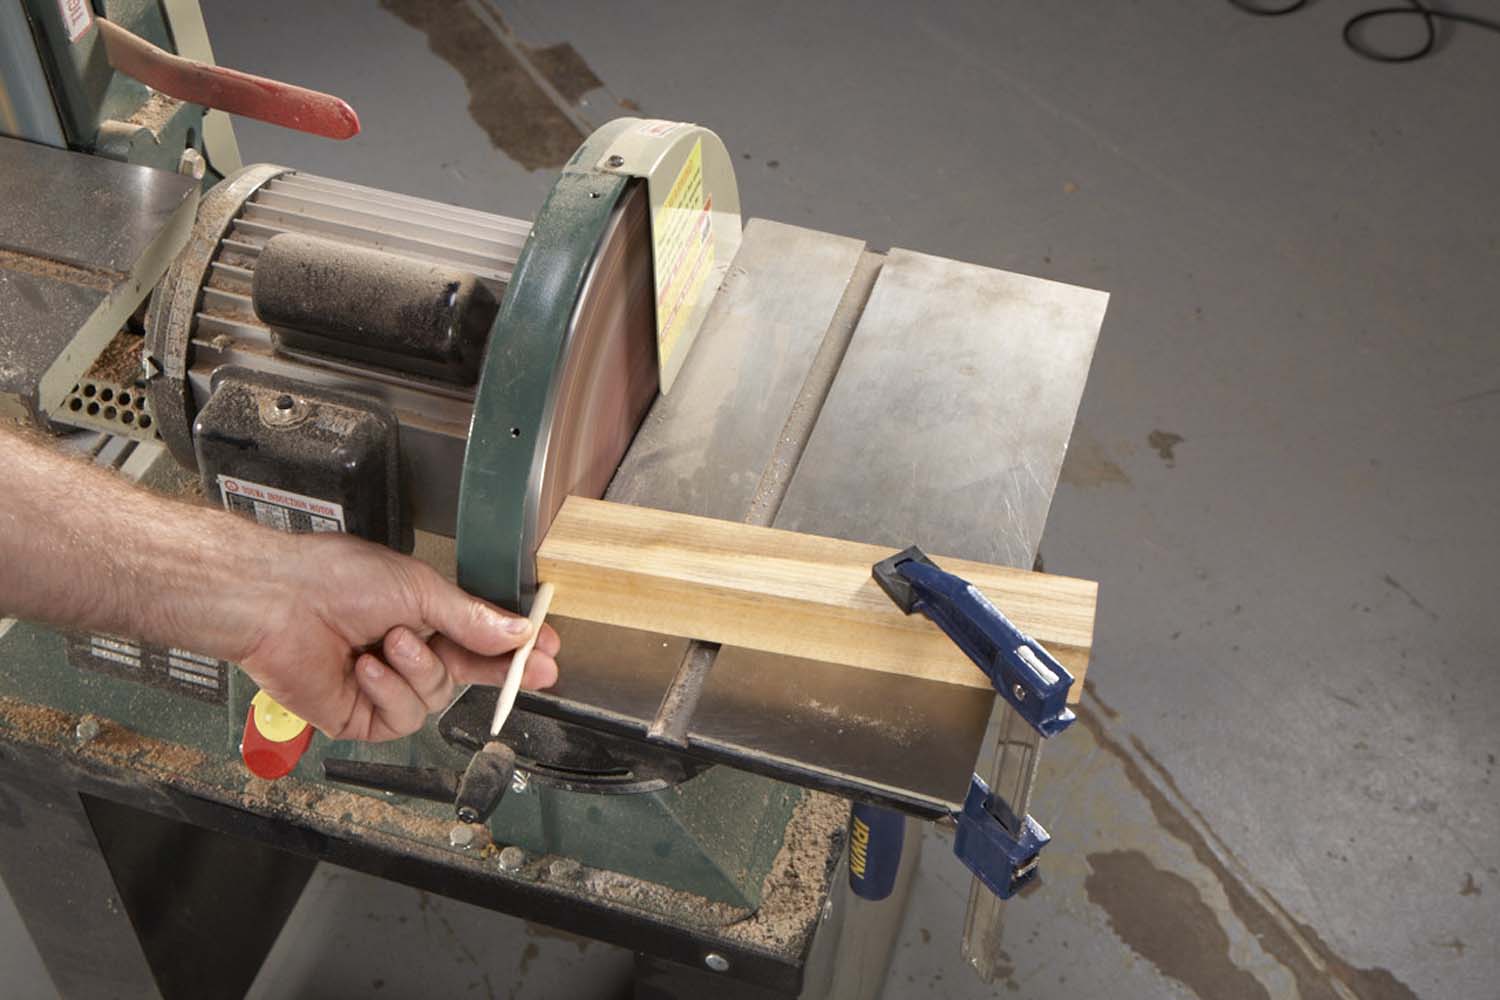
Photo 5. Create the bottle’s tip by tapering the end of a 5/16″ birch dowel, using a similar jig that creates a 5° chamfer.
Chisel
Fig D: Chisel Dimensions
Handle
- Create an octagon from a 1″ x 1″ x 12″ long basswood blank, using a chamfer bit and the router table.
- Using the pull saw and miter box, cut a 3″ long section from the blank to make the handle (Fig. D). Then drill a centered 5/16″ dia. x 3/8″ deep hole in one end for the blade.
- Create the handle’s bowed shape on the disc sander (Photo 6). Draw guide lines 1/8″ in from the edge on both ends of the blank. Then rock the handle on each facet to remove the waste.
- Slightly chamfer both ends by rotating the handle while holding it at 45° to the sanding disc.
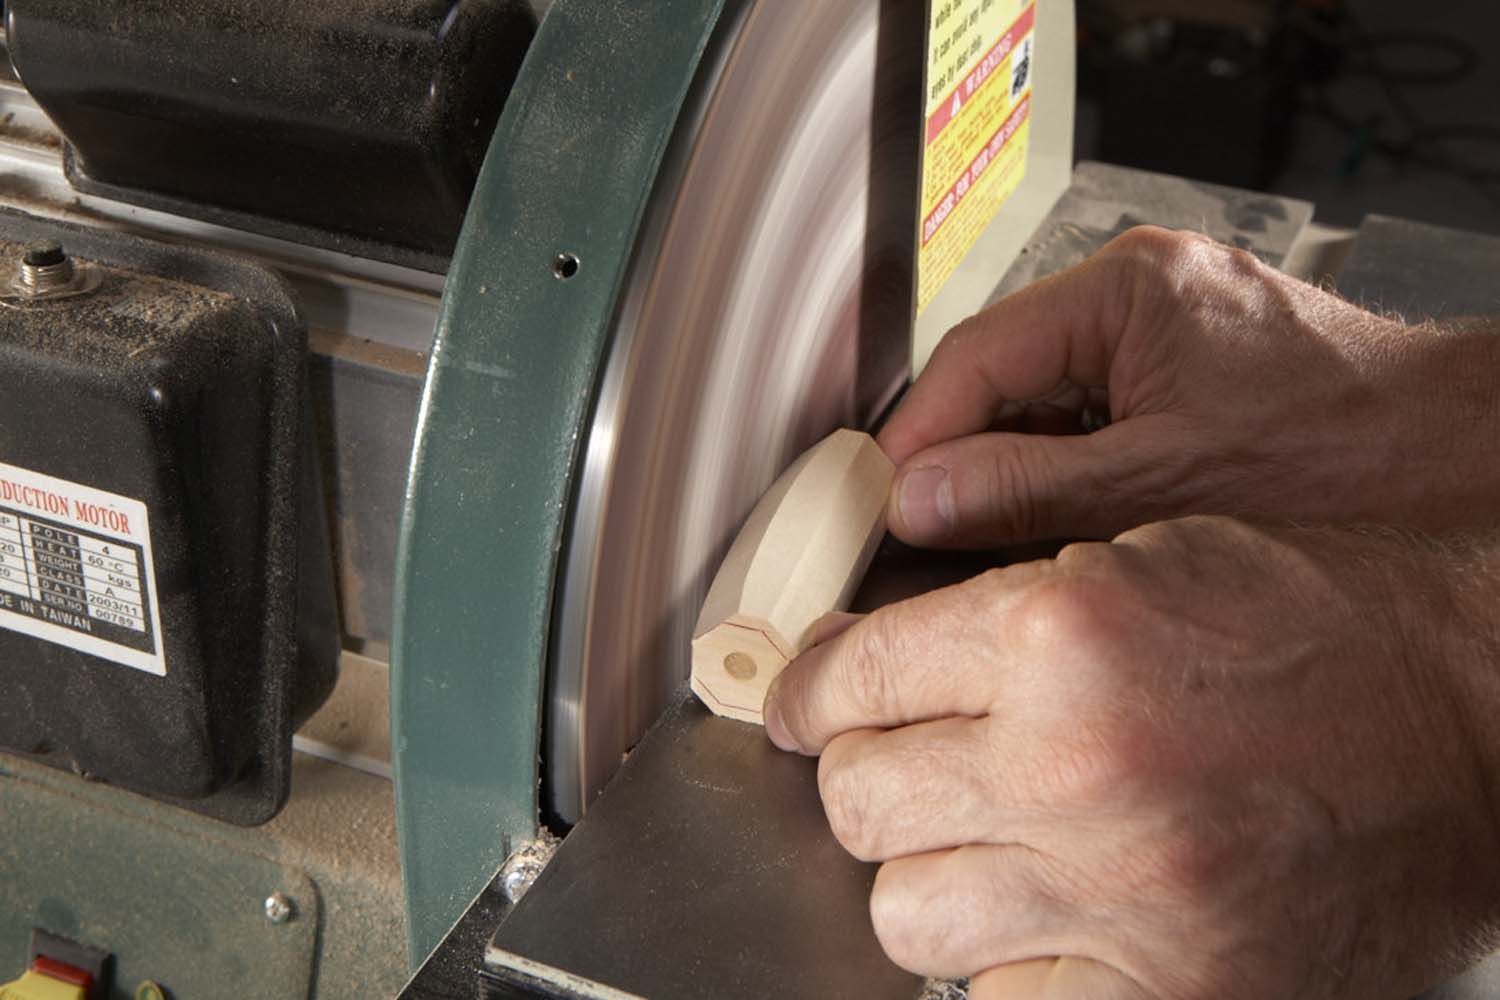
Photo 6. Create the handle’s bowed shape by rocking from the center to both ends on each octagonal edge. Marks drawn on each end show how much waste to remove.
Blade
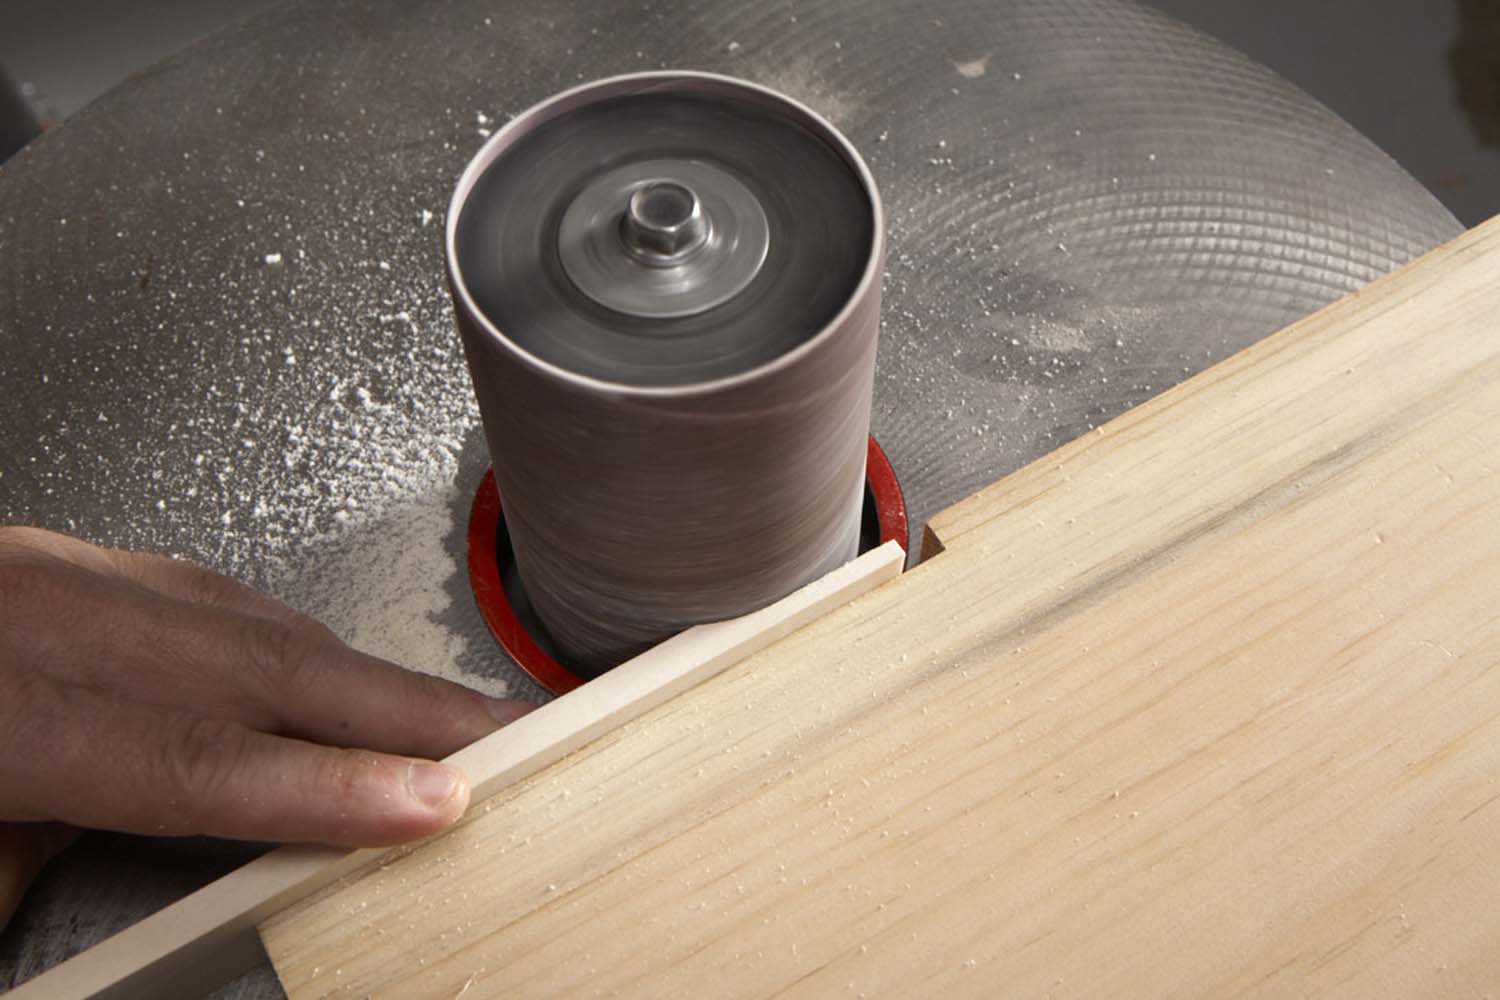
Photo 7. Shape the top of the blade using an oscillating spindle sander and a notched board that acts as a fence and a stop.
- Create the blade by shaping a 1/4″ x 1″ x 3-1/2″ basswood blank on an oscillating spindle sander outfitted with a 3″ drum (Photo 7). A board with a 1/4″ deep notch acts as both a fence and a stop. Clamp the board in position to sand the blank to the blade’s 3/16″ thickness and 2-3/8″ length.
- Shape the blade’s bevel after repositioning the board so its notch a 1/16″ from the drum. Don’t use the stop; just sand until the bevel is 1/2″ long.
- Shape the blade’s 1/4″ x 1-7/8″ tang (Photo 8). Lay the blank flat and use a 5/8″ deep notch, positioned to remove 3/8″, so one pass on each side will create the 1/4″-square tang.
- Slightly chamfer the edges of the tang. Then press it into the handle, crushing its soft basswood corners to create a tight fit that doesn’t require glue.
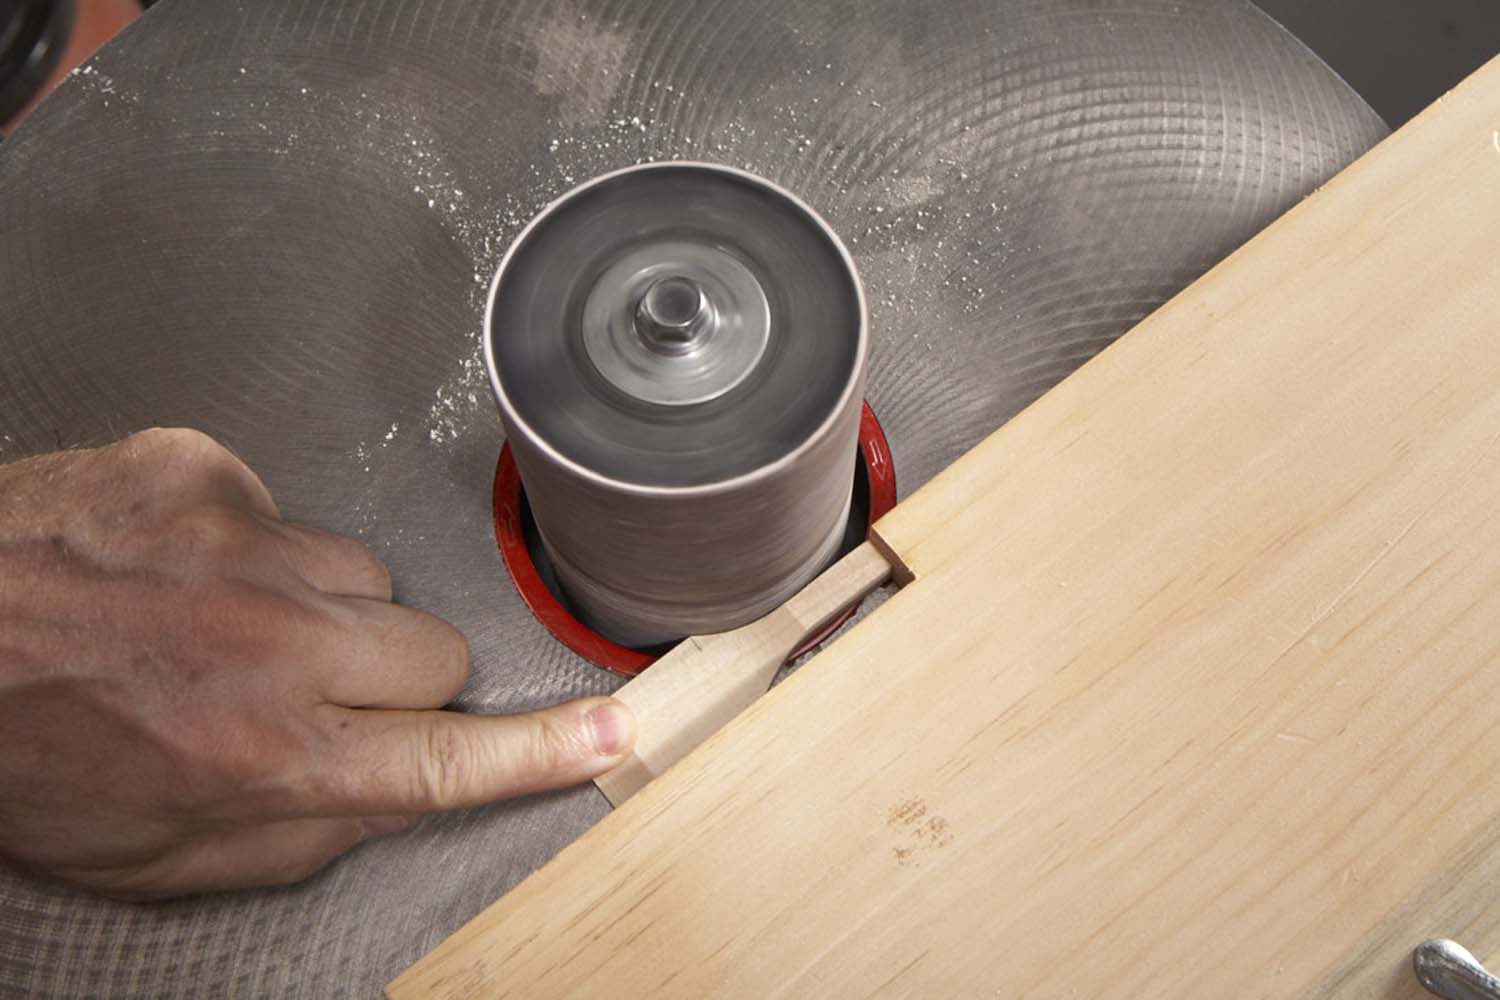
Photo 8. Lay the blank flat, use a deeper notch and make one pass on each side to shape the blade’s square tang.
Combination Square
Fig. E: Combination Square Dimensions
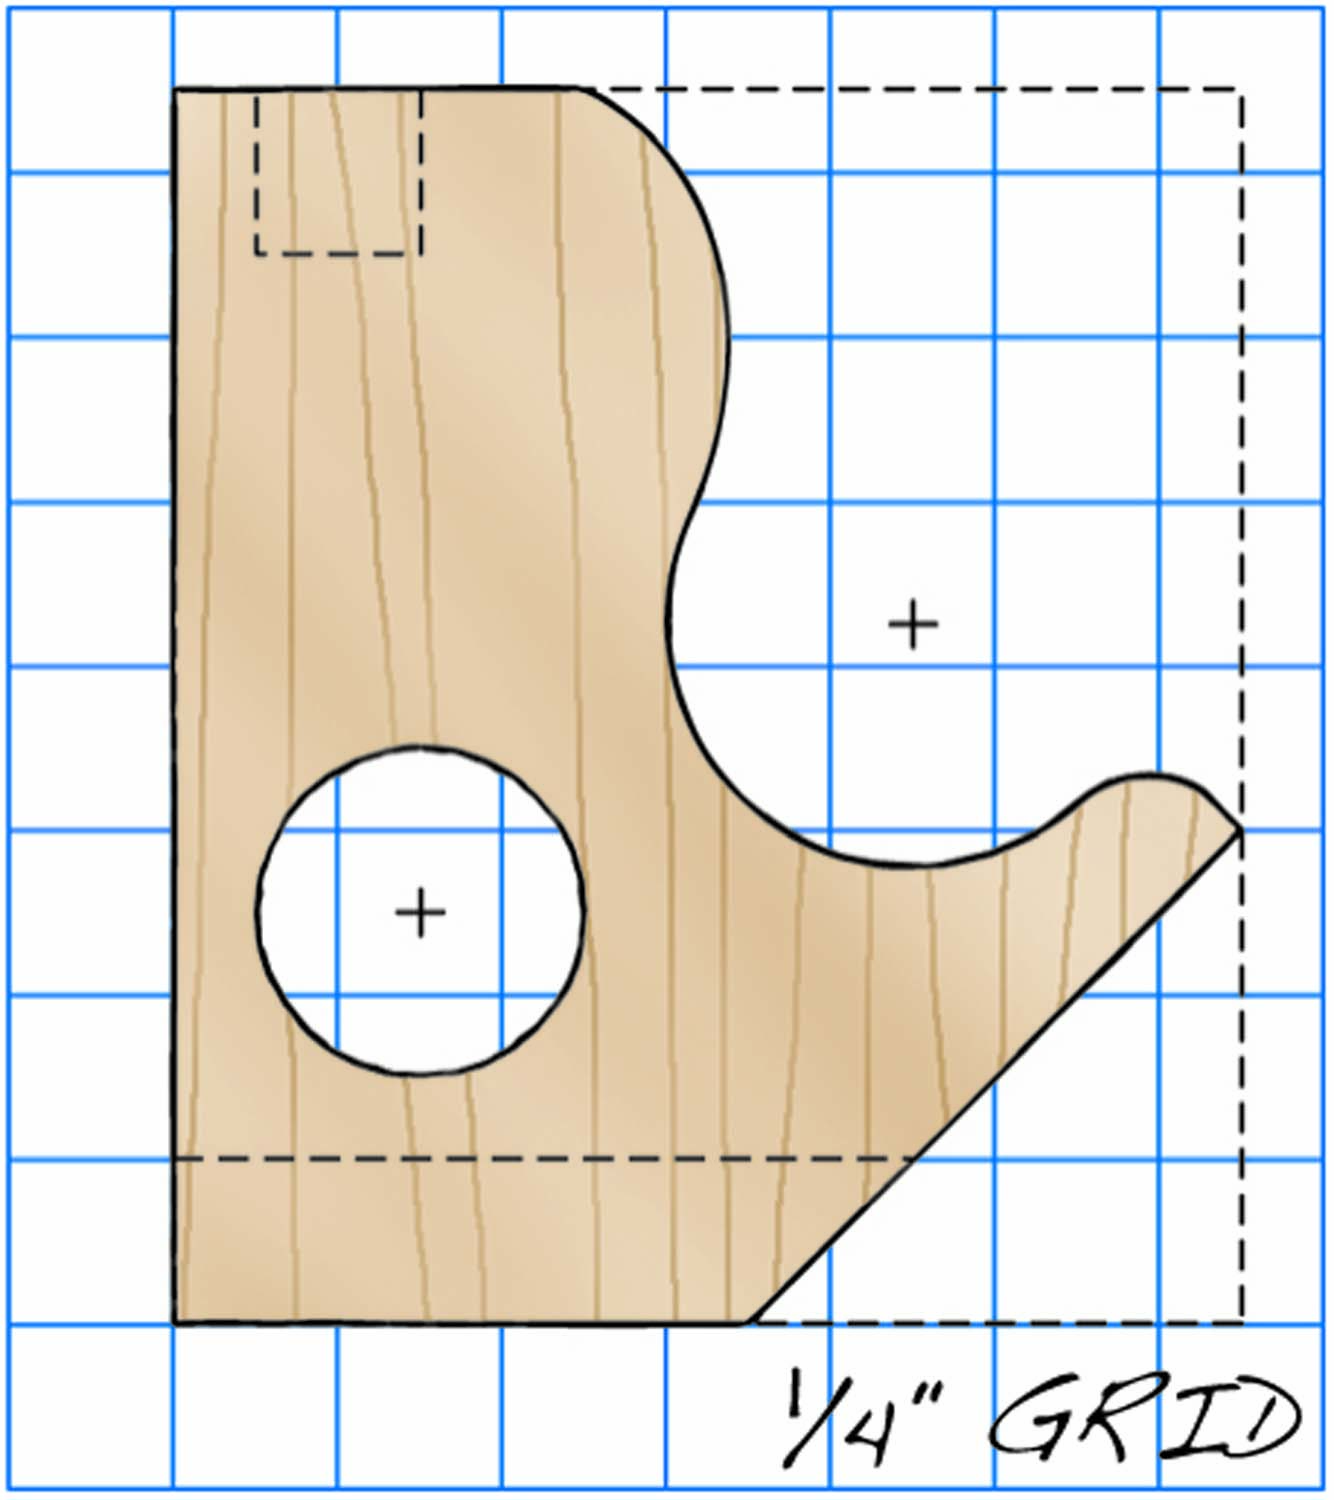
Fig. F: Head Pattern
Head
- Rout or saw a 1/8″ wide x 1/4″ deep slot in one edge of a 1/2″ x 1-7/8″ x 12″ cherry blank (Fig. E).
- Use a pattern (Fig. F) to lay out several head profiles on the blank. It’s easiest to make these complex profiles in multiples.
- Drill a 1/4″ dia. x 1/4″ deep hole in the top end of each profile and a 1/2″ dia. hole through each face.
- Drill 3/4″ dia. holes through the blank to define the heads’ contoured profiles (Photo 9).
- Cut each head from the blank, using the pull saw and miter box. Cut the end profile’s 45° edge first. Then cut that head’s 90° edge to separate it from the blank. Repeat the process to cut out the remaining heads.
- Remove the waste on the outside corner of each blank by making pull saw cuts into the drilled hole. Then smooth the contours on the oscillating spindle sander. Keep your fingers out of harm’s way by using a small handscrew to hold each head.
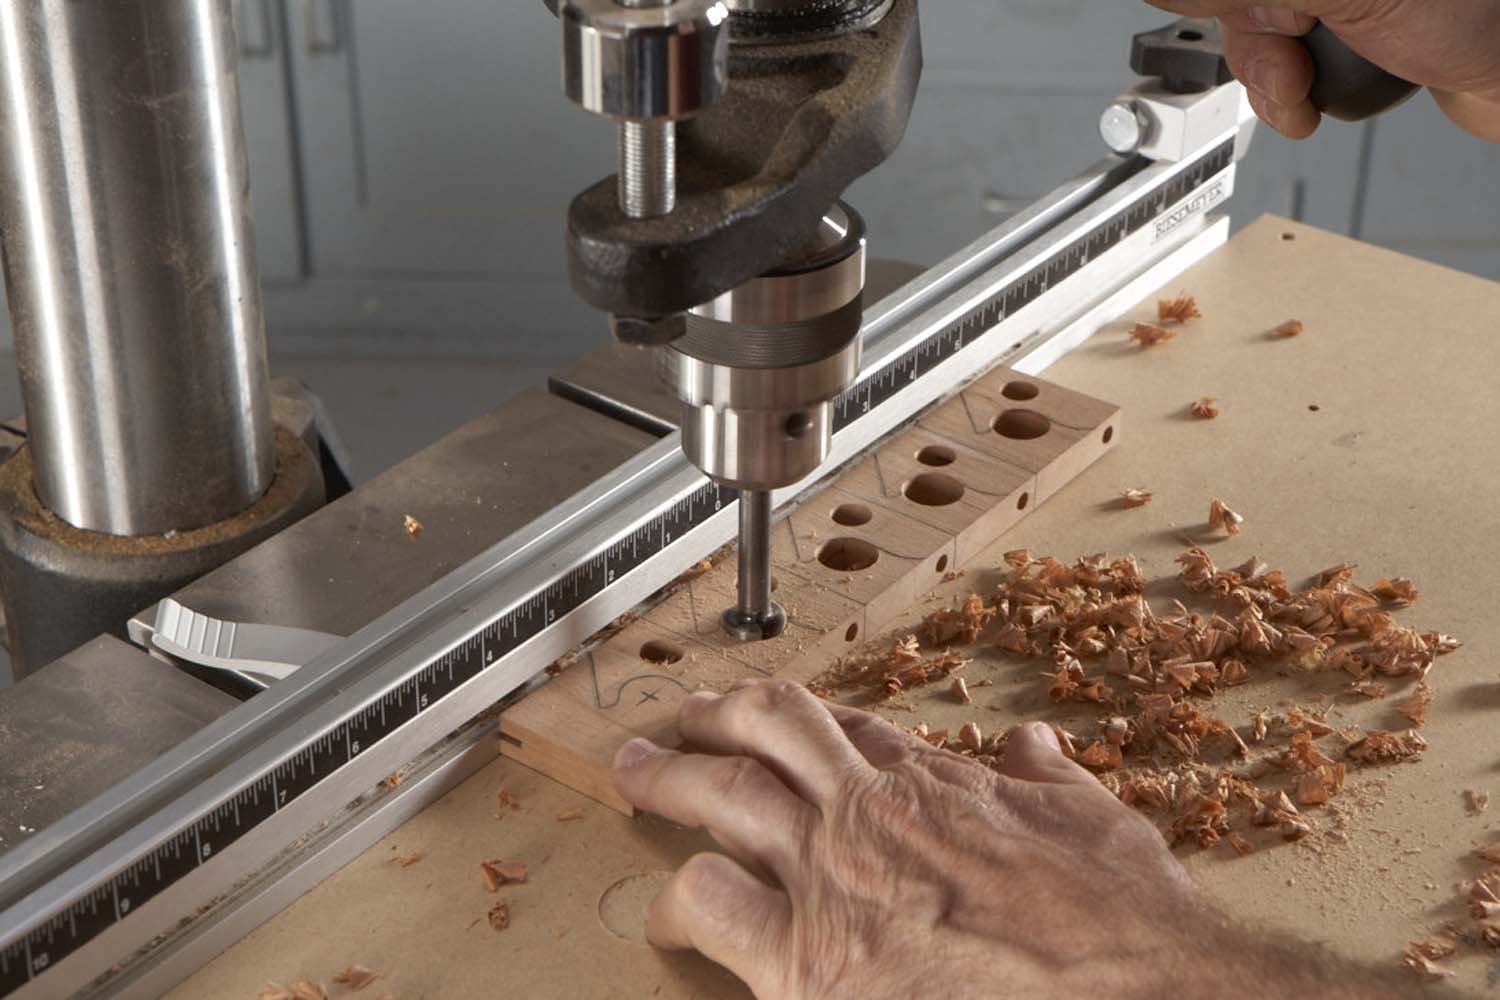
Photo 9. Drill 3/4″ dia. holes to define the heads’ contoured profiles. It’s easiest to make these small, complex parts in multiples.
Ruler

Photo 10. Use an auxiliary bed to mill the blank for the square’s ruler. This bed fully supports the thin blank, so it won’t be destroyed by the planer’s feed rollers and cutterhead.
- Quartersawn hard maple makes the most realistic rulers, because its vertical figure simulates rule marks. Mill a 1/4″ x 1/2″ x 12″ blank to snugly fit the combination heads’ 1/8″ slots (Photo 10).Make an auxiliary bed that hooks over the planer’s infeed table and extends onto its outfeed table to plane this super-thin stock. This bed shields the thin blank from the alternating pressure exerted by the planer’s feed rollers and cutterhead, which would cause it to flex and shatter. into the cutterhead and shattering. Make sure to orient the blank’s grain direction properly during this operation and prepare extra blanks—even with an auxiliary bed, planing super-thin stock is risky business.
- Cut the milled blank to 4-1/2″ lengths using the pull saw and miter box.
- Press-fit the ruler into the handle. Gluing isn’t necessary.
Adjustment Screw
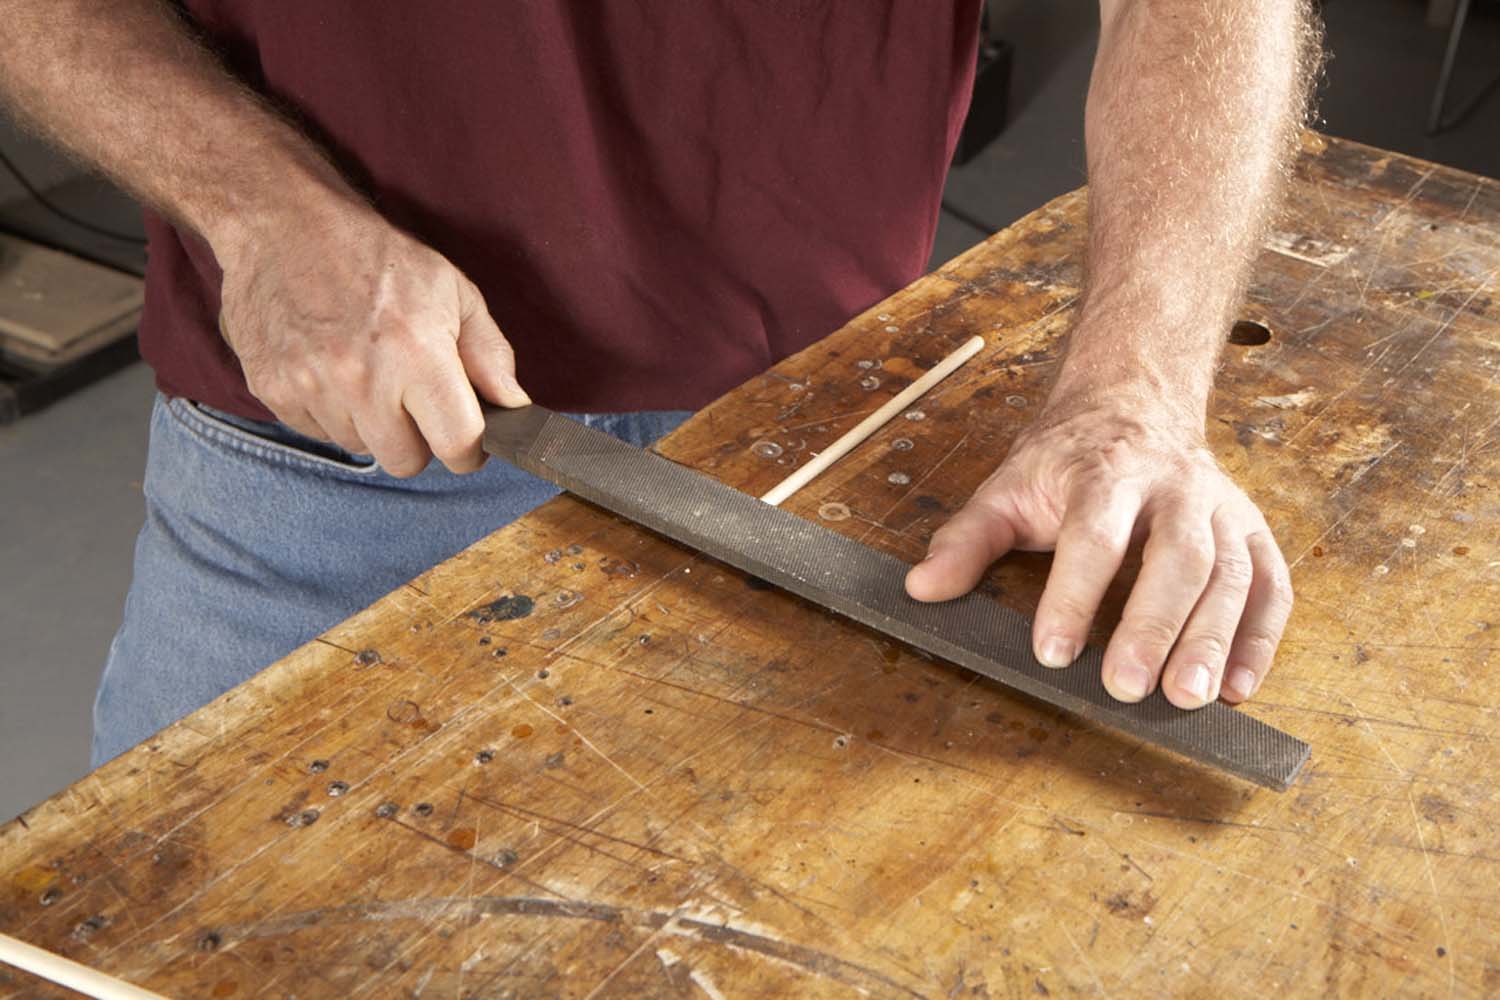
Photo 11. Roll texture onto the end of a 1/4″ dowel. Cut off the textured end to create the square’s adjustment knob.
- Use a coarse double-cut file to roll texture onto the end of a 1/4″ dowel (Photo 11).
- Cut the dowel to 5/8″ long adjustment screws, using the pull saw and miter box, and glue them into the holes drilled in the handles.
Hand Plane

Fig. G: Hand Plane Dimensions
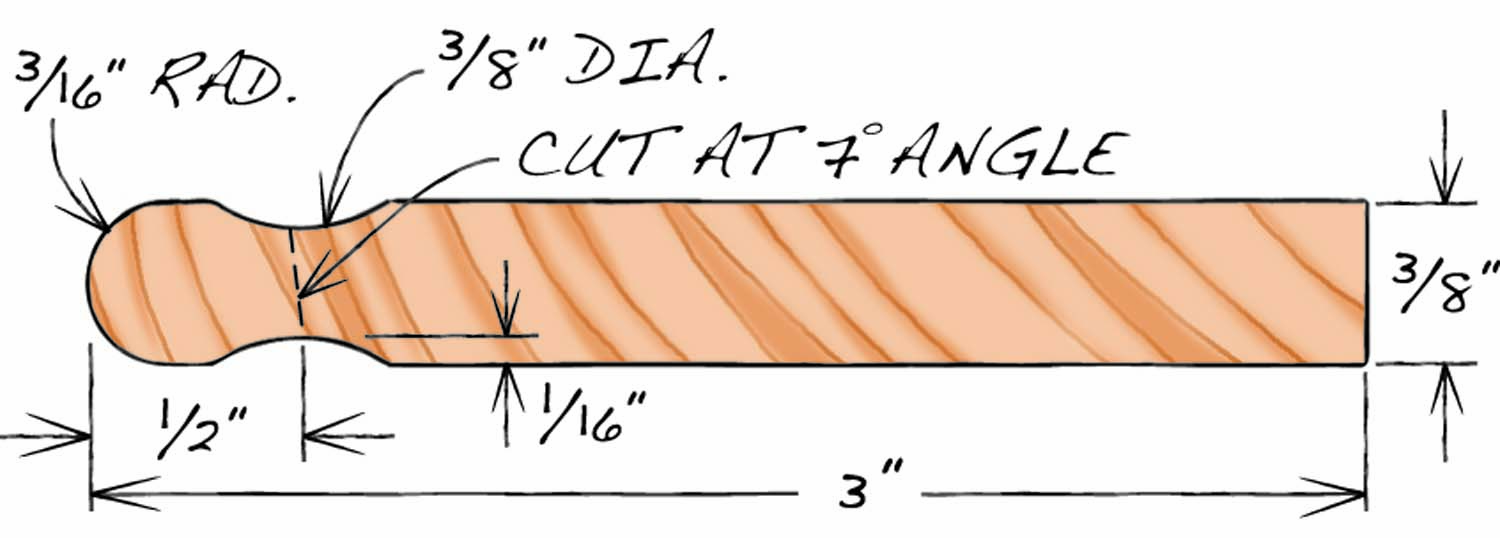
Fig. H: Pommel Dimensions
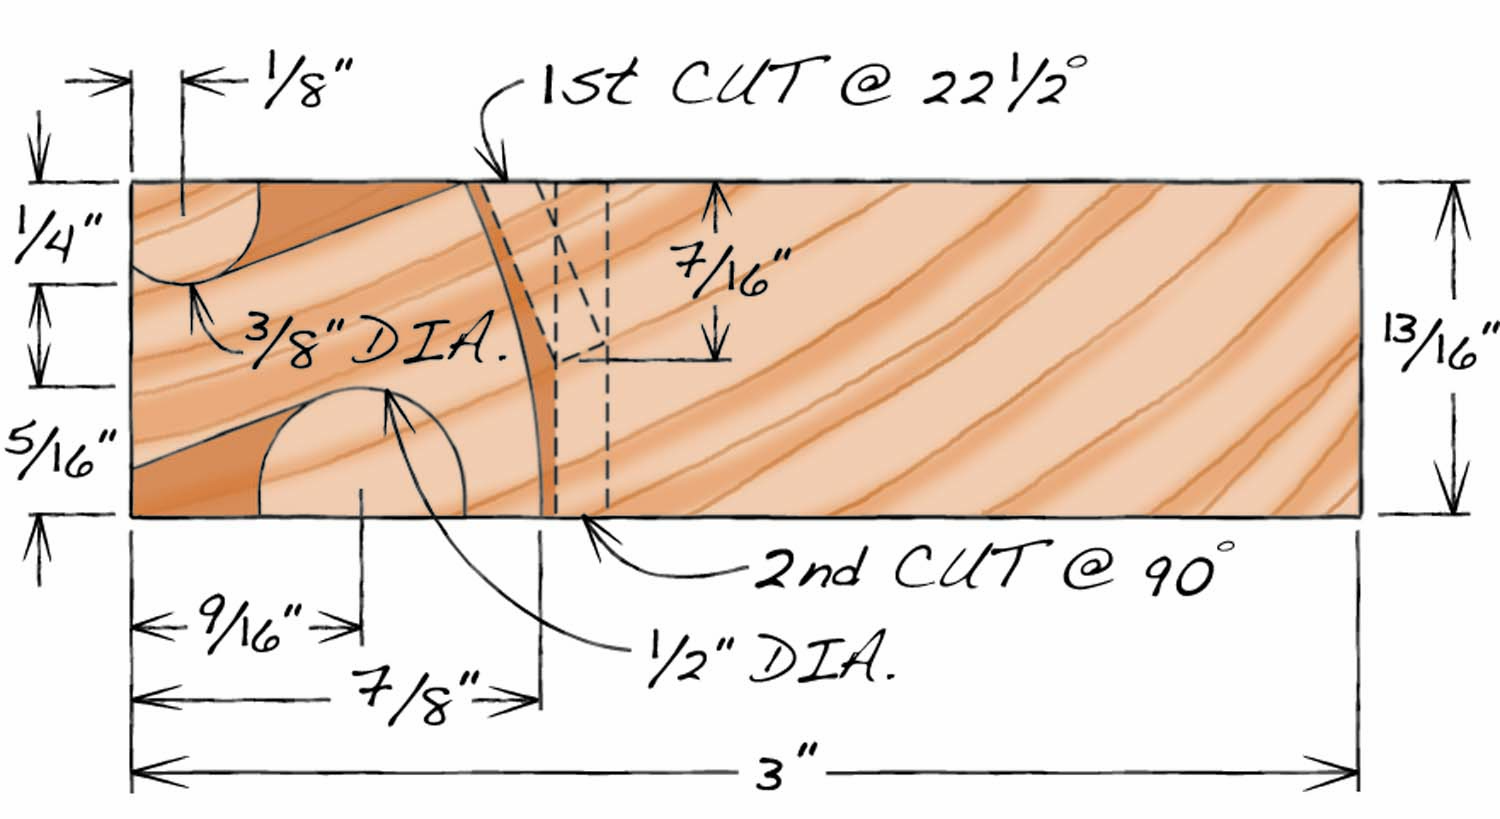
Fig. J: Handle Dimensions
Pommel
- Shape the pommel (Fig. G; Fig. H) on router table, using a 3/8″ x 3″ x12″ mahogany blank.
- Round the end first, using a 3/16″ roundover bit. Set the fence and make two passes, one on each face.
- Use a 3/8″ core box bit to create the neck (Photo 12). Set the bit’s height at 1/16″ and set the fence 1/2″ from the center of the bit`. Then make two passes, one on each face.
- Rip the profiled end from the blank as a 1/2″ wide x 12″ long offcut, using the tablesaw with the blade tilted at a 7° angle.
- Cut the profiled offcut into 1/4″ wide pommels, using the pull saw and miter box.
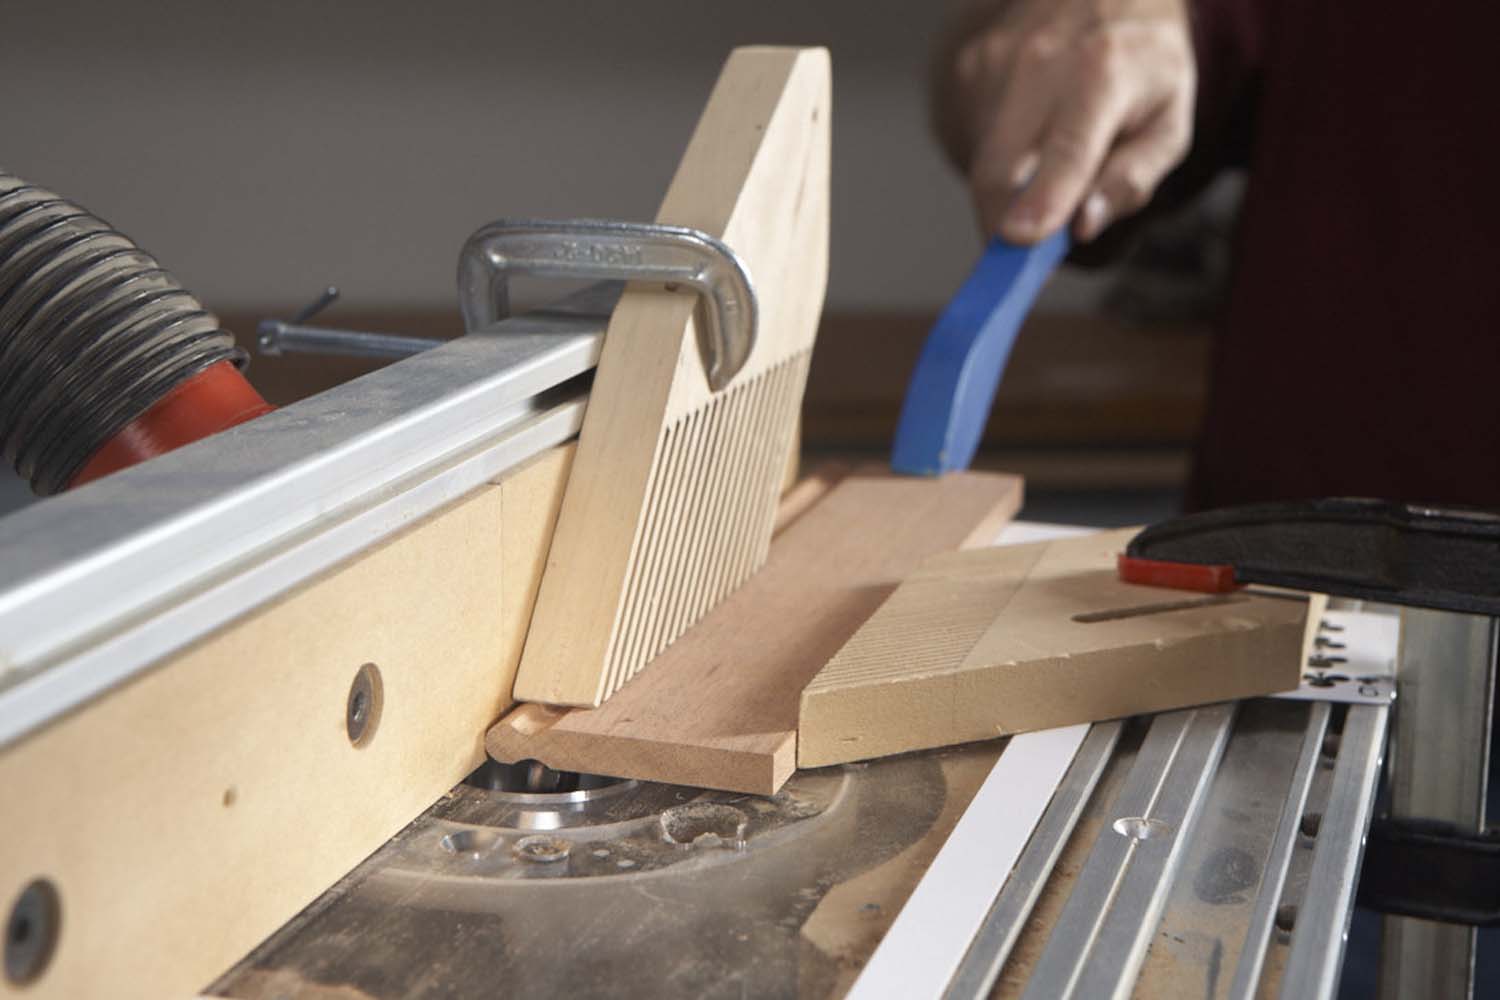
Photo 12. Shape the pommel on the edge of a wide blank. Use a core box bit to create the neck and a roundover bit to shape the edge. Then rip the completed pommel section from the blank.
Blade
- Mill a 1/8″ x 11/16″ x 12″ mahogany blank to 1/16″ thickness, using the planer and auxiliary bed.
- Crosscut the milled blank into 5/8″ long blades, using the pull saw and miter box.
Handle
- Transfer the handle profile (Fig. J) to the end of a 13/16″ x 3″ x 12″ mahogany blank.
- Cut the profile’s two coves on the router table. Use a 3/8″ core box bit to shape the partial cove at the base of the front. Set the bit’s height at 1/16″ and set the fence 1/8″ from the center of the bit. Then make several passes to complete the cut, raising the bit incrementally to its final 1/4″ height.
- Use a 1/2″ core box bit to shape the handle’s back edge. Set the bit’s height at 1/16″ and center the bit 5/16″ from the fence. Flip over the blank and complete the cut as before, raising the bit incrementally to its final 5/16″ height.
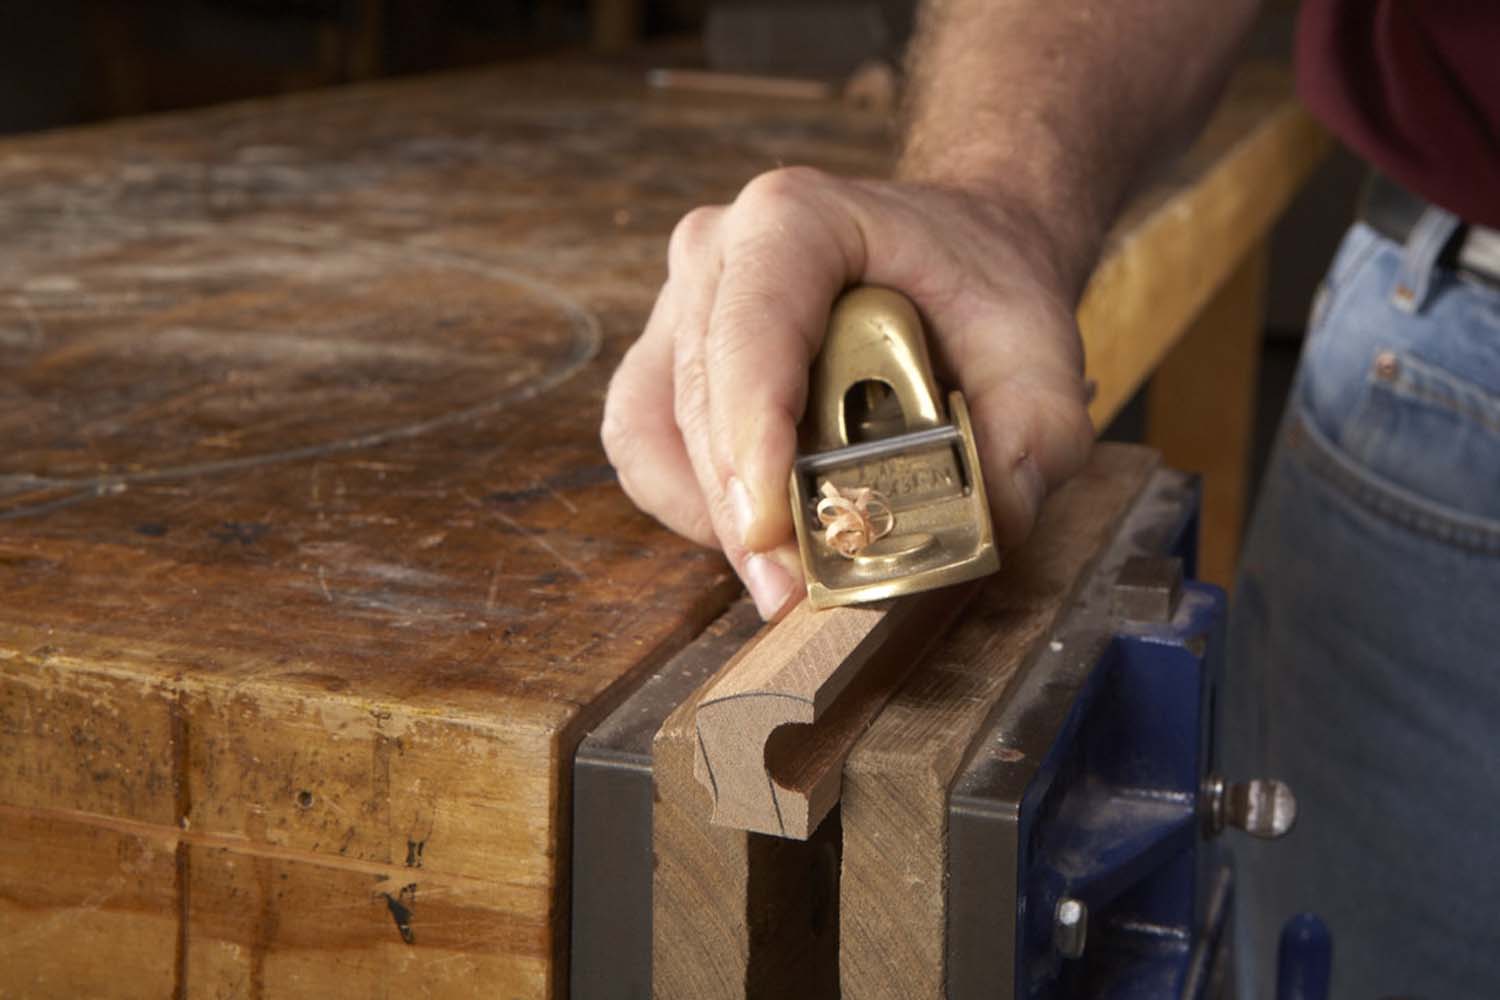
Photo 13. Use a block plane to finish shaping the handle section after routing a pair of coves and ripping the partially-shaped section from a wide blank.
- Cut a groove to define the angled portion of the handle’s top profile, using the tablesaw. Tilt the blade to 22-1/2° and set its height at 7/16″. Install a fence and cut the groove slightly outside the lined profile.
- Return the blade to 90°. Then rip the profiled section from the blank as an offcut.
- Finish shaping the profiled section with a block plane (Photo 13).
- Cut the shaped section into 1/4″ wide handles using the pull saw and miter box.
Body
- Cut 1/2″ x 7/8″ x 12″ basswood blank into 2-3/8″ lengths, using the pull saw and miter box.
- Shape the top of the body on the spindle sander, as before, using the spindle sander and the notched fence.
- Use a 3/4″ chisel to cut a 3/16″ deep notch at a 30° angle in the top face. Start by making a 90° cut into the wood, with the bevel facing the back end of the body. Then, with the bevel facing the same direction and the blade angled 30°, make a second cut into the first to create a shallow notch. Repeat these two cuts to deepen the notch (Photo 14).
- Glue the blade into the notch.
- Glue on the handle and pommel.

Photo 14. Cut an angled notch for the blade in the plane’s base, using a 3/4″ chisel.
Bio
Jock Holmen is a woodcarver who lives in Burnsville, MN.
Here are some supplies and tools we find essential in our everyday work around the shop. We may receive a commission from sales referred by our links; however, we have carefully selected these products for their usefulness and quality.