We may receive a commission when you use our affiliate links. However, this does not impact our recommendations.
 This versatile approach is easily adapted to other styles and uses.
Project #1916 • Skill Level: Advanced • Time: 2 Days • Cost: $300
It’s deeply satisfying to sit in a chair that you’ve created in your own shop—and watch others do the same. Building chairs is also a great way to learn new skills and techniques.
To be fair, chairs face more challenges than any other type of furniture. To be comfortable for a wide array of people, they must incorporate key dimensions, curves and angles. Those same bodies put tremendous stresses on a chair, so strength is also critical. Last, you have to deliver that strength and comfort in a graceful package.
I’ve been making chairs and teaching the craft for many years, and this design is the straightest path I know to a strong, comfortable, elegant chair.
This design is also versatile. As I did here, you can add arms and tilt the back for comfort, making it a fine addition to any living room or den. I also pushed the style toward Greene-and-Greene, with arched shapes, a splined cloud-lift shape on the arms, and the use of sapele, which is close in color to the Greenes’ favored mahogany.

A. Straighten the back a little and delete the arms, and you have a standard dining chair.

B Change the leg and rail contours.

C Add brackets like these and move the chair into Greene & Greene territory.
All of these elements—functional and aesthetic—are easily changed without changing the overall approach to construction. Leave off the arms and stand the back up a little straighter, and it’s a classic dining chair. Replace the Greene-and-Greene elements, taper the legs, redesign the back slats, whatever, and the appearance changes significantly.
If you go with a thinner or narrower seat frame, however, you might consider adding a stretcher system to the legs to strengthen the structure, as I sometimes do.
As for the seat itself, I like upholstery, which adds comfort and contrast. I’ll show you how to make a seat template you can take to your local upholsterer (I recommend hiring a pro for this job) or use as your own guide.
Follow along and I’ll show you how I break down a beautiful chair into a series of straightforward steps.
Occasional Chair Cutlist and Diagrams

 Eliminate Angles Where You Can
As they do on many attractive, comfortable chairs, the side rails on my chairs splay outward at the front, by 10°, and also drop down toward the back. At the same time, the front legs are vertical and the back legs are curved. That creates compound (both horizontal and vertical) angles where the side rails meet the front and back legs.
The key to my approach is simplifying angles where I can while refusing to compromise on what matters most. For example, while some chairmakers lean the front legs back slightly to meet the backward-leaning seat frame squarely, I’ve found that a chair looks more pleasing if these legs are vertical in every direction.
At the back of the chair, however, I’m able to make things easier on myself and my students. While some chair designs twist the curved back legs outward, adding another angle to the joints at the back of the seat frame, I’ve found that my chairs look best with both the front and back legs vertical (plumb) in the front view. That makes the angles simpler at the back seat rail, and also means that both back rail and the crest rail above it are the same length with square ends.
I also bevel the two facing edges of the crest and back rails so the lumber slats meet them squarely and can therefore all be the same length. These subtle moves greatly simplify the construction without any negative impact.
Loose Tenons Simplify Compound Angles
I’ve tackled chairs many different ways, but for me using loose tenons (also called slip tenons) offer the most straightforward approach. Making the tenon separate means the parts all have simple butt joints, which are far easier to cut at compound angles than traditional tenon shoulders are. That also makes the lengths of parts easier to calculate. Last, I can get perfect-fitting tenons right off the planer.
Part of why I love slip tenons is my horizontal mortiser, which makes it easy to cut matching mortises in the ends or edges of any workpiece.
Horizontal Mortiser: A Furnituremaker’s Best Friend

As my woodworking projects became more complicated, I built my own horizontal mortiser. I recognized back then that using slip tenon-joinery would let me cut my rails and pieces at clean compound angles on the tablesaw, without having tenon shoulders to fit and extra tenon length to account for.
On the mortiser, once I fit the piece wherever I wanted it to go, I just had to align the ends of that piece with the front edge of the mortiser table and cut a mortise. Also, the mortiser cuts mortises just as easily in the ends of parts as it does in their edges.
As I started doing this sort of joinery, I found that the whole process was much faster and more precise, even with simple pieces like doors. I’ve never looked back since then, and I think my success as a furniture maker is due in large part to having horizontal mortisers in my shop. Some of my chairmaking students show up as doubters, but most start looking for a horizontal mortiser as soon as they leave class.
After a while I bought a commercial mortiser called a Stanfield, and eventually became a dealer for the product. When the owner retired, I bought the remaining stock. I redesigned the machine a couple times, had it manufactured locally, and sold 50 more over the years.
On the other hand, lots of machines and techniques will deliver good slip-tenon joinery, including the Multi-Router, PantoRouter, European-style horizontal mortisers, and mortising attachments that come with some jointers and multipurpose machines. With a few jigs, the Festool Domino works well too.
The reason I prefer the Stanfield concept is because the piece of wood you’re working on is right in front of you as you work, letting you see your layout as you set up the machine, and the cutting action as you mortise. And the wood stays stationary while the bit moves, which is a significant advantage for large pieces, like bed rails. I use metal-cutting, solid-microcrystalline end mills for the mortiser, since they are just a fraction of the cost of woodworking bits. I’m not pushing the product, but I’ve still got some to sell.
Mill and Shape the Parts
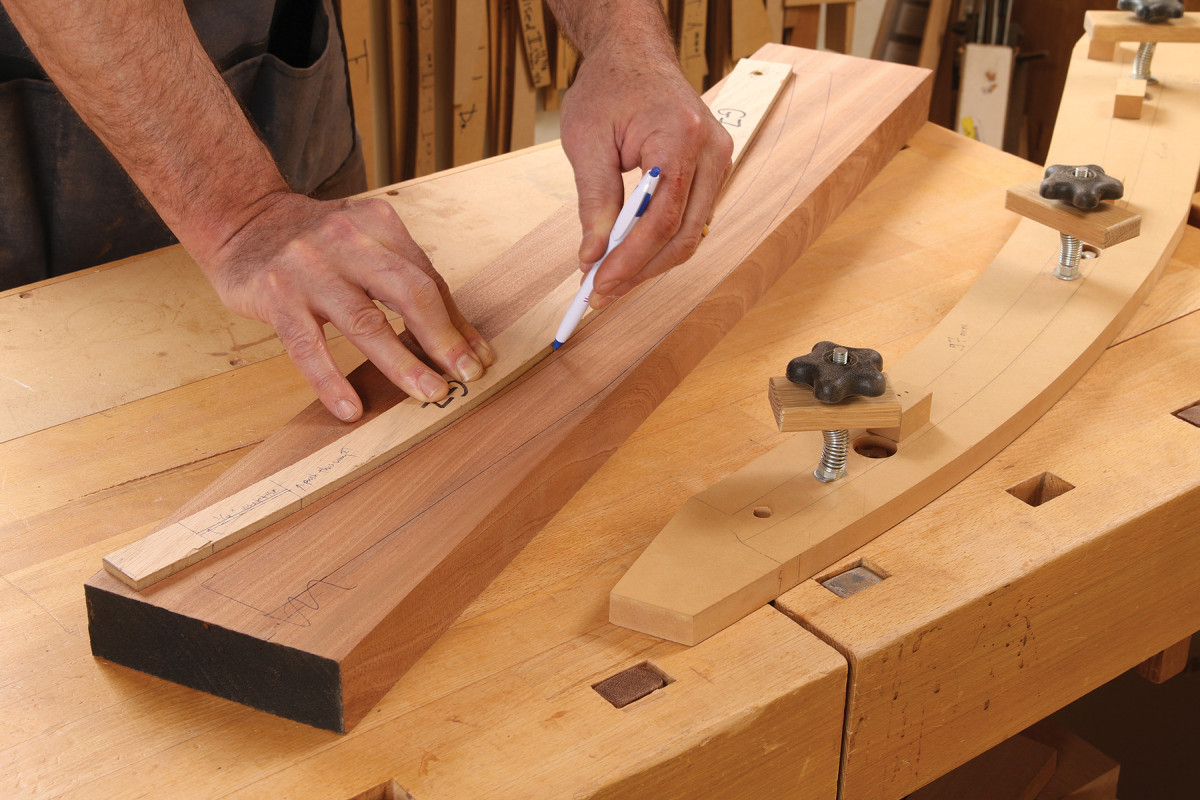
1. Make a template for the rear legs and reverse it when marking out each one. I use the same template to lay out the shaper jig for smoothing the curves.
I begin the design process with a full-size side view of the chair, which I draw on a piece of 1/4“. MDF. This lets me see how the chair will look and sit, and lets me work out the main dimensions and angles. Add to that a few patterns for the curved parts, plus a plan (top) view, and you have what you need to start building. With this article, of course, you have all of that already, but I would still consider drawing out the main views full-scale.
You’ll definitely need to make a template for the curved back legs, using more of the 1/4” MDF, which includes the locations of the mortises for the seat rails and crest rail. I use that template to lay out the legs on my lumber with two goals in mind: minimal grain runout and symmetrical grain on the front face of each leg, especially at the top. I achieve the latter by flipping the template to lay out each leg.
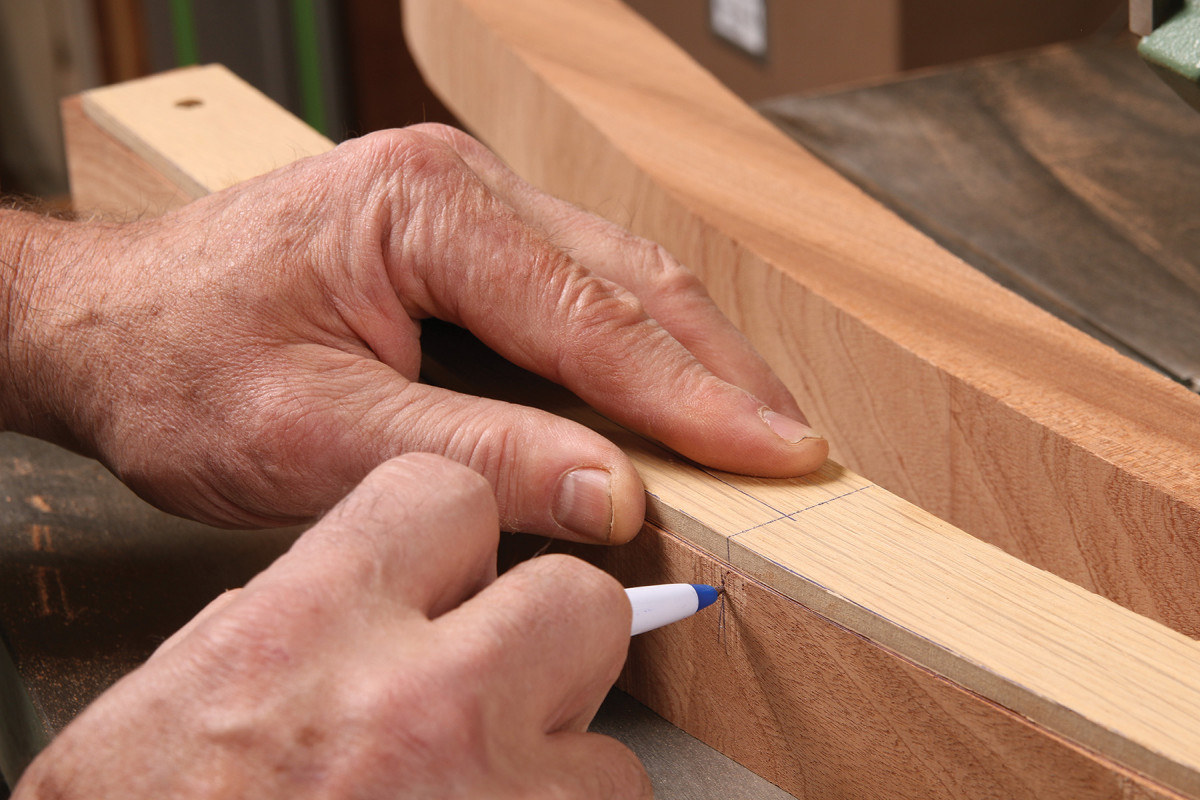
3. Carry the mortise locations onto all sides of the leg. As you smooth the sides you’ll need to redraw some lines.
After cutting out the shapes on the bandsaw, I carry the line for the top of the side-rail mortise from the template to the workpiece, and around all four sides. It’ll be my reference for a number of subsequent steps, so I don’t want to lose it as I joint and plane the legs to final thickness.
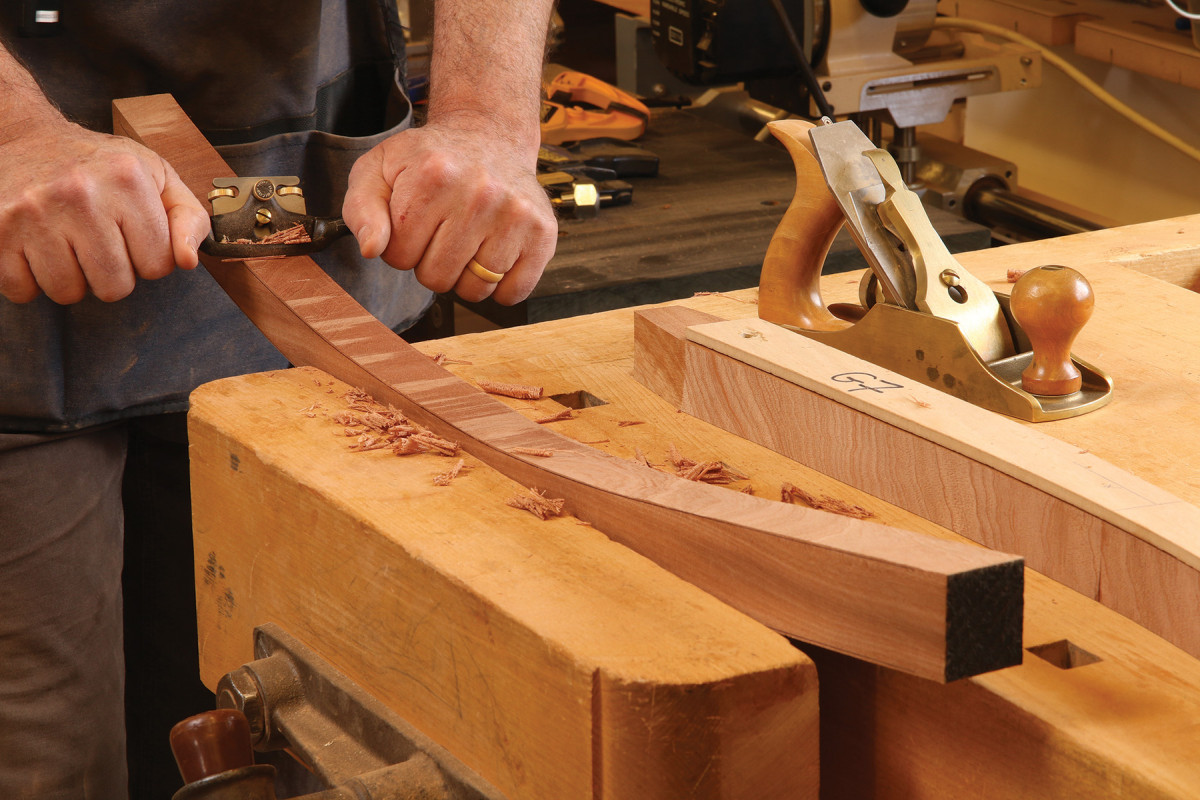
4. The simplest option is to smooth the curves by hand, with a spokeshave in the inside and a bench plane on the outside.
The bandsawn curves can be spokeshaved and handplaned to their final shape, but if you’re making more than one chair, I recommend taking the time to make a template jig for the shaper (see photos 1–5). You can do the same on a router table; you’ll just need to take lighter cuts and be more careful to avoid tearout. After shaping the back legs, I mill the rest of the chair stock to its rectangular shapes.
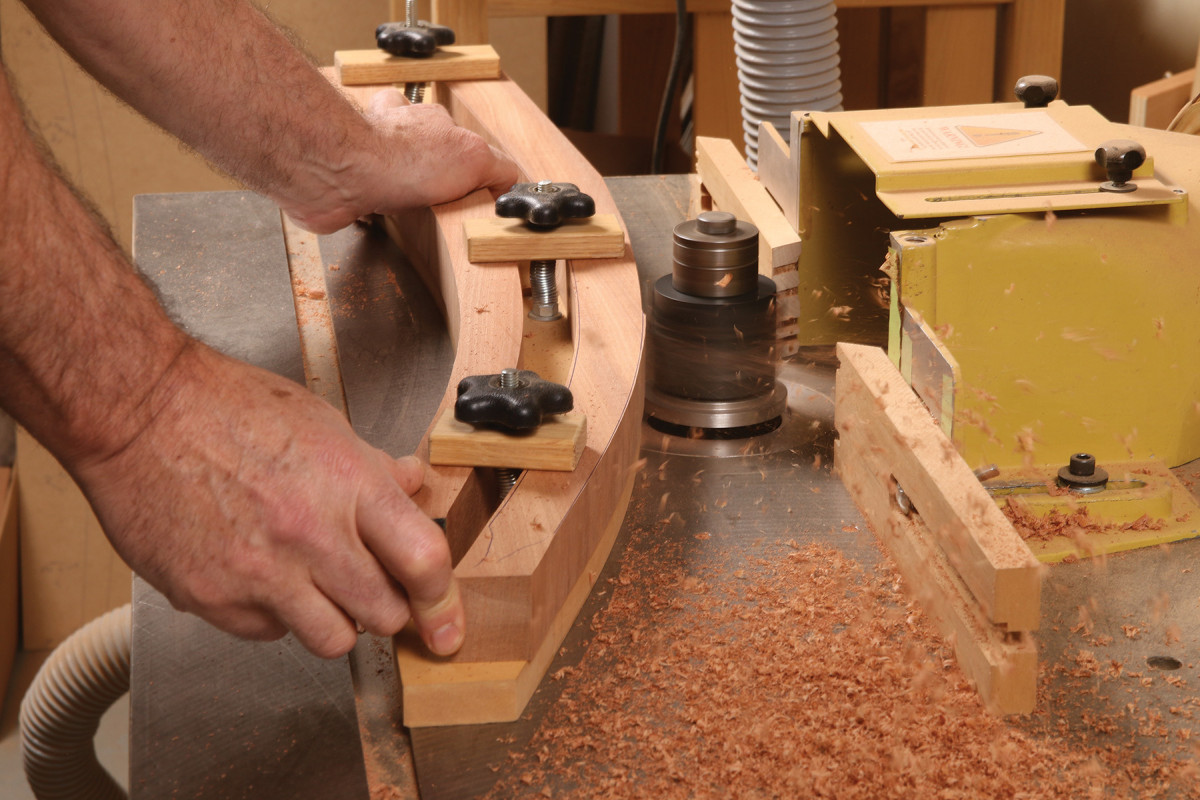
5. The fastest option is power. A shaper or router jig speeds things along. Register the legs on the jig using your layout lines and the location of the mortises.
Start With the Side-Rail Joinery
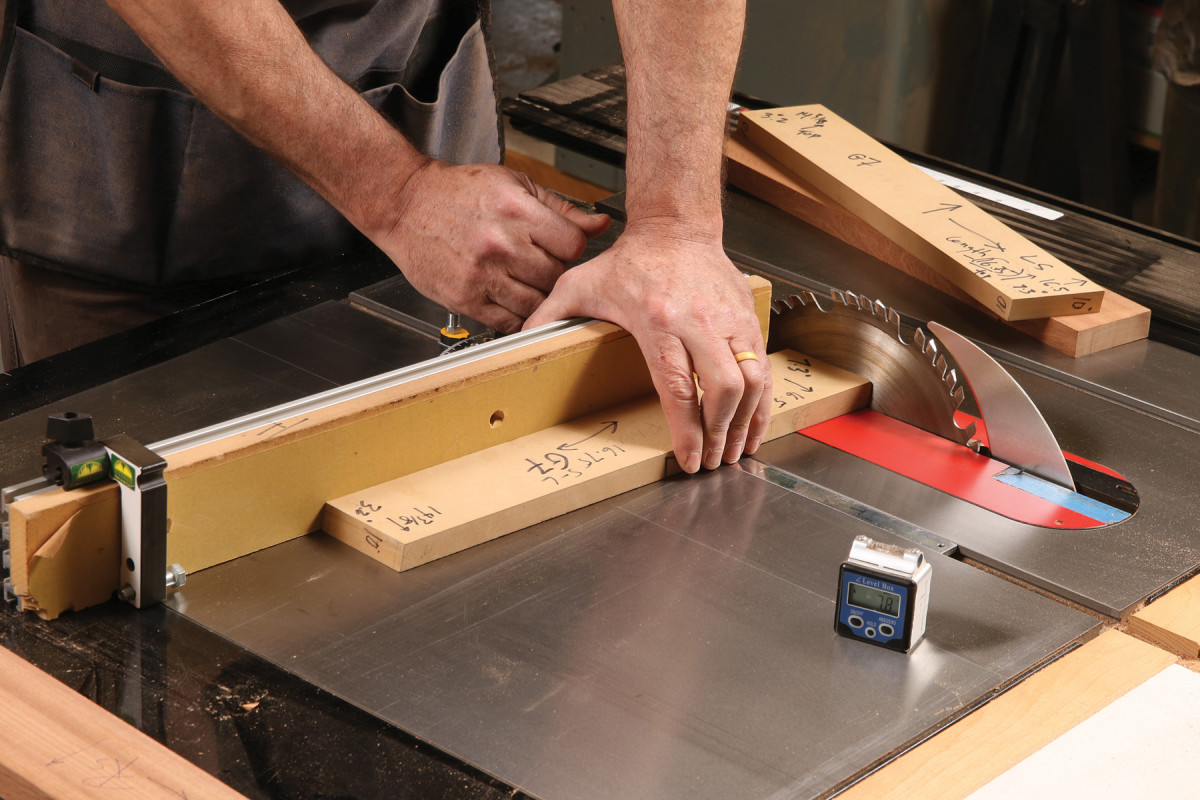
6. Make an accurate MDF sample with labels to help set up the four cuts without getting confused.
Joinery starts with the side seat rails, which have compound angles on each end. These four ends require four different setups on the tablesaw, with both the blade and miter gauge angled each time. To keep track of those angles, and set them up accurately, I make a copy of each side rail in 3/4“. MDF. Trust me: It’s worth it. These templates are labeled with all the necessary angles, they’ll show you how long to cut each part, and you can save them for the next time you make this chair.
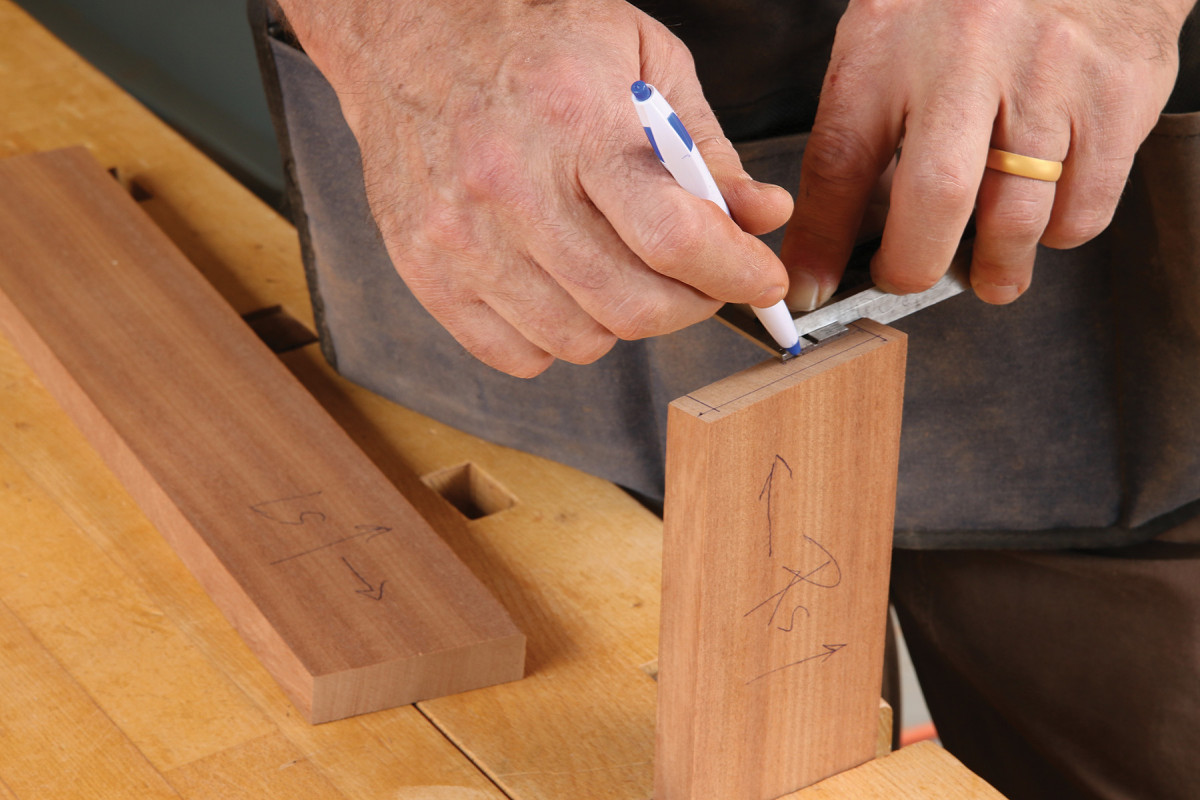
7. Lay out 3/8″ mortises in all four ends of the side rails. These will enter at an angle, so cheat them a little to one side so they don’t pop out of the edge of the rail.
With the butt joints cut I lay out the 3/8“-thick mortises on the ends of the pieces, making sure I leave mortise walls that are at least 1/4” thick. Orienting the side rails for mortising is as easy as bringing their compound-angled ends parallel to the front face of the mortiser table and wedging a piece of wood under the back of the workpiece to bring that face into vertical alignment with the edge of the mortiser’s table. The horizontal mortiser makes it easy.

8. To set up the compound mortising angle for the ends of the side rails, align the end of the part with the front edge of the table, and tilt it upward until it is aligned vertically.
After clamping the rail in place, I set the height, depth, and end stops on the mortiser, and cut the mortise.

9. Place a 3/8″ bit in the collet and use the layout to set up the height of the bit.
To locate the tops of the mortises in the curved back legs, I use the line I transferred from the shaper jig. To create the 3/16” reveal I want between the legs and rails, I measure the mortise wall on the rail (see photo 10), and then extend the square to lay out the same mortise wall on the corresponding leg.
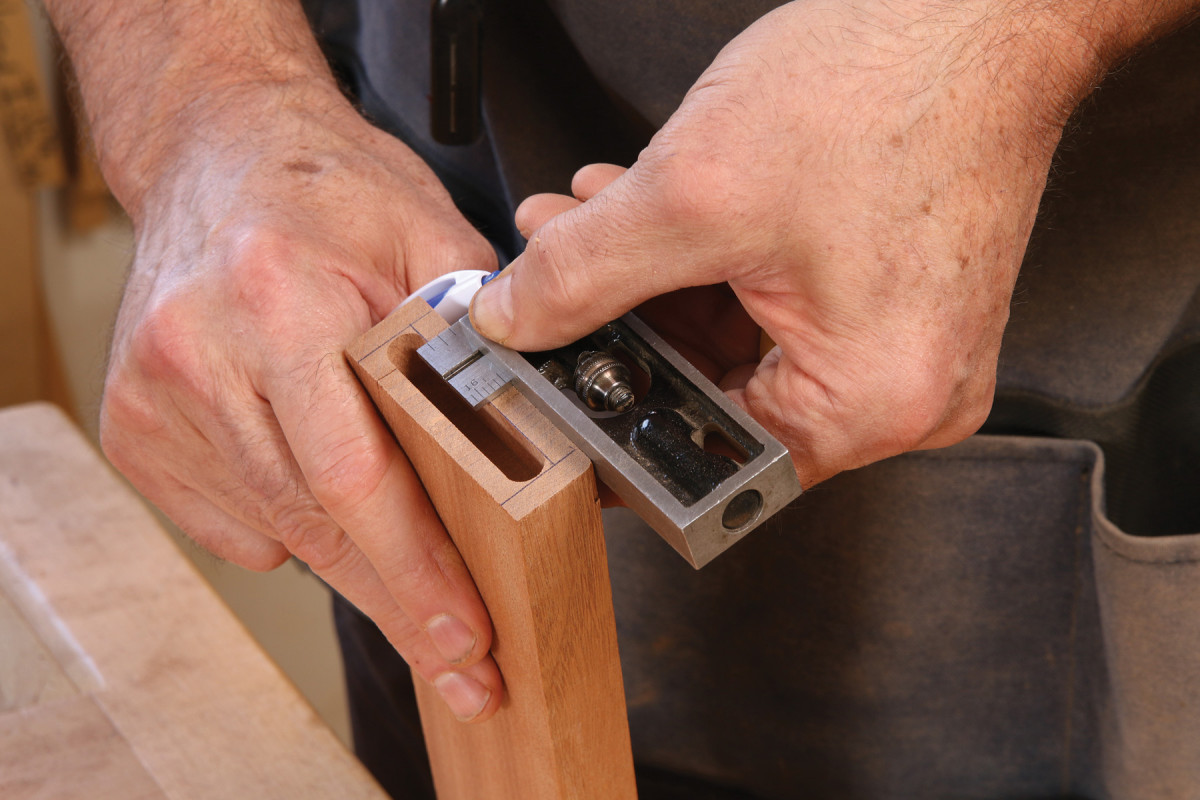
10. Use the rail mortises to lay out the leg mortises. To create a 3/16″ reveal, I extend my combo square past the front mortise wall by that amount.
After considering the orientation of the front legs for the best grain match, I locate their mortises vertically by hooking a long square onto their bottom ends, and use the direct-measuring trick again to set the amount of inset between rails and legs.

11. Use the marks from the leg templates to lay out the top and bottom of the side-rail mortises.
Because the mortises go into the rails at an angle, they can go squarely into the front and back legs. That means the legs can lay flat on their sides on the mortiser table.

12. The back legs lie on their side, with the flat area aligned with the edge of the mortiser table, and the mortise goes squarely into the leg.
How I Handle Slip Tenons
At this point I mill tenon stock to fit the mortises I’ve cut so far. I like ash here because it’s stable and inexpensive, with large pores that give the glue a little more bite. I start each piece on the jointer and planer, test the fit in a mortise, and then move to the tablesaw and router table to rip each piece to width and round the edges before chopping the tenons to a bit under the depth of the two mating mortises, to give excess glue a place to go.
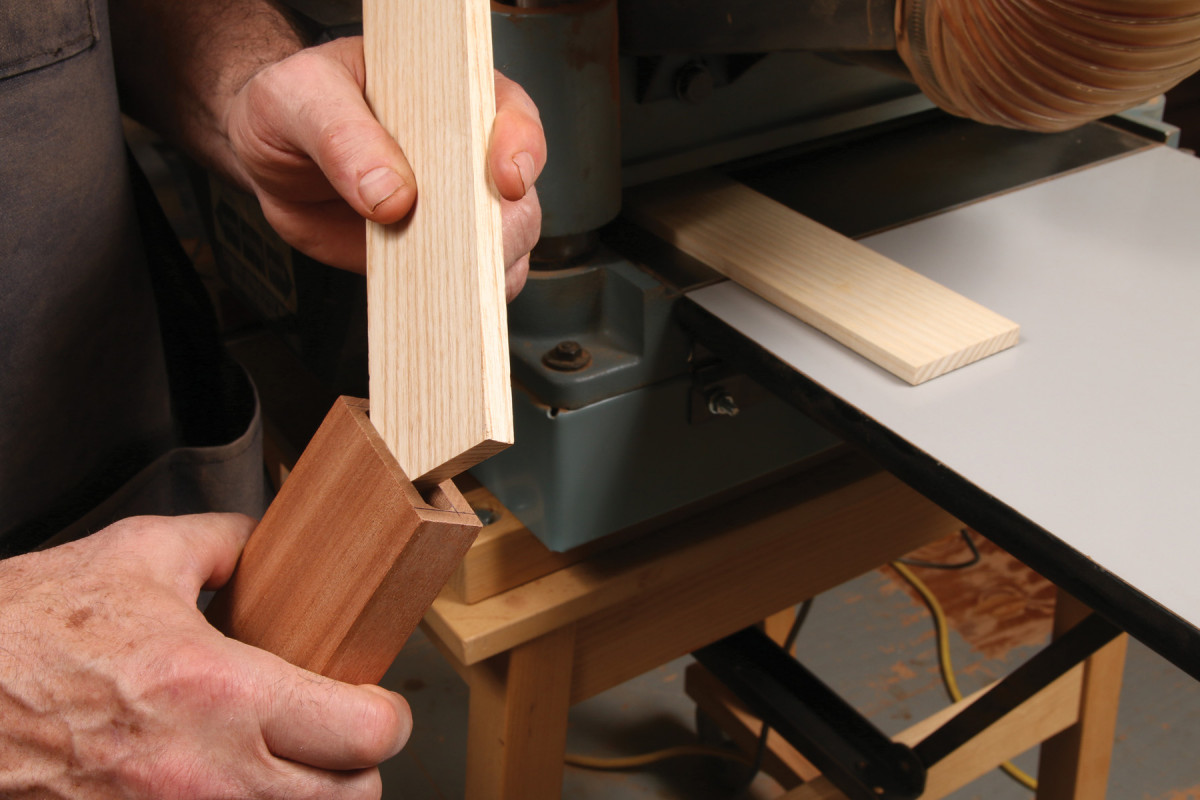
13. For the slip tenons, plane the stock to a snug fit, then rip to width and round the edges.
After a quick dry-fit to make sure everything comes together well, I always glue the tenons into the rails first, so I can dry-fit the chair as it comes together. I use Titebond III, and clean up any squeeze-out so the other mortise will go on easily later. I’ve got more mortising to do on the front and back legs, so I leave those separate for now.
By the way, I always mark the outside faces of glued-in tenons to help me to keep the pieces oriented properly through the rest of the build.
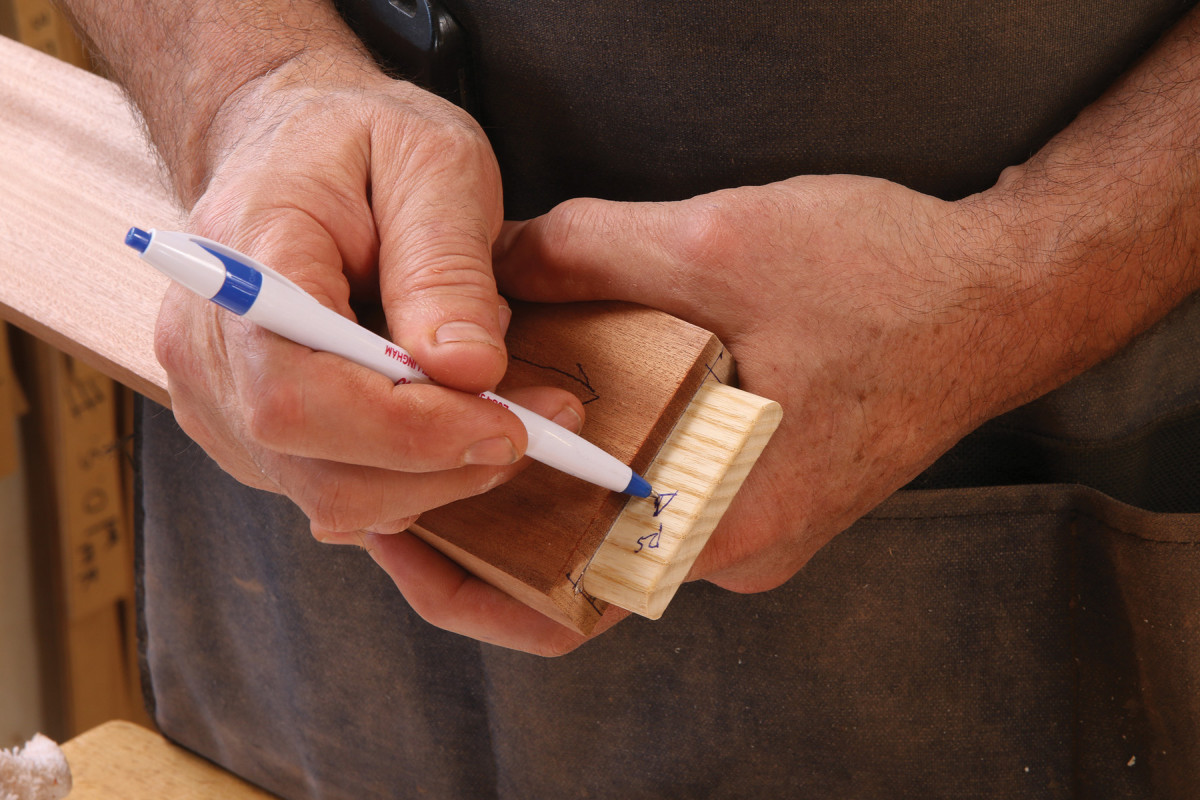
14. Mark the location and orientation of these tenons in the seat frame.
More Seat Joinery
Now we can go on to mortising the front seat rail as well as the back one, which is extra-thick now to accommodate its curve. Because all four legs are vertical in the front view, the back and front rails enter them squarely, making the joinery simple. Note that the mortise in the back rail is set back 3/8” from the front edge so you don’t expose the tenon when cutting the curve.
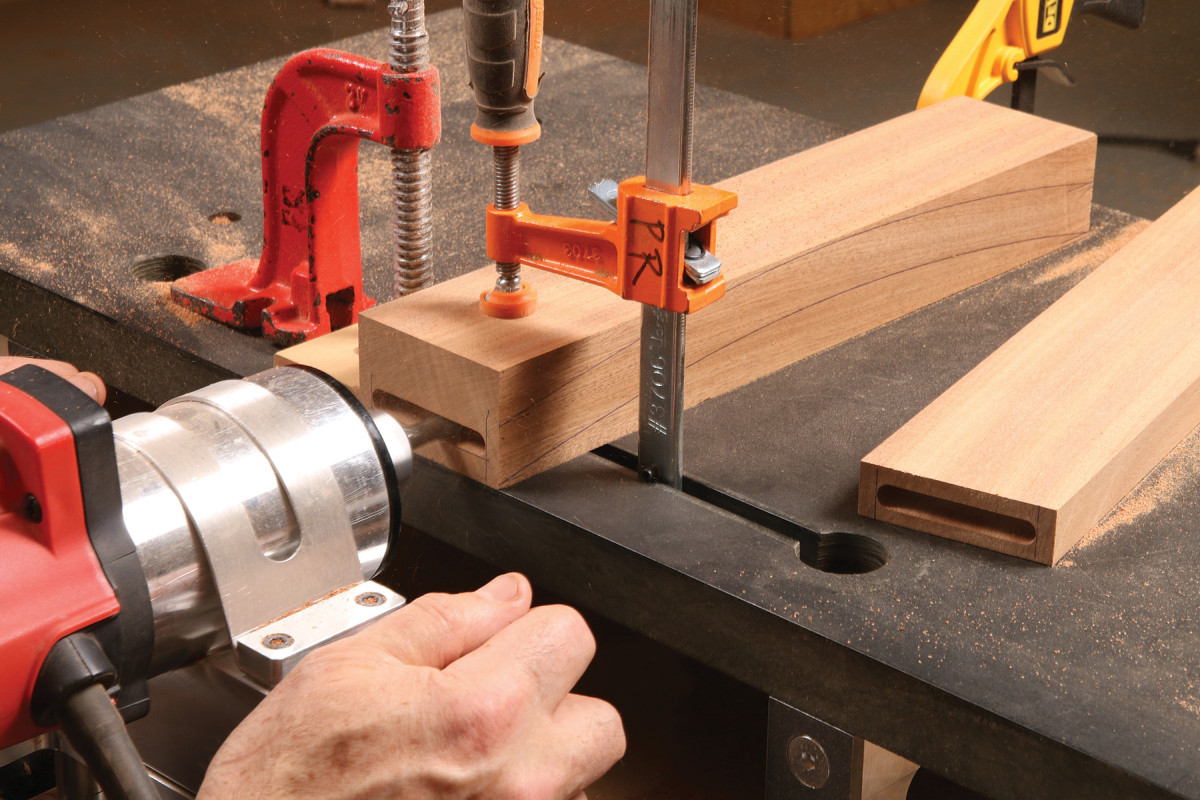
15. Mortise the front and back rails. Be sure the mortises in the back rail (and crest rail) are located so they will stay inside the curves of those parts. Mortise the legs too.
To locate all of the leg mortises vertically, I simply carry a line around from the side-rail mortises. By the way, to keep the side, front, and back tenons from interfering with each other inside the legs, I make the back- and front-rail mortises a little shorter. Most of the stresses in a chair occur in the side-rail joinery, so I want those tenons to be as long as possible.
Also, I locate the front-rail mortises for the same 3/16” reveal used on the side rails. And once again, I mill up the loose tenons I need, and glue them into the rails only at this point.

16. Use the leg template to mark the location of the crest-rail mortises, and cut them.
Add the Crest Rail
Next I cut the joinery for the crest rail. Once again, because the back legs are vertical and parallel in the front view, the crest rail can be the same length as the rear seat rail, and square in its ends. With legs that twist outward, the crest rail can be very tricky and time-consuming to cut, join and fit.
I switch to a 1/4” tenon here so I can get the reveal I want between crest rail and back legs without the tenon popping out of the curved rail. And I make the mortises in the legs an extra 1/8” long so the crest rail can be pulled down tight on the lumbar slats later. I take the position of these mortises from the back-leg template.
Once the tenon stock is glued into the crest rail (which is still a thick piece of stock at this point), I can dry-fit the back of the chair. This reveals a complication: Because the back legs are curved and the crest and seat rail also curve, the bottom edge of the crest rail and top edge of the rear seat rail are not parallel to each other, which means the two center lumbar slats would have to be slightly shorter than the two outside ones, with angled ends.
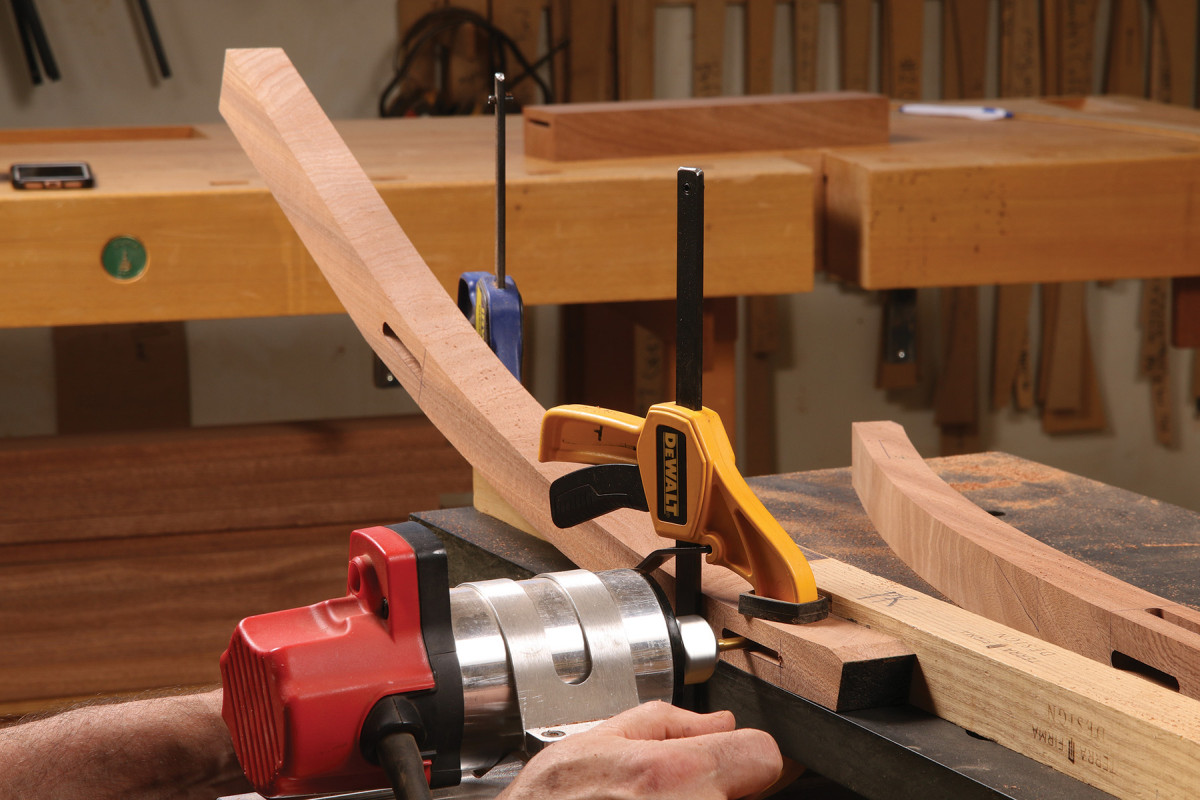
17. Last, mortise the crest rail and glue in its tenons.
My trick for avoiding this complication is to bevel the bottom edge of the crest rail and the top edge of the seat rail to 10° before cutting their curves, so these edges end up parallel and square to each other in the chair.
After making these slightly angled rip cuts, I lay out the curves again on those edges, and cut the curves on the bandsaw. I always start with the concave side. That gives me a square side to rest on the bench when smoothing them (with a big curved sanding block). After the fronts are sanded, I cut out the back curves. The rails rest steady on their two ends as I smooth the curves with a random-orbit sander.
The Slats and Back
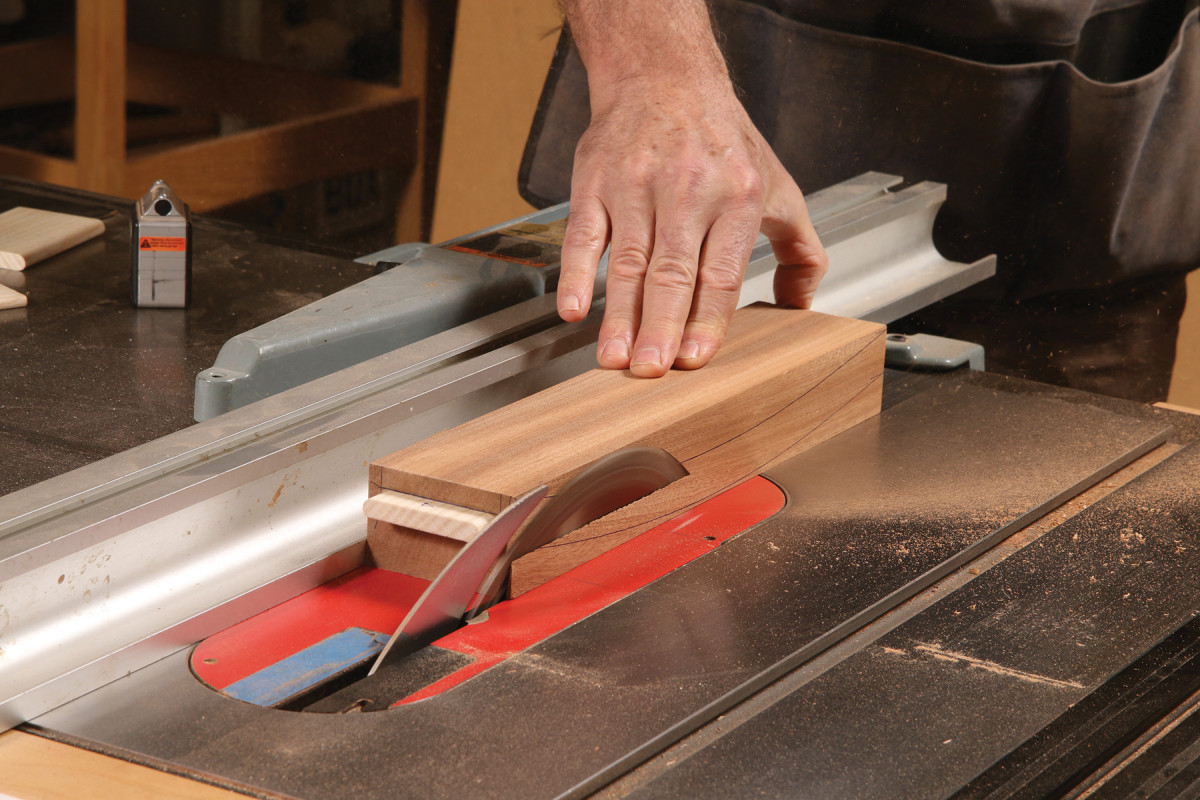
18. The lumbar slats are next. I find it helpful to bevel the crest and rear seat rails so they are square and parallel to each other.
To figure out the length of the lumbar slats, I dry-fit the rear legs and rails, tap the crest rail up to the top of its extra-long mortises, and measure down to the seat rail. That leaves room for the crest rail to push down tightly on the slats with no gaps. Then I cut the slats to length. Since the inside edges of the rails will be square to each other, the ends of the slats are square too.
Because this “occasional” chair leans back a little more than my dining chairs do, it gets a lumbar curve that is less pronounced. I use a template to mark the curves on all four slats.

19. Dry-fit the chair to find the length of the lumbar slats.
The ends of the slats are square, but the tenons will be going into a rail that is angled at 10°, so I tilt the slats the same amount when mortising them. Before gluing tenons into the slats, I use the mortises to help lay out the corresponding mortises in the crest rail and rear seat rail.
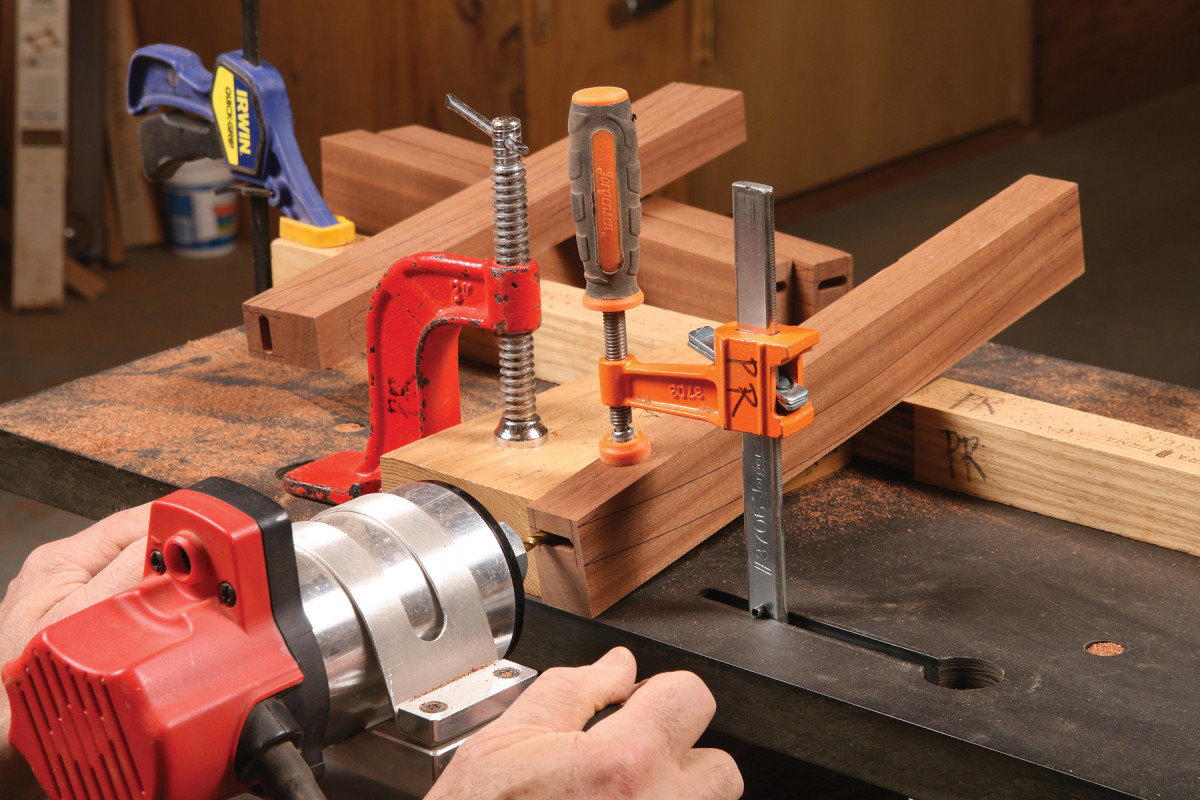
20. Mill and mortise the thick lumbar pieces before cutting their curves.
Next cut out the curves on the bandsaw, following the same process for cutting and smoothing I used on the curved rails. As I go, I round the edges by laying the pieces on edge on the router table and using a 3/16” roundover bit.
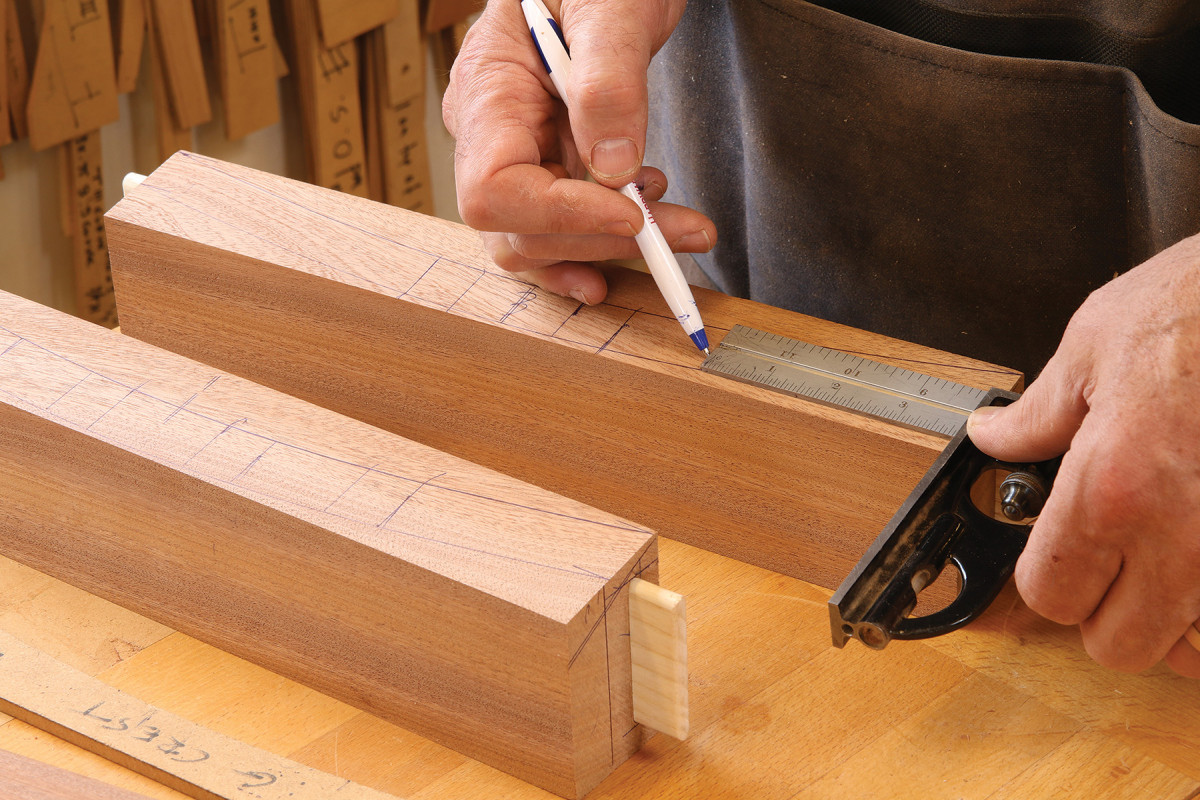
21. Use the lumbar slats to lay out the corresponding mortises in the curved rails. Wait until after smoothing the curves to lay out the front-to-back locations.
You’re now ready for your first glue-up, joining the curved rails to the curved slats. This is the time to do any last shaping of these parts, so I put a curve in the top of the crest rail now, saving the cut-off to be used as a clamping caul. I also bevel the back of that top edge with a block plane to add a little more grace. After that, it only takes two bar clamps to assemble the back.
Glue Up the Frame
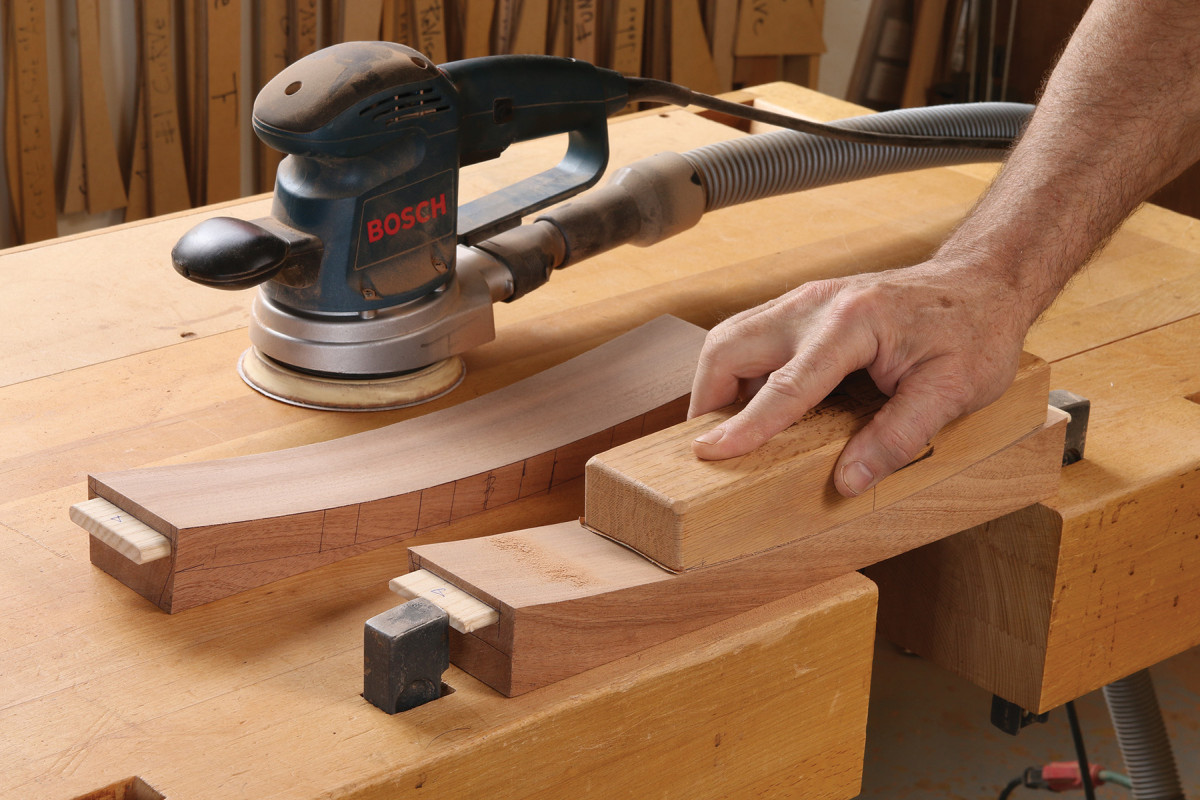
22. Saw and smooth the curved rails.
This version of the chair has arms, which run from the back legs to the extra-tall front legs. So before final assembly, we need to cut some extra joinery. Sometimes I mortise arms to legs, but on chairs like this one, which has wide seat rails giving the frame all the strength it needs, I don’t. I attach the arms front and back with 3/8” dowels.
To do this you first need to cut off the tops of the front legs at 9°, to match the angle of the arms. Next I center a dowel hole on the top of the arm, using a drilling attachment on the horizontal mortiser, with the leg tilted to 9° (this can also be done on the drill press. On the sides of the back legs, where the back of the arms land, I drill another dowel hole.
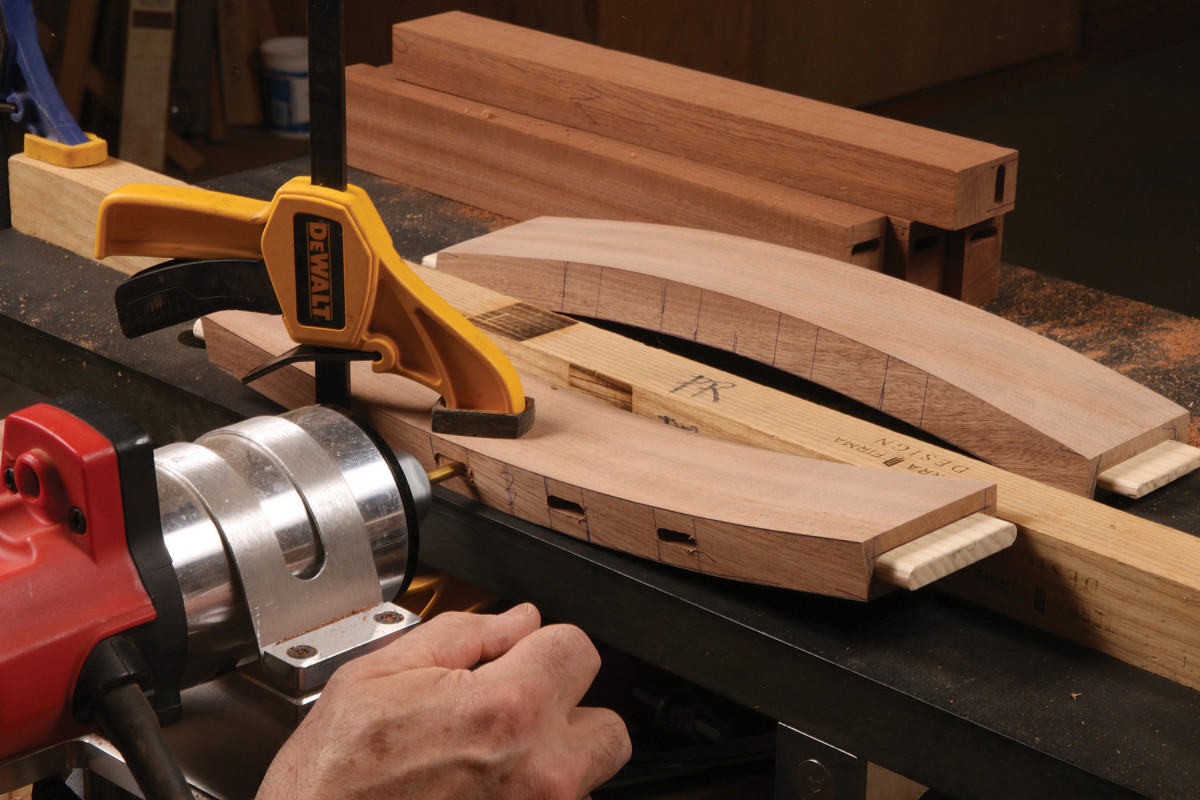
23. Clamp the curved rails to align each mortise in the curved row. The mortises go in square to the workpiece.
I now fit the glued-up back assembly into the back legs, make a mark 1/4” above the crest rail, and cut off the tops of the legs. This is also the time to finish shaping and rounding the other chair parts. To keep clamps from slipping as I glue up the two sides of the chair, I make clamping cauls with the same compound angles as the joinery.
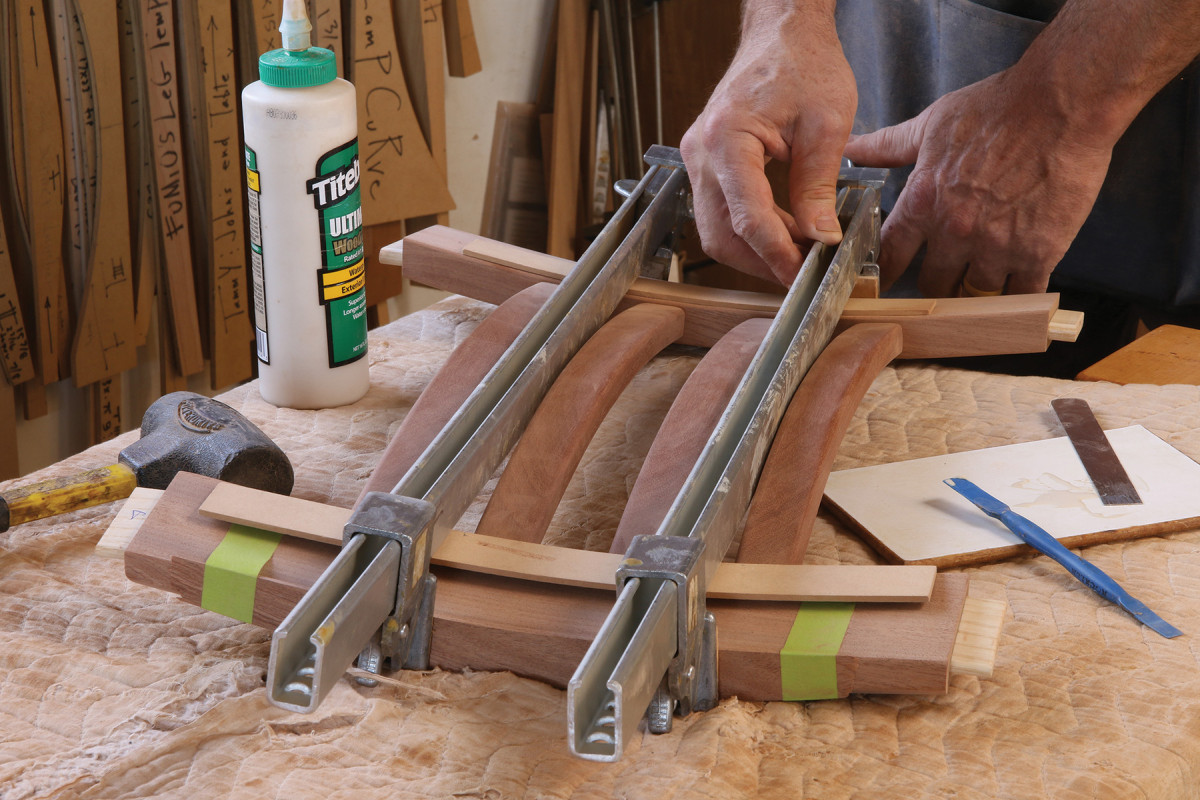
25. I save the offcut from the bandsawn curve to protect the top of the crest rail during clamping, and thin MDF pieces to protect the faces of both rails.
Once the side assemblies have been clamped for at least an hour, you can add the front seat rail and the back assembly and connect the two sides.
Add the Arms
After the main frame of the chair is glued up, I work on the arms. I make a template for the general shape and trace it onto my stock. Because the arms flare outward to match the sides of the seat, they cross the back legs at an angle. So I need to bevel the inside face of the arms at 4° to meet the back legs cleanly. Then I drill a dowel hole into this beveled flat, by placing a wedge under the workpiece.
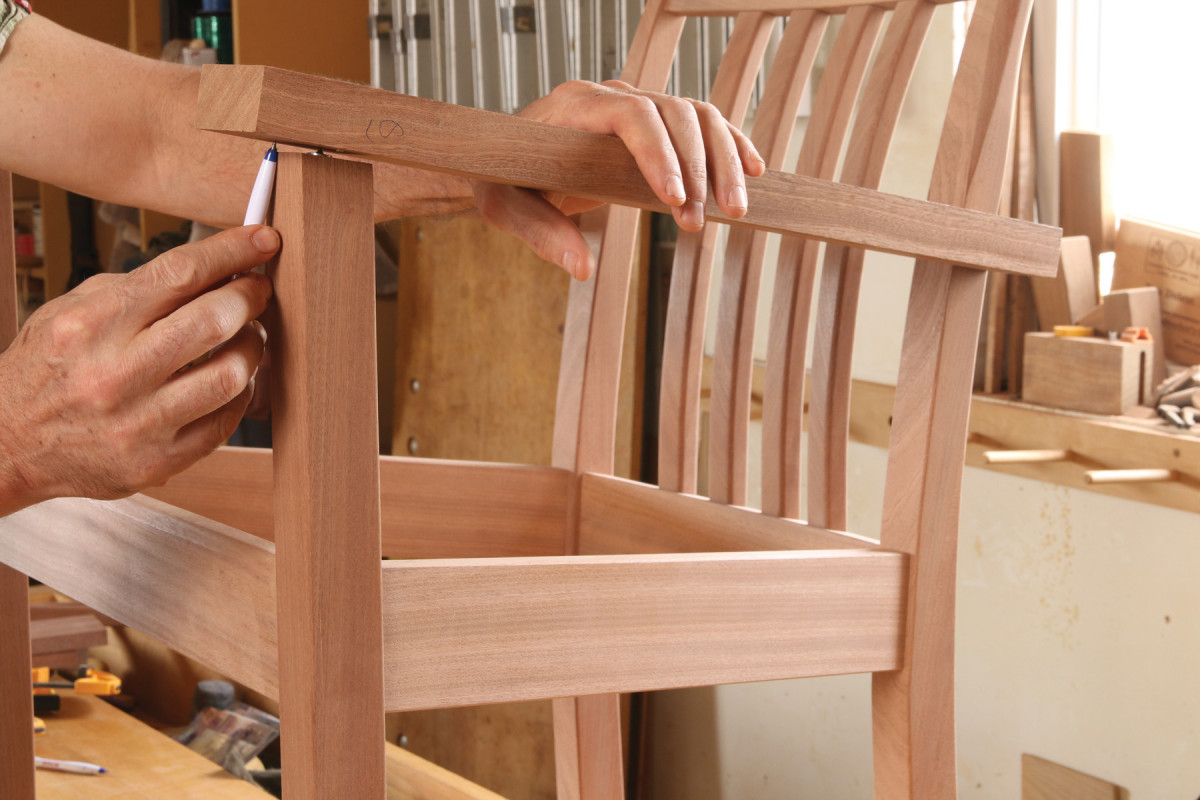
26. After giving the arm a tap to mark the mating dowel hole in the arm, mark the angled line where the front of the arm will end.
To locate the dowel hole at the front of the arms, I attach them briefly to the back legs and place a dowel center in the hole in the top of the leg, giving the arm a tap to dimple its lower face for a mating dowel hole. This step also shows me where to cut off the front end of the arm. I leave them about 1/32” proud at this point, cutting them at a compound angle to match the front face of the legs (miter gauge at 4° and blade tilted at 9°), and sand them flush after assembly.

27. After drilling dowel holes in the back legs where the arms connect, dry-assemble the chair.
Next, I lay out the cloud-lift shape on the front of the arm. I do it with a shaper jig, but you could do it on the bandsaw and smooth it by sanding. Then I use my horizontal mortiser again to cut the slot for the spline (a router jig would also do it), and square off the back of the cut with a chisel.
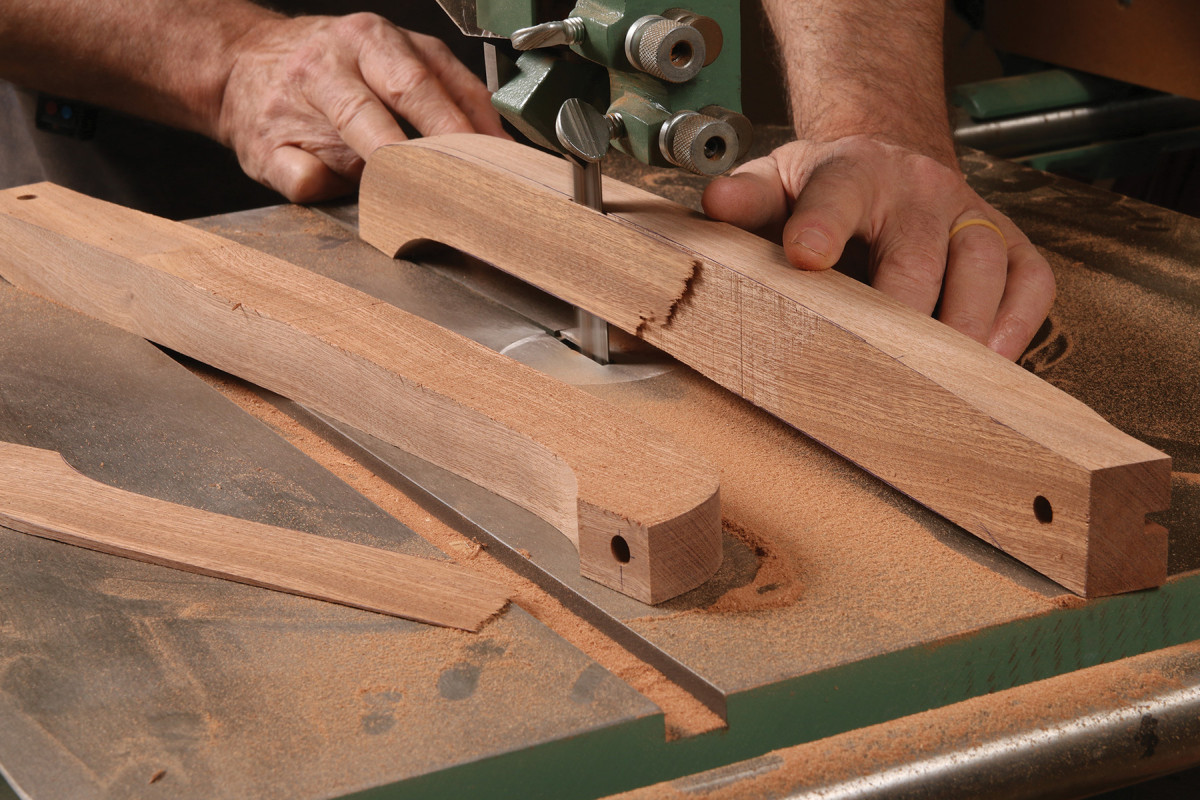
28. Cut the curves on the arms and the shallow taper If desired, but leave the arms a hair long at the front end. You can sand them flush later.
After the arms are cut out to their general shape, I taper their bottom face so they get thicker at the front, to echo the general splay of the chair. The taper starts 1/4” deep at the back and ends about 1″ from the front end. Now the arms can be rounded over, sanded, and glued onto the chair. Last, I make splines that echo the cloud-lift shape, and fit them to their slots.
Finishing Touches
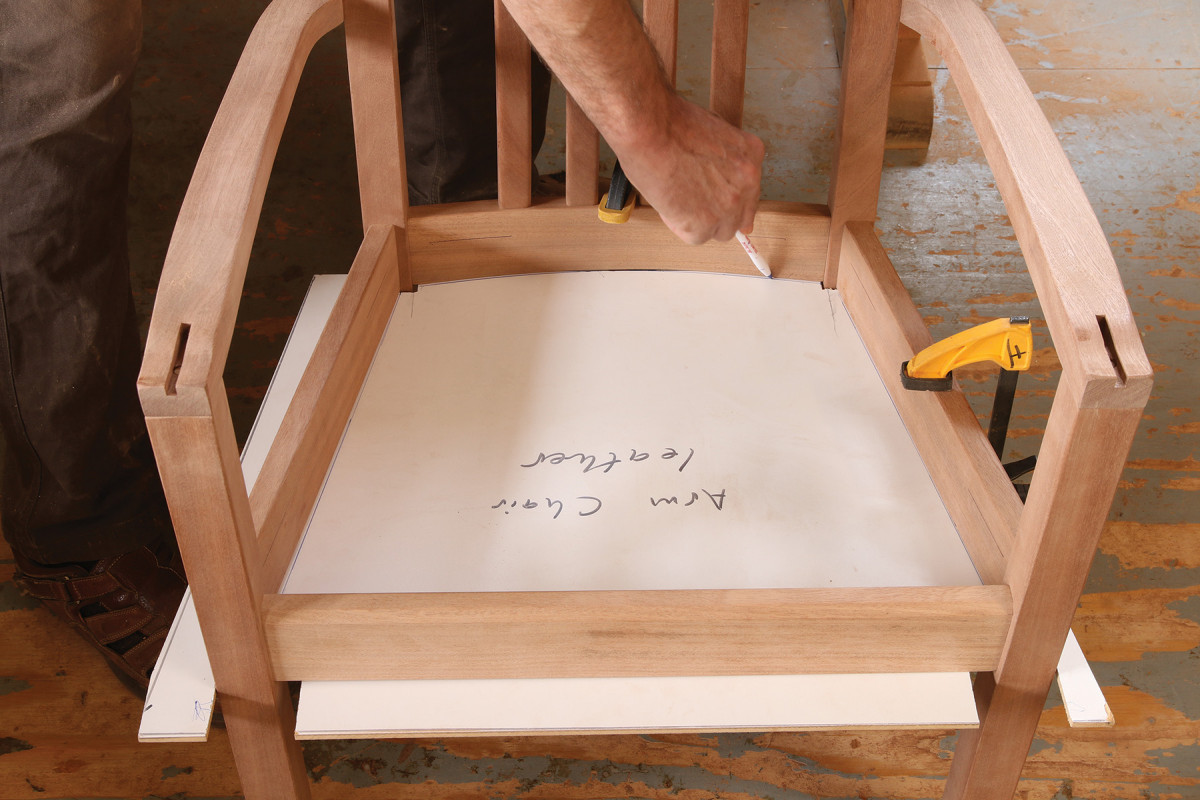
29. Here’s how to make an accurate seat base that you can take to an upholsterer. Notch a thin template to fit around the legs, and use a pen to trace the interior of the seat frame. Offset that line inward by 1/8″ to make room for the upholstery. Cut out that template and trace it onto 3/4″ Baltic birch plywood.
I use thick corner blocks to support the upholstered seat bottom, as well as a ledger strip at the front edge where most of the pressure hits. They are angled to match the corners of the seat frame. I set the top of the blocks down 1″ from the seat rails, clamp them in place with a Quik-Clamp, drill, countersink and screw them in.
Next I make a seat-bottom template to take to my upholsterer. It sits inside the frame with a 1/8” gap all around. The size of the gap is dependent on how your upholsterer (or you) wraps the seat bottom, but 1/8” works well for the upholsters I’ve used.
The actual seat blank is made with 3/4” shop-grade plywood. After making the template, I trace its shape on the plywood and then flip it over to make sure it’s symmetrical, to keep things consistent for my upholsterer. If it looks good I saw out the shape, beveling the front edge at 9° so it doesn’t bind when I drop it into place. I also cut the back of the front leg notches at 9° for the same reason, using my backsaw.
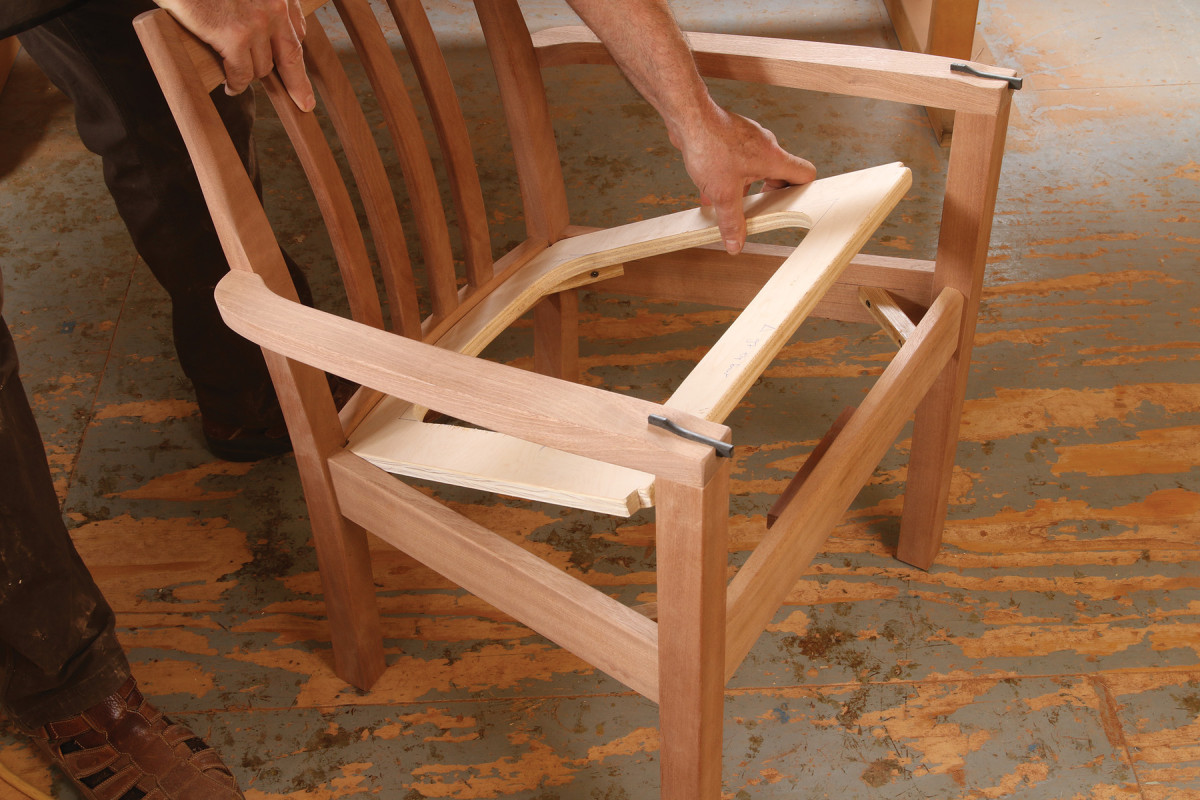
30. Saw and smooth the seat blank and cut a hole in the middle for webbing. Note the corner blocks are screwed into the frame to support the seat, as well as the extra ledger strip up front where the pressure is greatest.
I usually have my upholsterer install webbing for comfort so I need to cut out the middle of my plywood, leaving a 3″-wide frame all around. I do this with a jigsaw.
I turn over the chair at this point, brand it with my logo, and drill 5/64” holes in the center of the bottom of the legs in case Hafele felt pads will be added in the future.
Before applying finish, I go over the chair with a red 3M pad. I finish my chairs with three coats of Livos Interior Oil Sealer (#244) or Sam Maloof Poly/Oil Finish, waiting at least 24 hours between coats. I go over the chair three times with clean rags or paper towels after applying each coat, working the intersections hard, so as not to leave any residue there. If I rub the wet coats firmly and thoroughly, each one glistens with an even, satin sheen and I don’t have to sand between them.
Here are some supplies and tools we find essential in our everyday work around the shop. We may receive a commission from sales referred by our links; however, we have carefully selected these products for their usefulness and quality.


 This versatile approach is easily adapted to other styles and uses.
 Eliminate Angles Where You Can


