We may receive a commission when you use our affiliate links. However, this does not impact our recommendations.
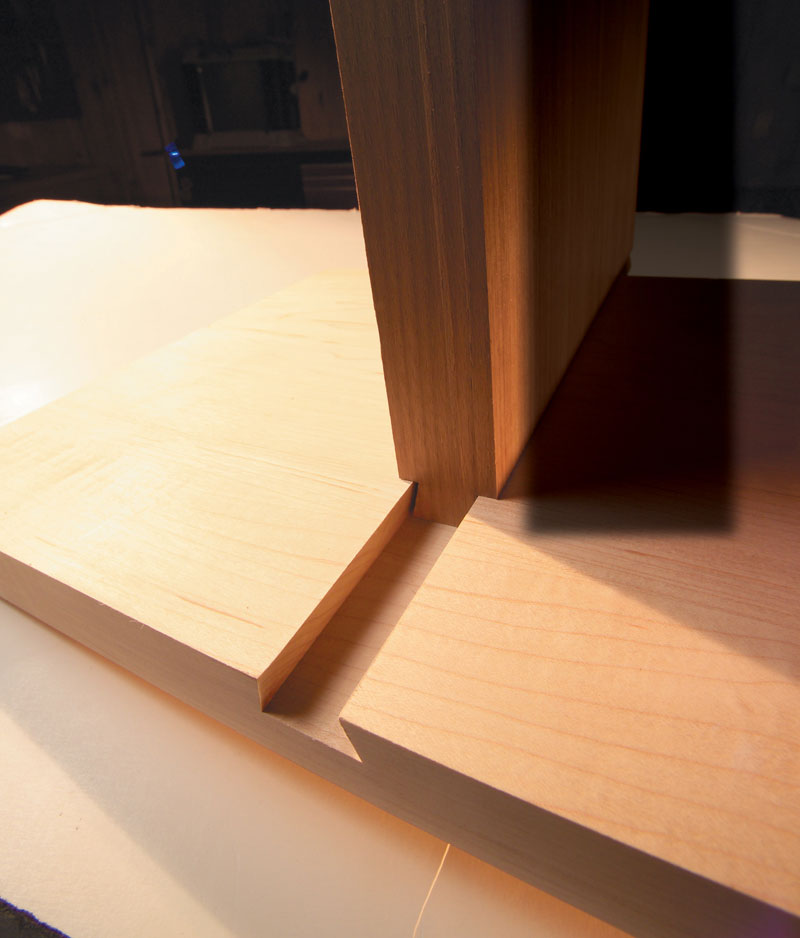
Tapered Sliding Dovetails
Two jigs make a complicated joint ever so easy.
By Luke Hartle
| The tapered sliding dovetail joint is one of the hallmarks of fine craftsmanship. But making it has made many craftsmen pull out their hair! I’ve made it simple, using a jig with a micro-adjust feature for dialing in a perfect fit.This exceptionally strong joint was traditionally used to bind solid shelves and dividers to the sides of a carcase. A standard sliding dovetail must overcome a lot of friction to go home, but a tapered sliding dovetail is a cinch to assemble. My bookcase on page 70 makes full use of it, additionally joining the top to the sides. The jigs I built are sized to fit the bookcase, but it’s easy to tailor them to another project.
To reduce setup time, I used two routers to make the joint, but that’s not absolutely necessary. You’ll need a 1/2-in. top-bearing dovetail bit, a 1/2-in. top-bearing flush-trim bit, a 3/8-in. straight bit and a 5/8-in.-dia. template guide.
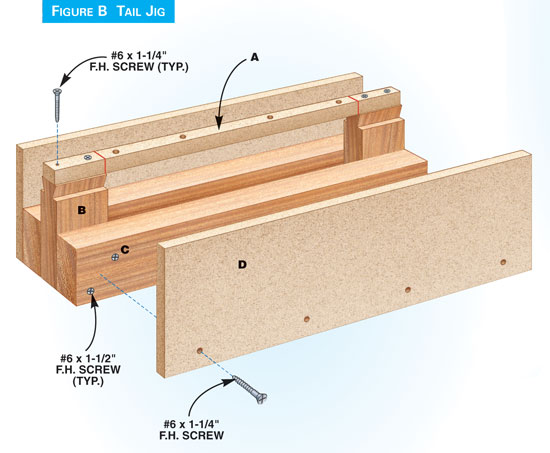
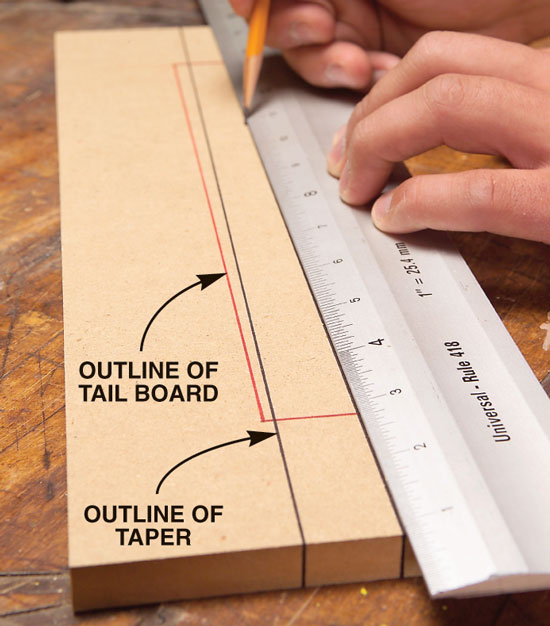
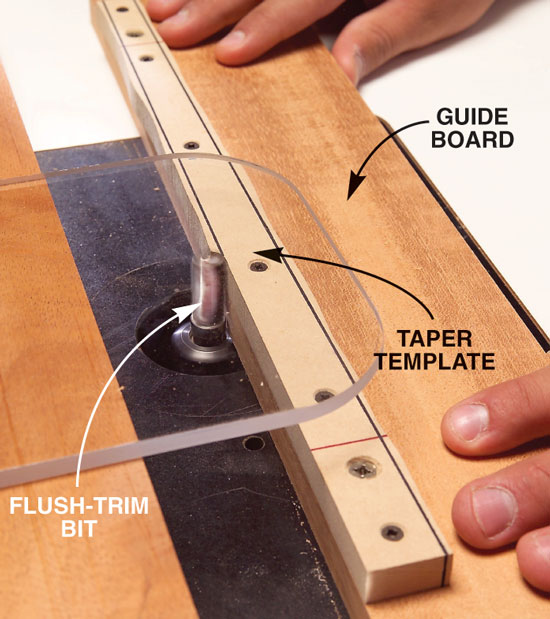
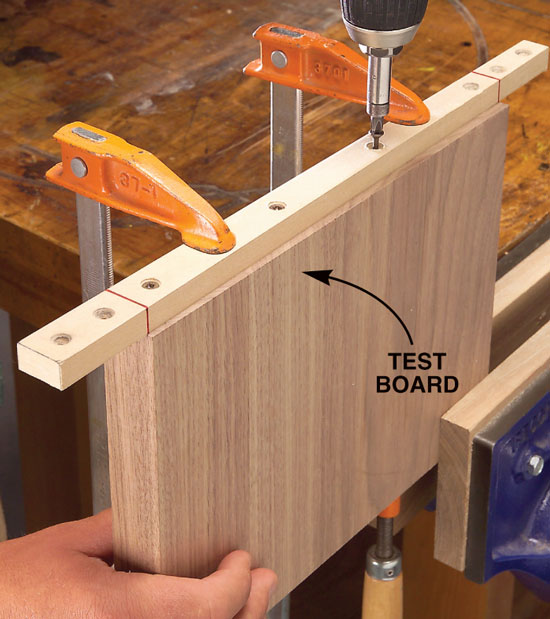
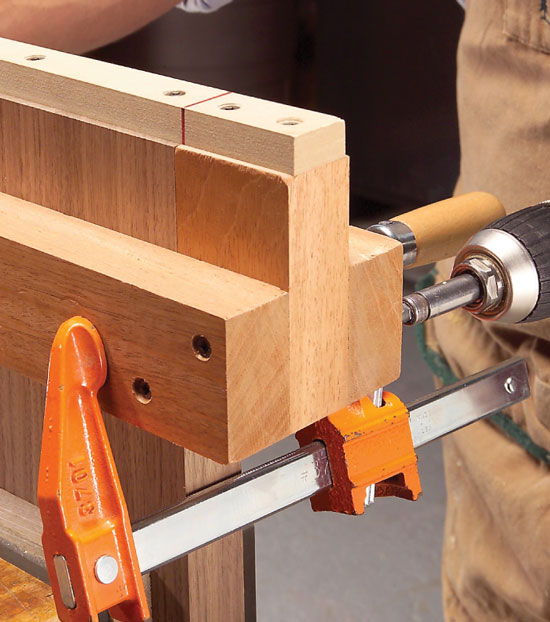
Build the tail jig1. Make a taper template for routing the tails. First, draw a rectangle (shown in red in Photo 1) the same size as the end of the board that receives the tail. Next, draw two lines (shown in black) inside the rectangle indicating the amount the dovetail will taper (Fig. A, below). Each side of this taper has a 1/8-in. rise over the joint’s 11-in. length, or run. A 1/8-in. rise works equally well if the joint is a few inches shorter or longer. Rough-cut the template 1/16 in. outside the black lines with your bandsaw. 2. Cut to the black lines on the router table (Photo 2), using a top-bearing straight bit (see Sources, below). Fasten the template to the guide board with screws so the template doesn’t flex. 3. Screw the template to a test board (Photo 3). Align the red lines with the board’s edges. Position the template so it’s exactly centered from side to side, clamp it in place and drive in the screws. 4. Assemble the rest of the jig on the test board so it fits tightly (Photo 4). Clamp the braces (C) in place first; then add the ends (B, Fig. B, below). 5. Add two outriggers (D, Photo 5). Stand the jig on a flat surface to ensure these boards are level with the template. 6. Rout a test dovetail with a bearing-guided router bit (Photo 6; see Sources, below). Lower the bit so it cuts 1/2 in. into the test piece. Unscrew the template and remove the jig.
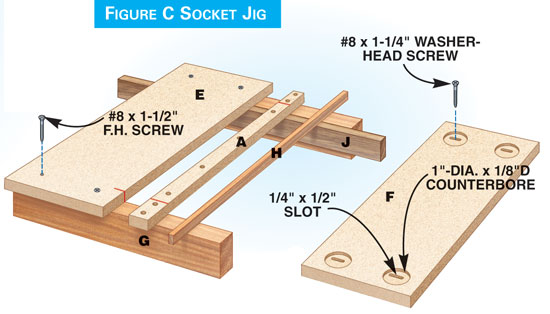
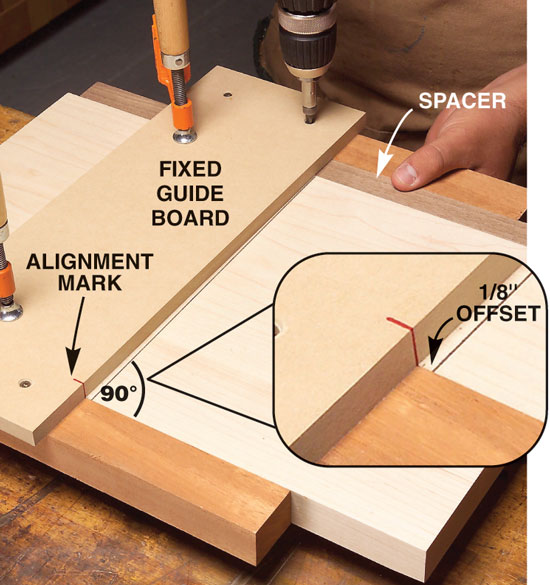
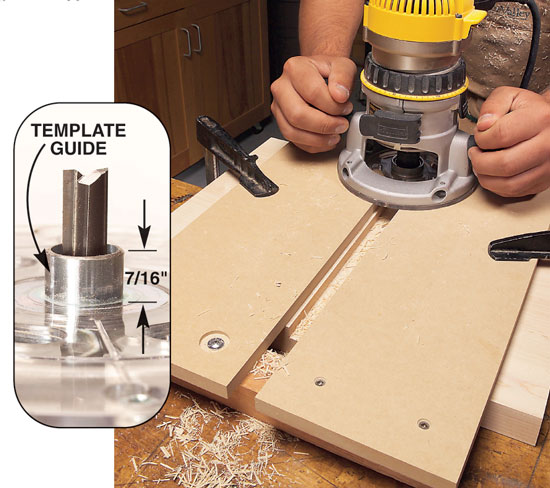
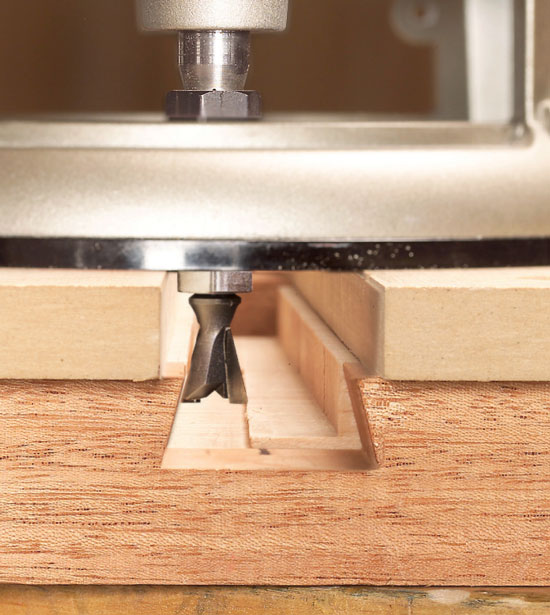
Build the socket jig7. Build this jig around a second test board (Photo 7). To position the fixed guide board, use the same 1/8-in. taper you used to make the tail jig. Draw an alignment mark (shown in red) on the guide board perpendicular to the test board’s edge. Lay the fixed guide board exactly on the line at one end and offset it by 1/8 in. at the other end. Fasten the guide board to the braces (G). The spacer enables this jig to fit the 12-in. top of the “Dovetailed Bookcase” project. 8. Add the adjustable guide board (Photo 8). Butt it tight to the taper template and a spacer. The spacer makes up for the difference in diameter between the bearing and the dovetail cutter 1/2 in. up from the bottom (the depth of the tail and socket). Align the template’s red line with the alignment mark on the fixed guide board. 9. Rout a test socket (Photo 9). Remove most of the waste with a second router so you don’t have to alter the dovetail bit’s depth setting or prematurely dull this special bit. Use a 5/8-in.-dia. template guide and 3/8-in. straight bit. File the template guide to 7/16 in. long, so it’s shorter than the thickness of the template material. Make the cut 7/16 in. deep, which is 1/16 in. shy of the socket’s final depth. 10. Rout the socket with the bearing-guided dovetail bit (Photo 10). The socket will be 1/2-in. deep—exactly the same depth as the tail. Remove the jig from the test piece.
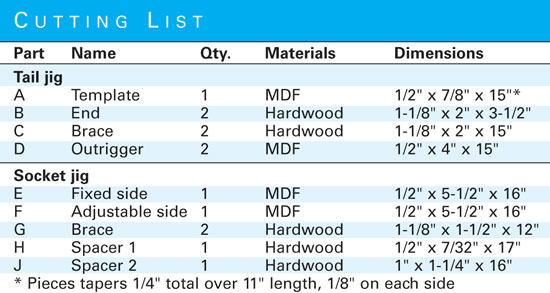
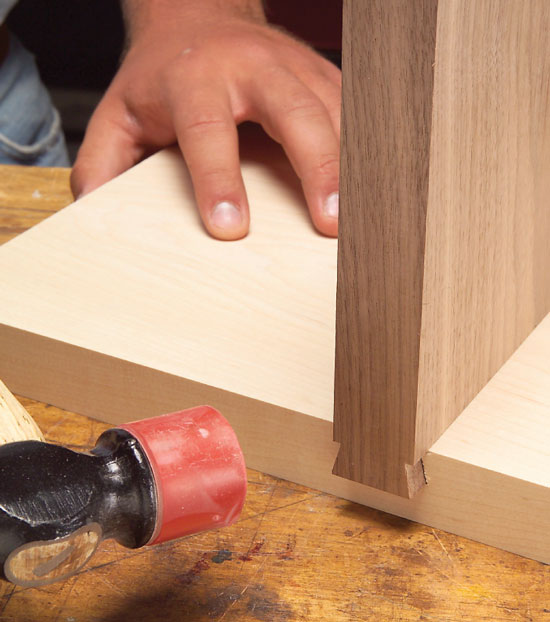
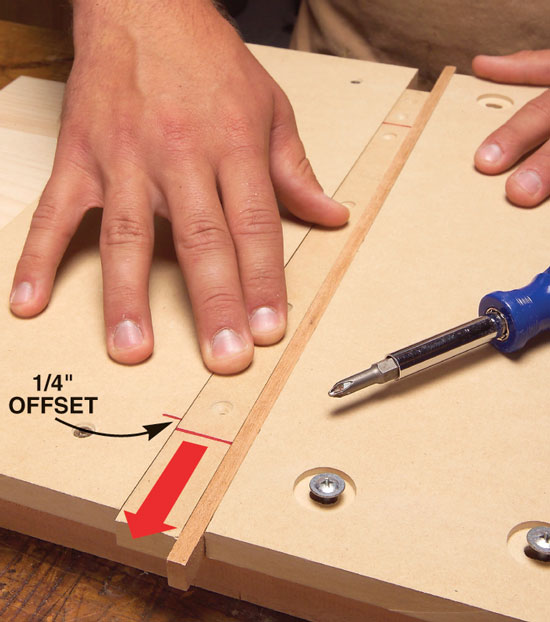
Test the fit11. Test the joint’s fit (Photo 11). If the tail won’t go home or slides too far, adjust the socket jig (Photo 12). Using the red lines as a reference, shift the template 1/4 in. and rout another test socket. Slide the template in for a looser joint and out for a tighter joint. You may have to cut a couple of test sockets to get the right fit, but once you do, replace the template in the tail jig and you’re all set to cut the real tails and sockets (Photo 13). Source(Note: Product availability and costs are subject to change since original publication date.) Amana Tool, amanatool.com, 800-445-0077, 1/2-in. top-bearing dovetail bit, #45850; 1/2-in. top-bearing flush-trim bit, #45460; 3/8-in. straight bit, #45414. Cutting List
Fig. A: Taper Template
Fig. B: Tail Jig
Fig. C: Socket Jig
This story originally appeared in American Woodworker October 2005, issue #117.
|
Click any image to view a larger version.
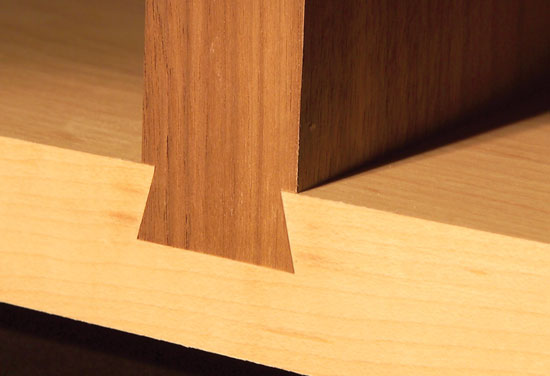
A sliding dovetail joint has two mating parts: a tail and a socket. It’s much easier to assemble when both parts are tapered. As the tail slides into the socket, the joint gradually locks into place until it’s rock solid.
1. Draw an end view of the tail’s taper. Rough cut this piece just outside the black lines, to make a taper template.
2. Rout the taper template using a board as a guide. This guarantees the template will have absolutely straight edges.
3. Fasten the taper template to the end of a short test board.
4. Build a jig for routing the tails. Assemble it on the test board, with the taper template, to fit tightly.
5. Add two outrigger guide boards to the jig. These pieces will help you balance a router on the taper template.
6. Rout the dovetail. Follow the taper template with a dovetail bit that has a bearing above the cutter (see inset).
7. Build the socket jig. Offset a fixed guide board by 1/8 in., the same amount as each side of the template is tapered (see inset).
8. Add a second, adjustable guide board. Use the taper template and a spacer to position this board. Align the red marks.
9. Rout a test socket. Remove most of the waste with a straight bit (see inset), using a second router with a template guide.
10. Finish the socket with the bearing-guided dovetail bit.
11. Assemble the joint. It will be very loose until you get near the end, because both parts are tapered. You may have to adjust the width of the socket to make it flush and tight with the tail.
12. Adjust the socket’s width by altering the gap in the jig. Slide the taper template 1/4 in. in or out to micro-adjust the gap’s width. Rout a new socket and try the joint again.
13. A perfect fit should only require a few light taps to assemble. The joint should be tight when its two parts are flush. |


Here are some supplies and tools we find essential in our everyday work around the shop. We may receive a commission from sales referred by our links; however, we have carefully selected these products for their usefulness and quality.