


We may receive a commission when you use our affiliate links. However, this does not impact our recommendations.
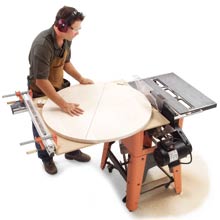
It's easy to cut perfectly round tabletops of almost any size on your tablesaw. All it takes is a simple jig (Fig A)
and careful setup. With this method, you can safely cut dia-meters from
12 in. to within an inch of your saw's rip-fence capacity.
Why use a tablesaw? It's better than bandsawing or routing, especially
for large-diameter circles. Unlike bandsawing, when you're working on
the tablesaw, the blank is fully supported, so it's easy to control.
Unlike routing, you stay in one place while making the cut and you
don't have to deal with a tangle-prone cord. Tablesawn results are
better, too. The circular blade leaves a cleaner edge than a bandsaw
blade does and it won't tear out the end grain, the way a router bit
can.
This tablesaw technique is similar to the approach used for cutting
circles on a bandsaw. Using a clamped-on jig with a center pin, you
make the cut by rotating the blank into the blade. Unlike the bandsaw
method, however, you must start with a blank that's already roughsawn.
Cutting the circle to final size takes several steps. Like turning a
rough blank into a round on a lathe, you gradually cut down the high
spots until the blank is perfectly round. Here's how to do it:
1. Draw the circle on the bottom of the blank, using a compass or trammel.
2. Use a jigsaw to rough-saw the blank 1/4 in. to 1/2 in. larger
than the final diameter. Starting on the bottom face, draw a diameter
line that continues all the way around the blank.
3. Enlarge the center hole that remains from drawing the circle to fit the jig's center pin. Mount the blank (Photo 1). Then install the retainers.
4. Before you position the jig, unplug your saw and install an
alternate tooth bevel (ATB) blade with at least 40 teeth. Raise the
blade fully. Set the rip fence so there's just enough room for the jig
and blank to slide past the blade. Align the blank's centerline with
the reference line you've drawn on the clamp rail (Fig. A).
5. Hold the jig against the fence, slide it forward into position and clamp it securely (Photo 2).
6. Lower the blade fully to locate the jig for the first cut.
Spin the roughsawn blank to find its widest spot. Then reset the fence
so the blade will remove about 1/16 in. from this point. A more
aggressive cut wouldn't work; it would cause binding between the blank
and the blade.

 |
PHOTO 1: Mount the roughsawn blank on the jig. It rotates on the center pin. Align the blank's centerline with the reference line on the jig's rail. |
 |
PHOTO 2: Clamp the jig to the rip fence at the point where the tip of the fully raised blade, the top edge of the blank and the centerline meet. Lower the blade completely. Then position the blank for the first cut by adjusting the fence. |
7. Start the cut by raising the blade (Photo 3). Then rotate the blank clockwise (Photo 4). Shut off the saw and lower the blade.
8. Reset the fence and repeat the cutting process, as needed,
removing about 1/16 in. from the edge of the blank each time. Removing
1/16 in. reduces the blank's overall diameter by 1/8 in. Your last
fence adjustment, to dial in the final diameter, will probably be less
than 1/16 in.
9. Remove saw marks on the edge by sanding or by routing a profile.
This technique was developed from a tip supplied by Paul Lee.
 |
PHOTO 3: Start the cut by raising the blade into the blank after setting the fence to remove only 1/16 in. from the edge. Hold the blank firmly, so it can't move. Turn on the saw and slowly raise the blade to full height. |
 |
PHOTO 4: Complete the cut by rotating the blank clockwise. After one full rotation, shut off the saw and lower the blade completely. Reset the fence about 1/16 in. closer to the blade for the next pass. Repeat the cutting process until the blank reaches its final diameter. |
Here are some supplies and tools we find essential in our everyday work around the shop. We may receive a commission from sales referred by our links; however, we have carefully selected these products for their usefulness and quality.


