We may receive a commission when you use our affiliate links. However, this does not impact our recommendations.
All of your tablesaw accessories close at hand
by Eric Smith
The last time I could find them all, I counted 18 accessories for my tablesaw. Dado set, push sticks, throat plates, extra blades, miter gauges, tenoning jig, wrenches, etc.—they’re all essential and they were all over the place. The problem is finding a convenient, central place to put them that’s out of the way yet accessible.
I came up with a cabinet that fits in the underutilized space below my saw’s extension table. It has two deep drawers for plenty of storage. The full-extension slides and stepped sides allow you to see and grab what you need without digging through stuff. Adjustable shelves on the side hold the rip fence, extra miter gauge and whatever else you can pile on them. The overall design is flexible and open-ended, so you can add extra holders and pegs wherever you need them. I made this cabinet to fit my tablesaw, but it can easily be modified to fit most other brands.
Assemble the Cabinet Box
Cut the parts from the two sheets of plywood (Fig. B, below). Add the 1/4-in. hardwood edging (G). Screw the cabinet sides (B, D) and back (C) to the bottom (A) (Photo 1; Fig. A, below). Attach the top with screws.
Photo 1: Assemble the cabinet with butt joints and screws.
Build the Drawer Boxes
Set up the drawer pieces (H through L), clamp and fasten them with screws (Fig. A). Add hardwood edging.
Attach and Adjust the Drawer Slides
Full-extension drawer slides are a must to access the drawer’s contents (see Sources, below). The slides consist of two parts: a cabinet member and a drawer member.
Attach the cabinet members flush with the front edge of the cabinet (Photo 2). Use a 14-1/2-in. spacer for the upper slides and a 3/4-in. spacer to set the bottom cabinet members.
Photo 2: Spacer boards make it easy to install the drawer slides in the cabinet. The 3/4-in. spacer is also used to position the drawer members up from the bottom edge of the drawers.
To set the drawer members, align the 3/4-in. spacer block flush with the bottom edge of the drawer side. Set the drawer member on the spacer flush with the front and screw it to the drawer.
Complete the Drawers
Nail hardwood edging to the sides and top of the drawer faces (M). Set the drawers in the cabinet. Align the faces to the drawers and fasten with 1-in. brads or double-faced tape. Open the drawers, and screw the faces to the drawer boxes from inside.
Install the handles (see Sources, below). Add a peg (R) to the top drawer face for hanging a push stick.
Add Shelves and Custom Storage
Attach the shelf standards (see Sources) to the cabinet side. Snap shelf supports in place and screw on the shelves.
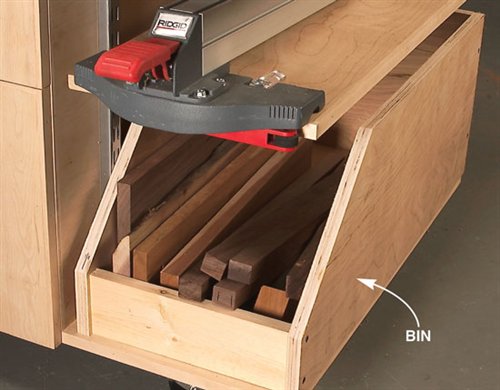
I used leftover plywood to make a scrap bin for the bottom shelf. Fasten a bracket (N, P, Fig. A) on the left side of the cabinet for your miter gauge. Mount it as low as possible to avoid interfering with the operation of the blade-tilt handwheel. Add other holders—a peg for the arbor wrench, for example—as needed.
I fashioned a blade holder (Q, Fig. A) from a 2-ft. length of 2×6 (Photo 3). Lower the blade completely and clamp the 2×6 to the rip fence. Set the fence at 13/16 in. Start the saw and slowly raise the blade until it barely breaks through the 2×6. Lower the blade completely, move the fence over 15/16 in. and repeat the process. Continue until you have five slots.
Photo 3: Make the blade holder on your tablesaw. Cut a series of blade-shaped slots in a clamped-on 2×6 by slowly raising the blade until it just breaks through the top.
Remove the 2×6 and cut the holder to fit the width of the drawer. Set the holder in the drawer and secure it with screws from the bottom.
Finally, tip the cabinet on its back and attach the wheels. Use 3-in. locking swivel casters in the front and fixed casters in the back. Screw the casters in flush with the left edge and 6-in. in from the right edge.
Features
Drawers
Deep, open-sided full-extension drawers provide easy access and big capacity.
Brackets
Dowels and a bracket keep everyday accessories right at hand.
Shelves
Adjustable shelves store accessories that don’t easily fit in the drawers. There’s even a bin for storing offcuts you simply can’t bear to throw away.
This story originally appeared in American Woodworker July 2006, issue #122.
Source information may have changed since the original publication date.
Sources
Woodworker’s Hardware, (800) 383-0130, www.woodworkershardware.com
-28-in. full-extension drawer slides, 100-lb. capacity, #KV8400, $11 a set.
Home centers and hardware stores
-Wooden drawer handles, locking wheels and heavy-duty adjustable shelf standards and brackets.
Here are some supplies and tools we find essential in our everyday work around the shop. We may receive a commission from sales referred by our links; however, we have carefully selected these products for their usefulness and quality.


