We may receive a commission when you use our affiliate links. However, this does not impact our recommendations.
Tablesaw Picture Frame
Safely make shaper-quality molding on your tablesaw without fancy jigs.
By Eric Smith and Richard Tendick
| This how-to story has a picture-perfect ending. In fact, you might want to round up some spectators for applause in the final steps. Richard Tendick has developed a safe, simple technique to help you make narrow, complex picture-frame stock using nothing more than a tablesaw. That’s right, there are no routers or specialized jigs and sleds to make, either. With Richard’s system, you actually glue the frame before the final cut. The fun comes when the frame is cut loose from the square stock. |
You may also like… |
Richard’s molding also simplifies assembly. Mitering and gluing odd-shaped picture frame molding can be a struggle. With this technique, the frame is mitered and glued when the stock still has its square profile. That makes building a picture frame much easier.
Grain and color are importantThis technique requires 1-1/2-in. square stock. For a frame to look good, the grain must flow smoothly around all four pieces (see “Oops,” below) and the color must be consistent. Choose clear, straight-grained wood for your frame stock. It’s best if you can cut the frame stock from a single length of wood. Buy extra wood for test cuts. We found 1-1/2-in. square oak stair balusters sold at home centers to be an excellent source for frame stock.
Set up for the cuts1. Rough-cut the frame stock to a few inches over the finished dimensions for cutting on the tablesaw. 2. Sketch the cuts on the end of each piece for orientation (Photo 1; Fig. A). All cuts start at the same end, so if you find yourself reversing the piece, something is wrong. Pay attention to grain direction! (See Fig. A and “Oops.”) 3. Cut spacer strips 3/8, 5/8 and 3/4 in. wide by 18 in. long. You’ll use these for setting the fence and saw blade height for some of the cuts.
Making the saw cuts4. Set the blade to make a 3/8-in.-deep cut and make Cut 1 (Fig. A, below). 5. Set the blade and fence for Cut 2 (Photo 2) and make the cut. 6. Make Cut 3 with the blade titled to 33 degrees. Set the blade just high enough to poke through the wood about 1/4 in. (Photo 3). 7. Make Cut 4 to create the rabbet that holds your picture, matte and glass (Photo 4). Set the fence and blade height using Cut 1 as a reference.
Sanding, mitering and gluing8. Sand the frame before cutting the miters (Photo 5). It’s a lot easier than sanding into the corners of an assembled frame. 9. Before you cut the miters, take a 1/2-in.-thick slice off your stock. Save the slice for setting up the last cut. 10. Attach a long subfence to the miter gauge. Use a drafting square to set the gauge at 45 degrees. 11. Cut the miters (Photos 6 and 7). 12. Test-fit the frame with a band clamp before gluing to check for tight-fitting joints. 13. Glue the frame together, spreading a heavy coat of glue over the entire miter (Photo 8). Yes, that includes the part that will eventually be cut off. Wipe off excess glue with a damp rag.
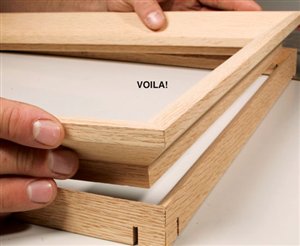
The final cut (the fun part!)14. Set up the tablesaw for Cut 5 (Photo 9). 15. Make the final cut on all four sides of the frame (Photo 10). 16. Lift the frame from its four-sided offcut (Photo 11). (You may want an audience for this step). 17. If the inner frame doesn’t fall away from the offcut immediately, don’t panic. Ours didn’t (and of course, we panicked). It turned out that despite our best efforts, the blade was set a hair too shallow. All we had to do was push down gently on the frame to break that sliver of wood and release the offcut.
Finishing touches18. Reinforce the corners with 1-in. wire brads (Photo 12). Predrill the holes with a No. 60 wire gauge bit or clip the head off a brad and use that as a bit. You may need to use a mini-chuck if your drill doesn’t hold a bit that small. We don’t recommend using a nail gun for this step—it’s too easy to blow a nail out of the face of the frame. The nail would be hard to extract, and the resulting damage, difficult to repair. With a drill, if you accidentally drill a hole in the wrong spot, it’s easy to hide with filler. 19. Sand the outside of the frame and fill the nail holes. Stain as desired and finish with at least two coats of varnish or polyurethane.
Oops!At first we didn’t pay attention to grain orientation. The result was mismatched grain and a bad-looking corner. Make sure the face of your frame is positioned so the growth rings run perpendicular to it. This will give you a straight-grained face, which will make the corners match better. Fig. A: Picture Frame Profile CutsThis story originally appeared in American Woodworker September 2004, issue 109. |
Click any image to view a larger version.
1. Sketch the saw cuts on the leading end (the end that goes into the saw blade first) of the frame stock before you start cutting.
2. Use spacer sticks to set the fence and blade height for Cut 2. With the blade at 45 degrees, use the 3/8-in. spacer to set the fence. When the teeth center on the 5/8-in. spacer’s upper corner, you’ve reached the blade height.
3. Tilt the blade 33 degrees to make Cut 3. Use a 3/4-in. spacer to set the fence. A featherboard and a rubber-tipped push stick make the cut smooth and safe.
4. Make Cut 4 on the side of the blade away from the fence to prevent kickback. This also allows the stock’s large sides to bear against the fence and table for greater stability.
5. Sand off saw marks on the frame’s face. The molding can be pinched in a vise to hold it steady.
6. Make the first miter cuts to the left of the blade. Clamp the stock face up to a wooden fence attached to the gauge. The end being cut should angle toward you. Make this cut on all four pieces.
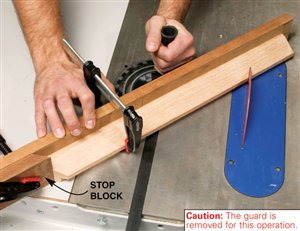
7. Make the second miter cut on the right side of the blade. Clamp a stop block to the fence so the frame’s parallel sides will be exactly the same length.
8. Glue and clamp the mitered frame together. A band clamp is perfect for the job. The clamp’s metal plates hang on each corner of the frame to help position the band and protect the wood.
9. Set up your tablesaw for the final cut using a cross section of the frame stock as a guide. Clamp a 1/4-in. spacer to the fence just above the offcut to create a gap between the offcut and the fence to prevent kickback.
10. Make Cut 5 on all four sides of the frame. The offcut won’t release from the frame until all the cuts are complete.
11. Lift the frame out of the offcut. If your last cut was a bit shallow, you may need to push down in spots to separate the frame from the offcut.
12. Drill pilot holes for a couple of 1-in. brads to reinforce each miter joint. Keep the brads on the back of the frame where they won’t be seen.
Tip: Get a Better Grip – Hold small pieces of wood in the tablesaw with this rubber-tipped push stick. Just glue a standard eraser into the push stick notch. |
Here are some supplies and tools we find essential in our everyday work around the shop. We may receive a commission from sales referred by our links; however, we have carefully selected these products for their usefulness and quality.


