


We may receive a commission when you use our affiliate links. However, this does not impact our recommendations.
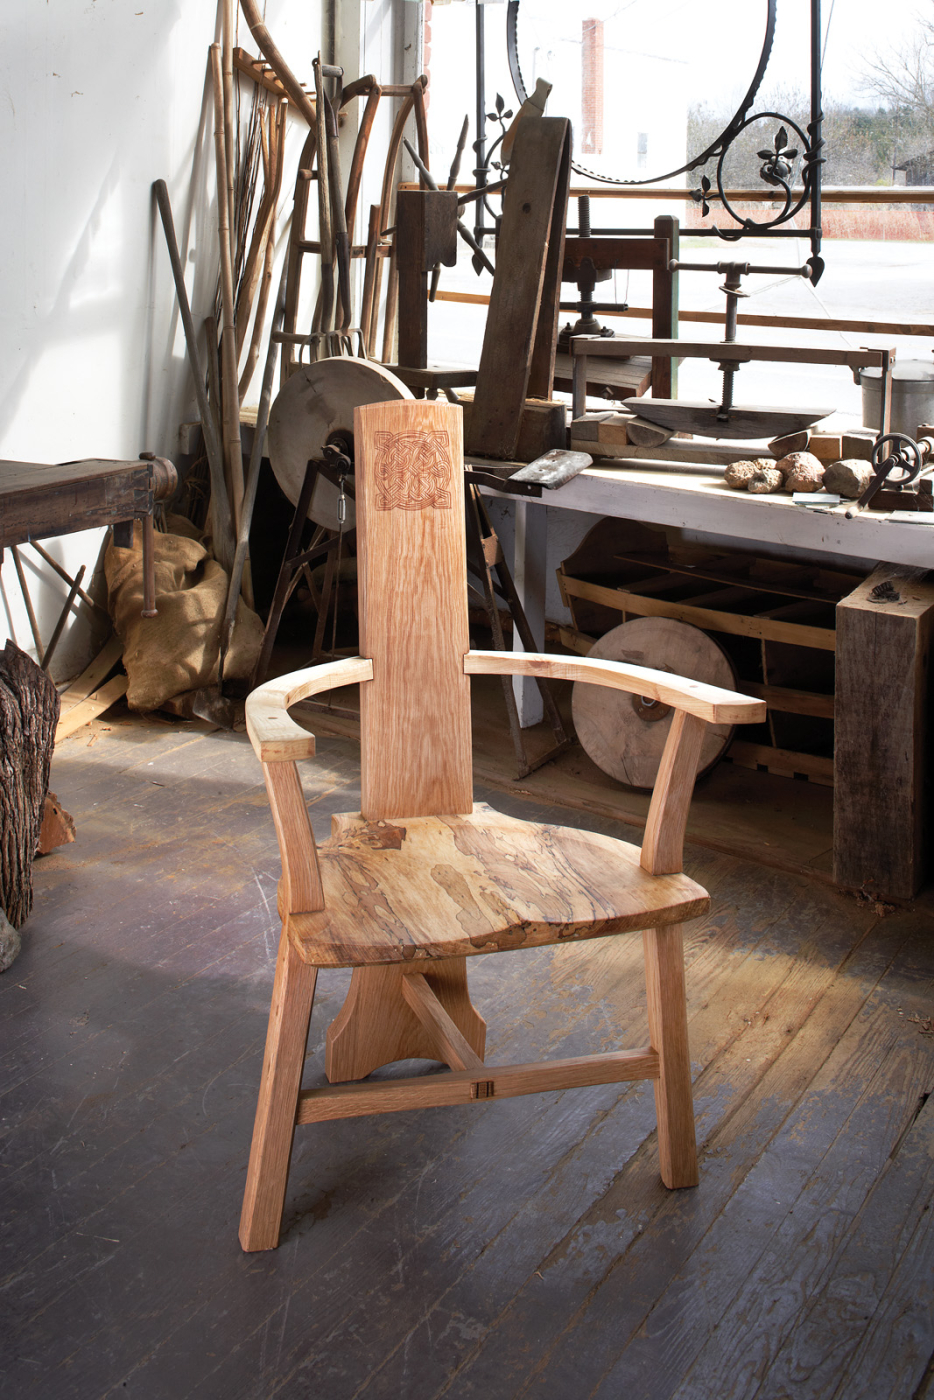
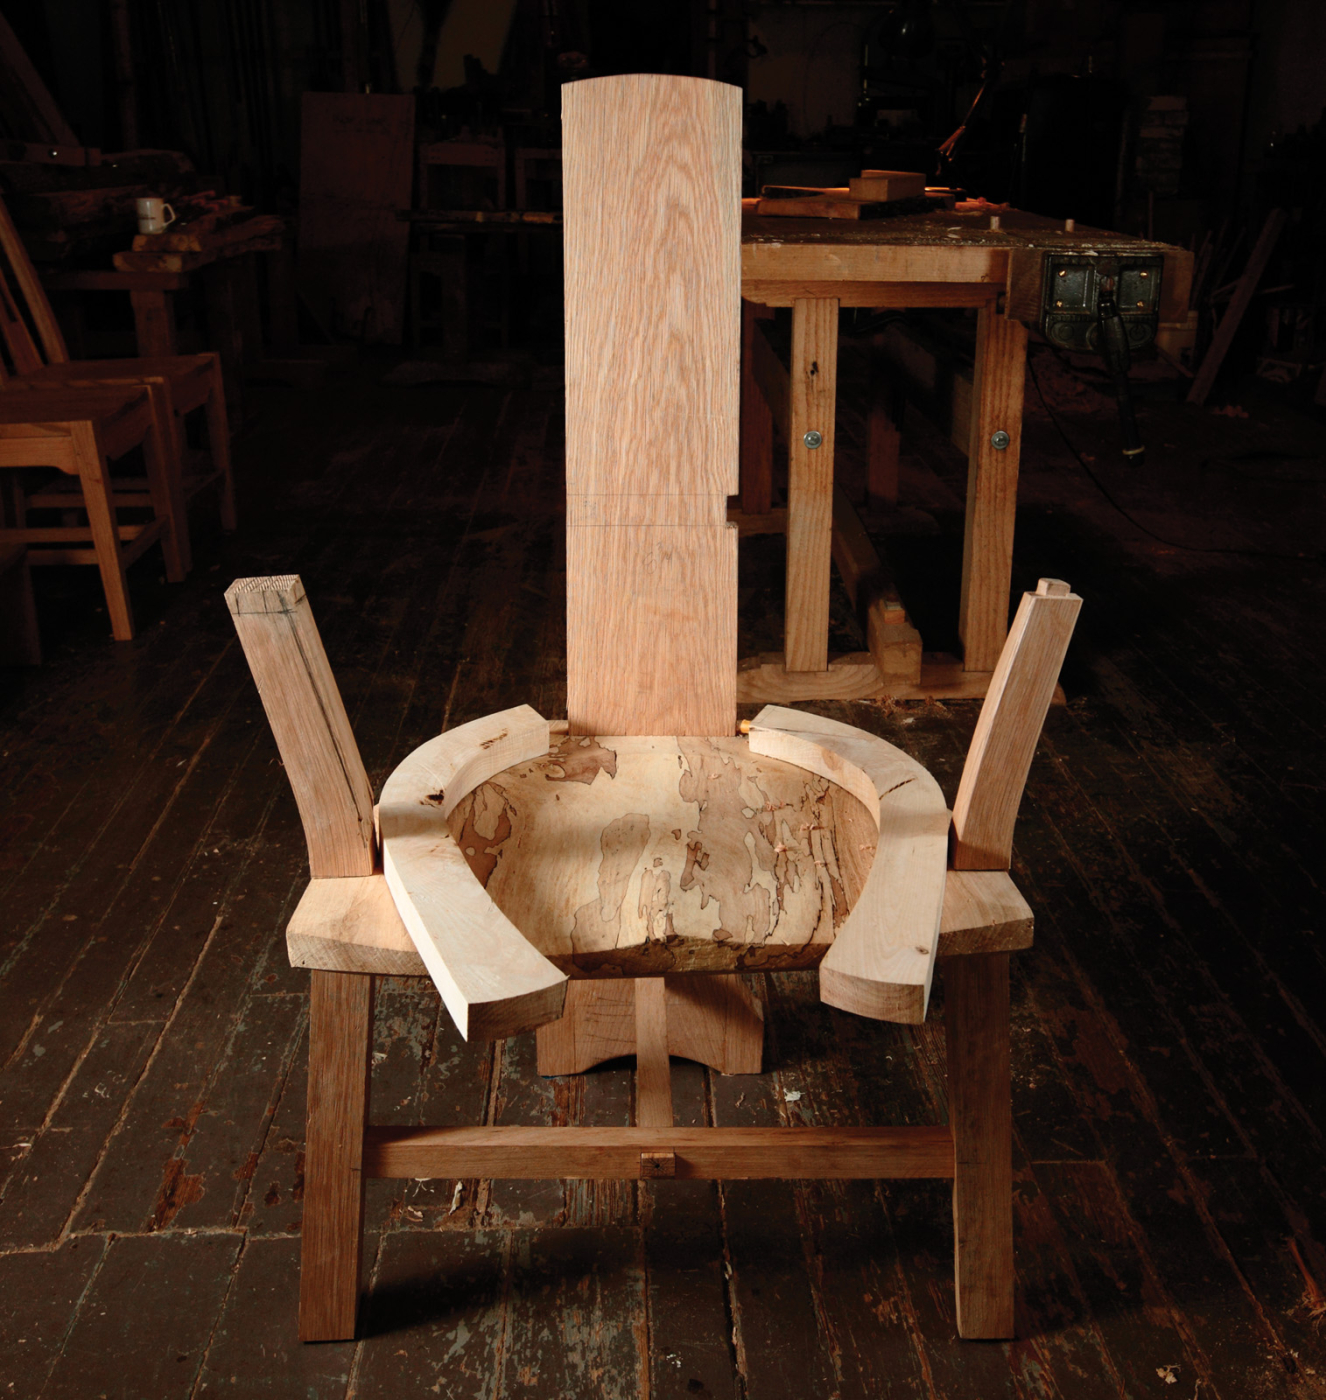
Historic lineage. With roots in ancient Ireland, this chair shares elements of both Welsh Stick chairs and Sam Maloof’s iconic rockers.
Building a throne for the common man.
I’m sitting here listening to Fiona Richie’s “Thistle & Shamrock” radio show, thinking of an old friend, John Brown, from Ireland, and the ties between the Welsh and Irish cultures. I’ve been building Welsh stick chairs for ages, influenced by the ancient chairs in St. Faggon’s Castle and those built by John, who recently passed away. I’ve always loved the old chairs of Scotland and Ireland; they’re as rough as you get, but thrones nonetheless.
The Sligo chair, joined and pegged together, has its origins in the early 16th century. A sketch of this type of chair, dated 1832 from Drumecliffe, near Sligo, shows a three-legged, T-shaped seat with a crest piece attached to the top. Claudia Kinmonth, in her book “Irish Country Furniture” (Yale), describes the “Tuam chair” and mentions several reproductions made for Thoor Ballylee, the poet W.B. Yeats’ Tower House in Dublin. Kinmonth tells us that the chair was made with no nails, screws or glue. What follows is my interpretation of this ancient chair.
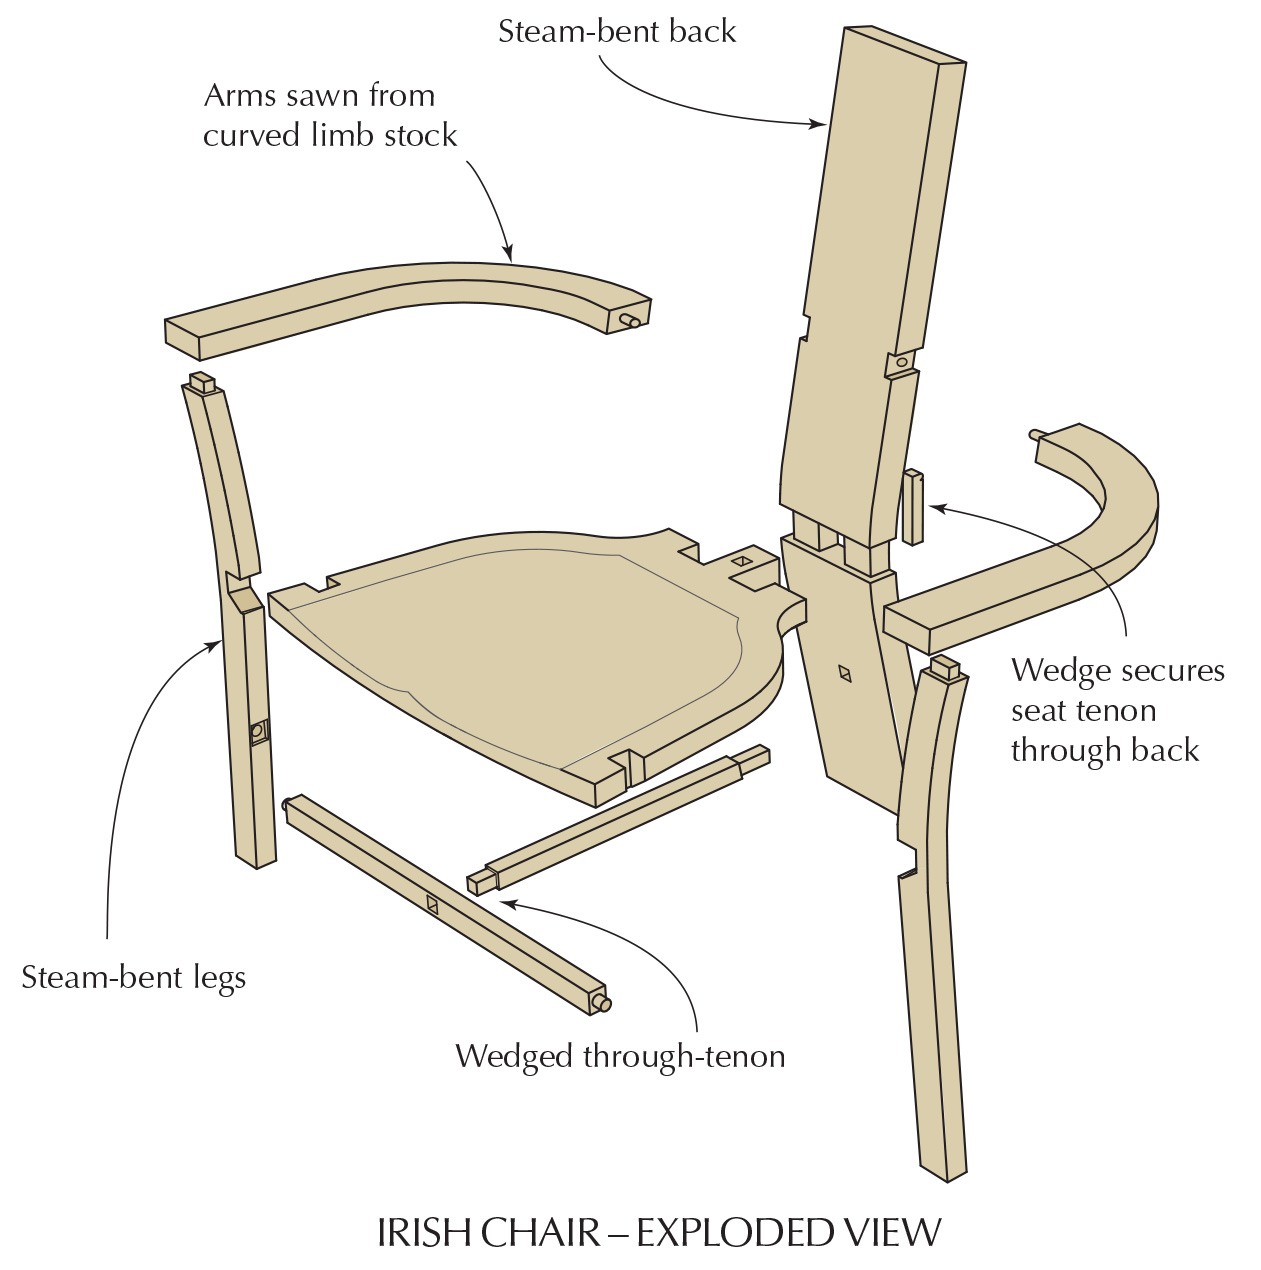
I’ve taken the liberty of exchanging the flat-planked, T-shaped seat for a more comfortable Windsor-style seat, and I joined the front legs in a Maloof-ian style. The original chairs had a back carved out of a heavy timber. I’ve steam-bent the back plank and also the front legs. The original arms were cut out and pegged to the back as in the old ones. This is a scribe-and-fit chair; there ain’t no square.
Video: Watch Don Weber split wood from a log.
Extra: Check out the Irish Chair SketchUp model.
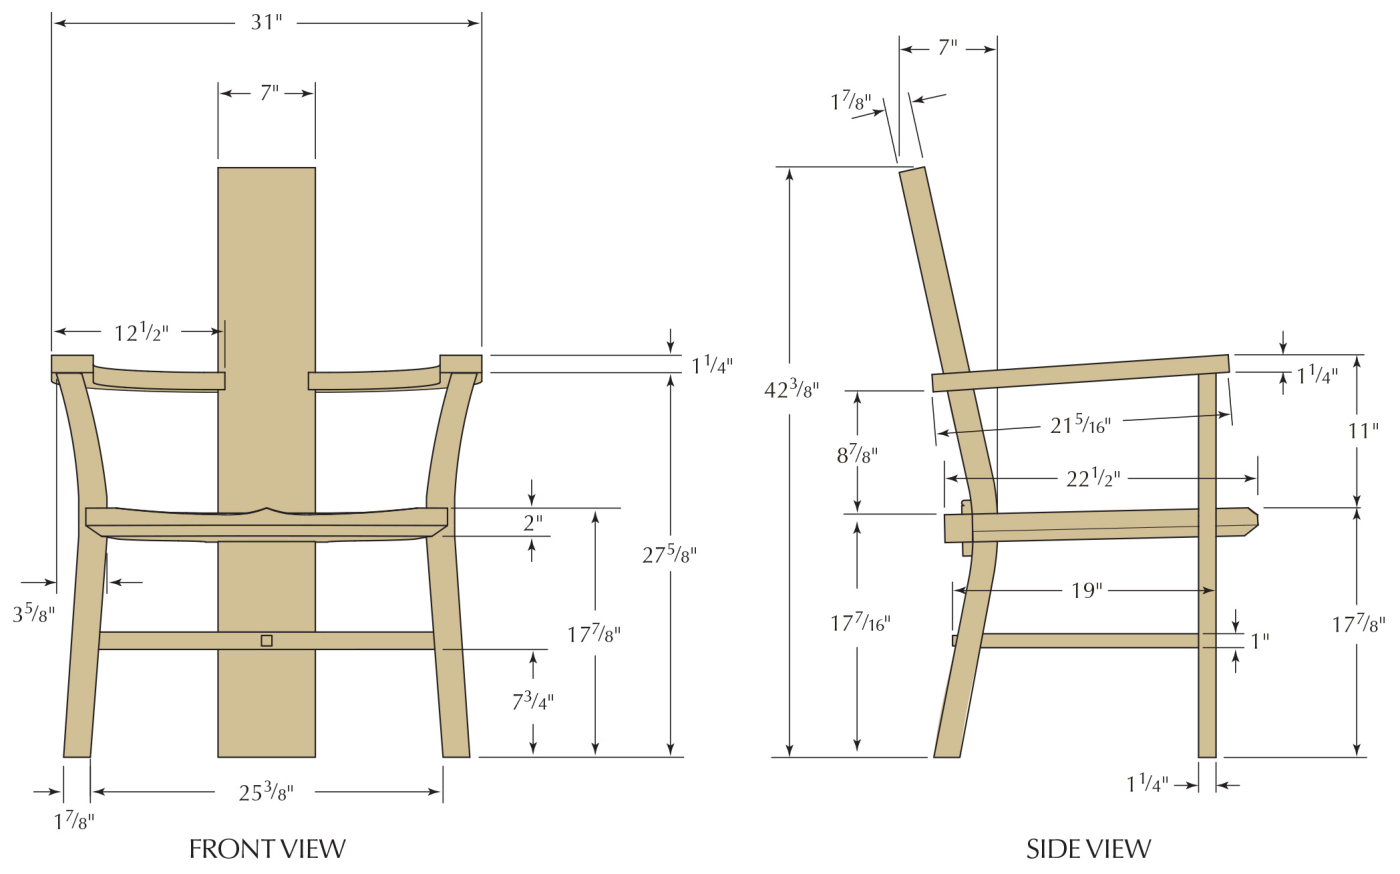
Irish Chair Diagrams

 The Bodger’s Steam Box
 The Bodger’s Steam Box
I recall reading an article in a woodworking magazine about a very patient Japanese temple builder who bent living trees with cables and winches to create curved timbers for his temple structures. This is kind of like that, but on a much smaller scale.

Full head of steam. A gas burner boils water to charge the plywood box with steam. This setup is inexpensive and very efficient.
The steaming box I built is 6′ long and 113⁄4” square, made from one sheet of 3⁄4” plywood. I varnished the inside to keep it from warping from the steam, then glued and screwed it together. The back of the box is screwed in place and the front is hinged for access. This box sits on a rolling table over a boiling pot of water. A piece of 3⁄4” copper pipe diffuses the steam inside the box and a T-joint fitting protrudes out the bottom of the steamer and through the plywood lid of the boiler.
 I use a burner from an outdoor cooker to heat the water. The rule of thumb for steaming is one hour per 1″ of thickness. The larger pieces are left in the steamer for 21⁄2 hours. Once steamed it’s a mad dash from the steamer to the bending form, so the closer you set up your operation the better.
In the 12-gallon pot, I add about 10 gallons of water. I’ve had the water boil out, so I’ve added a filler hole (and plug) in case the water gets low so I can add boiling water from another pot. Keep a stick handy to measure the depth of the water so that you don’t run out.
Big Bend
Bending a 2″ x 7″ white oak plank took a lot of manpower until I attached a 4×4 timber with an eye bolt through it to the undercarriage of my workbench and used a come-along to draw the steamed wood down to the form.
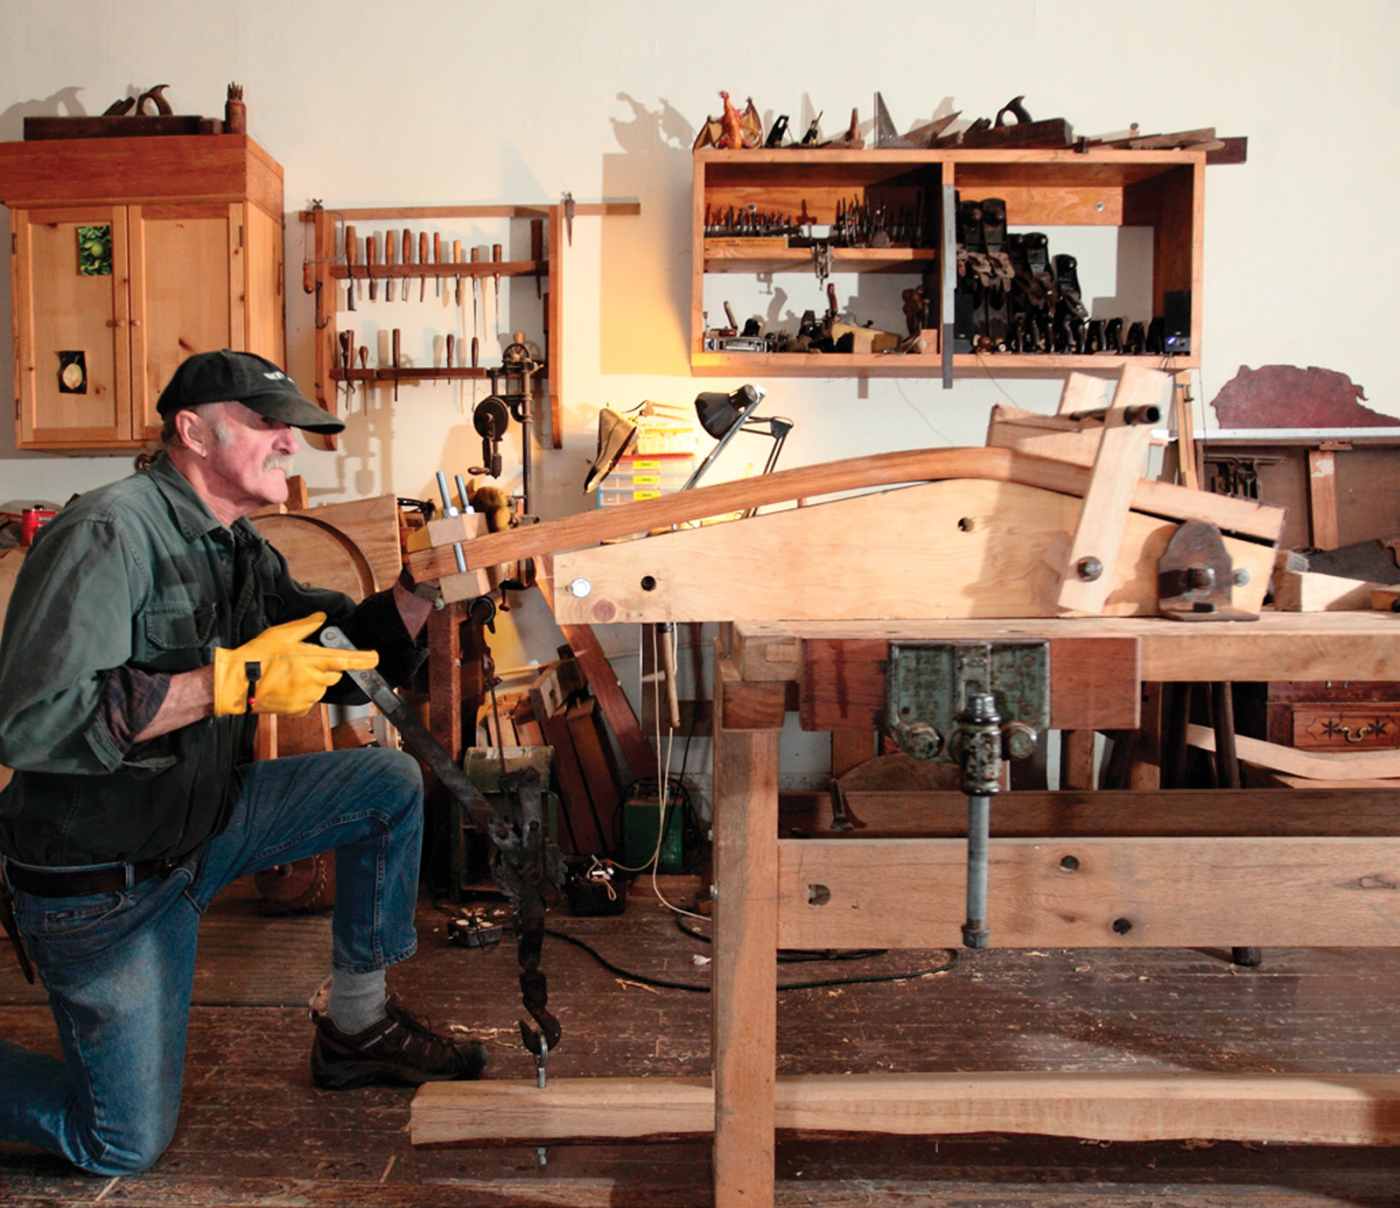
Hot potato. A come-along rigged to a 4×4 below the bench provides the power to bend the thick back just out of the steam box.
Hold on. A bracket and pipe holds the back to the form as it dries.
The form was made from three pieces of 2″-thick pine, band sawn to shape then bolted together. A piece of angle iron was lagged to the end of the form to attach it to the workbench, and a pair of arms with a piece of black pipe (salvaged from an old bar clamp) passed through holes in the arms to allow me to tighten the bent wood down to the form with wedges driven from underneath the pipe.
Another set of arms with a piece of pipe at top and bottom allowed me to slip the frame over the form with the come-along still attached to secure the other side of the bend. This allows me to release the tension on the come-along and remove the form from the bench when bending multiple pieces.
I try to do several pieces in the steamer at the same time to economize on fuel and in case any of the bending pieces fail. The front legs are bent on a similar form. When all the pieces from the steamer are bent, the forms with the bent wood on them are placed in a drying room I’ve built in the workshop – the only climate-controlled space in my old building!
Have a Seat While You Wait
I let the bent wood dry for at least two weeks to limit the amount of spring back. While I’m waiting, I work on the seat. The seat is D-shaped with a tail and wings, and made of spalted elm. The tail will be mortised through the center of the back plank, and the wings notched past the sides of this piece.
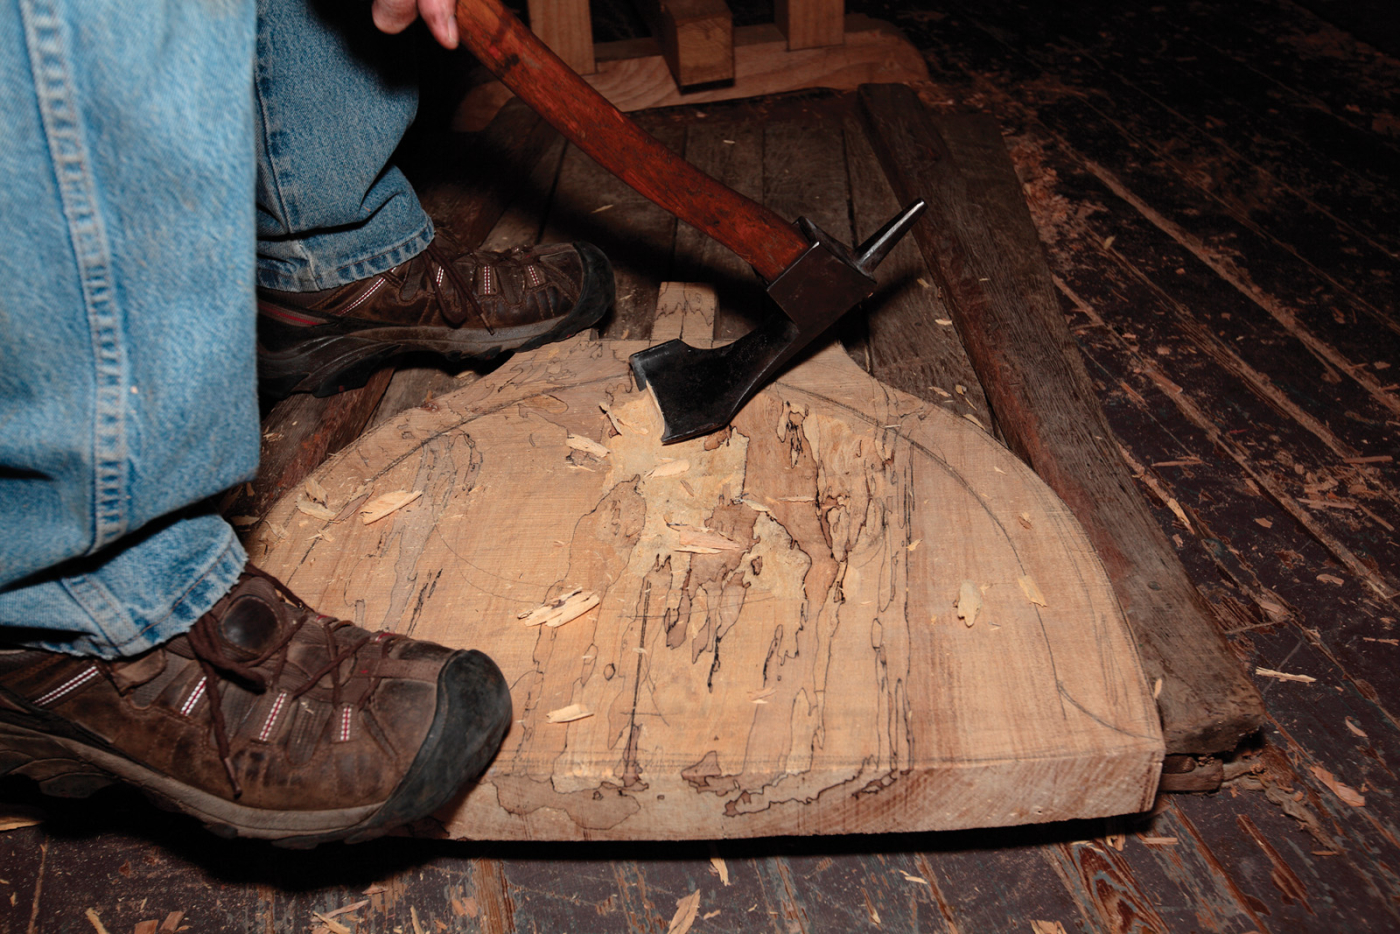
Quick work. An adze is used for the initial hollowing of the saddled seat.
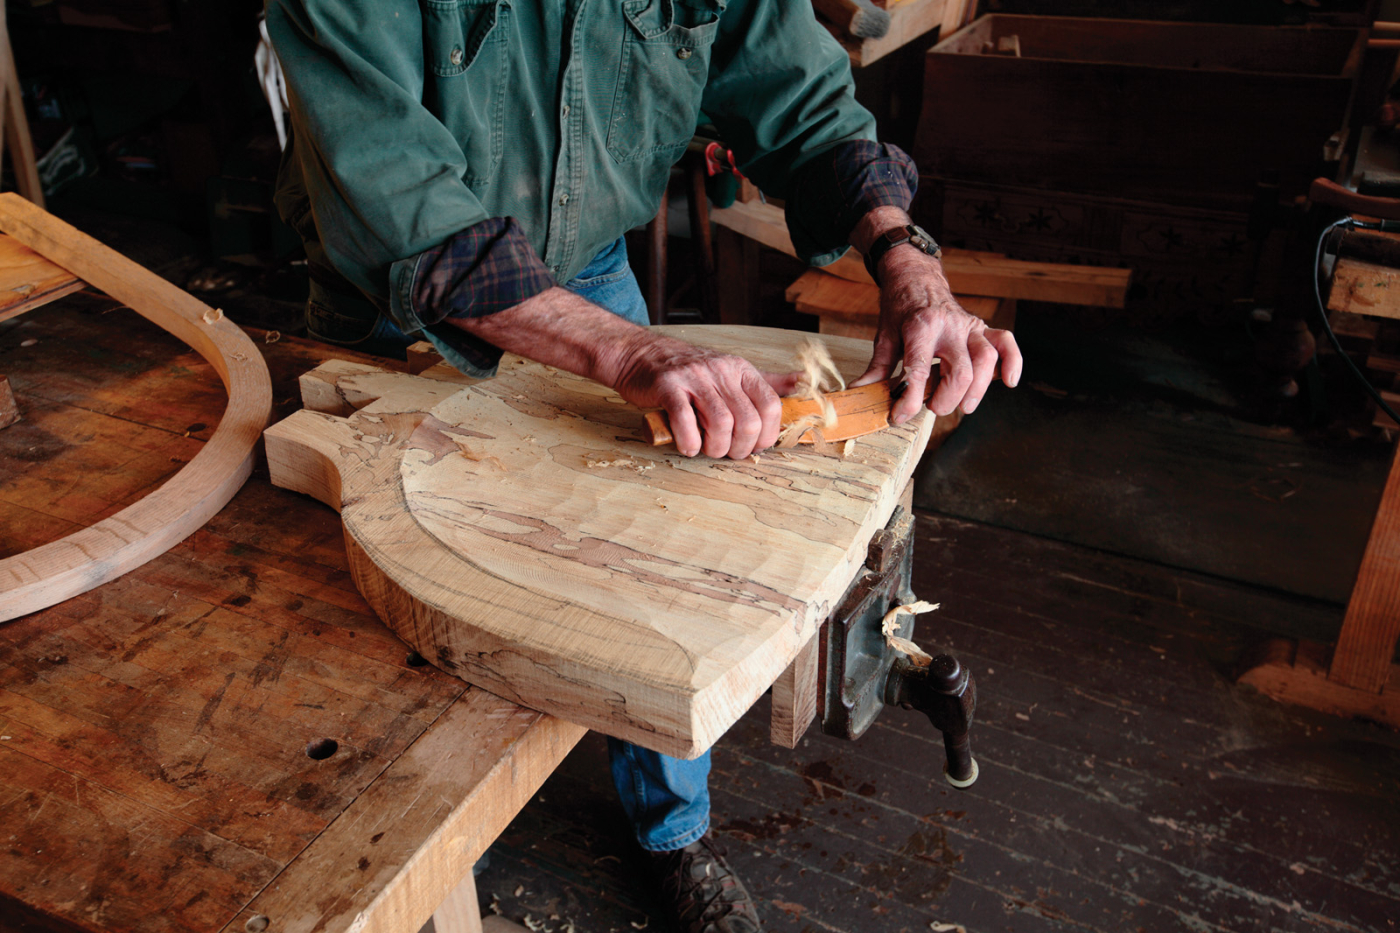
Smooth bottom. A travisher removes the adze marks and refines the shape of the seat.
I carved the seat bottom with an adze and travisher to a depth of 1⁄2“ at the back of the hollow of the seat. But you can grind away at it with an Arbortech or an abrasive wheel. The bottom of the seat has a bevel 1″ in and 3⁄4” high around the bottom perimeter. A plane and a spokeshave can bevel the bottom nicely, if you prefer.
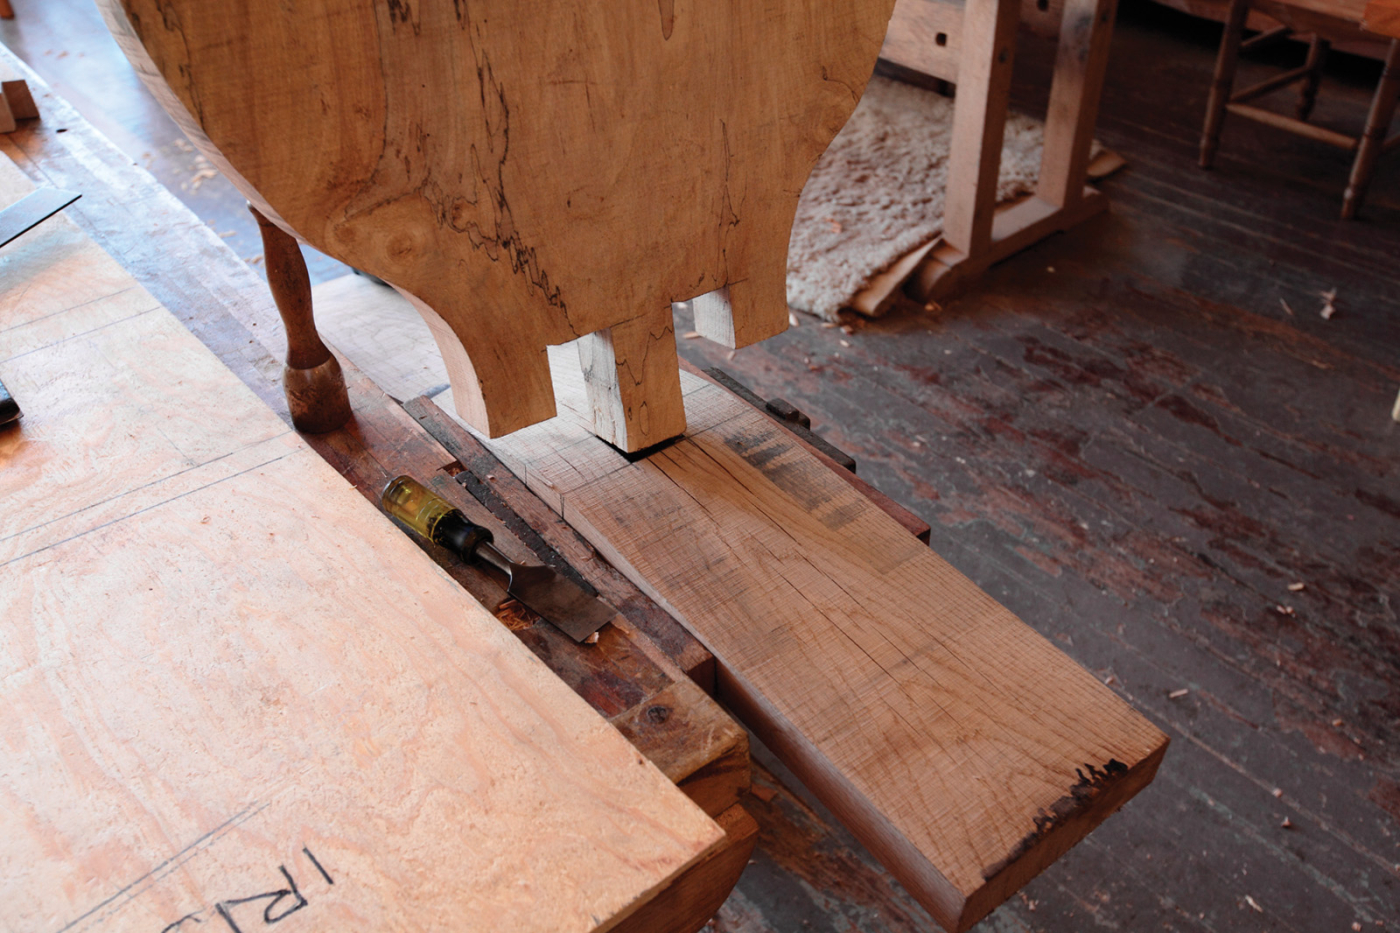
Strong back. A through-tenon connects the seat to the back of the chair. The back will be notched to capture the edges.
The tail or tenon on the seat is 2″ square and 4″ long. This allows enough room for a mortise behind the back to hold a wedge that secures the chair together. To lay out the angle of the through-mortise in the back, I first traced the bent profile of the 2″ x 7″ piece (which we’ll call the back blank) on a piece of 1⁄4” plywood. Then I measured up from the bottom edge 17-1⁄2” at the bend, and 18″ up on the other edge of the plywood.
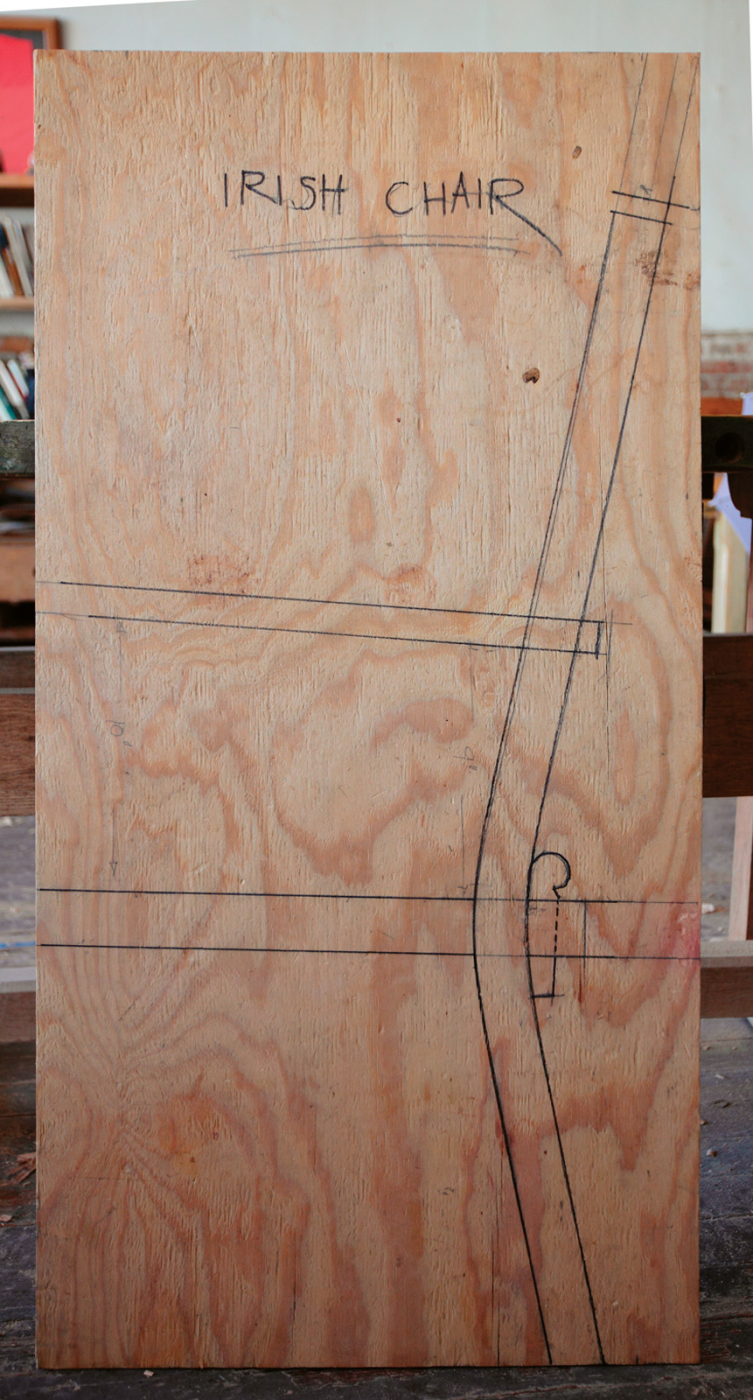
Big picture. A full-size drawing on a piece of plywood starts with tracing the steam-bent back. All the dimensions for the other parts and the locations of the joints are then derived from that pattern.
Right there. The full-size layout locates the joint between the seat and the back.
This gives you a 1⁄2“ drop in the seat that leans you back when you sit down in the chair. If you carry this line across the plywood, when you place your back plank along the traced profile, you can bring the line up the face and the back with a framing square, whatever the thickness of the seat. The arm rest location is 9″ up from the seat mark. Tuck your story board away for future chairs.
Coming through. After removing the waste at the drill press, a chisel is used to square the mortise.
What Would Sam Do?
When I first built this chair, I used a tapered dovetail cut into the sides of the seat to house the front legs; my thinking was that they would tighten in time with the weight of the sitter. The problem was that over time, the legs shrunk more than I intended and the seat began to drop. So, inspired by Sam Maloof’s joinery I redesigned the legs with a housed notch cut into the seat that would support the seat and allow shrinkage without exposing the joint.
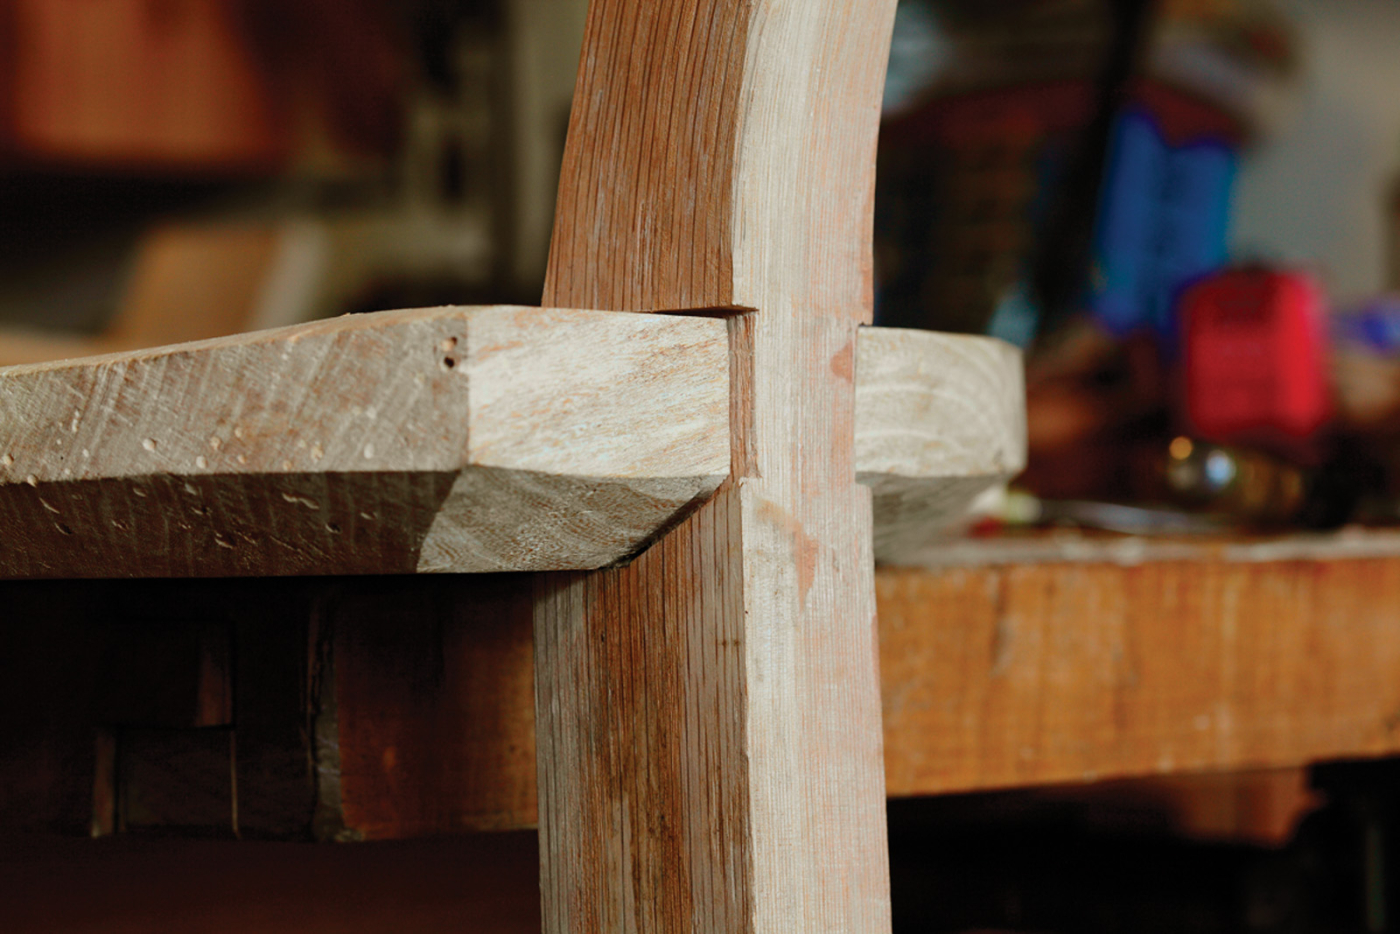
Match play. The notches in the front legs match the bevel angle on the bottom of the seat.
The only difficult part of this joint is the cut to correspond with the bevel on the bottom of the seat. The trick is to cut the notches in the leg and the seat, then ease the leg onto the slot. When the leg can go no farther, use a pair of dividers to scribe the bevel cut. The notch in the leg is 1″ deep and 1-1⁄4” wide. The notch in the seat is 3″ from the front edge of the seat.
 Once the legs are seated it’s time to work on the stretchers. With the legs clamped in place, measure between them to ascertain the length of the front stretcher. The stretcher is housed into the legs 1⁄4“ plus the tenons which are 1″ in length. I turn the tenons, which are 3⁄4“ in diameter, on the lathe; they could also be cut by hand with a backsaw and chisel. All the holes are 3⁄4” diameter and 1-1⁄4“ deep, 9″ down from the bottom of the seat.
I set the front stretcher in the holes so I can locate the center hole in the back leg. Measure the distance from the back to the front stretcher to locate the center rectangular mortise-and-tenon joint. Once the mortise has been made, I remove the front stretcher and house the rear one. I cut the tenon on the table saw with a dado stack, because I’m working on several chairs at a time – but you can cut this tenon with a backsaw and clean up with a chisel.
Fit the T-joint together, insert the round tenons in the holes on both the front legs and scribe around the ends of the stretcher for the housing cut to a depth of 1⁄4“.
To a T. A single stretcher connects the front legs, and an additional stretcher joins the center to the back.
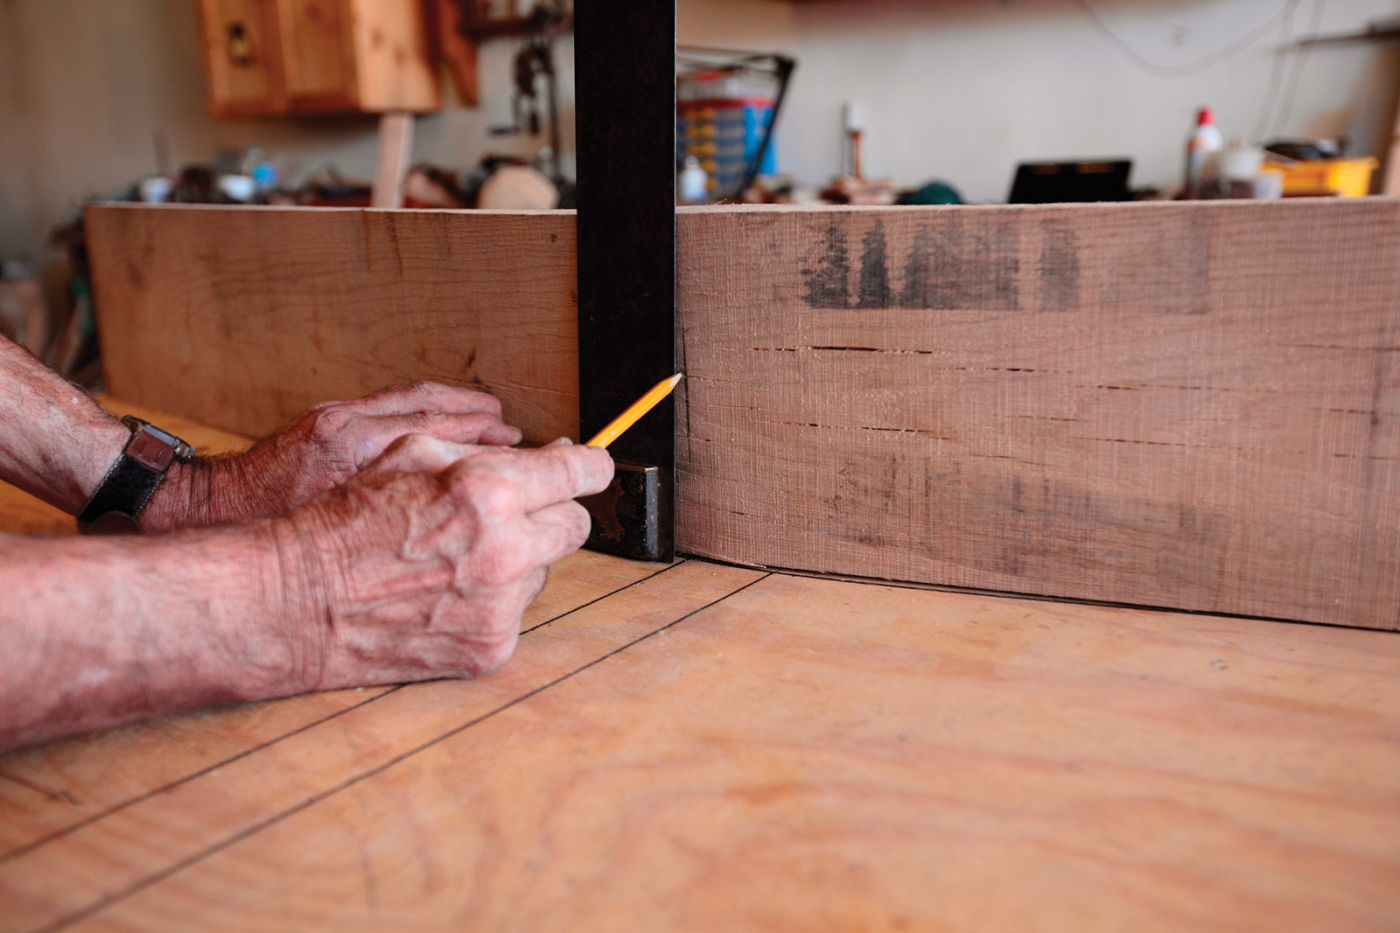
Clamp ’er up and see how she fits. When the frame fits good and tight, I trim the feet to level the chair. My method of leveling a chair is to measure up from the workbench surface to the front edge of the chair which should be 171⁄2“ to 18″. The seat should drop at least 1⁄2” at the back. I adjust the height with wedges until all is right. I then measure the difference and make a spacer that I will use to scribe around the bottoms of the feet to get the chair to fit flat on the workbench.
Back to Nature
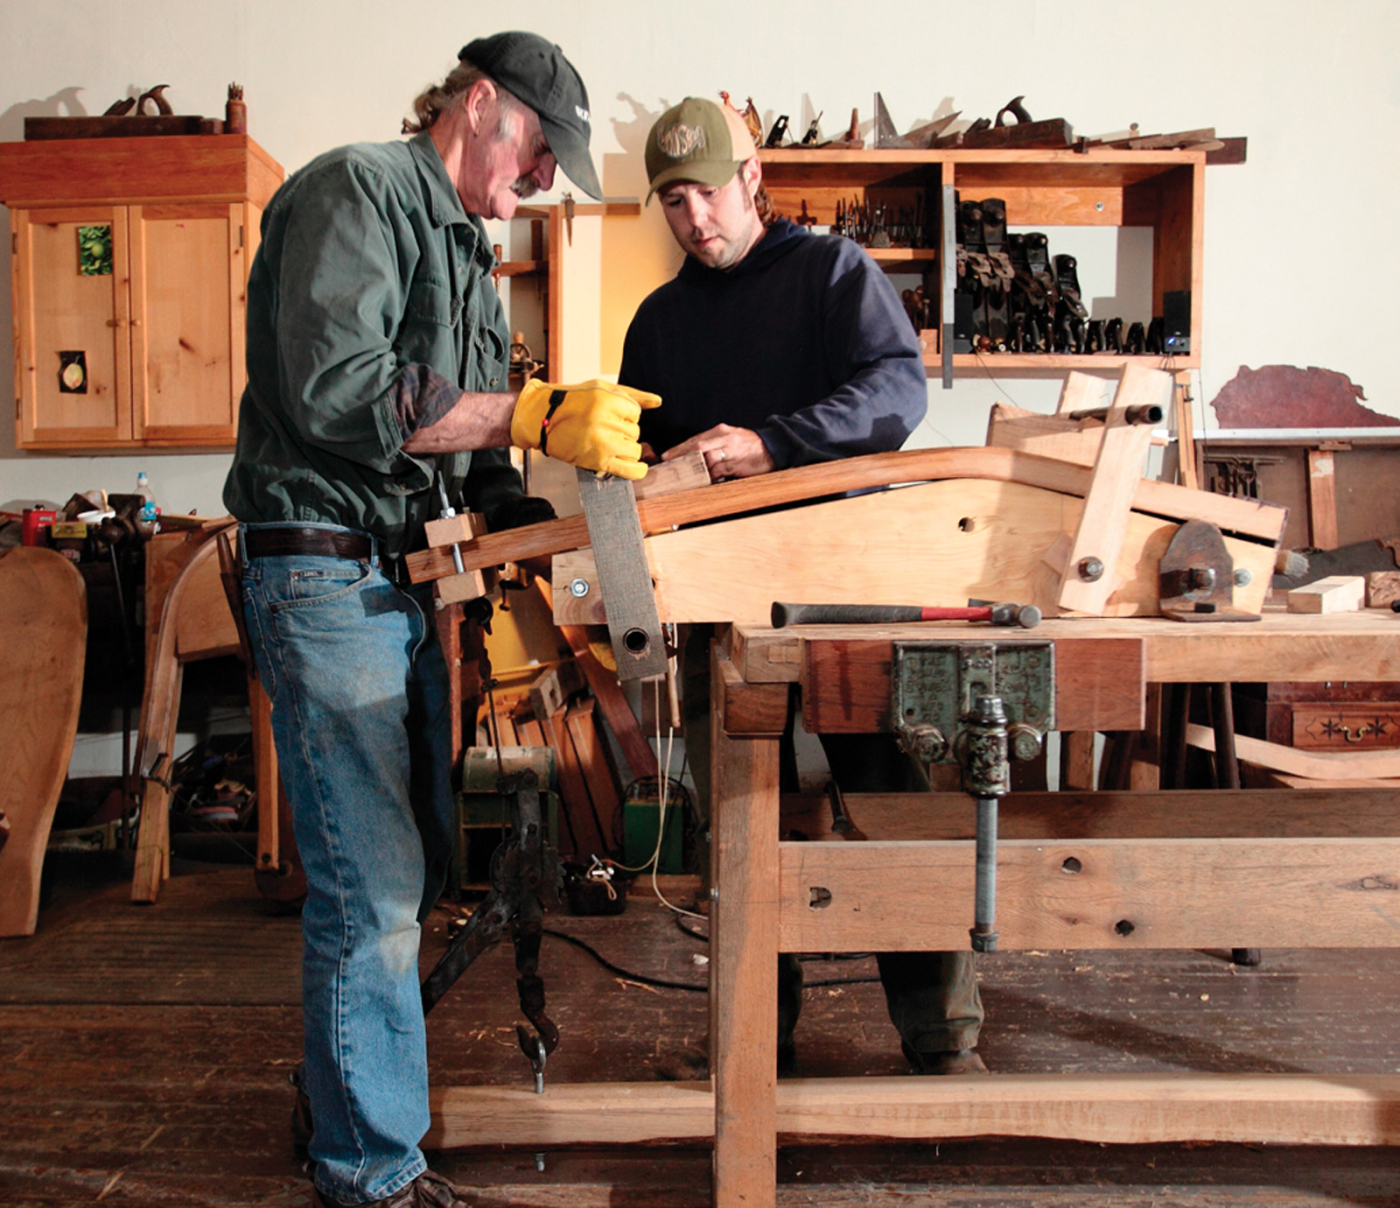
Now to the arms. The first Irish chair I built had a steam-bent arm (the same one I use on my Welsh Stick Chair), which was a 58″-long white oak stave that was 1-1⁄8“ thick x 1-1⁄2” in width. The bending form I use has a winch-type system to pull both ends of the arm stock at the same time. If you are not inclined to take on this bend as well, the arms can be cut on a band saw and attached to the back with a tenon or lapped across the back.
This chair has wide, sawn arms to go along with the heavier seat, so I was concerned about short grain. A curve cut from a straight-grained piece of timber will have short grain somewhere, leaving a weak point in the arm.
To eliminate that problem I look for timbers with a natural curve – a large-diameter bent branch or a tree that has grown out of the side of a hill. These will naturally have the grain following the curve of the bend and no short grain to cut through. Also, you often get curly grain along the inside of the curve.
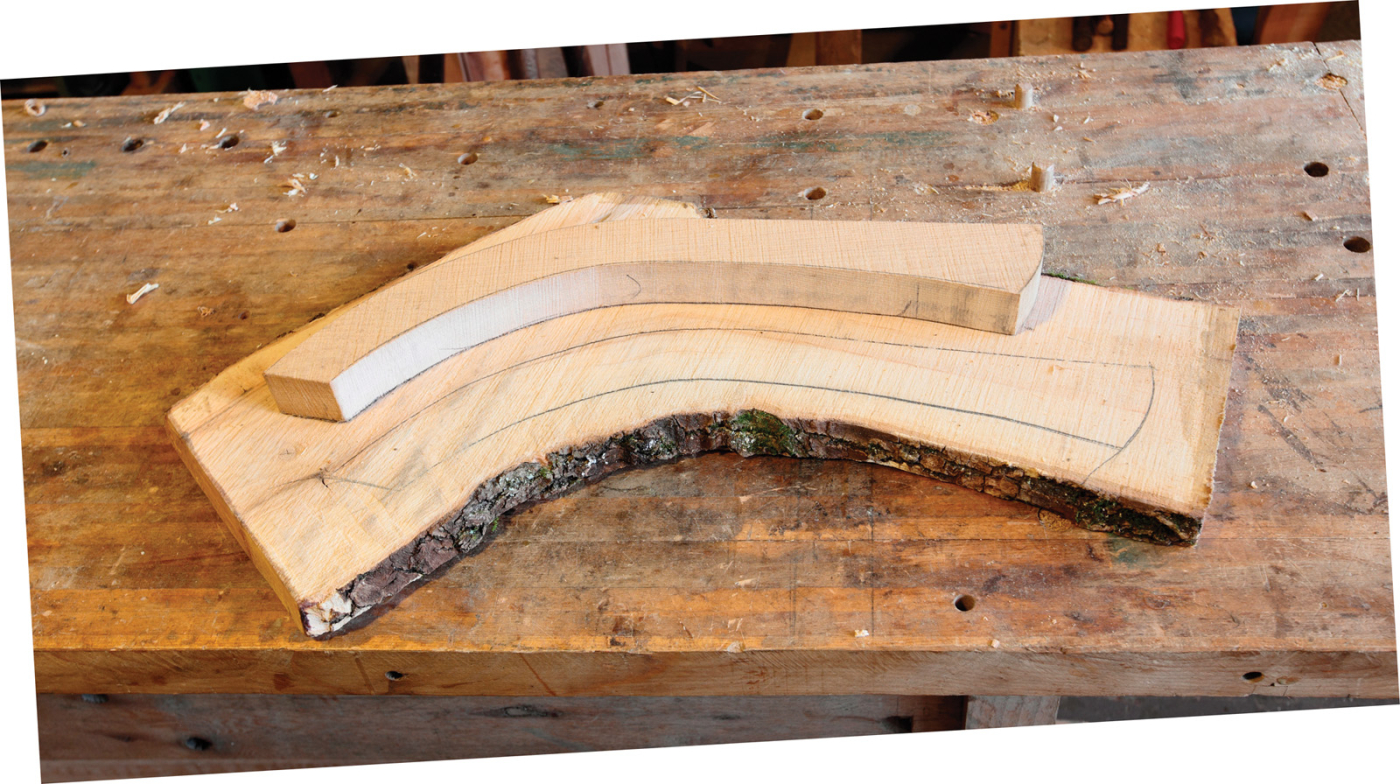
Natural fit. The arms are cut from a curved branch; avoid short grain where the arm bends.
I have a Wood-Mizer sawmill so cutting these timbers is not a problem for me. A good-sized band saw can also be used to rip the timber in half, then into 1-1⁄4“ planks. A log 8″ in diameter will get you at least four sets of arms.
The arms are notched into the back of the chair and secured with 1⁄2“ hickory or hedge apple pegs. I lay the arm on top of the arm stump (the portion of the front leg that extends above the seat). Then I mark out the notches 9″ up from the chair seat on either side of the bent back. If you lay the arm alongside the tenon in the arm rest stump, you will get the correct angle for the notch.
Carving the Celtic Knot
 The Celtic knot carving on the headpiece adds decoration and identifies the chair as Irish. The knotwork I chose was from the Pictish school, probably from the “Book of Durrow.” I found a book ages ago on Celtic knots titled “Celtic Art, The Methods of Construction,” by George Bain (Dover). If you’re game, you can work through the intricacies of your design or make a copy of the knot that suits you and enlarge it until it fits the piece you want to carve.
 I taped the knot drawing and a piece of carbon paper on the work then traced over it, lifting the drawing every so often to check my work. I use a 60° veiner V-tool to incise the decoration. A light mallet and regular tapping allows you to progress around the curves. With practice it becomes quite fun. My carving took about 40 minutes to complete. Practice your carving on a scrap of tight-grained wood such as maple or cherry. Just remember to stop when the lines pass under a crossing line.
Custom Fit
With a backsaw and a chisel, I cut the notch 1⁄2“ into the back plank. When you have the arm fitted into the back, you can then swing the arm around to center it on top of the arm-rest tenon and scribe around this tenon onto the bottom of the arm.
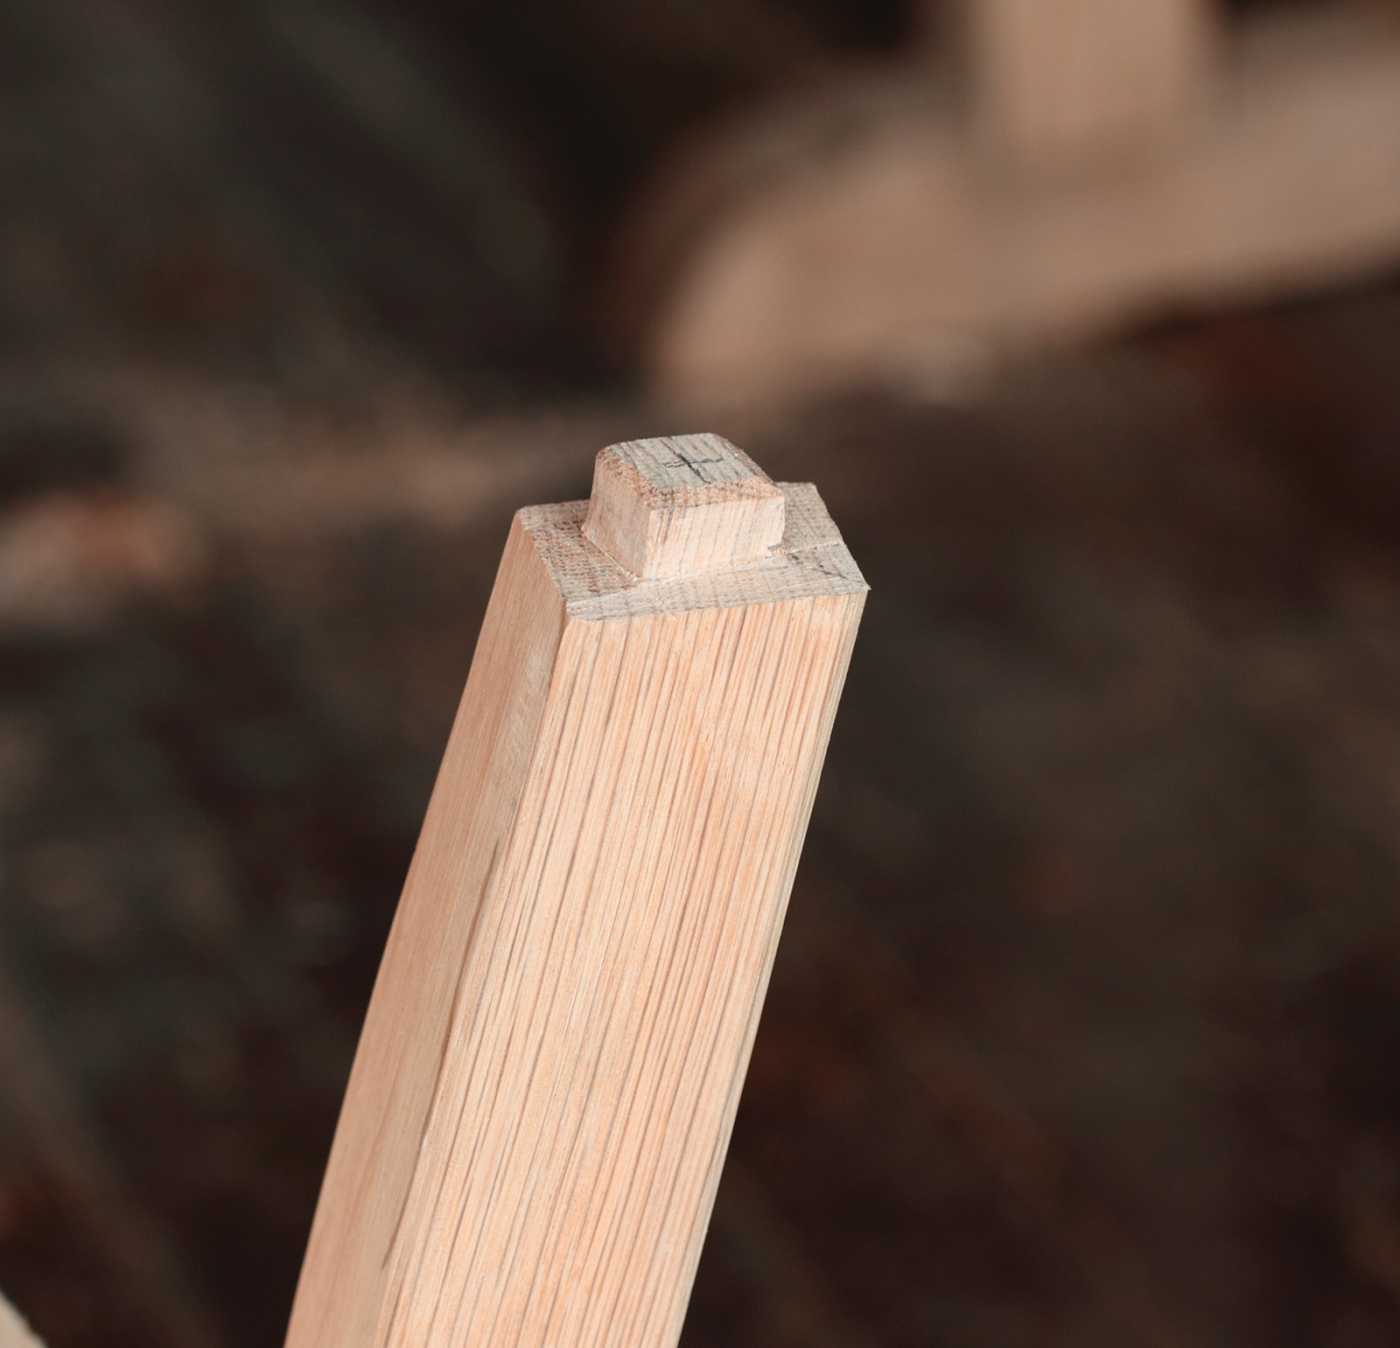
Tenons with a twist. At the top of the front legs, the tenons are set at an angle to match the arms.
To make the mortise, bore a hole with a 3⁄4“ Forstner bit to a depth of 1⁄2“ then square the hole with a chisel to the scribed lines. A 1⁄2“ hole is drilled into the back end of the arm; a dowel center can then be used to locate the hole in the back plank for the peg to be glued into. Once everything comes together, glue and clamp all the joints.
When the glue is set, I shape the arms with a Japanese rasp, spokeshave and cabinet scraper. When I’m happy with the final shape, I bore down through the arm into the stump and drive a 1⁄2“-diameter x 3″-long peg into the hole, leaving at least 1⁄8“ proud to be cleaned up later with a chisel. I cut in from four sides with a shallow-sweep gouge to leave a peak in the center of the peg.
After all surfaces are smoothed with a cabinet scraper, I give the chair at least three coats of oil varnish, or Minwax Antique Oil Finish. The first coat is thinned out with turpentine so it can soak well into the wood. When that first coat of oil is dry, I rub the chair down with #320-grit sandpaper, then I give the chair two more coats of finish. The last coat is rubbed out with a Scotch-Brite pad then a final coat of paste wax is applied. Polish the chair down, pull up the chair to the fireside and have a pint of Guinness with me.
Here are some supplies and tools we find essential in our everyday work around the shop. We may receive a commission from sales referred by our links; however, we have carefully selected these products for their usefulness and quality.


