We may receive a commission when you use our affiliate links. However, this does not impact our recommendations.

The best method for mortising is to first bore the areas at either end of the mortise, then space the next few mortises the width of the mortising chisel. In this case, the spacing works almost perfectly. The goal is to allow the chisel bit to have enough wood to drill straight without wandering from side-to-side. On some mortises the spacing between the first holes will be less than the width of the chisel.
Patterned after the model #562 taboret shown in the L.&J.G. Stickley catalog of 1914, the original of this table now sells for $1,600 at auction.
As with all white oak Arts & Crafts pieces, wood figure is important to make a simple design stand out. Choose the best figure for the top and the panel pieces. If the stretchers and legs are also well-figured, so much the better.
After cutting the legs to size, mark the best faces for showing off the grain. Then cut 3/8″ x 2-5/8″ x 1″-deep mortises in the legs for the stretchers, and 3/8″ x 1-1/8″ x 1″-deep mortises for the aprons. These mortises are centered on the width of the legs and located as shown in the diagram. I used a benchtop mortiser for this step, but you could also use a plunge router with an up-spiral bit to cut them. Now change the bit (either mortiser or router bit) to a 1/4″ bit and mark and cut the 1/4″ x 5-3/8″ x 1/2″-deep mortises for the panels in the aprons and stretchers.
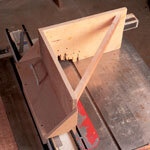
With the mortises complete, head for the table saw and get ready to cut tenons.
I use a rip blade to form my tenons. I cut the cheeks first, then define the shoulders, so there isn’t a chance of the shoulders being accidentally notched by the saw blade during the cheek cut. By cutting the shoulder last, any “notching” will happen against the tenon cheek.
When making the shoulder cut on the table saw, it’s easiest to use the rip fence to define the 1″-tenon length. If you use the fence to the right of the blade, and the miter gauge to the left of the blade you will trap the fall-off piece between the blade and fence, causing it to shoot back from the blade. Instead, set the fence for 13″ to the right of the blade and use the miter gauge to the right of the blade as well. This way you can cut both tenoned ends with a single setup, and the waste will fall harmlessly to the left of the blade. If you’re paying careful attention, you will realize 1″ tenons are going to bump into one another in the mortises. After cutting the tenon shoulders, reset the fence and the blade angle to cut 45° miters on the ends of the tenons.

Complete the mortise by drilling away the waste between the first mortises. This allows the mortise chisel to cut most efficiently without pulling to the left or right and bending the chisel.
Don’t leave the saw yet. You still need to form the 1/4″ x 5-1/4″ x 1/2″ tenons on both ends of the panels. You might have noticed that the tenons are 1/8″ less wide than the mortise dimensions. This is no mistake. When the side panels are positioned between the stretchers and aprons, the shoulders of the panel tenons will fit snug against the stretchers and rails. If the mortises in the legs were the exact width of the tenons, and off by even a little bit, they would force a gap between the panels and the two rails. The 1/8″ extra space on the panel tenons is to allow for wood movement.
Next, mark the 1″ curve on the bottom edge of each stretcher and cut the shape on the band saw. The easiest way to mark this curve is with a flexible 1/8″ wood strip bent to the 1″ mark and then traced with a pencil.
One last step before assembly. The top is held in place by table top fasteners. These are screwed into the underside of the top, and fit into 1/8″-wide grooves in the aprons. These fasteners allow the top to adjust to wood movement without affecting the base. Run these grooves on all four aprons on the table saw. This will let you decide which way the top will fit later.
You’re ready to sand, then glue up the base. A dry fit is definitely a good idea to make sure everything fits and to make sure you know how to hold everything in place once the glue goes on.
With the base glued and clamped, cut the pieces for the top, and glue them together. To reduce the amount of sanding necessary, a few biscuits added to the joint will help align the pieces and keep them from slipping during glue-up. When the base is ready, mark each of the peg locations on the mortise and tenon joints, and drill a 1-1/4″ x 1/4″ hole at each location. Then peg the holes with 1/4″ oak dowels. Cut the excess dowel length flush to the table leg and finish sand.
Unclamp the top and sand it flat. Then mark 2-1/4″ in from each corner and run a line at a 45° angle to clip the corners of the top on the band saw to an octagon shape. Then finish sand the top.
I used the same finish on the table that was used on the chair. If you’ve built the chair as well, put a nice lamp on the table, get a good book, and sit down to some early 20th century comfort. PW
David Thiel is a senior editor at Popular Woodworking.
Here are some supplies and tools we find essential in our everyday work around the shop. We may receive a commission from sales referred by our links; however, we have carefully selected these products for their usefulness and quality.