We may receive a commission when you use our affiliate links. However, this does not impact our recommendations.
Stickley Style Chest of Drawers
Build a masterpiece with handsome quartersawn oak.
By Randy Johnson
|
This striking chest of drawers is closely modeled after one of Gustav Stickley’s most famous designs. Both bold and graceful, the wide overhanging top, slightly bowed legs and arched apron of Stickley’s chest show the strong influence of his brilliant associate Harvey Ellis. My version is nearly identical in appearance, but I’ve modified its joinery to strengthen the case and improve the drawers’ operation. Building nine drawers is a big part of making this chest. I’ve used a sliding dovetail joint popular in Stickley’s time. The drawers run on center-mounted wooden guides, a recent innovation 100 years ago when the original chest was built. Center guides help wide drawers track well, even when they’re pushed or pulled with only one hand. I’ve added web frames to strengthen the chest. They also make the guides easier to install. |
You may also like… |
Stickley built most of his Mission-style furniture from quartersawn white oak. I used quartersawn red oak. It generally has less pronounced figure, but I was able to find some beautiful boards. I used quartersawn oak for everything except a couple of leg parts. I used the best-looking boards for the outside of the chest and the plainer-looking boards, which were more rift-sawn in appearance, for interior parts. Lumber that is quartersawn or rift-sawn is very stable and is a good choice for drawers and related parts.
I used heavy solid copper hardware with a hammered texture and antique finish. It cost an eye-popping $350. Less-expensive Mission-style hardware is widely available, but I love the heavy feel and authentic appearance this hardware adds to my chest. If you’re up to a real challenge, you can make your own hardware (see “Hammer Your Own Copper Hardware").
Gustav Stickley considered his life’s mission to promote the values of fine workmanship. He named his magazine and his line of furniture The Craftsman. When you build this chest and hammer out the hardware, you’ll certainly be a craftsman, too!
|
Stout mortise-and-tenon joinery make this chest strong enough to withstand many years of heavy use. I used the router-based Leigh frame-and-mortise jig to cut all the joints because it’s quick and super-accurate, but many other joint-making methods will work as well. |
Click on any image to view a larger version. |
|
Start with the sides. After cutting the joints, rout grooves in the rails and stiles using a slot cutter. The grooves hold the side’s quartersawn oak panels. The panels are solid wood, so the grooves must be deep enough to allow them to expand and contract. |
|
Stain the panels before you assemble each side. Prestaining the entire width of a panel guarantees that no unfinished wood will show when the panel contracts in dry weather. Tip: Stain the edges of the stiles and rails, too. This removes the risk of getting stain lap marks on the center panel later when you stain the rest of the case. |
|
Glue and clamp the sides. The panel isn’t glued in the grooves, of course. It must be free to move. Be careful in applying glue to the joints. You don’t want any glue squeeze-out to make its way into the grooves and adhere to the panel. |
|
Make each leg from three pieces. Glue a plainsawn board between two thick strips of shop-made veneer. This classic trick makes a leg with four quartersawn faces. See “Quartersawn Oak” for more on how to rip a plainsawn board with a perfect quartersawn edge. |
|
Taper the legs on your jointer. The legs are bow-shaped, wide in the middle and narrower at the top and bottom. With the jointer running, carefully lower the leg on the cutterhead and push the leg through. Repeat this cut until you reach the taper’s layout line. |
|
Glue the legs to the sides, using biscuits for alignment. Put tape next to the joints on the legs and on the sides, to catch glue squeeze-out. After clamping, pull off the tape to remove the excess glue. |
|
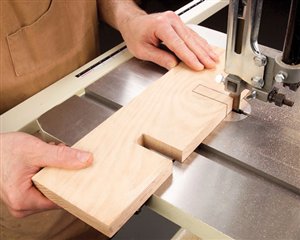
Cut notches on the vertical drawer divider. These notches interlock with complementary notches in the two top horizontal drawer dividers. You can freehand these cuts if you’ve got a steady hand, or use a miter gauge. |
|
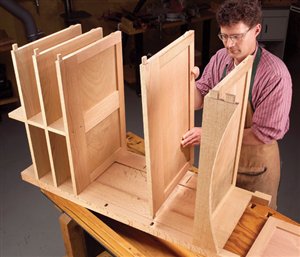
Assemble the top three web frames as a unit. The top two web frames interlock with the vertical drawer divider. The third web frame is screwed to the bottom end of the vertical divider. |
|
Check the fit of the web frames. All must be glued at the same time, so you don’t want any surprises. For the actual glue-up, it’s a good idea to enlist a helper. |
|
Glue two bottom guides in the center of each drawer. Use an extra strip as a spacer, but remove it before the glue sets. Bricks supply sufficient pressure and are simple to use. |
|
Install drawer center guides from the back of the chest. To position each guide, fasten the front end first. Slide in the drawer and align the drawer front with the case. Finally, fasten the guide on the back rail. |
|
Drill holes for the drawer hardware. Apply masking tape on which you draw clearly visible layout lines. Marking on bare wood often requires a lot of erasing later on. Here, you simply peel off the tape. |
|
Fasten the top to the chest’s sides. There are four cleats under the top. The outer two serve as braces for screwing the top assembly to the sides with low-profile figure-eight fasteners. The drawer sides are inset, so they won’t hit the fasteners. |
|
Screw on the back to complete the chest. The back adds the final rigidity to the case. Push it, lift it, slam the drawers—this beautiful chest is strong enough to last for generations. This story originally appeared in American Woodworker September 2005, issue #116. |
|
Here are some supplies and tools we find essential in our everyday work around the shop. We may receive a commission from sales referred by our links; however, we have carefully selected these products for their usefulness and quality.


