We may receive a commission when you use our affiliate links. However, this does not impact our recommendations.
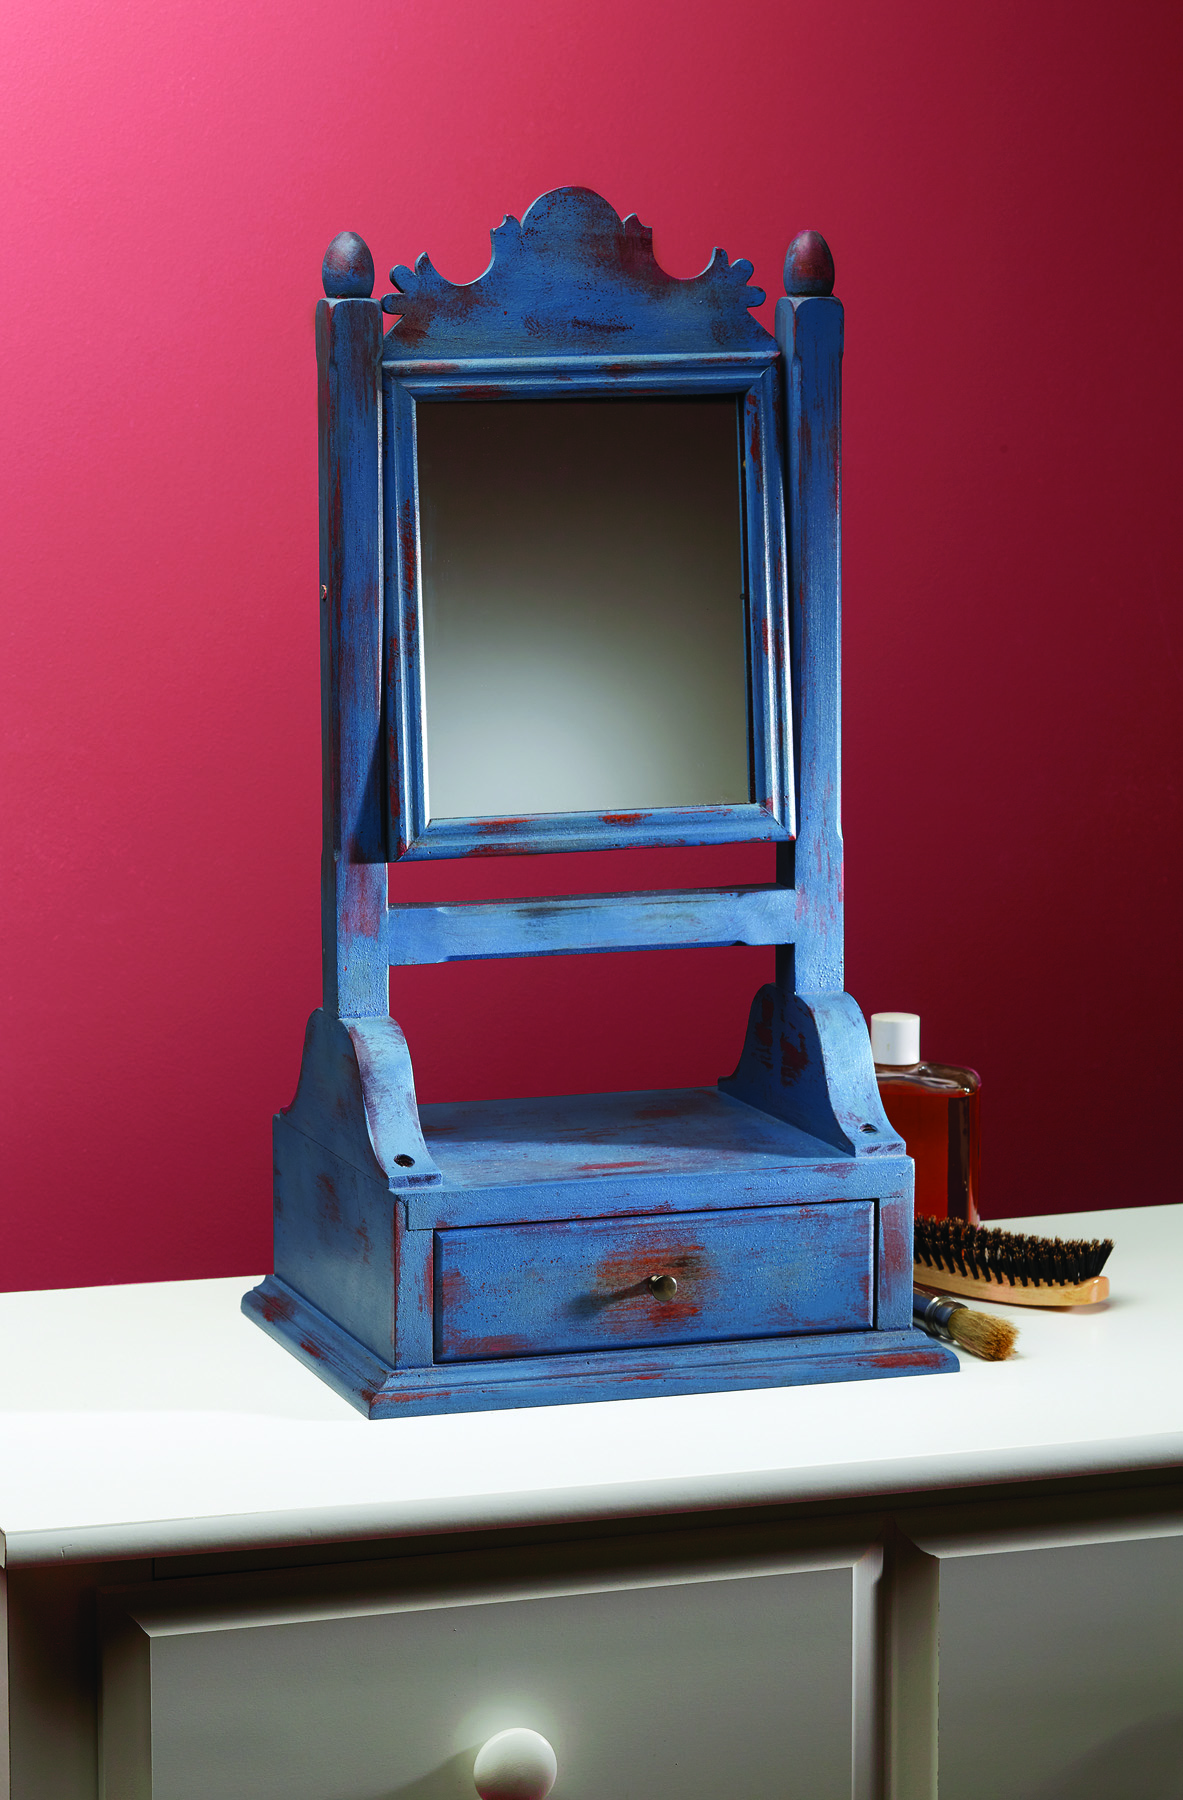
Discovered in a museum basement, this Piedmont design makes heads turn.
This article originally appeared in the August 2013 issue of Popular Woodworking.
My first trip to the Museum of Early Southern Decorative Arts was for business. Robert W. Lang, the magazine’s executive editor, and I traveled to Winston-Salem, N.C., to research and select furniture projects for the book “Furniture in the Southern Style” (Popular Woodworking Books).
Upon our arrival, we did not head straight for the museum showrooms as you might expect. Instead, we headed toward a furniture junkie’s dream – a basement filled with file cabinets, each stuffed with furniture photos and related information.
Among the candidates for the book’s projects was a small mirror stand. My fondness for this form usually falls to Federal-period designs, yet there was something about this unadorned Southern shaving mirror that caught my eye. It is different; it’s captivating.
Make Mine with a Twist

Twisted rabbet. The small bevel cut on the edge of the top rabbet eliminates end grain from the show surface.
A few days in the shop should be enough time to build this project. It is, from a construction point of view, simple to build. Joinery is no more complex than the typical mortise and tenon and a few rabbet joints, plus slip joints for the mirror’s frame. The mirror face and crest are applied to the frame.
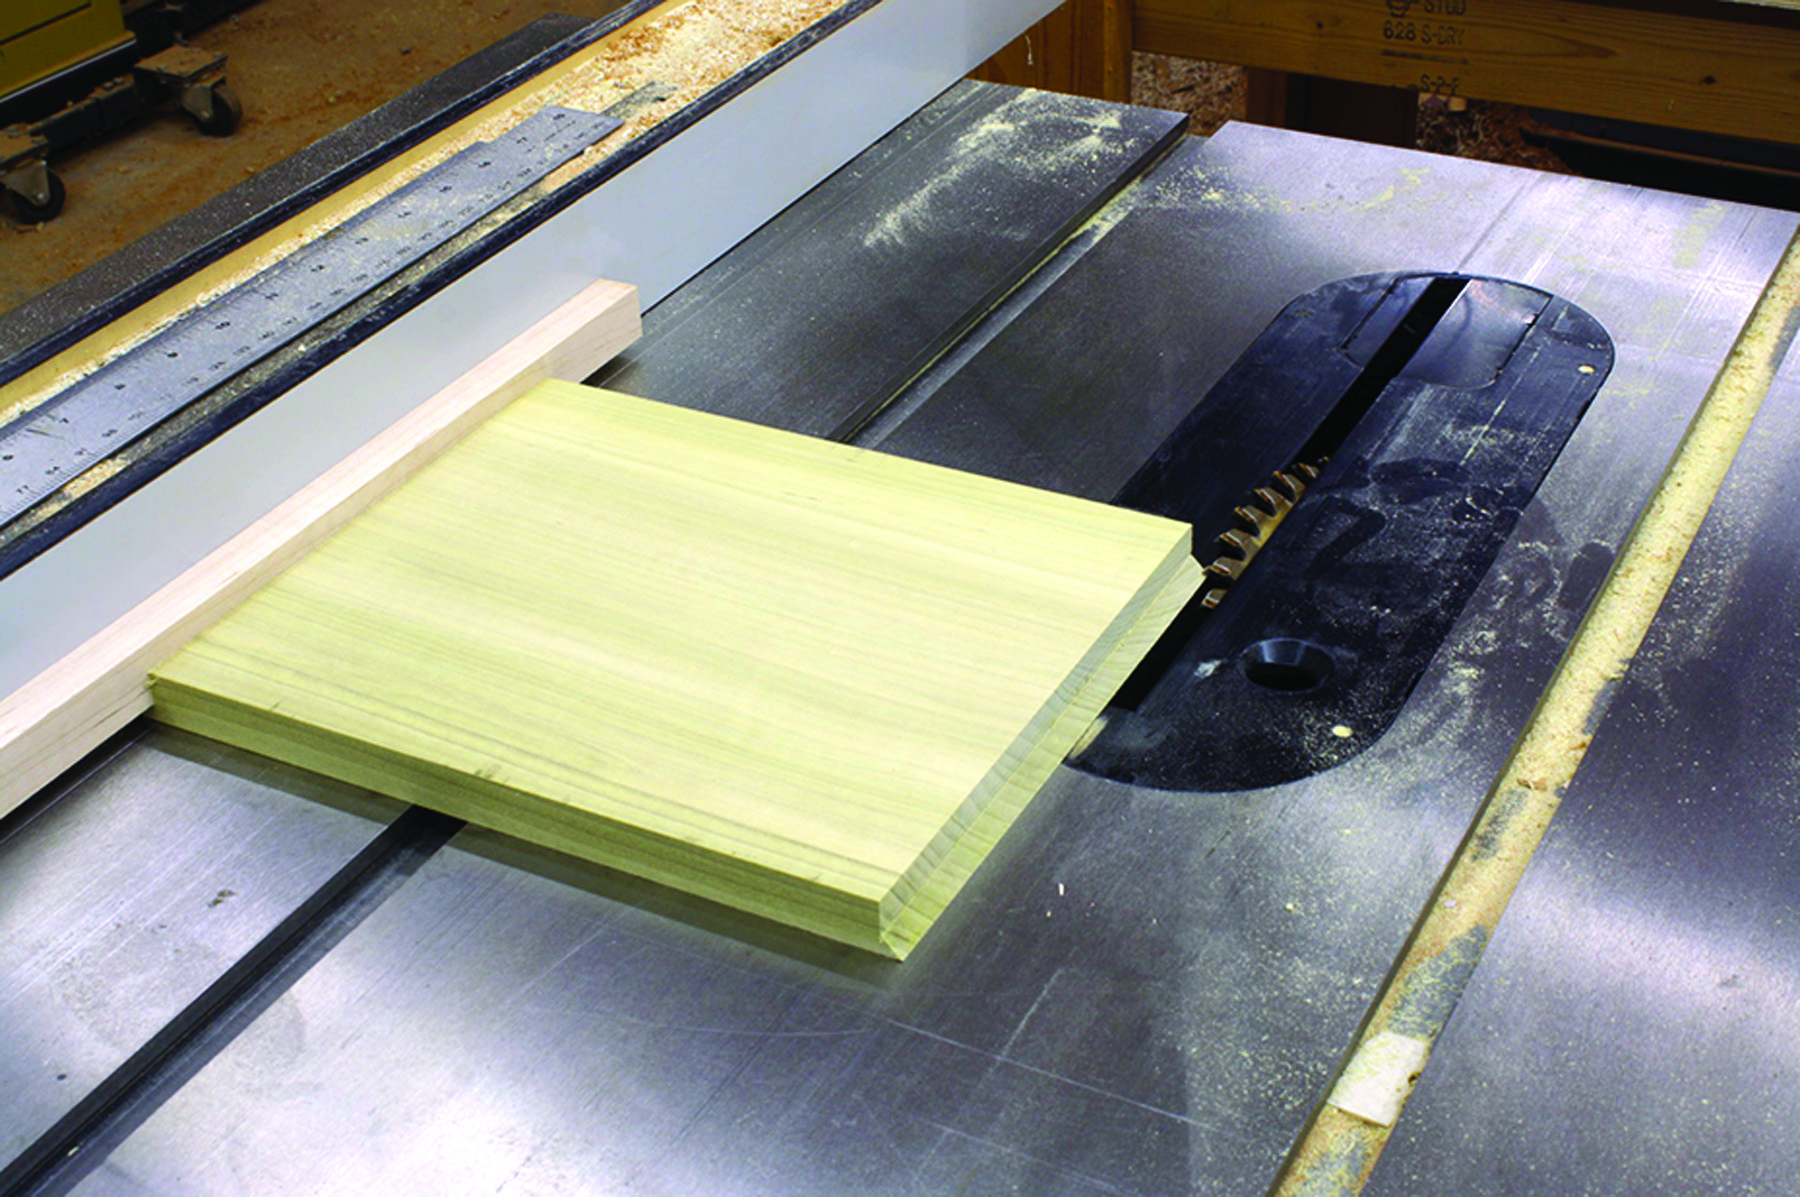
To begin, mill the pieces for the base top, bottom and sides. The only catch is that the sides are wider than they are long in order to keep grain direction consistent around the base.
Simple fix. Because the mitered end can slip under the fence, a spacer set between the rabbet and fence allows one setup for both end cuts.
The base sides have simple 9⁄16” x 3⁄4” rabbets at the bottom and top edges. I cut those using a two-step method at my table saw; one cut is with the piece flat to the table and the other is run with the piece on edge. After the rabbets, the bottom joinery is complete. But to join the top to the base there is a twist: The rabbeted area is modified with a 45º miter on the remaining edge of the side’s rabbet as shown above.
Base two. To make the second base side and get a matching part, it’s best to work from your completed base than from the pattern.
The top is longer than the bottom to allow for the matching angle detail. With your top sized, cut a 3⁄16” x 9⁄16” rabbet at both ends. Your first angle cut has an uncut, square edge riding against your fence, but as you attempt the cut on the second end, the previously mitered end can slip under your fence and give you trouble. To avoid this problem, set up your cut using a piece of scrap fit between the fence and the square shoulder of your workpiece. Trim the 3⁄16“-square protrusions to a matching 45º.
All four base pieces are rabbeted for a back. I used a 1⁄4“-thick back and cut my rabbets 5⁄16” deep.

Squared hole. Cut a 1⁄2″ x 1⁄2″ mortise that is 11⁄4″ deep and centered on each post base at the crown of the piece.
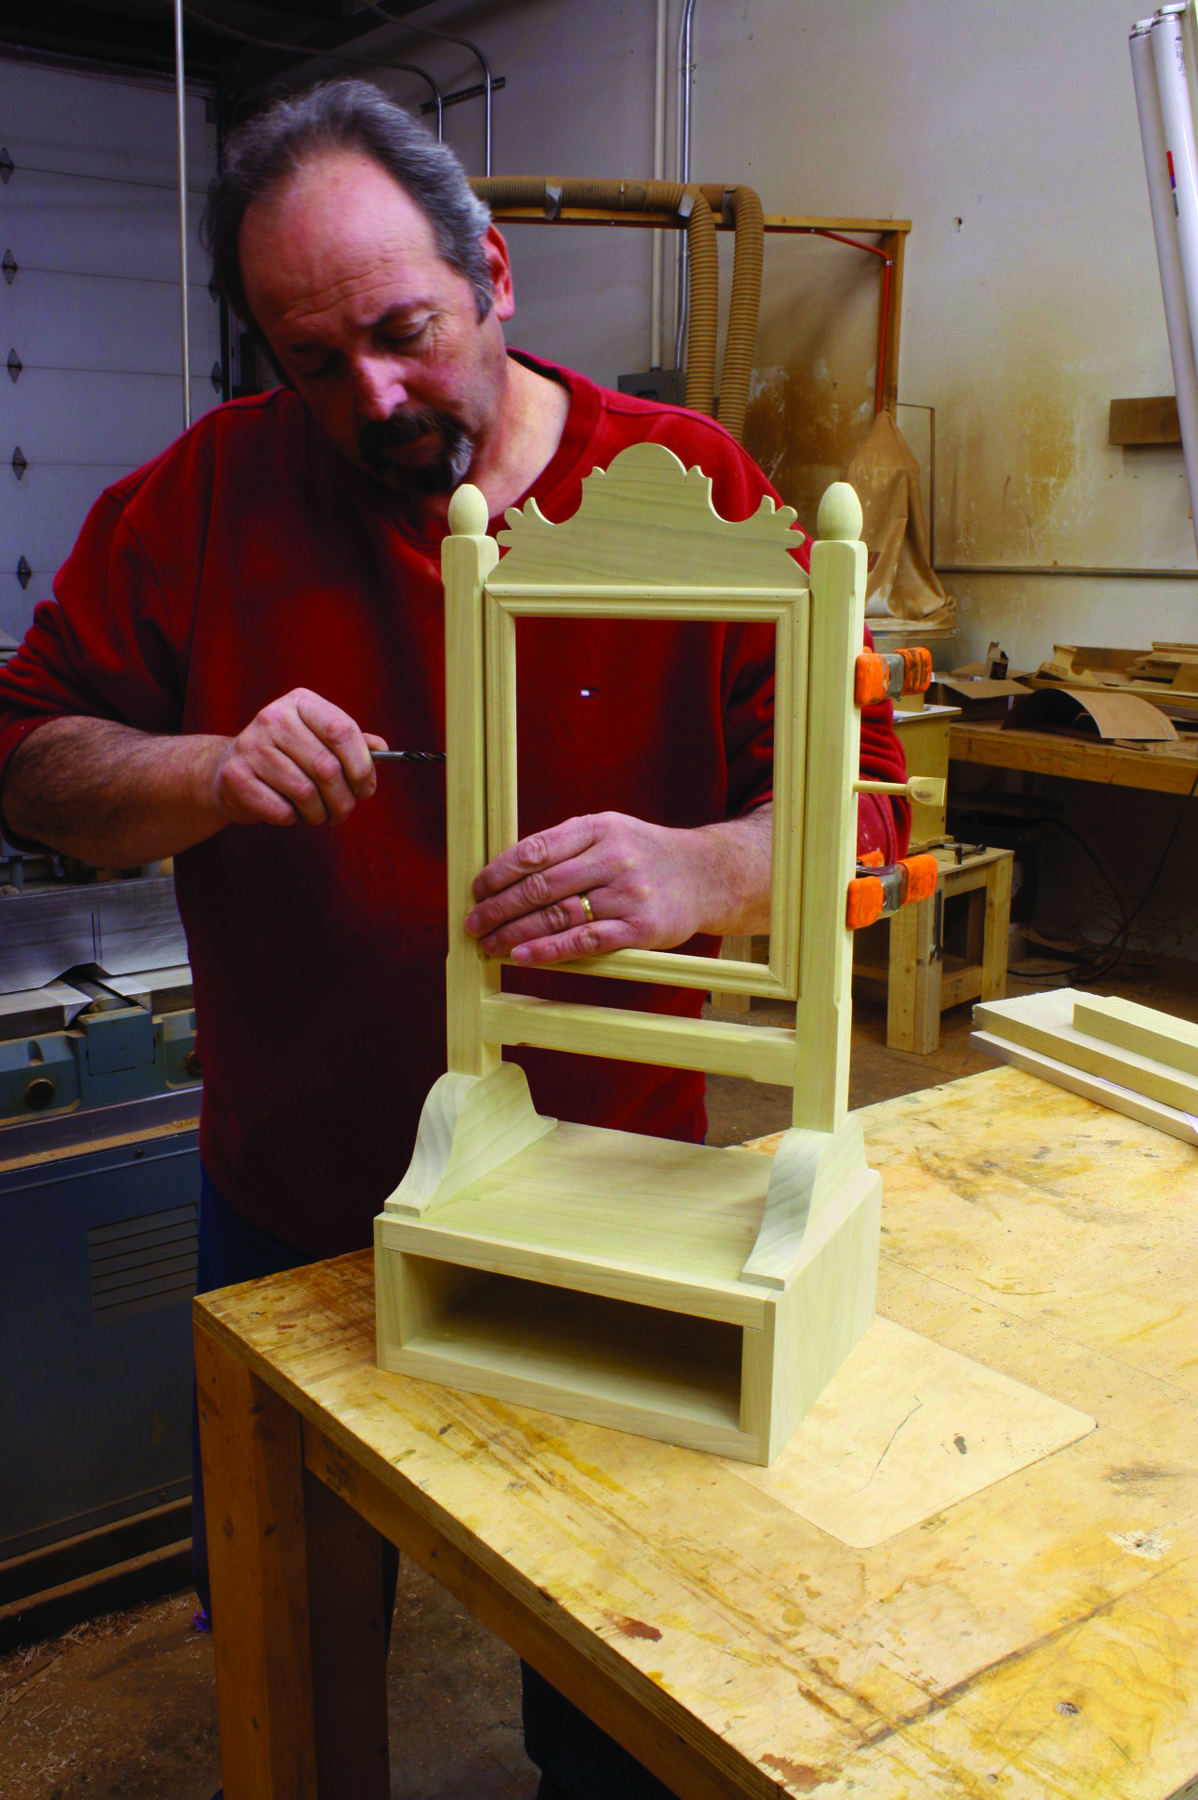
The base can be only partially assembled at this time. The bottom is fit into the side rabbets and screws are driven through pilot holes. Insert two screws per side, spaced about 1″ in from the outside edge. It also helps if you angle the screws slightly to catch more of the meat of your side. The top is later attached by screws driven through the mirror post bases.
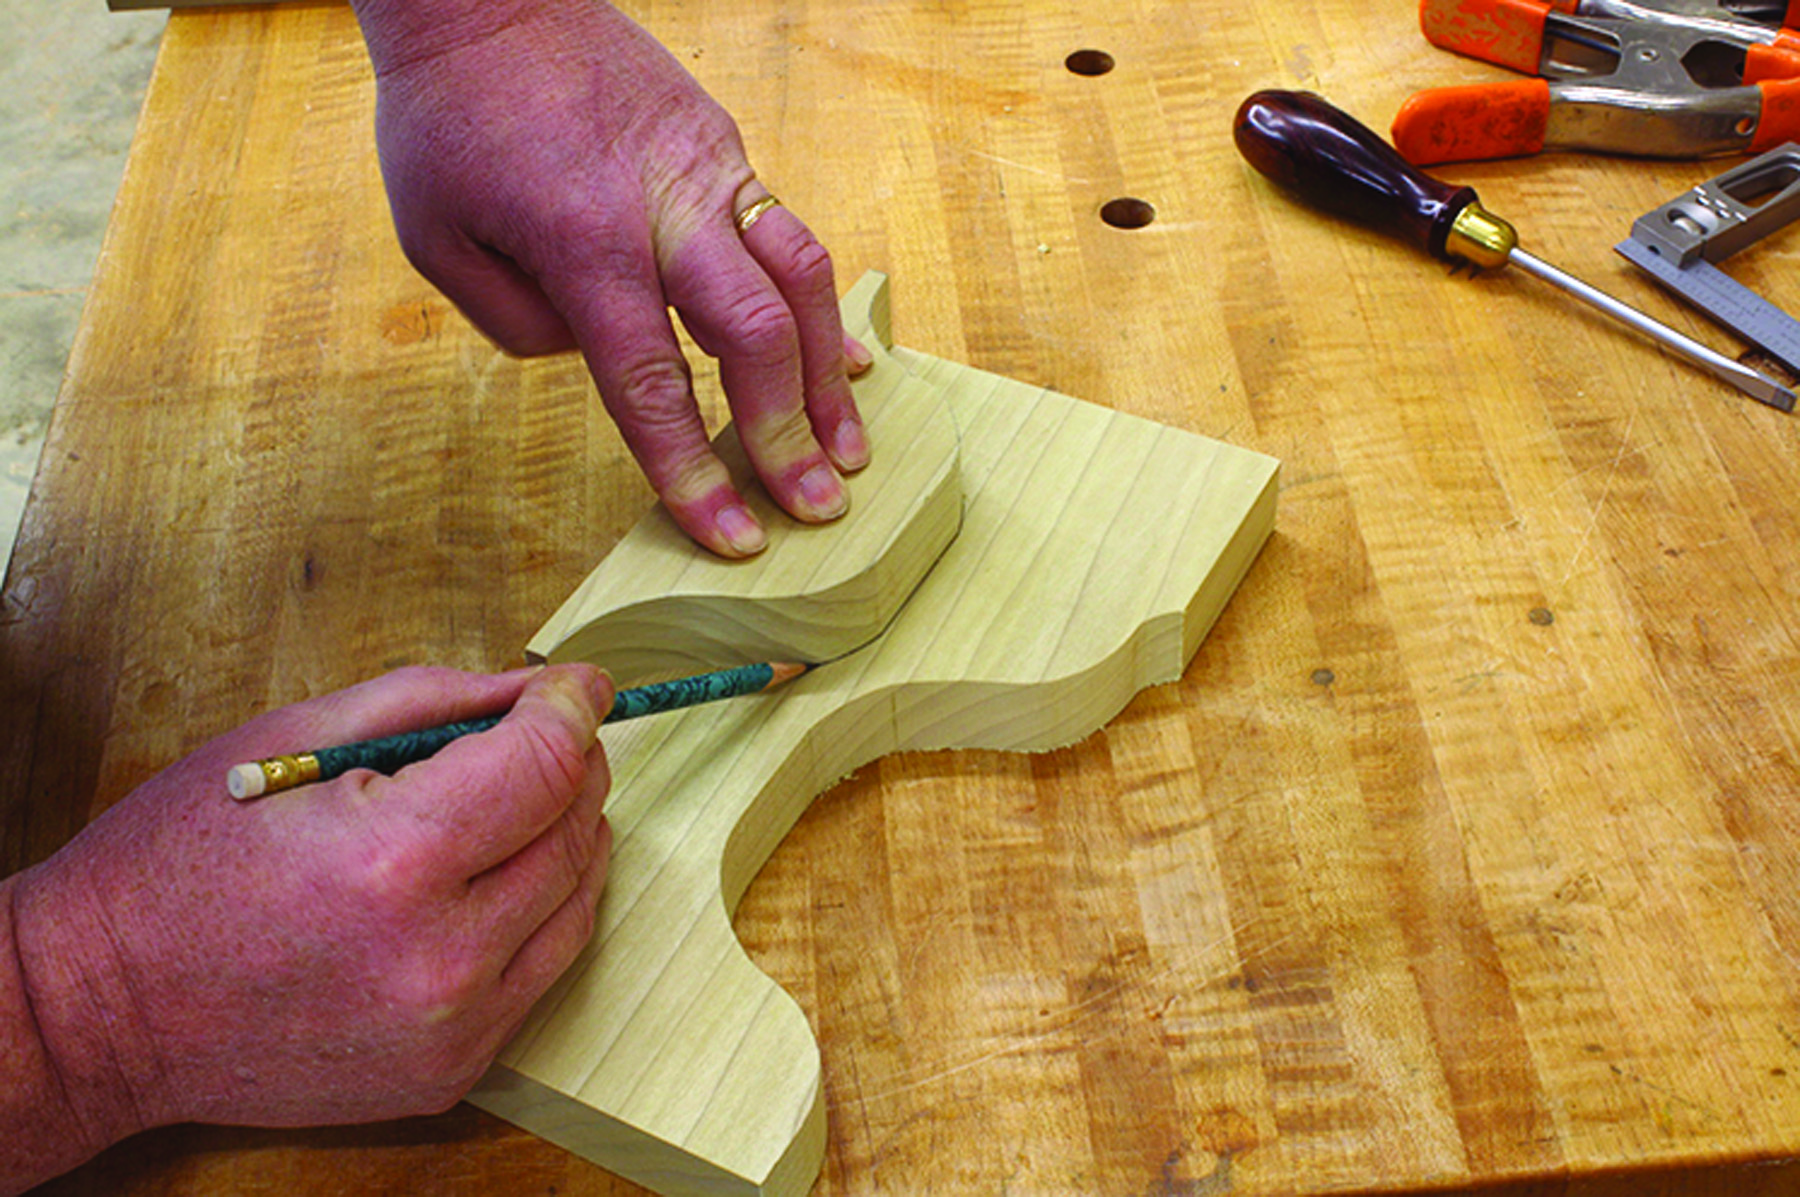
The post bases are 1″ thick. Use a paper pattern to lay out a base. Cut the shape from your stock then sand and clean any rough surfaces. Use that workpiece to lay out the second post base.
Each base is mortised for the 1⁄2“- square post tenons. There are a couple of ways to chop the 11⁄4“-deep mortises, depending on your method of work. I used a dedicated mortise machine, but you could just as easily drill a 1⁄2“-diameter hole then square the corners.
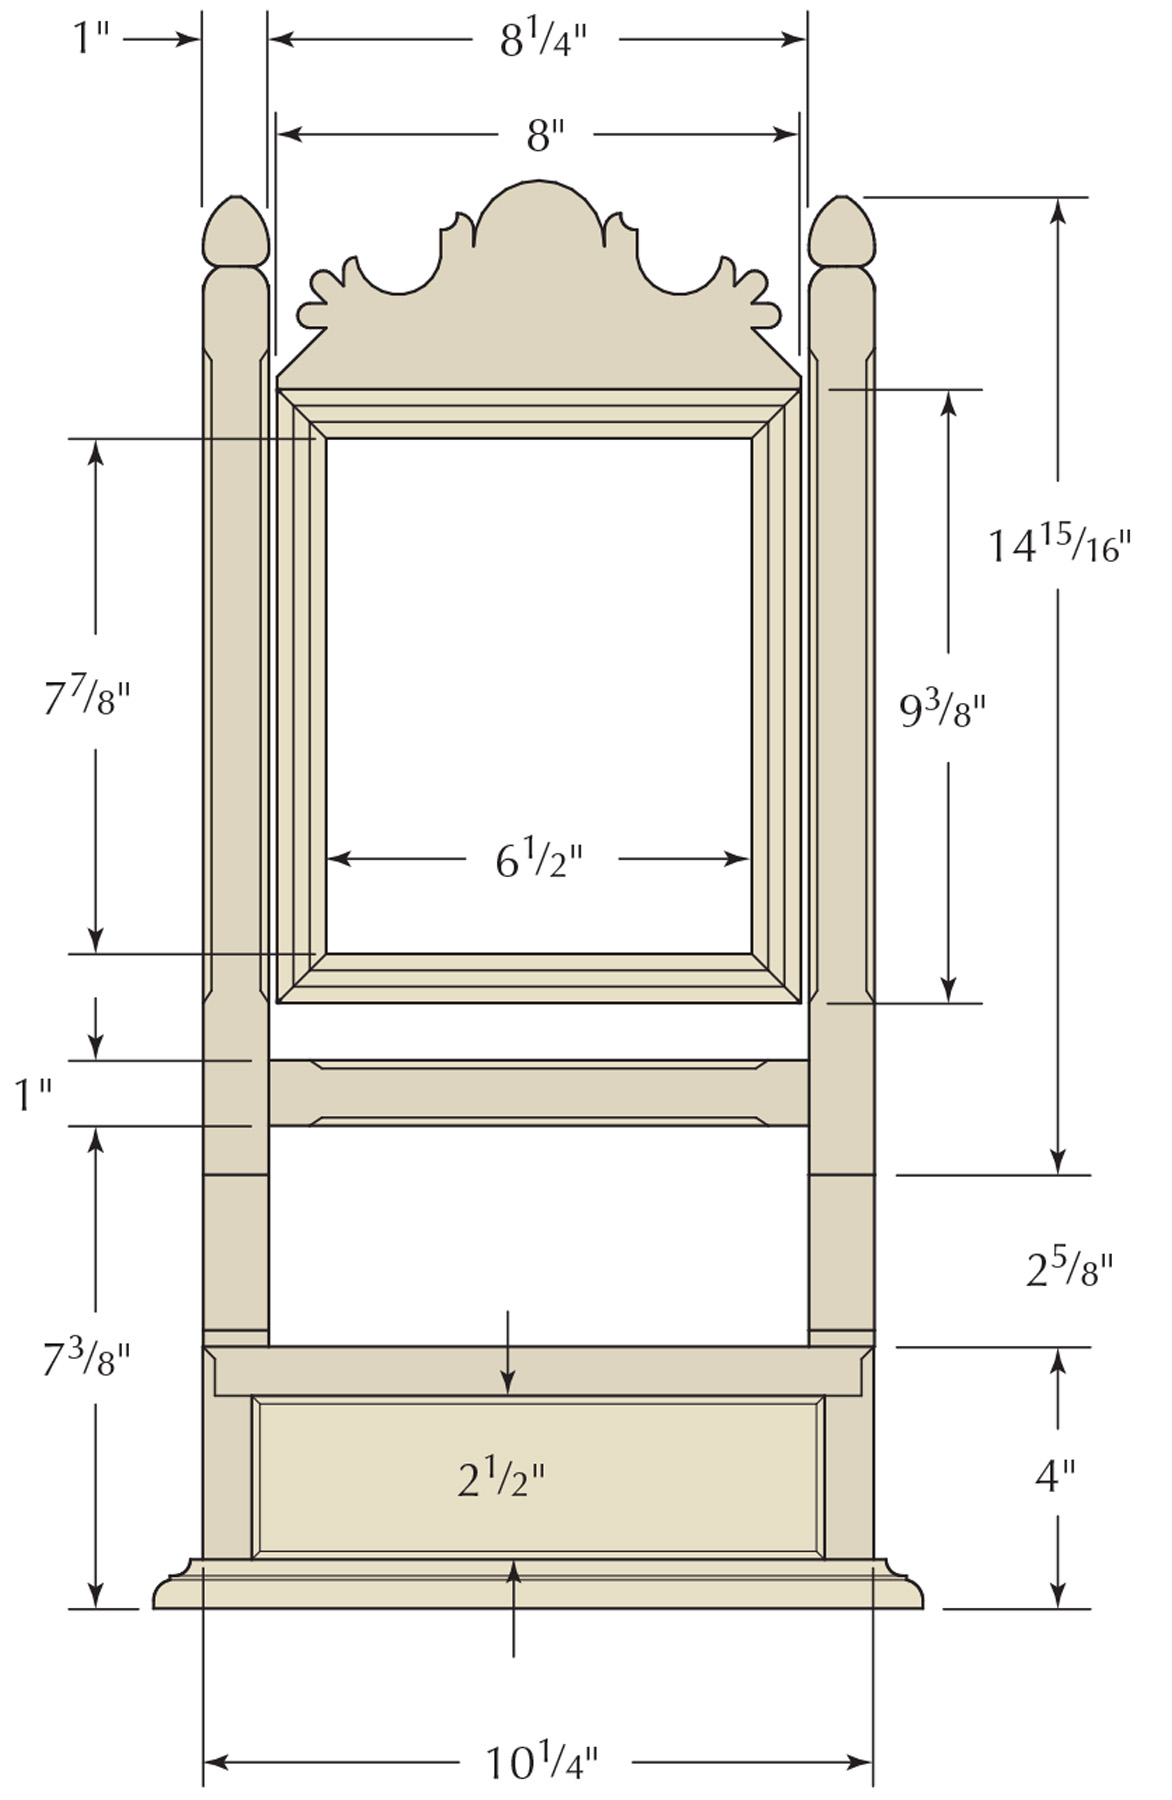
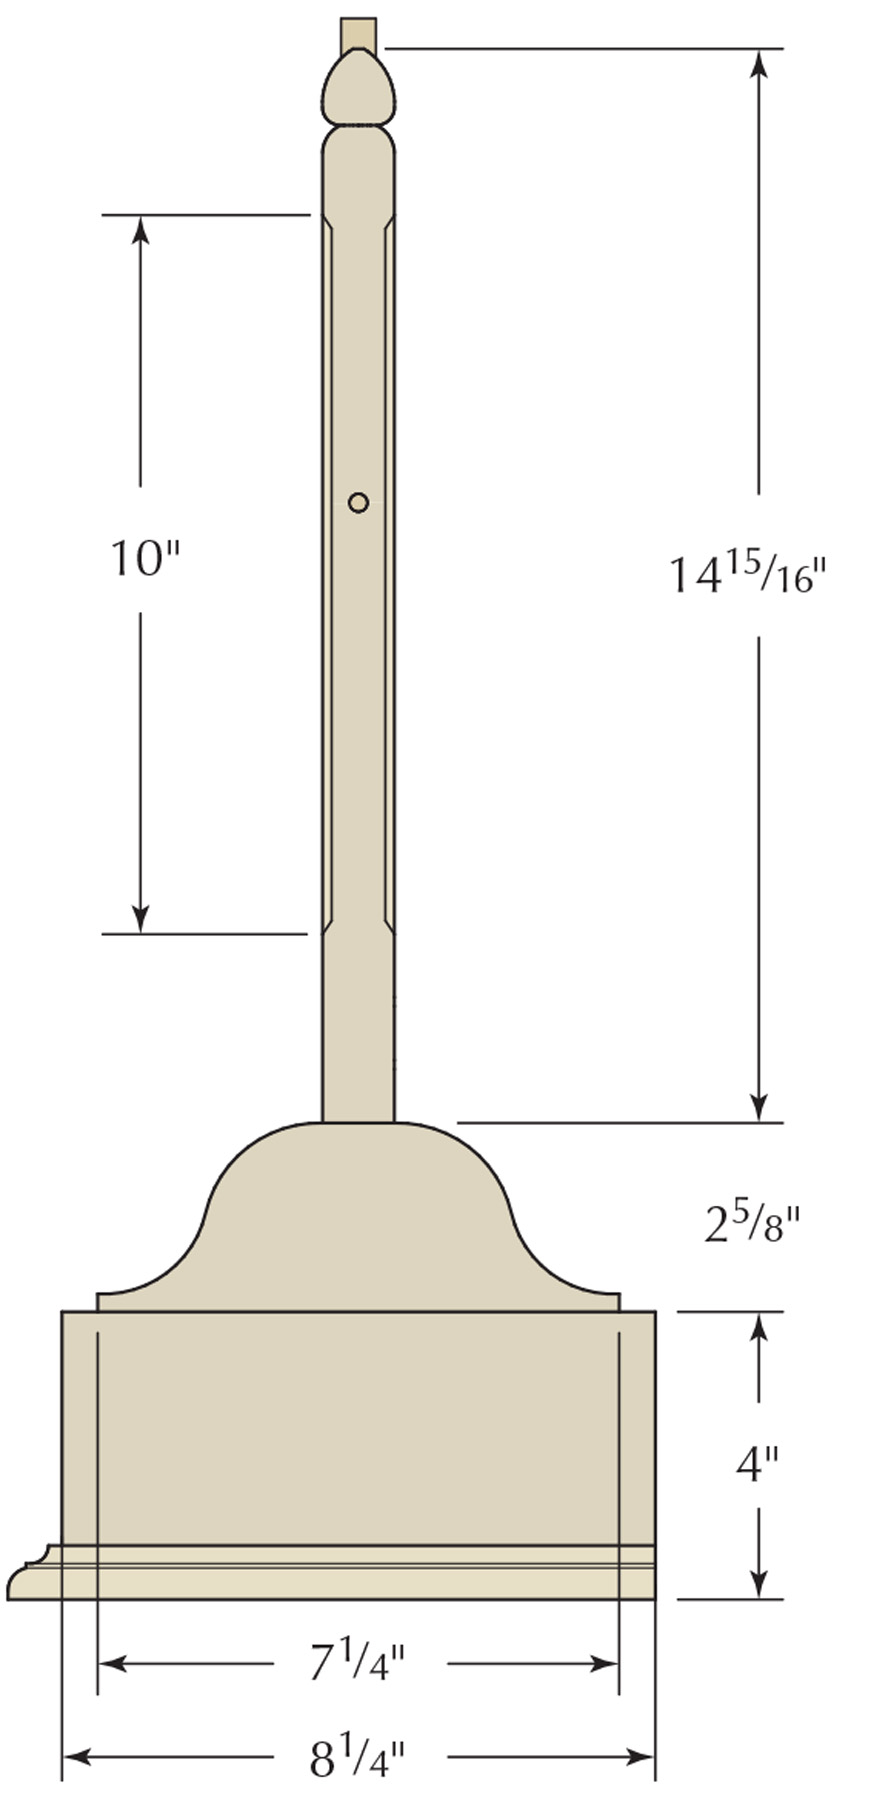
Southern Gent’s Mirror Stand Cut List
No.ItemDimensions (inches)MaterialComments
t w l
❏ 2 Base sides 3⁄4 81⁄4 4 Poplar Grain runs from top to bottom
❏ 1 Base bottom 3⁄4 81⁄4 97⁄8Poplar
❏ 1 Base top 3⁄4 81⁄4 101⁄4 Poplar Rabbet with a 45º bevel cut
❏ 1 Base moulding 11⁄16 5⁄8 36 Poplar Material to wrap three sides
❏ 1 Base back 1⁄4 3 97⁄8Poplar
❏ 2 Post bases 1 25⁄8 71⁄4Poplar
❏ 2 Mirror posts 1 1 163⁄16 Poplar 11⁄4″ TOE*
❏ 1 Crossbar 1 1 91⁄4 Poplar 1⁄2″ TBE**
Mirror
❏ 2 Mirror backs – long 1⁄2 1⁄2 93⁄8Poplar
❏ 2 Mirror backs – short 1⁄2 1⁄2 8 Poplar 1⁄2″ TBE
❏ 2 Mirror faces – long 1⁄4 3⁄4 93⁄8Poplar
❏ 2 Mirror faces – short 1⁄4 3⁄4 8 Poplar
❏ 1 Mirror crest 1⁄4 33⁄88Poplar
Drawer
❏ 1 Front 3⁄4 21⁄2 83⁄4Poplar
❏ 2 Sides 1⁄4 21⁄4 73⁄4Poplar
❏ 1 Back 1⁄4 21⁄4 81⁄2Poplar
❏ 1 Bottom 1⁄4 73⁄4 83⁄4Poplar
*TOE = Tenon one end; **TBE = Tenon both ends
Front
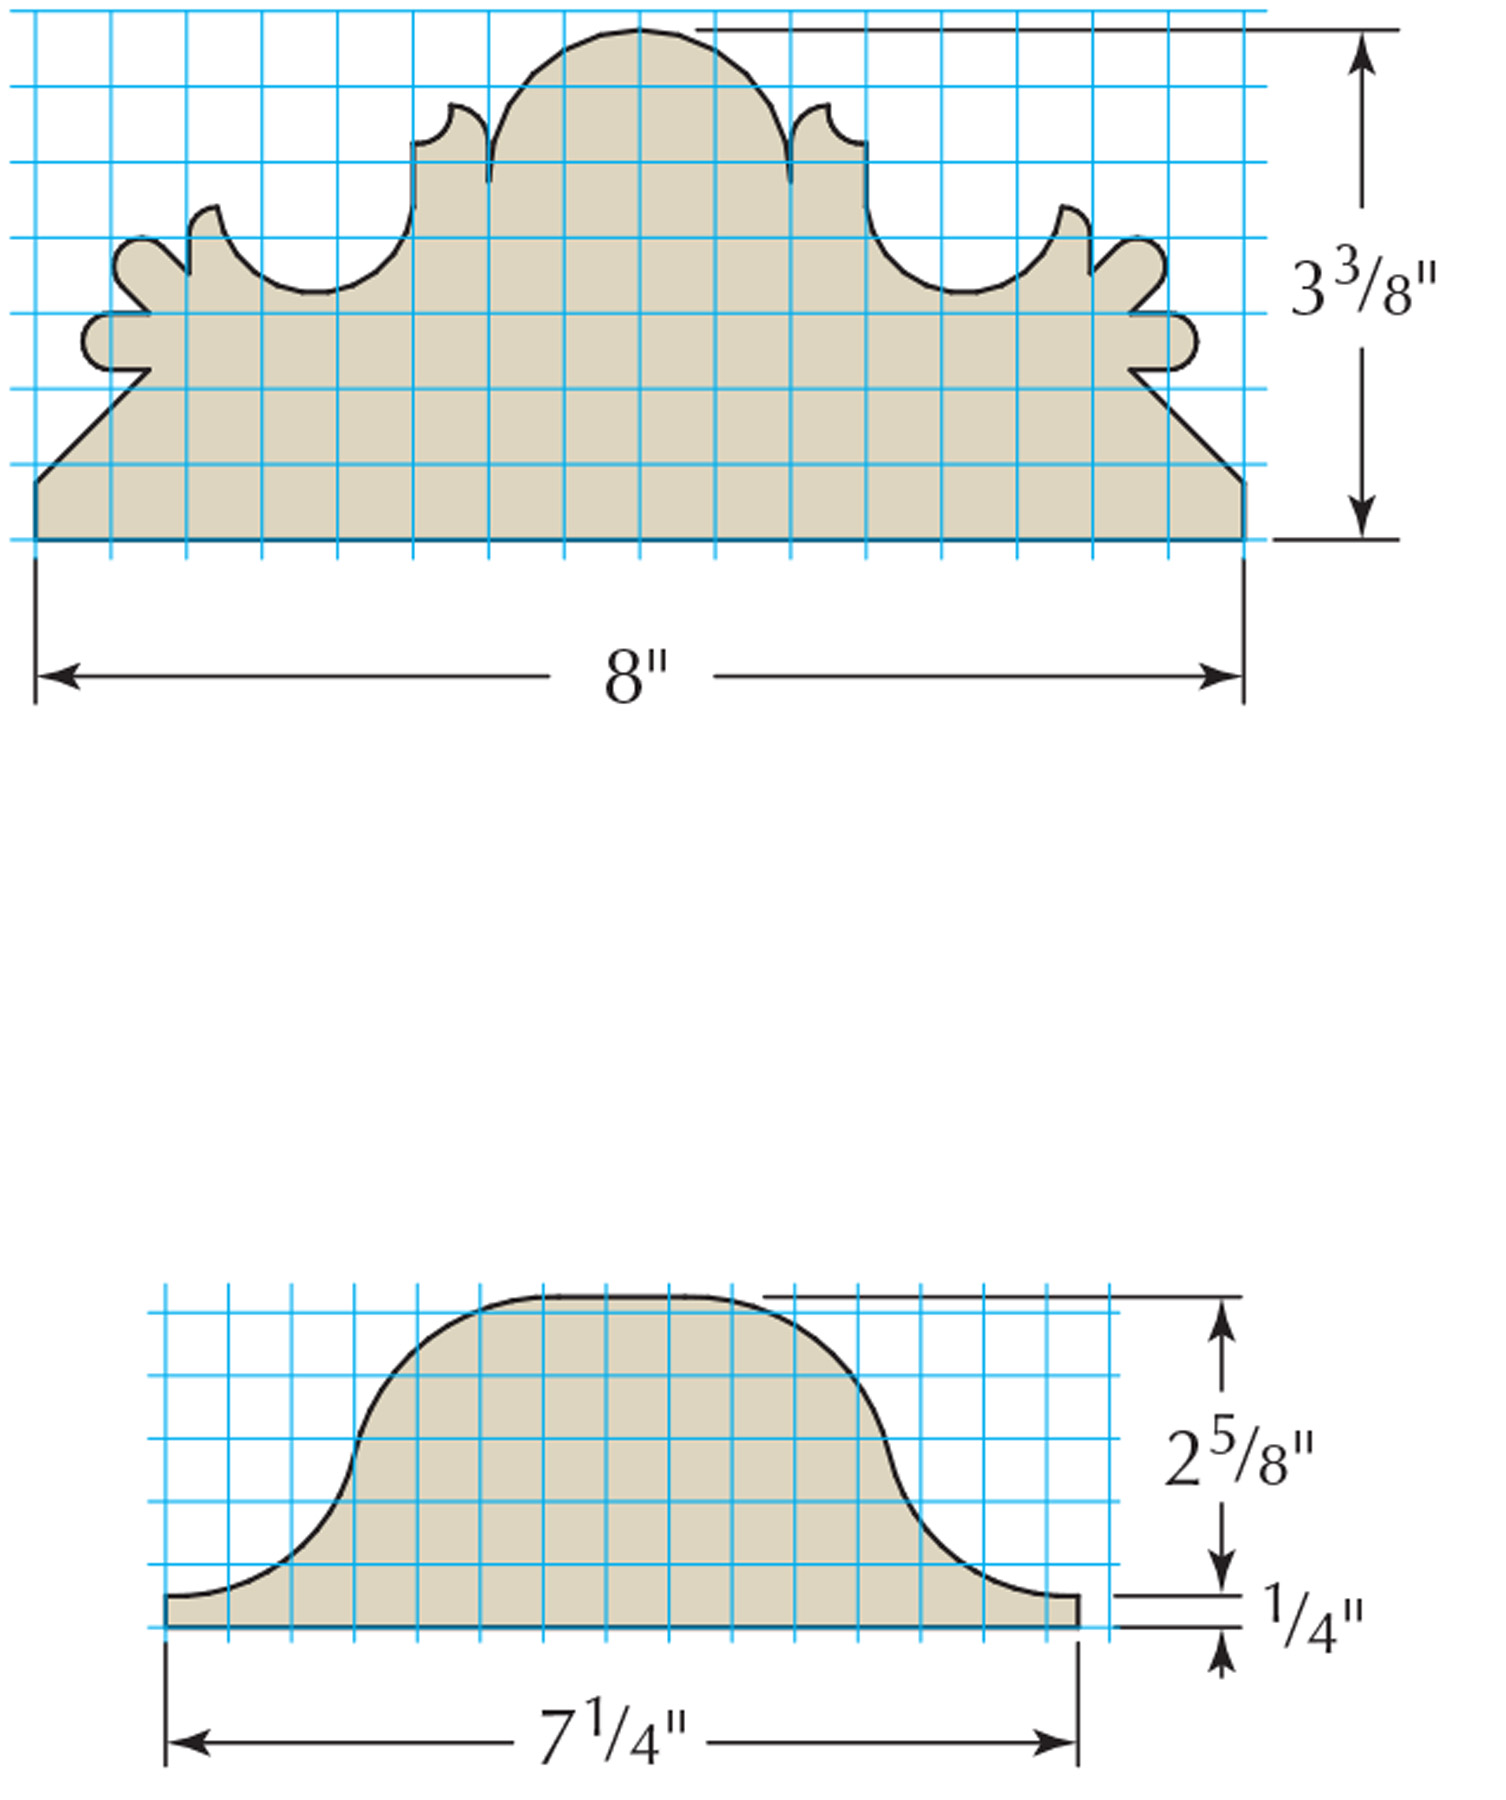
Crest (top) and Side (bottom) Pattern
Side
Establish Your Goal
Accelerated & accurate. “Bump-cutting” the tenons at the table saw is a quick technique if you only have a few tenons to make.
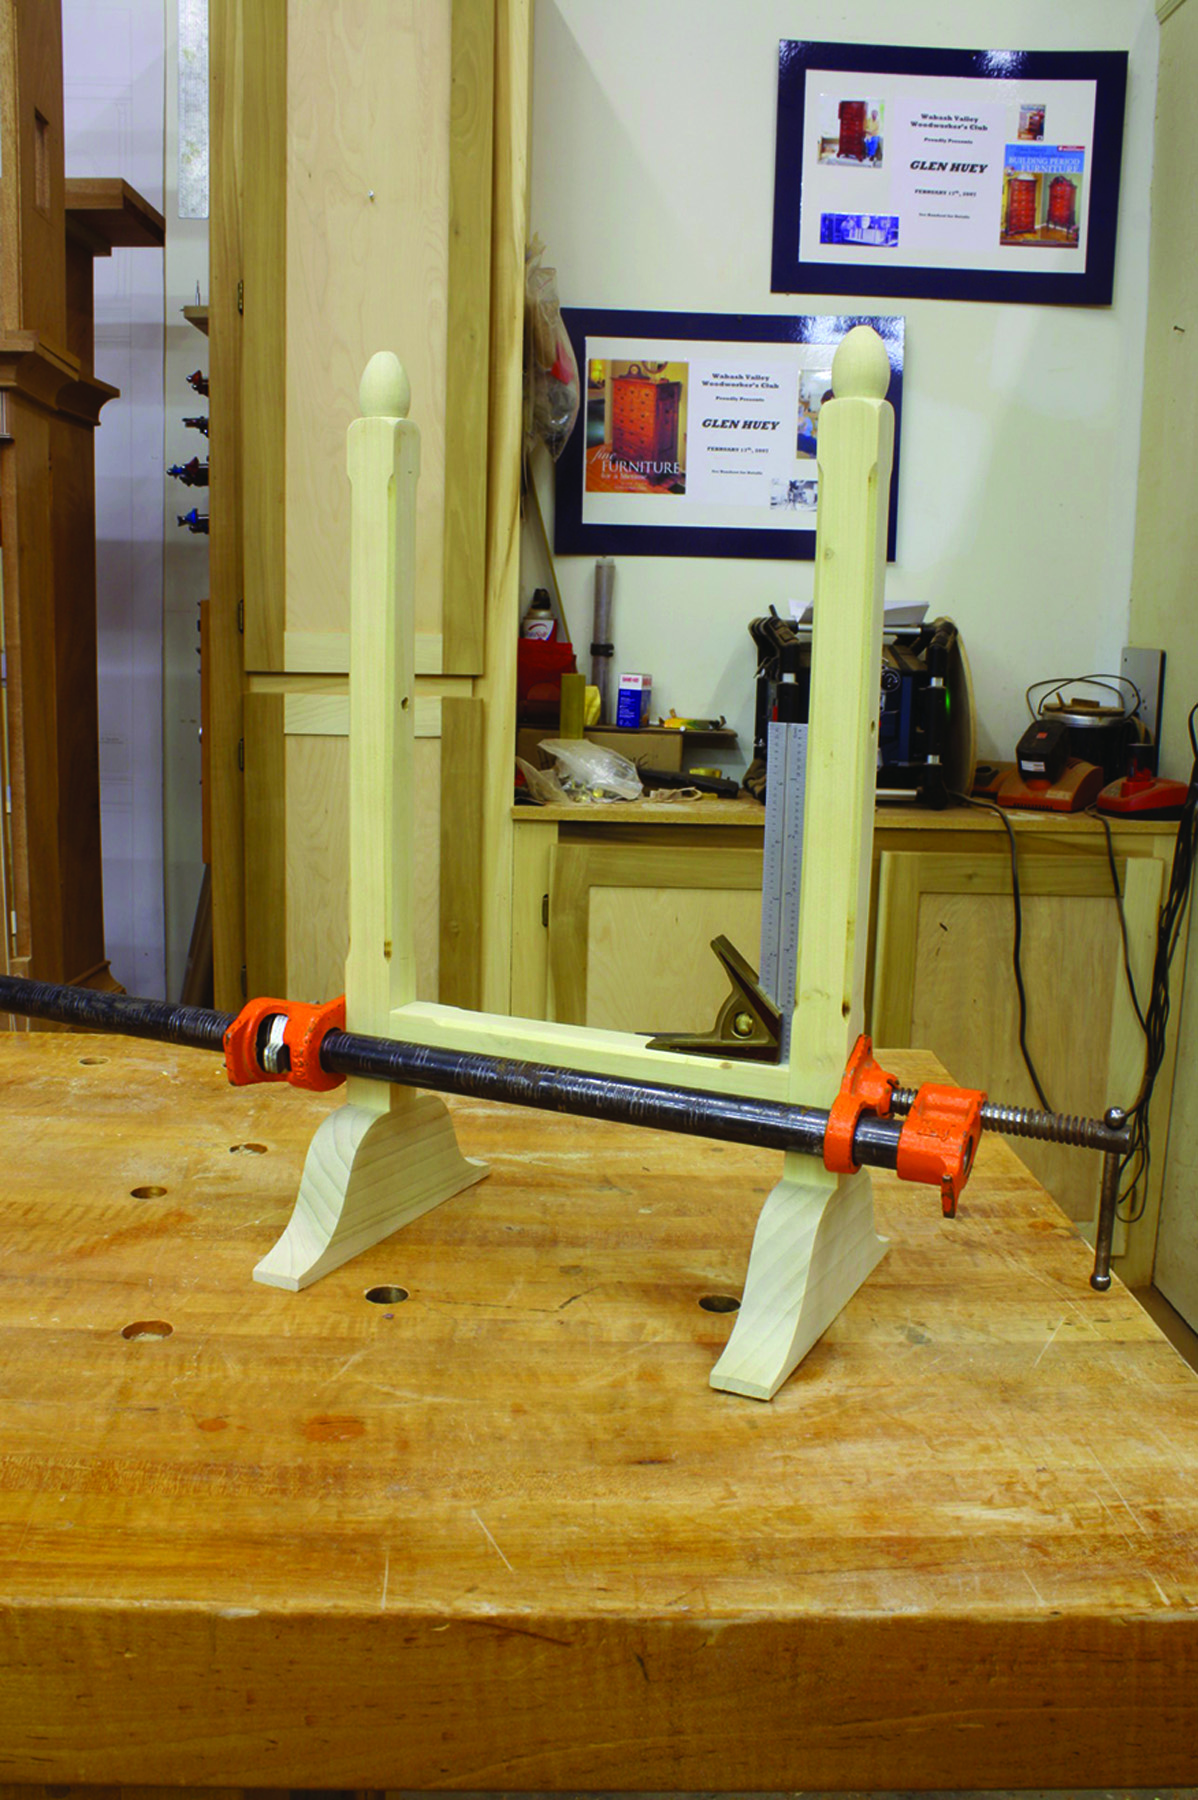
When assembled, the mirror stand reminds me of goal posts at a football game. While these pieces are too small for a field goal attempt, they do need to stand straight, strong and square.
Mill the material for the mirror posts and crossbar. The posts for this project have an egg-shaped detail at the top that is turned at a lathe. If you don’t have a lathe, you can create this detail by hand using rasps and chisels, or you can change the design to a more simplified detail, such as a pyramid shape that is easily cut or planed.

Not so square. To gain a bit more strength, tenons on the crossbar have smaller edge shoulders and larger cheeks.
After the post detail is made, the next step is to locate and cut mortises for the crossbar. The mortises begin 7⁄8” above the tenons, or 21⁄8” off the post’s end, and are 3⁄4” in length and 1⁄2” wide.
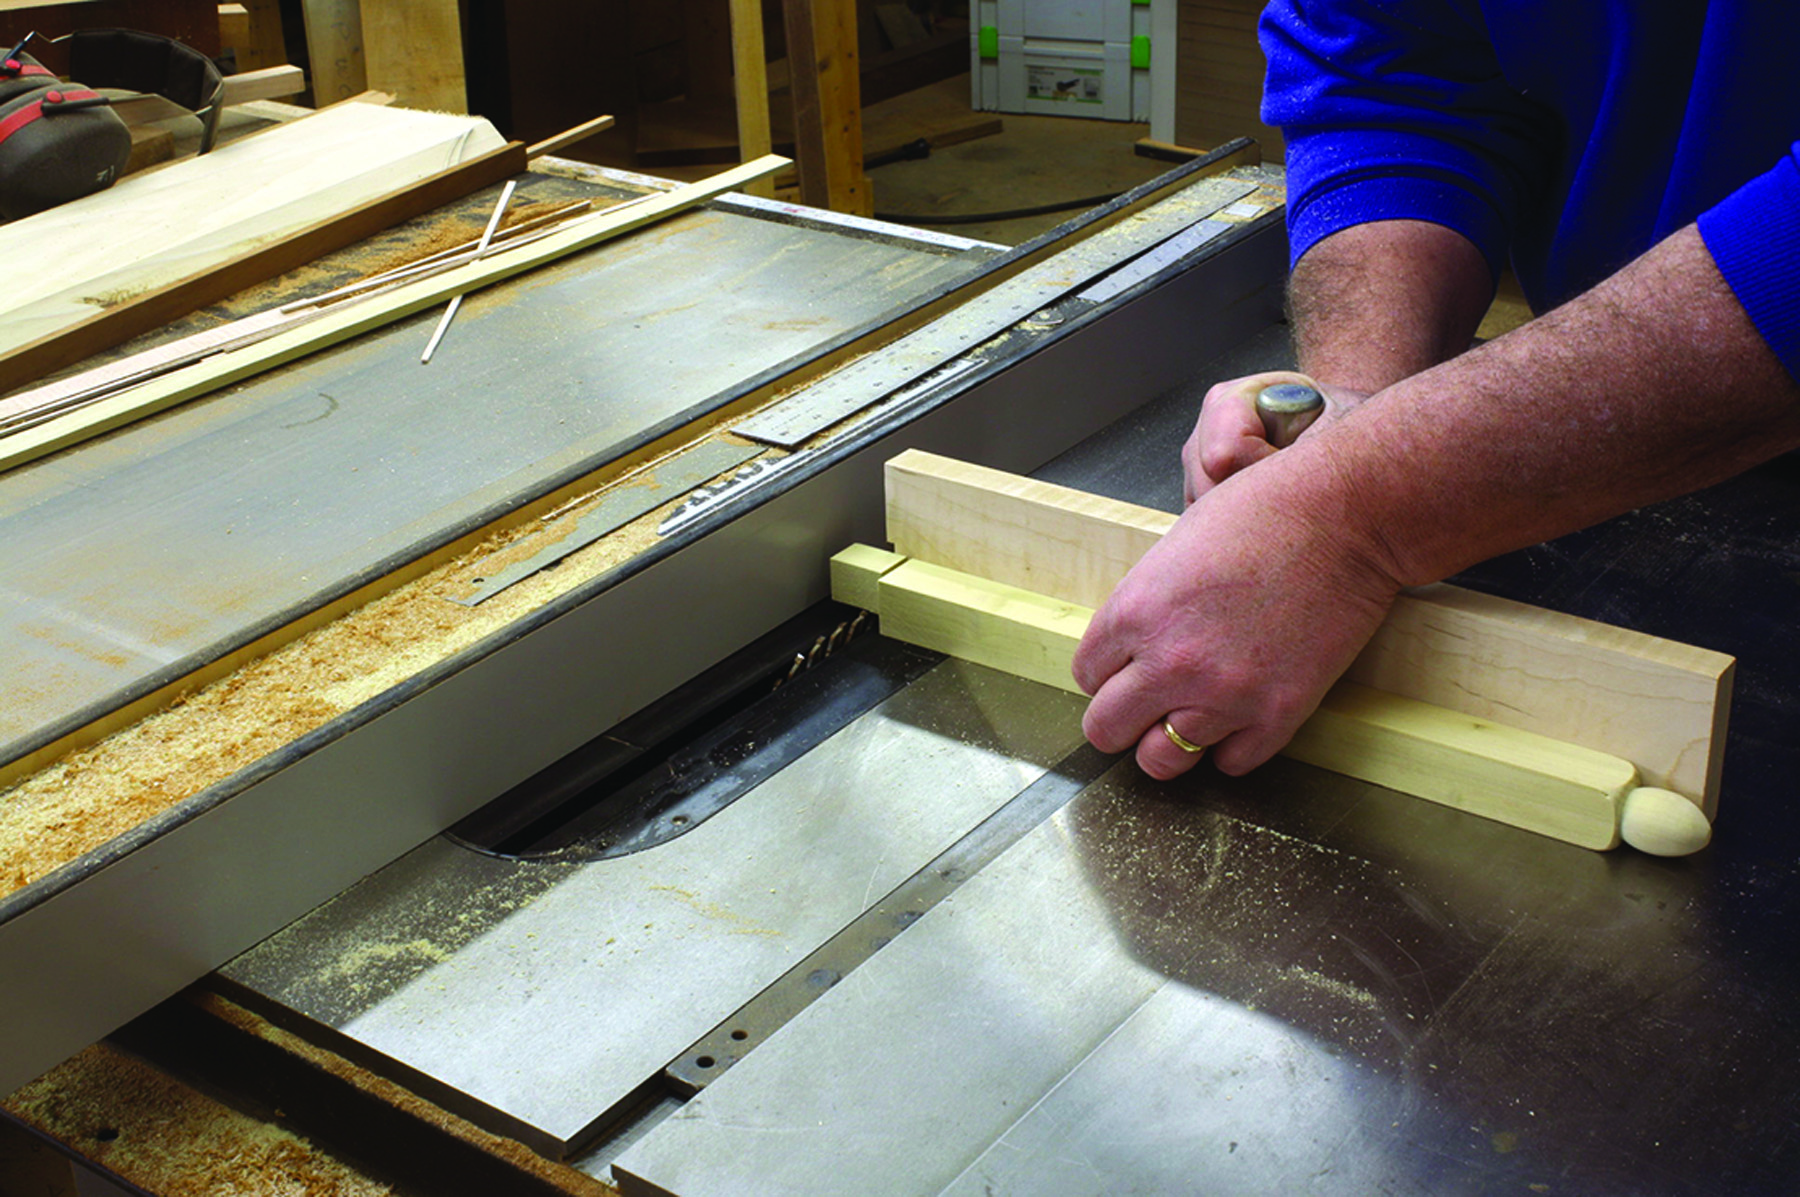
To form the tenon at the base of each post, set the saw’s depth of cut at 1⁄4” with the fence set for a 11⁄4“-long tenon. Use the miter gauge as a guide as you slide the workpiece back and forth, bumping the fence as you simultaneously push the workpiece over the blade. I call this cut a “bump cut.” Repeat this process on all four faces and you have the tenon cut. If necessary for an exacting fit, pare the tenons.

Break the edge. A chamfer bit in your router table makes quick work of the 12 chamfers on the posts and crossbar.
While you have the saw set up for these tenons, create the 1⁄2“-long tenons on the ends of your crossbar. These are also bump-cut at the table saw.
When you finish the mortise-and-tenon work on the posts and crossbar, measure and mark the start and stop locations for a routed chamfer on each. The post chamfers begin 25⁄8” up from the tenon and are 10″ long. The chamfers on the crossbar are 7″ in length and are centered from side to side. Set stops if you feel it’s necessary, but I prefer to freehand these cuts.
Check for racking. Because it’s so easy to rack the small assembly, it’s not good enough to clamp without checking for square.
Before you can assemble the posts and crossbar, drill 1⁄4“-diameter holes through the posts for the dowels that allow the mirror to swivel. To assemble the mirror stand, spread glue in the mortises and on the tenons then slip the parts together. Clamp the assembly at the crossbar and make sure the posts are square to the crossbar. (Securing the clamp can rack the glue-up.) When everything is square, set the unit aside to allow the glue to dry.
Non-traditional Mirror Frame
Easy to cut & strong. Sometimes called an open mortise-and-tenon joint, a slip joint is strong when used on small parts such as these.
The steps I used to build the mirror frame vary from traditional methods. I built the frame back, applied the mirror’s front pieces then cut a small groove for the mirror crest. The results are a solid mirror that will withstand years of use.
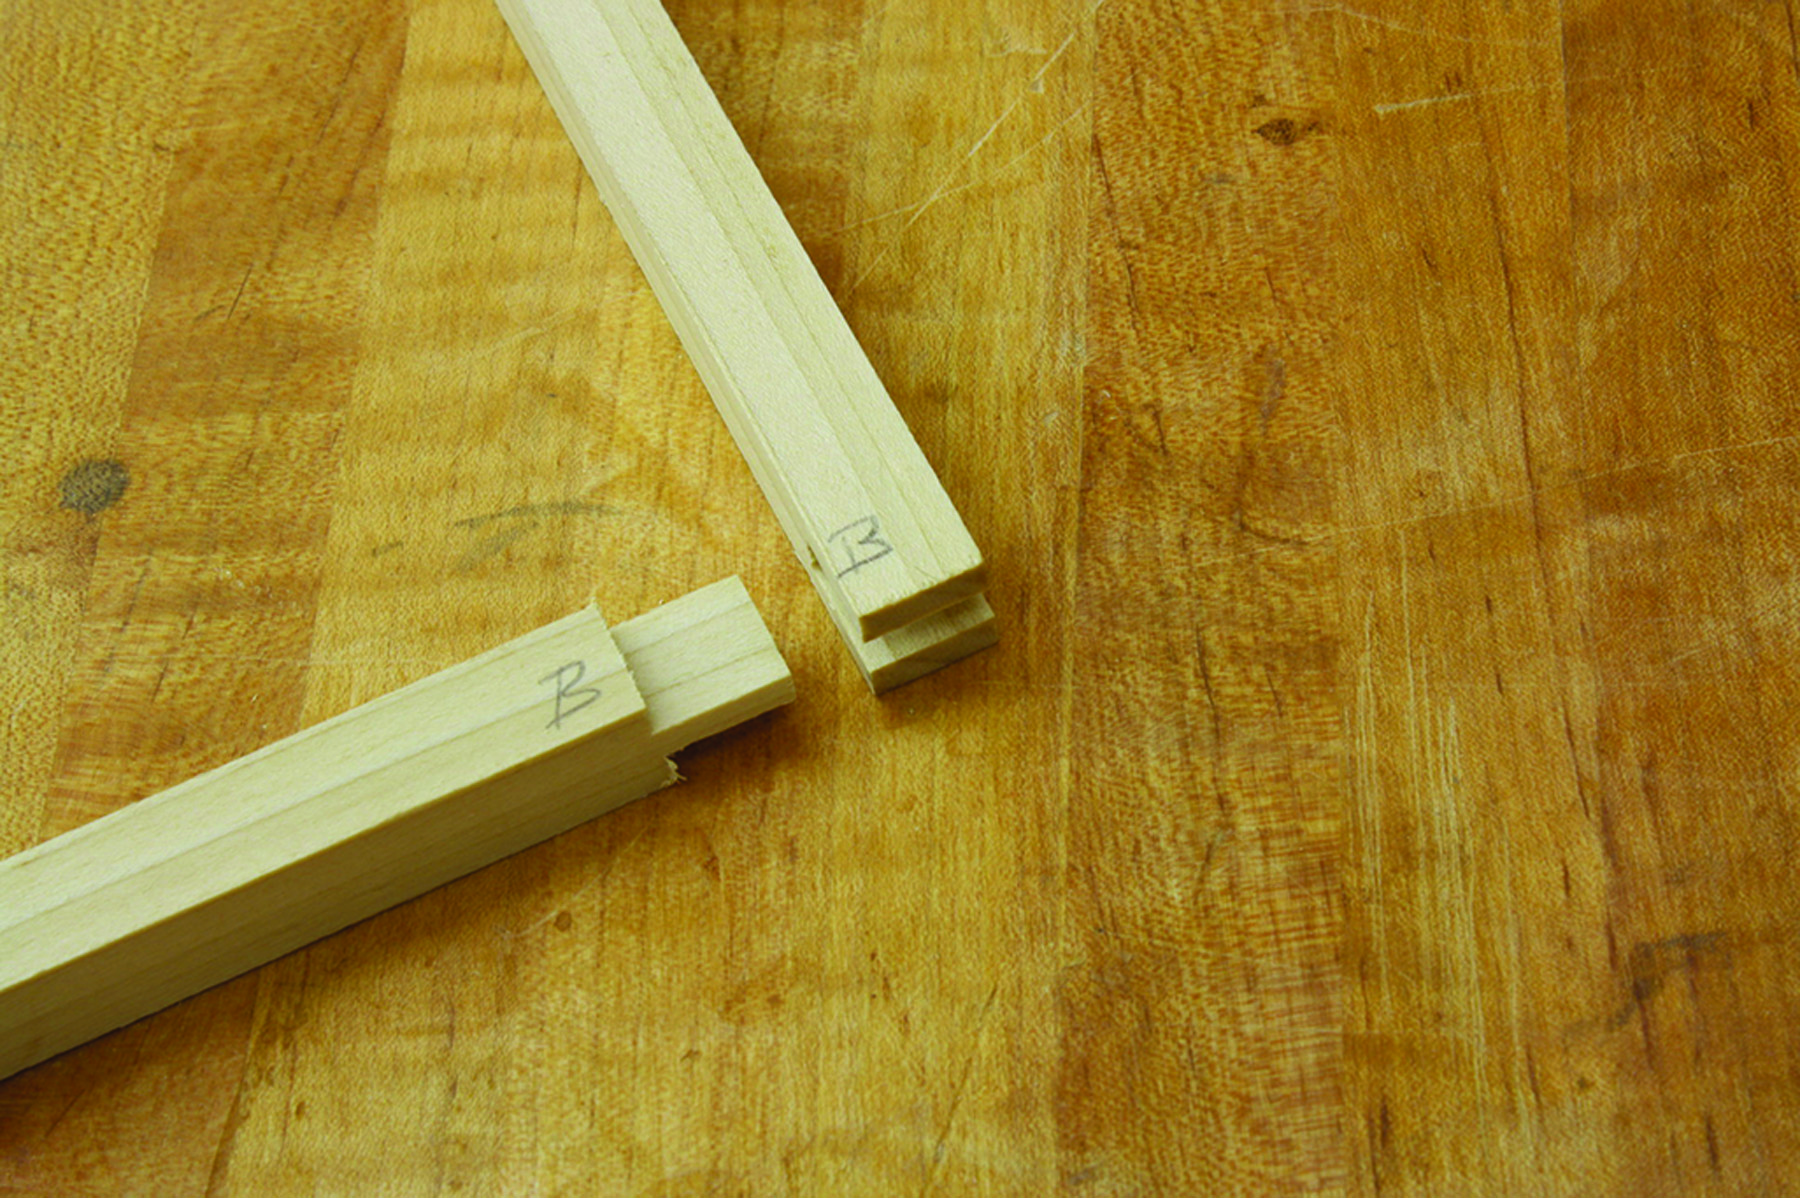
To begin, mill and cut the mirror frame pieces to size. The corners are joined with a slip joint. Cut tenons on the ends of the short (top and bottom) piece, then cut a slot in the long (side) pieces as shown above. Apply glue to both parts of the joint, slip the mirror frame together and check that it’s square, then set it aside as the glue dries.
Motherboard? The mirror frame’s front pieces are profiled on a wide board then sliced free to avoid working with small and thin pieces.
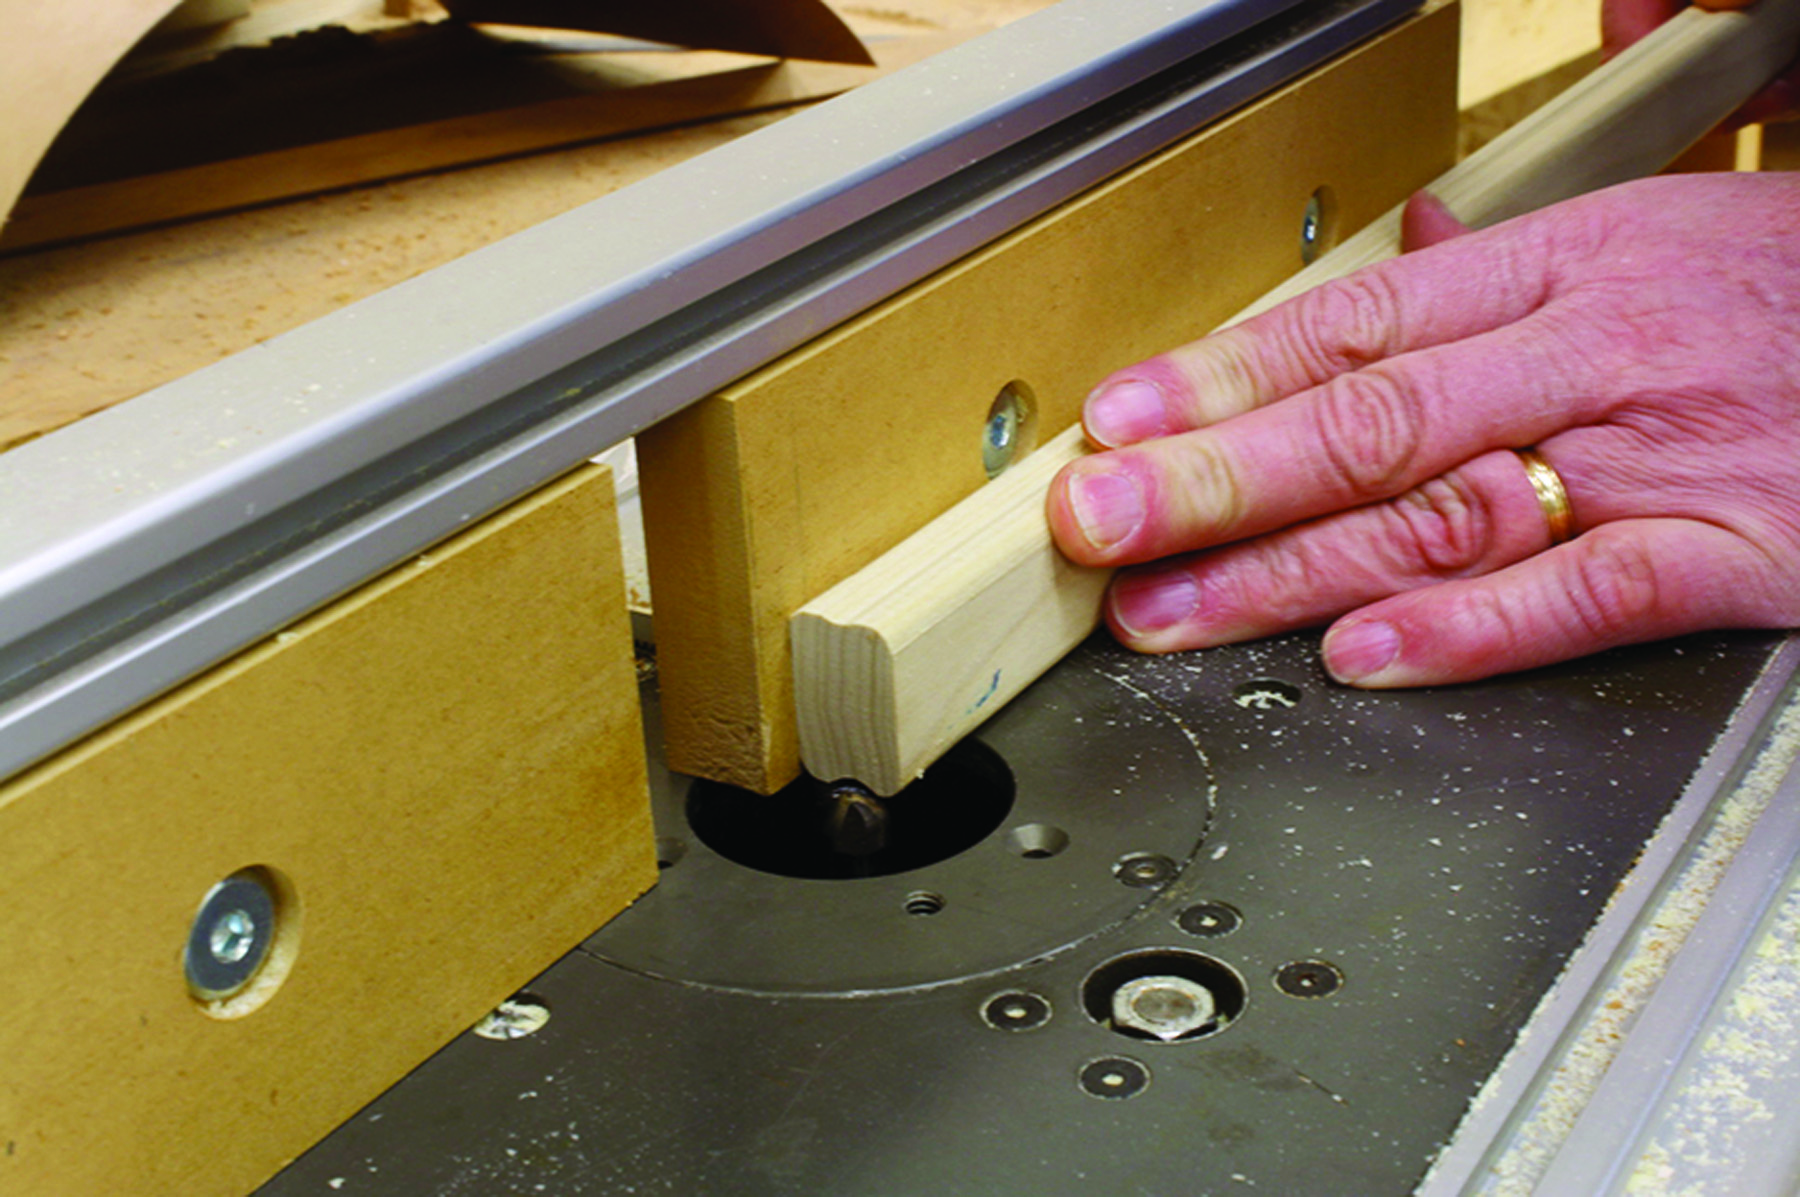
Use a 1⁄8“-roundover bit to profile the edges of the frame faces. Create a small trough at the center of the faces using a 1⁄2” core box bit at your router table. Set the depth of cut shallow (1⁄8” deep).
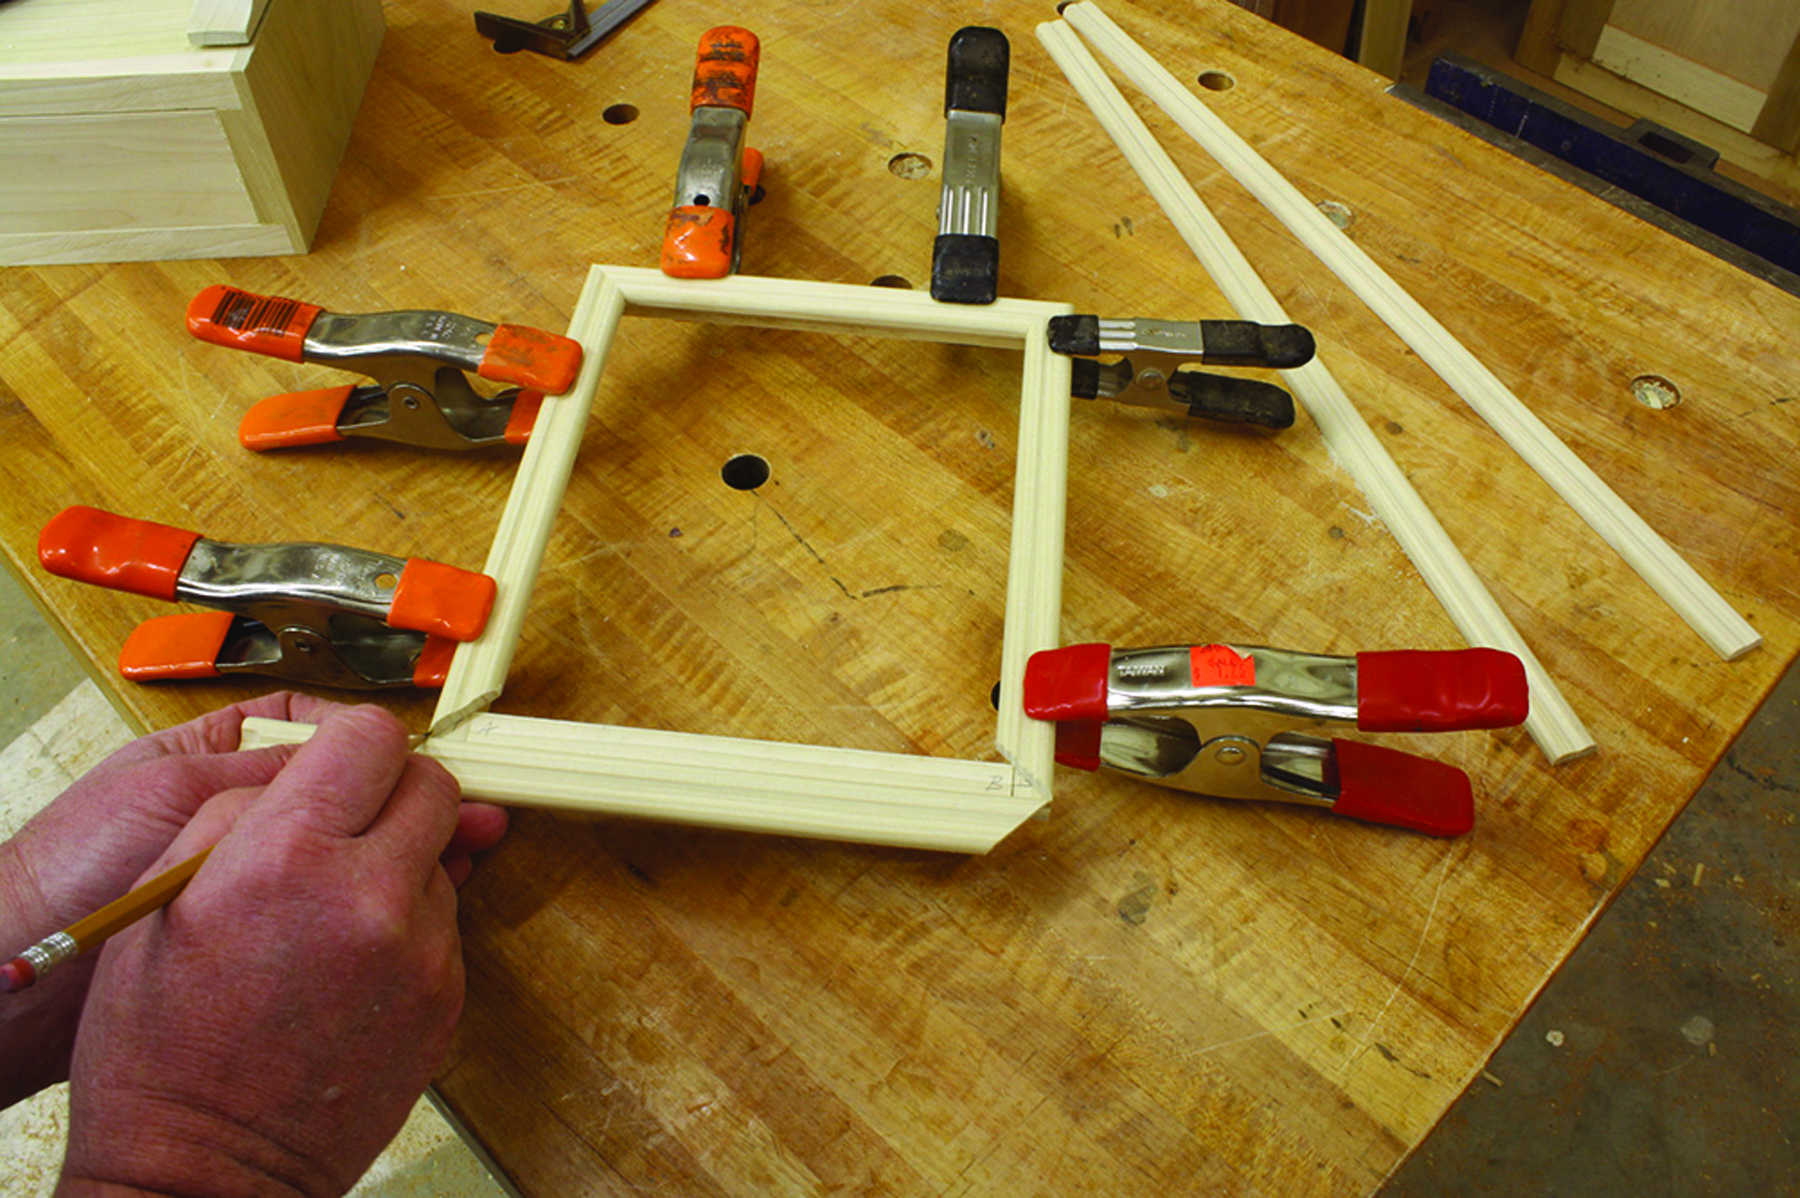
The faces are mitered and fit to the frame. Apply glue then use spring clamps or 23-gauge pins to hold things in place until the glue dries.
The mirror crest begins as a paper pattern spray-glued onto a 1⁄4“-thick piece of stock that’s oversized in both width and length. Cut the crest at the band saw, then clean up any rough areas using a rasp and sandpaper.
Reverse & mark. The last piece of the frame can be difficult to size. Reverse the piece, match the miters at one end then mark the opposite end with your exact cut location.
Now cut a 1⁄4“-wide groove along the top rail of the frame. The depth of cut is 3⁄16“, or just deep enough to capture the crest. Put glue in the groove then seat the crest into it; keep the frame vertical so that the crest remains properly in place as the glue dries.
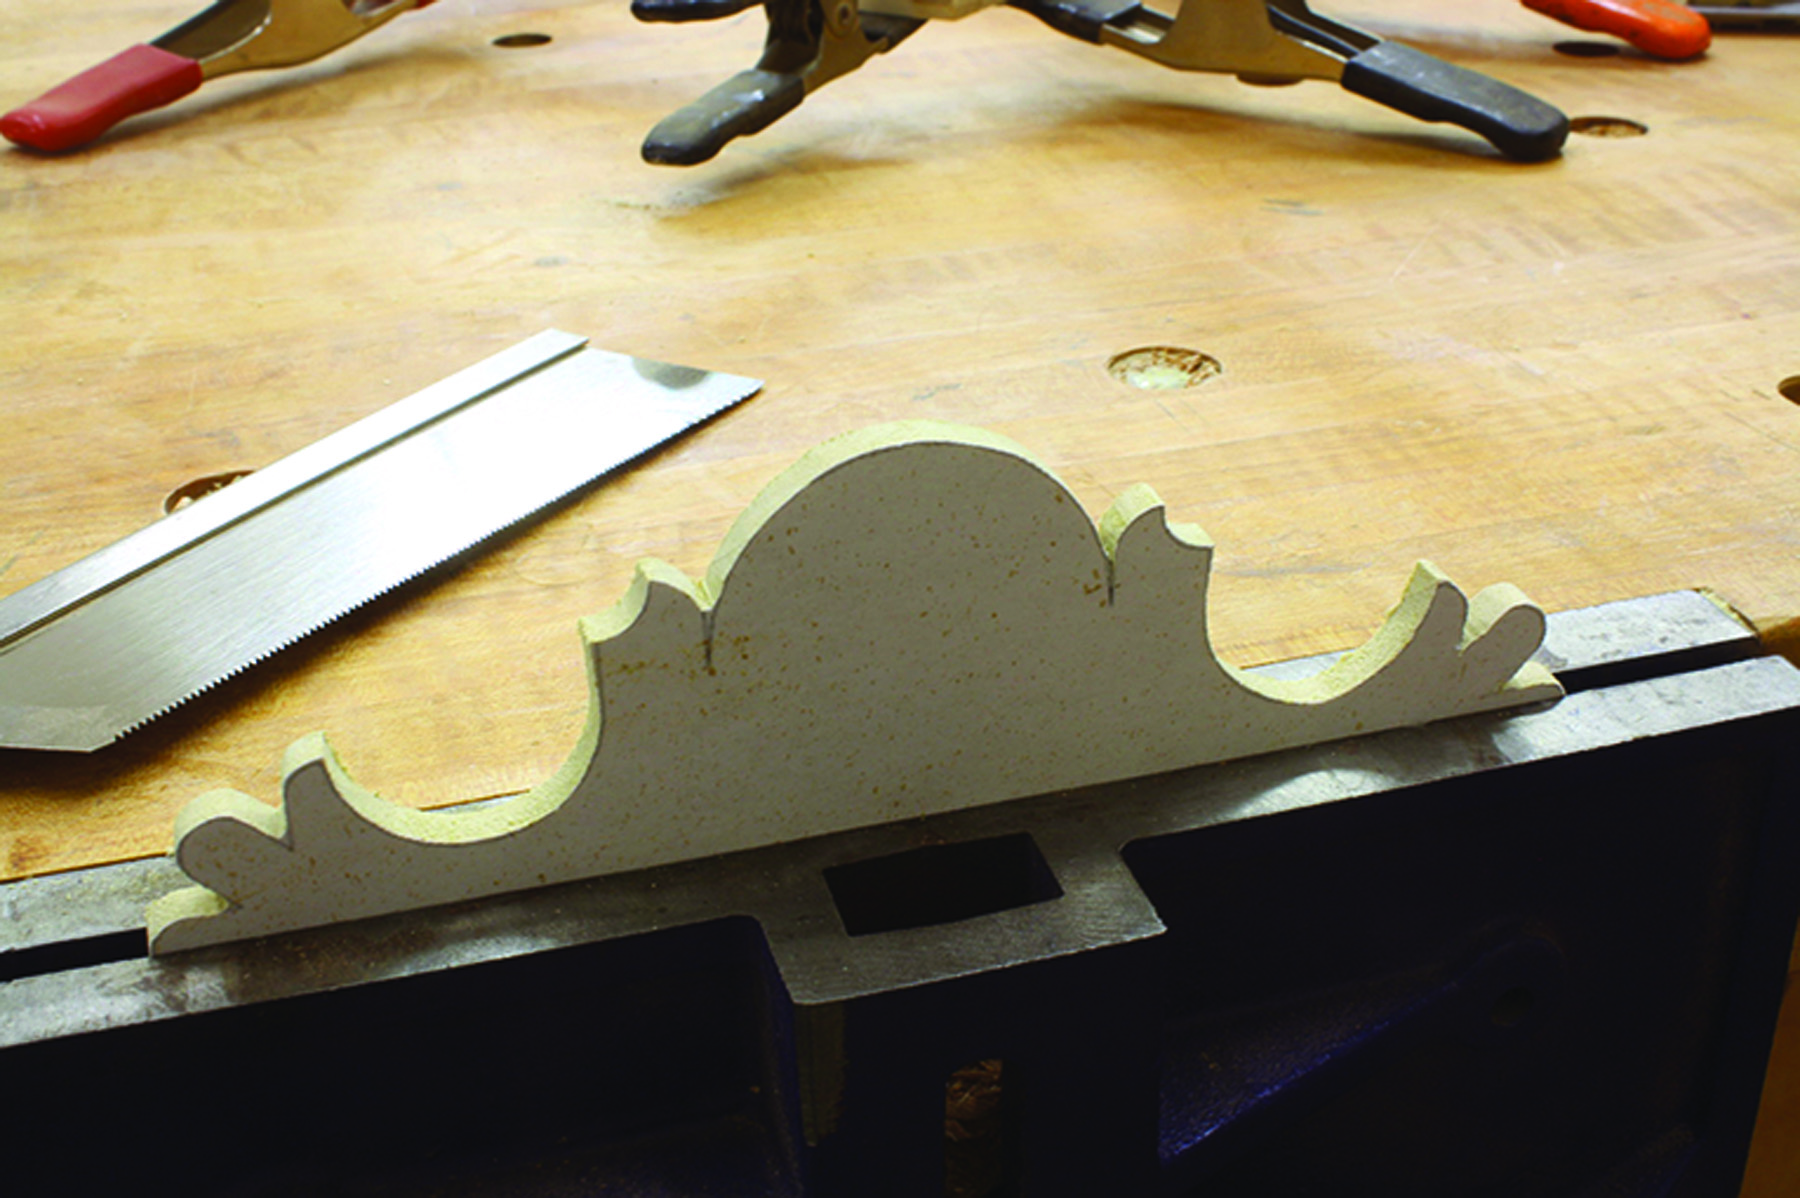
Fine-tuned by saw. Areas of the crest, such as on either side of the half-round at the top, are difficult to get into when cutting at a band saw – but a thin Japanese dozuki is perfect to clean up these cuts.
The next step on the frame is to hang it in the stand. Begin by drilling a 1⁄4” hole into one side that is centered from front to back and about 6″ up from the bottom. Drill as deeply as you can without going through the frame. Slip a short piece of dowel through the post to just catch the frame. Hold the frame in position and level with the posts. Use the same drill bit to push through the second post and mark the location on the frame. Remove the frame from the post assembly then drill the second hole used to hang the mirror.
Aged Look in Paint
 I painted my Southern gent’s shaving mirror then added a little antiquing by rubbing and removing paint in certain areas, then applying dark paste wax.
The process is to sand the piece smooth with #180-grit sandpaper, use #120-grit sandpaper to knock off any sharp edges, then dye the shaving mirror using a water-base aniline dye (dark brown or cherry works great). After smoothing any raised grain with #320-grit sandpaper, apply two coats of clear or blonde shellac as a sealer coat – this allows you to better manipulate your paint. Then use #320-grit sandpaper to sand the shellac.
Next, the paint is applied. Work in small areas to maintain control. As the paint dries there is time to manipulate the final surface. There are a couple of methods I use. Sometimes I rub away paint using a damp cloth, which can be done almost as soon as the surface is painted. Or I allow the paint to reach a near-dry stage then I press and remove my hand from the surface to lift paint off (I wear disposable gloves for this work).
Another great technique to age paint is to blister it using a propane torch. After the bubbled paint dries, it is easily scraped or sanded away. When colored wax (or other ”grime”) fills in the broken bubbles, your project can quickly look as if it’s aged 50 years or more.
As you contemplate aging your piece, think about natural areas of wear such as along the moulded edges, around the drawer pull, at the top and bottom of the mirror (where someone would grab it to adjust the angle) and of course, on top of the base where items would slide. As you fiddle with the paint, remember that less is more. Also, try these techniques first on a practice board or you may find yourself adding another layer of paint.
— GDH
Everything Comes Together
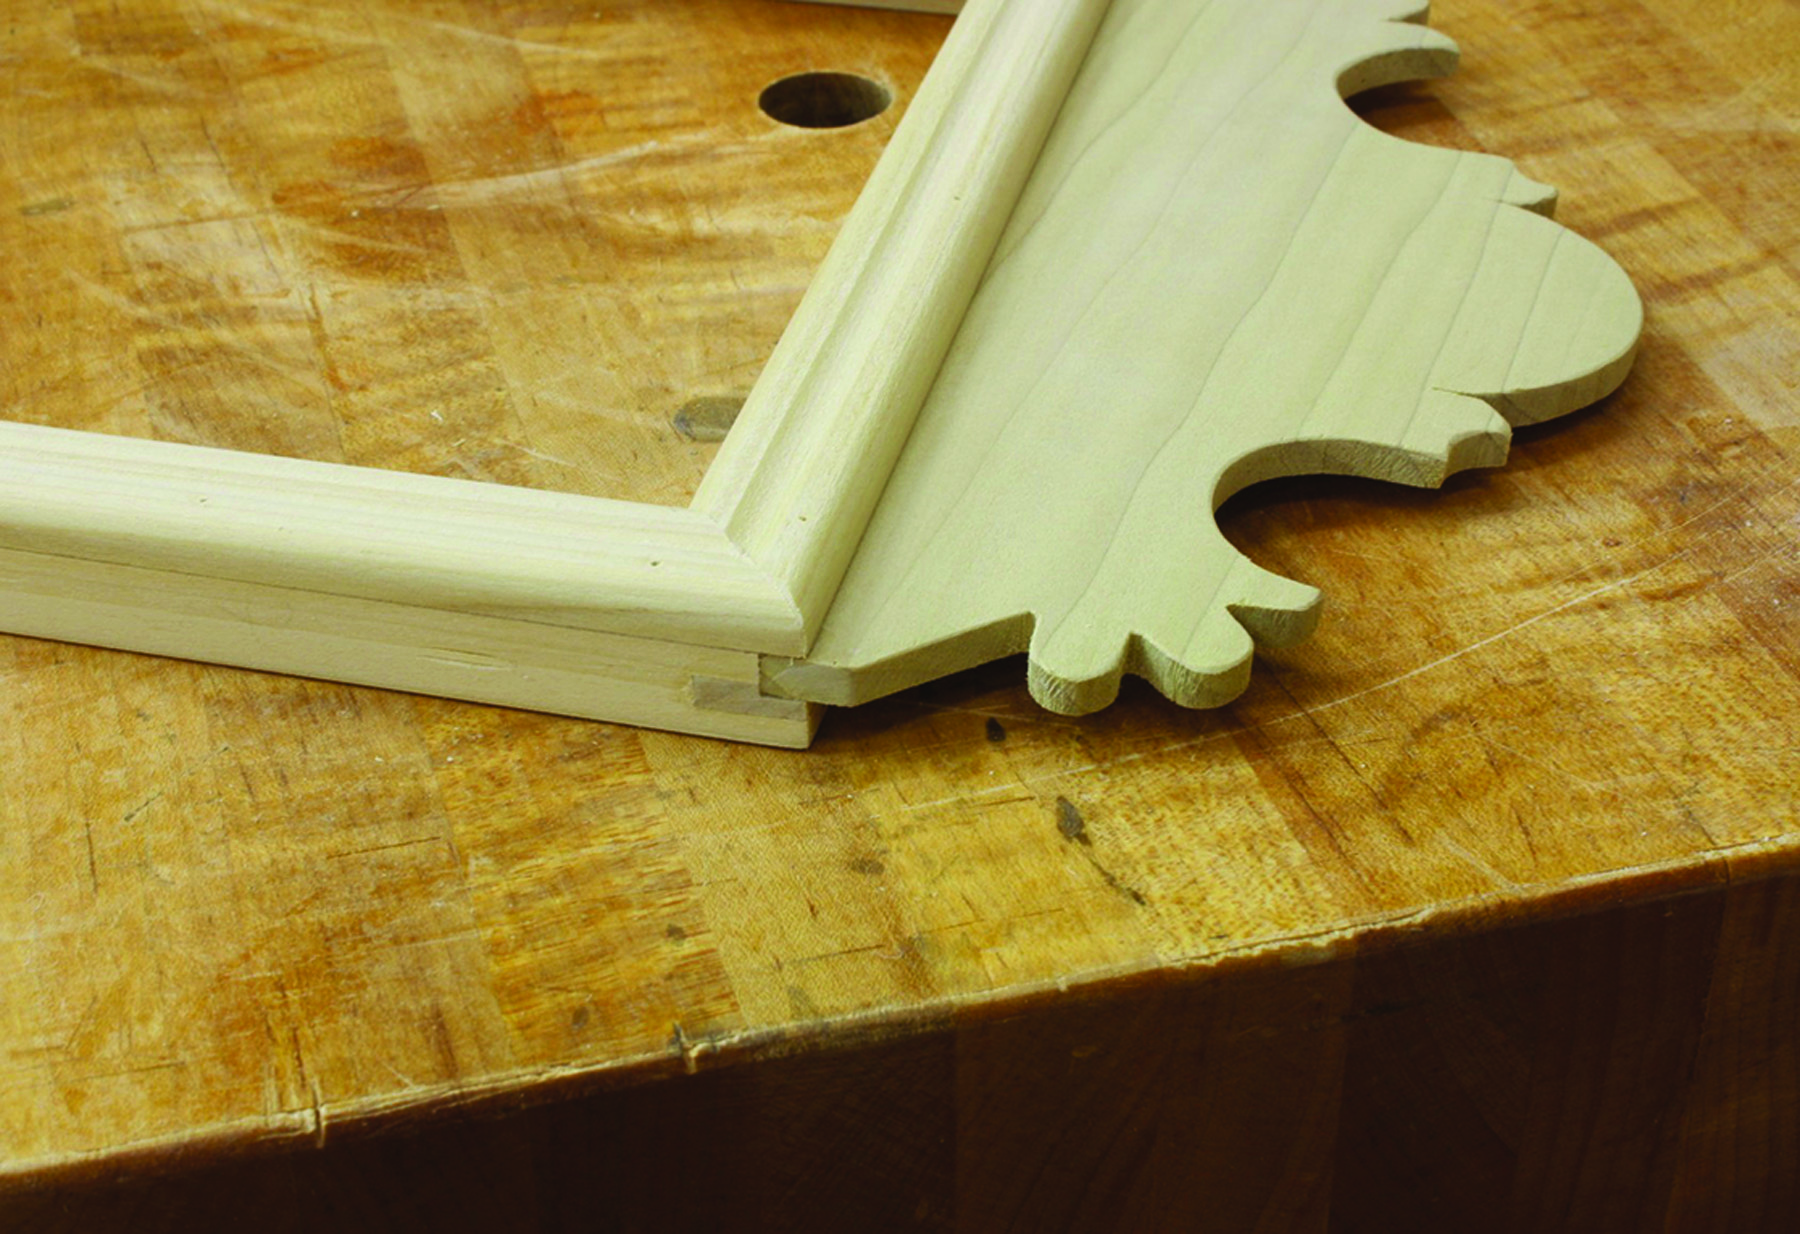
Buck tradition. Mirror crests were usually attached to frames using small glue blocks, but a small groove holds better.
It’s time to attach the shaving stand assemblies. Slip the top into the base then align the mirror stand in position – the mirror assembly is flush with the sides of the base and centered from front to back. Drill and countersink holes then, using four #8 x 11⁄4” wood screws, attach the assemblies. The screws travel through the post stands and the base top then grab into the base sides.
Best technique. To get an accurate hole location, push the bit through the post and mark the frame as you hold the frame aligned to your posts.
A moulding wraps around the front and sides of the base. I used a classical Roman ogee router bit, but any profile will do. (Again, I routed a wide board then ripped the moulding free.) The corners are mitered, and the moulding is attached using glue and brads.
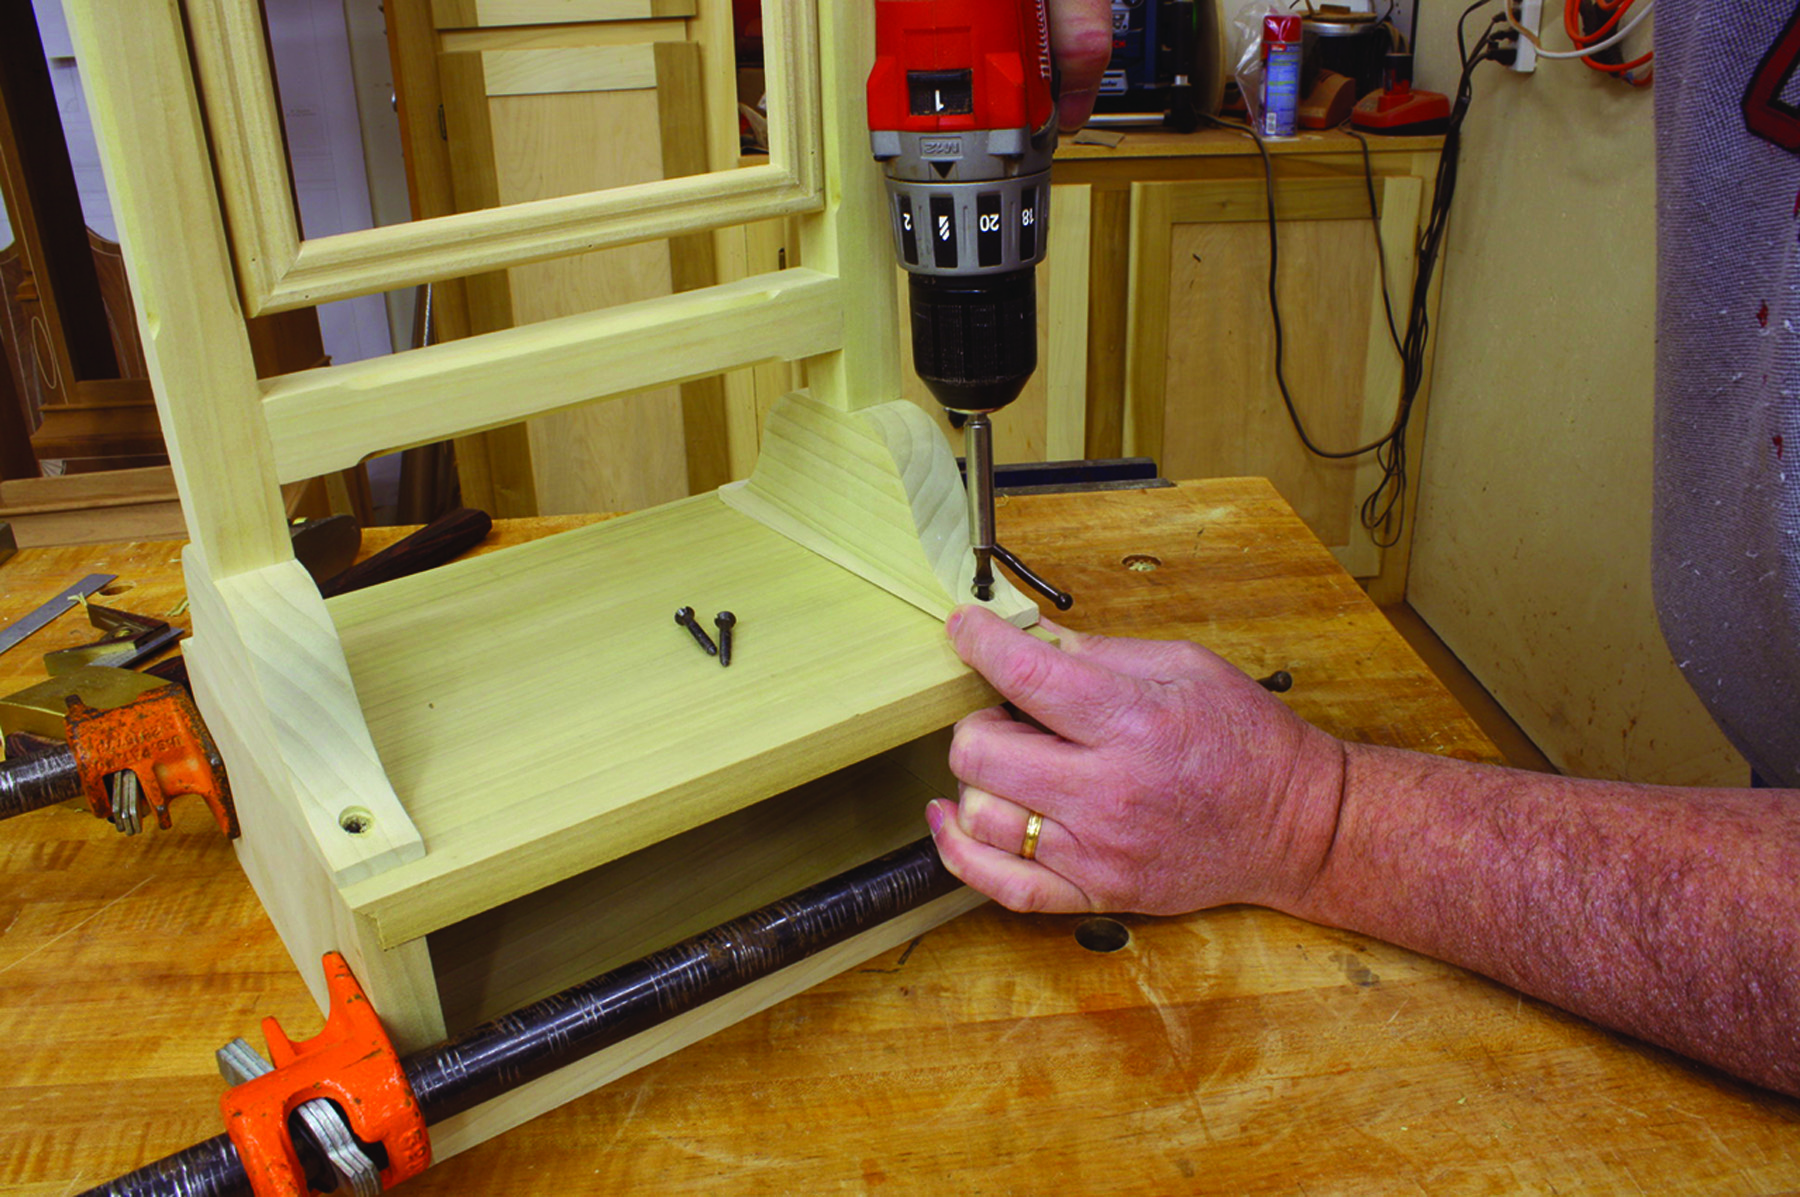
Final connections. Use a couple of clamps to keep the top tight and in position as you drive your screws through the post bases.
The drawer is simple. I cut my drawer front to size, eased the outer edges using an 1⁄8“-roundover bit, then cut rabbets for the drawer sides and bottom. I glued and pinned the drawer sides to the front, and pinned the drawer back in shallow dados cut in the sides. The bottom is attached using pins.
I decided from the beginning that my mirror was going to be painted with an “aged” finish – see “Aged Look in Paint” at right for details. After the paint was complete, I cut the mirror glass to fit into the frame. Small blocks can be pinned to hold the glass in place, or you could cut and fit a full-size back.
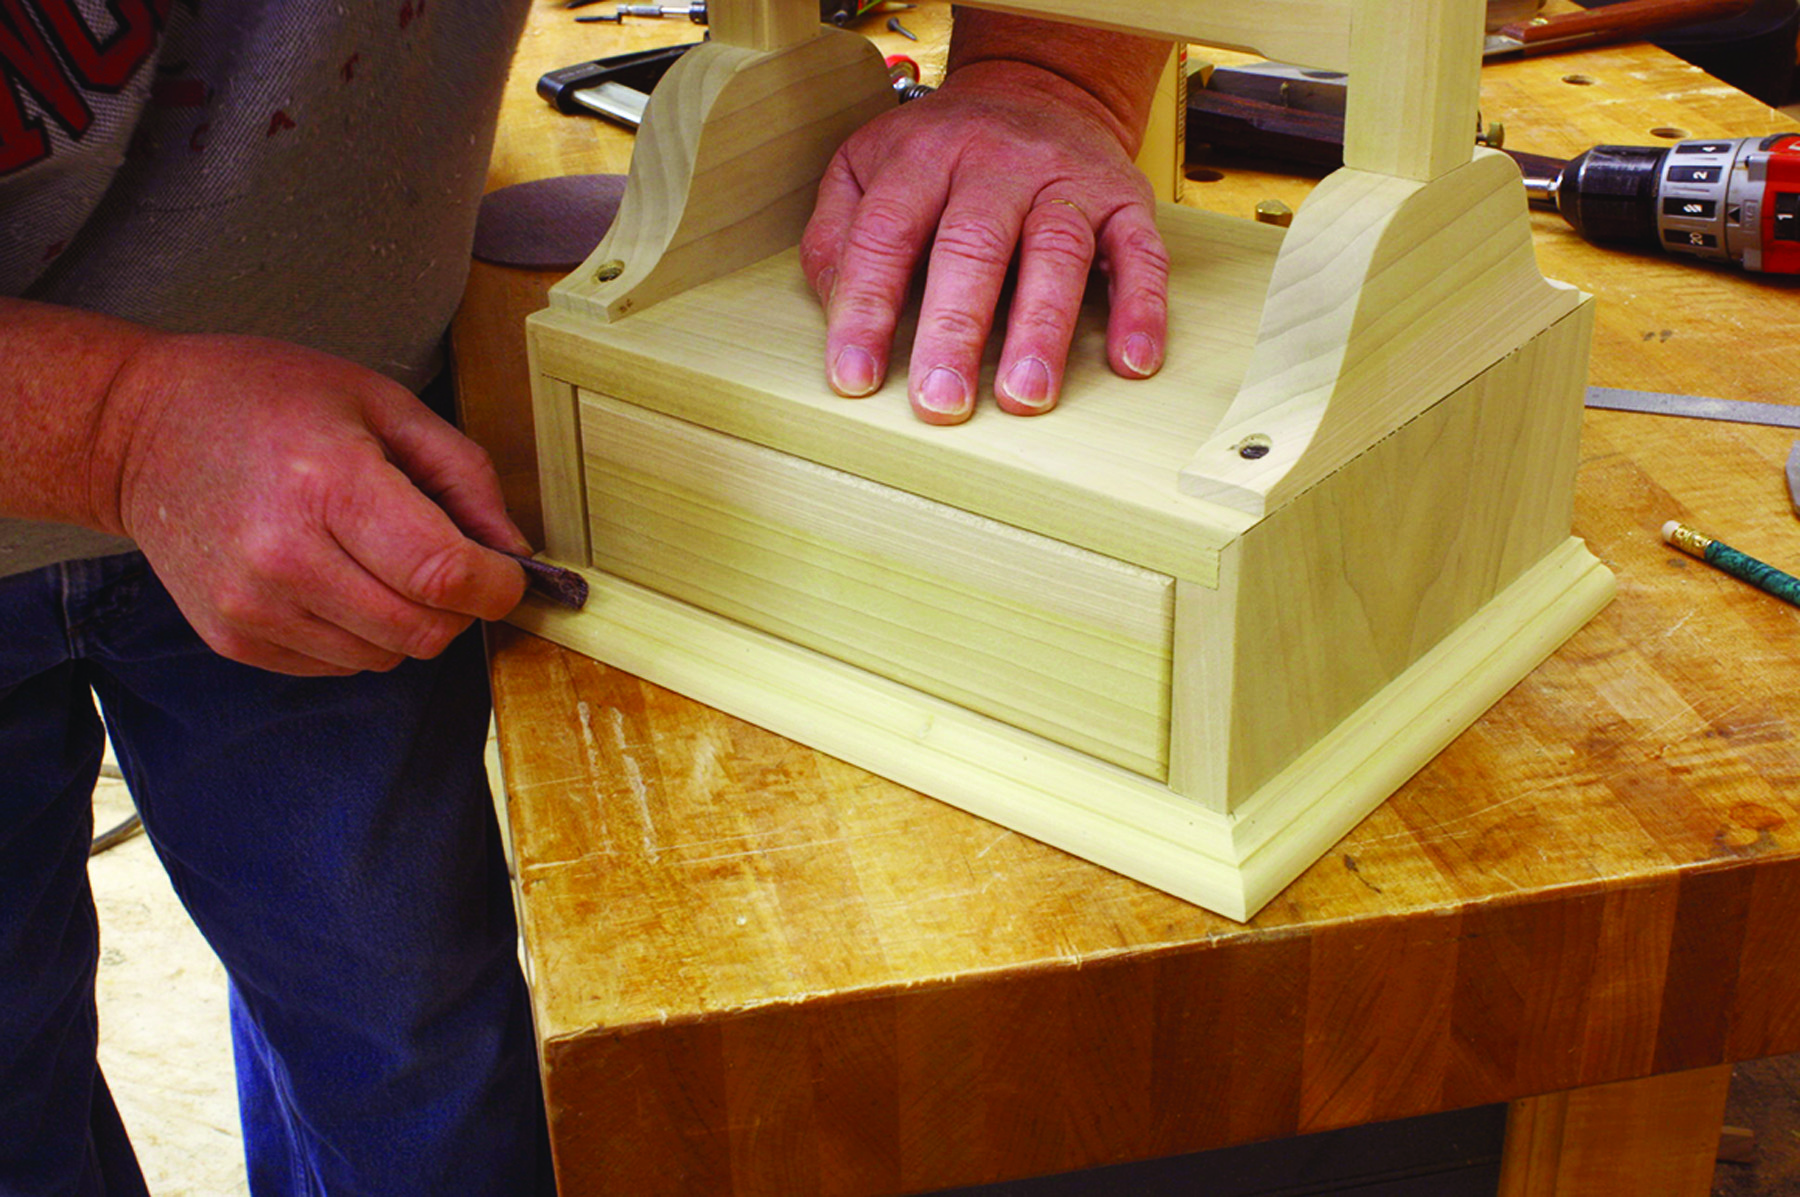
Smooth slide. The 11⁄16″-tall x 5⁄8″-wide base moulding fits just below the top edge of the base bottom so as not to impede the drawer operation.
Although this is a gentleman’s shaving mirror, it is a bit small by today’s standard to reflect a woodworker’s mug as he scrapes away a day’s stubble. It is, on the other hand, perfect for viewing earrings and necklaces, or a well-tied tie. My guess is that other members of the house will instantly lay claim to this project.
Glen hopes one day to become a gentleman. He hopes to become a scholar, too.
Video: Watch the author “bump-cut” tenons at his table saw.
Blog: Read more about the interesting twist of the top’s rabbet joinery.
Plan: Download free, full-size drawings of the post stand and mirror crest designs.
Top Pattern – Side Pattern
Here are some supplies and tools we find essential in our everyday work around the shop. We may receive a commission from sales referred by our links; however, we have carefully selected these products for their usefulness and quality.