We may receive a commission when you use our affiliate links. However, this does not impact our recommendations.
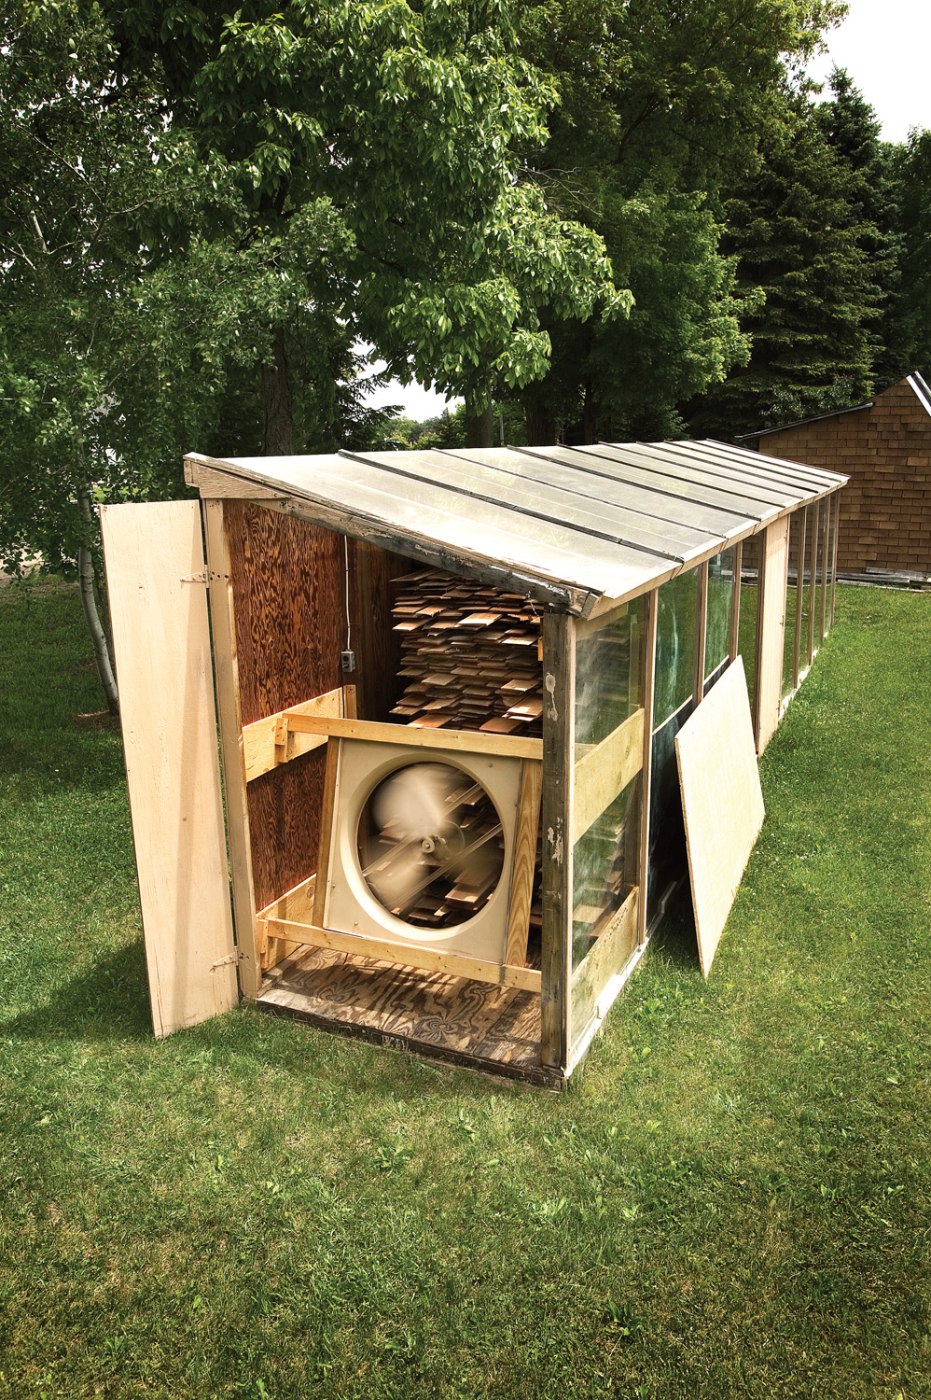
Solar kilns used at The Home Shop in Charlotte, Mich. Two 16′ kilns are joined at the middle by a 4′-section for sticker storage. The end wall is opened with the door to the left and the main panel is temporarily leaning against the outside.
A cost-effective and efficient way to take green boards to usable lumber.
The solar drying kiln is the most cost-effective way for the craftsman to get quality boards for woodworking from green lumber. Today there are many band saw operators cutting boards from trees that grow in abundance in much of America. The solar kiln is the link between this resource and the shop.
A wood kiln is any space used for controlling heat and humidity where lumber is dried. The solar drying kiln harnesses the free energy of the sun. It operates on the regular cycle of day and night to prevent wood stress that can ruin lumber in other systems. The scale of the unit at 1,000 board-feet (bf) capacity, plus the simple structure and affordable cost of running a fan, makes this solar kiln practical for the home craftsman or small professional shop.
The Basics of Drying
Evaporation from the surface of lumber occurs when surrounding air picks up the water. The capacity of air to hold water is dependent on temperature. This is expressed in the term “relative humidity,” where humidity is the degree of saturation in a volume of air, and the amount is relative to the temperature. When temperatures fall, moisture from saturated air precipitates. When temperatures rise, the air can hold increased amounts of water, making it effectively dry air. Hold on to this last statement because it is how a kiln works.
To give an example of relative humidity at work, take our homes in winter. Air passes in and out of the normal home every one-half to three hours for a complete air exchange. Outside air at 30° Fahrenheit (F) at a comfortable 60 percent relative humidity comes inside where it is heated to 70° F and is 20 percent relative humidity, because of the capacity of warmer air to hold more moisture. This phenomenon is even more at work at higher temperature ranges. The interval from 70° F to 120° F sees a 10-fold increase in moisture-holding capacity, which is the range in which the solar drying kiln works. The ambient air on a hot sticky day in summer at 100 percent relative humidity with little capacity for drying becomes desert-dry air of 10 percent relative humidity when the sun heats it to 120° F inside the kiln.
Another operating principle is the daily cycle of the sun’s energy shutting off at night. This is key to the trouble-free operation of the kiln. The danger inherent in standard hot-air dryers is the stress in wood due to surface shrinkage before core areas can dry. Such stress not only warps lumber, it is the cause of “case hardening,” which we encounter when sawing a board that will bind the saw blade. In the extreme, it can tear the core apart in a condition known as “honeycombing.”
In the solar kiln, the boards have a chance to “normalize” every day – what I like to think of as smoothing out the differences in moisture levels throughout the wood. Because of this daily cycle, you do not have to monitor the progress of drying to be sure to have good results. Nature does it for you. A word of caution: If you incorporate ways of shortening the drying time by having drying go on 24 hours a day, attention must be given to the impact it will have on boards because that then erases the normalization period.
Do You Need a Kiln
Who needs a kiln? What are the other options for drying small lots of boards?
A woodworker called for advice on drying box alder lumber cut into 4/4 x 6′ boards. Before giving him the rundown on solar kilns, I checked out whether he needed one at all. The quantity he had was about 200 bf, and of that it was the wood with distinctive reddish markings that he was most interested in drying.
First of all he was hoping that I would have room to dry it for him. The answer to that question is almost always “no.” It is very difficult to combine outsiders’ small lots into existing drying schedules. You will be fortunate if you ever find this to be a possibility.
Accordingly, with the small quantity involved, and no immediate time constraints, he could dry them at home. Knowing what it takes to dry lumber will open up on-site possibilities. This is what you need to do:
• Find a site with a temperature rise of 10° to 20° F or more above ambient air for a part of the day.
• Separate the boards to allow for equal drying on all sides.
• Provide for air circulation.
• Wait. It takes from a month to a year depending on thickness, species and optimal conditions.
Think about a space where it gets hot, like the space above your garage, the attic, a barn loft, etc. Your home during the winter will serve the need, since this is, after all, the environment in which furniture exists. There is a fair amount of moisture given off in the short initial loss of free water that might best be done outside before home drying. Your shop can serve your drying needs if you have the space. In winter, my shop serves to finish off wood that cannot dry in the solar kilns, as we heat the shop most days with a wood stove.
Boards are best stickered using dry 1″ square sticks that optimize air flow between layers. But sticks ¾” thick will work almost as well. The key thing is to keep the stack narrow and the boards spaced wide apart when depending on natural air flow. By tying into the building for support (C-clamp a strut to a stud for instance), it is possible to make a stack one board wide. If you can rig up a common box fan for air flow that would be best.
The ultimate in natural air flow is to stand individual boards on end. The next best is standing them on edge. The disadvantage here is the possibility of warpage in drying, as well as running out of space to store them.
Keep the basics in mind and you will find places already available. The most important act of all is to do it promptly. Keep it simple, but do it.
Build Diagrams


 Building the Solar Kiln
The kilns used in our business of providing wood to craftsmen who make Shaker oval boxes have a capacity of 1,000 bf to 1,500 bf of lumber. To give scale to this amount, 500 bf of dry hardwood boards weighs about a ton, or a good sized pickup truck load. Each kiln is a building wide enough to hold a 4′-wide stack, and long enough to fit the longest logs you are likely to have sawed. Our boards are 12′ long and the kiln is 16′, which allows for the fan at the end. You can adapt the size you build to suit your cutting needs.
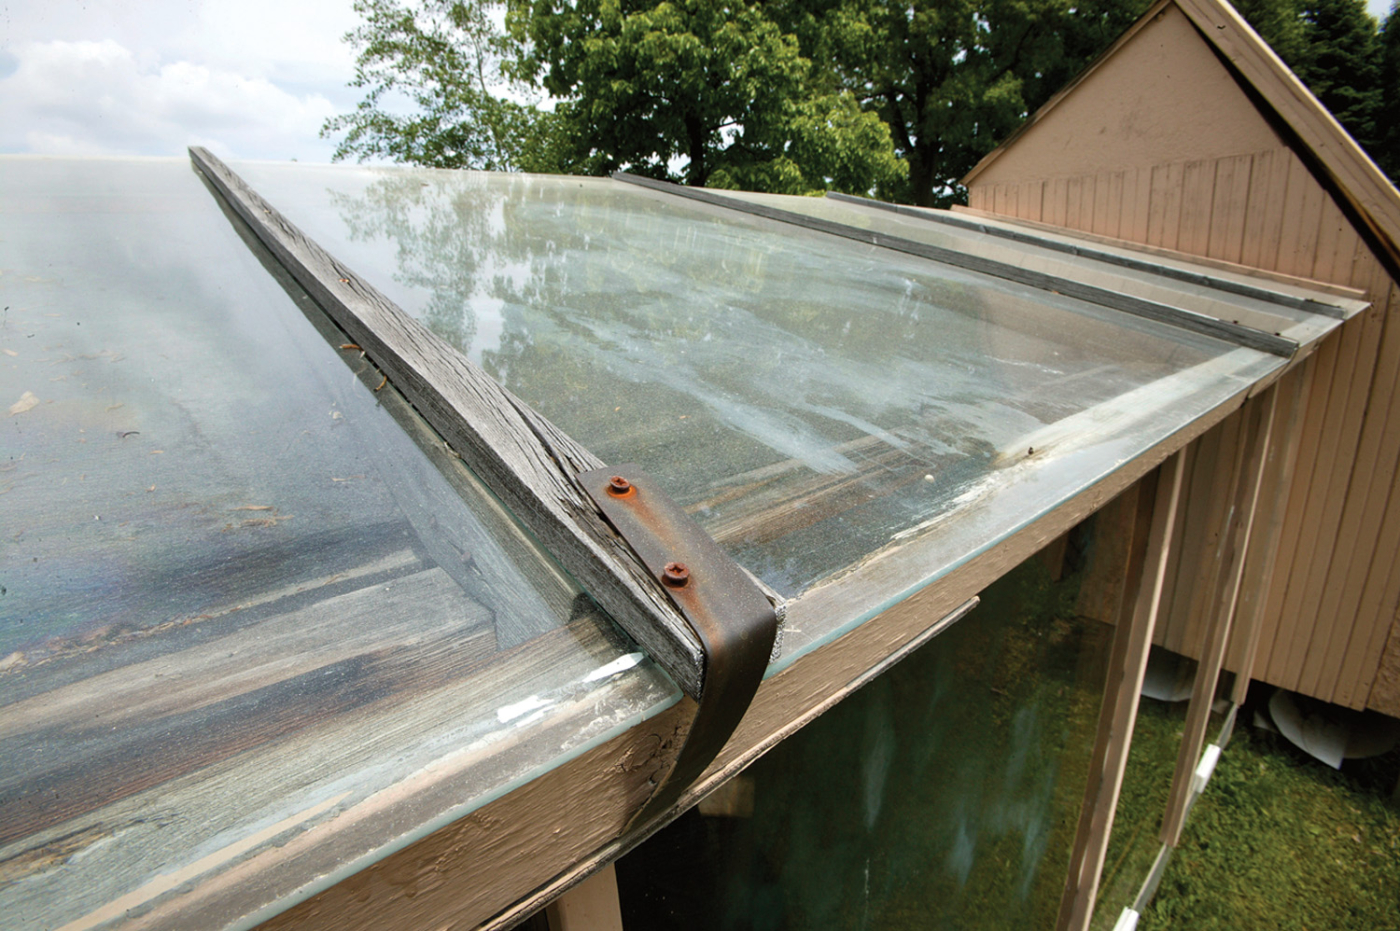
The window wall and roof make use of readily available salvaged sliding door glass panels, which are 76″ long. Each piece of glass lands on a rafter or stud and is held is place by a batten. The end of the rafter batten has a strap to prevent the glass from sliding.
The construction uses standard 2 x 4s, 1⁄2” plywood sides, a 3⁄4” plywood floor and 4 x 4s and cap blocks or short posts for a foundation. The south wall and roof are made from recycled tempered glass of the kind used in sliding patio doors. These thermopane units have a nasty habit of developing air leaks in the seals, which fogs the glass. Replacement is common, and used glass is readily available from those in the window business. The condition of the seal does not affect our use, because single-layer glass is used. To separate old thermopanes, run a utility knife around the edge to lift the glass off the seal. Do not clean off the remaining rubber seal on the glass as it will make for a better installation. We do not use double-pane glass because the night-time insulating qualities are not necessary as the kiln shuts down anyway, and in the day there would be a 10-percent sun loss due to the second layer of glass.
The plans show construction details for the building. Before building, however, you must obtain the recycled tempered glass panes. Their size will determine the spacing of studs and rafters, as well as the exact overall size of the building. The standard thermopane in 8′-patio doors is 46″ x 76″, and in 6′-patio doors, 34″ x 76″. Either size will work as it is the 76″ length that will span the roof. The edges of the glass need to be supported on 2 x 4 framing, which will be adjusted according to glass size.
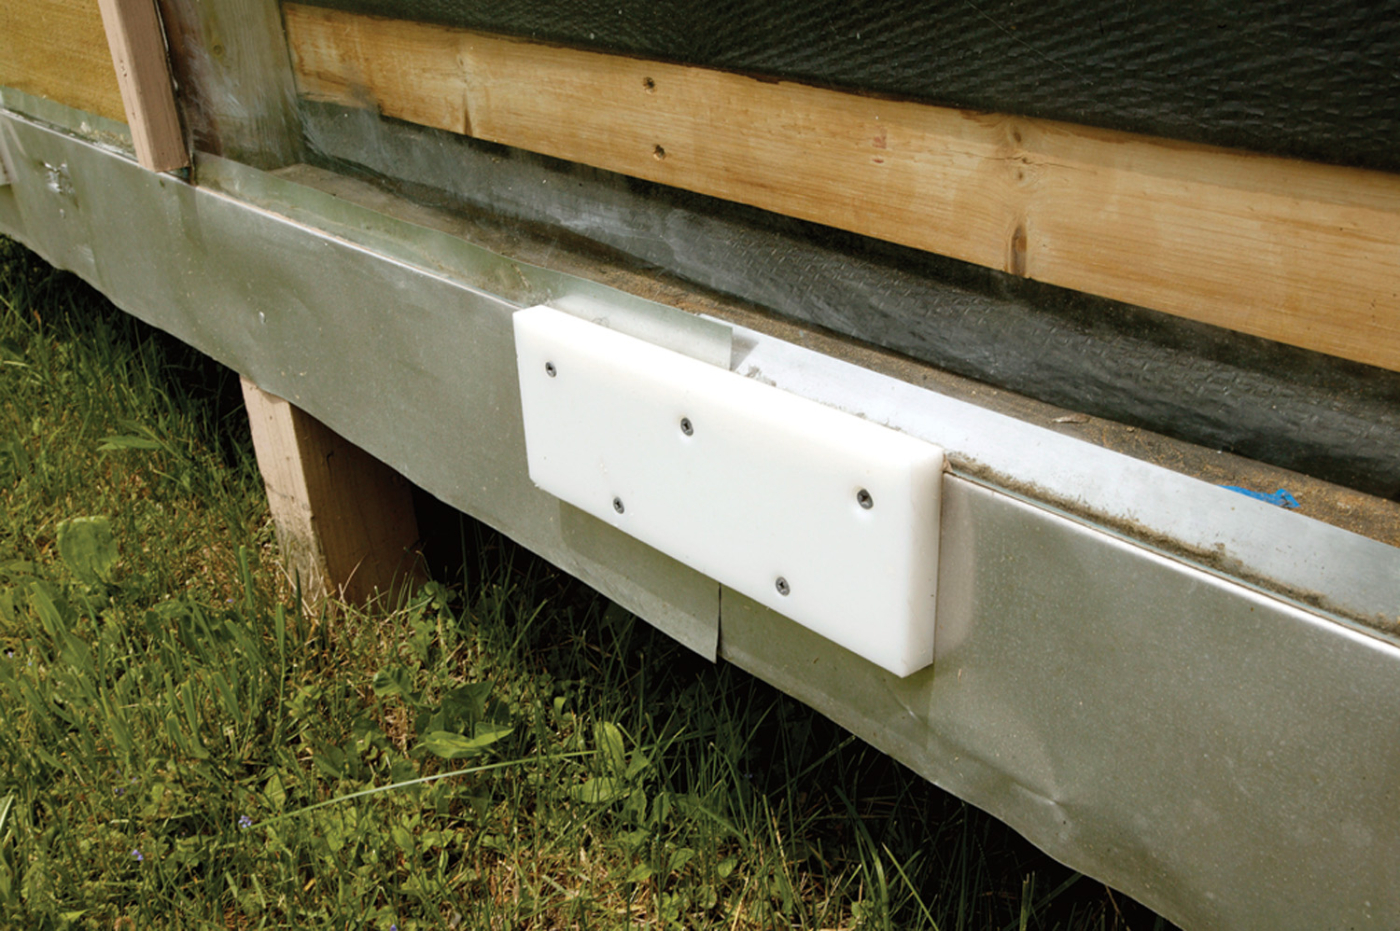
The bottom of the wall windows rests on a 1⁄4″ ledge in the framing. Aluminum flashing keeps water out while the glass is held in place by a block, in this case scrap Corian left over from a countertop installation.
I have learned from dismantling older kilns that the use of outdoor wood will add years to the building. Rafters, wall plates at top and bottom, floor plywood, and foundation framing need to withstand water. The simple wood-batten and deck-screw fastening of glass on the roof gives adequate service, but as it does not prevent some water leakage, the framing beneath needs to be rot resistant.
A word about air infiltration is in order. Do not be concerned with stopping up all the cracks and sealing the doors. This building works well with the level of construction used for a hen house. Some air flow from different places in the building is normal.
Two areas of structural concern for glass attachment are the foot ledge on which the south wall glass rests, and the straps over the eave end of roof glass. The plans show the use of flashing to cover the shelf that supports the glass sheets for the wall. Follow directions (shown in the drawings as well as the photo below) to achieve the 1⁄4” step in the flashing. The roof glass offers an interesting example of glass dynamics. Glass expands and contracts with temperature changes. Every time it does, glass tries to creep down the roof slope. To counter this, a strap made from a double fold of flashing 11⁄2” x 14″ is screwed into the rafter around the eave end. If these screws enter the eave board only and not the rafter, the entire board can be pushed out.

Bending the aluminum flashing used in the 1⁄4″ ledge on which the window wall glass will rest. Step one was to make a right angle in the flashing. Here, the final bend is facilitated by a board with a 1⁄4″ rabbet sawn in it and clamped to the bench.
The kiln works when air is warmed, circulated through the stack of boards, and a portion vented from the building laden with moisture. The glass south wall and roof provide solar energy for warmth. The adjustable soffits along the eaves provide escape for moisture. Air circulation within the kiln is provided by the fan. There is a great deal of resistance to air flow within a stickered pile of boards. To overcome this resistance, a high-volume fan is needed. A 30″-attic fan that operates in the 5,000 cubic feet per minute (cfm) range can do the job. Units are available from discount builders’ supply for $220.
The fan mounts on a removable 2 x 4 frame at the opening end of the kiln. The frame fits into holding slots so it can be lifted out for loading or servicing. The power is switched through a thermo switch of the sort used in farm silos. This will be set for seasonal nighttime temperature, which in Michigan is 70° F in the summer and 50° F in the spring and fall.
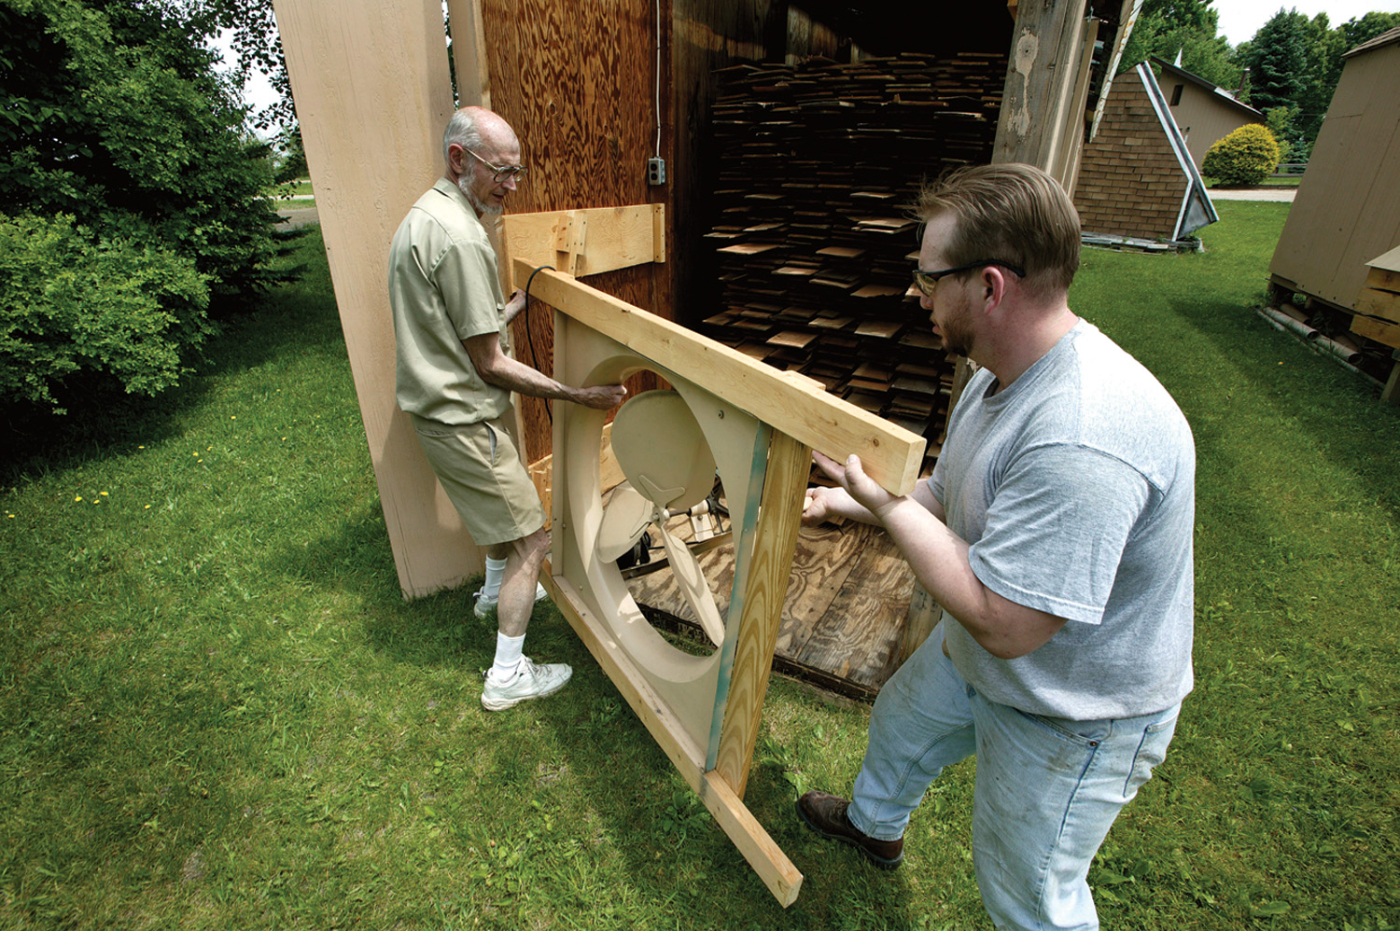
Before loading, the end of the kiln is opened by a hinged door panel and unscrewing a 4′-wide main panel. The 30″ fan is being removed to give access.
With this temperature switch in place, the fan operates during the day only. It switches off at night when there is little temperature advantage which allows the boards to equalize their internal moisture levels.
Operating the Kiln
Stacking lumber in this kiln is a hand operation because we are too small a business for the use of a forklift. Were mechanical loading desired, then a beam of two 2 x 12s across the top of the back wall would allow for removal of all the back plywood panels and supports when loading from the rear. As it is, we use a cordless drill to unscrew the plywood section in the back where a man stands to add sticks to the layers of boards during loading.
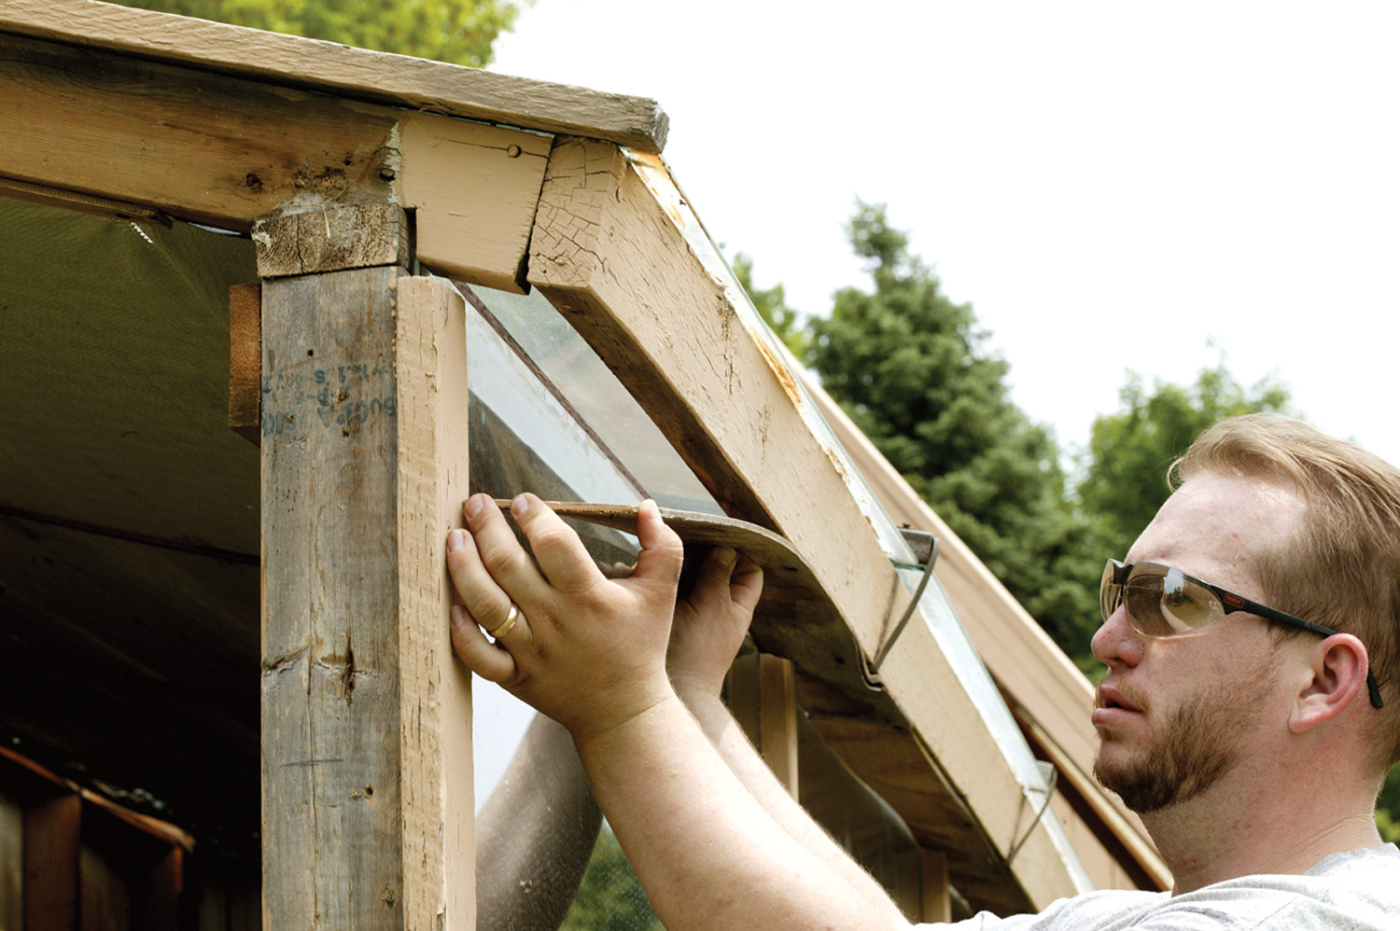
The space at the top of the window wall is opened by removing the soffit panels. It is when green wood is first introduced that this venting of moisture-laden air is necessary. Later in the drying cycle, the soffit is screwed shut to increase temperatures in the kiln, while moisture is dissipated through small cracks in the structure’s simple construction.
It also makes it bearable to work in there on a sunny day. The large end panel is secured and opened the same way. (The 16″-wide end panel is hinged to afford access to check as drying progresses.) Deck screws placed 18″ to 24″ apart has not been a problem for access the three or four times a year it’s needed. It should be noted that the end panel is structurally necessary to keep the building from sagging, so keep it screwed in place except when loading.

Here, we replace the fan, which will be plugged into a receptacle whose power is controlled by a thermostat. The end wall is closed by using drywall screws to secure the door and the main end panel.
When stacking lumber, use dry sticks 1″ square by 4′ long. Scraps cut while milling can be a source of sticks, but wet wood sticks can cause mold growth. Better to invest the time to make ones that are kept protected from rain when not in use. Ours are 3⁄4” thick by 1″ wide rather than the full 1″ squares of commercial operators. When loading, keep the sticks in line, one above the other, to avoid bending unsupported boards with all the dead weight of the load above. Spacing is three feet apart. You will need about 200 when filling the kiln.
Space the boards a few inches apart for air flow. We have experimented with different ways of moving air, and simply having a large-volume fan at one end blowing through the stack spaced with the edges of the boards 1″ to 2″ apart works. However, we often leave an additional chimney 6″ wide up the middle in the first half of the load. When drying is complete, unsticker the pile, as wood can easily reabsorb moisture during poor drying months.
Everyone asks how long it takes to dry lumber in a solar kiln. There are many answers, ranging from four weeks to six months. Weather, species of wood and thickness of boards are the major factors. Comparing solar drying with other systems, the night shutdown period means extended drying times for any size or kind of stack. The season of the year will predictably come as a major factor. Here in Michigan, the kilns work effectively March through October. During winter months, drying down to 12-15 percent moisture content (MC) will occur, but it takes warmer conditions to achieve full drying. When we need boards dry in winter, we unload a small number, like one-fourth of a total kiln, into the shop (which is heated every day). These are stickered using two ordinary 24″ box fans to finish the drying.
The two other factors affecting drying times are the species and thickness of the lumber. Softer woods dry in half the time of oak and maple. As the thickness increases, so does the length of time, and at least proportionately: twice the thickness, twice the drying time, or more.
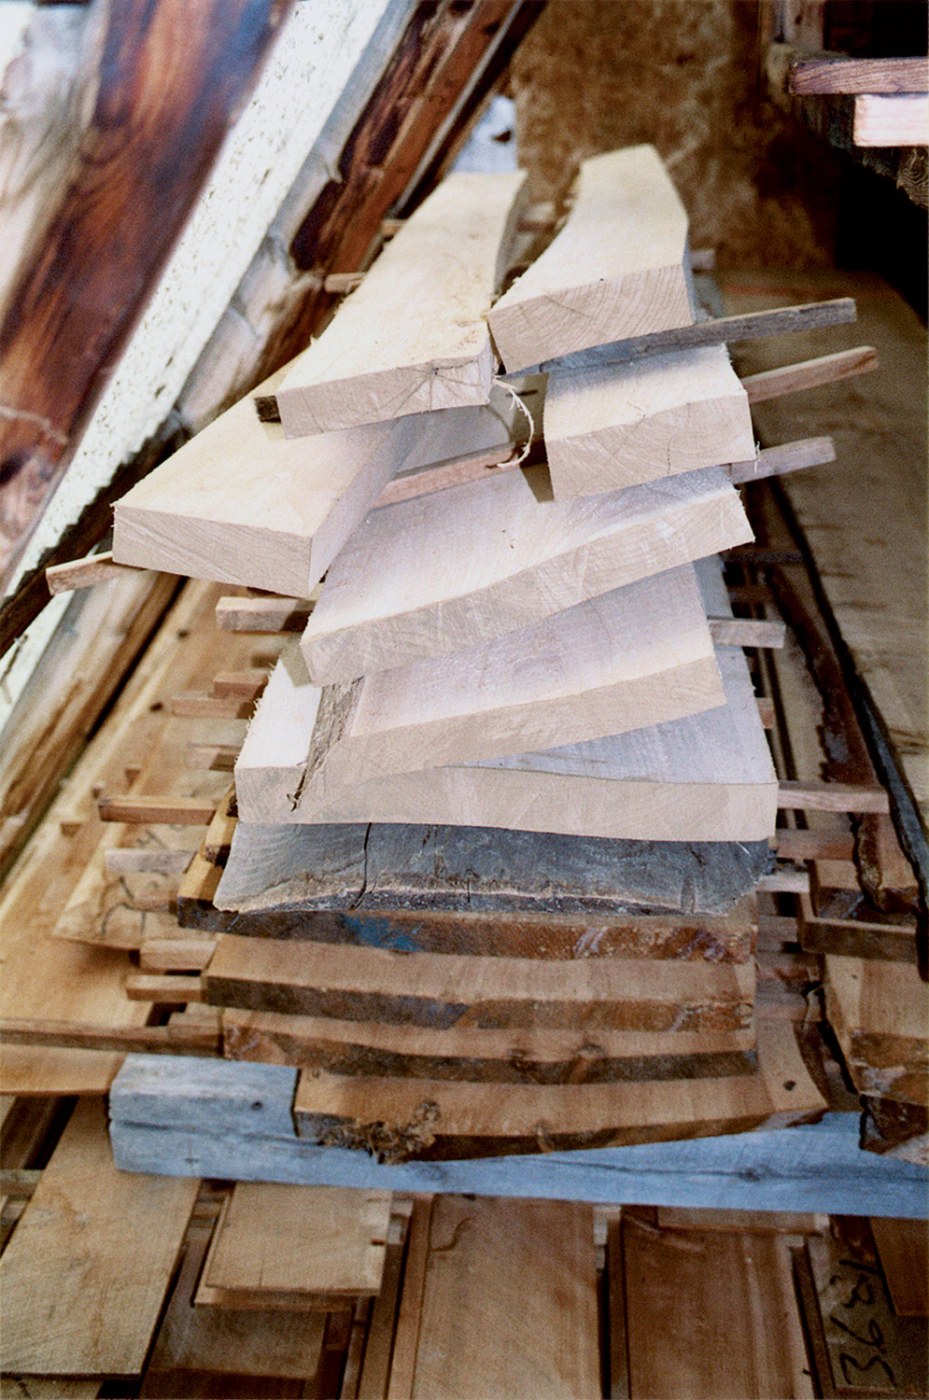
Some types of wood are prone to warping. Elm is one of them, especially when knots are present. Here, elm boards were set on top of the kiln load to dry. Without the weight of stacked boards on top, this is what happened a month later. It was so bad, one had to laugh! I never saw anything like it in 20 years. You can read all the reports, but at the end of the day, experience will be your teacher.
All of this means you need to have a moisture meter in order to operate a drying kiln. Also, check periodically while unloading, as the top layers dry sooner than lower ones do. Lignomat makes a line of meters, and the smallest unit, the mini-Ligno, is what we use. The regional standards vary a bit depending on local conditions. Here in Michigan, boards used in furniture making are 7 percent MC. Air drying will achieve 14 percent MC after a year. The reason for using a kiln is to finish the drying, shorten the time, and avoid defects from weather exposure, mold and bugs.
The benefits of these kilns remain outstanding for the small operator. They provide the means for converting readily available green lumber into finished stock. The low investment and small operating costs make it possible to easily begin with one kiln, and add another if needed. This can overcome the slower drying times inherent to such a system. Couple these economics with the self-regulating drying cycle, and you have a user-friendly system for the craftsman with a small shop.
Here are some supplies and tools we find essential in our everyday work around the shop. We may receive a commission from sales referred by our links; however, we have carefully selected these products for their usefulness and quality.


 Building the Solar Kiln


