


We may receive a commission when you use our affiliate links. However, this does not impact our recommendations.
By Jim Stuard
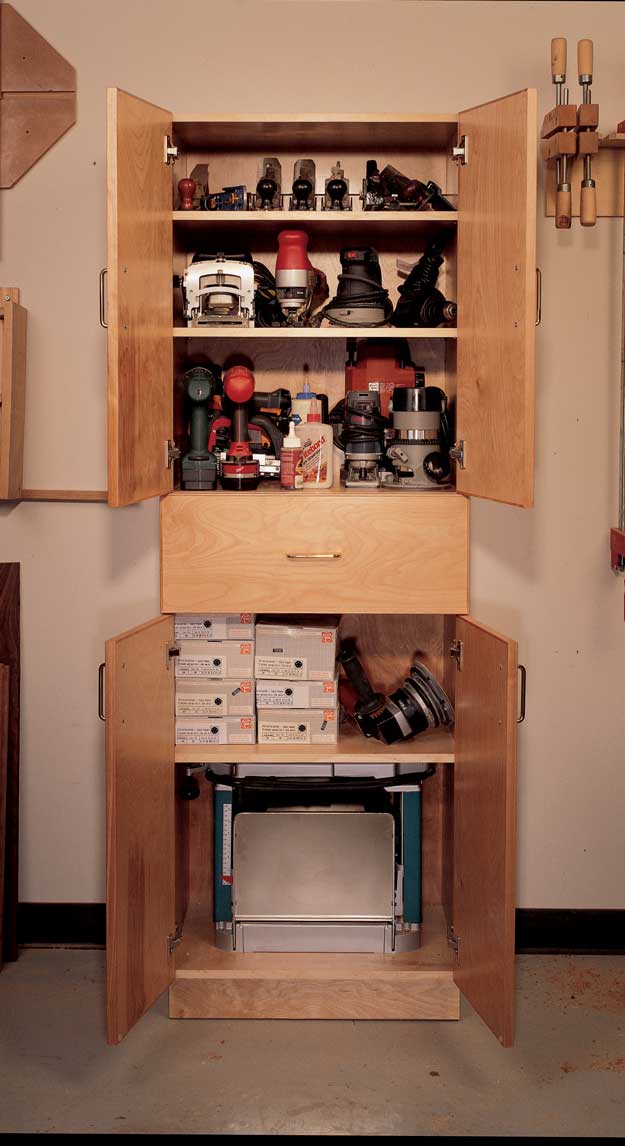
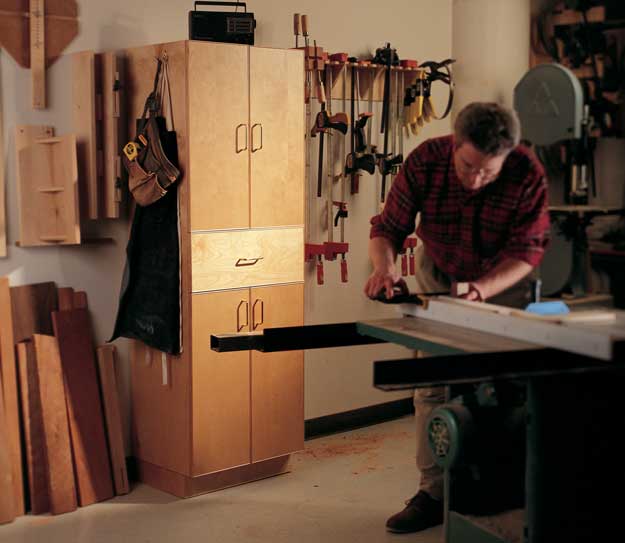
This shop cabinet squeezes 13 cubic feet of tool storage into less than 3 square feet of floor space.
If you’re like most woodworkers, your shop is packed to the gills with tools, tooling and accessories. Storing power tools on open shelves is no good; dust will get into the windings and shorten the life of your motors. You need an enclosed cabinet, and you need one that takes up less floor space than a band saw. This cabinet has a place to store routers, all the bits a woodworker could need and other accessories such as edge guides, bases and template guides. There’s also room for other tools such as jigsaws, sanders, biscuit joiners and even a portable planer.
Build the Case
Before cutting the plywood, check out the optimization diagram which shows you how to lay out the parts on two sheets of plywood. After the parts are cut to size, cut 1 ⁄2″ x 3 ⁄4″ rabbets on the ends of the sides to hold the top and bottom pieces. Unless your shop has high ceilings, you’ll need to cut the rabbets with a plunge router, straight bit and an edge guide. First set the router for the finished depth using your turret depth stop. Now raise the bit halfway and make a pass that defines the shoulder of the rabbet. Now climb cut (which is basically routing in reverse, moving the router backwards) the waste out to the edge of the board. Finally, plunge to the full depth of your rabbet and repeat the above procedure.
The next step is to cut the 1 ⁄4″ x 3 ⁄4″ dadoes in the sides. Mark the location of the dado and make a simple jig to rout it. The jig uses a bearing-on-top straight bit to guide against the edges of the jig. To make the jig, take the fixed shelf and place two strips of plywood against it on a flat surface. Place all this on top of two cross pieces on either end of the strips and glue and nail them in place. Leave a little room (about 1 ⁄2″) across the length of the dado cut to adjust the jig. Clamp the jig on the marked lines and rout the dado in two passes. Finish machining the sides by cutting the 1 ⁄2″ x 1 ⁄4″ rabbet for the back on the back edge of both sides, top and bottom. (If the cabinet won’t be attached to the wall, use a thicker back for stability.)

Here’s the simple jig to rout the dadoes. It uses a bearing-on-top straight bit to guide against the edges of the jig. Clamp the jig right on the marked lines and rout the dado.
Check the top, bottom and fixed shelf for a good fit, then glue and nail or screw the cabinet together. Fit the back and set it aside. Place the case on a flat work surface and add iron-on edging. Finish the case by gluing and nailing the hanging rail into the top of the case, flush with the rabbet in the back.
Build the Base
Now comes the adjustable base. When I made custom cabinetry, we often added an adjustable-height base to cabinets so we could compensate for uneven floors or walls. The base is a simple plywood rectangle. You attach the adjustable feet to the inside corners and drill holes in the case above the feet. This allows you to adjust the base with a screwdriver while the cabinet is in place.
The base itself is a simple mitered frame, with biscuits added at the miters. Cut the miters, then glue and clamp the base together. Make sure the base is square by measuring across the corners.
While the glue dries, cut out the blocks that hold the adjustable feet. They’re just 11 ⁄2″ x 11 ⁄2″ x 31 ⁄4″ blocks. Drill a centered, 7 ⁄16″ hole through the length of the block for a T-nut. Drill holes at right angles to one another in the block that will be used to screw the blocks to the base. Hammer in the T-nuts. With the feet threaded into the blocks, the entire assembly is about 4″ long. It should flush up with the top and bottom of the base frame.
Now it’s time to attach the base. Cut out four 3⁄4″ x 3⁄4″ cleats that fit between the levelers and drill mounting holes in the cleats for attaching the case bottom. Screw them in place about 1 ⁄32″ down from the top edge of the base. Make sure to position the base on the bottom. Temporarily screw the base in place with four 11 ⁄4″ screws.

Use screws and glue to attach the levelers to the inside corners of the base frame.The top of the block (the end opposite the foot) should be flush with the top edge of the base frame.

With the case on its back,take two hand screws and attach them to the back lip of the case, 1⁄4″ in from the back. This provides a little offset for the moulding on our walls.If you have larger base moulding where you are,make the base a little taller or less deep to accommodate the larger moulding. Place the base up against the case bottom. Center it on the bottom and temporarily screw it into place with four 11⁄4″ screws.
Take out all the feet and use a pencil to mark the location of the top of the leveler hole. Drill the holes using a piece of scrap to back up the hole or you’ll tear out the veneer on the inside of the case bottom. When you re-attach the base, you’ll be able to adjust the levelers using a straightbladed screwdriver.
Build the Doors
The doors are plywood slabs with a mitered moulding nailed to the edges. The moulding is a 3⁄16″ x 13⁄16″ solid wood edge with a bullnose routed on the front (see diagram). The bullnose is referred to as a cockbead, which is a common detail on period furniture from the 18th and 19th centuries. It’s an easy way to dress up a door or drawer front.
After the edging’s been applied, it’s impossible to sand into the corners, so begin making the doors by finish sanding the fronts of the doors and drawer fronts. Next, attach the moulding. First apply two opposite pieces, then fit and attach the last two pieces. Use a sharp pencil to mark the location of the miter cuts. Place the piece on the miter saw and cut to the line. You don’t always get the cut right the first time. Make your cut a little long and nibble away at the miter until you get a snug fit, then glue and nail the edges in place. We use Accuset’s micropinner to attach the mouldings. The 23-gauge pins don’t split the edge, and they leave a hole about the size of a period on this page. Putty the holes if you like. Rout off any overhang on the back side with a router and straight bit. Finish sand the backs.

After making the stock according to the diagram, take a piece and cut a miter on one end. Be sure to make the first cut with the bullnose up. This isn’t important for the first two edges, but it’s very important for the last two. Use a piece of scrap with a miter cut on both ends to test the fit of the miters.

When fitting the second set of edges,start by cutting the miter on one end. Flip the edge over and place what will be the bottom edge of the miter into the miter on the right. Gently press the flat edge up against the other miter. Mark the location of the miter and make the cut.

Drill the holes for the hinge cups on your drill press. Always make a test piece with a hinge and mounting plate to test your setup.

Take out all the feet and use a pencil to mark the location of the top of the leveler hole. Remove the base and drill 1⁄2″ holes into the case bottom.

Lay the plate on the marks and drill pilot holes into the cabinet.
You’re ready to hang the doors. The cups for European cabinet hinges are usually 35mm or really close to 13⁄8″. Using the instructions supplied with the hinges, derive a drilling location for the hinge cup. I’ve always drilled hinge cups about 3″ or 4″ in from the top and bottom of the door. This leaves enough room to adjust the hinge when mounted. The first thing is to drill the hinge cup holes. Set your drill press to drill the holes a little deeper than the cup. Now transfer the layout holes to the door on the cabinet. Attach the mounting plate and screw the hinges in place. European hinges can be adjusted in three dimensions: in-out, up-down and leftright. When the cabinet is level and plumb, adjust the hinges to make the doors even.
Build the Router Bit Drawer
The drawer uses standard construction. Cut 1⁄4″ x 1⁄2″ rabbets on the ends of the sides. Cut a 1 ⁄4″ x 1 ⁄4″ groove in the bottom inside edges of all the parts to hold the bottom. Glue and nail the drawer together with the bottom set into the groove. After the glue is dry, take apart the commercial drawer slides, scribe a line on the sides and attach the small part of the slide to the drawer box. Make sure it’s flush to the front of the drawer box.
Measure from the mounting line and add 3 ⁄4″ to that for the lid, hinges and gap. Measure that distance down from the inside, underneath the fixed shelf. Mark the location and mount the slide. The slides have two different mounting holes. The drawer has slots that allow up and down adjustment, and the cabinet parts have slots that allow forward/backward adjustment. Insert the drawer into the slides on the cabinet.

After attaching the slide to the drawer, mark the location of the cabinet part of the slide on the cabinet side.

Use a framing square to run a line back from this mark and mount the slide 1⁄16″ back from the front of the cabinet.
Before mounting the front on the drawer box, nail two finish nails through the front of the drawer box until they just protrude from the outside. Place the front against the drawer box and space it so the gaps on the top and bottom are equal. Push the front against the nails in the drawer box and gently push the drawer out. Drill some clearance holes and attach the front.

Position the drawer front and place a couple of clamps on the drawer box to hold it in place. Drill countersunk clearance holes into the drawer box and attach the front with 1″ screws.
Now nail on the drawer lid’s back rail and attach the lid with two hinges. Drill a 1″ hole in the lid so you can lift it easily. Cut out, drill and attach the two router storage inserts. Finish up the project by drilling a series of 7mm holes for the shelf pins. Make a template from scrap for this.

Use a stop collar on your drill bit when drilling holes for the shelf pins. I made this drilling jig from shop scrap.
Lee Valley sells metal sleeves for the shelf pins, but I deemed them unnecessary. You could probably get away with using a 1⁄4″ bit to make these holes, but it makes the pins fit a little sloppy. Attach the back with #6 x 1⁄2″ flathead screws. Check the fit of all the doors, drawer and shelves, then disassemble all the loose parts for sanding. Apply three coats of clear finish and reassemble all the parts.
Diagrams

Elevation

Profile

Profile of Drawer

Bullnose Moulding
Small Shop Storage Cabinet Cutlist
| 2 Sides | 3⁄4″ | 16″ | 68″ | Birch ply |
| 2 Top and bottom | 3⁄4″ | 16″ | 231 ⁄2″ | Birch ply |
| 1 Fixed shelf | 3⁄4″ | 153⁄4″ | 23″ | Birch ply |
| 4 Shelves | 3⁄4″ | 151⁄2″ | 221⁄2″ | Birch ply |
| 1 Back | 1⁄4″ | 231⁄2 | 671⁄2″ | Birch ply |
| 4 Doors* | 3⁄4″ | 12″ | 291⁄4″ | Birch ply |
| 2 Base front and back | 3⁄4″ | 4″ | 231⁄2″ | Birch ply |
| 2 Base sides | 3⁄4″ | 4″ | 14″ | Birch ply |
| 1 Cleats for base | 3⁄4″ | 3⁄4″ | 96″ | Solid wood |
| 4 Leveler blocks | 11⁄2″ | 11⁄2″ | 31⁄4″ | Solid wood |
| 1 Hanging rail | 3⁄4″ | 3″ | 221⁄2″ | Birch ply |
| 1 Drawer front* | 3⁄4″ | 93⁄8″” | 24″ | Birch ply |
| 2 Drawer sides | 1⁄2″ | 8″ | 151⁄2″ | Baltic birch |
| 2 Drawer front and back | 1⁄2″ | 8″ | 21″ | Baltic birch |
| 1 Drawer bottom | 1⁄4″ | 15″ | 21″ | Baltic birch |
| 2 Drawer rails | 1⁄2″ | 1″ | 201⁄2″ | Baltic birch |
| 1 Drawer insert slider | 3⁄4″ | 141⁄2″ | 12″ | Birch ply |
| 1 Drawer lid | 1⁄2″ | 121⁄2″ | 211 ⁄2″ | Baltic birch |
| 1 Lid back rail | 1⁄2″ | 3″ | 211 ⁄2″ | Baltic birch |
* Finished size with bullnose edging attached
Small Shop Storage Cabinet Supplies
Lee Valley Tools • 800-871-8158 • www.leevalley.com
4-107º Full overlay hinges,00B10.01
1-14″ Full ext.drawer slides,02K10.14
4-4″ Swivel leveler,01S06.04
4-3⁄8″-16 T-nuts (10 pc.),00N22.24
5-4″ Wire pulls,01W78.04
1-Coat hook,00W80.01
24-Shelf pins (50pc.),94Z03.02
1-25′ Maple edge banding,41A05.01
2-25mm x 15mm hinges,00D30.08
8-#1 x 3⁄8″ screws (10pc.),91Z01.02
This is offered by Lee Valley as a package priced at $72. Ask for item #05D1510
*Note: The screws supplied with the hinges use a #1 (square) drive. You’ll need a small #1 square drive bit.
This article appeared in the April 2001 issue of Popular Woodworking Magazine.
Small shop storage cabinet.

Discover everything you need to know to keep your woodworking shop in tip-top shape. These 7 resources include a variety of projects specifically designed to improve and organize your workshop. From hand tools to workbenches, this collection is full of helpful information and instructions from master woodworkers for both beginner and expert woodworkers.
Get your Ship-Shape Shop kit on shopwoodworking.com.
Here are some supplies and tools we find essential in our everyday work around the shop. We may receive a commission from sales referred by our links; however, we have carefully selected these products for their usefulness and quality.


