|
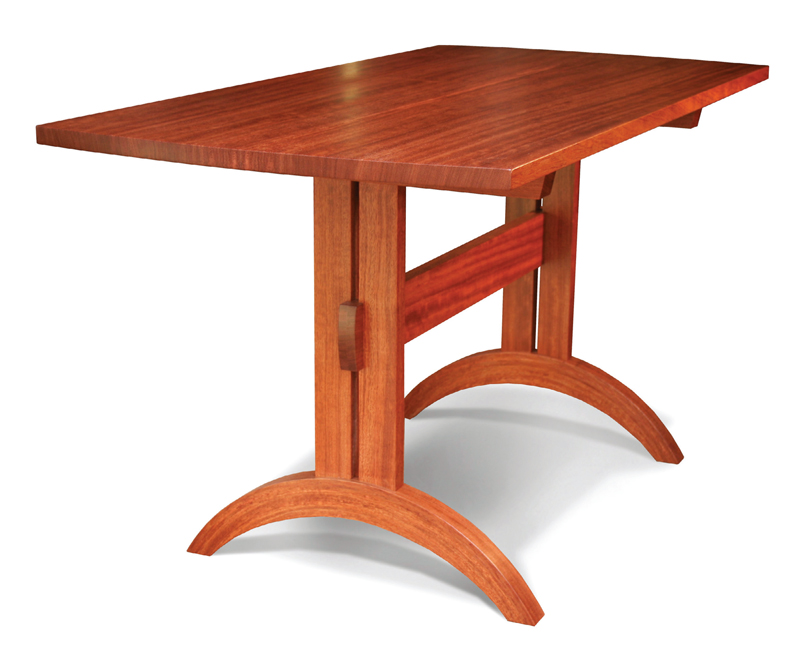
This modern interpretation of
a Shaker communal table appeals to
furniture maker Mark Love’s customers
because of its elegant simplicity,
ample legroom, and the fact that it’s
easy to clean under. But Mark loves to
build it because of the feet.
“Making these feet out of glued
laminations and seeing how beautiful
and strong they are when you do it right is thrilling,” Mark says. “Sam
Maloof made the rockers for his
famous chairs using the same technique.
Because the line of the grain
follows the arc, they are exceptionally
strong.” Building this table is an ideal
way to develop your bent-lamination
skills. It would be much easier to saw
the feet out of 7" wide boards, but
then the grain would run across the
arc instead of with it. This short-grain
orientation would make the
feet much weaker, and
more likely to break
under the table's
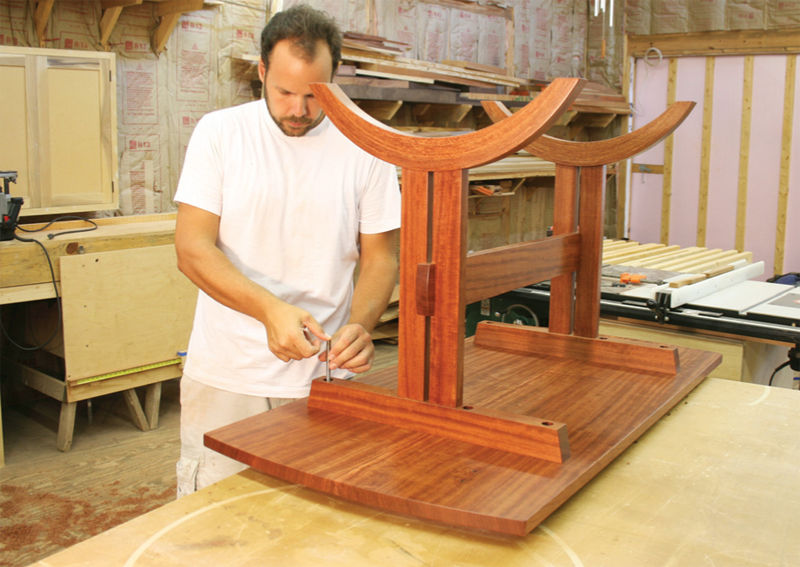
weight.
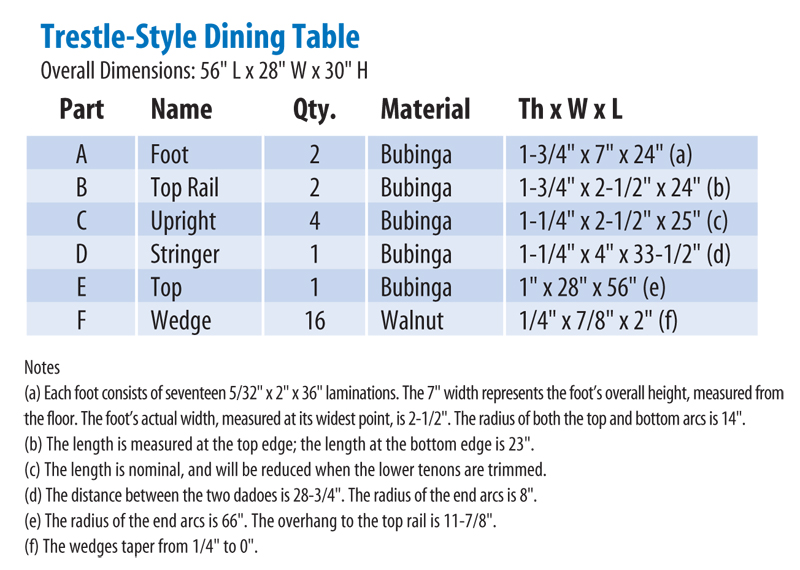
Materials
Mark built the 28" x 56" table
shown here out of a single board of
bubinga, an exotic hardwood with a
ribbony texture and reddish-purple
overtones. Bubinga is usually very
stable and straight. “It’s not essential
to make the table from a single board,
but I found one that was big enough
for my entire cut list,” Mark says. “It
was a fun challenge to figure out how
to do it, and I ended up with very little
waste.”
Rough out the parts
1. Roughsawn boards typically
have end checks (cracks in the ends)
that must be cut off. To make sure the
checks are completely removed without
wasting precious length, nibble
each end in 1/16" increments. Make a
crosscut and test the thin offcut—if it
breaks when you gently bend it, make
another crosscut. Repeat until you get
an offcut that won’t easily break. You
can often lose several inches on a piece
of hardwood by doing this, but it’s a
small price to pay when the alternative
is discovering cracks in the completed
project.
2. Lay out the parts on your boards
before you start cutting. You may
have to try several times in order to
find the right combination of efficient
use and good-looking pieces.
3. Mill everything to within 1/4" of
its finished dimension (Fig. A and Cutting List, below). Milling
often releases internal stresses in rough
boards, so once you cut the parts, sticker
them and allow them to rest (ideally
overnight) until the parts adjust to their
new width and thickness.
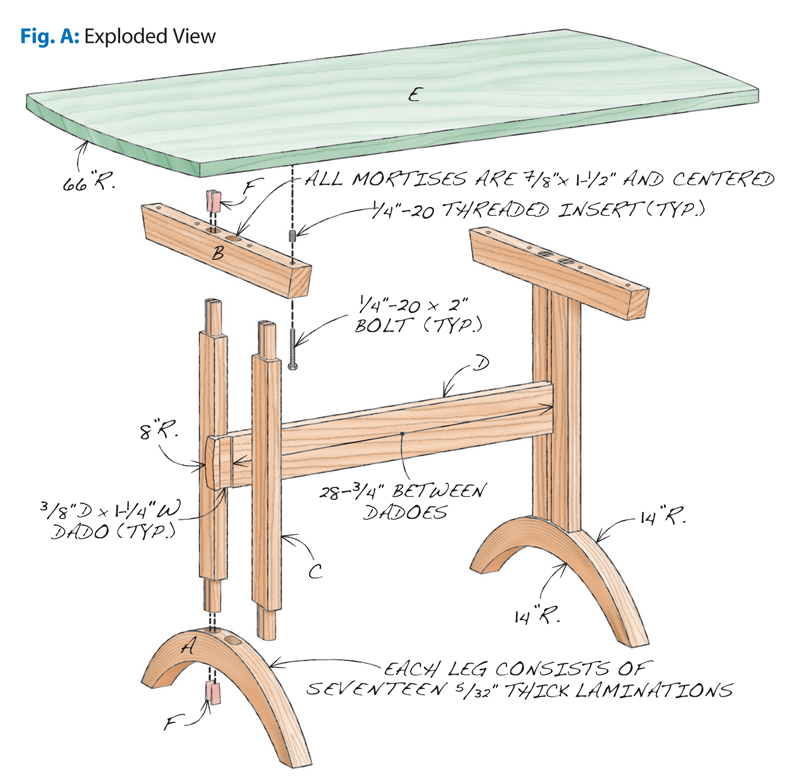
Laminate the feet
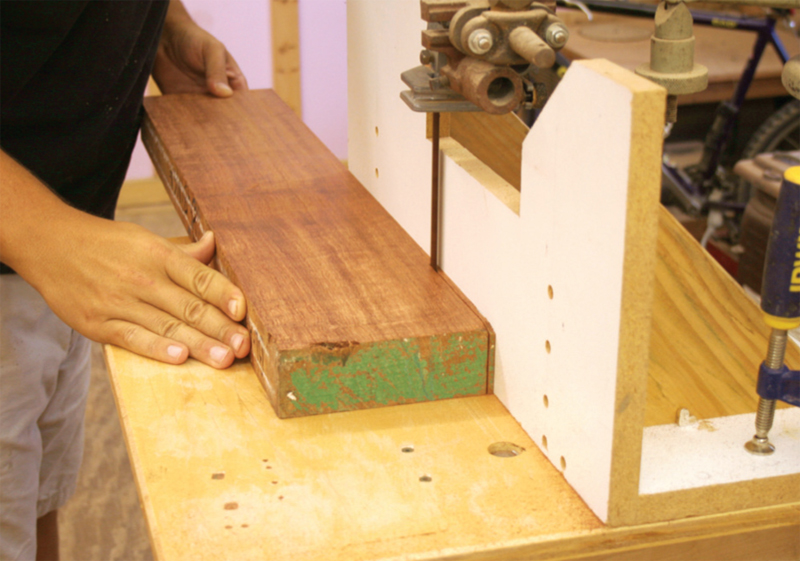
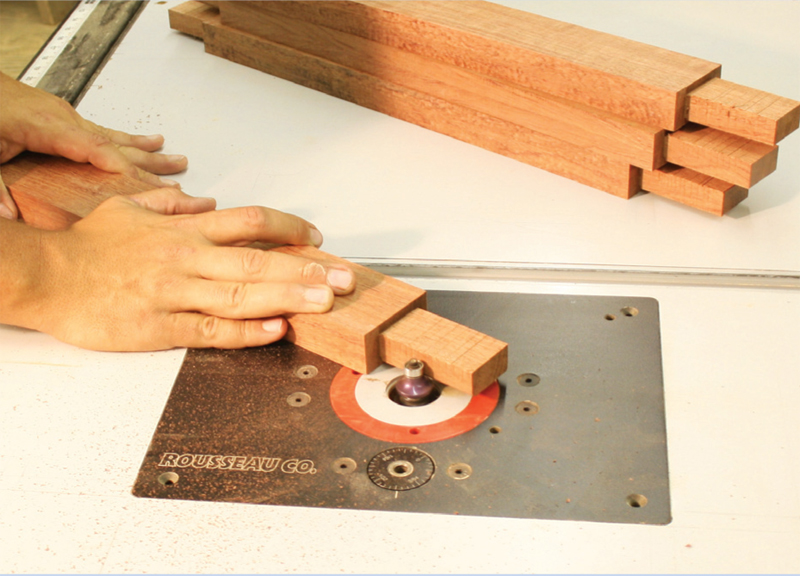
4. Each foot consists of seventeen
5/32" thick laminations. To make
the blank from which the laminations
come, mill a piece that’s 2"
thick and 36" long, with enough
width to yield about forty 3/16" thick
laminations. You can use multiple
blanks if you don’t have one wide enough to get all the laminations,
as long as the color and grain are
consistent. Joint one edge of the
blank. Then using the bandsaw, rip
a 3/16" thick lamination and set it
aside (Photo 1). The bandsaw leaves a
rough edge, so you’ll have to joint the
blank after ripping each lamination.
Repeat the process until you end up
with 34 laminations (plus extras, for
insurance) that are jointed on one side
and bandsawn on the other.
5. Run the laminations through the
planer, jointed side down, until they
are all precisely 5/32" thick.
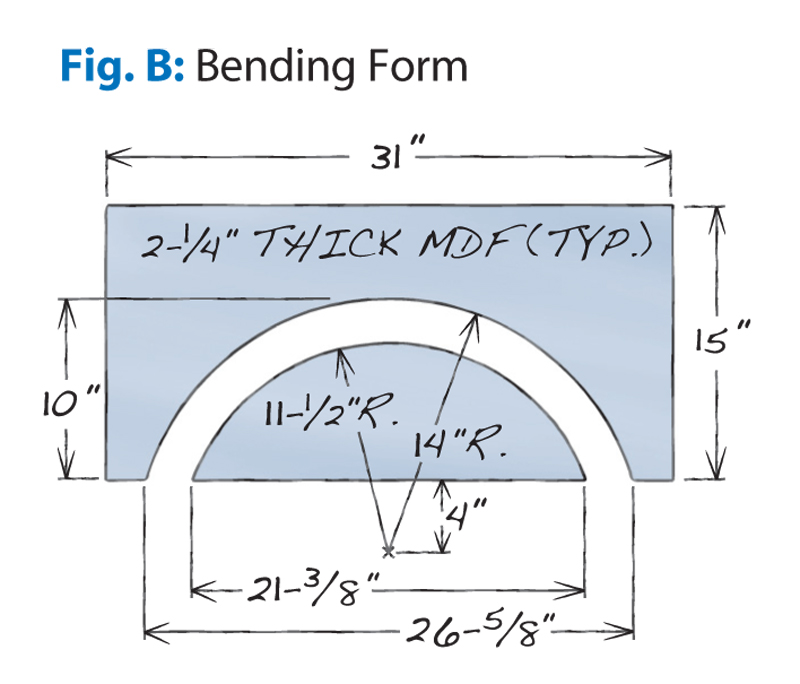
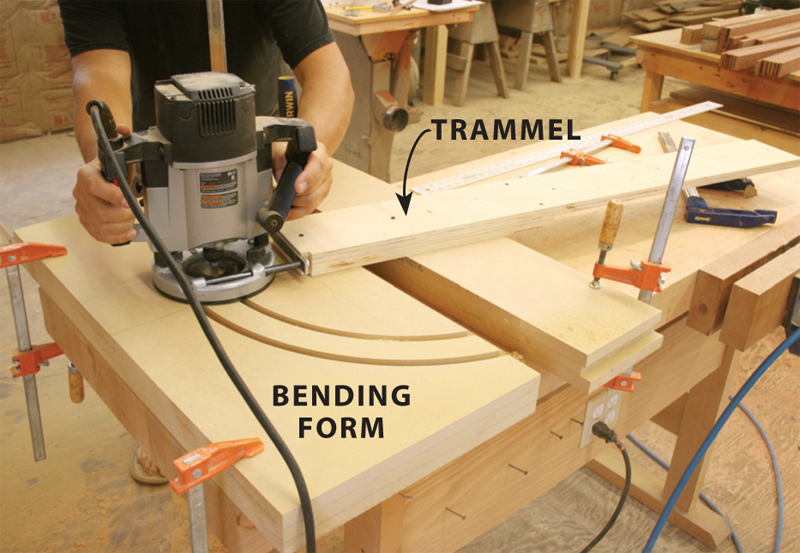
6. Glue together three pieces of
3/4" MDF to make the bending form
for the feet (Part A, Fig. A and Fig. B).
Cut concentric arcs into the form by
setting the router up twice, but keeping
the same pivot point on the trammel.
Using a 1/2" straight bit, make
several passes until you have gone
as deep as you safely can. (Photo 2).
Take the form to the bandsaw and cut
along the channels you’ve just made.
Flip over the two jig parts, so the
rough edge left by the bandsaw is at
the top. Then remove the rough edges
by routing with a flush-trim bit. Rub
paraffin wax on both of the completed
form's arcs to keep the laminations
from sticking during glue-up.
7. Clamp 17 of the laminations in
the form without glue and replace any
that crack (Photo 3). Prepare to work
quickly when you’re ready to glue—
yellow wood glue has only about five
minutes of open time. Apply glue to
one side of all 17 laminations and
stack them, maintaining the original
order to preserve consistency of the
grain. Do not put glue on the outside
faces of the top and bottom laminations!
Place the stack in the form and
clamp it together. This assembly is
under considerable stress, so wait 24
hours before you remove the clamps.
8. The sides of the feet are rough
when they come out of the bending
form. Scrape off the squeezed-out glue
and joint one side to flatten it. Then run
each foot through the planer, to flatten
the other side. Mill the feet to final 1-
3/4" thickness.
9. Use a shopmade “lazy Susan” jig to true the curved top edge of each
foot (Photo 4). Fasten the foot to the
jig’s 14" radius circular piece with
screws near the ends, so that it barely
protrudes (about 1/32") beyond the
edge. The ends of the foot will be cut
off, so the screw holes won’t matter.
Clamp the jig’s bottom (square) piece
to the sander's table so that the foot
almost touches the belt. Then gently
tap it forward with a hammer until it
just touches. Rotate the foot back and
forth until your edge is smooth.
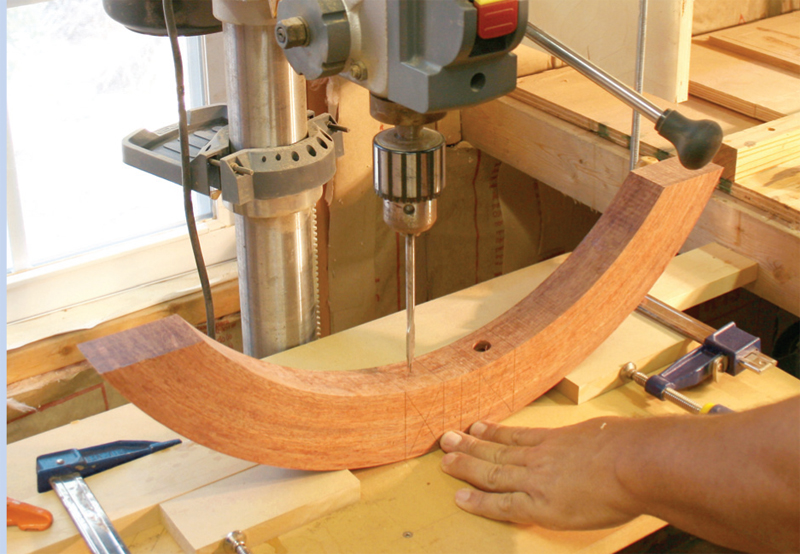
10. Cut each foot to its final 24"
length. Lay each foot on its side and
square a straightedge across the ends,
7" down from the top, at the center.
Draw a line across both ends. At this
line, the foot should measure 24" from
tip to tip. Bandsaw each end below
the line. Then sand to it (Photo 5).
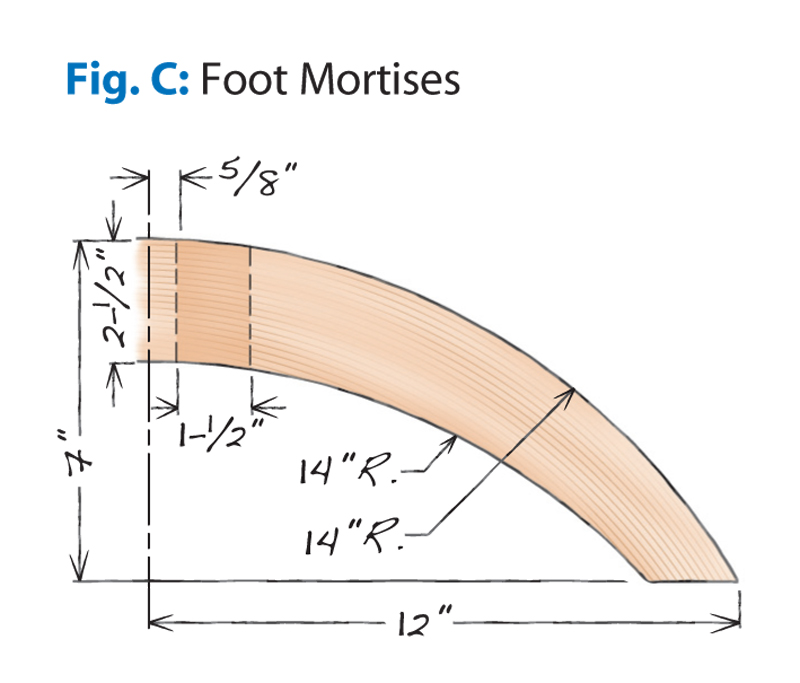
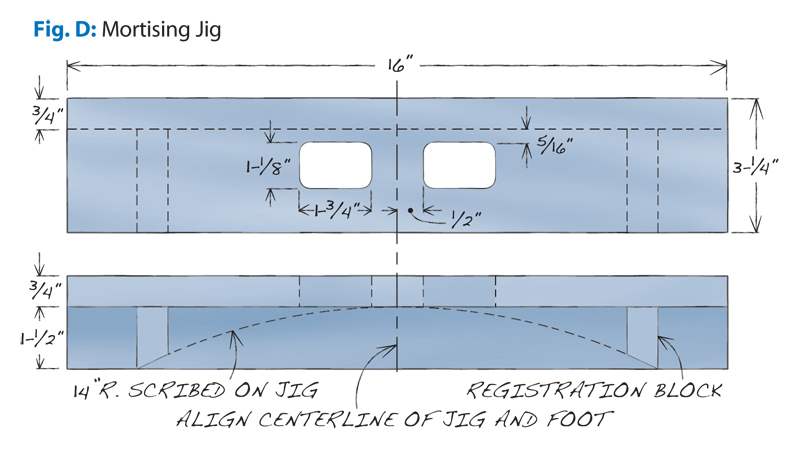
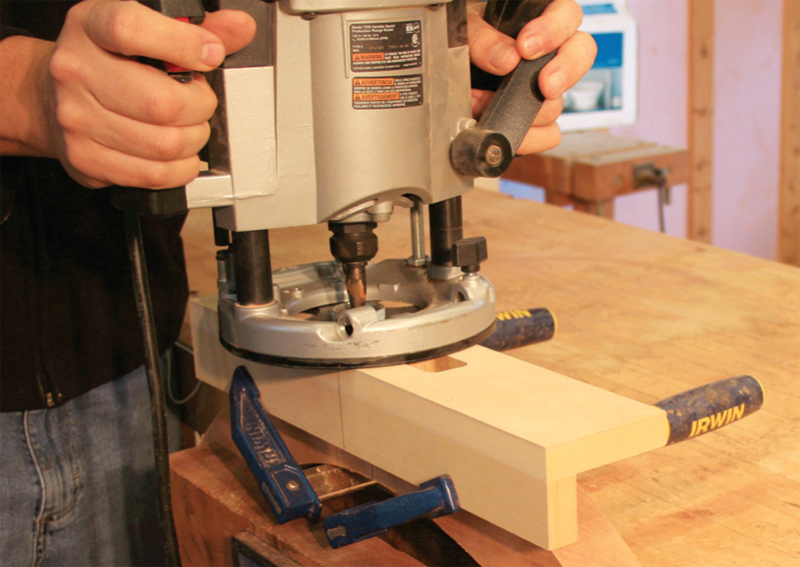
Rout mortises
11. Two through mortises must
be routed in each foot (Fig. C). The
surfaces are curved, so a pair of jigs
are required to complete the job. The
first jig guides the router on the top
of the foot (Fig. D). The holes in the jig
are larger than the mortises by 1/4"
all around, which allows using a 3/4"
guide bushing and a 1/2" mortising bit
to rout the mortises. Find the centerline
of each foot (Photo 6). This line will be
your reference for positioning the foot
in the mortising jig. Centerlines marked
on both sides of the jig match up with
the lines marking the center point of
the foot. Clamp the jig to the foot,
using small clamps that run underneath
the foot. Clamp the assembly in
your bench vise and then plunge-rout
the mortises halfway through the foot
(Photo 7).
12. Finish the mortises from the
bottom of the foot. First, drill pilot
holes (Photo 8). Then use an improvised
platform to hold the router level
and a flush-trim bit to finish the mortises
(Photo 9).
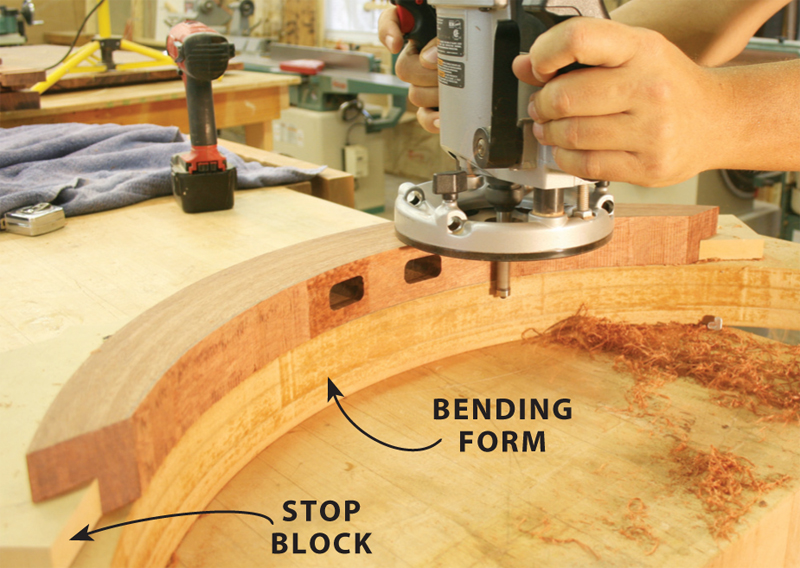
13. Rout the bottom edge of the
foot, to lighten its appearance. Simply
use the top half of the bending form
to rout a 14" radius. Install a stop block
to secure the foot and rout the arc
with a flush-trim bit (Photo 10).
Finish-sand
before assembly
14. At this point, finish-sand both
feet. “Nothing affects the final finish
as much as sanding does,” according
to Mark.
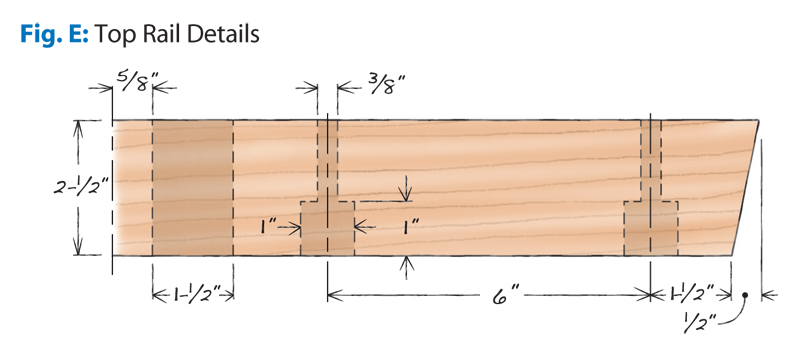
Make the top rails
15. Mill the top rails (B) to their final
dimensions, and mark their through
mortises (Fig. E). There’s no need for a
jig to rout these mortises, because the
router will ride nicely on the flat surface.
Install a 1/2" upcut spiral bit and
set the router’s edge guide exactly
7/16" from the outside of the bit. Then
plunge-rout each mortise from both
sides. This creates a perfectly centered
7/8" wide mortise, although a bit of
chisel work is required to flatten the
peaks left where the two cuts meet.
Use the drill press to drill the counterbored
holes, through which the bolts
that secure the top will go. Drill 1"
deep with a 1" Forstner or spade bit,
and then switch to a 3/8" brad point
bit to drill the shank holes.
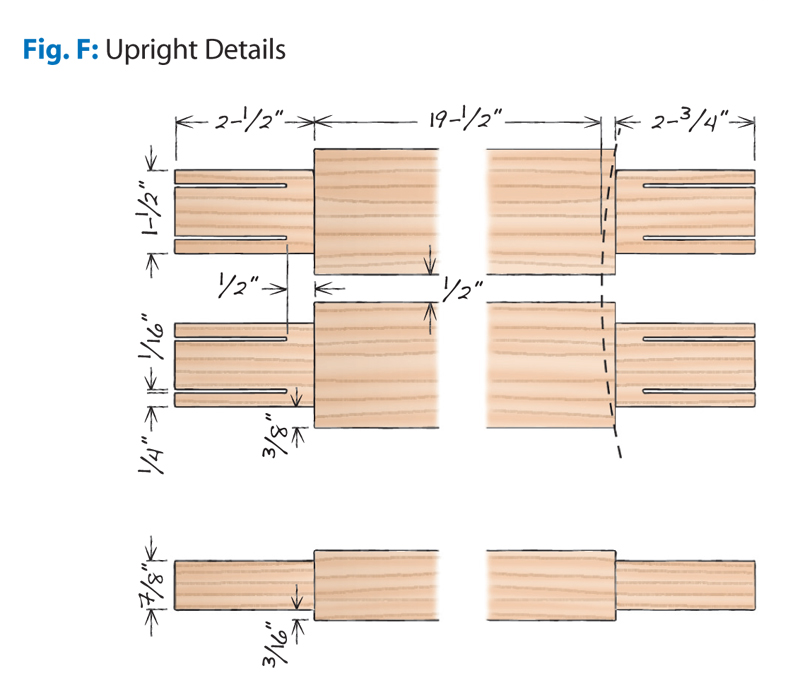
Cut the tenons
16. The uprights (C) feature
wedged tenons on both ends (Fig. F).
Note that the bottom tenons are longer.
Start by cutting the tenon shoulders
on the table saw, using the miter
gauge equipped with a fence and
a stop block. Saw the tenon cheeks
slightly oversize on the bandsaw. Then
install a dado set to precisely cut the
tenon cheeks to final thickness.
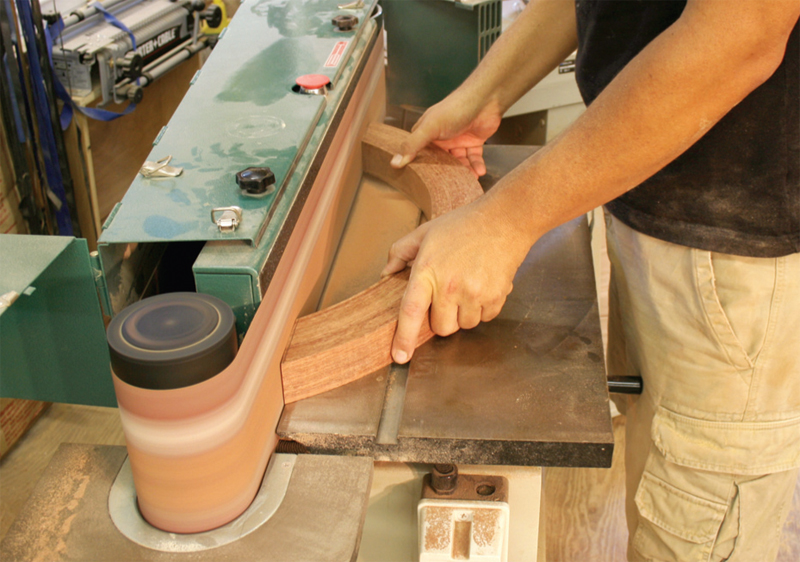
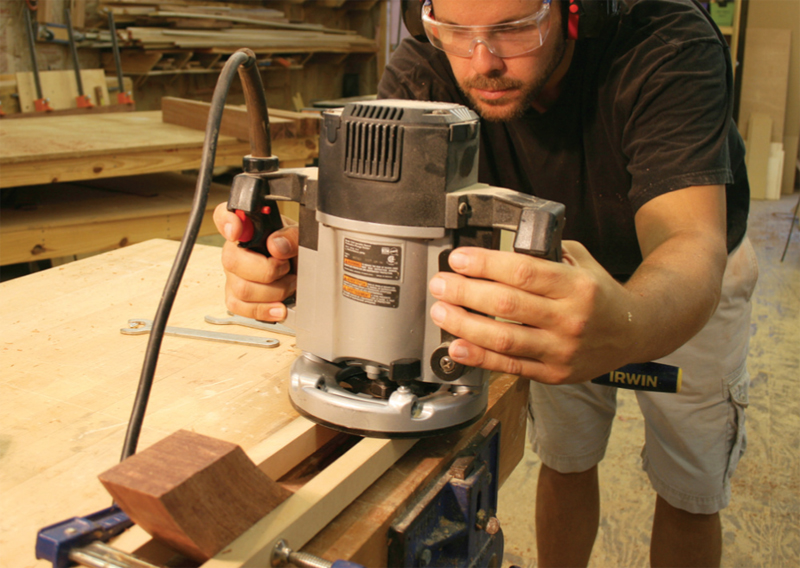
17. Radius the tenon edges to fit the
mortises with a 1/4" roundover bit, followed
by paring or sanding (Photo 11).
18. Assemble each end to make
sure everything fits. Disassemble the
parts and then use the bandsaw to cut
slots in each tenon for the wedges.
19. Shape the bottom shoulders of
the uprights, so they fit properly on
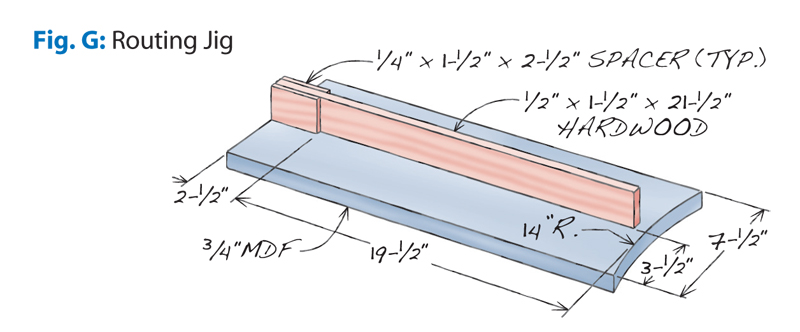
top of the arched foot. Make a jig to
hold each pair of uprights for routing
(Fig. G). The jig has a 14" radius arc to
match the foot and a center divider
that exactly positions the uprights.
Place an upright on each side of the
divider with its top shoulder registered
against the 1/4" spacer. Clamp
the uprights together across the jig.
Flip the assembly over and mount it
in your bench vise. Then use a flushtrim
bit with a top-mounted bearing
to rout the uprights' arched shoulders
(Photo 12). Flip the uprights over,
reinstall them in the jig, and repeat
the process to rout the remaining
shoulders. After routing, you'll have to
finish the job by hand (Photo 13).
20. Fit the tenons in the mortises
and check the shoulders. The bottom
tenons will protrude. Cut off the extra
length, leaving just a bit to be cleaned
up later with a flush-trim bit.
Assemble the base
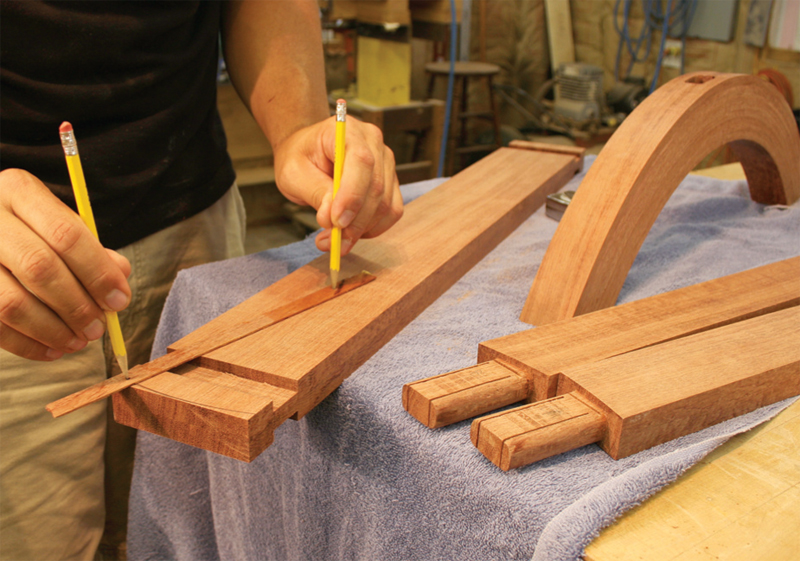
21. Mill the stringer (D). Then locate
the dadoes for the uprights (they’re
spaced 28-3/4"). Size the dado widths
so that the unsanded uprights will
almost, but not quite, fit. When the
uprights are finish-sanded, they’ll fit
perfectly.
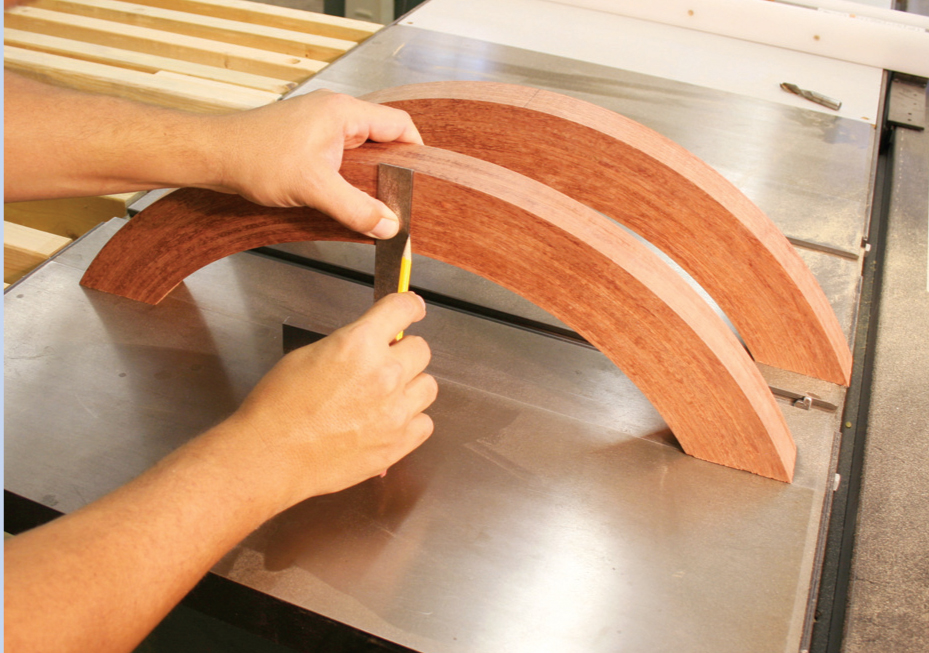
22. Draw the arc on each end of the
stringer and then sand to the pencil
line (Photo 14).
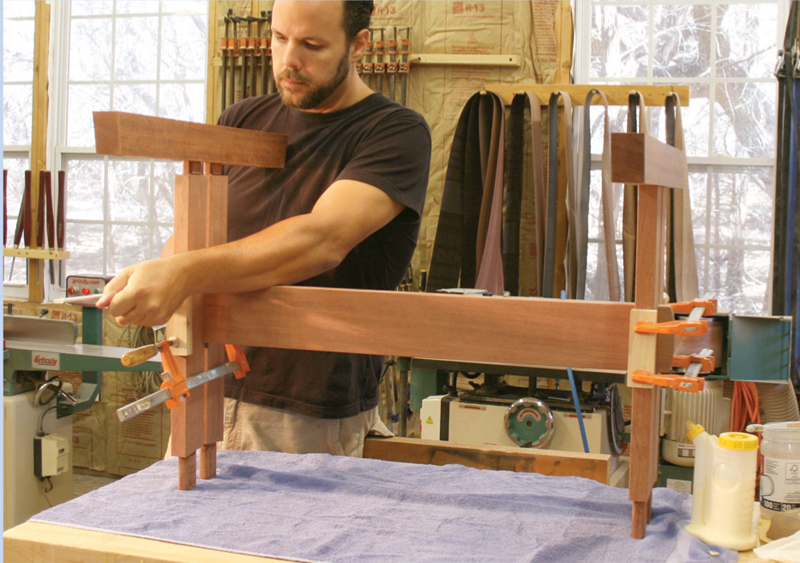
23. After finish-sanding all the
parts, it’s time to assemble the base.
There’s no joinery to hold the uprights
to the stringer, so carefully measure
and mark the centerpoints on
both the uprights and the stringer,
and match them up. Brush glue into
the dadoes, install the uprights, and
gently apply clamps. Then knock on
the top rails to keep everything in
place (Photo 15). Allow at least a couple
of hours for this assembly to dry.
24. Remove the top rails, apply
glue around all the tenons and slide
them back on. Repeat with the feet
(Photo 16). Draw the parts together
with clamps, using small wooden
blocks to protect the already finishsanded
pieces.
25. Complete the base by driving in
the wedges that spread and lock the
tenons (Photo 17).
Glue up the top
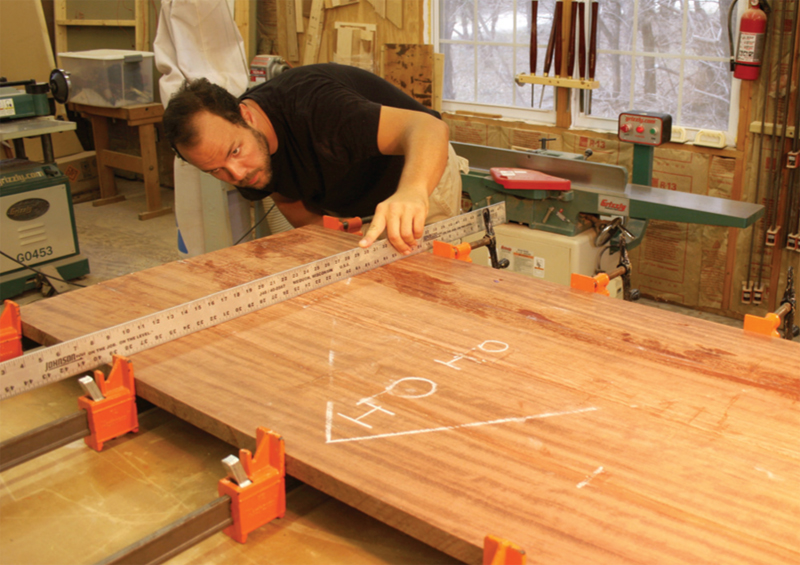
26. Lay out the rough-cut boards
you’ve set aside for the top (E) to create
a pleasing appearance. Once you’re
satisfied with your layout, draw a chalk
triangle on the boards to make it easier
to maintain the order as you joint the
all the edges. Alternatively mark the
edges “I” and “O” to designate which
side goes “in” or “out” against the
jointer fence. This cancels out unsatisfactory
results caused by a slightly outof-
square jointer fence. Check the fit of
each joint as you joint the edges.
27. Although they aren't absolutely
necessary, you may want to use biscuits
or splines to align the boards
for gluing. Mark swears by Domino
tenons, spaced at 10" to 12" intervals.
Spread glue on the edges of each
board and then glue and clamp the
top (Photo 18).
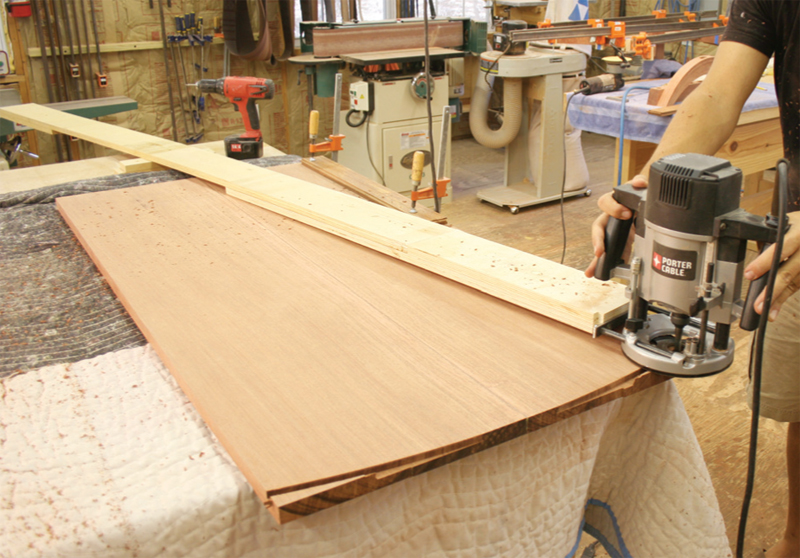
28. Use a shop-made trammel to
rout the 66" radius arcs on the ends of
the top (Photo 19). Then finish sand.
Apply finish and
attach the top
29. Apply your favorite finish to the
top and the base. Mark uses a HVLP
gun to spray lacquer in satin finish.
Let each coat dry, sand with 400 grit
paper, and then spray another coat.
30. Now the base is sanded, finished
and ready to go. Place the top
upside down on a blanket to protect
the finish. Then measure and set the
base onto the top where it will go.
Poke a 3/8" brad point drill bit through
the holes in the top rails and tap it
with a hammer to mark the top.
31. Drill 9/16" deep holes in the
top and use a T-wrench to drive in
the 1/2" brass threaded inserts (see
Source, below). Position the base
on the top and fasten it (Photo 20).
There’s enough play between the 3/8"
shank holes in the top rails and the
1/4" bolts to accommodate the top’s
seasonal movement.
Source
McFeely’s, mcfeelys.com, 800-443-7937, 1/4-20 Brass Threaded
Insert, #3606-BI-D, $12.35 for 25.
See plans for a large version of this trestle table.
Cutting List

Fig. A: Exploded View
Fig. B: Bending Form
Fig. C: Foot Mortises
Fig. D: Mortising Jig
Fig. E: Top Rail Details
Fig. F: Upright Details
Fig. G: Routing Jig
This story originally appeared in American Woodworker April / May 2010, issue #147.
April / May 2010, issue #147
Purchase this back issue.
|
|
Click on any of the images to view a larger version
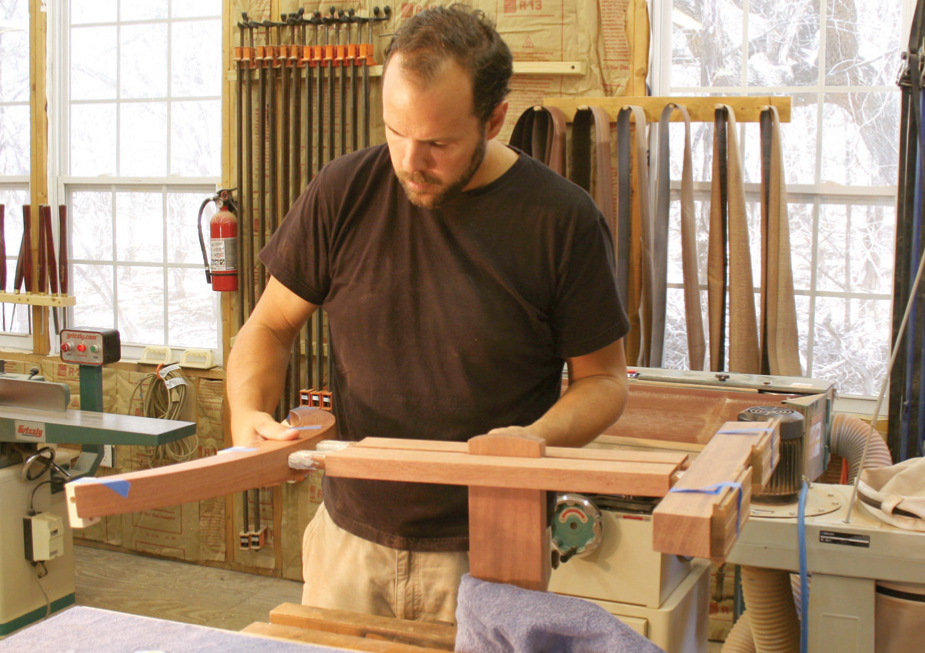
1. Saw laminations
to make the
feet. Each foot
contains seventeen
5/32" thick laminations.
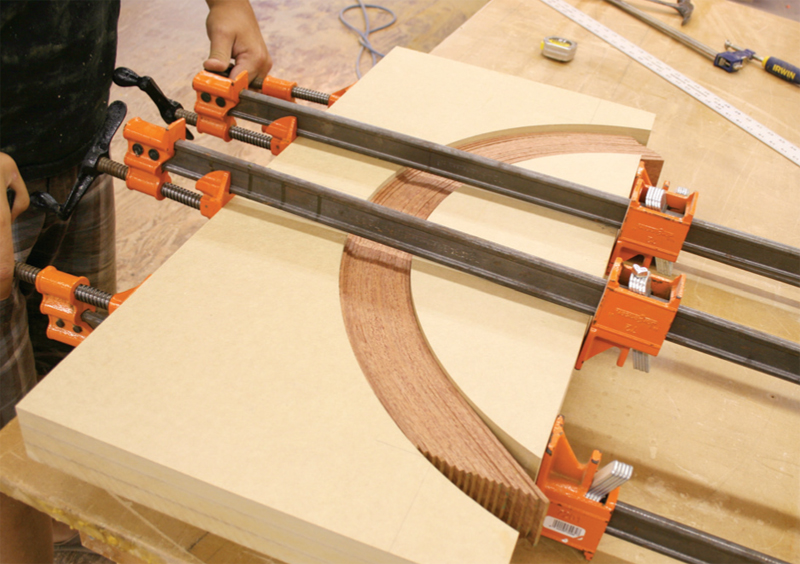
2. Make a bending
form to laminate
the arched feet. Use
a shopmade trammel
to rout a pair of
arches in a glued-up
MDF blank. Remove
the curved section
in the center to
create the two-part
form.
Watch a video showing how to glue up a bent-laminated foot.
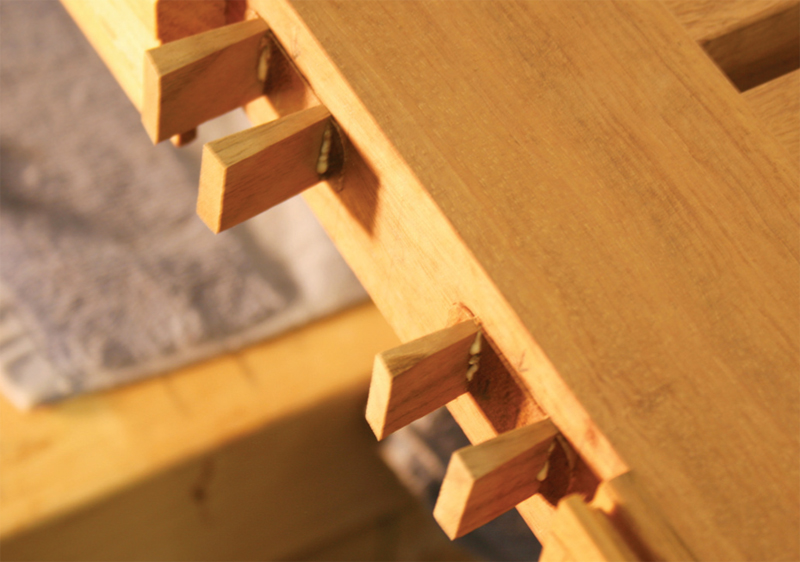
3. Test-bend the
laminations without
glue, and replace
any that fracture.
When the laminations
draw together
easily and tightly,
without any gaps,
they’re ready to be
glued. Unclamp,
apply glue to each
lamination and then
clamp them all back
together.
4. The curve on
the top surface of
each foot must be
consistent, so screw
it to a “lazy Susan”
jig and sand down
the high spots.
5. Sand the bottom
of each foot
flat after cutting it
to final length.
6. Stand the feet
on a flat surface to
lay out the mortises.
Mark a centerline to
use as a reference
point.
7. Rout through
mortises in each
foot in three steps.
First, use a jig to
plunge-rout the
mortises from the
top, as deep as possible.
The jig provides
a flat surface
for routing on the
arched foot.
8. Next, tip the
foot over and drill
pilot holes deep
enough to reach
the mortises routed
from the top.
9. Improvise a
level platform
to complete the
mortises. Install a
flush-trim bit, and
plunge through
the pilot holes. The
bit’s bearing rides
on the walls of the
previously routed
mortises.
10. Rout the
bottom edge of
each foot, to make it
more graceful. Use
the bending form
(with a custom stop
block attached) as
a pattern to match
the radius of the
bottom arc with the
top. This step creates
tapers at both
ends of the foot.
11. Round the
uprights’ tenons
to fit the mortises
in the feet and top
rails. Stop routing
before the bit
cuts into the tenon
shoulder and complete
the job by paring
with a chisel or
sanding by hand.
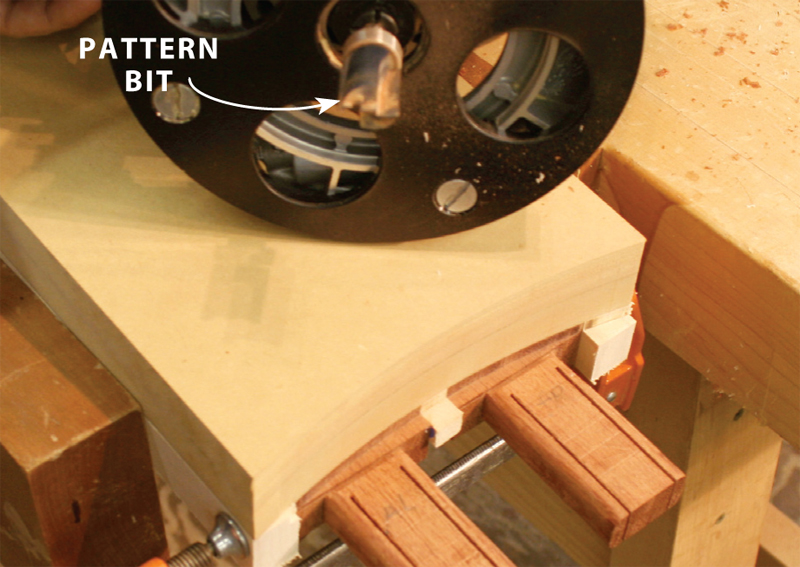
12. Shape the
uprights’ bottom
shoulders to fit the
arched feet, using a
shopmade jig and
a pattern bit. A pattern
bit is a plunge
cutting flush-trim
bit; its bearing is
mounted above the
cutters.
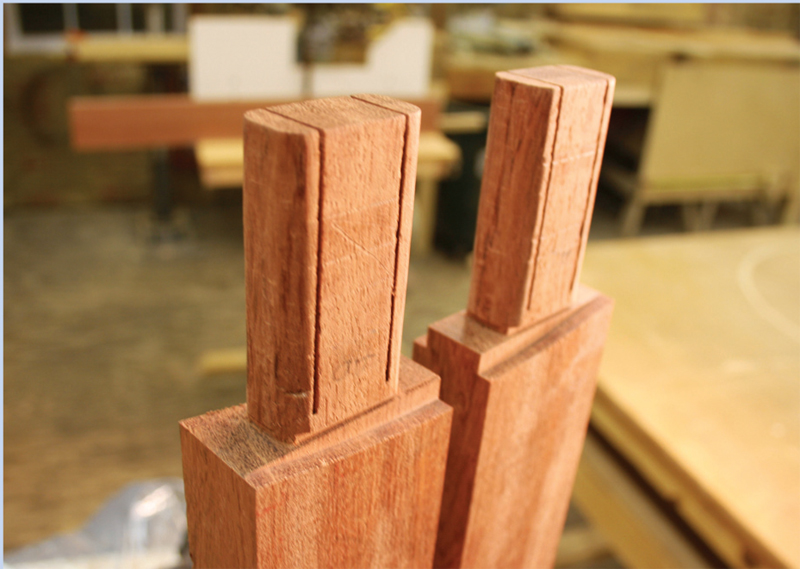
13. Routing
leaves some work
to be done to complete
the uprights'
arched shoulders.
Remove the remaining
waste by hand.
14. Complete
the stringer. Cut
dadoes for the
uprights and shape
its curved ends.
15. Assemble the
base in stages. First,
glue and clamp the
stringer between
the uprights. Work
on a flat surface and
mount the top rails
to keep the uprights
aligned.
16. Complete
one end at a time.
Apply glue and
install the top rail
and the foot. Then
use clamps to gently
draw the joints
together.
17. Drive in the
wedges as far as
they’ll go. After the
glue has dried, cut
off the waste and
rout the wedges
flush.
18. Place a
straightedge across
the top during glueup,
to make sure
it stays flat when
clamping pressure is
applied.
19. Use a shopmade
trammel and
a straight bit to
rout the top’s ends.
Complete the job
in several steps, by
making incrementally
deeper passes.
20. Attach the
top after applying
the finish. Center
the base and use
a brad point drill
bit to mark the
locations for the
threaded inserts in
the top. Drill holes
and install the
inserts. Then bolt on
the top.
|