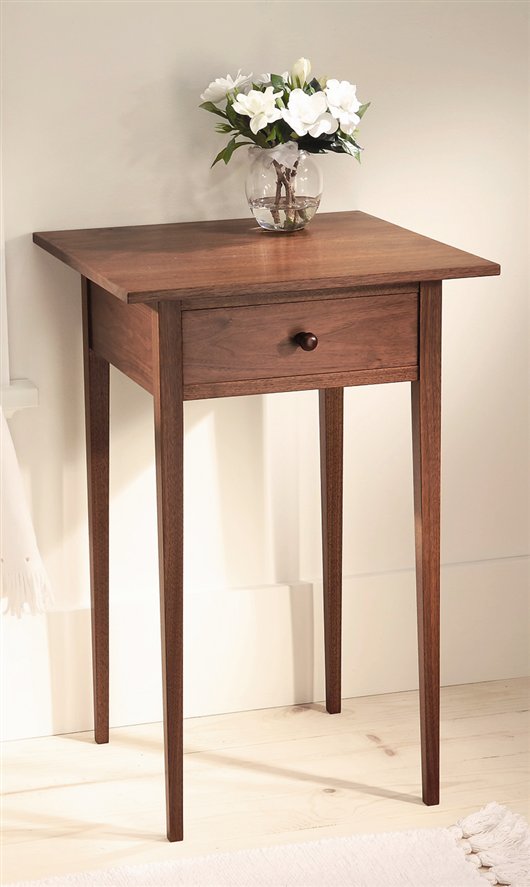
When I first saw a
drawing of this table
20 years ago in a book
by Thomas Moser, I knew I had to make it
(see Sources, below). It perfectly captures
the essence of classic Shaker design. Taut,
lean and elegant, Moser’s reproduction
has become an American icon.
Here’s an up-to-date version that retains
the Shaker spirit. They used mortise-andtenon
joinery, but I’ve substituted biscuits.
For this table, the biscuits are just as strong
and can be made much faster. The Shakers
planed their wood by hand. For my version,
you can machine all the parts and then give
them a few licks with a hand plane. The
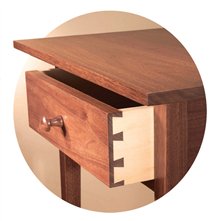
Shakers also hand-dovetailed their drawers.
You can make machine-cut dovetails if you
wish, but I prefer the look of handmade
joints. Don’t be intimidated by handmade
dovetails, though. I’ve worked out a new
dovetailing system that puts a handmade
drawer within reach of anybody, including
a first-time woodworker, who has a sharp
chisel. (See “Precise Hand-Cut Dovetails“.)
If you’ve never planed wood or cut
dovetails by hand before, this project is a
great way to get started. I built this table
in walnut, a wood that is easy to work with
hand tools. Cherry, mahogany, red oak or
other woods of equal density would also
be good choices. The pieces are small
and easy to handle. I used a No. 4 smooth
plane, a No. 5 jack plane and a No. 6 fore
plane, but all three aren’t necessary. A
single No. 4 or No. 5 is OK.
Make the legs and rails
1. Select straight-grained wood for the legs (B, Figure A, below). Mill the wood into
square blanks (see Cutting List, below). Lay out the tapers
and cut them on the bandsaw. (See “Bandsawn Tapered Legs“.) Note that the
legs only taper on the two inside faces. Joint or hand-plane
the sawn surfaces.
2. Mill the side rails (C), back rail (D) and front rails (E).
Cut all these pieces the same length. Mark reference lines
for biscuit slots in the legs and rails (Fig. B, below). Note
that the front legs only have one set of slots.
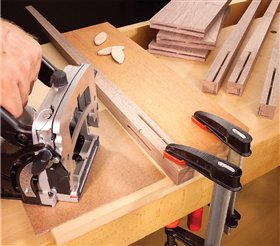
3. Cut No. 20 biscuit slots in the legs and rails with their
face sides down. Use the bottom of the plate joiner, not
the fence, as a reference surface. Place a 1/8-in. piece of
hardboard under the plate joiner when you cut leg slots
(Photo 1). This automatically creates an 1/8-in. offset
between the legs and rails.
4. Plane or sand the outside faces of all the rails (Photo
2). Sand with 180- or 220-grit paper to remove any small
ridges left by the plane iron. Plane the outside faces of
the legs.
Build the case
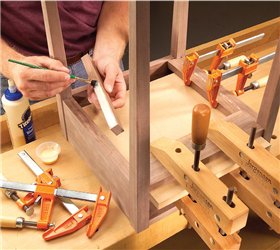
5. Glue the side legs and rails together. Be careful to align
the top of the legs with the top of the rails. Make sure the legs
are square to the rails. Check this is with a straightedge placed
across both legs. The leg’s faces must be in the same plane.
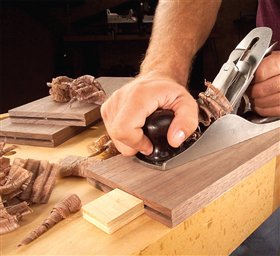
6. Make the top and bottom spacers (F, G). Glue them to
the sides. Plane them exactly even with the legs (Photo 3).
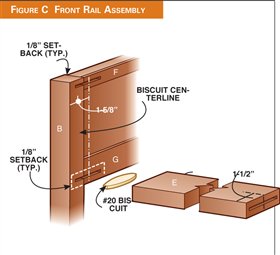
7. Mark biscuit centerlines on the front rails (Fig. C). Mark corresponding centerlines on the sides. Note that
the front rails are set back 1/8 in., like the side rails. Mark the
top face of the upper front rail and the bottom face of the
lower front rail. Cut biscuit slots in the rails, referencing from the bottom of the plate joiner, with the marked faces down.
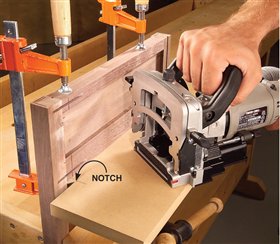
8. Stand each side assembly upside down and cut biscuit slots
for the top front rail. Cut slots for the bottom front rail (Photo
4).
9. Plane and sand the front edges of the front rails.
10. Glue the case together. Check the 1/8-in. setback of
the front rails with a combination square, or temporarily tape
a piece of 1/8-in. hardboard to the front of each rail. The
setback is correct when the hardboard is flush to the legs.
11. Mill the kickers (H) and drawer supports (J). The
kickers prevent the drawer from tipping when opened. Glue these parts to the case (Photo 5).
Build the drawer
12. Mill the drawer front (L). Crosscut
it to exactly fit the opening from end to
end. For successful dovetailing, all the
drawer parts must be perfectly flat and
straight. Machine these parts 1/8 in.
larger than final thickness and let them
sit for a few days, in case they bend or
twist. Then rejoint the face sides and
take the pieces down to their final thickness. Mill the drawer sides (M)
and back (N). Rip the front, sides and
back 1/32-in. narrower than the drawer
opening. For now, cut the back to the
same width and length as the sides.

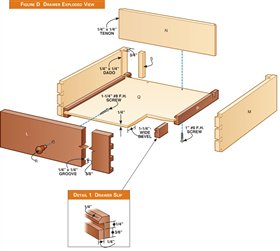
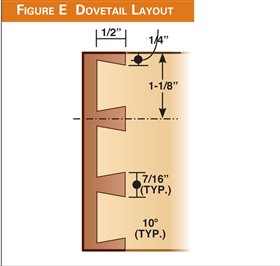
13. Dovetail the sides to the front (Fig. E). Cut a groove in
the front for the drawer bottom (Fig. D). Cut dados across the sides to
receive the back. Assemble the sides and front without glue; then measure, crosscut and rip the back
to fit. Cut rabbets in the back to fit the sides’ dados. Drill the
drawer front for the knob’s tenon and screw (see Sources,
below).
14. Glue the drawer. Strengthen the rear joints with glue
blocks (S).
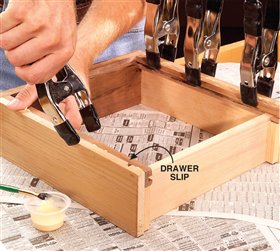
15. Install the drawer slips (P) (Photo 6; Fig. D, Det. 1). Make
them from a wide blank (see Cutting List). Groove the sides
of the blank for the drawer bottom. In addition, cut a groove
of the same width in a scrap of wood to use as a test piece for
fitting the drawer bottom. Plane a chamfer above each groove.
Rip the slips from the blank. Notch the back of each slip to fit
under the drawer’s back; then glue the slips to the drawer.
16. Glue up the drawer bottom (Q) and cut it to fit. Use
a hand plane to chamfer the underside to fit the drawer’s
grooves. As you’re planing, test the chamfer’s fit in the extra
grooved piece. Stop planing when the bottom slides freely.
Slide the bottom into the drawer and fasten it to the back.
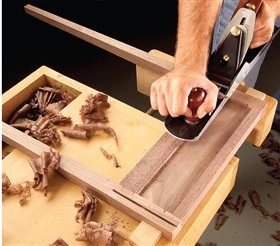
17. Plane or sand the sides flush with the drawer’s
front. Install the knob (R) and test-fit the drawer in the
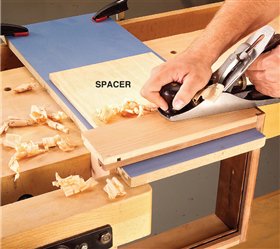
case. It should be tight from side to side. Plane the sides
so the drawer’s rear fits loosely in the opening (Photo 7).
Continue planing until the drawer’s front is only a paper
thickness narrower from side to side than the opening.
Glue stops (K) to the back rail so the drawer front is flush
with the rails.
Make the top
18. Glue up the top (A) and cut it to final size. Mark
the bevels under the top (Fig. A) and use a hand plane or
tablesaw to trim to the lines (Photo 8).
19. Cut slots in the kickers and back rail for tabletop
fasteners (Fig. A) using a plate joiner. Clamp the base
to the top and drill angled holes in the top front rail
(Photo 9).
Apply a finish
20. Remove the top from the case and the bottom and
knob from the drawer. Finish the top, the case and the drawer
separately. On the drawer, only the front needs finish.
21. Assemble the table. Rub a few strokes of paraffin wax
on the drawer sides to make the drawer slide easily.
Sources
Cambium Books, cambiumbooks.com, Thos. Moser’s Measured Shop Drawings for American Furniture, Thos.
Moser, 2001, $22.95.
Smith Woodworks & Design, niceknobs.com, 908-832-2723, Walnut knob, 7/8″ dia.,
#TK78, $1.27 each.
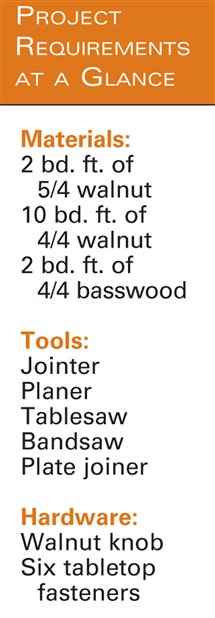
Project Requirements at a Glance

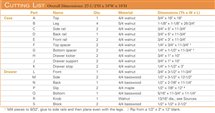
Cutting List

This story originally appeared in American Woodworker January 2006, issue #119.

Purchase this back issue. |
|
Click on any of the images to view a larger version

1. All the joints in this table are made with biscuits. They’re
plenty strong for this job and can be made very fast. Cut
the joints while each piece is still perfectly flat and square.

2. Plane or sand the side rails to remove machining marks.
Planing is quicker, quieter and a lot more fun than
sanding. This small project, though primarily built with power
tools, is a good opportunity to put your planes to work.

3. Plane two strips flush with the legs. They’re glued to
the completed side assembly. These strips provide level
surfaces for the front rails’ biscuit joints. Planing these pieces
by hand is more precise than milling them with a planer.

4. Cut a biscuit slot to receive the lower front rail. Clamp
a notched board under the side rail for support. This rig
guarantees that the slot is square to the leg and the same
height as the corresponding slot in the lower front rail.

5. Glue drawer supports to the sides. Both supports have
to be parallel so the drawer doesn’t rock. Clamp a
board to the front rail to make sure both supports are in
the same plane.

6. Add slips to widen and strengthen the drawer sides.
The drawer sides are basswood, a soft wood that’s easy
to cut and pare for dovetailing. The slips, made from a hard
wood, prevent the soft sides from wearing prematurely.

7. Plane the drawer to perfectly fit the case. The drawer
should be about 1/32 in. narrower across the back than
across the front, to make it easier to slide. Support the
drawer with a board and a spacer.

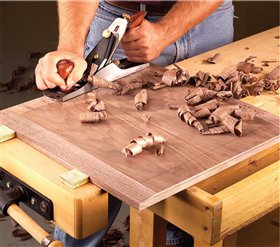
8. Bevel the top’s underside by hand or on the tablesaw.
Planing goes quickly—about as fast as setting up a
tablesaw—if you use a slightly curved iron set for a heavy
cut. With a plane, you’ll have no saw marks to remove.

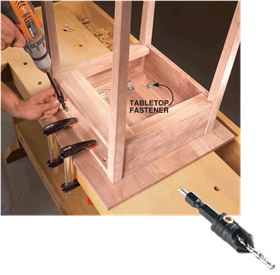
9. Attach the top with angled screws. Drill the
pilot holes with an extender and a bit with a
built-in countersink (see inset photo). Use the plate
joiner to cut slots inside the table for tabletop fasteners.
The fasteners allow the top to shrink and swell without
cracking.
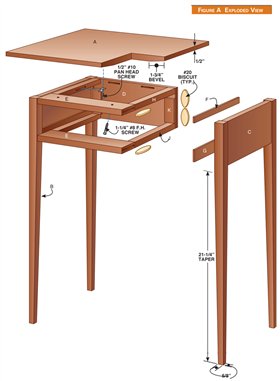
Fig. A: Exploded View

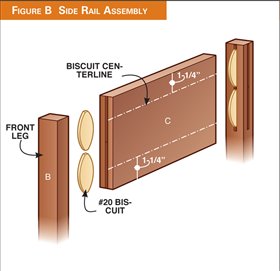
Fig. B: Side Rail Assembly

Fig. C: Front Rail Assembly

Fig. D: Drawer Exploded View

Fig. E: Dovetail Layout

|


