We may receive a commission when you use our affiliate links. However, this does not impact our recommendations.

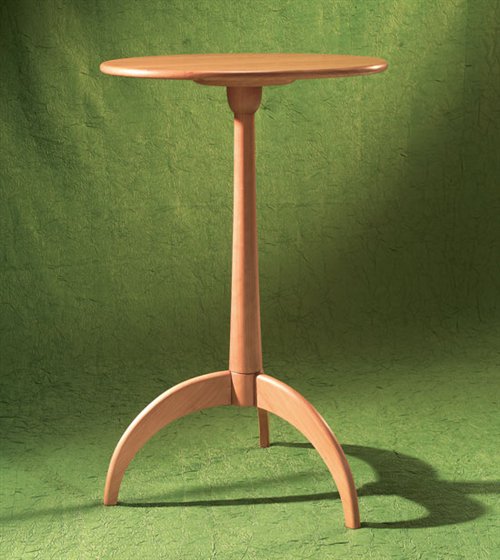
Shaker Stand
By Tim Johnson
| Though it looks modern, the original version of this three-legged stand was built almost two hundred years ago in a Shaker community. Simple, purposeful and elegant, this stand is an outstanding example of Shaker design. Like the Shakers, we’ve embraced simplicity and innovation in our version of this timeless American classic.We’ve devised jigs to handle difficult steps like fitting the dovetail joints and shaping the boldly curved legs. We’ll show you how to turn the tapered column step-by -step. We’ll also show you how to glue up a great looking top. |
|

You may also like…
Shaker Table
Shaker Sewing Cabinet
Shaker Sideboard
Shaker Blanket Chest |
| Turn a rough cylinder using a 3/4-in. roughing gouge. You’ll have to relocate your tool rest at least once. |
|
Click on any image to view a larger version.

|
| Turn down to 2-in. diameter on both ends using a parting tool and a caliper to establish the correct diameter. |
|
 |
| Mark reference points on the blank from a shop-made story stick. |
|
 |
| Cut in to final diameter at all the reference points, using a parting tool and a caliper. |
|
 |
| Gradually shape the column with a 3/4-in. spindle gouge, using the cut-in diameters for reference. |
|
 |
| Finish the tapered body with a continuous smoothing cut. |
|
 |
| Finish the top with a 3/8-in. spindle gouge. Work downhill, rotating the gouge to continue cutting as you bear in. |
|
 |
| Sand everything smooth, starting with 100-grit paper and working through 280 grit. |
|
 |
| Cut a shallow V-groove to mark the top of the legs and the base of the column. |
|
 |
| Establish the tenon at the top with a parting tool and a caliper. |
|
 |
| Cut the tenon shoulder at a slight inward angle so the tabletop will sit flush on the shoulder’s outer edge. |
|
 |
| Divide the column into three equal sections so you can index it in the dovetail jig (Photo 13). Drill pilot holes at the three index points. |
|
 |
| A simple indexing jig registers the column so you can rout dovetailed sockets for the legs. |
|
 |
| Rout dovetail sockets using a template guide and three different bits. To complete each step, you have to index the column at each socket location. Horizontal and vertical reference lines drawn at each index point allow you to return to exactly the same location for subsequent steps. |
|
 |
| Rout dovetails in the leg blanks. A simple jig allows you to rout both faces. Make an initial scoring cut to eliminate tear-out. Then reset the fence and rout the dovetail. |
|
 |
| Shape the legs on the router table using a jig. One side of the jig creates the outer edge, the other side shapes the inner edge. |
|
 |
| Round over the top of the legs. To prevent kickback, hold the leg against a start pin when you engage the bit. Move away from the pin and bear against the pilot as you rout. |
|
 |
| Glue the legs into the column. Slide each leg into the socket and seat it against the routed shoulder. |
|
 |
| Reinforce the leg joints with a shop-made metal plate, just like the Shakers did. |
|
 |
| Wet the edge of the top before you rout. It may seem goofy, but this technique really minimizes tear-out, especially on this round shape, where you have to rout against the grain half of the time. |
|
 |
| Glue the subtop to the top with the grain running the same direction, using a centered circle for positioning. |
|
 |
Product Recommendations
Here are some supplies and tools we find essential in our everyday work around the shop. We may receive a commission from sales referred by our links; however, we have carefully selected these products for their usefulness and quality.


