We may receive a commission when you use our affiliate links. However, this does not impact our recommendations.
Rustic Picture Frame
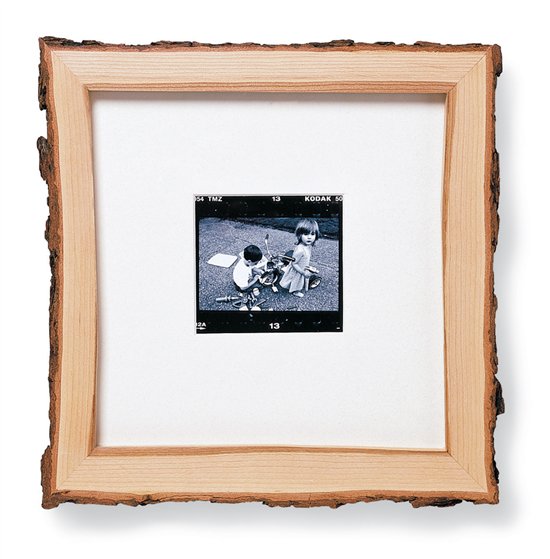
Picture this: your favorite family photo in a frame made of wood harvested from your own backyard.
By Dave Munnkittrick
| Picture this: your favorite family photo in a frame made of wood harvested from your own backyard. Believe it or not, there are some real diamonds in the rough to be found in firewood or even fallen limbs, and the best part of all—it’s free!First, run the flat of the log on your jointer to create a reference surface for sawing the log on the bandsaw (Photo 1). Then, create a 90˚ edge to use against the fence of your bandsaw. Mark each piece in the order it comes off the log. This helps you orient the grain when you build the frame. Sticker your best pieces indoors and let them dry. Use a moisture meter to test for a moisture content of around 8% before using your wood.
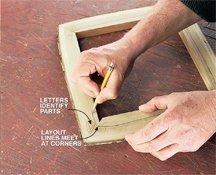
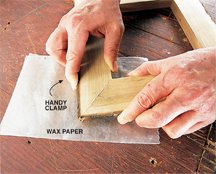
Once your wood is dry you can start to build the picture frame. Joint and plane each piece to a uniform thickness. On the bandsaw, rip the pieces down so they are somewhat equal in width. Then joint the inside edges so they can register against the fence of a miter box. Cut miters on all the ends. With a bark edge it’s hard to take precise measurements, so a little bit of trial and error is required to get good miters on all four corners. Dry fit the frame and even up the inside edges (Photo 2). Cut the inside edge profile on the bandsaw and sand it smooth. You’ll have to cut a rabbet on the back of the frame to hold your picture. Use a router table and a rabbeting bit set deep enough to accommodate glass, matting, picture and backing (approx. 3/8″). Glue one joint at a time. To avoid damaging the bark edge, use your hands to clamp the joint (Photo 3).
SourcesHighland Woodworking, highlandwoodworking.com, 800-241-6748, Titebond Wood Molding Glue, #165024. Rustic Wood: Your woodpile, your neighbor’s woodpile, fallen limgs, storm-damaged trees. This story originally appeared in American Woodworker August 2000, issue #81.
|
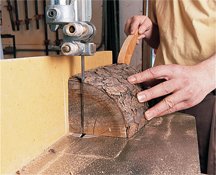 1. Saw the log into 1” thick slices. After each cut, joint the log’s edge to smooth the face of the next piece. Set the slices aside to dry. 1. Saw the log into 1” thick slices. After each cut, joint the log’s edge to smooth the face of the next piece. Set the slices aside to dry.
2. Mark the inside edges for trimming while holding the outer edges flush at the corners. You can shoot for a perfectly straight inside edge or follow the grain for a more natural look. Letter each miter joint for easy identification.
3. Clamp the joints with your hands—the most versatile clamps in your shop! Usually a few minutes of hand pressure results in a good initial tack set. Let the glue cure a good half-hour before moving on to the next joint. |

Here are some supplies and tools we find essential in our everyday work around the shop. We may receive a commission from sales referred by our links; however, we have carefully selected these products for their usefulness and quality.