


We may receive a commission when you use our affiliate links. However, this does not impact our recommendations.
 I’m working on a book project at the moment in which we’re including an article that refers to another article…and I’m out of pages. So instead of editing around the problem (no time for such shenanigans), I’ve decided to post said “another article” online, and provide a link in the text. I figure I might as well share “another article” with everyone. So below you’ll find “A Better Blanket Chest Design,” from the Summer 2008 issue (no. 10) of Woodworking Magazine. And at the bottom, you’ll find a link to download a PDF of the article as it appeared in the magazine (in which you’ll find the drawings and cutlist).
Christopher Schwarz built this chest, and six years on, it still serves as his living room coffee table/workstation. (And for the record, the finish has held up well to my having spilled red wine on it more than once…)
A Better Blanket Chest Design
Though the chest is one of the oldest forms of furniture, that doesn’t mean that the human race has settled on the best way to build it.
There are, in fact, many ways to build chests that make the process fussy, challenging and time-consuming – and the results look identical to a simpler chest.
To find the best way to build a chest, we surveyed plans and historical photographs of hundreds of examples from 1600 to the present. And then we boiled all that down to find the simplest way to build the complex chest shown here, which is an adaptation of a blanket box from the Shaker’s Union Village community.
This may not actually look like a complex chest. But compared to historical examples, this chest was fancy in many ways. To understand why, let’s look at the development of the form.
Community Chests
The first chests had all the joinery you’d find in a dugout canoe (that is, none at all). Early chests were made from one block of wood hollowed out with tools, fire or other forms of gumption.
Later, when riven boards became common, chests were built with two ends that also served as feet (the grain of these ends ran vertical). Then the front and back were fastened to the ends. This grain ran horizontal.
There were some other common variations as well, including assemblies where the ends, front and back became frame-and-panel constructions – and the stiles ran to the floor. Another type of chest was a simple box propped up on feet that were turned or were slabs of wood (such as with the Sea Chest that’s in this issue).
On all forms of chests, moulding typically appears as a transition point between the box and the base or the box and the lid.
From there it was a short hop to make the chests out of two separate assemblies: the box itself and the base, which we call the plinth.
How to join the box and the plinth is the focus of this story. It doesn’t have to be difficult for the chest’s maker, but it sure can be.


Two Trying Designs
Traveling down the more difficult design path when building a chest begins with one assumption: That the plinth is merely moulding and should be applied to the box as such.
Once you make this assumption, here’s one difficult (and common) way to make a chest: You cut a moulding profile into the top edge of the plinth pieces, join the plinth pieces at the corners and wrap them around the box. If you use a miter joint at the corner, it’s fussy to fit the plinth exactly to the box – errors are easy to make and hard to hide. If you use dovetails, it is even fussier to wrap the plinth pieces because you’ll have to cope the moulded edges at the corners.
Oh, one more thing – the plinth is like Atlas. It supports the whole chest, so you should use some fairly thick stock when making it, at least 3⁄4″ for a sizable chest. Or you need to add some glue blocks at the corners to support the box.
But what if you don’t want that big 3⁄4″ step between the plinth and box? Well, you can cut a rabbet into the top edges of the plinth pieces, but then you are rabbeting, dovetailing and coping all your plinth pieces, and any error is going to result in a noticeable gap.
A variation of this particular design is supposed to make some of this easier. You wrap the plinth pieces around the box, and then you apply mitered moulding to the top edge of the plinth pieces. This hides any errors and makes the moulding easy to join at the corners.

When setting out all your joinery for the plinth (and the box above it), it’s critical to mark your parts. I use a cabinetmaker’s triangle to orient my front, back and end pieces.
And this does improve things. But it’s still more work than necessary.
A second common way of building a plinth is to use bracket feet below a mitered frame that has its edge moulded. The mitered and moulded frame supports the box above. The bracket feet below support the frame. What’s the downside? You need to get the fit between the box and the frame dead-on – or add another layer of moulding to hide any gap between the box and frame.
The above method is easier than wrapping your moulding around the box, but we think there’s an even better way to build this chest.
Detach Your Plinth

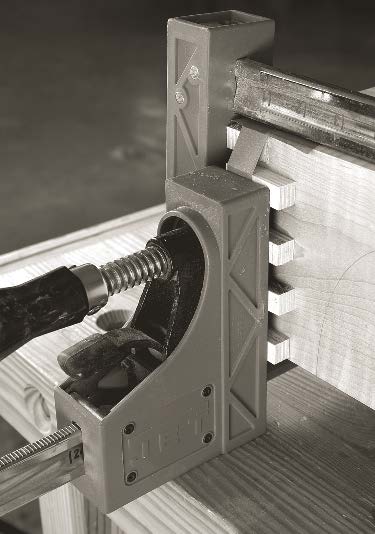
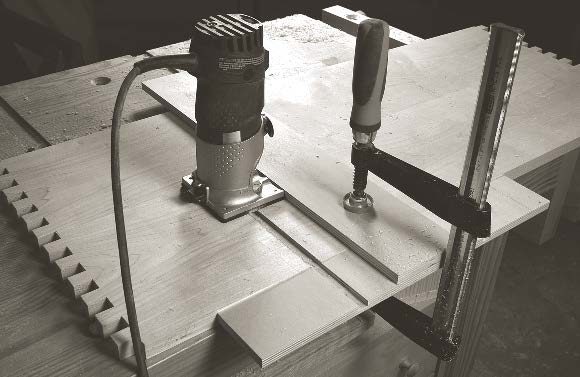
Don’t try to clamp your work in our finger-joint jig vertically. Gravity will fight you the entire time. Lay the jig flat and let gravity lend a hand as you position your pieces for routing.Though it seems counter-intuitive, it’s easier to get a more accurate result with a chest like this if you build the plinth separate from the box so it acts as a platform for the box. Then you set the box on the plinth, drive a few fasteners and run moulding around the transition point to hide errors or irregularities.
Why is this better? For starters, you don’t have to be as fussy with your joinery to make the outside dimension of your box match the inside dimension of your plinth. If your box or plinth end up a little bigger or smaller than intended, then you can size your moulding to accommodate the difference. It’s a lot easier to trim 1⁄16″ off a skinny piece of moulding than it is to remove that off the front and ends of a 16″-tall chest.
The other distinct advantage is that you don’t have to jump through hoops if you want to use a delicate transition moulding. It’s just as easy to make the transition large as it is small.
When routing between the fingers, try to stay clear of the jig as you plow through the workpiece, as shown above. Then clean up the walls of the joint. This makes tighter joints.
Plus, making the plinth separate doesn’t require much more wood (it can be as little as two sticks).
And the extra material is hidden so it can be an inexpensive or ugly species.
Finally, making a separate plinth allows for easier repairs, should that ever be necessary. You can easily detach the plinth or even replace it.
About the Union Village Chest
The Union Village Shaker community is near our offices in Cincinnati, Ohio, but it doesn’t figure large in the world of Shaker furniture like the eastern Shaker communities do. Union Village was the first and largest Shaker community west of the Allegheny Mountains, and it was the parent community for the western Shaker communities in Ohio, Kentucky, Indiana and Georgia.
Founded in 1805, more than 4,000 Shakers lived at Union Village during its peak, selling herbal medicines, seeds and brooms. The community declined until it was sold in 1912, and the structures are now a retirement community.
Be sure to plan your plinth’s finger joints so that the top of the front and back pieces can take a through-rabbet as shown.
One of the artifacts from the village is a walnut blanket box with fine lines and tight dovetails. The box is similar to many Shaker chests that are extant, but this one has always been a favorite.
We chose to adapt this design because it highlights the advantages of our preferred chest-building method. The fine bit of transition moulding around the plinth is easy to accomplish with this construction technique.
While we retained the proportions and lines of the Union Village original, we used finger joints
instead of dovetails. And we used figured maple instead of walnut. These alterations give the box a contemporary feel without looking like a pack of cigarettes with cabriole legs, or some such post-modern nonsense.
Begin the Building
The two keys to a successful glue-up: A slow-setting glue and small plywood blocks that press the fingers together.
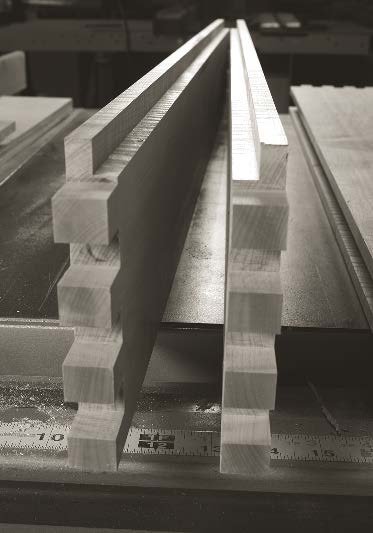
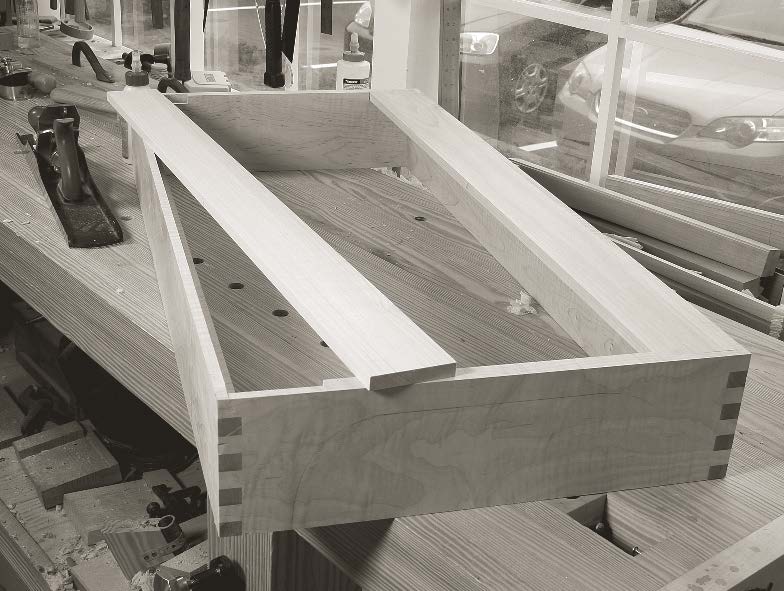
Unless you possess wide boards (as the Union Village Shakers did), you need to glue up narrow boards into wider panels for the lid, front, back and ends of the box. The plinth and bottom are made from narrow stock. So while the glue in my panels was curing, I worked on the plinth.
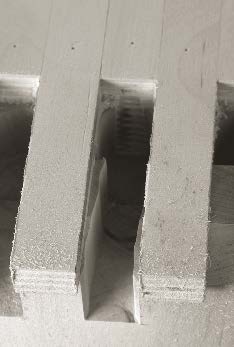
The plinth has a front, back and ends that are joined with finger joints. Plus there are two “carcase supports” sunk into the plinth pieces. The carcase supports are housed in 3⁄8″ x 1⁄2″ rabbets that run the full length of the front and back, plus 3⁄8″ x 1⁄2″ stopped rabbets in the ends.
Cut the finger joints on the corners of the plinth pieces. After much experimentation, we found the best results came from plowing down the middle of the joint with a straight bit and then routing the sides. This eliminated the risk of our router shifting the parts around.
A little alcohol and a block plane make light work of the proud end grain from the completed finger joints. The alcohol softens the tough end grain.
Once you get the corner joinery cut, plow the 3⁄8″ x 1⁄2″ rabbet on the top edge of the plinth’s front and back pieces. Note that if you lay out your finger joints correctly, this rabbet runs through the entire length of the front and back pieces.
To cut this rabbet, I used a dado stack that was buried in an accessory wooden fence on our table saw. This method allows you to cut the joint with the work flat on the table, not on its edge.
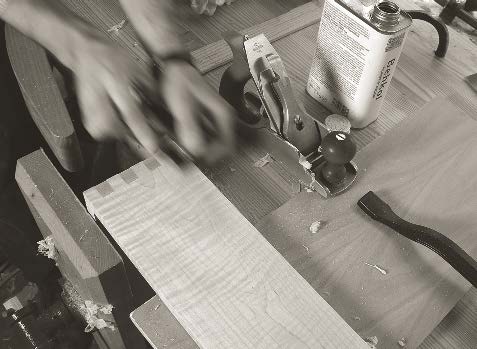
Before you cut the curves on the plinth, assemble it. The corner joints will strengthen the feet as you cut the dramatic curve. To glue the joints, you can choose cyanoacrylate, as explained in this issue, or use a slow-setting polyurethane or liquid hide glue. Yellow glue sets up too fast.
To clamp the finger joints, I made a bunch of small blocks of wood that I taped to the fingers. These little blocks allowed my clamps to put pressure right where it was needed.
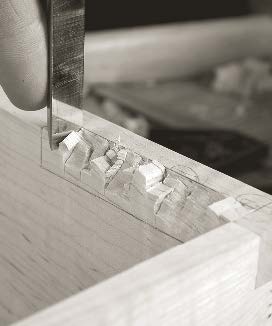
After you saw out the extents of the notch for the carcase supports, chisel the waste with some light chopping.
After the glue has cured, remove the clamps, trim the end grain bits flush and make the 3⁄8″ x 1⁄2″ stopped rabbet in the ends of the assembled plinth. First cut a bunch of kerfs with a handsaw, then chisel the waste.
Then fit those carcase supports into the rabbets in the plinth. Glue and nail the carcase supports into the plinth’s rabbets. Then get ready to cut the curves on the assembled plinth.
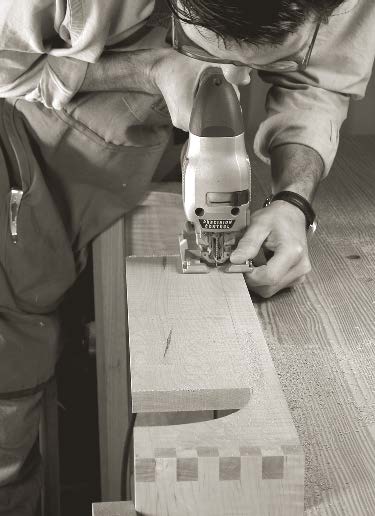
To cut the curves, first remove the bulk of the waste with a jigsaw, then clean up the curves with a plywood pattern and a router equipped with a pattern-cutting straight bit.
The curves on the ends, front and back are identical, so one short plywood pattern handles all the curves. To rout the straight run between all the curves, I clamped a straight piece of stock to the plinth and used that as a pattern.
This is what you paid your money for when you bought this magazine: The two carcase supports hold the carcase in place and give you a place for your transition moulding.
Build the Box
The box above the plinth is fairly simple. Here’s how it goes together: The corners are joined with finger joints. The bottom boards are shiplapped and nailed into rabbets in the front and back of the box. The till wall slides into a dado in the front and back. The till’s bottom is nailed to cleats below.
The hinges are let into notches cut into both the back and the two hinge blocks, which are glued to the outside of the box’s back. The hinge blocks support the hinge out to its barrel. And finally, the chest’s lid is screwed to the hinges.
Begin by ensuring the front, back and ends of the carcase are indeed square. If they are out, you need to correct them before you rout the finger joints. Otherwise your carcase will go together all cockeyed. I prefer to shoot the ends of panels with a shooting board and a heavy plane. This is slower than making one mighty cut on the table saw, but it is unlikely to make things worse.
Saw the curved shape of the plinth after assembly. If you do it before, the corners will be too fragile to clamp up without fussy cauls.
Cut your finger joints for the box. Then mill the 3⁄8″ x 1⁄2″ rabbet in the front and back pieces. Don’t cut stopped rabbets in the ends – that’s more trouble than it’s worth. The dado stack set-up you used for the plinth’s rabbets will do the same yeoman’s job in the carcase.
Before you assemble the carcase, rout the 1⁄4″ x 1⁄2″ x 6″ dados for the till wall. This job is handled by a right-angle jig we developed for the router.
Preparing for Assembly; Pulling the Trigger
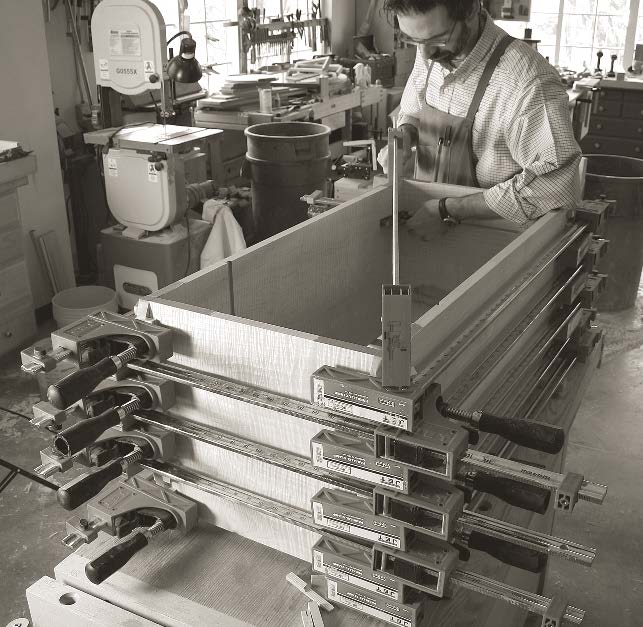
Assembling finger-jointed carcases used to be one of the most stressful glue-ups in our shop. It usually involved every clamp in the shop, a helper and a bottle of Mylanta. That was back when we used yellow glue for the job. No more.
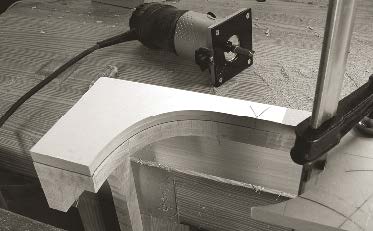
Normally, I would shape these curves with a rasp, but at the encouragement of our power-tool expert, I used a pattern-cutting bit and our trim router. I still like my rasps, but this is a very close second.
Yellow glue is probably the last glue you should use for this job. It sets up entirely too fast, leaving you with open joints and a sinking feeling in your stomach. Either use the cyanoacrylate glue method we explain on page 9 of the Summer 2008 issue, or use polyurethane or liquid hide glue. The last two solutions will give you an hour of assembly time. If you are still unsure of your skills, use liquid hide glue, which is reversible with a little heat and water.
The easiest way to glue the corners together is to get them semi-assembled, then wipe glue on the long-grain surfaces inside the joint with a flat little scrap. Then apply the little blocks like you did with the plinth and turn on the clamping pressure. After the glue has cured, level all your joints and get ready to fit the interior parts.
Thinking Inside the Box
The bottom boards are shiplapped on their long edges, then nailed into the rabbets on the bottom of the carcase. Cut the shiplap rabbets on the table saw like you cut all the rabbets for the
plinth and carcase. Cut the bottom boards to fit snugly, then space them out by inserting a couple quarters between each board. The 25-cent space allows the boards to swell during the wet months. Then nail the boards into the carcase’s rabbets. No glue.
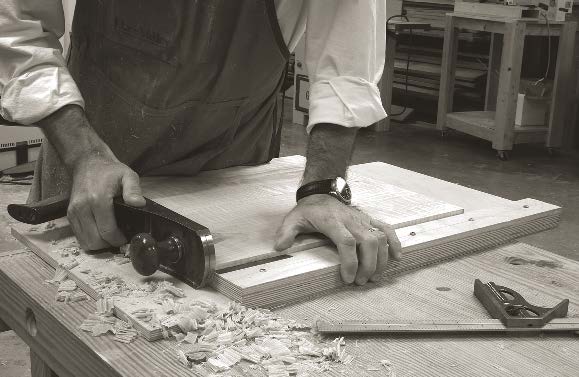
My shooting board and jack plane ensure that all my panels are dead square. These needed tweaking even after a ride on the sliding table on our table saw.
The till is simple. Fit the till wall into the dados in the front and back. Glue it in place. Then trim the till bottom to size. Glue and nail two till cleats below the bottom. Then nail the till bottom to its cleats. Again, rely on gravity and nails – not glue.
Carcase, Meet Plinth
Now you can join the plinth and carcase. Put the carcase upside down on the benchtop and center the plinth on the carcase. Screw the plinth to the carcase by driving through the carcase supports and into the bottom boards. About four screws in each carcase support will do the job.
Now you can figure out exactly how big your transitional moulding should be. Make your moulding (I used a 1⁄2″-radius cove bit and left a 1⁄16″ fillet at each edge). Then miter it, tweak it, glue it and nail it.
Shape the hinge blocks, attach them to the back of the carcase and then cut the recesses for the iron hinges. Screw the hinges to the carcase and then clean up your top piece for the last important detail.
The router dado jig from Woodworking Magazine Spring 2005, Issue 3, is a favorite in our shop. (Any jig that lasts more than a few weeks in our shop is to be admired.)
Shaping the edges of a lid is something I always enjoy doing by hand with a plane. First shape the ends (which will blow out the long edges). Then shape the long edges to clean up the previous step’s mess.
To shape the edges, I first mark the curve using a quarter, then I worked to that line with a traditional hollow moulding plane. A block plane will do the job, but it will leave a faceted surface that you should fair with hand sanding.
Then it’s just a simple matter of screwing the lid to the hinges and adding some sort of stay to keep the lid propped open.
The Finish is Simple & Easy
This blanket chest was built during the winter months, so I had to use a hand-applied finish instead of spraying it in my driveway. We prefer an inexpensive and forgiving home brew that is detailed in the Shortcuts section on page 4 of the Summer 2008 issue.
Here the corners are nearly fitted and I’m smearing an oh-so-thin layer of polyurethane glue into each joint.
I’ve built a fair number of chests during the last 15 years, from tool chests to toy chests to other blanket chests similar to this Union Village version. Each had its charms, but each also had its rough spots, especially when massaging the transition between the base and carcase.
Not so with this chest. The only real challenge will be to decide which room of the house it belongs in.
— Christopher Schwarz
For a PDF of this project, including the drawings and cutlist, download this PDF: https://drive.google.com/file/d/0B48U9lpqDVKcdWsybEVJaVgxaUE/edit?usp=sharing
Here are some supplies and tools we find essential in our everyday work around the shop. We may receive a commission from sales referred by our links; however, we have carefully selected these products for their usefulness and quality.


The link for the pdf file appears to be broken or the Google drive app is no longer available?
Wow, oh spiller of the red wine, that is some add on article. That Maple is insane.
I sneer now, and shake my fist at F&W, because I miss Woodworking magazine. It really was the better of the 2, and it’s replacement hasn’t lived up to your hype. Sigh…………