


We may receive a commission when you use our affiliate links. However, this does not impact our recommendations.
 All the flavors of walnut shine in this versatile storage and serving piece.
 All the flavors of walnut shine in this versatile storage and serving piece.
Project #2313 • Skill Level: Intermediate • Time: 60 hours • Cost: $1,000
My sister asked me to make a dining table and sideboard for her house. She was ready to move on from garage sale finds and inherited pieces that filled the dining room but didn’t suit the house or the way she wants to use the room. She’s drawn to the crisp cool of Mid-Century furniture. But she also gave me an opening to come up with an “inspired-by” look rather than a “copy-of” knock-off.
 The design I came up with combines strong geometric shapes. The case is divided into thirds: banks of drawers flank a center section of open shelving. Two bypass sliding doors aren’t strictly necessary, however I like a sense of motion and transformation in otherwise static furniture. A separate base assembly lifts the case off the floor and allows light and shadows to play in the openings.
 For the materials, I worked with a co-worker who happens to be a sawyer, who happens to be the editor-in-chief of this magazine. That gave me access to plenty of air-dried walnut. Slow, natural drying preserves the range of colors and tones in walnut: chocolaty browns, veins that lean toward purple, and midnight mineral streaks. An added benefit is that the air-dried stock works much easier (in my opinion) than its kiln-dried brethren.
 Working with wide rough sawn planks holds particular delight. I get to find project parts within the board to fulfill project needs. Sometimes it’s color, other places grain pattern takes priority. Even the leftover sections can be used in the unseen parts of a project. I’ll highlight a few of these decisions as we go along with this project.
 There is a down side to using rough boards. You’ll end up spending more time in stock prep: cutting planks apart, jointing and planing parts to size, and gluing up panels. A quick glance at the final result shows you that I find this well worth the effort.
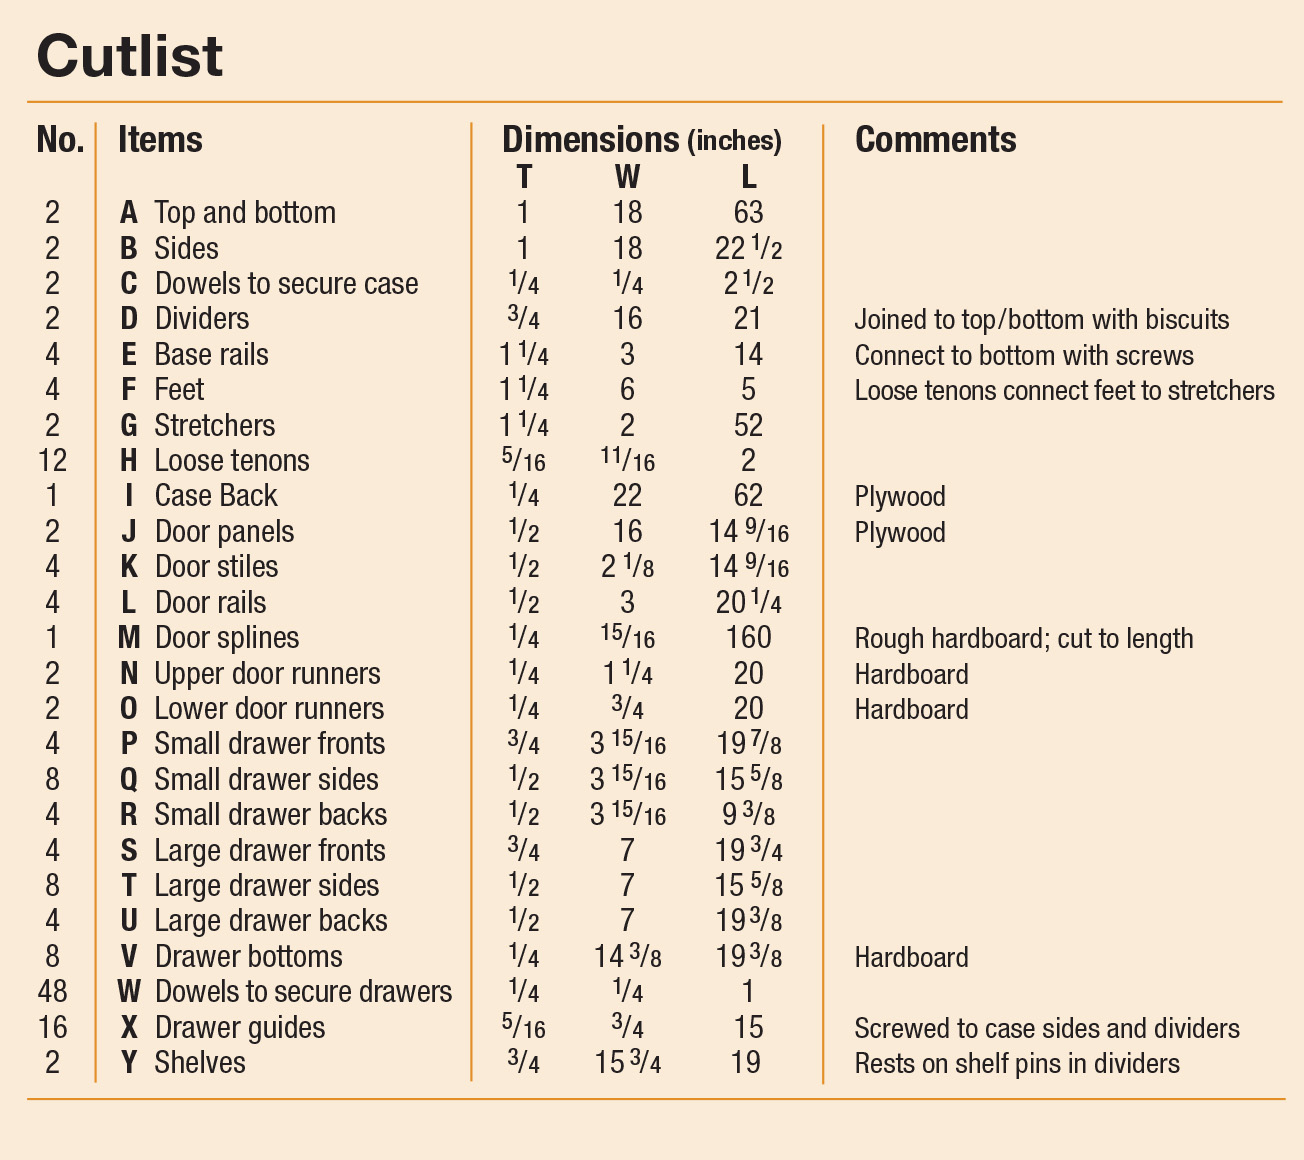
Cutlist and Diagrams


 Making the Case
 Making the Case
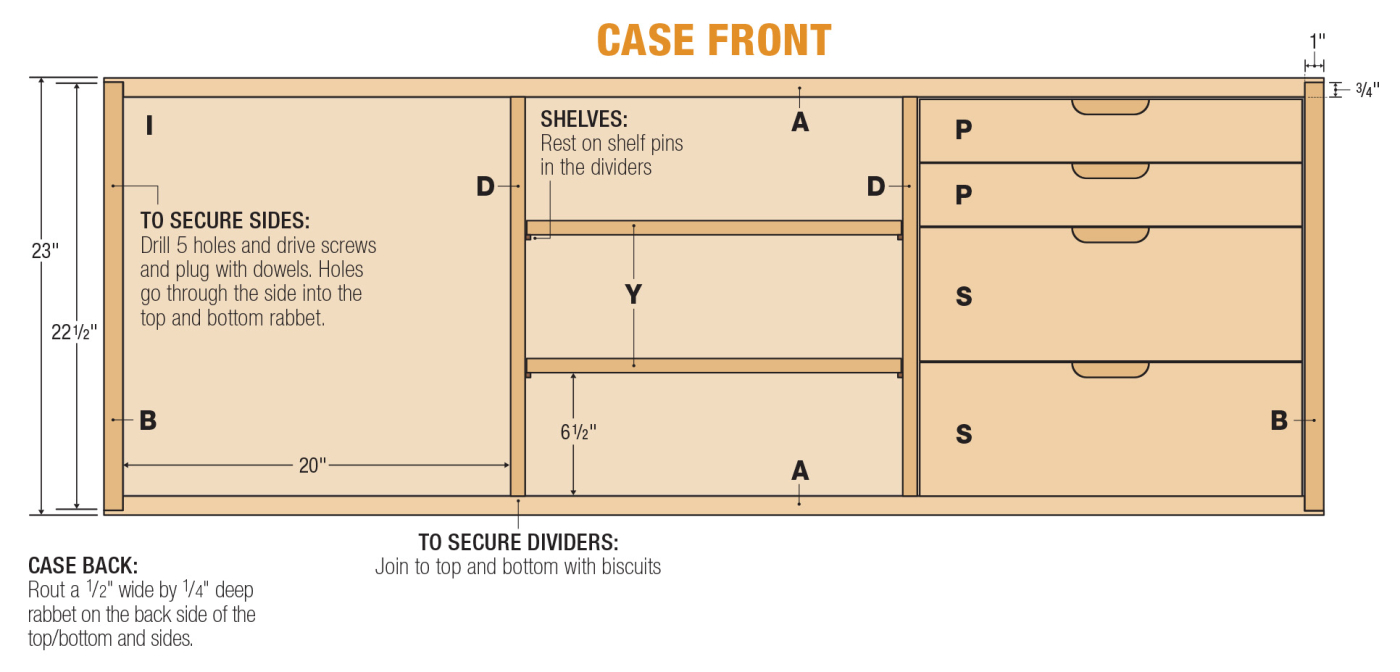
A large case piece like this requires quite a few glued-up panels. So long as I have the necessary clamps available, I’ll prep panels right away. First up is to find the longest, best-looking pieces to make the top. The next priority is the sides. For the bottom, only the first few inches are visible. The same goes for the two vertical dividers.

1 There are a lot of panels to glue up for this project. Be sure to set aside the best for the top and sides.
The overall length of the top and bottom was 63“. It’s crucial that these parts are the same length. It’s possible to crosscut this on the table saw, but the width and length turn this into an awkward task. Instead, I used a track saw. You could cut both parts at the same time or singly. I marked the cut lines squaring the line off the back edge.

2 Take the tool to the work and cut the top and bottom with a track saw. Support the workpiece on a piece of foam insulation
A lot of Mid-Century case pieces are joined with miters at the corners. This gives a clean, flowing look to the grain. Personally, I dislike miters. On large solid wood parts in a home shop, these joints are problematic to get seamless and stay tight.

3 The case is joined with rabbets cut with a router and edge guide.
Instead, I like rabbets on case pieces, especially when cutting a deep rabbet on each end of the top and bottom. When it’s assembled, the thin line that’s visible punctuates the ends of the sideboard.
Power Tool Joinery
Cutting joinery on large pieces means a hand-held router to me. Fitted with an edge guide and straight bit, I can tackle all the rabbets and grooves necessary while also reducing the amount of heavy lifting of panels or parts. For the end rabbets, I worked down to the final depth in several passes. This eases the strain on the bit and router motor. With a depth and edge guide adjustment, you can cut the smaller rabbet that’s needed for the case back.

4 Switch out to a smaller bit for the door grooves.
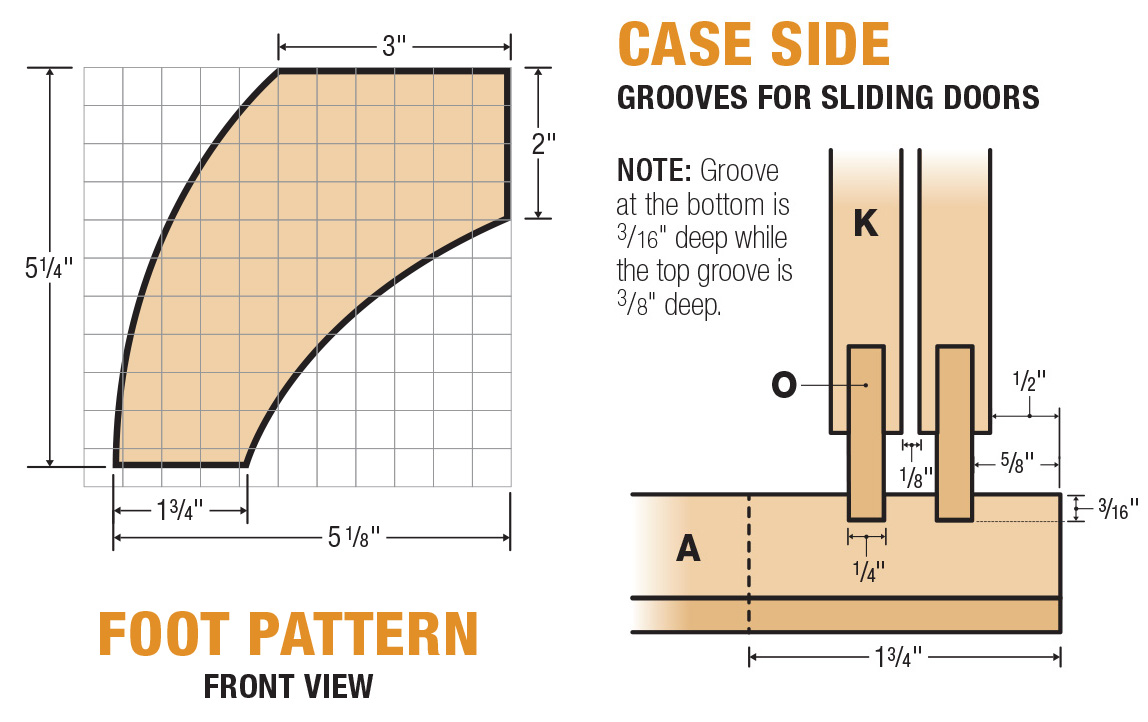
Keep the wrenches close by, so you can cut the two grooves for the sliding doors. The grooves in the bottom are much shallower than the matching grooves cut in the underside of the top. This allows the doors to be slipped into place (and removed, if necessary).
Inside the case, 2 dividers organize the space. They are flush with the rabbet in the back and stop short of the door grooves. I installed these using biscuits. I have two reasons for this approach: I have a biscuit joiner that I love using. Second, using biscuits means I only need to focus on getting the length of the dividers right without factoring joinery into the process.

5 Biscuits offer a simple way to install the divider panels. The plywood guide registers the tool and ensures a consistent spacing on the top and bottom
I cut a piece of plywood to use as a spacer so that the rows of biscuits slots in the top and bottom are consistently located. To cut the slots in the dividers, I laid those down on the bench with the outside face down. I glued the biscuits into the top and bottom prior to gluing up of the main case. It’s one less thing to juggle.

6 Run a bead of glue in the slots in the case bottom. Press the biscuits into the slots, then butter the exposed portion. You don’t need to add glue between the biscuits.

7 The biscuits secure the parts, but you’ll still need to watch the front-to-back alignment.
Case Assembly Details
Large cases can easily turn into unintended parallelograms during assembly. A set of assembly squares counteracts any tilt. A side benefit is that the squares hold parts steady while I’m working at the other end. Titebond’s liquid hide glue offers plenty of open time to brush glue onto the rabbets, get clamps in place, parts aligned, and everything cinched down before seizing up (my patience included). The extra drying time (24 hours) required is a small penalty I’m willing to pay. That doesn’t mean progress grinds to a halt.

8 Assembly squares provide the extra set of hands necessary to get the sides glued into place while keeping them perpendicular.

9 My goals here are keeping the joints tight and the case square while the glue dries.
After allowing the glue to cure a few hours, I marked and drilled holes to reinforce the rabbets. I drilled five holes in each joint. The end and center holes are for woodscrews for the mechanical connection. The other two holes are pinned with dowels. You could easily go with dowels for all five. But I liked the insurance of the screw threads.

10 The end and center holes house long woodscrews in order to add strength to the rabbets.
The screws are concealed with end grain woodplugs to match the dowels. I used walnut to make a low-key contrast with the wood that adds to the exposed rabbet on end. The final decorative element is routing a chamfer around all the edges. This surface catches light and eases sharp edges.

11 I used liquid hide glue to install the plugs and dowels.

12

13 A block plane trims them flush.
This is a good point to pause and apply finish to the case. I used tung oil to bring out the colors in the walnut. Then two coats of spray lacquer add shine and maximum protection.

14 In keeping with the clean mid-century look, a simple chamfer eases the edges while adding a subtle facet to catch light.
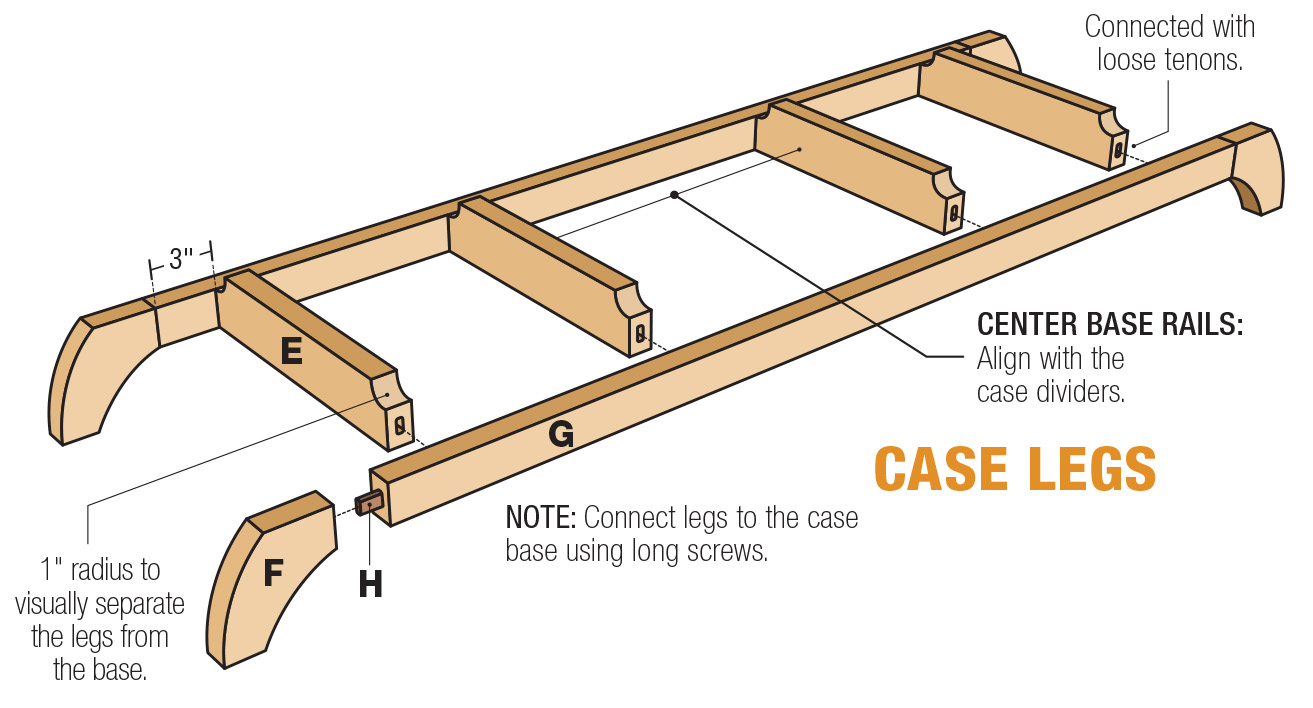
Elevated Base
Years ago, I made a small Mid-Mod cabinet for one of my sisters-in-law. The base was more like a short stand. Curved feet and cutaway rails added some liveliness to the square case. I’ve always liked how that looked, so I refined the design and scaled up the components for my sister’s sideboard. I used 1-1/4“-thick stock for the base. I cut these from the straightest grain stock. Four front-to-back rails attached to the case are cutaway on the ends to create a gap between the case and the long side-to-side stretchers. Two of the rails are located directly under the dividers in the case in order to provide sag-free support.
The curved feet attached on each end raise the base off the floor. The gap functions like molding to transition from case to base. The raised base allows light and shadow to change the look of the sideboard throughout the day. And keeps this from looking like a blocky safe.

15 Loose tenons join the components in the base assembly. A Festool Domino is one way to do it.
In keeping with a power tool joinery theme, the base pieces are all connected with loose tenons. In this instance I borrowed a Domino joiner to form the mortises. I had never used one and I’m considering its possibilities. The tool worked exactly the way it should—and frankly very similar to my biscuit joiner. It just causes severe discomfort in my wallet area.

16 Clamp narrow parts together in order to provide support to the joiner while forming mortises.
The mortises are cut in the feet prior to shaping. Doing this gives me a larger bearing surface for the joiner. I made a template for shaping the feet. I traced the template onto the foot and cut it slightly oversize at the band saw. The template is then used as a guide for a flush trim bit in the router table.

17 The closer you can cut to your layout lines, the easier the flush trimming.

18 A flush trim bit following a template creates identical feet.
At this point, I glued the feet to the stretchers. Then I rounded over the outside edge of the foot on each face. The other surfaces have a small chamfer before gluing the stretchers to the rails.

19

20 Clever clamping is necessary for gluing long parts.
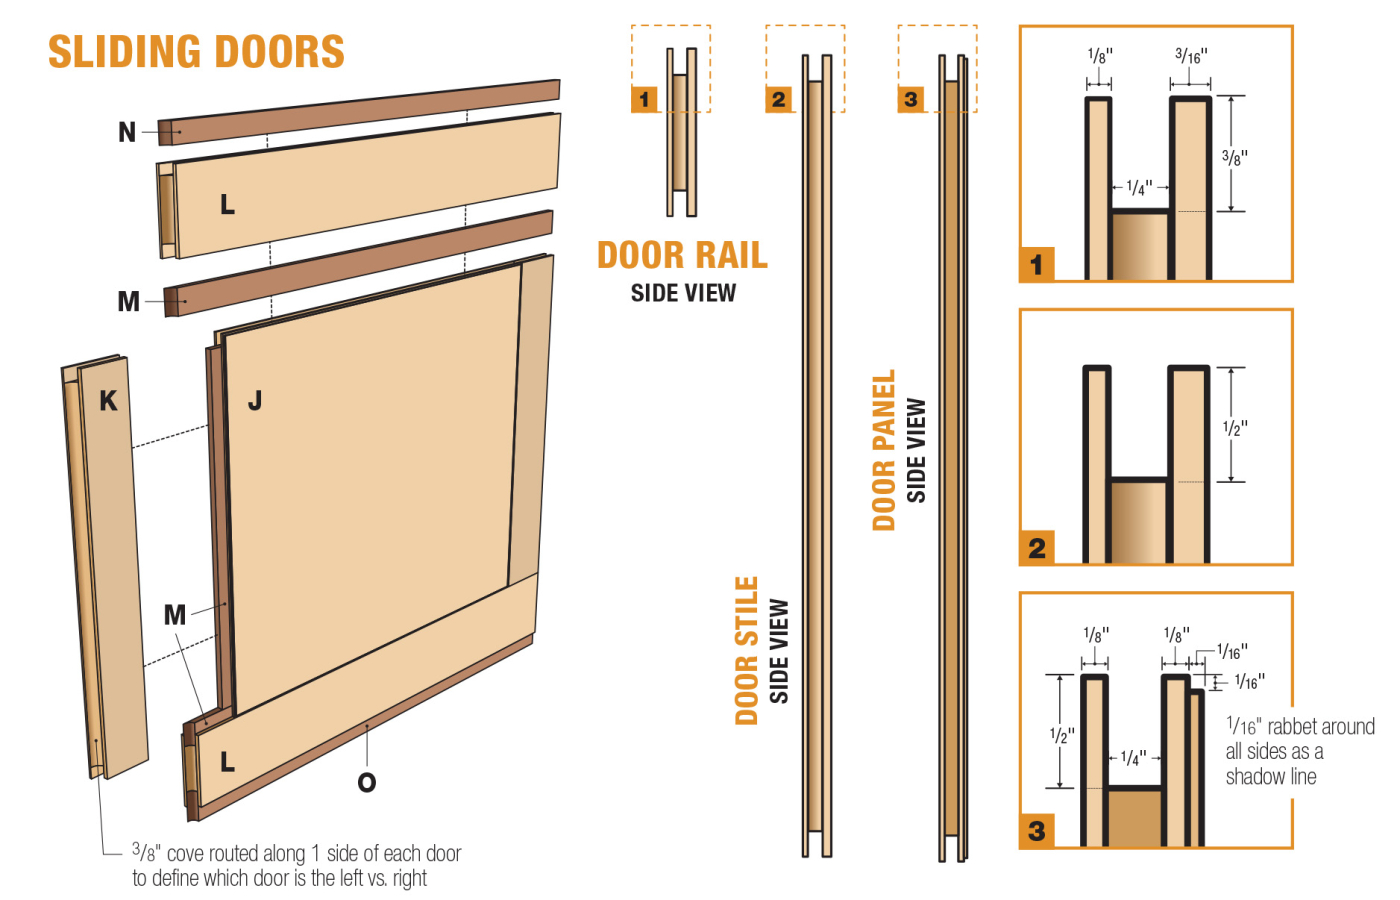
Sliding Doors
The doors on this sideboard are more like jewelry. The idea is to dress up the front by concealing the drawer banks, giving the center shelves a showcase effect. However, you can also slide the doors to the middle and cover the shelves for a totally different effect. The doors show off some delightful burl veneer and add a tip of the hat to George Nakashima.

21 Thick, dark tinted veneer glue minimizes how much bleed through you get … and see.

22 Chalk marks keep your head in the game to eliminate mix-ups.

23 Two pieces of melamine particleboard resist glue and distribute clamping pressure.

24 Pack in as many clamps as you can so that you get a flat, smooth panel.
The door construction is a little different than the typical arrangement. It goes like this. The veneer is applied to a 1/2“ plywood panel. A shallow rabbet routed around the panel transitions to the frame pieces. The two stiles are the same length as the panel. The rails run the full width of the door. (Take note that the lower rails are wider.) Since the veneer is the focal point, the frame pieces should feature straight, uniform grain lines.

25 Set off the panel with a shallow rabbet.

26 Next, join the panel to the frame with grooves and splines. I cut these at the router table with a slot cutter.
All the parts are joined with hardboard splines. Think of these as long loose tenons. I used a slot cutter in the router table to form the grooves and keep the front faces flush.

27 After gluing on the stiles, cut grooves for the door rails.
Finishing note. Before glueup, I used a brown marker to color in the rabbet on the veneered panel. Now it reads as a mysterious shadow line rather than farmer tan line.
Trim the door so that it’s about 3/8“ shorter than the opening. This allows it to tilt into the grooves cut earlier. Fire up the slot cutter again to cut a groove along the top and bottom edge of the door. A narrow hardboard runner glued in the bottom is wide enough to bottom out in the groove and raise the door 1/16“ off the case bottom. The upper runner is wider so that it still catches in the upper groove when the door is settled in place. It’s a good idea to leave this extra wide and trim it down with some test fitting.

28

29 Once the rails are glued on, rout slots for the runners on the top and bottom.
Due to the veneer pattern, I definitely had a left and right door. To make this clear-ish, I routed a cove along the outside edge of each door. This acts as a pull as well as a transition between the door and the side of the case. The inner edge of the door is square.

30 The outside edge of each door gets a cove to act as a handle.
Side-Mounted Drawers
Over time, I’ve developed preferences for drawer construction. I like the smooth feel of drawers that ride on wood guides that fit into grooves in the drawer sides. And as often as possible, I like drawer pulls that are integrated into the construction rather than applied hardware.
Several of the walnut boards I had featured fun sections of pale sapwood running like rivers. I decided to use these for the drawer fronts as a surprise once the doors were opened. For the sides and back, I used quartersawn white pine for contrast and a bright drawer interior.

31 Rabbet the ends of the drawer fronts. The drawer sides will be doweled to the front and back.
Like the case, I assembled the drawers with rabbets reinforced with dowels. The drawer back fits into a dado and grooves in all the parts house the hardboard bottom.

32 A template and flush trim bit clean up the hand-hold opening on the top edge of the drawer fronts.
The drawer guides act as stops in addition to providing the running surface for the drawers. For this to work, the stopped grooves on each side have to be located consistently. That’s not as easy as it sounds. I wanted to use stop blocks on the router table fence to control the length of cut. But with a groove stopped on one end, half the drawer sides are routed in from the end. The others begin with a plunge cut and run out the back (so to speak).

33 I made this setup gauge to position the router fence and stop blocks to cut the groove for the drawer runners.
My solution is a hardboard setup gauge. A hole in the gauge fits over the bit. The long edge is used to position the router table fence. One edge of the gauge is used to center the groove on the narrow drawers. The other edge shifts the fence for the four larger drawers.

34 On half the fronts, you rout in from the end of the side, finishing at a stop block.
The end of the gauge indicates the location for the stop block on the outfeed side of the fence (for the right hand drawer sides). Once you rout half the drawer sides, flip the gauge end for end to set up the stop block on the infeed side for the left sides.

35 The remaining sides begin with a plunge cut using a stop block as a pivot point.
Your biggest challenge is organizing your drawer sides. You’re making mirrored pairs of sides. Frankly, I was surprised by how well this worked out.
The guides should be cut slightly narrower than the width of the groove. I also left them a little thick. This way, I could attach them to the case (with the back off) and use a shoulder plane and block plane to fine tune the fit and operation of each drawer.
Shelves & Finish
The center section combines both storage and display. I glued up two shelves that rest on adjustable shelf pins. This allows the shelves to accommodate whatever you want to show off. The front of the shelf features a slight chamfer and it’s set back from the leading edge of the dividers as well.
I pre-treated the walnut on this project with Tung oil to enhance the colors and grain. Then I sprayed catalyzed lacquer over the top to create some shine and add protection. The sideboard will be used for entertaining (with trivets, of course) and the top is a working surface just much as it a show piece. The drawers just have a single coat of lacquer to make cleaning easier. In my opinion, applying a heavy finish inside drawers often results in lingering chemical odors.
My sister lives in another state, so I have yet to see this piece in person in her house, but I’m sure it fits right in. My woodworking is a gift that I am able to share by building projects for family and friends.
Here are some supplies and tools we find essential in our everyday work around the shop. We may receive a commission from sales referred by our links; however, we have carefully selected these products for their usefulness and quality.


