We may receive a commission when you use our affiliate links. However, this does not impact our recommendations.
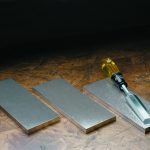
 According to conventional wisdom, plywood has something to hide: unsightly edges. But as you can see, this handsome tray turns that convention on its ear.
The key to its cool “micro-lam” appearance is Baltic birch plywood, which has uniformly thick plies that are virtually free of knots. As a result, its edges have a clean, linear look that’s distinctively modern.
Creating the micro-lam panels requires several cutting and gluing steps (Fig. A). You’ll also have to build a jig and use a router to surface the panels. This makes the project more challenging than just using an ordinary piece of hardwood plywood for the bottom—but what’s the fun in that?
Create the micro-lam panels
Transforming face-grain Baltic birch into micro-lam panels doesn’t require magic, just careful cutting and gluing. Start by cutting a 12″ wide x 60″ length of 1/2″ Baltic birch plywood into twelve 3-1/4″ wide x 12-3/4″ long pieces. Mark the front face and top edge of each piece so you can keep them oriented as they were cut from the sheet.
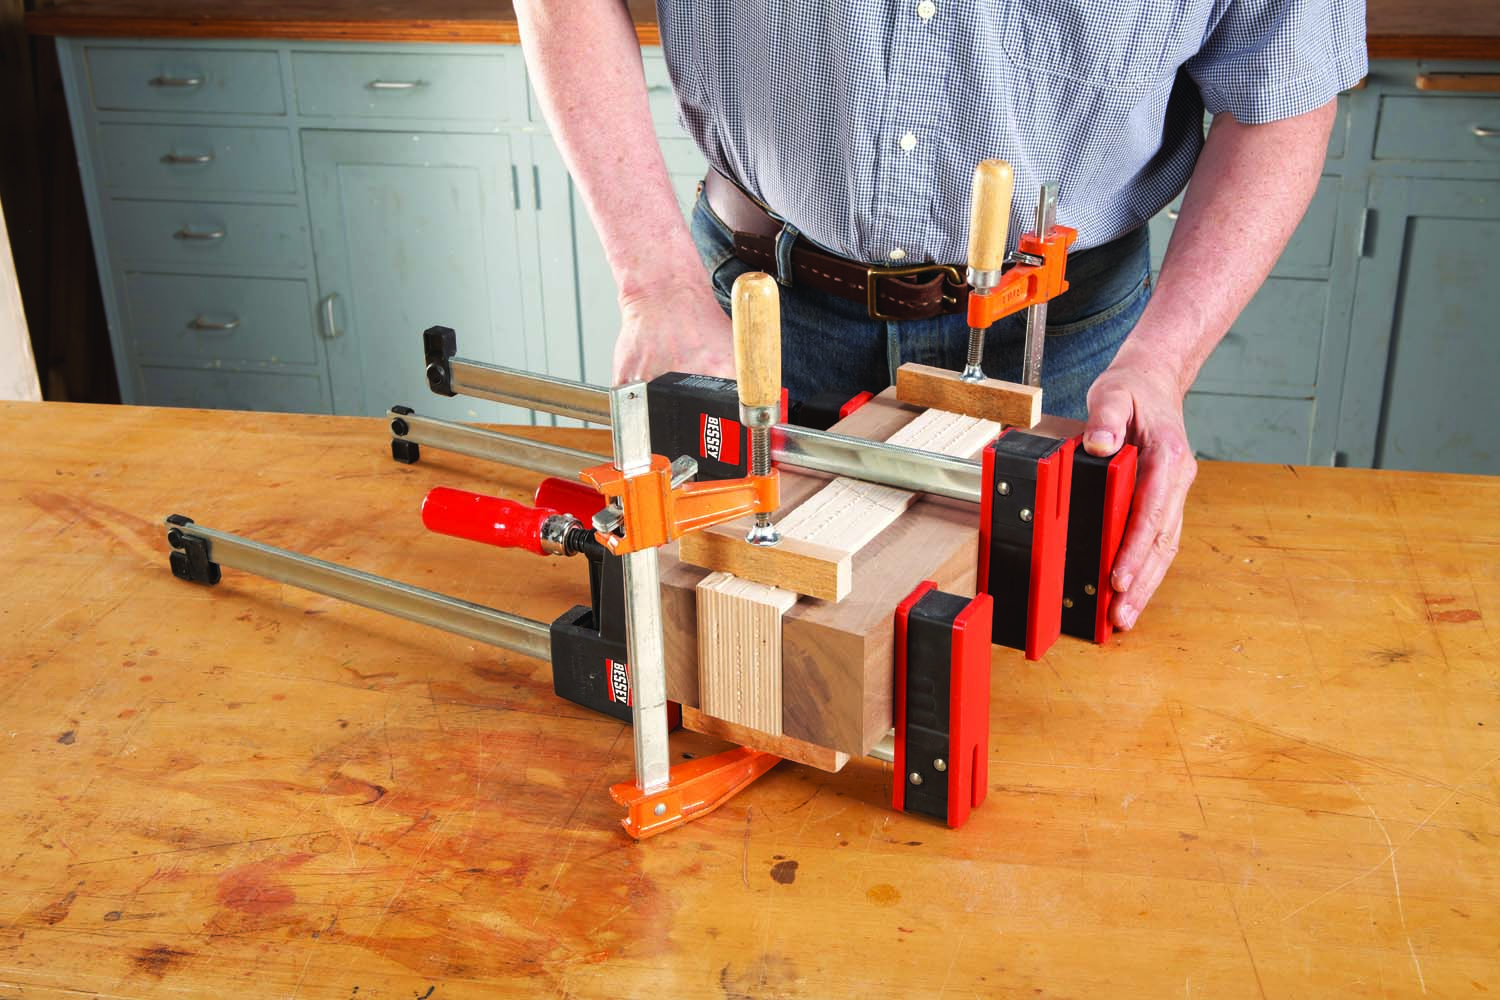
Photo 1. Glue pieces of Baltic birch plywood into blocks. TIP: Use thick cauls to evenly spread the clamping pressure and stiff cauls to keep the edges aligned.
Stack and glue the pieces into blocks, using cauls (Photo 1).
Tip: Rub paraffin on the cauls so they don’t stick to the glue. Make sure all the pieces in each block are oriented the same way and take care to keep their ends and edges aligned. Use waterproof glue, such as Titebond III. Glue up three four-piece blocks.
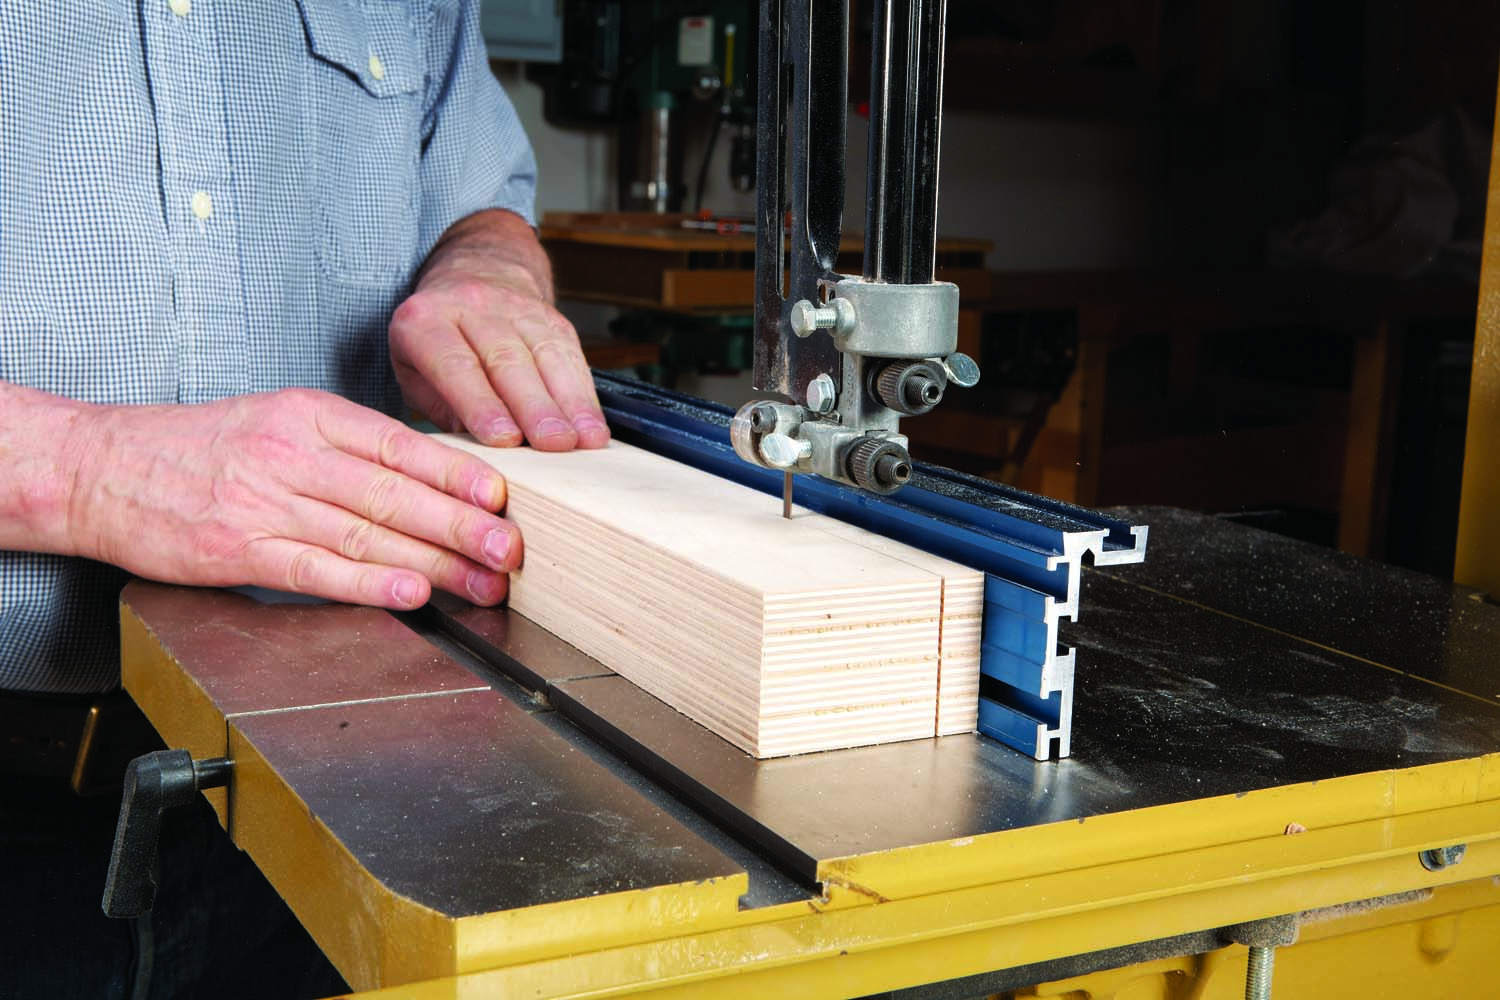
Photo 2. Saw each plywood block into micro-lam sections. Every cut must be straight, square and flat, so install a new blade and make sure the saw and fence are properly tuned.
After removing the clamps, scrape off the squeezed-out glue on one edge of each block so it will rest flat against the tablesaw’s rip fence. Raise the blade, set the fence and make one pass to clean and flatten the block’s opposite edge, remove as little material from the block as possible. Mark one plainsawn face on each block so you can reassemble. Then resaw each block into five 9/16″ thick micro-lam sections (Photo 2). After sawing each section, position the block’s resawn face against the fence and go again.
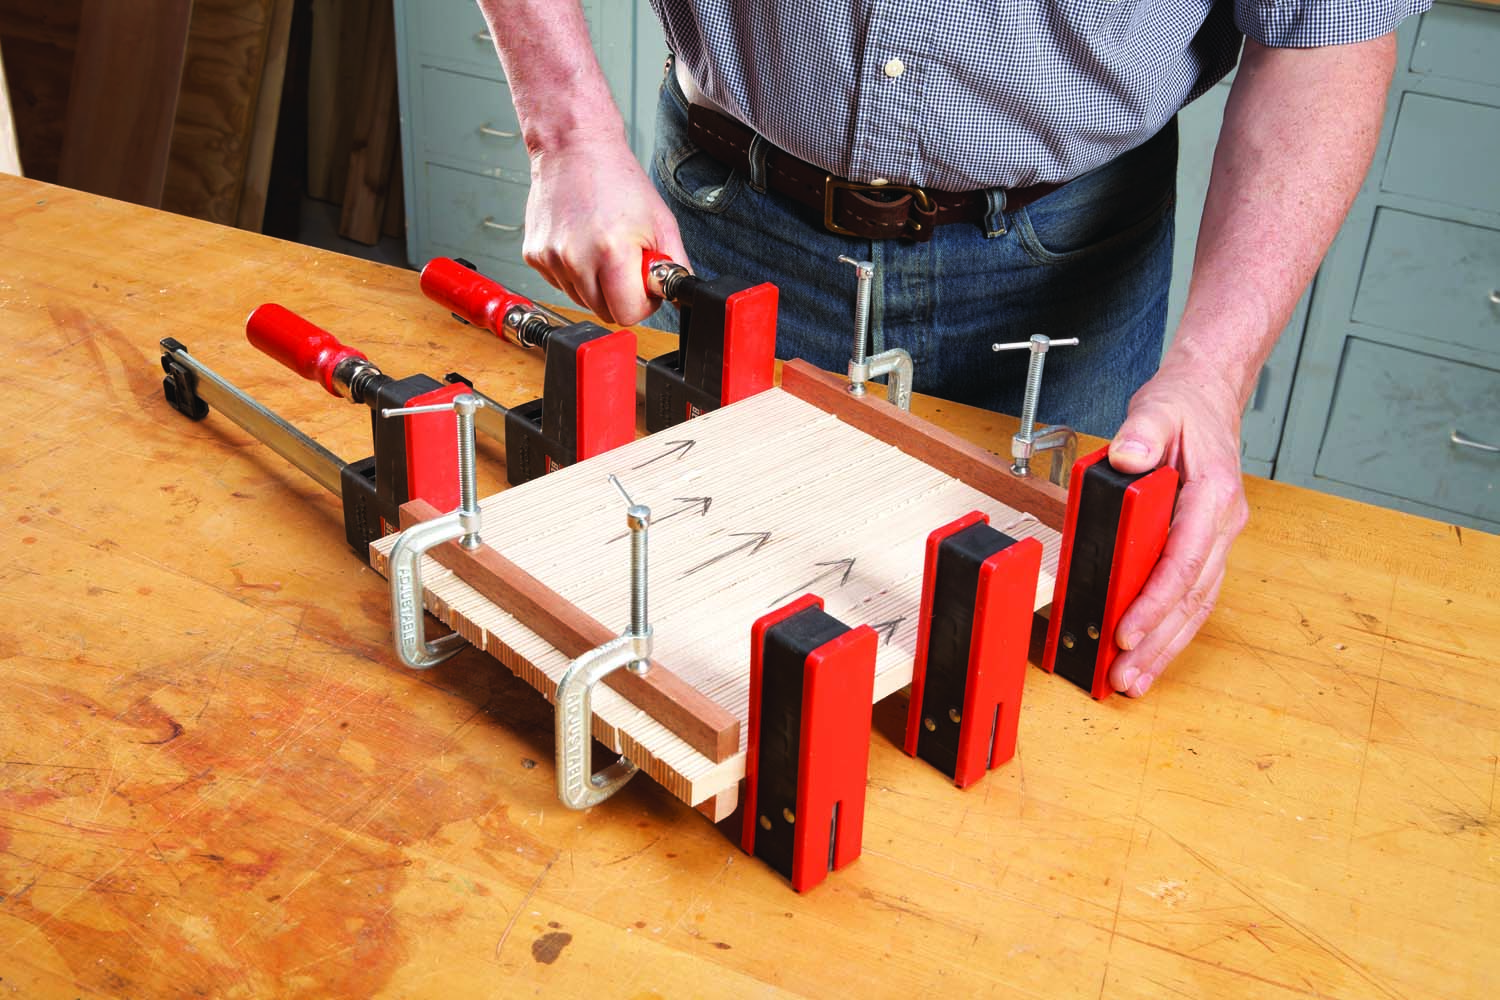
Photo 3. Glue the micro-lam sections into panels. Glue together two of these panels to create the tray’s bottom. Use a third panel to make its handles.
Edge-glue the five sections from each block to create three micro-lam panels (Photo 3). As before, use cauls to keep the sections aligned. Use a chisel to remove the squeezed-out glue on both sides of each panel after it sets up, but before it completely hardens.
Tip: Do not use water to remove squeezeout—if the unfinished micro-lam panel gets wet, it will permanently bow.
Believe it or not, the micro-lam sections have grain direction, which can cause unsightly light/dark color discrepancies (called “barberpoling”) if the sections aren’t oriented the same way.
Tip: To check for barberpoling, simply view the assembled panel under a raking light and reposition the sections as necessary before gluing.
Glue together two of the micro-lam panels to create the tray’s bottom (A, Fig. B), using cauls to ensure the long assembly stays flat. In fact, plan to keep it clamped between cauls whenever possible until you assemble the tray. Ditto for the third micro-lam panel which will be used to make the tray’s handles (B).
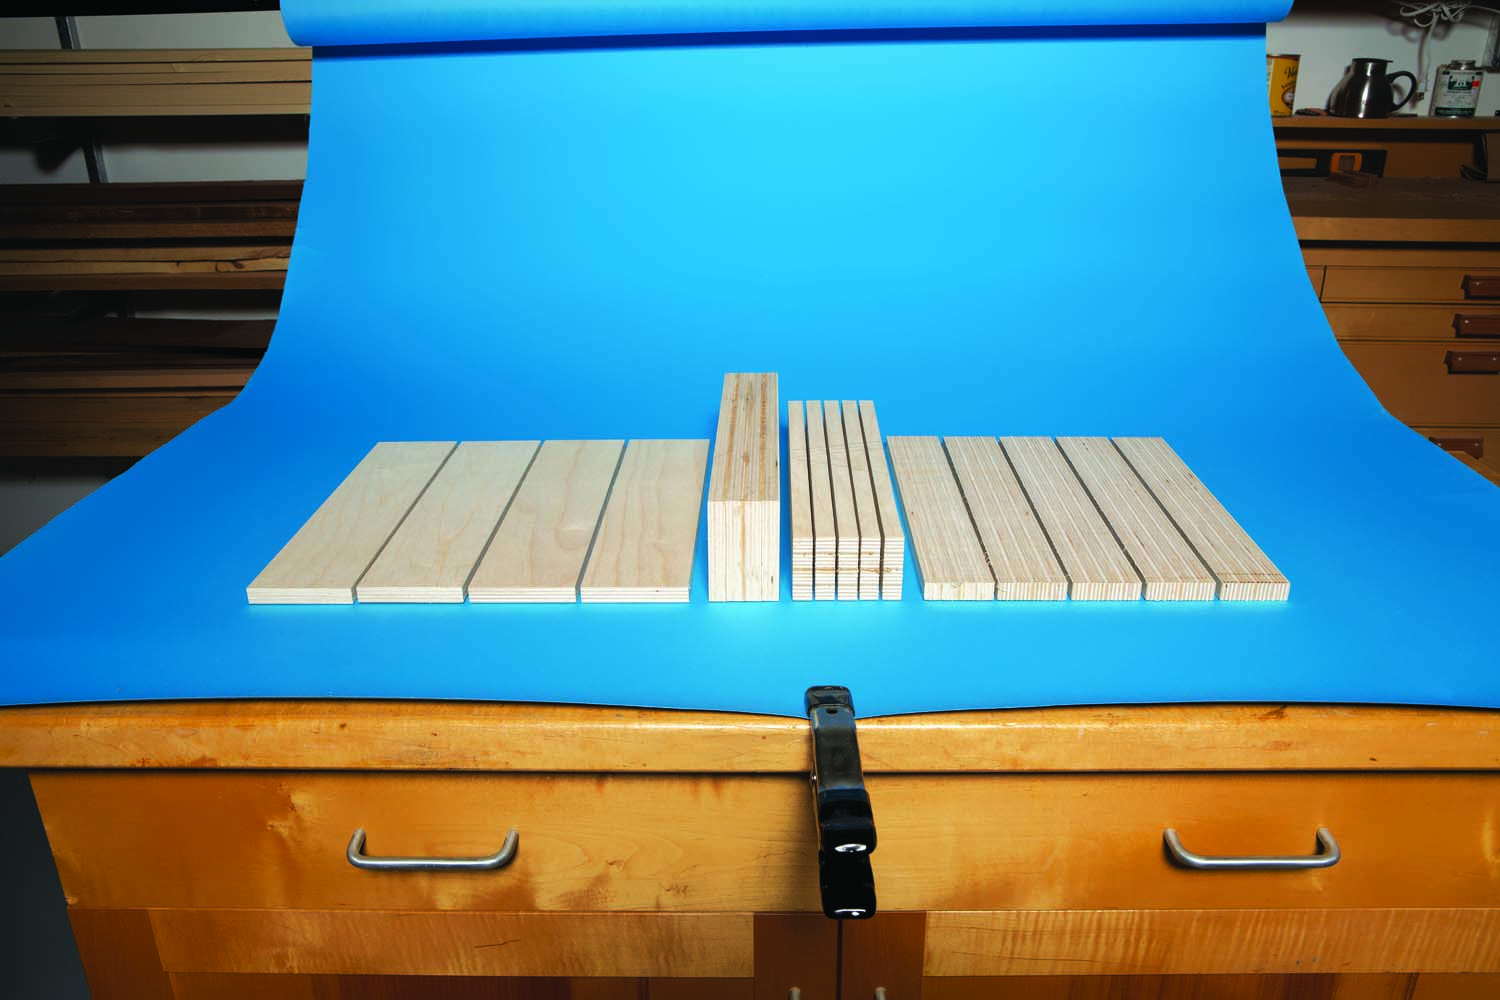
Fig. A. Make micro-lam panels by gluing Baltic birch plywood pieces (A) into a block (B). Turn the block on its face and resaw it into micro-lam sections (C). Then edge-glue the sections (D). Note: (A-D proceeds from left to right)
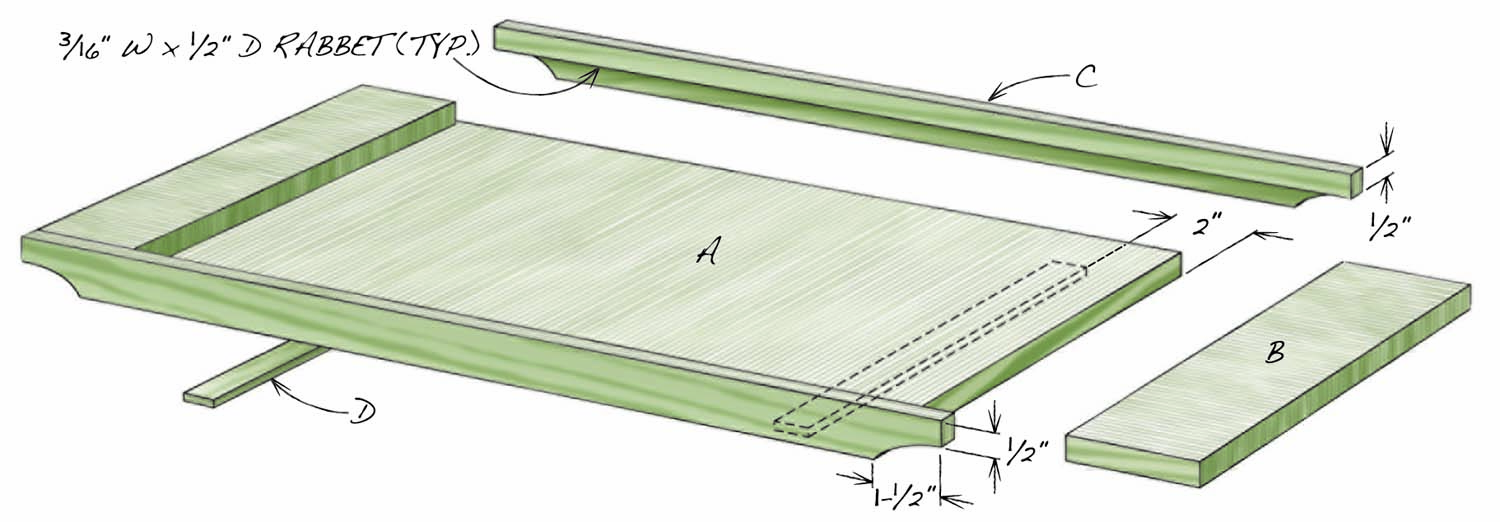
Fig. B. Exploded View
Cutting List
|
Micro-Lam Serving Tray Overall Dimensions: 1-5/32″ Th x 13″ W x 22″ L |
||||
|
Part |
Name |
Qty. |
Material |
Th x W x L |
|
A |
Bottom |
1 |
Baltic birch plywood |
1/2″ x 12-3/8″ x 19″ (a) |
|
B |
Handle |
2 |
Baltic birch plywood |
1/2″ x 2-1/2″ x 12″ (a) |
|
C |
Rail |
2 |
Baltic birch plywood |
1/2″ x 1″ x 22″ (a) |
|
D |
Foot |
2 |
Baltic birch plywood |
5/32″ x 3/4″ x 11-3/8″ |
|
Notes: (a) Plywood thickness is nominal. |
||||
Build a surfacing jig.
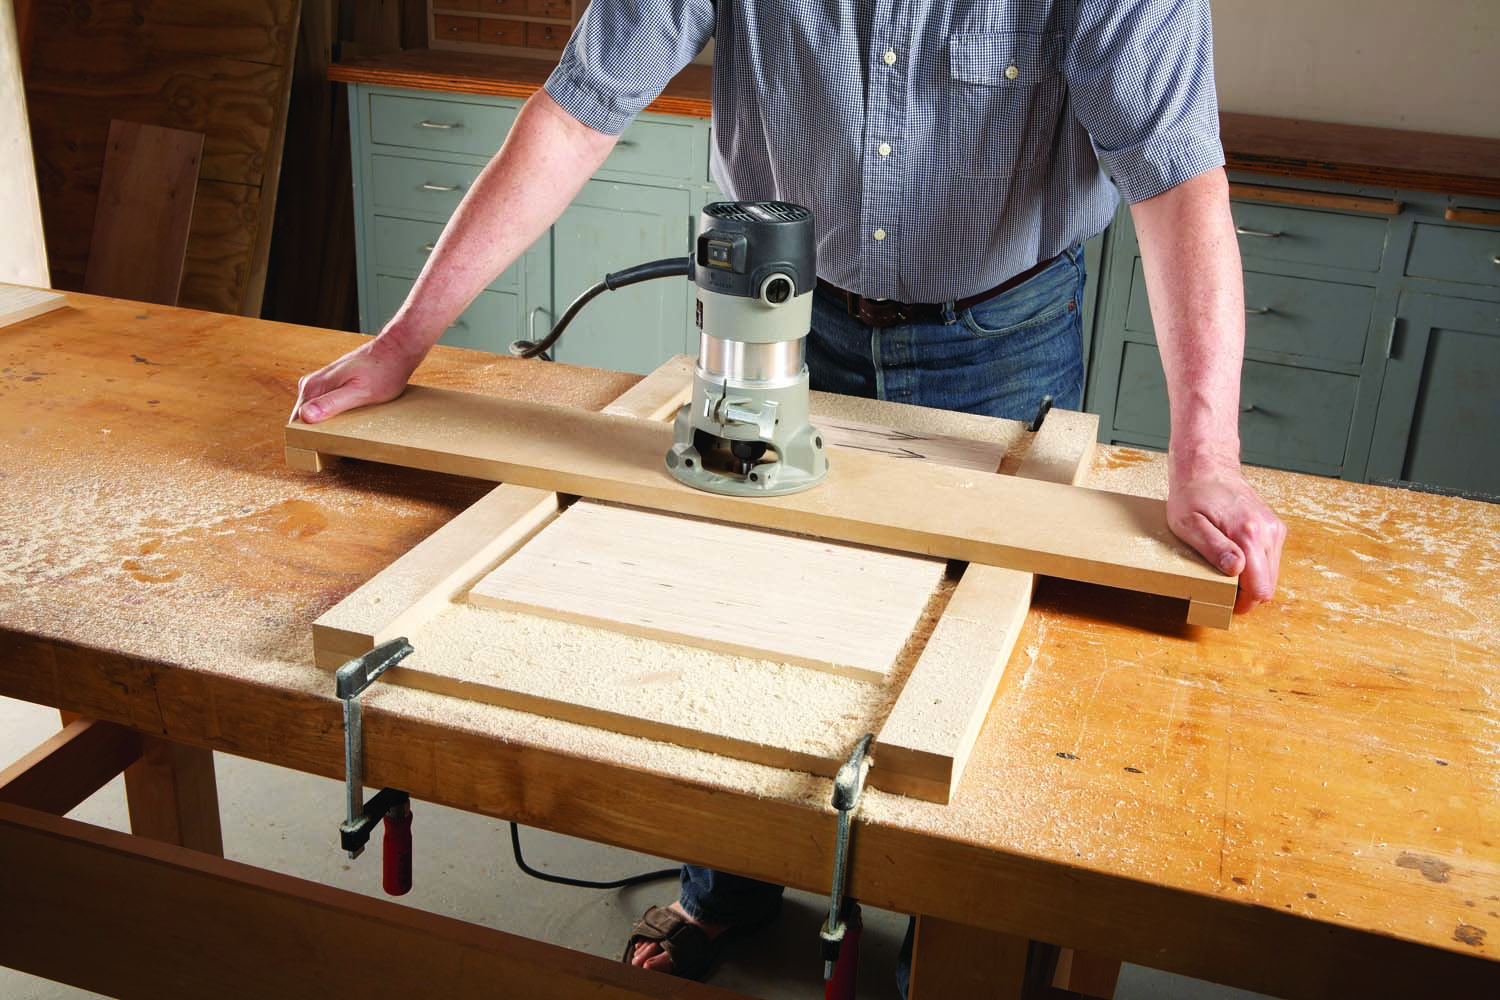
Photo 4. Surface the panels using a two-part routing jig. Fasten the panel to the platform and adjust the bit to make a light cut. Then slide the router over the panel.
One simple routing jig allows smoothing the micro-lam tray bottom and handle panel and milling them to consistent thickness (Photo 4). The jig consists of a platform to hold the workpiece and a gantry to hold the router. To make the platform, screw two 3/4″ x 2″ wide MDF rails on an 18″ x 28″ piece of MDF. To make the gantry, mount the router dead-center on a 6″ x 32-1/2″ piece of 3/4″ MDF after drilling a hole for the bit. Then attach stops to the bottom edges. The stops are designed to keep the bit from cutting into the rails, so their width depends on the bit you use. The 3/4″ dia. hinge mortising bit I used (Rockler #90814) required 1-1/4″ wide stops.
Center each micro-lam workpiece between the rails and adhere it to the platform using hot-melt glue. Place the gantry on the rails and adjust the bit to make a very light cut. Then slide the router over the workpiece.
Tip: For the best results, rout in line with the micro-lams and move the bit from left to right, as if routing an edge. (Routing back and forth or across the mirco-lams is more likely to cause tearout.)
Slightly lower the bit and make successive passes until the surface is flat. Then use a random orbit sander to remove any tear-out and smooth the surface. Flip over the workpiece and repeat the process to surface the other side. The final thicknesses of the tray bottom and handle micro-lams isn’t critical, as you can adjust the tray’s rails to fit.
Process the parts
After surfacing the tray bottom, cut it to final dimensions. Start by using a carpenter’s square to mark a square line on one of its long uneven ends. Carefully cut the line using the bandsaw. Then move to the tablesaw. Place the bandsawn edge against the fence and crosscut the opposite uneven edge. Then turn the bottom around and make a second pass to cut it to final width while truing its bandsawn edge. Finish by cutting the short ends square to the long ends.
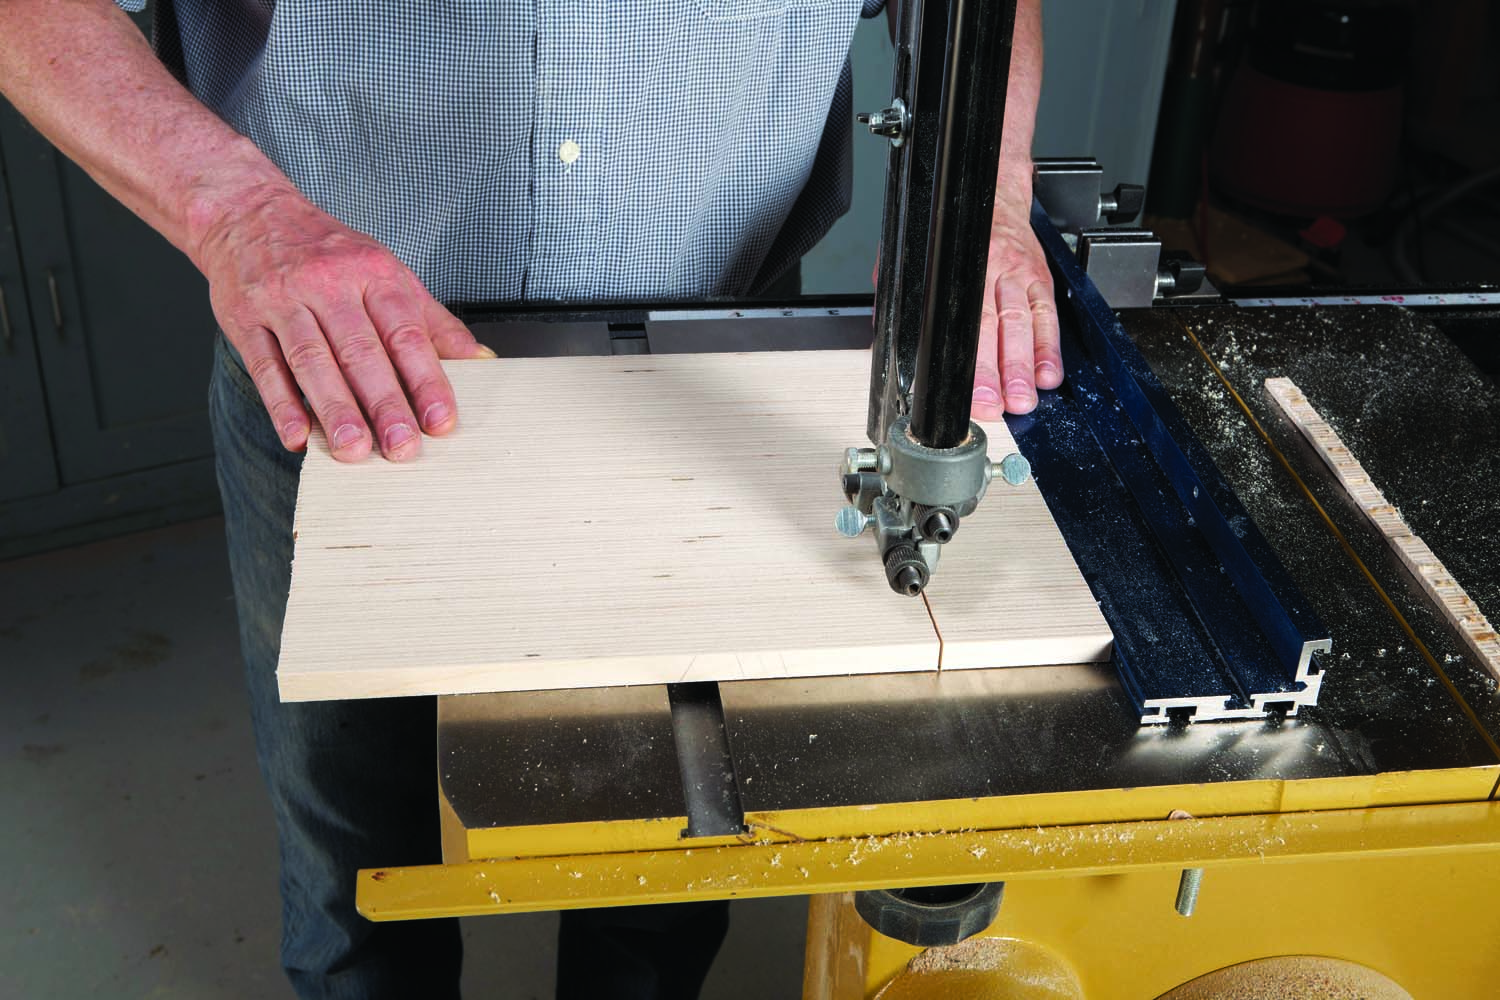
Photo 5. Cut the third micro-lam panel into narrow pieces. Glue two of these pieces end-to-end to make a blank for each handle.
After surfacing the handle blank, square one end. Then cut this blank into four 2-3/4″ wide strips (Photo 5). Use the tablesaw as before to trim the strips to final width and square their ends. Then glue two strips end-to-end to create each handle blank.
Make the rails
Make the rails (C) from a squarely cut 5″ x 22″ piece of 1/2″ Baltic birch. Cut 3/16″ deep rabbets on both long edges, sized to fully house the tray’s 1/2″ thick micro-lam bottom. Then cut the rails to width—the same dimension as the combined thickness of the micro-lam bottom and handle. To play it safe, cut the rails about 1/32″ wider (cutting them a bit too wide is OK; cutting them too narrow is not).
Mark and cut the curves on the rails’ ends.
Tip: Use a #20 biscuit to draw the shape. Make sure the curve is the same height as the rabbet, so they meet at the end of the rail.
Assemble the tray
Mark centerlines on both rails and the micro-lam bottom. Then glue the bottom to the rails. Make sure the parts are centered and use cauls to press the bottom firmly against both shoulders of each rabbet. Take your time: It’s best to glue one rail at a time.
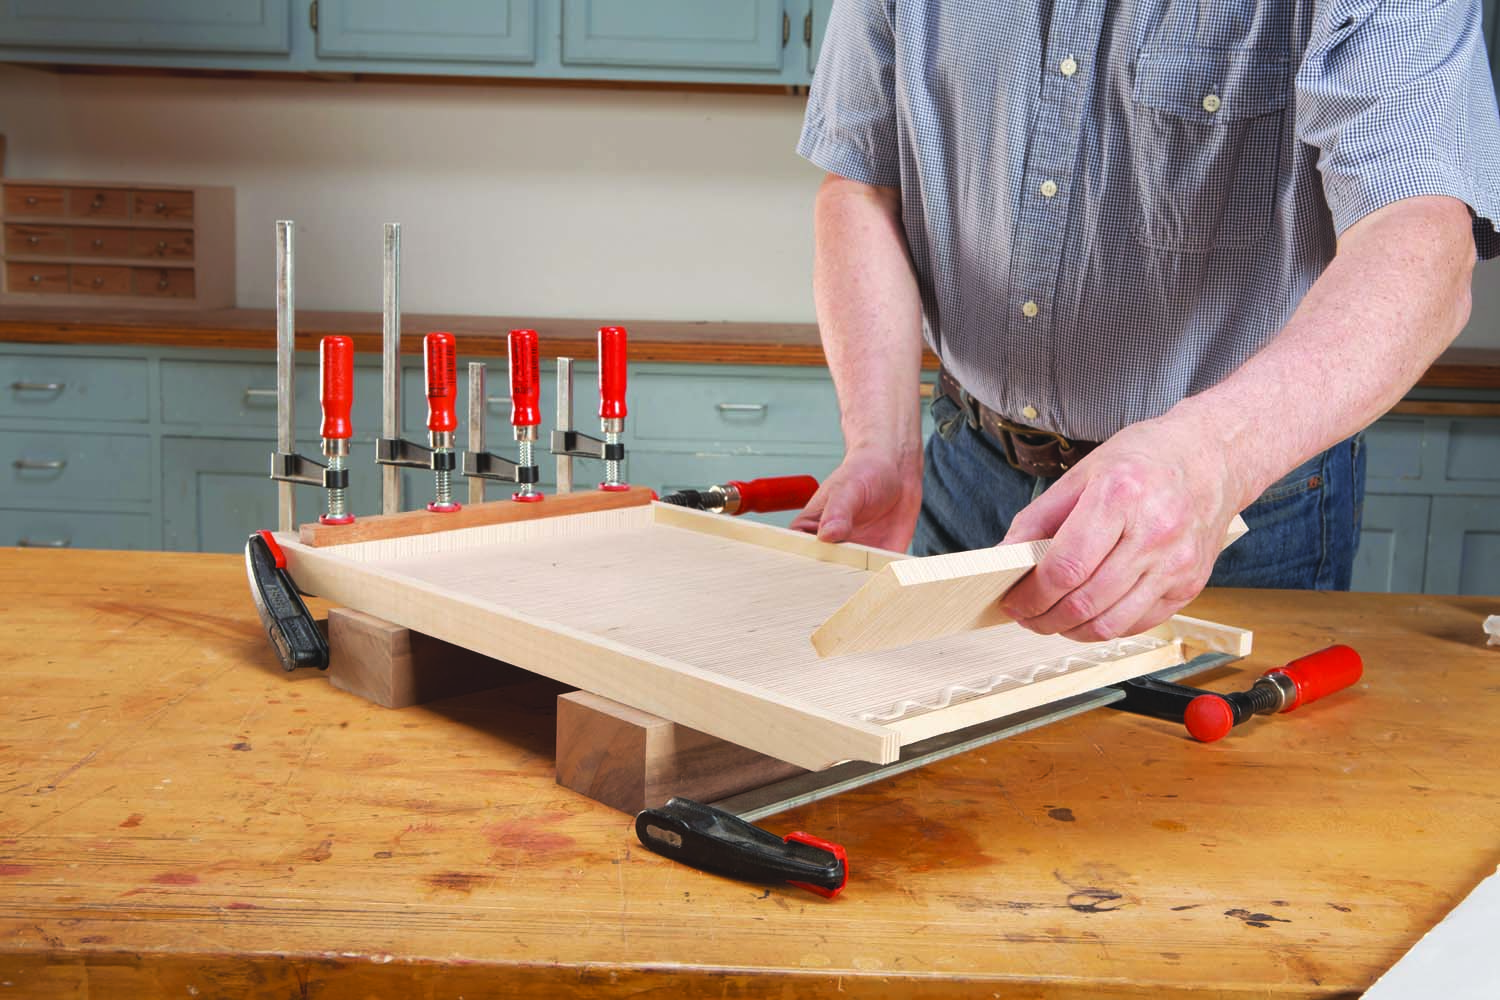
Photo 6. Glue on the handles after gluing the base into rabbets cut in the rails. The rails’ width matches the combined thickness of the tray’s handle and bottom.
Glue on the handles after cutting them to fit between the rails (Photo 6). Then cut and glue on the feet (D). Use a sanding block as necessary to level the rails with the handles. Then finish-sand the tray to 120 grit and brush three coats of oil-based polyurethane on every surface—top, bottom, ends and edges. Sand with 240 grit between coats.
Here are some supplies and tools we find essential in our everyday work around the shop. We may receive a commission from sales referred by our links; however, we have carefully selected these products for their usefulness and quality.