We may receive a commission when you use our affiliate links. However, this does not impact our recommendations.
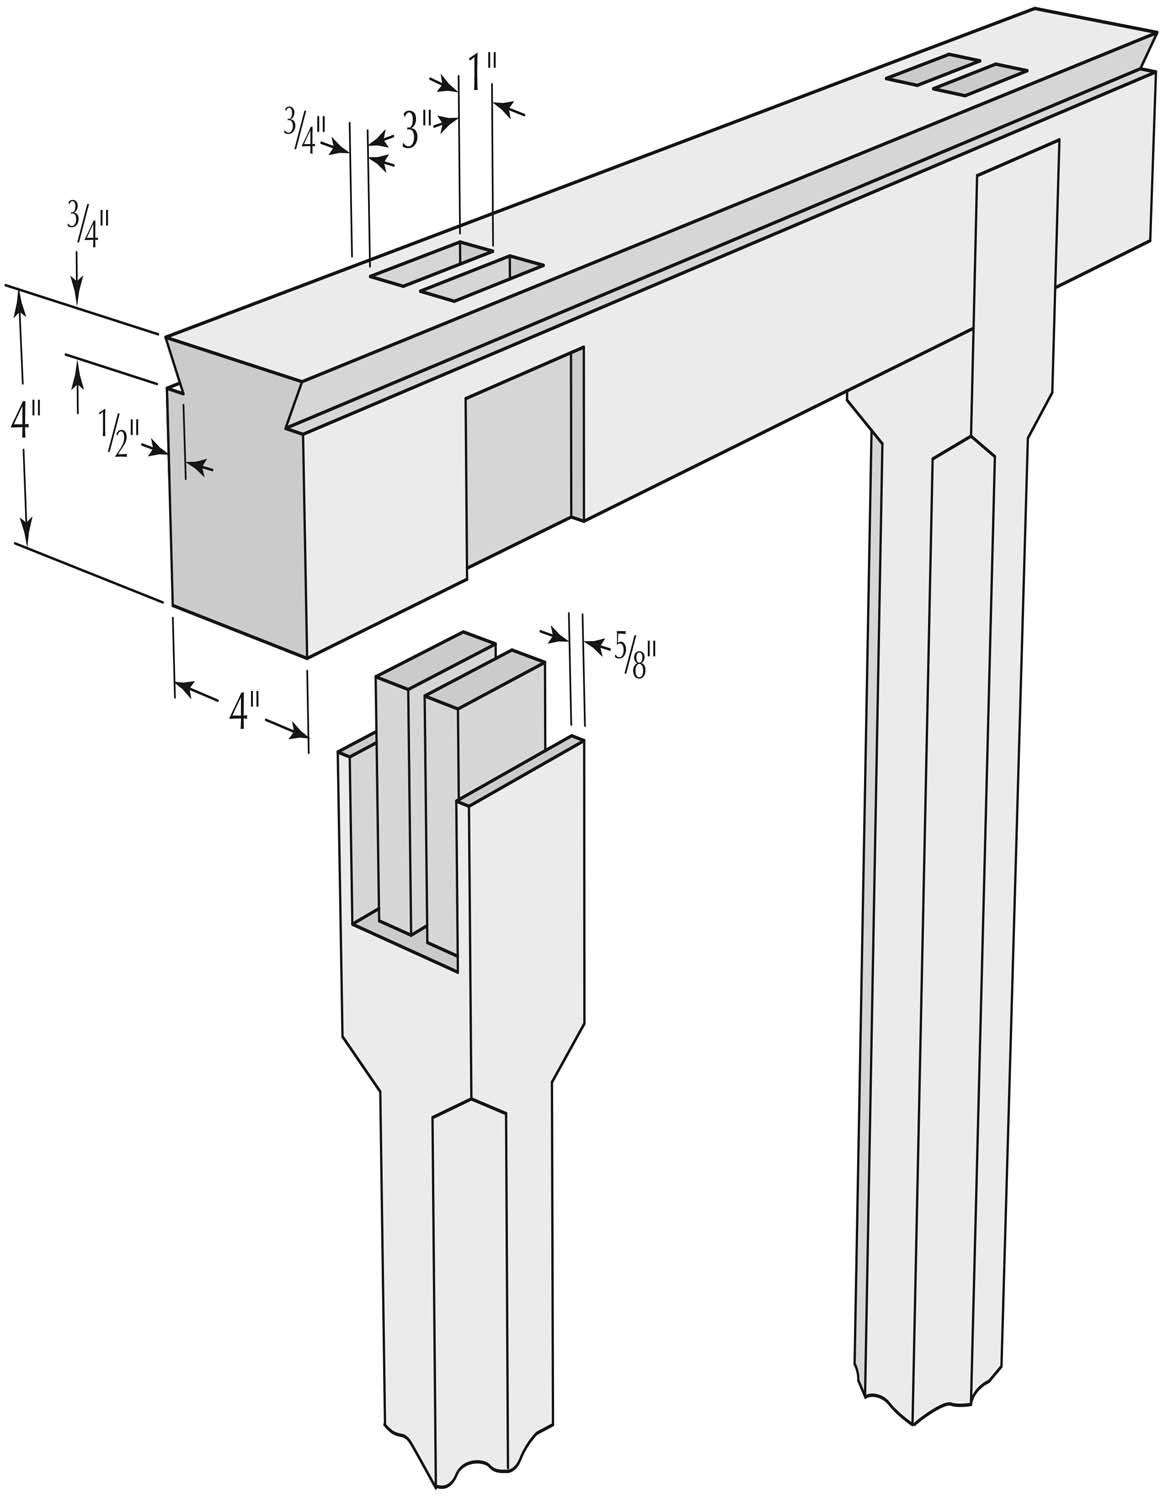
Artistic as well as strong. The leg-to-beam mortise-and-tenon joint handles front-to-back stress while the non-shouldered tenons, which are locked into the beam, help to keep the table from racking.
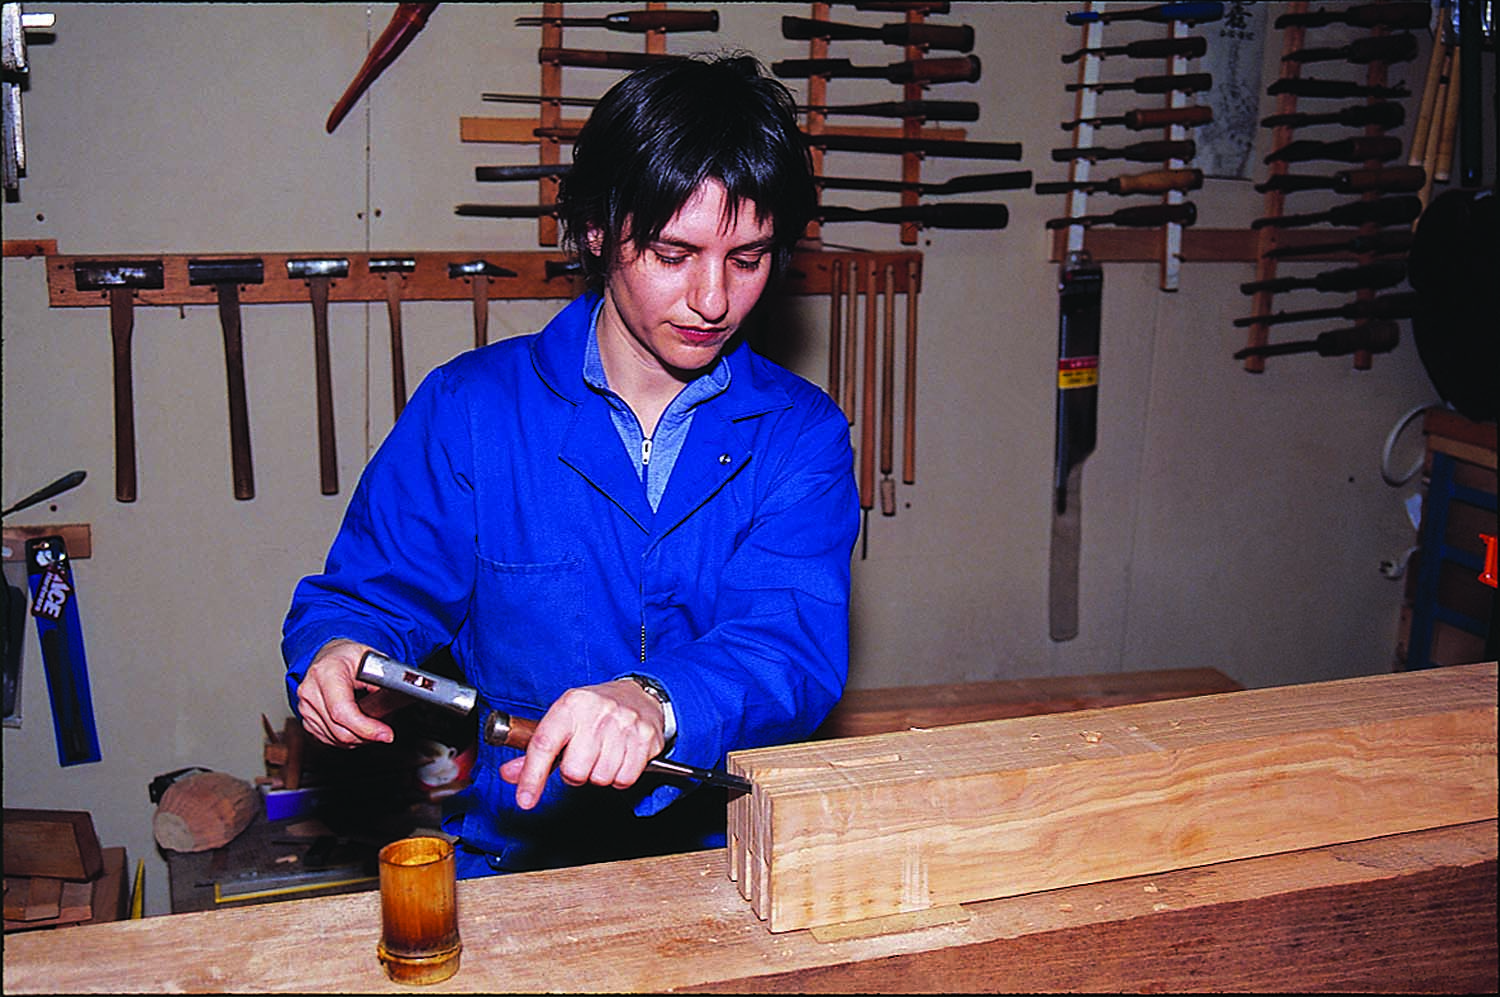
All these years, my assistant, Laure Olender, has not only been working with me doing woodwork, she also takes photographs (including those in this article), edits my articles and assists me at lectures and demonstrations. I thought she was ready to do her own large project from beginning to end. I brought up several traditional Japanese woodworking projects, but every one of them had some small, complicated, technical detail that did not fit well for her first large project.
I came up with the dining table idea and thought this to be the perfect project for her, so we made a plan. I explained all the necessary concepts to her before she started on the project, as I have many wishes, thoughts, traditions and ideologies about this dining table.
Origins Born on a Farm
In a small village in Japan, my woodworking Master and I first made this table for the Magobei household. That table was constructed in a traditional Japanese way; however, unlike Japanese dining tables, its legs were long and Western in style.
During World War II, Japan was struck by a dreadful food shortage. City people would take their belongings and other assets to exchange them for rice, potatoes and other foods. With time, farmers became extremely rich. Finally, the war ended and soon thereafter the new government freed farmers from the feudal-like system by agrarian reform – it was the first time in Japanese history that common farmers turned suddenly rich and wanted to live as rich land owners once did.
The farmers began to facelift their houses, the entrance door and the houses’ exterior shoji. Magobei was the first in his village to apply these changes, then many other farmers followed. It was also Magobei’s idea to have a Western-style table.
Most farmers I knew in this village were barefoot for most of their farming day. The Magobei house had a large dirt floor by the entrance and a wood-burning cooking stove dug in the floor’s corner.
From this dirt floor there was a small wooden veranda-like step that led to the tatami floor. In most Japanese houses, people remove their shoes while on the dirt floor then go up to the tatami floor. Each one in the family had a hakozen, a square wooden tray that held the individual’s eating utensils. After serving food on the hakozen, each would take it to the small veranda at the edge of the tatami floor. There they sat, with the tray in front of them, to eat their meals. Even during the winter months they would eat in this way, but with straw sandals on.
As you may know, Japan did not have a chair culture in its history. A large dining table on the dirt floor with two sitting benches somehow felt exotic, Westernized and contemporary. It brought Magobei pride and happiness. Thus I call the table Magobei’s dining table. It became so popular that neighbor villagers followed his footsteps.
The Object of Magobei’s Pride

A quick trip to flat. A power planer is used to flatten the tabletop, the first pass is run across the grain.
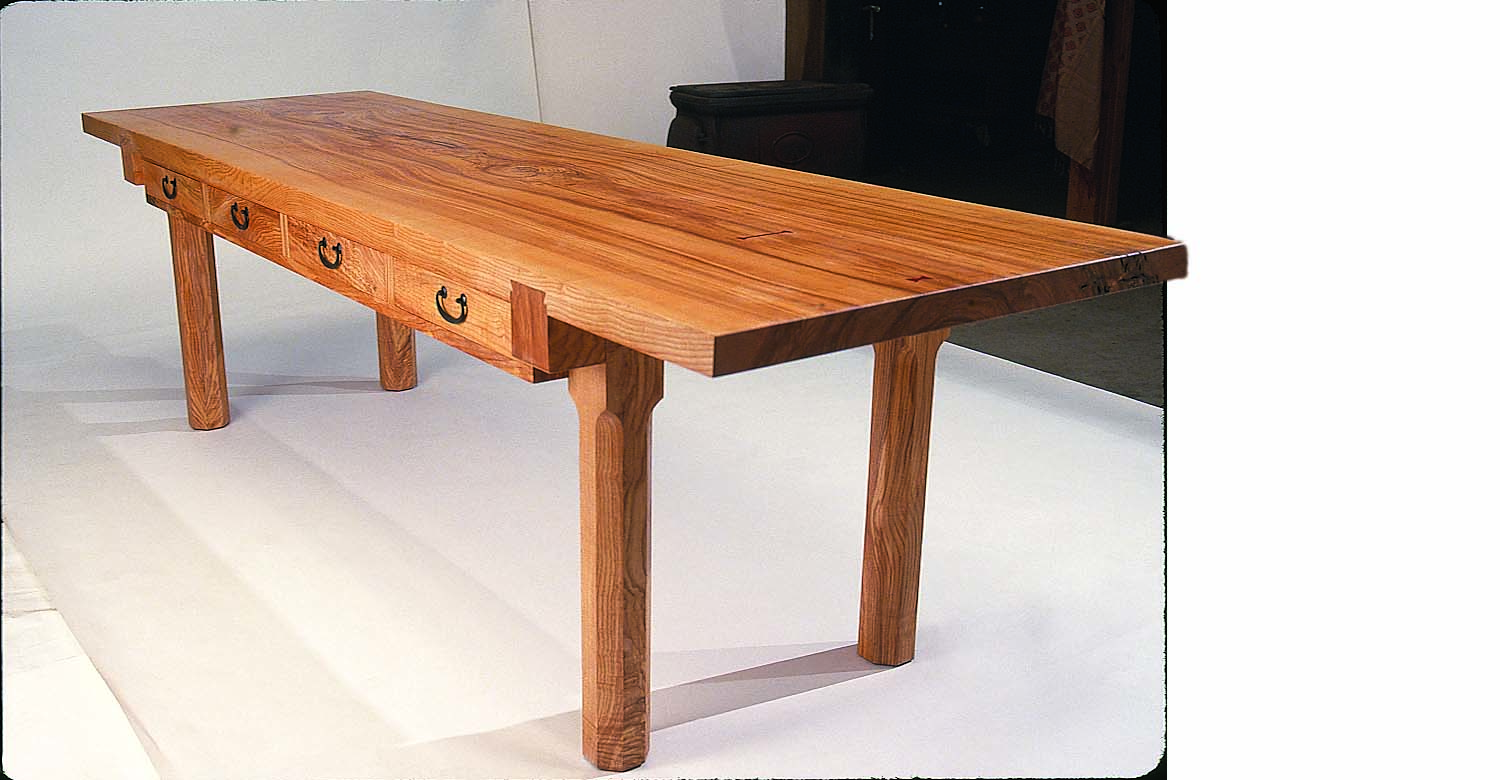
Two beams are secured to the tabletop with sliding dovetails. The legs are positioned and locked into that beam with mortise-and-tenon joints. There is no apron, no brace between legs and no leg-to-tabletop connection. I want no distraction with the tabletop. Here is my working procedure for this table: Begin with the tabletop, work the sliding dovetail beam and finish with the legs. Under my supervision, Laure will physically execute this table from beginning to end. Ash is the wood we chose.
Since I acquired the ash logs used for this dining table, many years have passed by. My original plan for this wood has progressed slowly, but well. I have made two small boxes for my friend’s young daughters, a part of my sculpture and produced a traditional Japanese geta-bako, or shoe cabinet. I also have a traditional Japanese kitchen cabinet, a mizuya, in progress.
This ash is quite old and even though it looked solid, many parts had lost its strength as lumber. We did not know how thick or wide it could be until it had been planed. The wood was dried for many years in a shaded and well-ventilated area; the wood had the chance to move as much as it wanted to move. By now, it was bone dry. However, once planed, the wood would still move slightly.
Truing the Slab for the Tabletop
Laure started by flattening both sides of the tabletop with a portable 6″ power planer – removing warp and twist carefully while trying to keep the top at maximum thickness. The blades were sharpened by hand and had a crown to avoid planer marks.
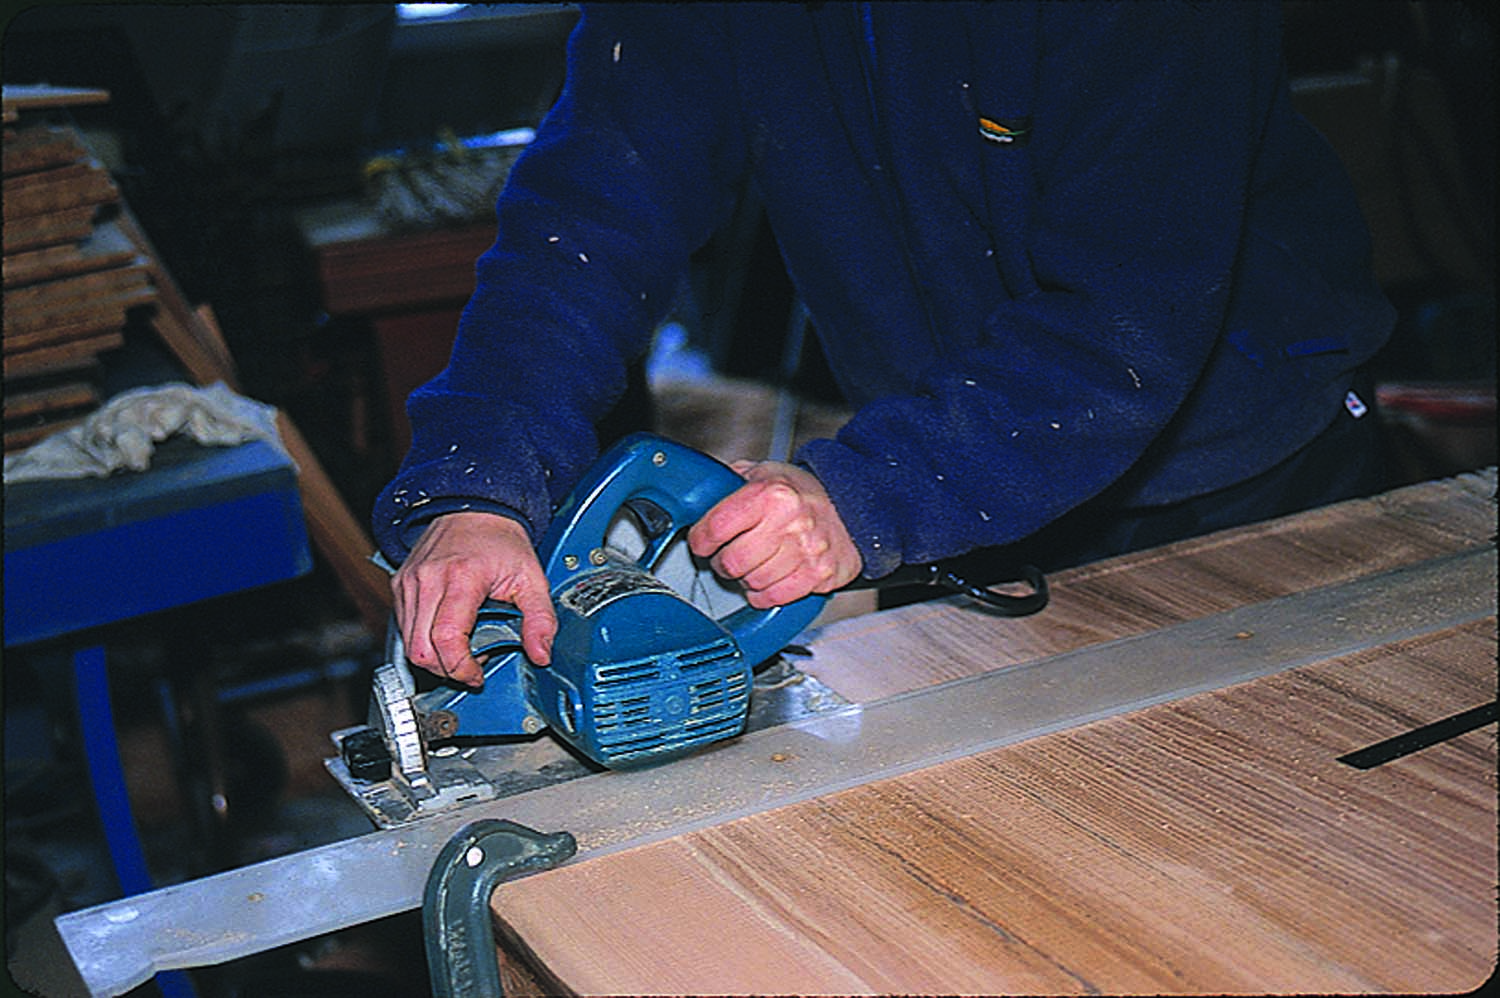
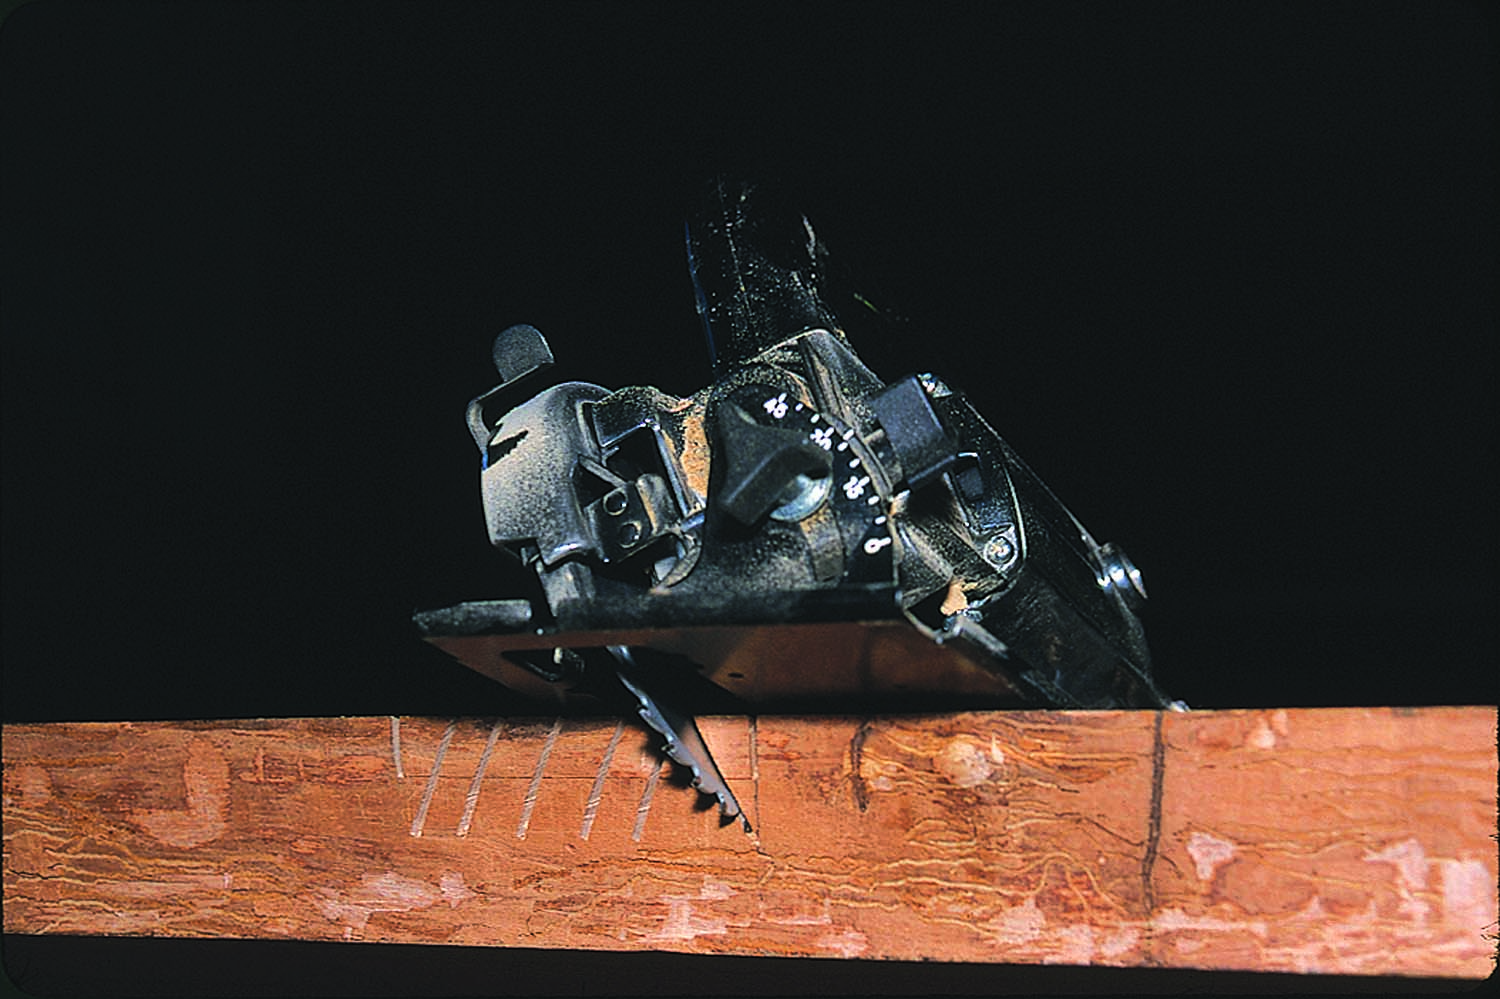
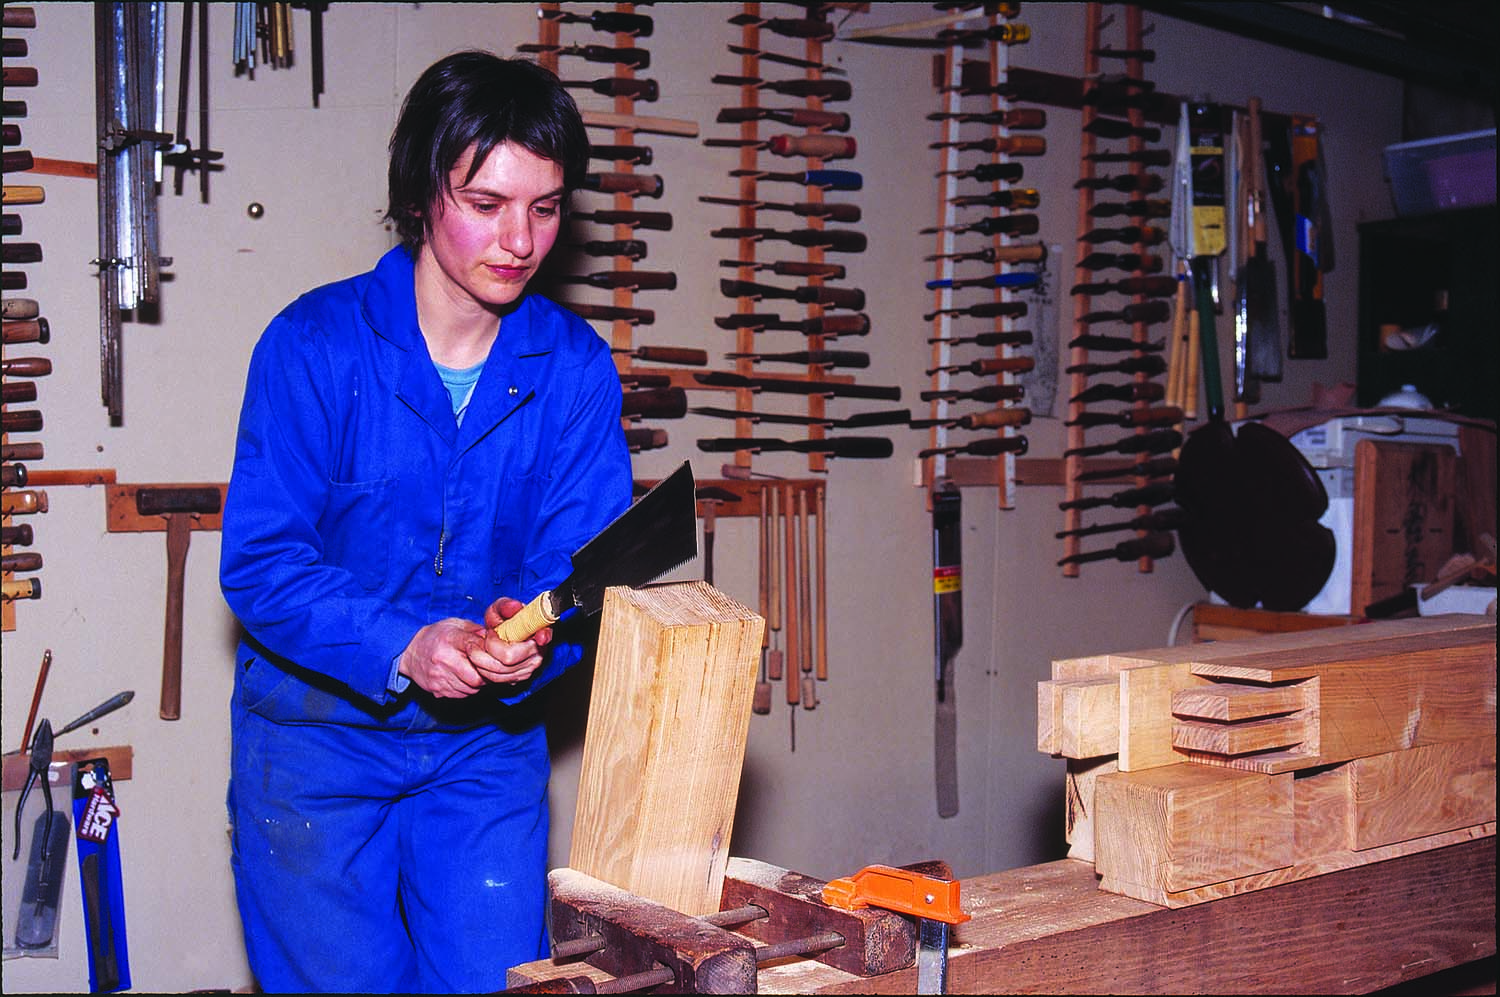
It takes two. To trim the end of the top, the circular saw blade was too small to cut through the entire thickness. The cut was completed with a kataba Anahiki-Nokogiri, a Japanese saw.
She used a wide brush soaked with water and brushed the convex side of the plank first, then started planing across the grain while constantly wetting the wood. I suggested she use the power planer to shape the slab. When using a power planer for rough shaping, I plane squarely across the grain using the full width of the cambered blade. For the medium work, pull the blade into the tool leaving about 4″ exposed then use the plane at a 30º- 45º angle to the grain. And for fine flattening adjust the blade further into the planer (expose about 21⁄2” of the blade), then follow the grain straight. (Another method would be to have three sets of blades to switch during use, each blade with less camber.) She followed my advice, taking down the high points while correcting the slab’s warp and twist on both sides.
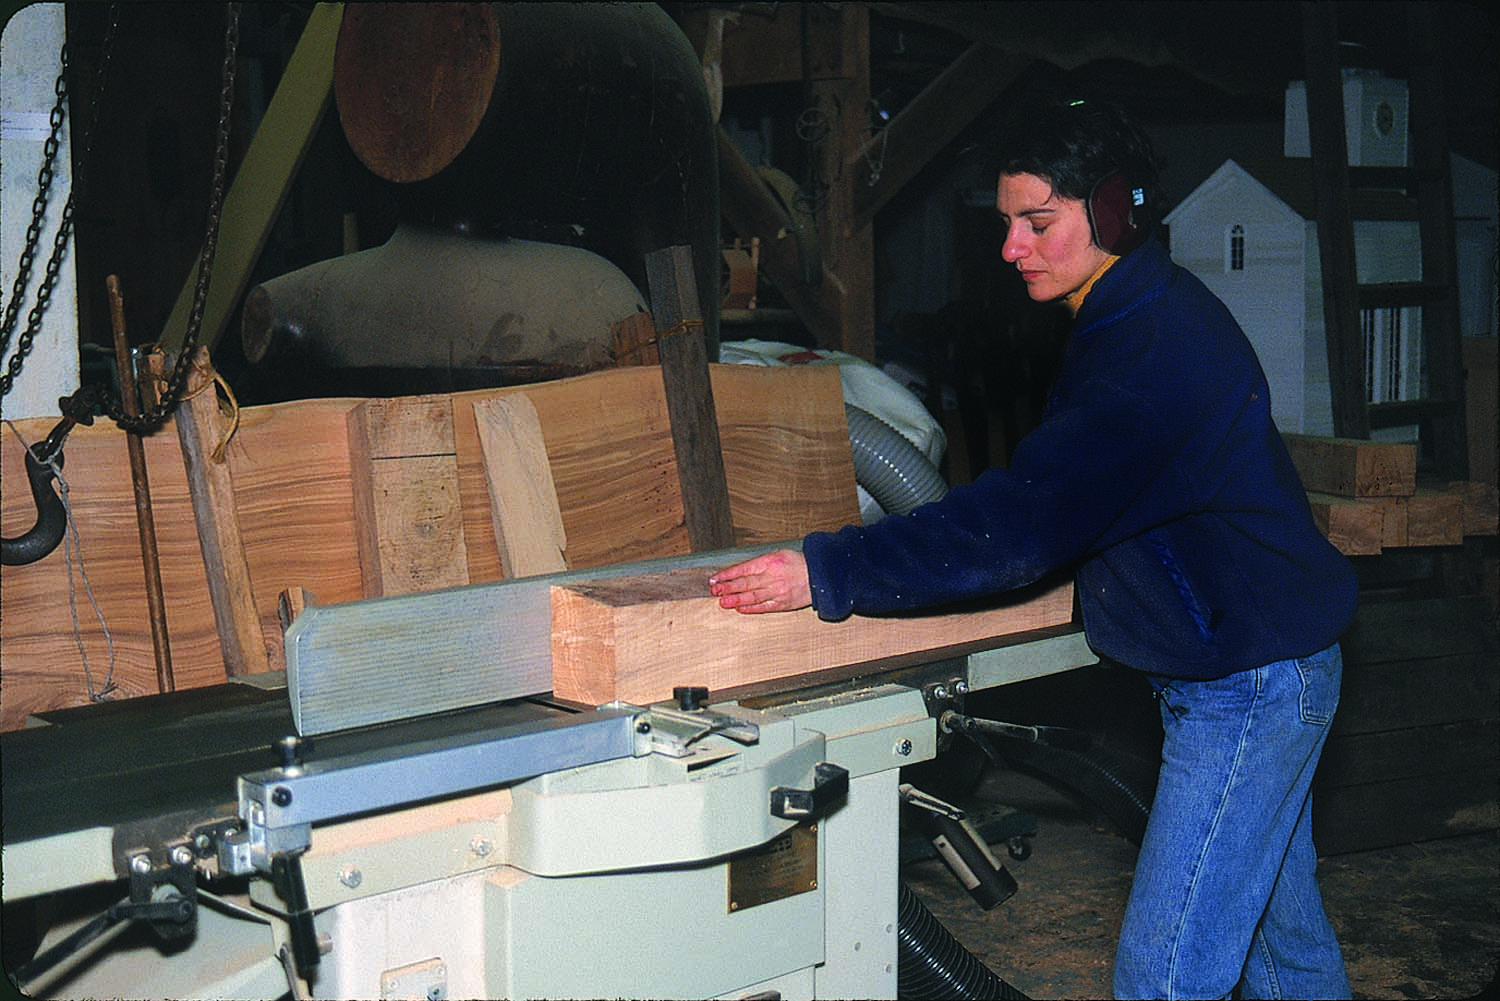
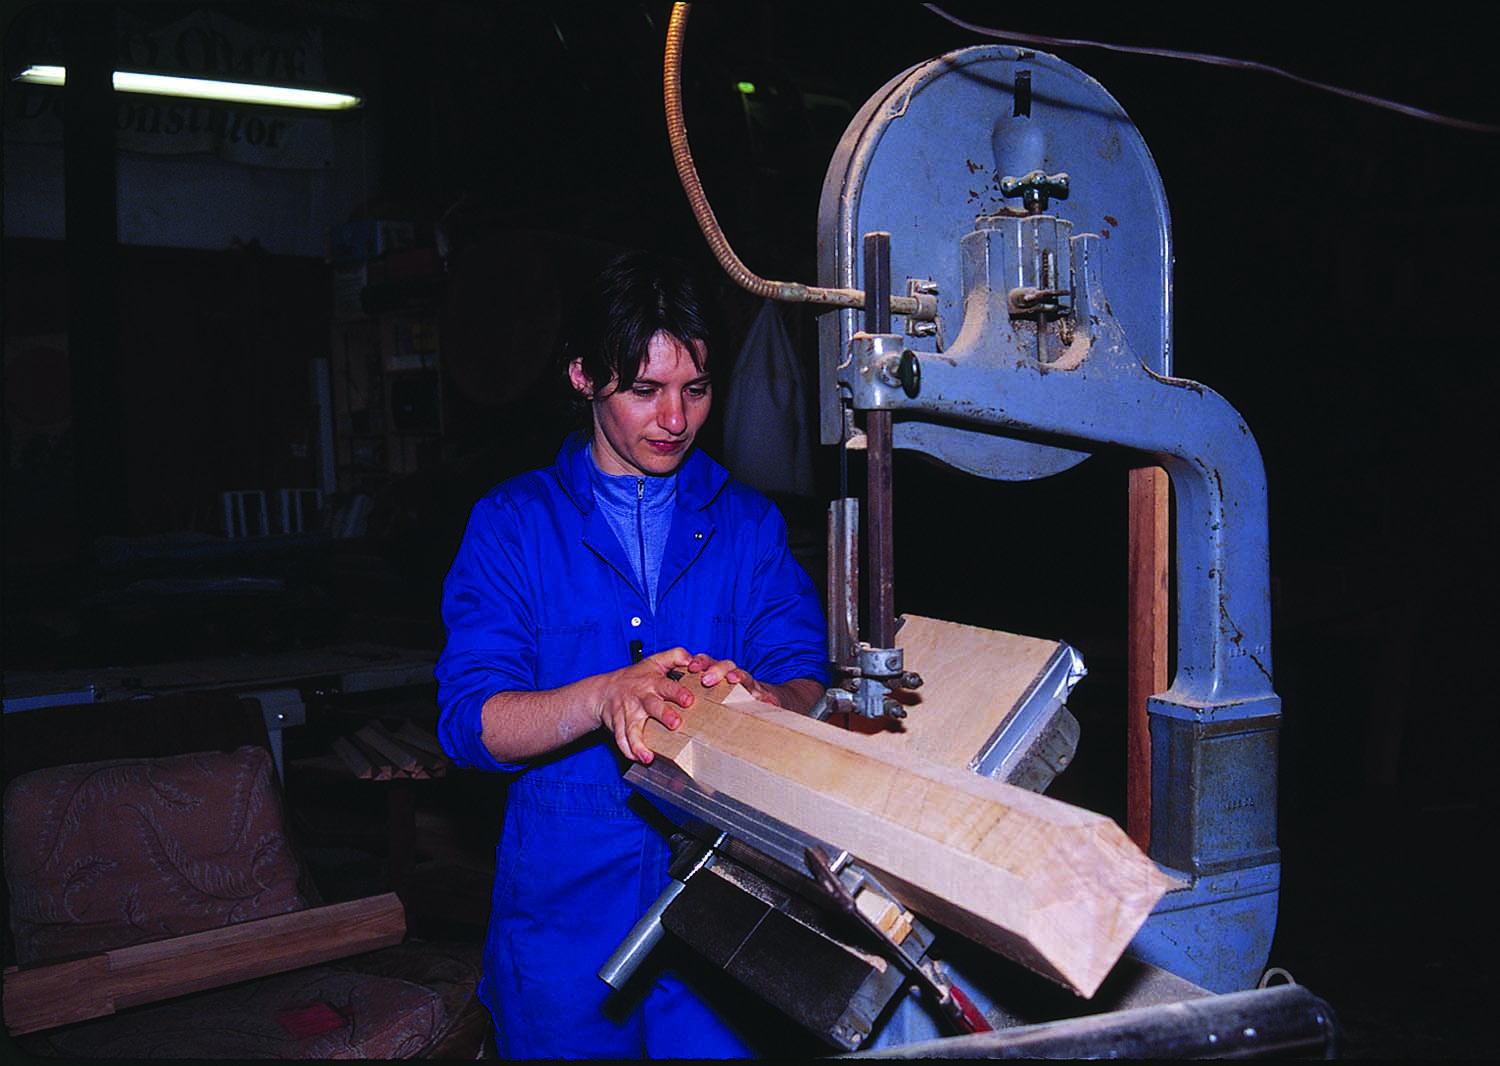
It’s not all handwork. A jointer squares the sides of the beams and legs before sizing them with the band saw with a 2″-wide blade.
It was about 90 percent done when we carefully checked both sides of the slab to decide which surface would face up. This decision was a quite difficult one. Commonly, one large board has straight grain (quartersawn) close to both edges and flat grain (cathedral grain) in the center of the board – Japanese woodworkers say the face with the older growth rings (the heart side of the board) is “kiura.” The face with the younger growth rings (the bark side of the board) is called “kiomote.” Most boards cup toward kiomote.
Commonly, you should use the kiura facing the top of the table, especially when you employ the through-sliding-dovetail beam to secure the top, as the joint is very visible. If kiura is facing up, the edges of the board will press down into the joint. However, if you use kiomote on top, then the board’s edges will try to move away from the beam’s dovetail edges – there is then a tendency for the joint to open.
After she finished planing, we saw so many defects on the kiura side that we had no choice but to use the kiomote side as the top surface.
In addition, I also had to give up my original idea of keeping the natural edges, as some parts were rotten or lacking in strength. Both edges had to be trimmed quite a lot, and one end was worse than the other. I marked the worst end’s maximum width then checked the other end. If I marked the same width on both ends, which is commonly done, then I would have to trim much more of the wood’s healthy portion. I did not have the heart to do that, so I explained to her that I would keep the maximum width on both ends. One end became 321⁄2” and the other measured 34″. The table length is about 108″. The 11⁄2” difference in width did not bother my eye or beliefs. I’d rather not take any healthy portions from the tabletop. I marked the maximum size of the tabletop then Laure trimmed its edges with the circular saw. As she was cutting the edges, she went through a 3⁄8“-diameter lead bullet. It was very soft; happily nothing happened to the blade.
No secret here. Cuts with a circular saw ease wood removal at the center of the tail socket. Create sharp corners using a dovetail chisel.
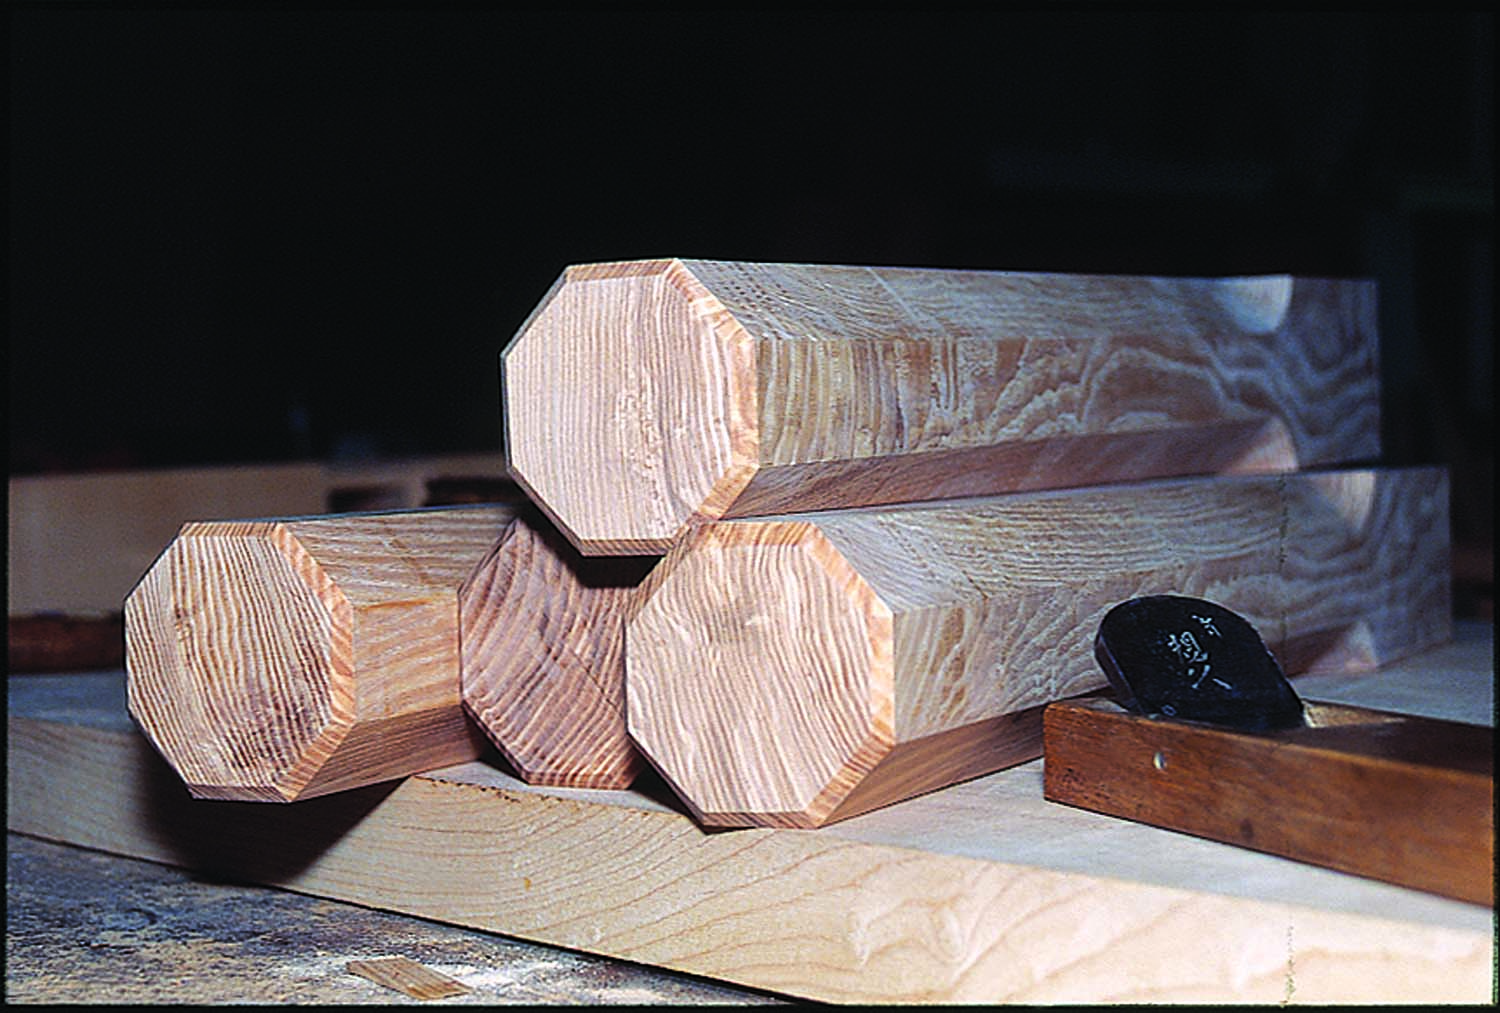
Develop the Dovetail Beam
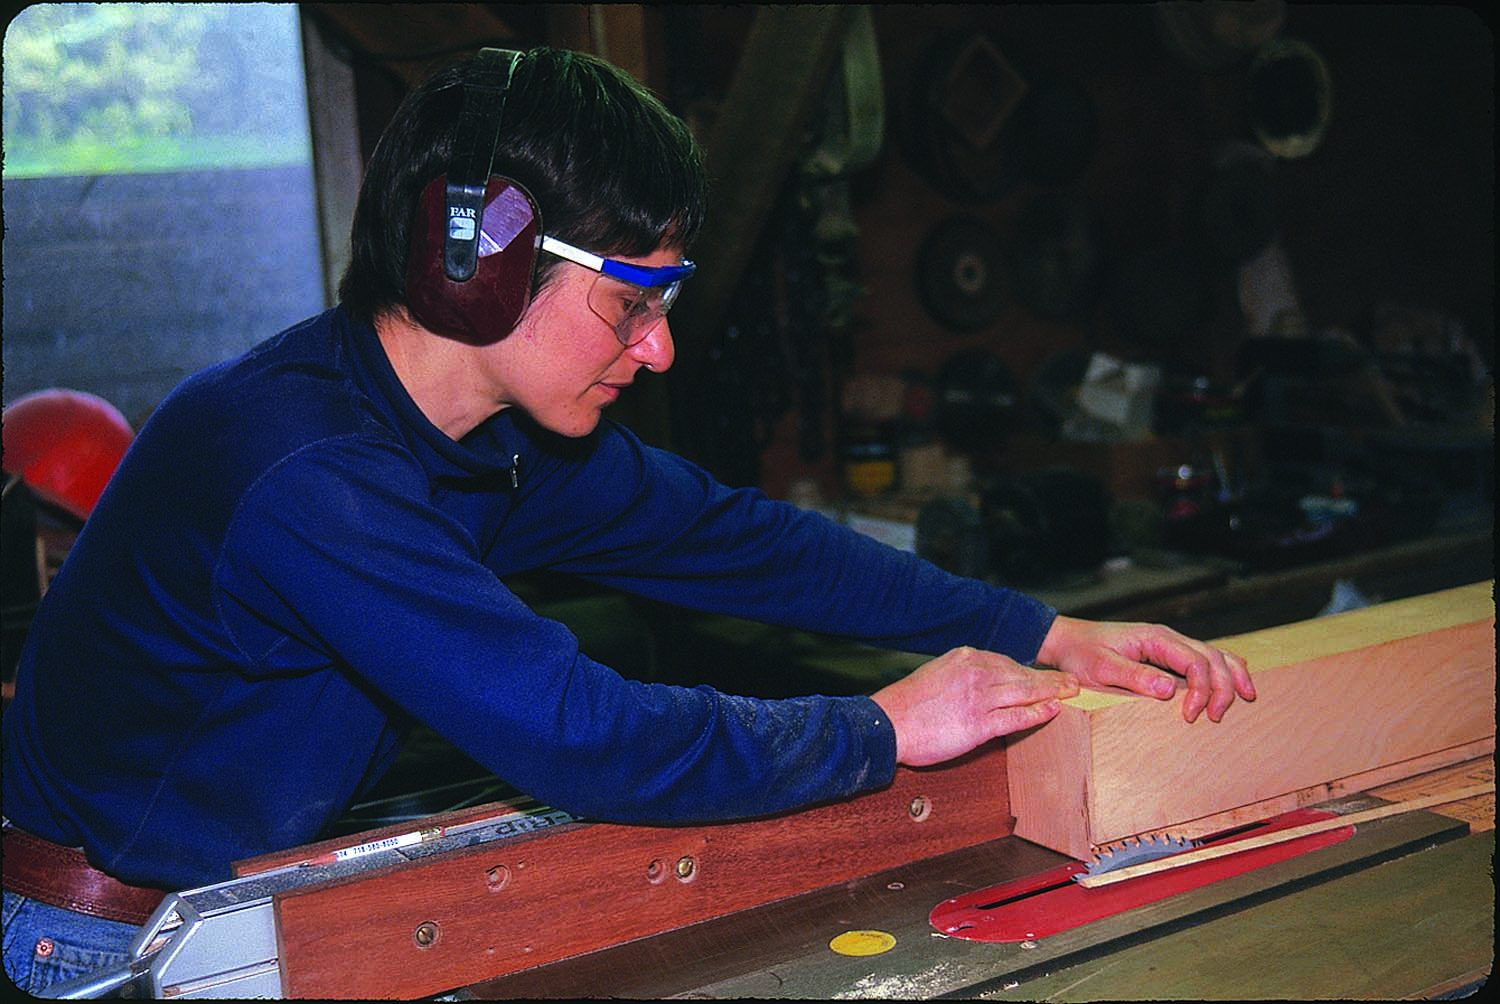
Now we have to think about the dovetail beam. The tabletop is about 2″ thick and 9′ long. I decided that the legs and beam be about 4″ x 4″ x 36″ with consideration for the part of the beam that goes into the tabletop with a tail. Laure used the jointer and band saw to produce all the pieces then she marked the position of the sliding-dovetail beams by looking at the movement of the grain and color. The four legs were chosen in the same manner – the left and right, then the front and backside.
On the bottom side of the tabletop we marked the centerline from end to end with a “sumitsubo,” an ink line. From this centerline, Laure marked the table ends squarely on both sides. From the end lines are marked the positions of the sliding dovetail beams.
Eye-catching and strong. The mortise work for the leg-to-beam joinery is complex in design but uncomplicated to produce.
Around this time of the process, I gave great consideration to the table’s weight. The table design had no brace for its legs and no apron under the table, so I could not depend on just the tail to steady the legs. I decided to sink part of the beam, with the tail, into the tabletop. That provides greater strength in the connection.
Smooth slides best. The bottom of the tapered pin groove is best flattened with a handplane.
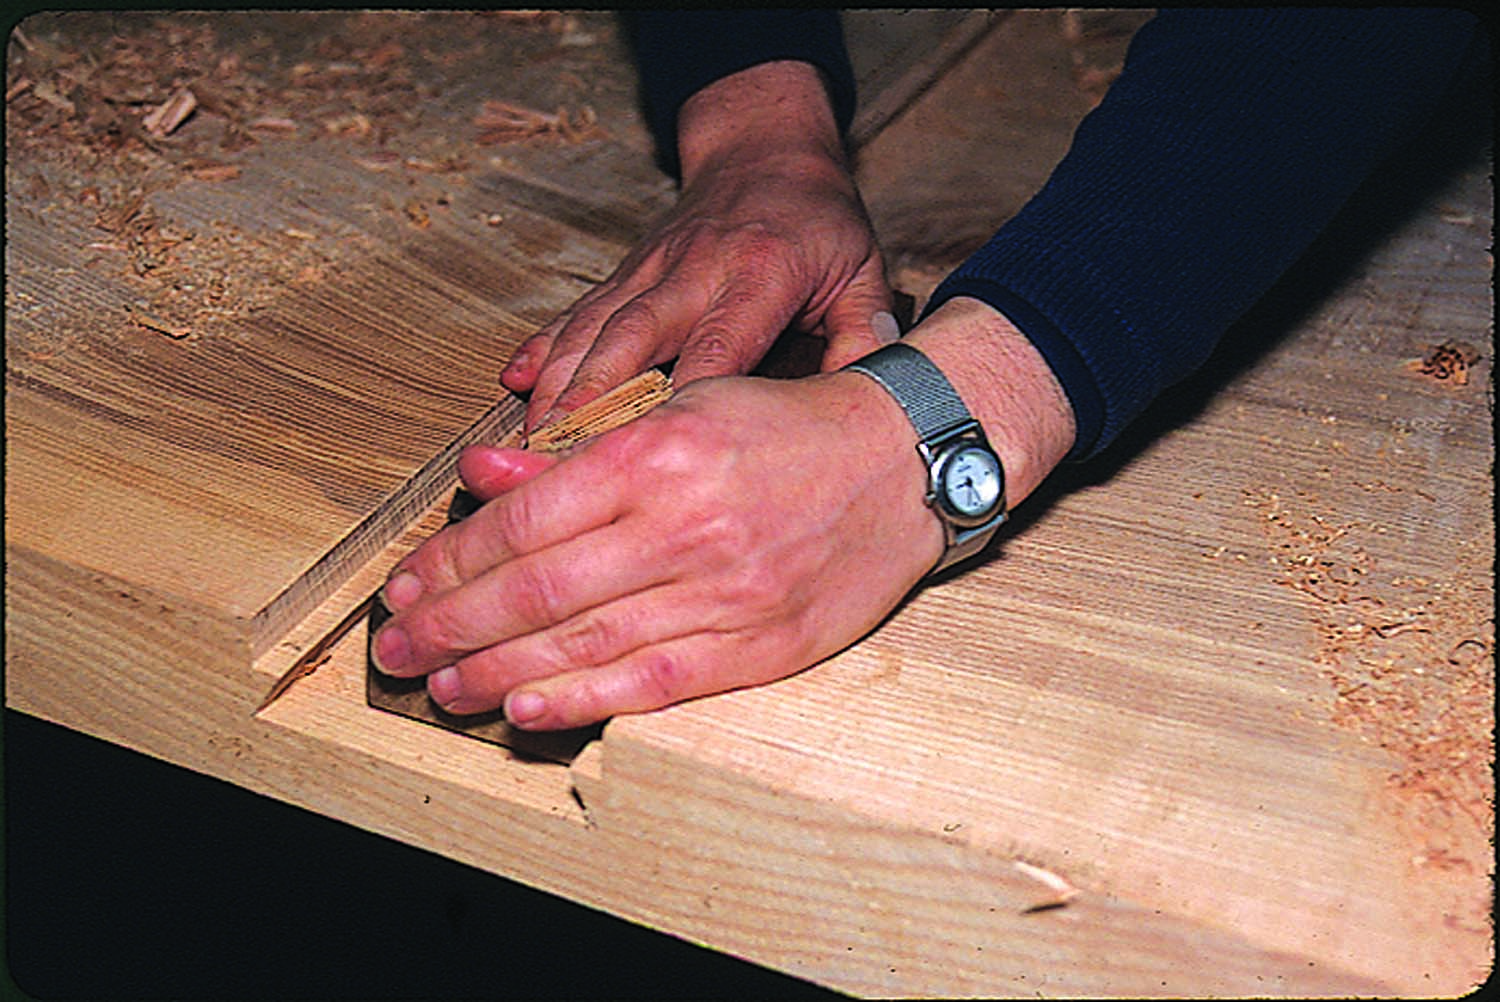
We decided on the tail’s angle, and the size and depth of the tail support, before she marked out the lines. Laure used a circular saw, chisels and a narrow Japanese plane to remove the waste. She checked flatness with a straightedge to produce the tapered sliding-dovetail groove.
Next, she marked the beam’s tapered sliding dovetail with a marking gauge and knife, and used the table saw to roughly notch out the tail.

Layout in spades. A few modifications to your marking gauge makes repetitive layout quick and easy.
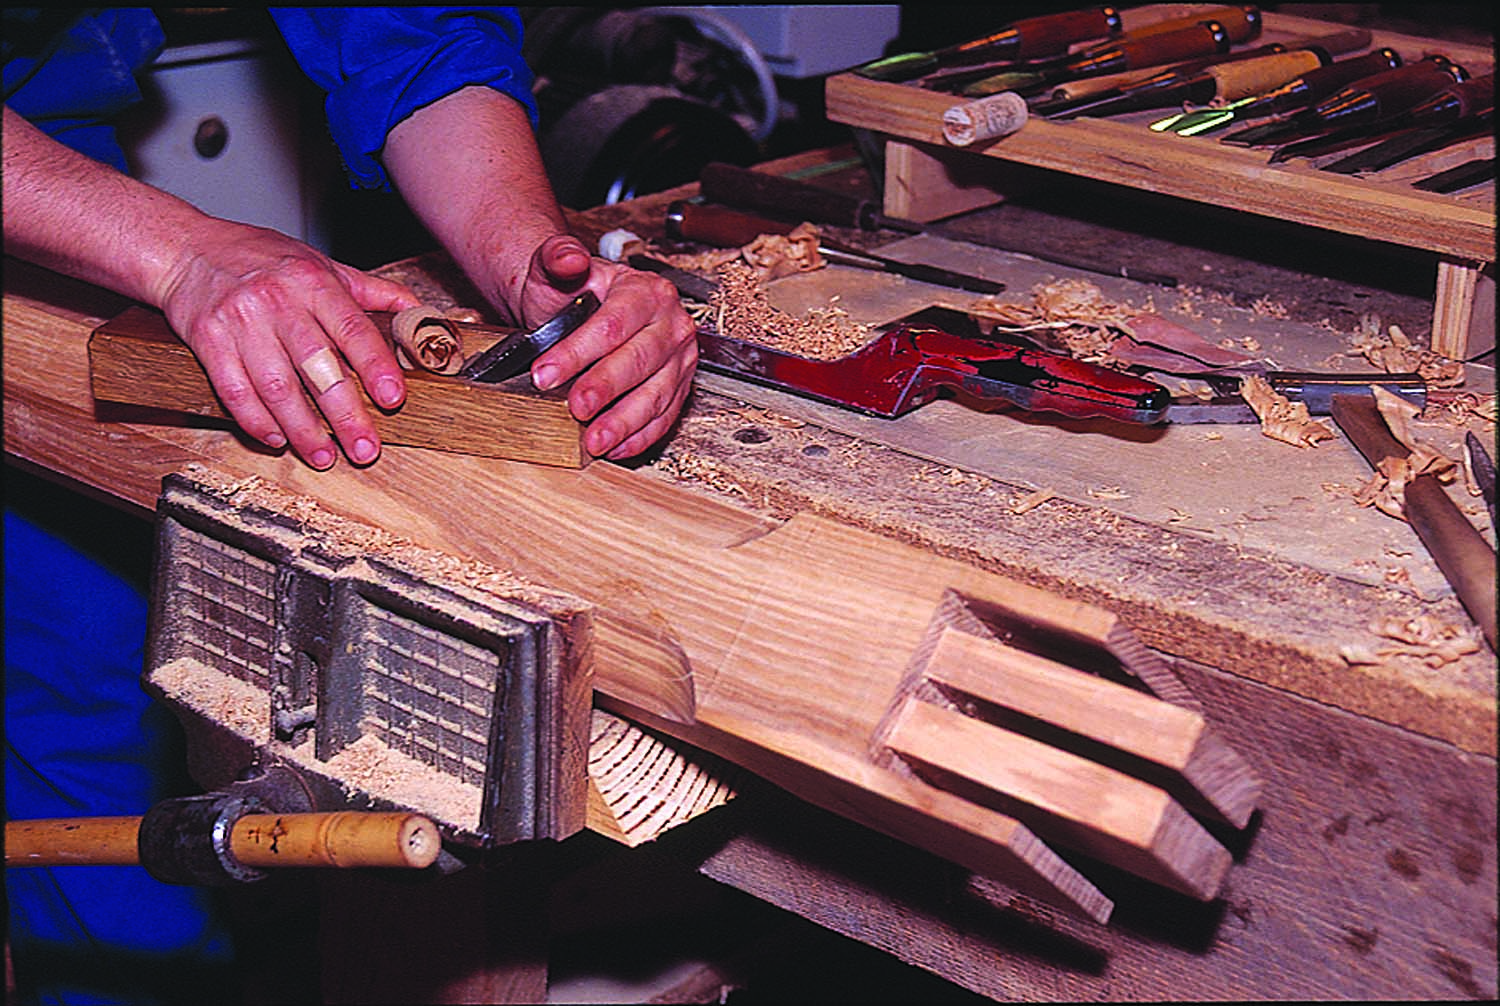
Using a “hifukura” plane and a chisel, Laure finished both tails, but struggled while manipulating this material. I did not have much knowledge or experience with ash, so I could not give her much advice. In spite of this, she accomplished the process after many adjustments.
Hybrid woodworking. Use a table saw to roughly notch out the tail, then use a hifukura plane and a chisel to finish both tails, testing the fit as you work.
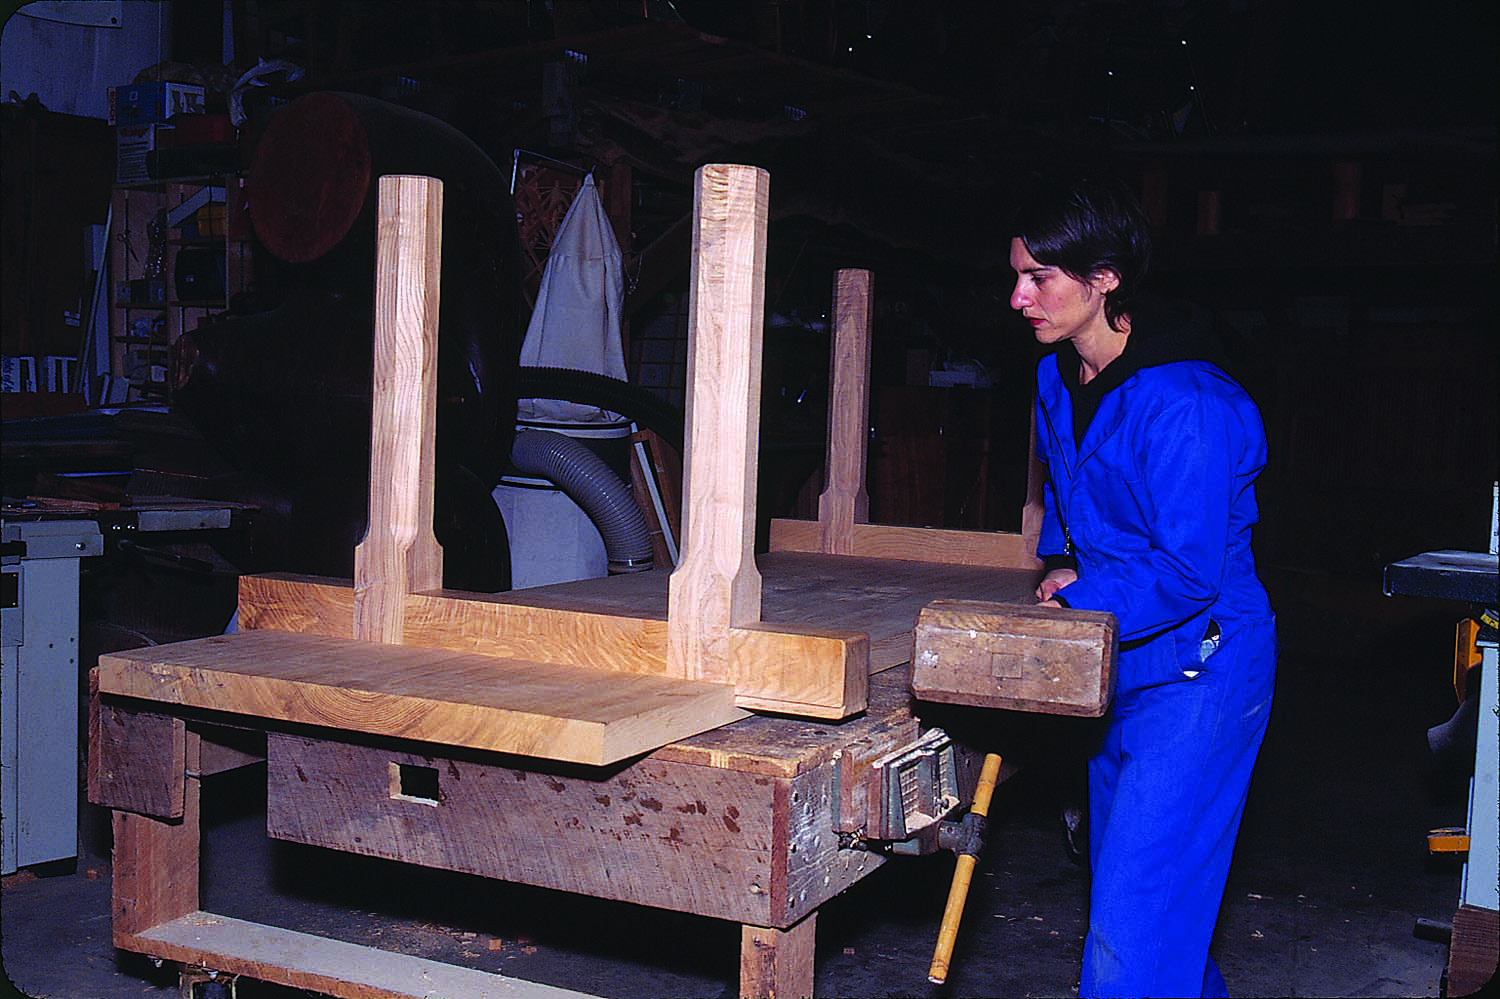
She mainly worked manually; I thought that was very important for her. She finished very nicely the pins and tails of the joint then cut a large chamfer on both ends of the tail beam before she pounded the beam into the groove using a Japanese wooden commander, a really big mallet. If the beam fit is too tight, take it out and make an adjustment. Then another and another ….
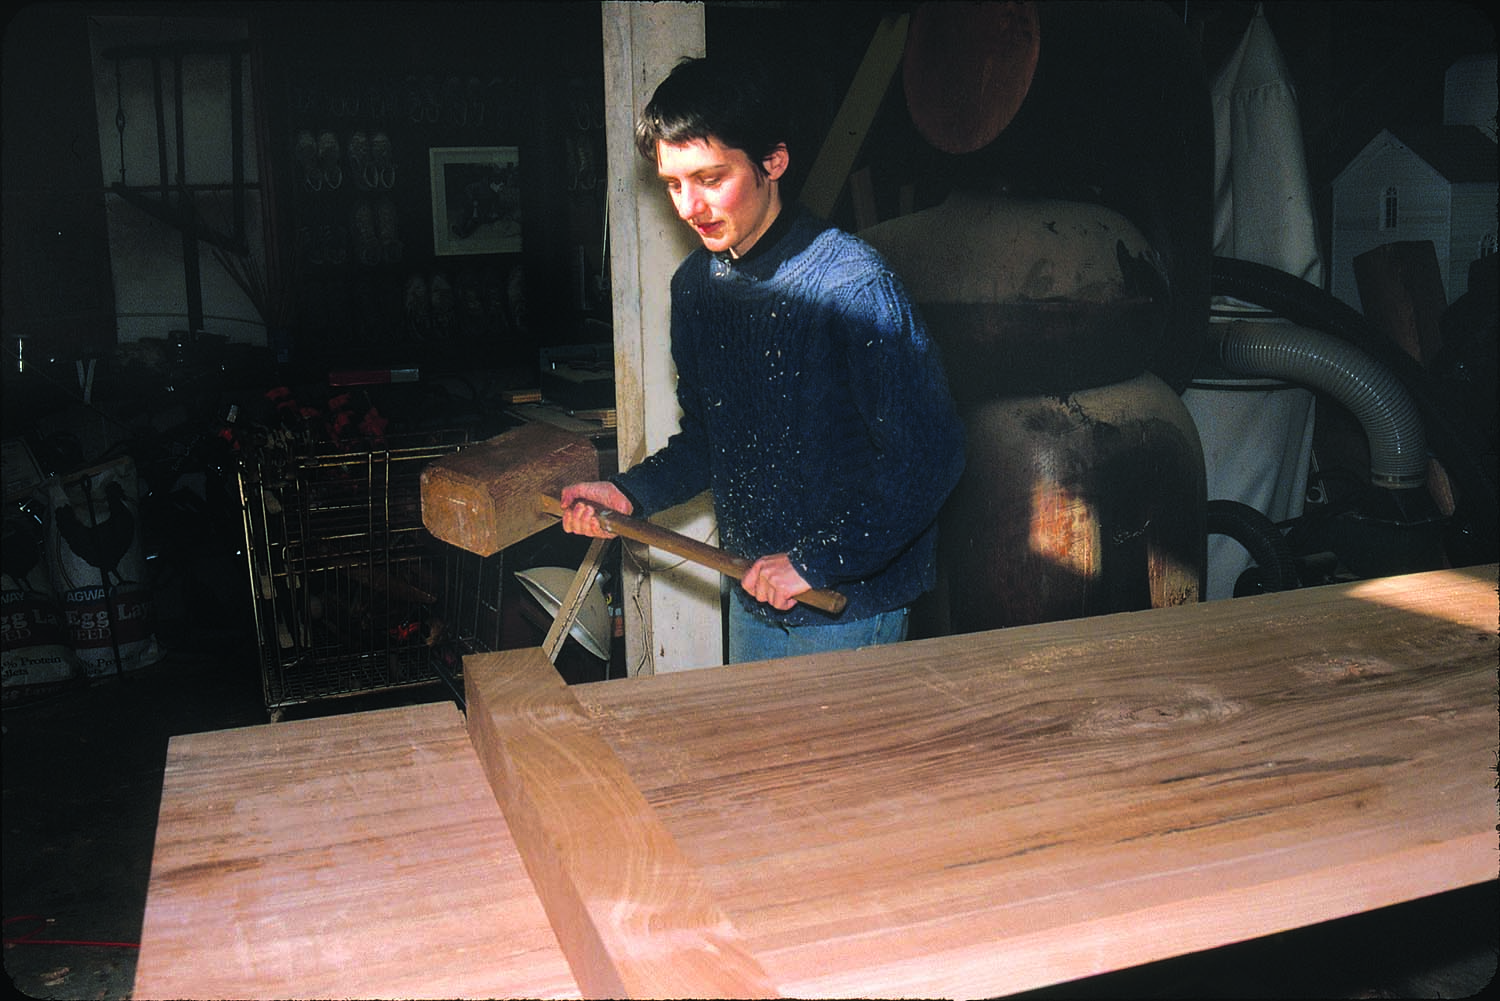
Aye, aye, commander. Dry-fitting a sliding dovetail into the table’s tapered pin groove takes a big hammer – and a steady eye as you swing.
I reminded Laure that we used the tabletop upside down (kiomote on top) so she had to make both ends quite tight. It was not easy to pound with a commander. With great effort, both beams finally reached their final position and each extended beyond the table about 3″ on both sides.
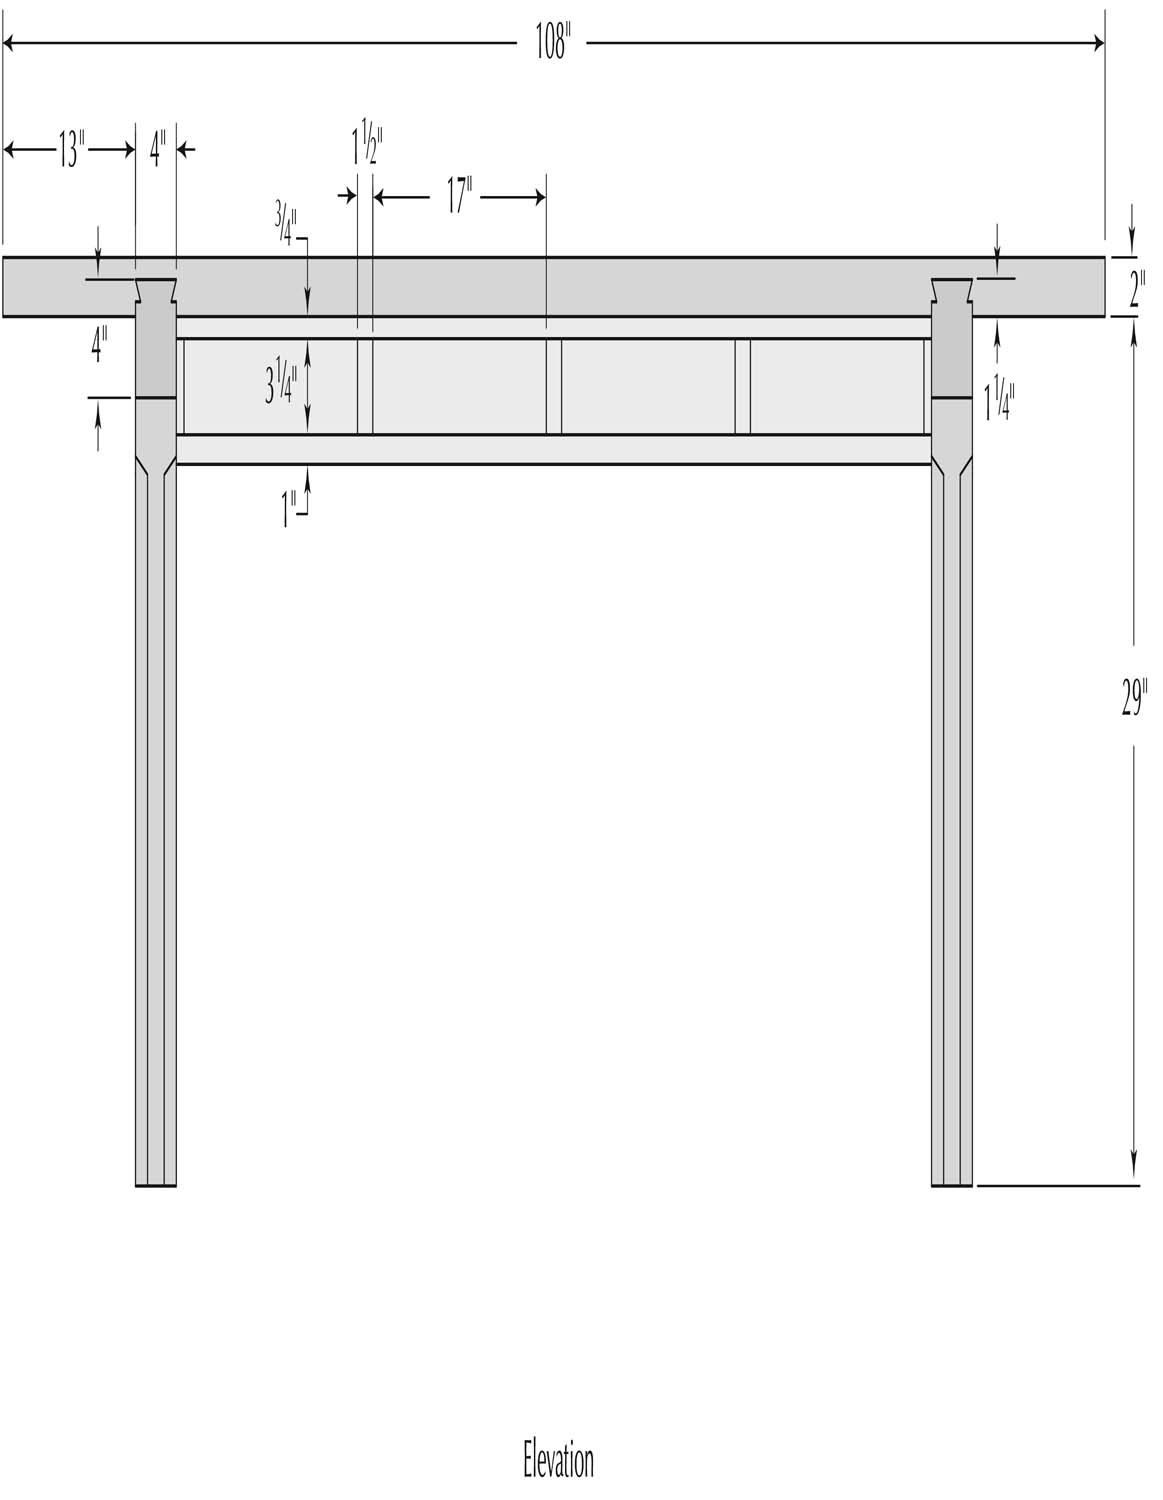
Elevation
Leg Joinery Detail
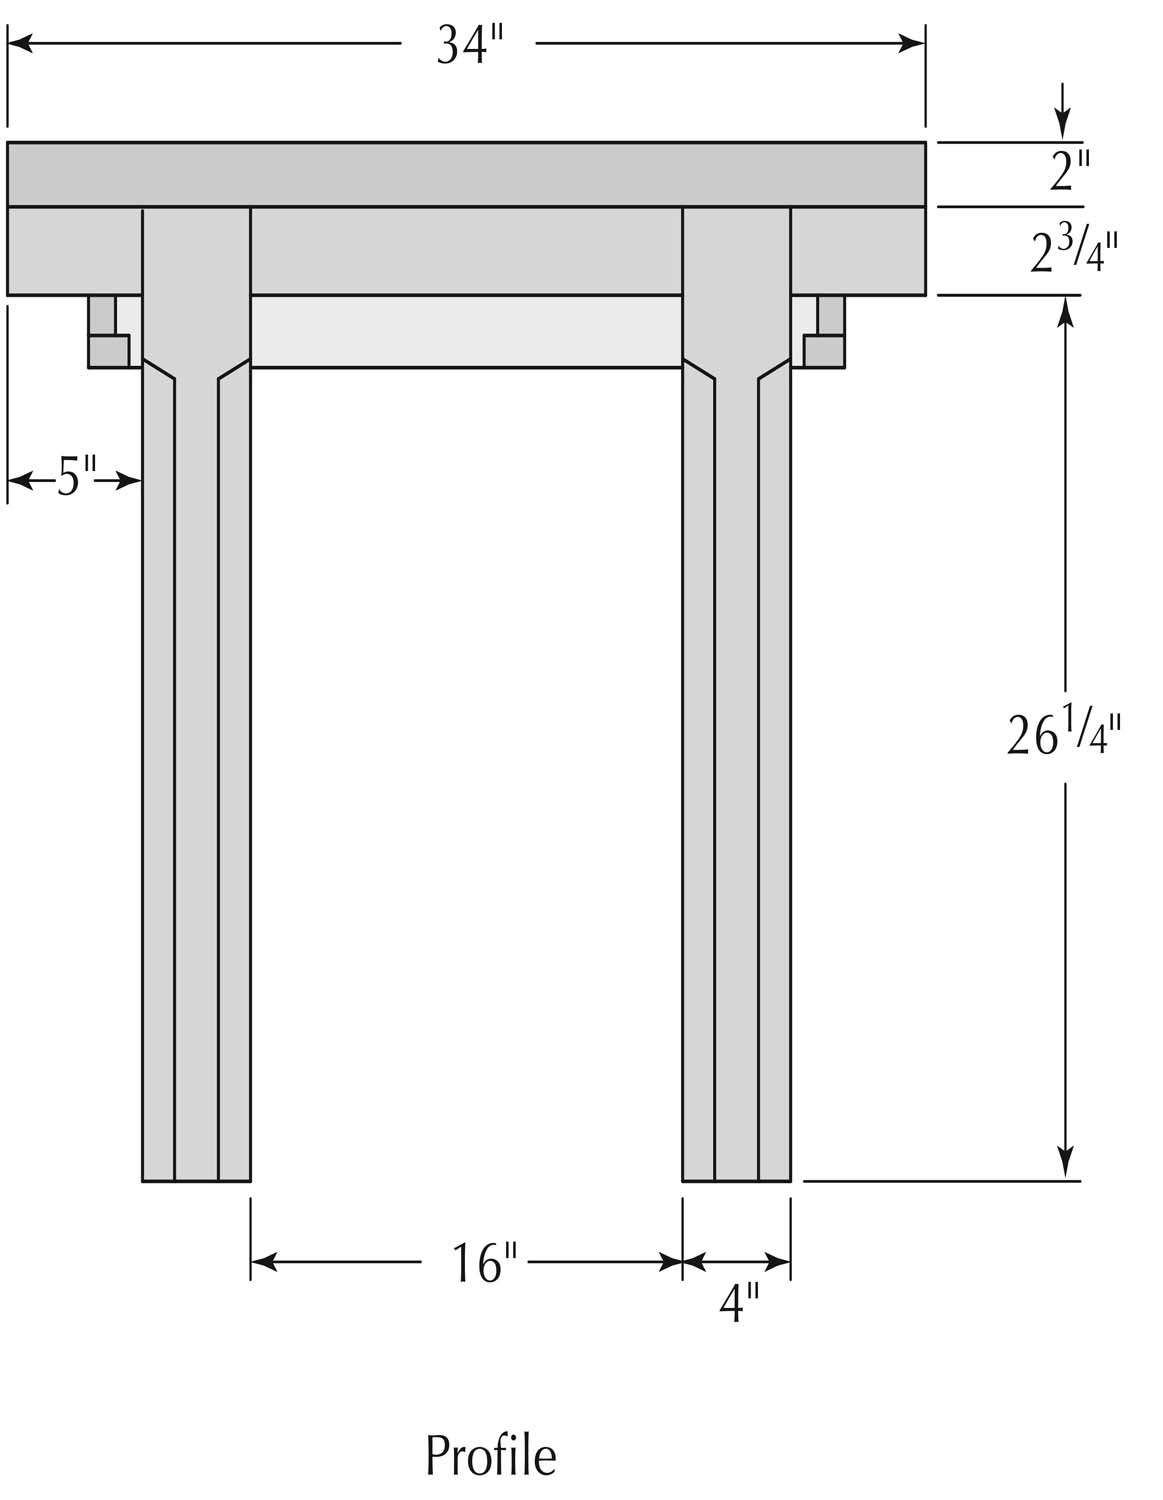
Profile

Not Just Regular Mortise-and-tenon Joints
We had to mark the position of the legs. First Laure marked the table edge all around the beams then she decided on the legs’ positions. Like I said before, this table does not have an apron or leg brace, therefore all the stress comes to this point, so I designed this joint to be able to take the stress from all angles.

Machined breakthrough. Roughly drilling mortises into the beam, halfway through from both sides, opens the slots with ease. Use a chisel to accurately clean the mortise for final fitting.
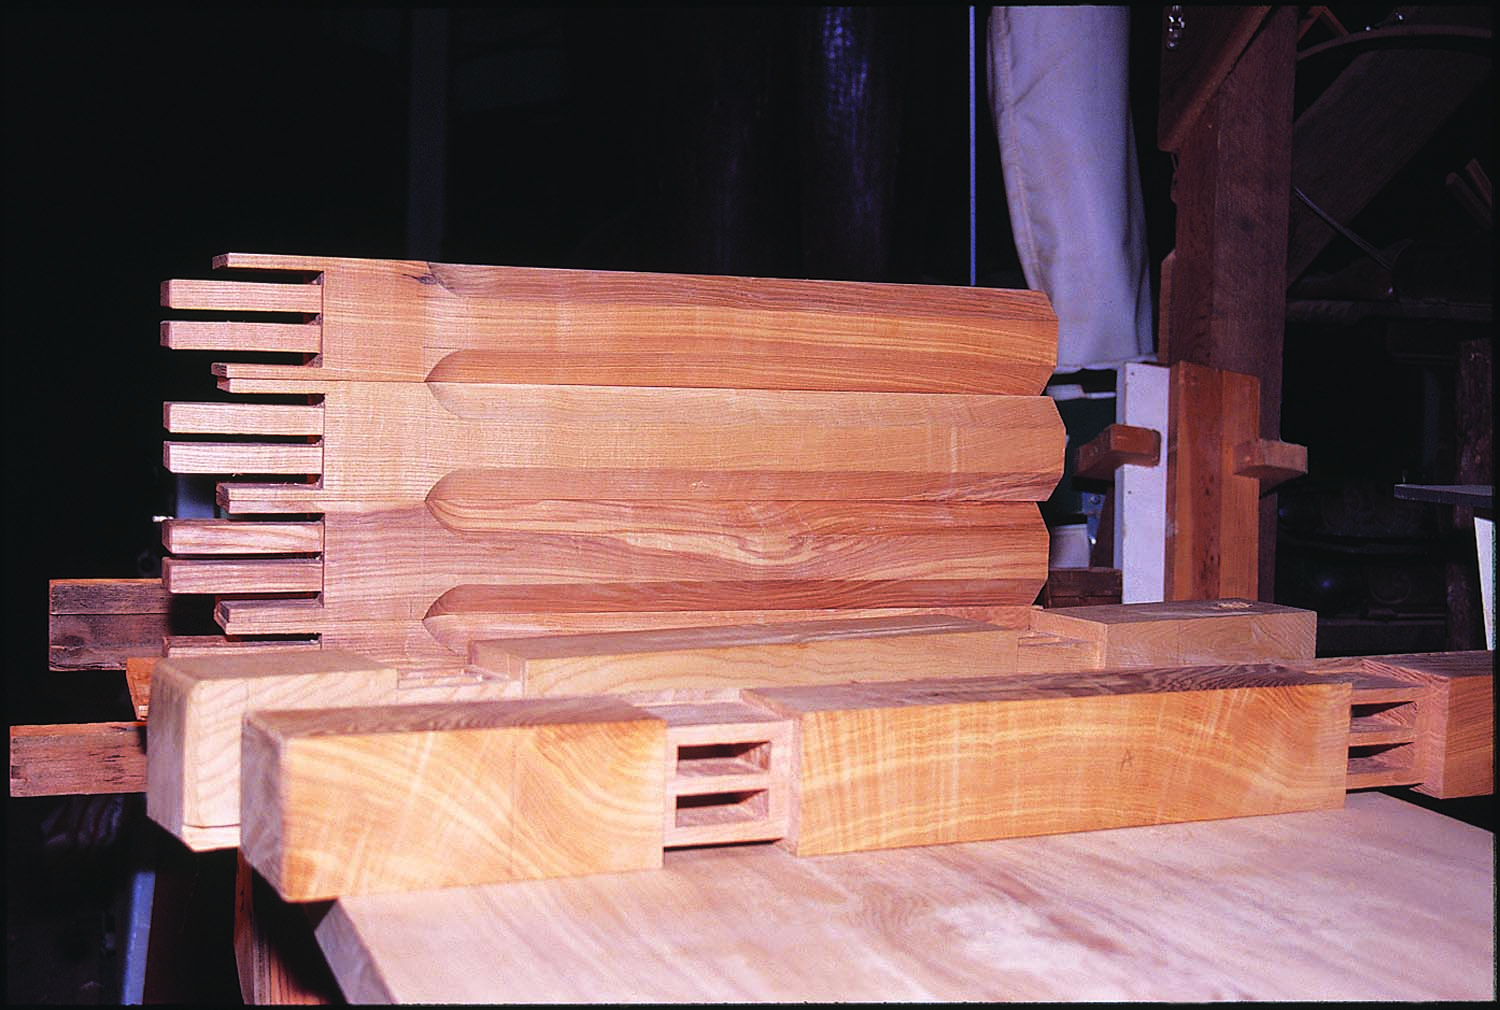
I utilized double mortise-and-tenon joints and placed a non-shouldered tenon on both extremities to sandwich the tenon joints. The non-shouldered tenon is flush with the side of the beam. In this way, the table is secure in length and width.
Laure pounded the beams out and marked the mortise positions, then marked cosmetic shoulders. She roughly excavated the waste from both sides with a mortise machine and bit, then cleaned the mortises from both sides using a Japanese chisel.
Meet in the middle. Removing wood from between the tenons doesn’t have to be pretty. Work in from both sides and work tight to your layout lines.
She notched down about 5⁄8” for the non-shouldered tenons that give extra support to the legs, then removed the material to leave a smooth surface.
Leg Tenons to Match
Test your skills. Sawing the tenons from the leg with a Japanese rip saw requires a sharp saw, a steady hand and a good eye.
Laure cut the end of the legs cleanly and squarely, then marked for the tenons. Next, she ripped the legs’ tenons with a Japanese hand-held ripsaw and removed the material between using chisels.
Dressed for driving. Chamfer the leg’s bottom edges to receive the pounding commander. By not hitting the edge wood fibers, you will save the integrity of the legs.
She then marked the exact tenon widths on both sides of the tenon cheeks. She could not saw these lines, so she used chisels to remove the material, following the lines very carefully. Then she chamfered all the tenon ends.
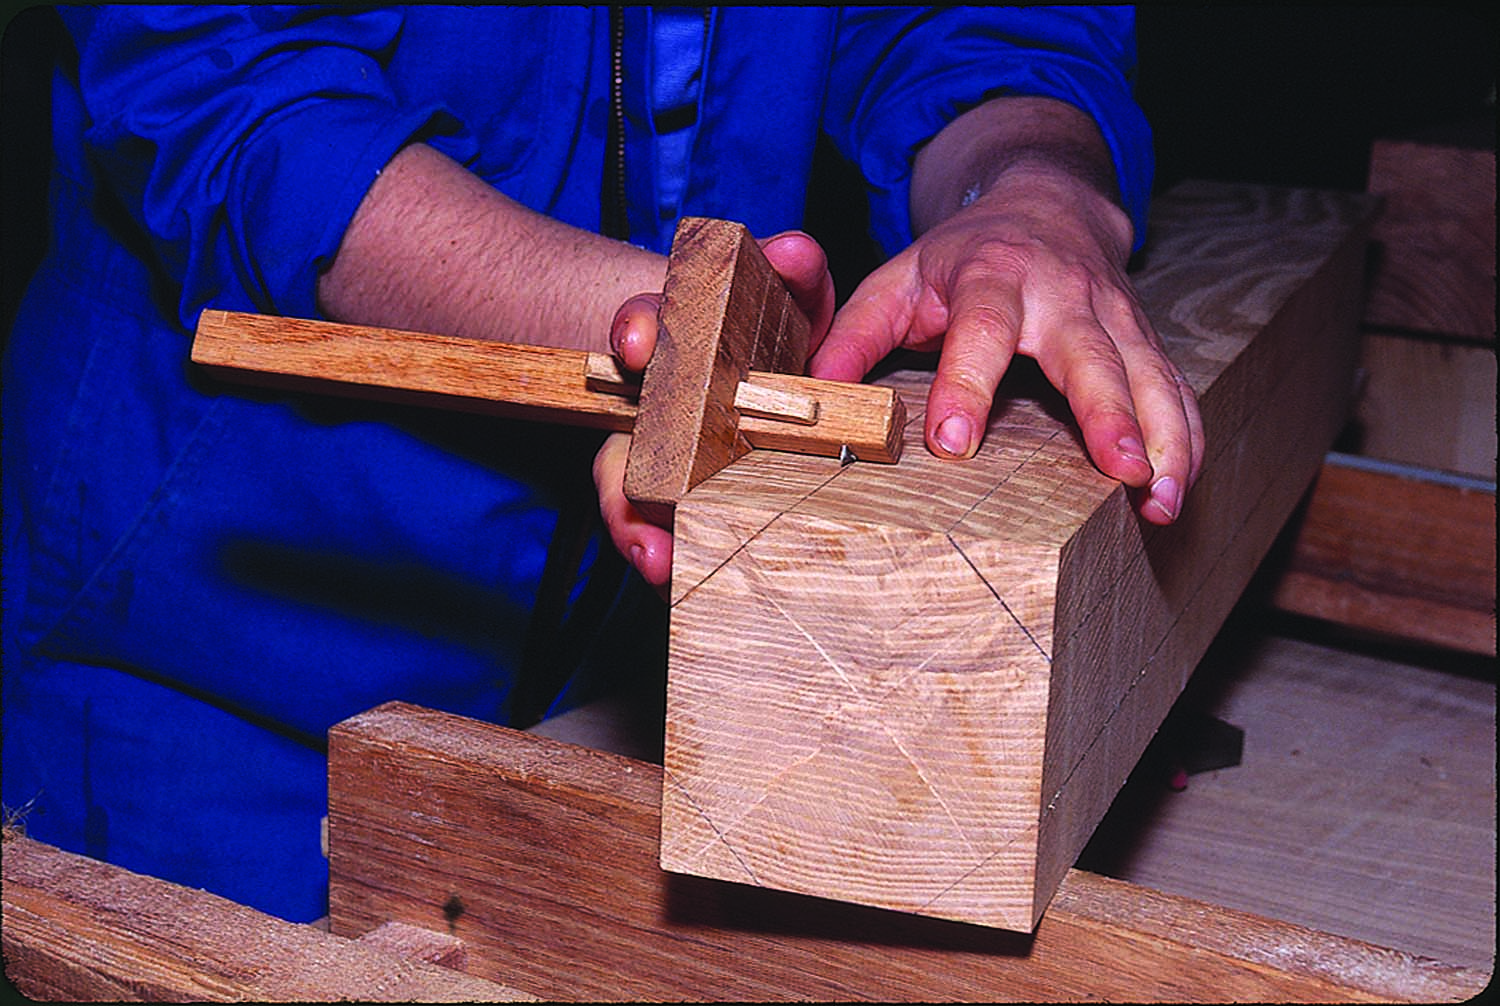
A workable road map. The octagon layout determines your chamfered corners, and the lines set with the marking gauge determine the final surface.
She chose an octagon for the leg shape. Out of hard cardboard, Laure made an octagonal template then traced it onto the bottom end of the legs. She used a marking gauge to draw the line up the face of the leg until it was 21⁄2” below the beam line. There she drew lamb’s tongues to not disturb the tenons.
Quick, but not final. The table of a band saw is tilted to 45º to rough-cut the leg corners. Get close to the line, but complete the work with hand tools.
She tilted the band saw table to 45º and adjusted the fence to make the cuts up to the lamb’s tongues.
Finesse the final surface. A drawknife, chisels and a handplane are used to cleanly finish the octagonal shaped legs, including the lamb’s tongue.
That gave the legs a rough octagonal shape. With a drawknife, Japanese plane and chisel, she cleanly finished the octagonal legs and lamb’s tongues.
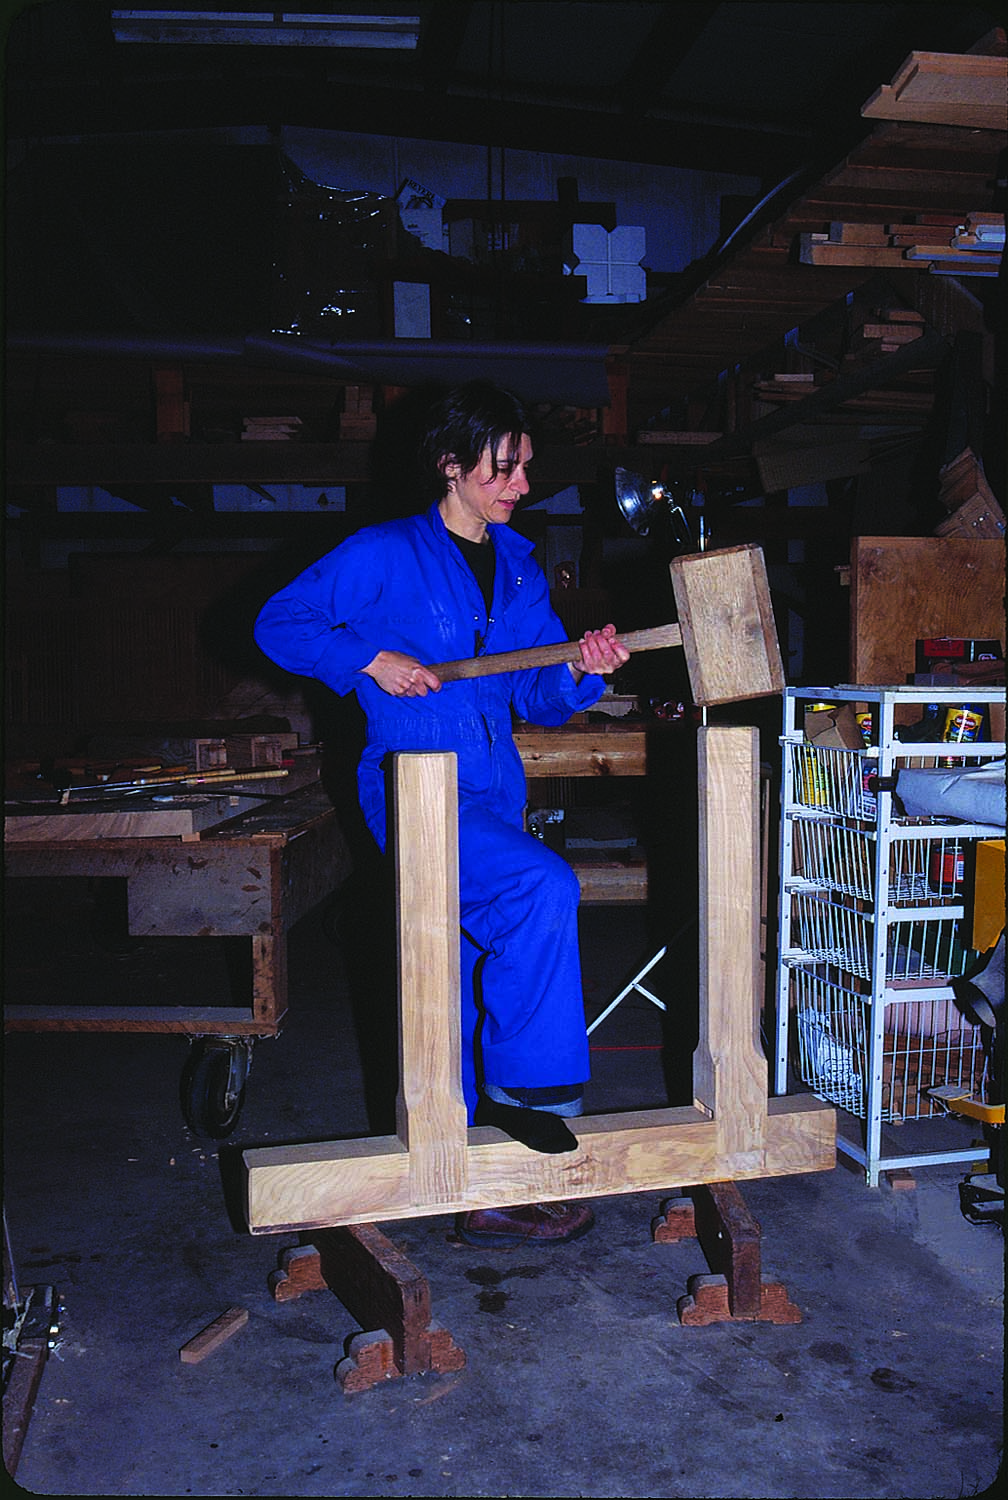
Table leg smackdown. To handle the stresses of use, the mortise-and-tenon joinery has to fit tight. Here the legs are persuaded using the pounding commander.
The end of the legs were chamfered to receive the pounding commander.
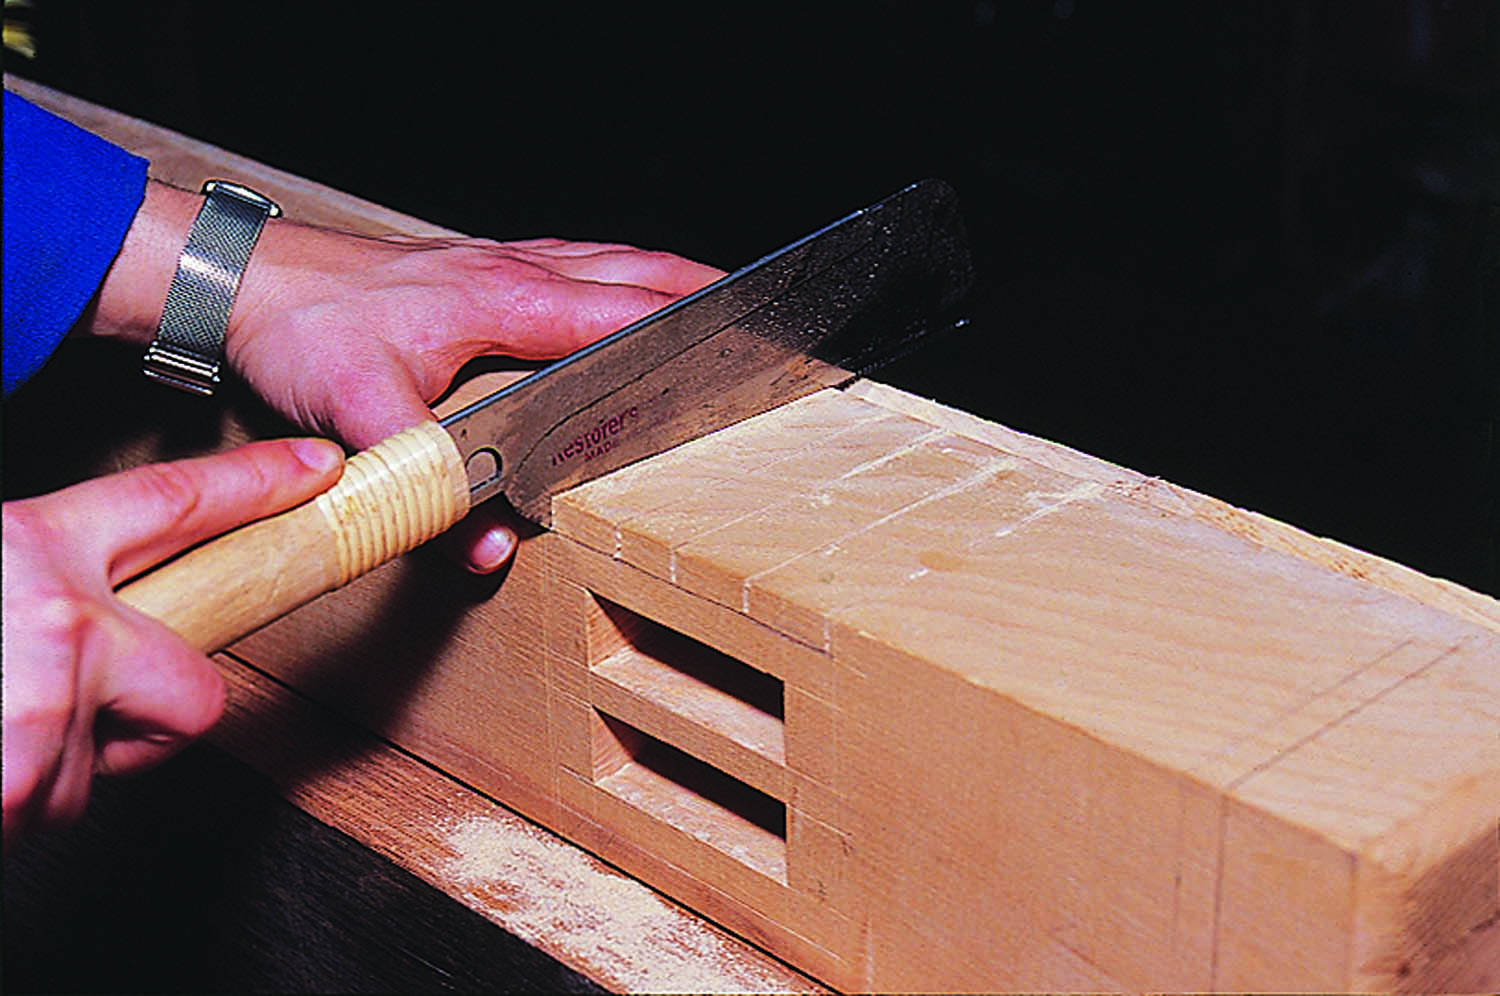
Quite a relief. The non-shouldered tenon fits flush with the beam’s face. The mortise is easy to complete if you kerf the waste materials prior to the chisel work.
The mortise-and-tenon joints are assembled with glue and wedges. She needed to cut a little slit for wedges on the tenon; however the non-shouldered tenons are on both sides of the center tenons, so it is difficult to use a saw to rip the slits. However, these outside tenons terminate at the bottom of the tabletop, hence the center tenons will be longer than the outside ones. She cut the outside tenons to their exact length and then ripped the slits with a small Japanese rip saw. All the legs were fitted and the joints adjusted.

No turning back. This completed leg-to-beam joint is not going to work loose under stress. Once the wedges are glued in place and the extra tenon length is trimmed, the joint is pleasing to the eye and strong.
After she cut and planed every part, Laure used a palm sander to smooth all the legs, sliding-dovetail beams and the bottom surface of the table. She was ready to assemble, with glue, the legs to the sliding beams. She pounded in one leg at a time –
the tenons, coming out of the beam, were tightly fit. She then hammered and glued the wedges into the slits, then left the leg there to assemble the next one. She then returned to the first leg to cut and plane the tenons flush with the beams. The second leg is finished in the same manner.
Laure cleaned and sanded, with a palm sander, the non-shouldered tenons. Before the final assembly, I suggested that she plane the top of the leg’s tenon a few more times so in the future the tenons will not touch the tabletop. Then she was ready to pound the beam into the top for the final time. I held the other side of the table.
One more time. The beams, with the legs attached, are again pounded into the tabletop. The beam’s ends are then cut flush with the edge of the slab.
She pounded the end of the beam while the legs gradually moved toward the center of the table. The dovetail was quite tight. Finally the beam mark came to the edge of the table. Everything went well.
She measured the length of the legs evenly and squarely, then marked and cut the legs with a Japanese saw. The octagon edges are chamfered then the end grain was planed. A larger chamfer was then cut all around the end of the legs.
In Part 2 (which will post later today) construction wraps up and finishing is complete – but a major design concern creeps into Toshio’s thoughts; it’s a near nightmare. He and Laure devise a plan to increase the strength of the table without giving in to aprons or thick braces. The solution involves hidden joinery and a masterfully built structure that serves multiple purposes.
Further Reading: Learn the history behind traditional Japanese woodworking techniques.
Here are some supplies and tools we find essential in our everyday work around the shop. We may receive a commission from sales referred by our links; however, we have carefully selected these products for their usefulness and quality.