We may receive a commission when you use our affiliate links. However, this does not impact our recommendations.

Kitchen Work Table
A perfect fit for
that small space
in your kitchen.
Edited by Tim Johnson
|
Here’s a compact work table
that you could tuck away in a
corner or use as a central
island for daily activities. It’s the same
height as standard kitchen countertops,
so it’s perfect for food preparation and
other standing chores.
The Cutting List has two
sets of dimensions; one for the 18-in.by
30-in. table shown here and another
for a larger 24-in.by 36-in. version.You
can easily build either table in a couple
of weekends. You’ll need a tablesaw, a
stacked dado set, a bandsaw or saber
saw, a drill press and a chop saw.You’ll
also need a plunge router to cut the
mortises and the curves on the rails.
|
|
You may also like…
Farm Table
Extending Dining Table
Cafe Table
|
Use your favorite hardwood, but
substitute hard maple for the top if you
plan to use it as a cutting surface. To
make the smaller version, you’ll need
about 12 bd. ft. of 5/4 stock for the top
and slats, four 3-1/2 ft. lengths of 2-in.
square stock for the legs and 5 bd. ft. of
4/4 stock for the aprons, rails and
stretcher. For the larger version, you’ll
need 20 bd. ft.of 5/4 and 7 bd. ft.of 4/4
stock. If you don’t have a jointer and
planer, have your lumber milled at the
lumberyard.
|
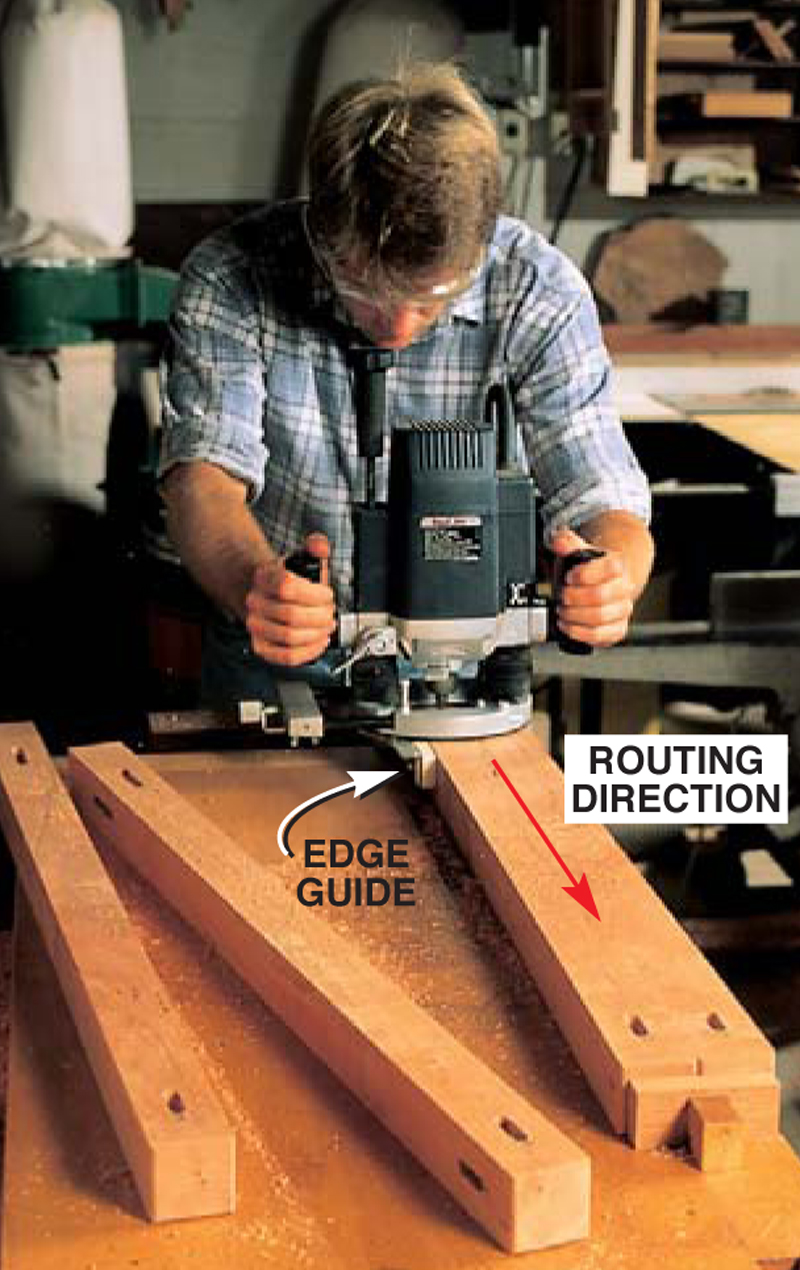
Keep your router stable
while plunging the mortises by ganging
two legs together. Make several shallow
passes until you reach full depth.To
maximize the gluing surfaces, the
mortises meet inside the leg and the
tenons are mitered to fit.
|
|
Click on any image to view a larger version
|
|
Cut tenons on the aprons and
rails with a dado set and the miter gauge.
Make a first pass on both sides as shown,
then make the final pass using the rip fence
to establish the tenon length. Hold the
apron tight against the miter gauge and flat
on the table. Fine-tune the tenon thickness
by adjusting the blade height. Note: Using the rip fence and miter gauge simultaneously is safe only
when there will be no off-cut piece.The blade guard must be removed for
this cut. Be careful.
|
|
|
|
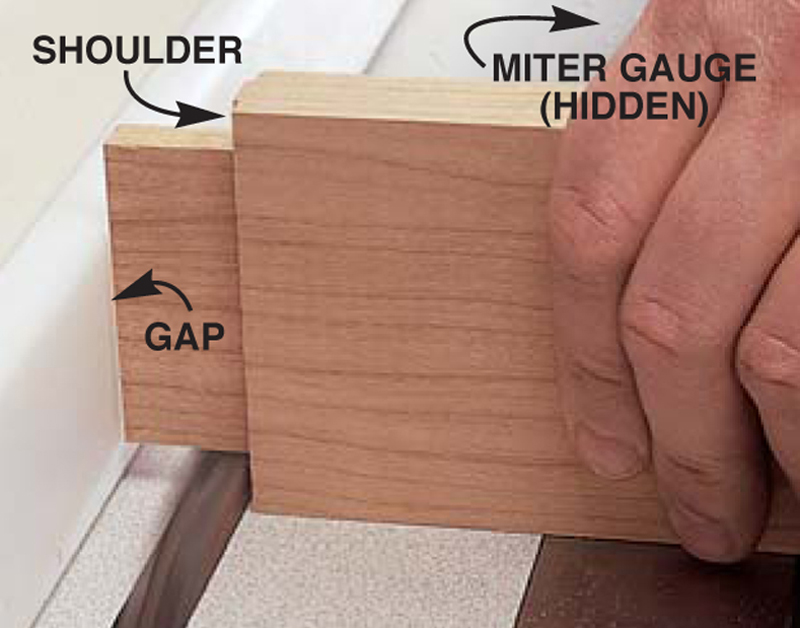
Cut shoulders on the ends of
the tenon after adjusting the height of
the blade. Hold the apron on its edge,
tight against the miter gauge and make
two passes, as in Photo 2. Keep the
tenon slightly away from the fence on
the final pass and pare away the
remaining waste with a chisel. Note: Using the rip fence and miter gauge simultaneously is safe only when there will be no off-cut piece.The blade guard must be removed for this cut. Be careful.
|
|
|
|
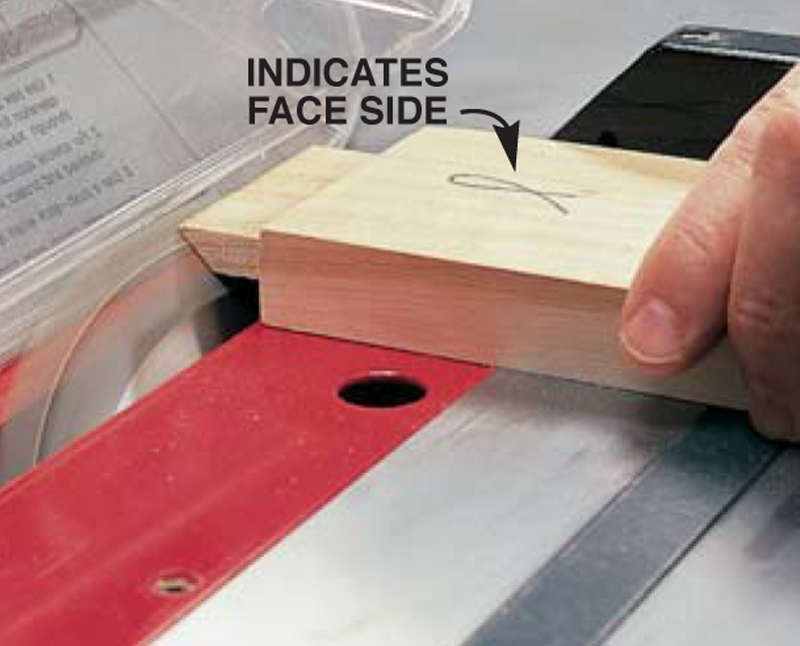
Miter the tenons, making sure
the angled edges are oriented properly
with the face side of the apron.
|
|
|
|
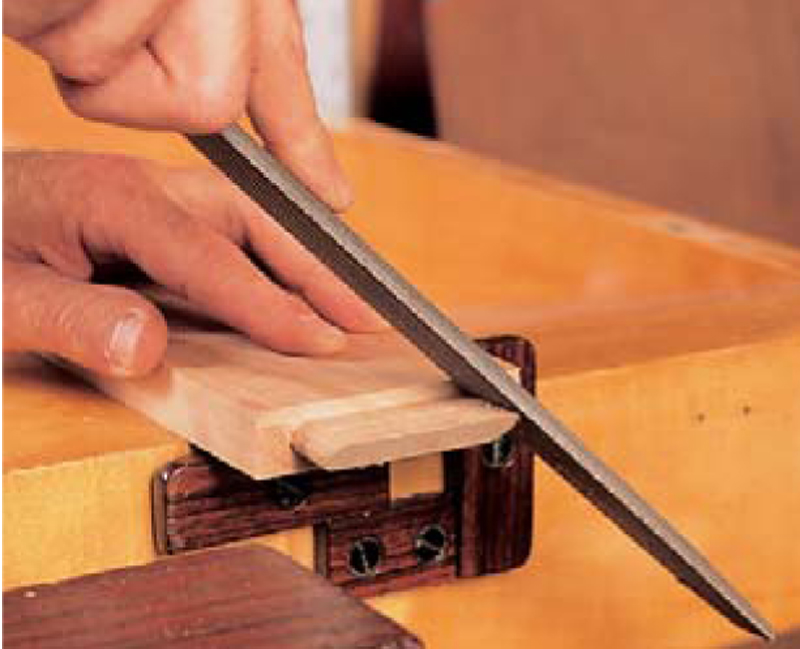
Round the shoulders of the
tenons with a rasp, making firm forward
strokes, so they’ll fit the mortises.
|
|
|
|
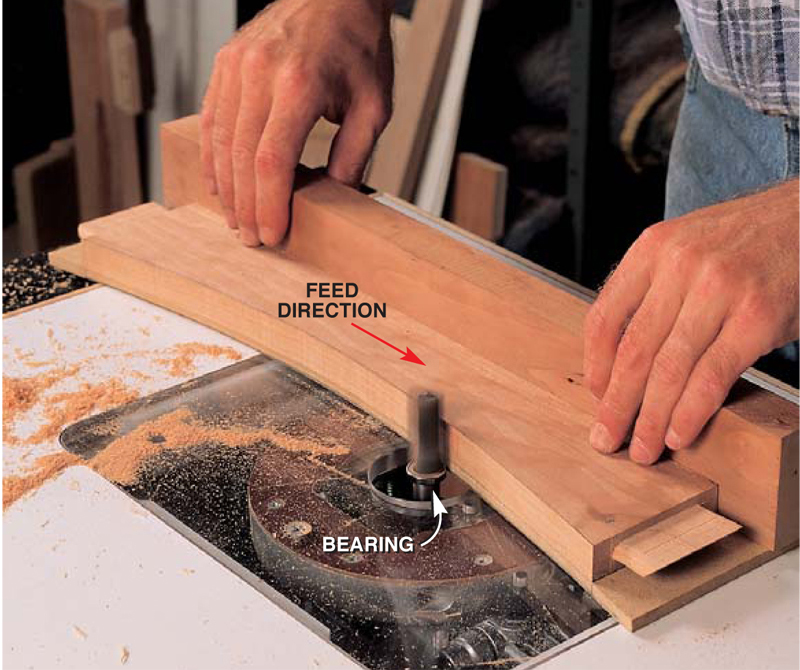
Rout the curved rails with a jig and a flush-trim bit with a
top-mounted bearing. First rough-saw the curve on the
rail, leaving it about 1/8-in. oversize.Then mount the rail on the jig, using
double-faced tape. As you rout, the bit’s bearing rides on the jig’s curved edge.
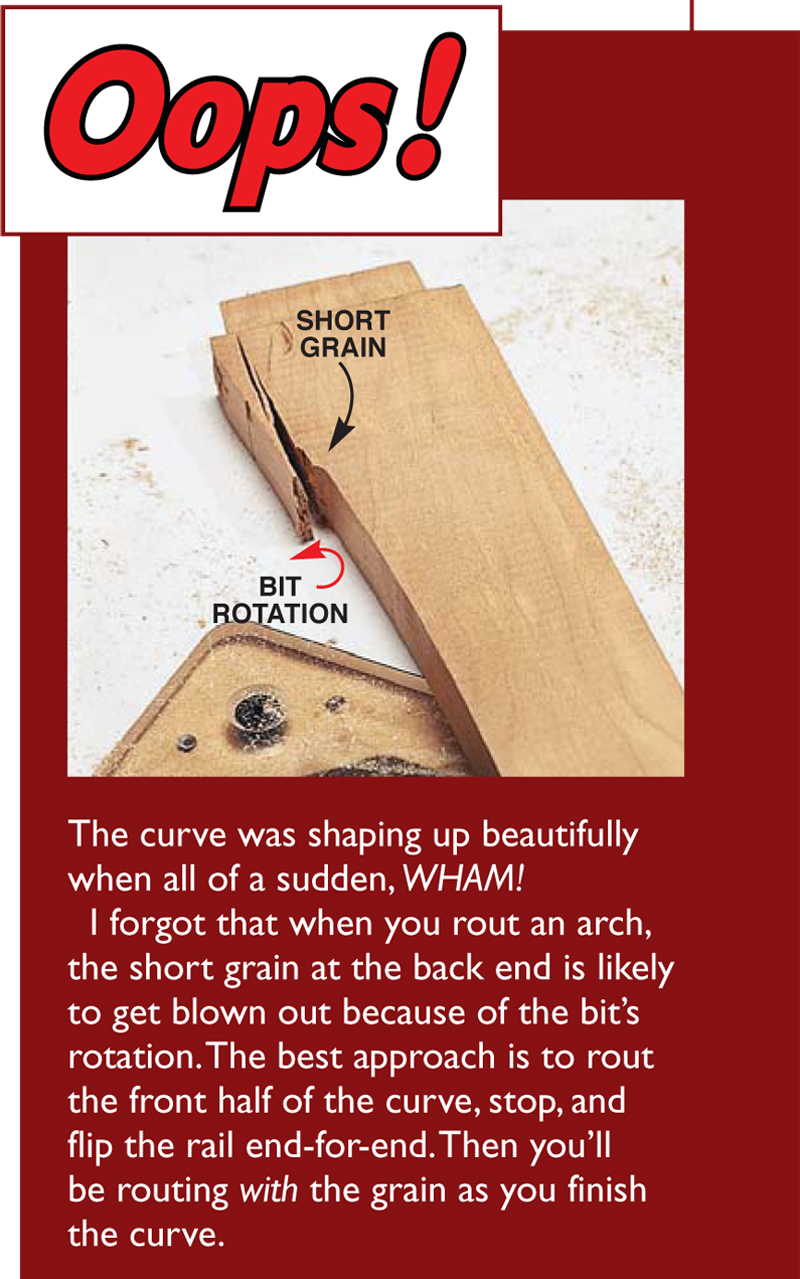
Do half the curve, flip the rail over, and do the other half (see OOPS!). Note: The guard has been removed for photo clarity. Use yours!
|
|
Oops!
|
|
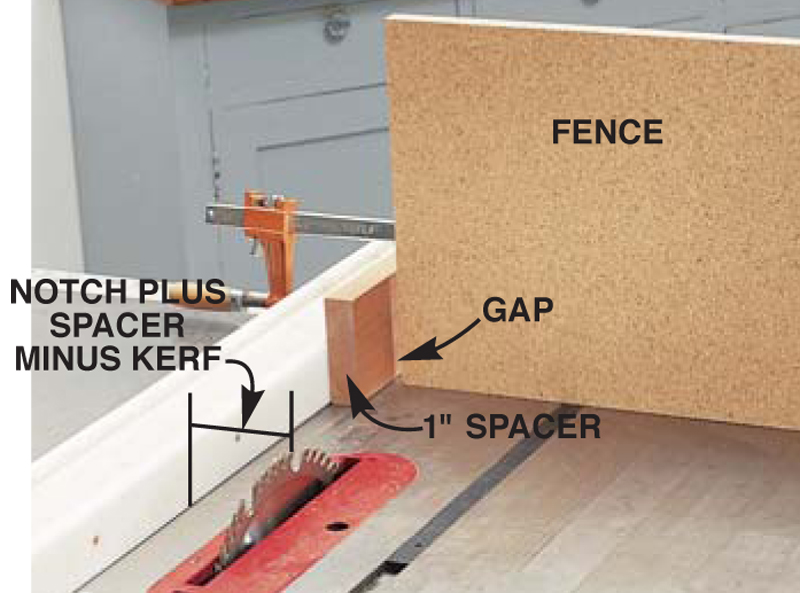
Before sawing the notches,
clamp a spacer block to the rip fence,well
in front of the blade. Screw a tall fence to
the miter gauge, leaving a gap so it won’t
bind against the spacer. Set the fence to the
combined widths of the notch and spacer,
minus the saw kerf. Raise the blade to the
height of the notch.
|
|
|
|
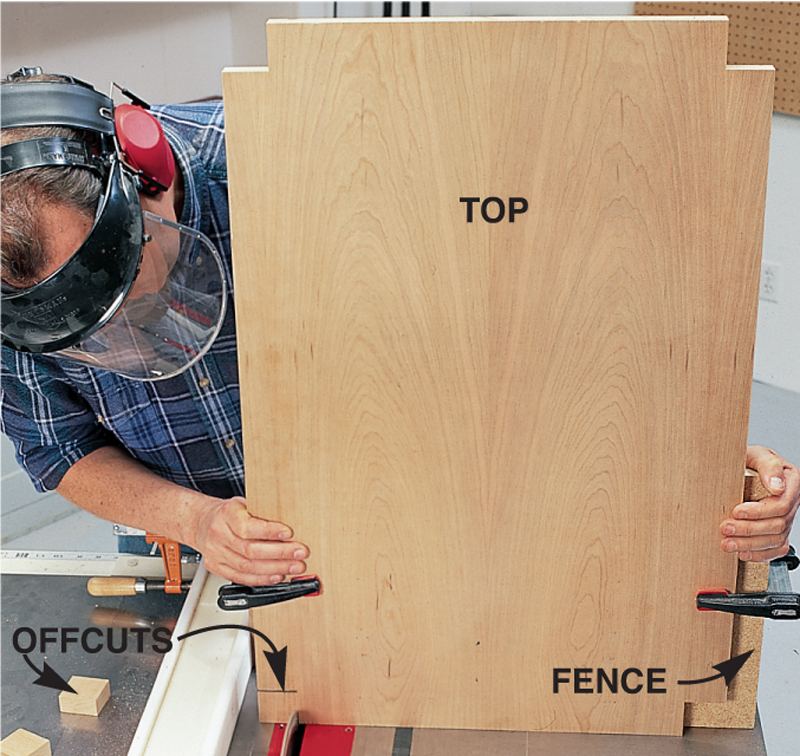
Cut notches after sliding the top
against the spacer block and clamping it firmly
to the tall fence.The spacer ensures an
adequate gap between the top and the rip fence
to keep the off-cut waste pieces from binding. Note: The blade guard must be removed for this cut. Be careful.
|
|
|
|
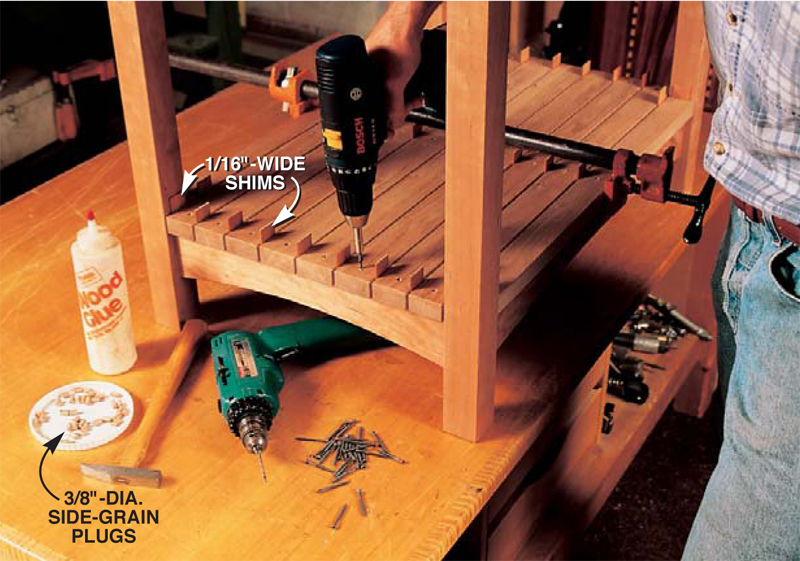
Attach the slats, using shims to keep them evenly spaced. Be sure to
put one shim between each leg and the adjacent slat. Use a clamp to keep the
slats aligned while the pilot holes are drilled and the screws are set.Wooden
plugs, glued in the screw holes and sanded smooth, create a finished look.
|
|
|
|
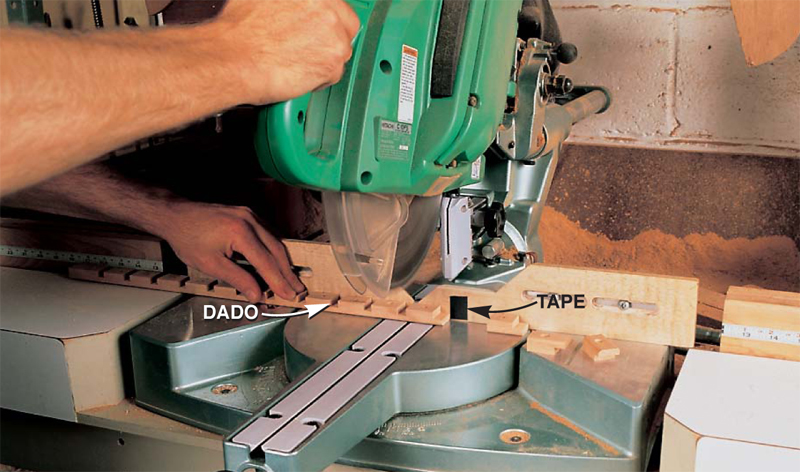
Cut wooden fasteners for the top from straight-grained stock
with evenly spaced dadoes sawn across its length. Black tape on the fence
indicates the correct length.
|
|
|
|
This story originally appeared in American Woodworker June 2001, issue #87.
|
|
|
Product Recommendations
Here are some supplies and tools we find essential in our everyday work around the shop. We may receive a commission from sales referred by our links; however, we have carefully selected these products for their usefulness and quality.