


We may receive a commission when you use our affiliate links. However, this does not impact our recommendations.

Add pizazz to your kitchen with contemporary curves.
This article originally appeared in the December 2013 issue of Popular Woodworking
For years, I’ve been trying to cajole Kelly Mehler to write an article for us on one of his many areas of woodworking expertise: building custom pieces that emphasize the beauty of carefully selected hardwoods.
And I haven’t given up on that quest – but one of his forms is just so appealing that I didn’t want to wait for Kelly to be convinced in order for everyone to see it. So I built it (with Kelly’s permission, of course).
Kelly and his wife, Teri, worked with kitchen designer (and renowned English Arts & Crafts furniture maker) Nancy Hiller to design this plate rack to integrate into their Berea, Ky., log home’s kitchen.
Adapt for Your Aesthetics
While Kelly built his plate rack in white oak to match the rest of his family’s kitchen, I decided on tiger maple – in part because I had a lot of it, but in truth because I’m not terribly fond of oak.
And after studying the pictures of Kelly’s, I also made some minor changes to the design of the plate dividers by setting mine back 1⁄4” from the front edge to create an additional shadow line – but more on that to come.
In addition, before drawing my plan in SketchUp, I measured the three sizes of Louisville Stoneware plates in my collection to make sure I afforded sufficient clearance for them to slide in and out of the rack, then located my fixed shelves accordingly.
It’s all in the Pattern

Patternmaker. After cutting 1⁄2″-thick plywood to the overall length and width of the sides, I used a flexible rule held in place around three nails to draw a fair curve for my pattern.
With six sides that must be identical, I decided on pattern routing as the most efficient approach. So the first task was to create a pattern for the router bit to follow. I used 1⁄2” plywood because it was handy, but 1⁄4” plywood or MDF would work as well. Or, if you’ve no wish to have a pattern on hand for future builds, you could cut and fair the first side from your stock, and use that to guide the pattern bit for the remaining sides.
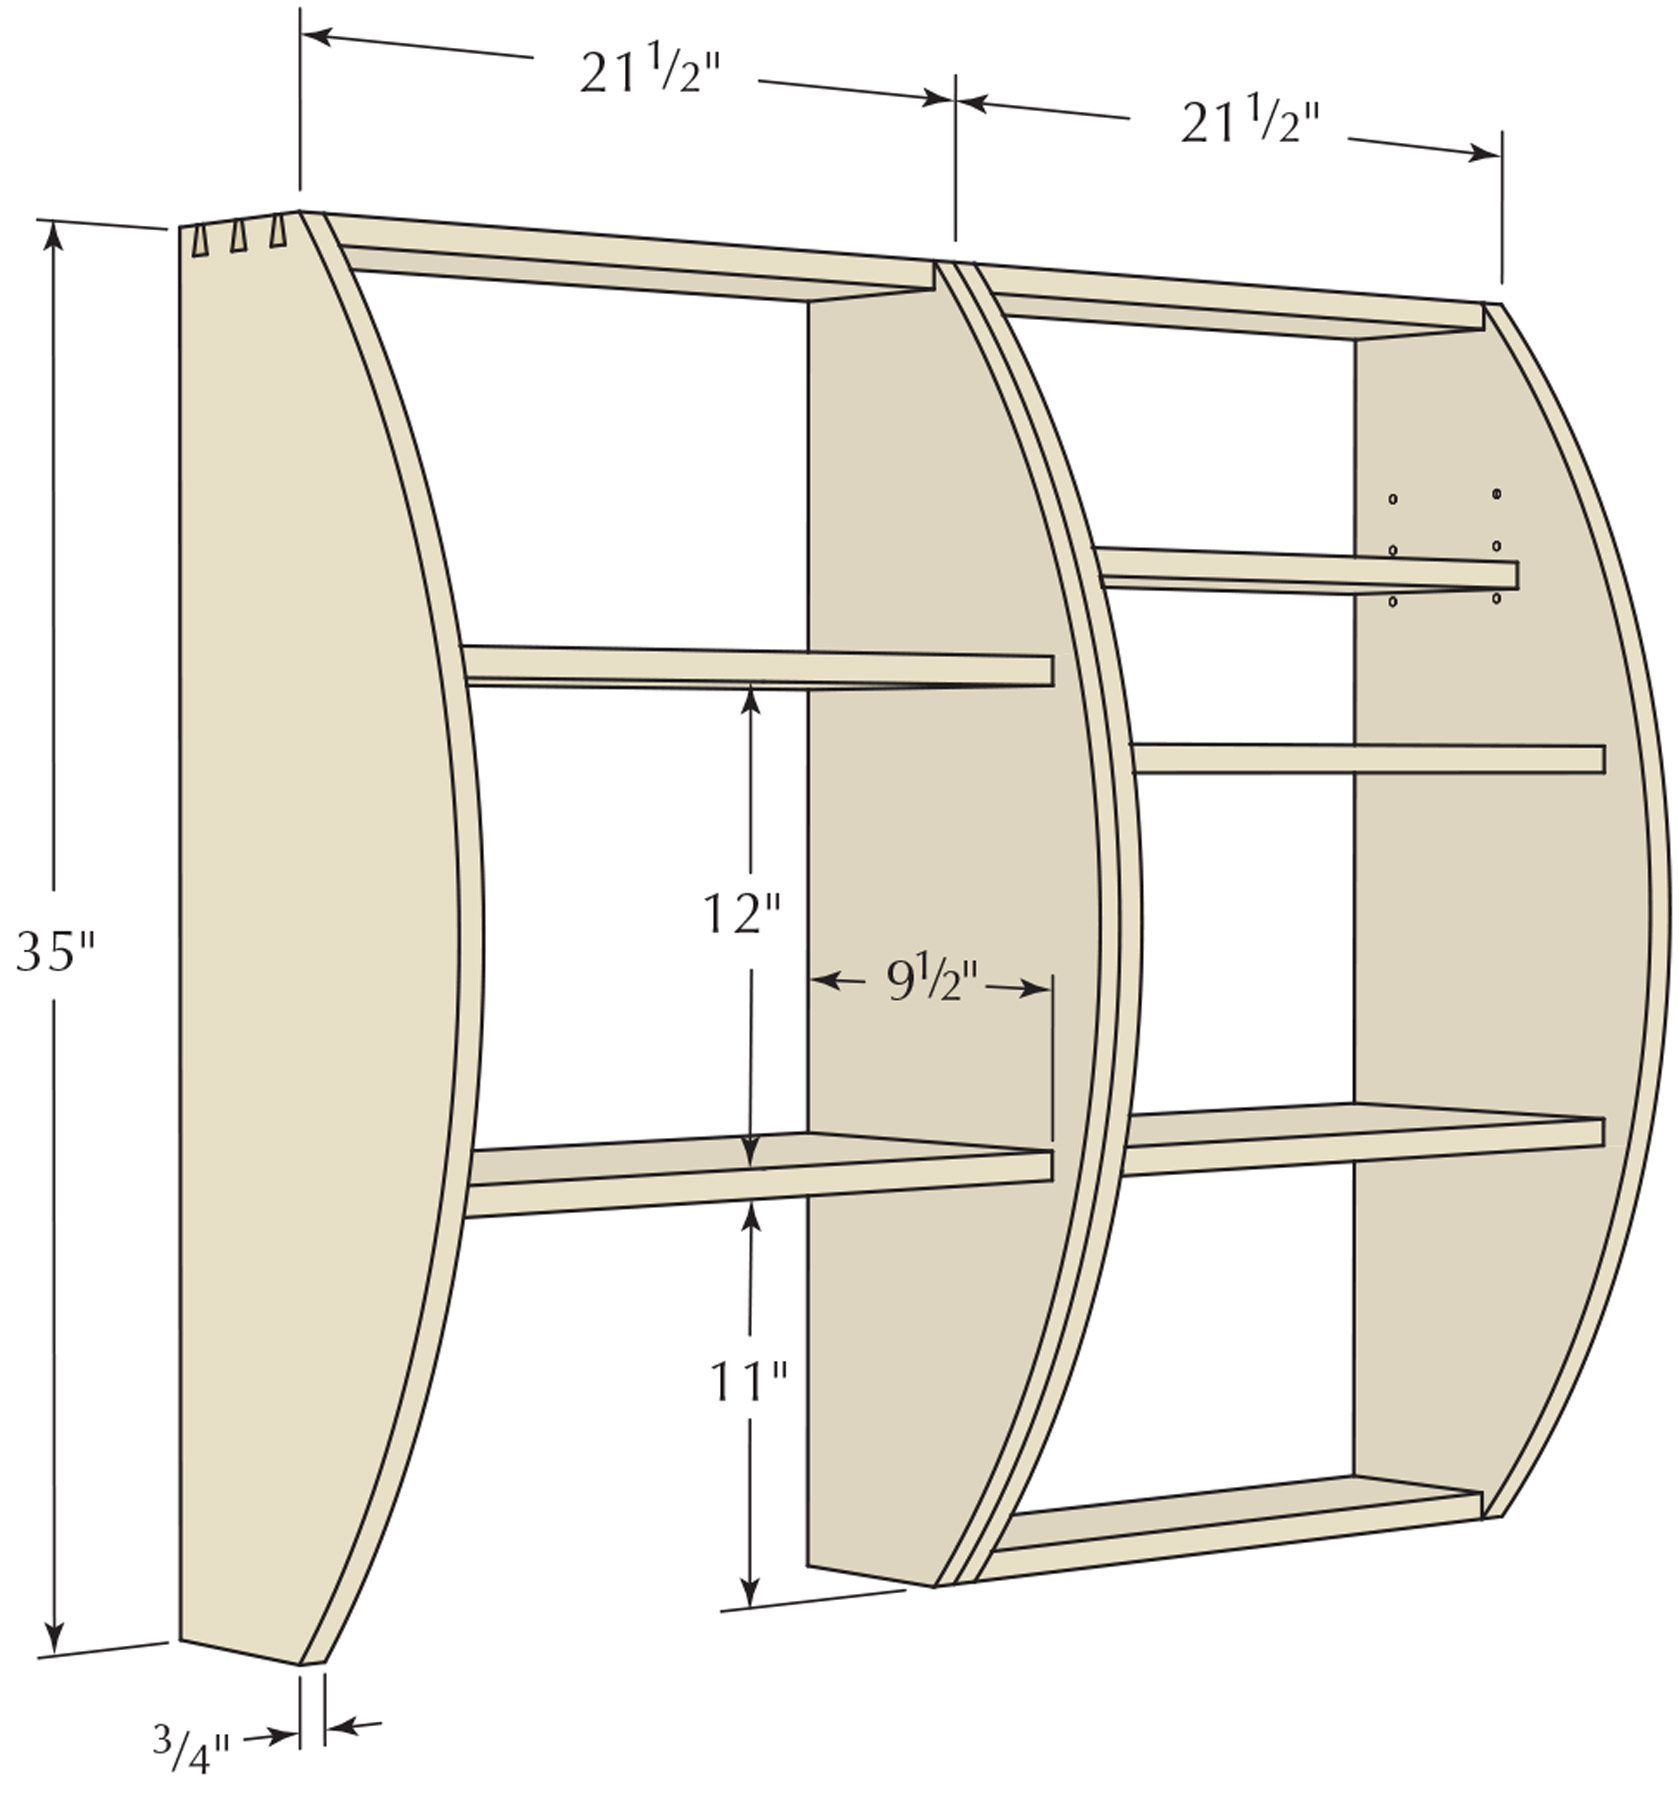
The sides are 111⁄4” wide at the apex of the curve and 35″ in length. I cut my plywood to that size, then tapped in a nail at either end just slightly more than 5″ from the back edge (the sides are 5″ at the top and bottom), and one nail just inside the edge at the apex of the curve. I then used those to hold a flexible metal rule in place while I penciled in the curve. (Note that to hit the 5″ mark perfectly with my flexible rule, the nail locations were adjusted in increments until I found the sweet spot.)

Shaving fair. A sharp spokeshave (followed by sandpaper as needed) made quick work of fairing the pattern’s curve.
After cutting close to my line on the band saw, I faired the curve using a spokeshave and sandpaper. Take the time to get your pattern as perfect as possible – how close to finished your sides are right off the router depends upon it.
With the pattern completed, process your lumber, then use the pattern to transfer the shape to the wood, registering it off the jointed edge that will become the back edge of each side. I recommend buying more wood than you need; because there is no decorative element beyond the form itself and the exposed joinery, you’ll want sufficient lumber from which to choose the best-looking sides possible.
Again, it’s to the band saw to cut close to your lines – about 1⁄8” away is ideal. Then, if you’re using a bottom-mount bearing-guided pattern bit as did I, secure the pattern beneath the workpiece (I do this using a holdfast at either end, with the edge to be worked hanging off the front edge of my bench) then rout off the remaining waste moving from left to right (into the direction of the bit’s rotation). Note that if you begin to experience tear-out, you may need to try climb-cutting. And if your band saw work was less than ideal and you have an excess of waste, remove it in a few passes (this will also reveal where tear-out is likely to occur) rather than hogging it all off at once.

Rout to shape. Move at a steady pace as you guide the router around the pattern, and be sure to keep the base plate firmly on the workpiece.
I recommend making a few passes on a piece of scrap first to determine the speed at which both you and the machine should move; get it right and you’ll have an almost finish-ready workpiece (that is, with no burns) right off the bit.
If you do get some burning, you’ll need to remove it with a spokeshave (for deep burns) or sandpaper, but try not to change the shape of the edge much. If you do, however, mark that side piece to go on the far right or left of the overall build where minor variations won’t be obvious.
Plate Rack Cut List
No.Item Dimensions (inches) Material
t w l
❏ 6 Sides 3⁄4 11 1⁄4 35Maple
❏ 5 Tops/bottoms 3⁄4 5 21 1⁄2Maple
❏ 6 Fixed shelves 3⁄4 91⁄2 20 h 1⁄2Maple
❏ 2 Adjustable shelves 3⁄4 61⁄2 19 3⁄4*Maple
Divider Subassemlies
❏ 12 Tops/bottoms 1⁄4 3⁄4 20Maple
❏ 32 Short dividers 3⁄8 3⁄8 9 3⁄4Maple
❏ 16 Long dividers 3⁄8 3⁄8 12Maple
* Sized for L-shaped supports; if using spoon supports, add 3⁄16

Section End Unit
3-D View Center & End Unit

Divider Subassembly
On to the Joinery

Tail board. On this build, the side pieces get the tails, with a half-tail on either end so as not to ruin the curve on the front, and to match it at the back.
I considered using the Festool Domino for loose-tenon joinery to attach the sides to the tops and bottoms; that would be plenty strong. But in the end – and for the ends – I decided on dovetails for a touch of added visual interest.
Because the force – and a lot of it if you have heavy dishes – is vertical, the tails are on the sides. And so that the line at the top and bottom of the curves remained clean, I laid out half-tails at the front and back edges. I don’t know about you, but I typically have half-pins at the corners when building casework, so I was sure to clearly mark the waste to avoid cutting away the wrong material.
I cut my dovetails by hand, tails first, and cope out the bulk of the waste before chiseling to my baselines. You should, of course, cut your dovetails with whatever method you prefer.

Trust but verify. After marking the dado locations and affixing my jig for the first cut, I ran a dado on a test piece first to confirm the depth of cut – which is 1⁄4″.
Note that while the two outside units are joined at both the top and bottom with dovetails, the center unit is open at the bottom in this design to accommodate a kitchen faucet.
After you have the dovetails cut and dry-fit, lay out the locations for the fixed shelves. And unless your dinner plates are also 111⁄4” in diameter and your salad plates are 9″ in diameter, you’ll need to adjust your dado locations accordingly.
Also consider any changes you may wish to make to the divider subassemblies. With my method and dado spacing, the top and bottom of the divider subassemblies can be no more than 1⁄4” thick and still allow room for my dinner plates to slide in and out. If you decide on thicker material for your subassemblies, you’ll need to leave sufficient space both for it and to get your plates in and out.
Measuring from the bottom, the locations for the 3⁄4“-wide stopped dados on mine are at 11” and 21 1⁄2” on the two outside units, and at 11″ and 23 3⁄4” on the middle unit. Measuring from the back edge, the dados are stopped at 9 1⁄2“. If your dado locations change, confirm that the curve at that point will accommodate a 9 1⁄2“-long dado; your dado length may require adjustment. I marked both the right and left edges of my dados so that I didn’t have to think as much when I clamped my simple router jig in position – because the router always runs to the right of the jig, but the jig placement changes depending on if you’re working on the left or right side of the case. Marking both sides of the dado makes it a no-brainer.
And if you decide to cut the dados by hand with a saw (before cleaning out the waste with a chisel), you’ll need both sides marked to guide the cut.
I stopped the 3⁄4” straight bit just shy of 9 1⁄2“, then used a chisel to square the end and remove the waste.
Now cut the fixed shelves to size and fit them in their dados. I processed my stock to 25⁄32“, and after sanding up to #180 grit, the shelves fit perfectly with just a little pressure.
Mark and drill the hole locations for the moveable shelves before moving on. Commercial shelf-pin jigs are available, or you can make your own jig that registers off the top or back – but with only three locations for each of the two moveable shelves, a jig isn’t strictly necessary. The holes are 11⁄2” from center to center, and start 26 1⁄2” from the bottom edge; they are located 1 1⁄2” and 5 1⁄2” from the back edge.
Sidebar: Design Process
 The design for the dinnerware rack was carefully thought-out for function, appearance and for the particular uses and space considerations of the piece. Based on her work with British kitchen designer Johnny Grey, Nancy Hiller’s prodigious kitchen-design skills once again proved enlightening. Nancy suggested that we measure each of our existing pottery pieces, glasses etc. with regard to how tall and how wide the dinnerware rack would ultimately need to be in order to accommodate the entire set.
While the sections for the plates are unchangeable, the top shelves are adjustable and thus flexible for changing uses. The dinner plates essentially provided the reference point for the depth of the piece and the apex of the curve on the side pieces so that the plates did not jut out and were firmly supported by the cross members.
 Then we had to factor in the height of the primary users of this space – especially my wife, Teri, who is 5’1″. Teri wanted to be able to reach the pieces used every day without having to climb up, and we still wanted to have counter space beneath the rack for other uses. We have a deep stainless steel double sink and 9″ tall faucets, the space for which needed to be considered functionally and aesthetically in the design. By making the dinnerware rack in three sections, the middle section could be made to specs for the sink faucets.
We chose flexible lighting above the piece that needed to be properly spaced within the context of the height and width of the dinnerware rack, the ceiling height and positioning so as to afford good task lighting. Functionally and ergonomically, the dinnerware rack’s location needed to afford convenience to its users. Therefore, proximity to the dishwasher, sink and to eating areas was considered in the placement and capacity of the piece.
Last of all, we realized that the dinnerware rack would be a focal point, so visual appeal and proportion were important. We wanted a fun alternative to the usual rectangular cabinets, but we wanted the piece to blend in with the other cabinetry and not overwhelm the space. Plus, the piece needed be both interesting and not look odd or out of place in our 93-year-old log home.
The clear finish was dictated by wanting to show the grain of the quartersawn white oak on the edges and sides, and we added small splashes of color on the curved edges from local potter and artist Teresa Cole whose graceful and colorful painted, stemmed flowers (inset) provided a unique visual touch in a subtle yet, we think, interesting way. — Kelly Mehler
Prep Before Glue

Square 1. Register the flat of the chisel off the flat of the end of the router cut, and rock it up to mark the remaining shoulders of the dado; try not to cross the penciled-in line of the dado’s end.
Before glue-up, I recommend getting all the surfaces as close to ready for finish as possible. Yes, you’ll no doubt get a mark or two – and some glue squeeze-out – that will need removing after your units come out of clamps, but it’s a lot easier to plane or sand with everything flat on your bench.
While I’d typically turn to my No. 4 for this task, the curly maple I chose wasn’t having it – so I pulled out the random-orbit sander. (That experience might dictate my wood selection in the future; sanding all the pieces was the only part of building this project that I didn’t enjoy.)

Square 2. With the chisel’s flat facing away from the waste, define the end of the mortise then chisel out the remaining waste.
With your parts prepped, place one side piece dado-side up on your bench, spread glue on the matching pins and slide them home. Now insert your fixed shelves into their respective dados, put glue on the still-exposed pins of the top and bottom, then slide the other side piece in place. (It helps to have someone on hand to help guide the second end of the shelves into place as you seat the side). Clamp it up and set it aside to dry, then repeat until all three units are assembled.
Before the center unit comes out of the clamps, countersink two screws through each side into the bottom fixed shelf, because there’s no bottom dovetailed piece holding it together. It’s your choice whether or not to plug the holes and cover the screws – if you’re hanging all three units as shown, the screws will never be seen.
I think this plate rack would also make a nice set of contemporary hanging bookshelves – and if I went that route, I’d build each unit with a shelf across the bottom, because there would be no need to make room for a faucet.
And if you’re pleased with the open shelf concept, after sanding the moveable shelves, you’re ready for finish. If not, see “Divider Subassemblies” to make the inserts before applying your finish – you’ll need finish on those, too.
Divider Subassemblies

Six at one plunge. I chose a piece of wood wide enough so that I could cut the eight holes for the dividers through at least six top and bottom pieces simultaneously, then rip them off at the table saw.
I’ve not yet determined if I’ll be using this piece in my kitchen. At the moment, there’s no space for it – but if I decide to tear out and replace my current (and careworn) cabinets, I’ll fit this into the plan. And if not, I have ample need for bookshelves. So, instead of fully integrating the dividers into the build as did Kelly Mehler, I decided to make six subassemblies that are slip-fit and pinned in place, but easily removed.

Slip fit. Cut the dividers to length for a snug fit between the fixed shelves.
I didn’t leave myself much wiggle room; the top and bottom pieces could be no more than 1⁄4” in thickness and still allow me to slip plates in and out. And with a piece that thin, how could I attach the dividers? I decided to use my favorite machine, the mortiser, to cut square holes in the top and bottom pieces. I walked off the hole locations with dividers, and plunged through wood wide enough to make six pieces (plus a saw kerf for each) at once. Then I simply cut the 3⁄8“-square dividers to length for a snug top-to-bottom fit, and pushed them into the shallow holes until they bottomed out.

Little ladder. Slide the dividers into the holes in the top and bottom pieces, and you get little ladders – six of them in my case.
I tapped each subassembly in place, with the front units 1⁄4” back from the front shelf edge, and the back units adjusted in no less than 1″ both to hold the plates and to allow room for a cleat under the back of the top fixed shelves to help secure the carcase to the wall.
— MF
A Simple Finish
For the finish, I decided on a few coats of sprayed lacquer with a satin sheen, with a light sanding between coats. I sanded with a #600-grit block after the final coat for a silky-smooth feel.
The striped grain in the maple imparts a subtle and pleasing chatoyance – but without overwhelming the eye – as you move around the piece and view it from different angles. That allows the wood to whisper while the form sings.
Web site: See more of Nancy Hiller’s kitchen design and furniture work at the NR Hiller Design site.
Article: Read about Kelly Mehler’s woodworking school in Berea, Ky.
Video: Build a simple plywood jig to rout shelf dados.
Here are some supplies and tools we find essential in our everyday work around the shop. We may receive a commission from sales referred by our links; however, we have carefully selected these products for their usefulness and quality.


