We may receive a commission when you use our affiliate links. However, this does not impact our recommendations.
Create a Soda-Shop Classic
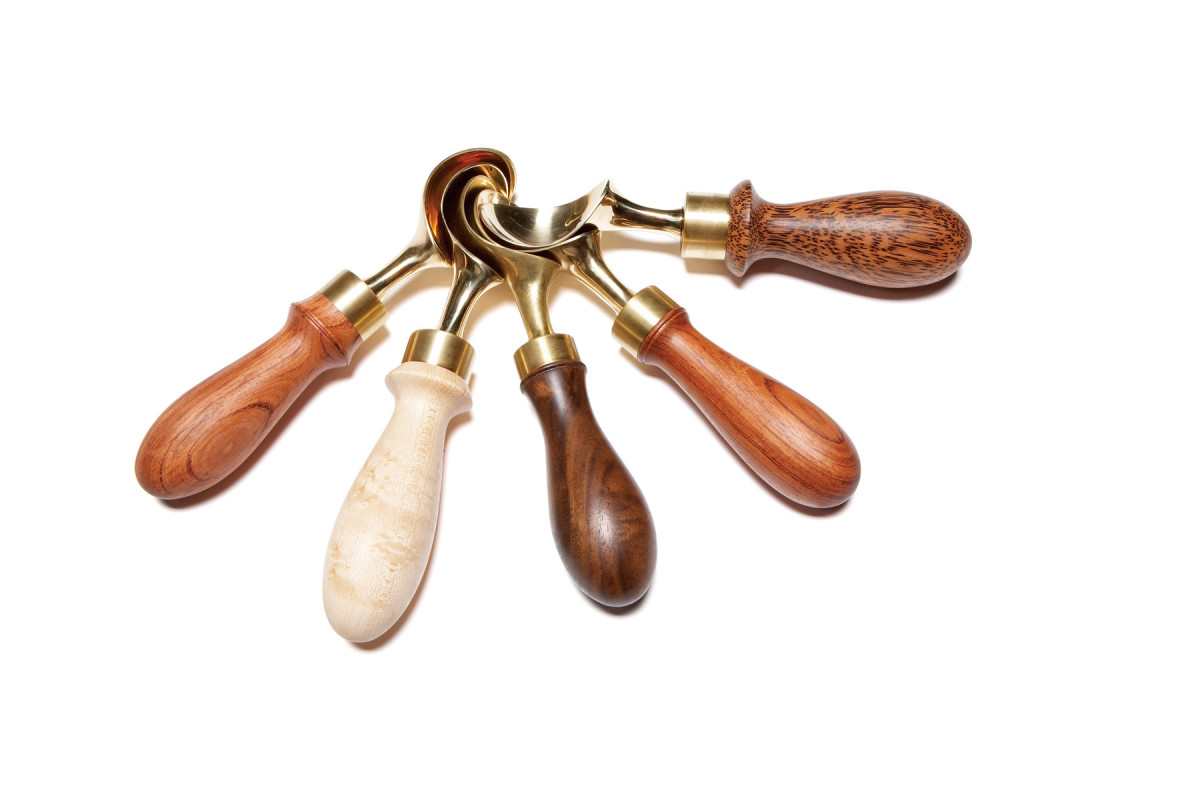
In simpler days, soda jerks quickly and efficiently dished perfect servings of ice cream with sturdy wooden-handled scoops. Once you’ve collected the metal parts (see Sources), a small block of wood and a little turning skill, I’ll show you how to create a classic ice cream scoop that will make you the envy of jerks everywhere.
How-To
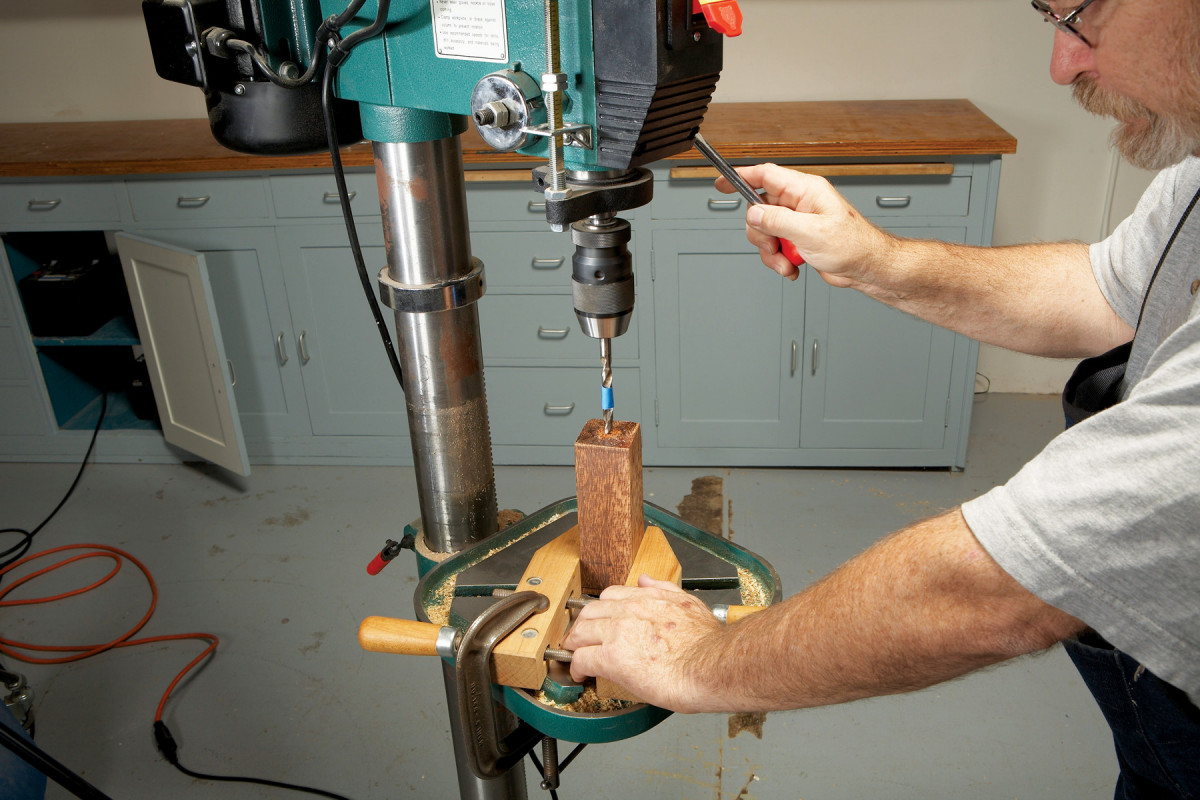
Photo 1. Use dense hardwood for the scoop’s handle. Start by drilling a hole for the scoop’s stem in the end of the handle blank.
Select a block of dried hardwood about 1-3/4″ square and 6″ in length. The handle must have a certain level of strength, so stay with domestic hardwoods as cherry, hard maple, walnut or yellow birch. Exotic woods such as purpleheart, black palm (used here), bubinga, rosewoods and goncalo alvesare also good choices.
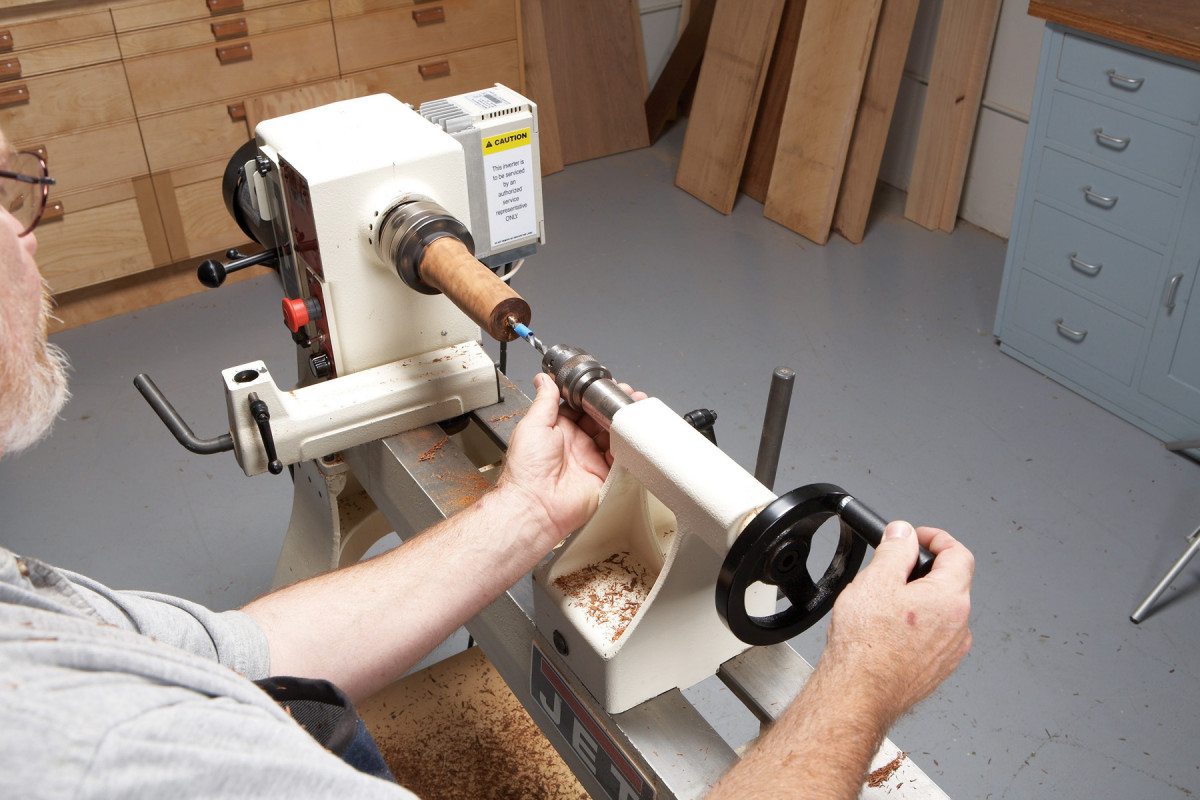
Photo 2. Another option is to drill the hole on the lathe. This method requires turning the blank to a cylinder and then replacing the tailstock center with a drill chuck. The mark left by the tailstock center locates the bit.
Drill a 3/8″ dia. by 1-1/4″ deep hole for the scoop’s stem (or “tang”). If the end of the blank is properly squared, this operation is easily performed on a drill press (Photo 1). Another option is to mount the blank on the lathe and turn it to a cylinder, using a spindle roughing gouge. Then replace the tailstock center with a drill chuck to drill the hole (Photo 2).
Photo 3. Once the hole is drilled, you have two options for re-mounting the blank: A cone-shaped live center or a small tapered plug. The cone centers itself; the plug fills the hole, so you can mount a standard live center.
Mount the drilled blank on the lathe with the drilled hole facing wards the tailstock. If you have a cone-type live center, simply run the cone into the drilled hole (Photo 3). Another option is to turn a tapered wooden plug that fills the hole and provides a surface to engage the tailstock center. The plug should protrude about 1/2″, so you can remove it when you’ve finished turning the handle.
If the blank you’ve mounted is still square, turn it to a cylinder, using a spindle roughing gouge.
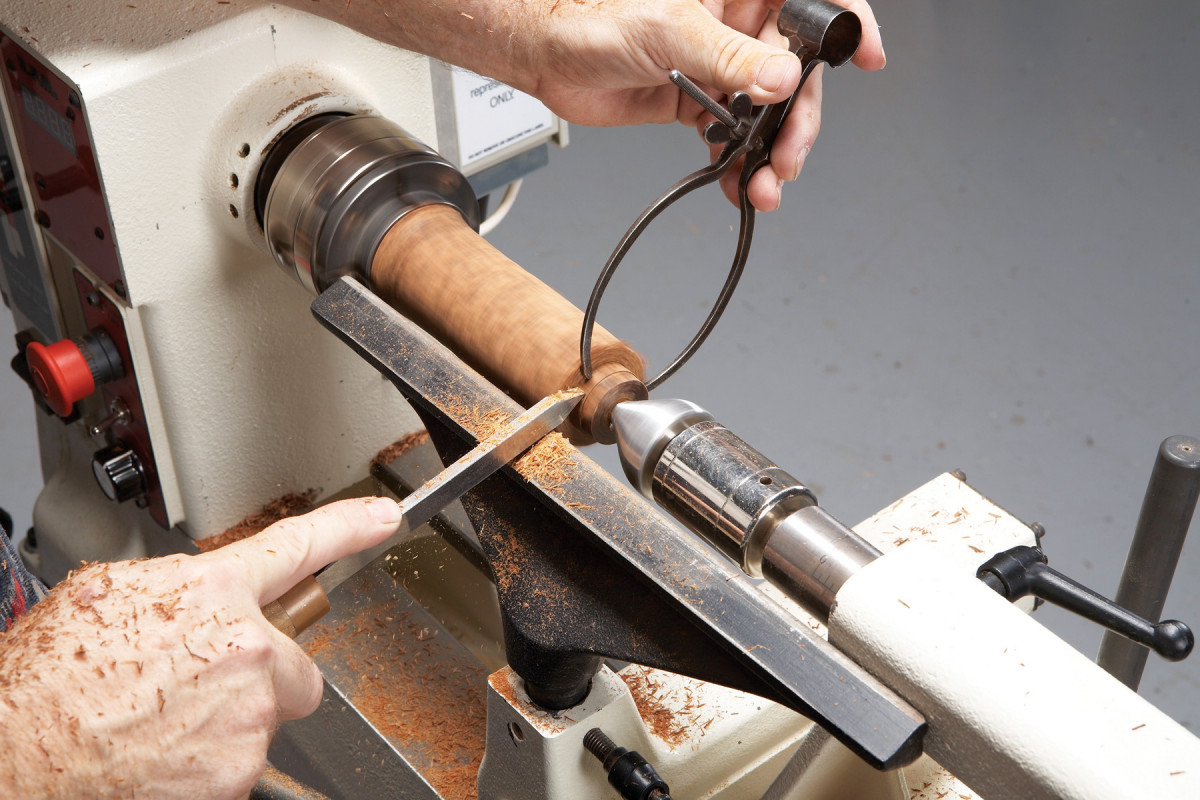
Photo 4. Turn a tenon to house the scoop’s ferrule in two steps. First, match the ferrule’s outside diameter. Then carefully reduce the diameter until you can drive on the ferrule.
Fit the brass ferrule to the blank. The ferrule is 1″ long, so mark that length on the blank with a pencil. Turning the correct diameter is a bit trickier. Start by turning the tenon to match the outside diameter of the ferrule (Photo 4). Before you use the outside calipers for any lathe work, be sure to round the ends.
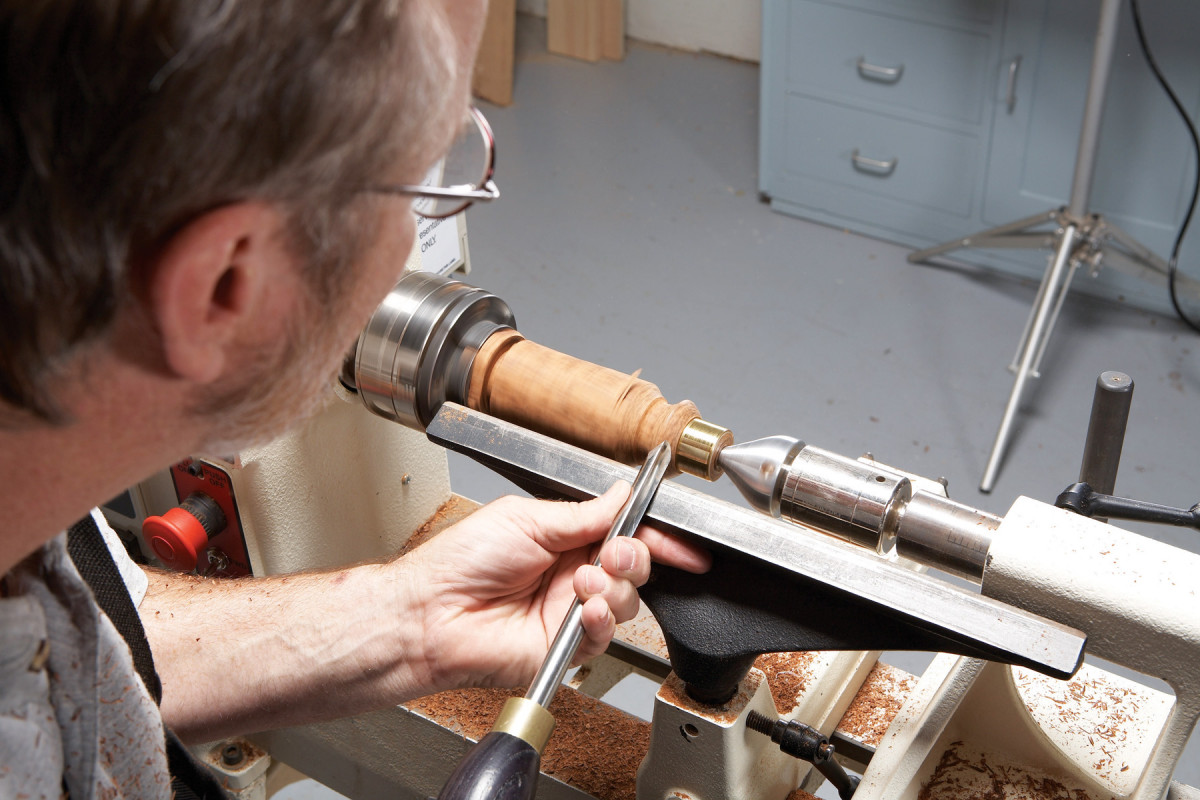
Photo 5. Once the ferrule has been driven on, shape the area behind it with the spindle/detail gouge, working from large to small diameters. I like to start with a wide, tapered flange.
Next, create a short taper on the end of the tenon. Keep checking until the ferrule just starts to go on. Turn the ferrule a few times around the tenon to create a burnished surface. When you start the lathe you should be able to “see” the diameter you are targeting.
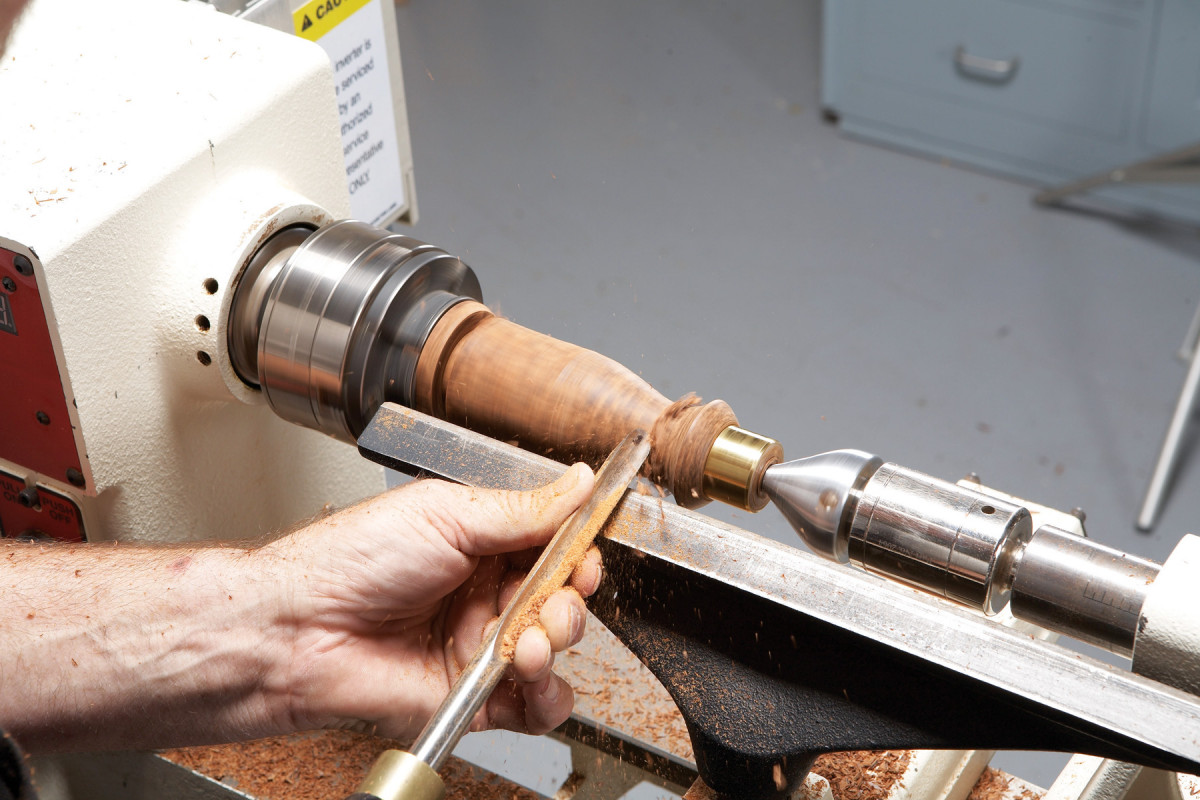
Photo 6. Reduce the diameter behind the flange to create the neck. From this point on, remove the handle often to check how it feels in your hand.
I try to achieve a very tight driven-on fit. Unless the tenon’s length is exactly the same as the ferrule, you may need another ferrule to drive the first one home. Another option is to turn the tenon to a slightly loose fit and glue on the ferrule with epoxy. If you use epoxy, wait for several hours before completing the turning.
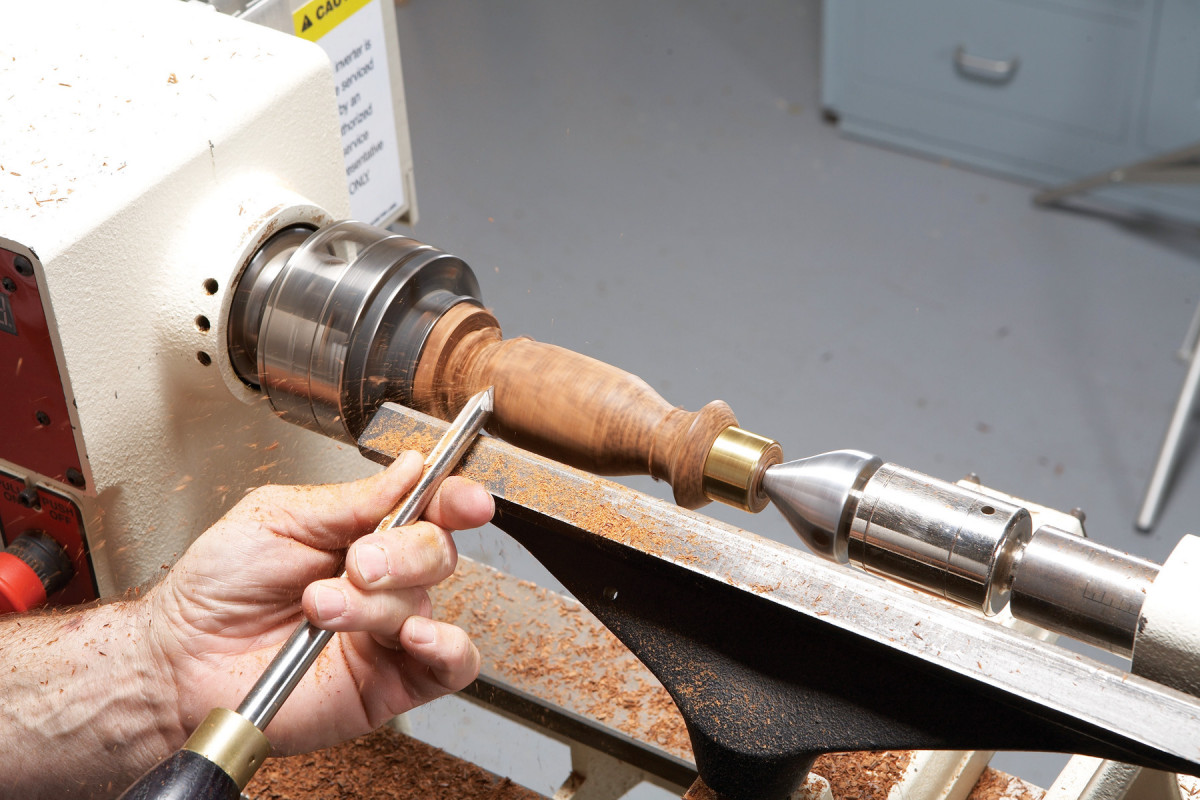
Photo 7. Start to shape the end of the handle. Be sure to leave sufficient waste, so you don’t whack into the chuck.
Shape the handle with a spindle/detail gouge (Photos 5, 6 and 7). This is an organic process: Remove the handle frequently, to see how it feels in your hands—the perfect shape is the one that feels right. Most of my handles end up about 5-1/2″ long, with maximum diameters near 1-5/8″.
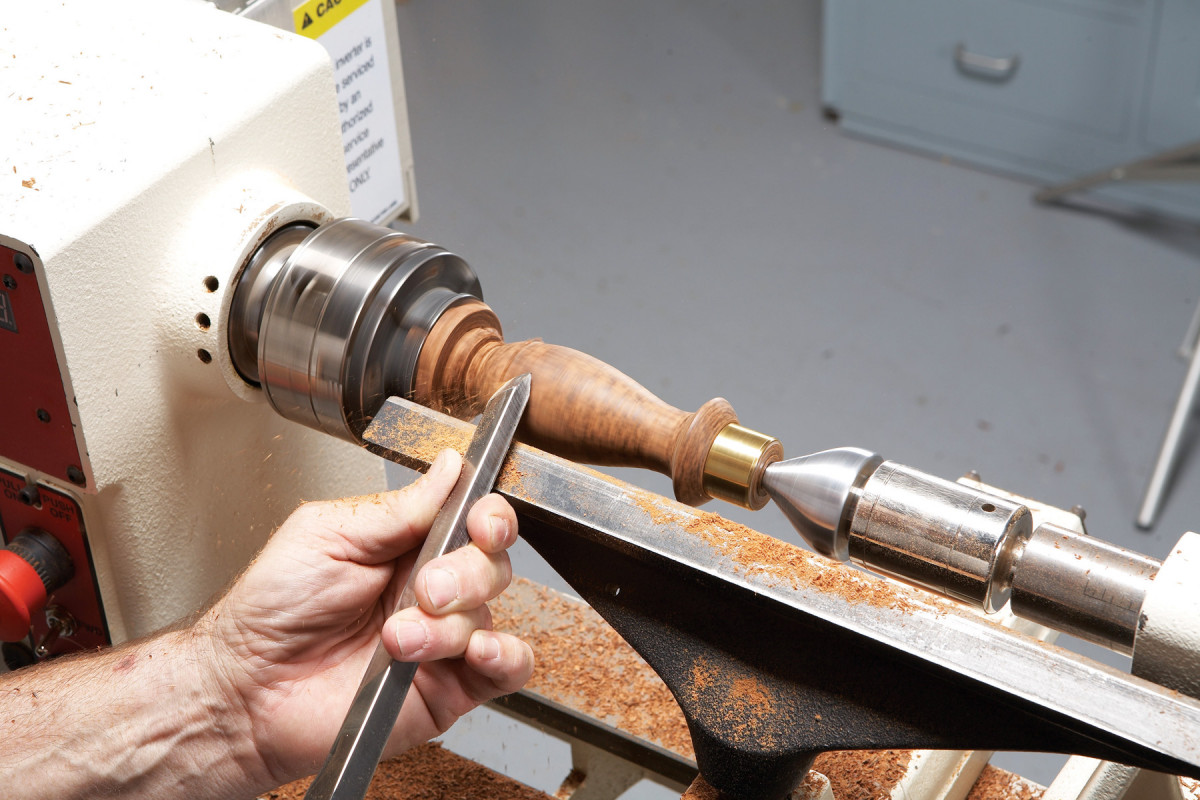
Photo 8. If you are comfortable with a skew chisel, use it to finish shaping the handle’s rounded areas. You can shape the entire handle with the spindle/detail gouge, but the skew leaves a smoother surface.
Switch to the skew chisel to finish shaping the rounded areas (Photo 8).
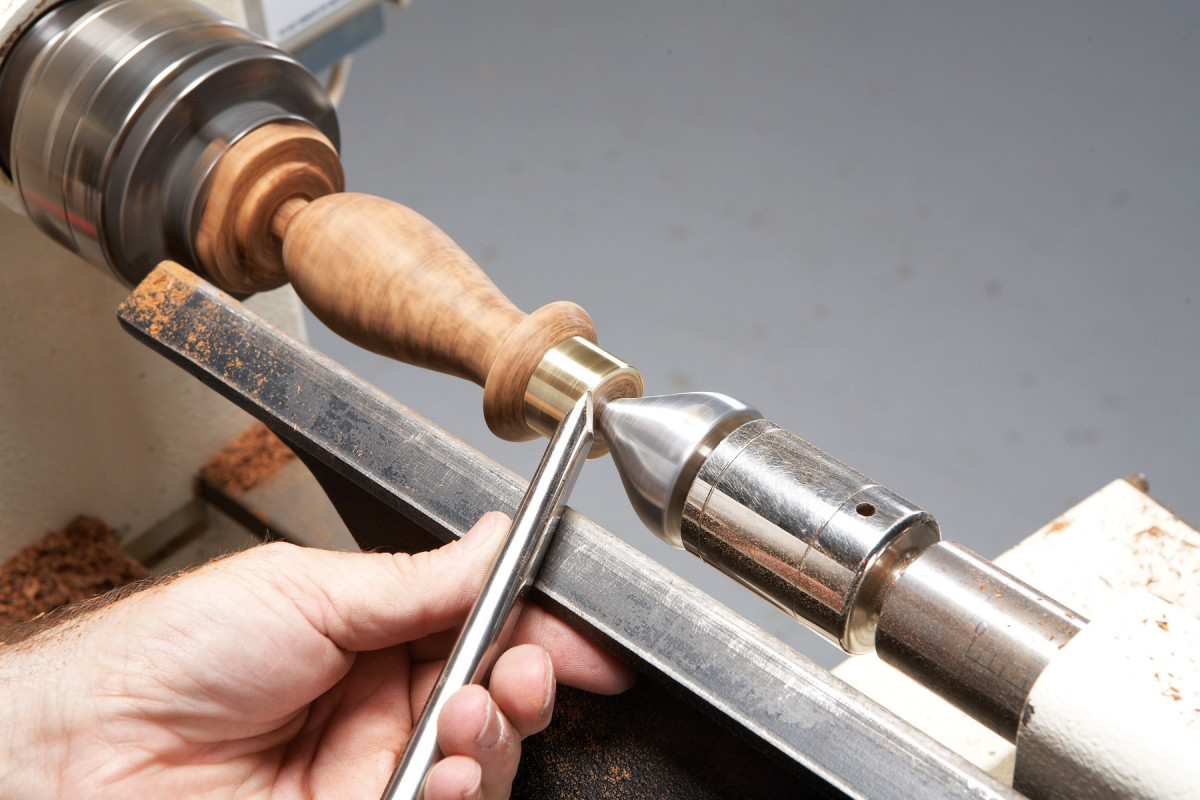
Photo 9. Trim the end of the tenon flush with the ferrule. Use the skew chisel long-end-down or a thin-kerf parting tool.
If the ferrule’s tenon protrudes, use either a skew chisel (long point down) or a thin kerf parting tool to turn the end flush with the brass (Photo 9).
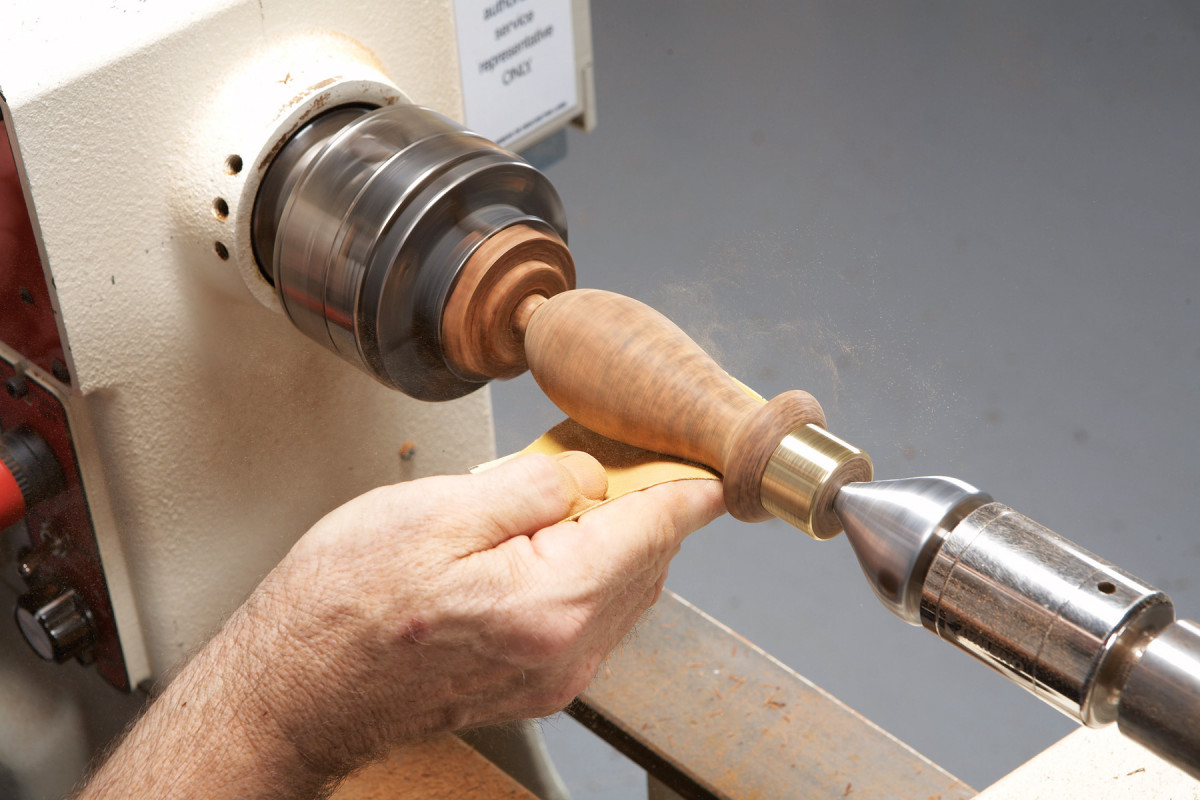
Photo 10. Finish-sand the handle. Start with 120-grit; if turning marks remain, drop back to 100-grit. Sand to 220-grit, or further if you still see sanding scratches. Sand the brass ferrule to the same grit.
When you’re satisfied with the handle’s feel and appearance, sand it—and the ferrule, too—to at least 220 grit (Photo 10).
Saw the handle from the blank. I usually remove the blank from the lathe and free the handle by using a coping or Japanese saw. Then I finish sanding the end of the handle by hand.
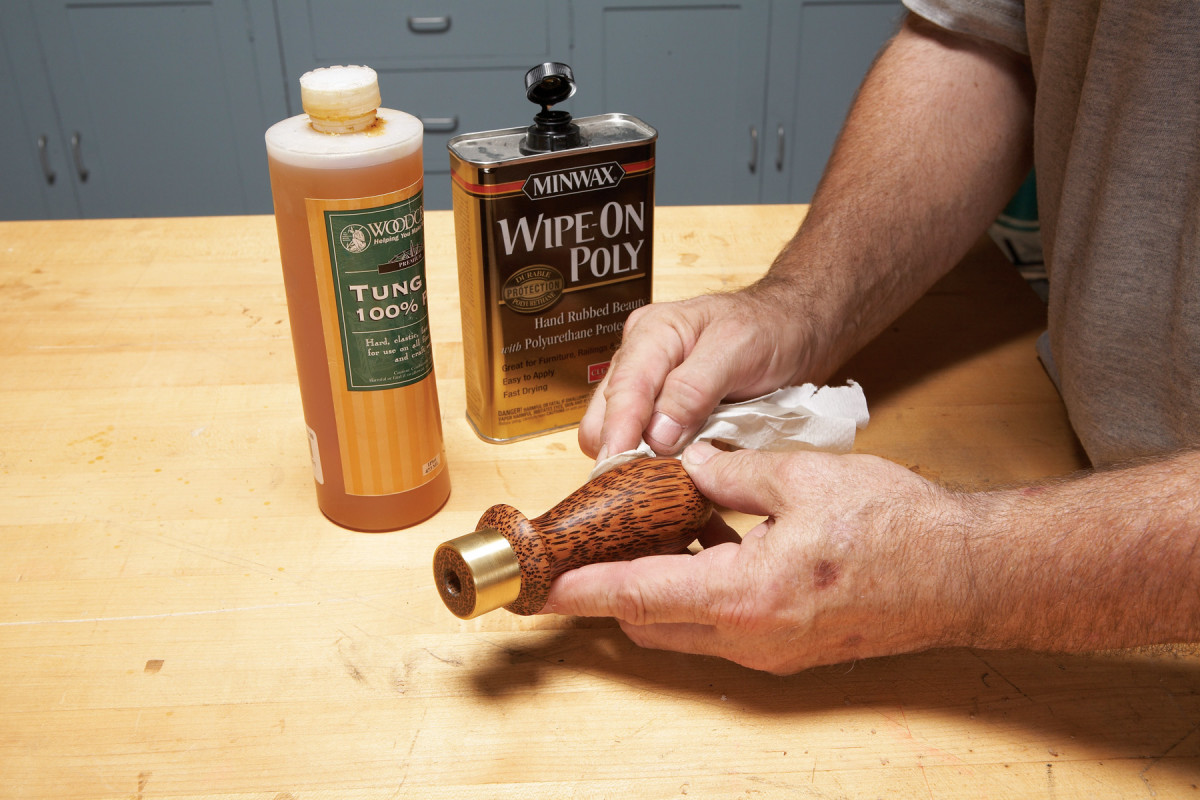
Photo 11. For a finish, I wipe on polyurethane or pure tung oil. I think tung oil looks better, but polyurethane lasts longer.
Apply the finish (Photo 11). For the best protection against water and washing, use a film finish such as a gel varnish or polyurethane. Wipe on at least three coats, with light sanding with 320- or 400-grit sandpaper, 0000 steel wool, or a very fine abrasive pad, such as white Scotch Brite. For a more natural look, use pure tung oil or even boiled linseed oil as the finish. Again, apply at least three coats and wait until the finish is completely dry before using the scoop.
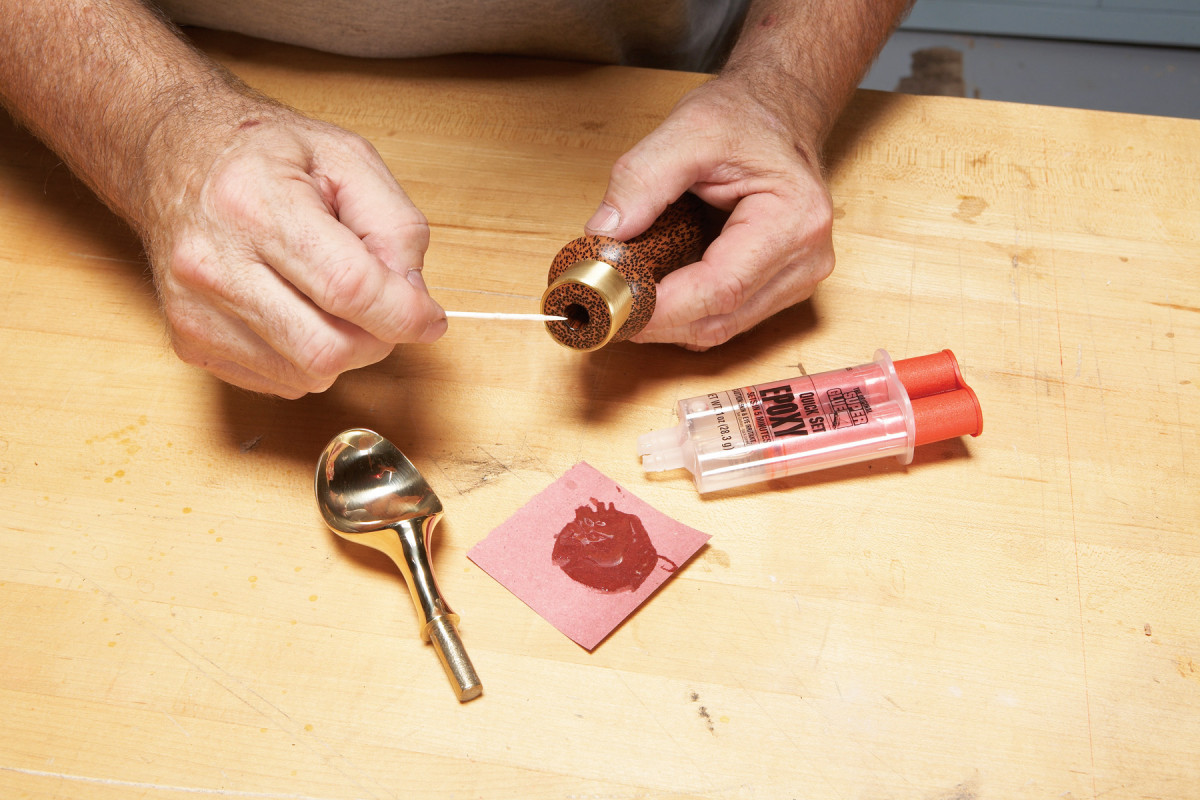
Photo 12. Install the scoop. Work a generous amount of epoxy into the hole. Insert the scoop’s tang and bed its collar against the end of the handle.
Glue the metal scoop into the handle with epoxy (Photo 12). Use a rag dampened with lacquer thinner or acetone to remove any epoxy that squeezes out. Prop the scoop upright for about one hour for the glue to set, and allow at least one day before use.
Tips for Using
Before you attack that frozen ice cream, immerse the scoop’s business end in a cup of hot water for a couple minutes. Use the side of the scoop to dish the ice cream—don’t dig in with the front, like a shovel. If you’re serving a gang of kids, or a gaggle of soda enthusiasts, dip the metal in the hot water periodically, to keep it warm.
After your ice cream social, wash only the brass part of the scoop. Don’t submerge the wood and don’t ever run the scoop through a dishwasher. Following washing, towel the scoop dry and then leave it out to air-dry, so any moisture that remains evaporates.
Sources:
Editor’s note: brass scoop kits seem to be no longer widely available, but these instructions will still work with the one linked below.
Woodcraft: Stainless Steel Paddle Ice Cream Scoop Turning Kit
Here are some supplies and tools we find essential in our everyday work around the shop. We may receive a commission from sales referred by our links; however, we have carefully selected these products for their usefulness and quality.