We may receive a commission when you use our affiliate links. However, this does not impact our recommendations.
 Here’s a fun way to save money, be creative, make something useful, and use up scrap stock: make your own picture frames. You can start from scratch and have finished frames in a day or less, and the only tools you need are a table saw and a router table. The challenge is to create unique profiles using the router bits you already have.
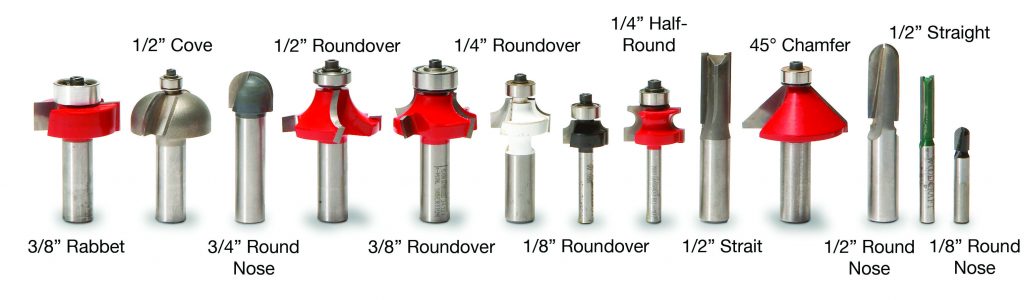
The frames and instructions that follow will get you started. You probably don’t have all the same bits, but that doesn’t matter. Just substitute and experiment. You’ll find that a little tinkering yields an amazing range of profiles.
Most frames are made using small stock, so be sure to work safely. Always use guards, featherboards, and push sticks. Never use stock less than 12″ long. Create profiles on long stock; then cut individual frame pieces from the profiled stock. Similarly, use wide stock to create thin pieces; rout the profile, then cut to final thickness. Rout large or deep profiles in multiple passes, raising the bit or moving the fence in small increments before each pass.
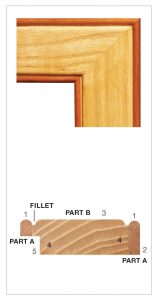
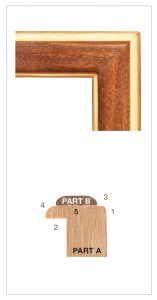
 Frame 1: Final Size: 1 1/8″ x 1 1/4″
Part A: Start with a 1 3/16″ thick by 2″ wide blank.
1. Round over the top edge by making one pass on each face with the 3/8″ roundover bit.
2. Saw a 7/16″ deep by 7/8″ wide groove on the inside face, 3/8″ from the rounded edge.
3. Rip the blank to final 1 1/4″ width. Orient the blank outside-face down (grooved-face up), with its rounded edge against the fence.
Part B: Start with a 3/4″ thick by 7/8″ wide blank.
4. Rout a 1/4″ by 3/8″ rabbet on the inside face. Orient the blank bottom edge down, with its inside face against the fence.
5. Rout a 1/4″ cove on the inside face, using the 1/2″ round nose bit. Orient the blank top-edge down, with its inside face against the fence.
Glue Part A to Part B.
 Frame 2: Final Size: 3/4″ x 1 1/2″
Use a 3/4″ thick by 1 1/2″ wide blank.
1. Rout a 45° chamfer on the inside face, leaving a 1/8″ wide edge on the top. Then, set the fence and orient the blank inside-face down. Then complete the cut by making several shallow passes.
2. Create the 3/8″ deep rabbet with two table saw cuts. First, cut a 3/8″ deep kerf on the inside face. Next, set the fence so this cut leaves a 1/8″ shoulder between the rabbet and the chamfer.
3. Make the second cut with the blank’s outside face against the fence. Raise the blade to meet the first cut and set the fence at 3/8″.
4. Rout a 45° chamfer on the outside face with the bottom edge 3/16″ wide.
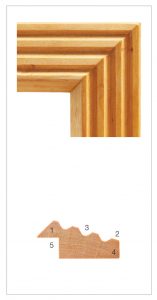
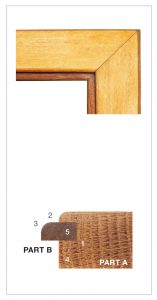
Frame 3: Final Size: 3/4″ x 2 1/2″
Part A: Start with a 1/4″ thick by 1 5/8″ wide blank.
1. Round both edges, using a 1/4″ half- round bit.
2. Rip the blank in half, to create two completed 3/4″ wide Part A blanks.
Part B: Start with a 3/4″ thick by 2″ wide blank.
3. Rout 1/8″ roundovers on both top face edges. Then, orient the blank on edge, with its top face against the fence for both cuts. To create the fillets, raise the bit’s straight shoulder above the table.
4. Glue Part A blanks to the edges of Part B.
5. Rout a 3/8″ by 3/8″ rabbet on the inside edge.
 Frame 4: Final Size: 1″ x 1 3/4″
Part A: Start with a 3/4″ thick by 1 3/4″ wide blank.
1. Rout or saw a 1/8″ by 1/2″ groove on the top face, starting 1/8″ from the outside edge.
2. Rout or saw a 1/4″ by 3/8″ groove on the same face, starting 11/8″ from the outside edge.
3. Rout a 1/4″ tall by 3/8″ wide cove on the inside edge, using a 3/4″ round nose bit. Orient the blank inside-edge down, with its top face against the fence.
After routing, the remaining inside edge should measure 3/8″ wide.
4. Rout a 3/16″ deep by 1″ tall cove on the top face, using a 1/2″ round nose bit. Use the same orientation as for PART C Step 3 (inside edge down, with the top face against the fence).
5. Rout a 1/4″ by 1/4″ rabbet on the 3 inside edge.
Part B: Start with a 1/2″ thick by 11/2″ wide blank.
6. Rout 1/4″ roundovers on one edge.
7. Rip the blank to final 3/8″ thickness, with the rounded edge on the offcut side of the blade.
Part C: Start with a 1/4″ thick by 11/2″ wide blank.
8. Rout 1/8″ roundovers on one edge.
Rip the stock to final 1/4″ thickness, with the rounded edge on the offcut side of the blade.
Glue Parts B and C to Part A.
 Frame 5: Final Size: 3/4″ x 1 1/4″
Use a 3/4″ thick by 1 1/4″ wide blank.
1. Rout a 1/4″ by 3/4″ cove on the top face, using a 1/2″ round nose bit.
Orient the blank inside-edge down,
with its top face against the fence. To complete the cut, make multiple shallow passes, raising the bit incrementally.
2. Rout a 3/8″ by 3/8″ rabbet on the inside edge.
 Frame 6: Final Size: 3/4″ x 1 1/2″
Use a 1 1/2″ thick x 1 1/2″ wide blank.
1. Rout a 5/16″ chamfer on the top
inside edge.
2. Saw a 17° bevel on the top face. Tilt the blade away from the fence, and orient the blank chamfered-edge up, with the chamfer facing the blade. Set the fence so the bevel meets the tip of the chamfer. Make the cut. Then remove the saw marks by sanding or planing.
3. Rout evenly spaced flutes on the beveled face, using the 1/8″ round nose bit.
4. Rip the blank to final 3/4″ thickness. Make the cut with the blank outside- edge down and its beveled face on the outfeed side of the blade. After sawing, the blank’s outside edge should mea- sure 5/16″ wide.
5. Rout a 3/8″ by 3/8″ rabbet on the inside edge. Orient the blank bottom- face down, with its inside edge against the fence.
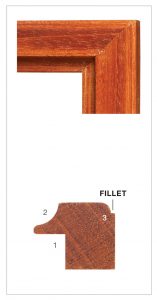 Frame 7: Final Size: 3/4″ x 7/8″
Use a 3/4″ thick by 7/8″ wide blank.
1. Rout a 3/8″ by 3/8″ rabbet on the inside edge.
2. Rout a 1/4″ by 1/4″ cove on the top face, using a 1/2″ round nose bit.
3. Rout a 1/8″ roundover on the top face. Orient the stock outside-edge down, with its top face against the fence. To create the fillet, simply raise the bit’s shoulder above the table.
Frame 8: Final Size: 1 3/16″ x 1 3/16″
Part A: Start with an 1 1/16″ thick by 1 3/16″ wide blank.
1. Rout 1/8″ roundovers on the top edge.
2. Rout a 1/4″ by 1/2″ rabbet on the inside face.
Part B: Start with a 1/2″ thick by 1 1/2″ 4 wide blank.
3. Rout 1/8″ roundovers on one edge.
4. Rip the blank to final 1/8″ thickness, with the rounded edge on the offcut side of the blade.
5. Glue Part B to Part A.
 Frame 9: Final Size: 3/4″ x 1 1/2″
1. Rip 1/8″ by 1/8″ saw kerfs in the top face, starting 3/8″ and 3/4″ from the inside edge.
2. Rout a 1/2″ cove on the outside edge. Orient the blank top-face down, with its outside edge against the fence.
3. Rout a 3/8″ roundover on the inside edge. Orient the blank top-face down, with its inside edge against the fence.
4. Rout a 3/8″ by 3/8″ rabbet on the same edge, with the blank oriented bottom-face down.
 Frame 10: Final Size: 3/4″ x 1 1/4″
Part A: Start with a 3/4″ thick by 1 1/8″ wide blank.
1. Rout or saw a 1/4″ by 1/4″ groove on the inside edge, starting 3/8″ from the bottom face.
2. Rout a 1/8″ roundover on the inside edge of the top face.
Part B: Start with 1/4″ thick by 1 1/2″ wide stock.
3. Rout a 1/8″ roundover on the top edge.
4. Rip the stock to final 1/2″ width, with the rounded edge on the offcut side of the blade.
5. Glue Part B to Part A.

Frame 11: Final Size: 1″ x 1 3/4″
Part A: Start with a 3/4″ thick by 1 3/4″ wide blank.
1. Rout a 1/2″ cove on the outside edge, leaving the edge 1/4″ wide.
2. Rout a 1/4″ by 1/4″ cove on the inside edge, using a 1/2″ round nose bit. Then orient the blank inside-edge down. Be sure the top face is against the fence.
3. Rout or saw a 1/8″ by 1/2″ groove in the top face, centered between the two coves.
4. Rout a 3/8″ by 3/8″ rabbet on the inside edge.
Part B: Use a 3/4″ thick by 2″ wide blank.
5. Rout 1/4″ roundovers on one edge.
6. Using a 1/2″ straight bit, rout 1/8″ deep by 1/4″ wide dadoes on both faces, starting 1/4″ from the rounded edge.
7. Rip the blank to final 3/8″ thickness, with its rounded edge on the offcut side of the blade.
8. Glue Part B to Part A.
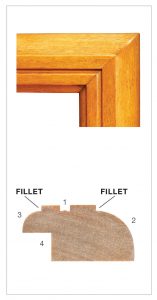 Frame 12: Final Size: 3/4″ x 1 3/4″
Use a 3/4″ thick by 1 3/4″ wide blank.
1. Saw or rout a 1/8″ by 1/8″ groove in the top face, starting 1/2″ from the inside edge.
2. Rout a 1/2″ roundover on the outside edge. Then orient the blank top-face down, with its outside edge against the fence. Next, create the fillet by raising the bit’s straight shoulder above the table.
3. Rout a 1/4″ roundover with a fillet on the inside edge.
4. Rout a 3/8″ by 3/8″ rabbet on the inside edge.
Here are some supplies and tools we find essential in our everyday work around the shop. We may receive a commission from sales referred by our links; however, we have carefully selected these products for their usefulness and quality.