We may receive a commission when you use our affiliate links. However, this does not impact our recommendations.
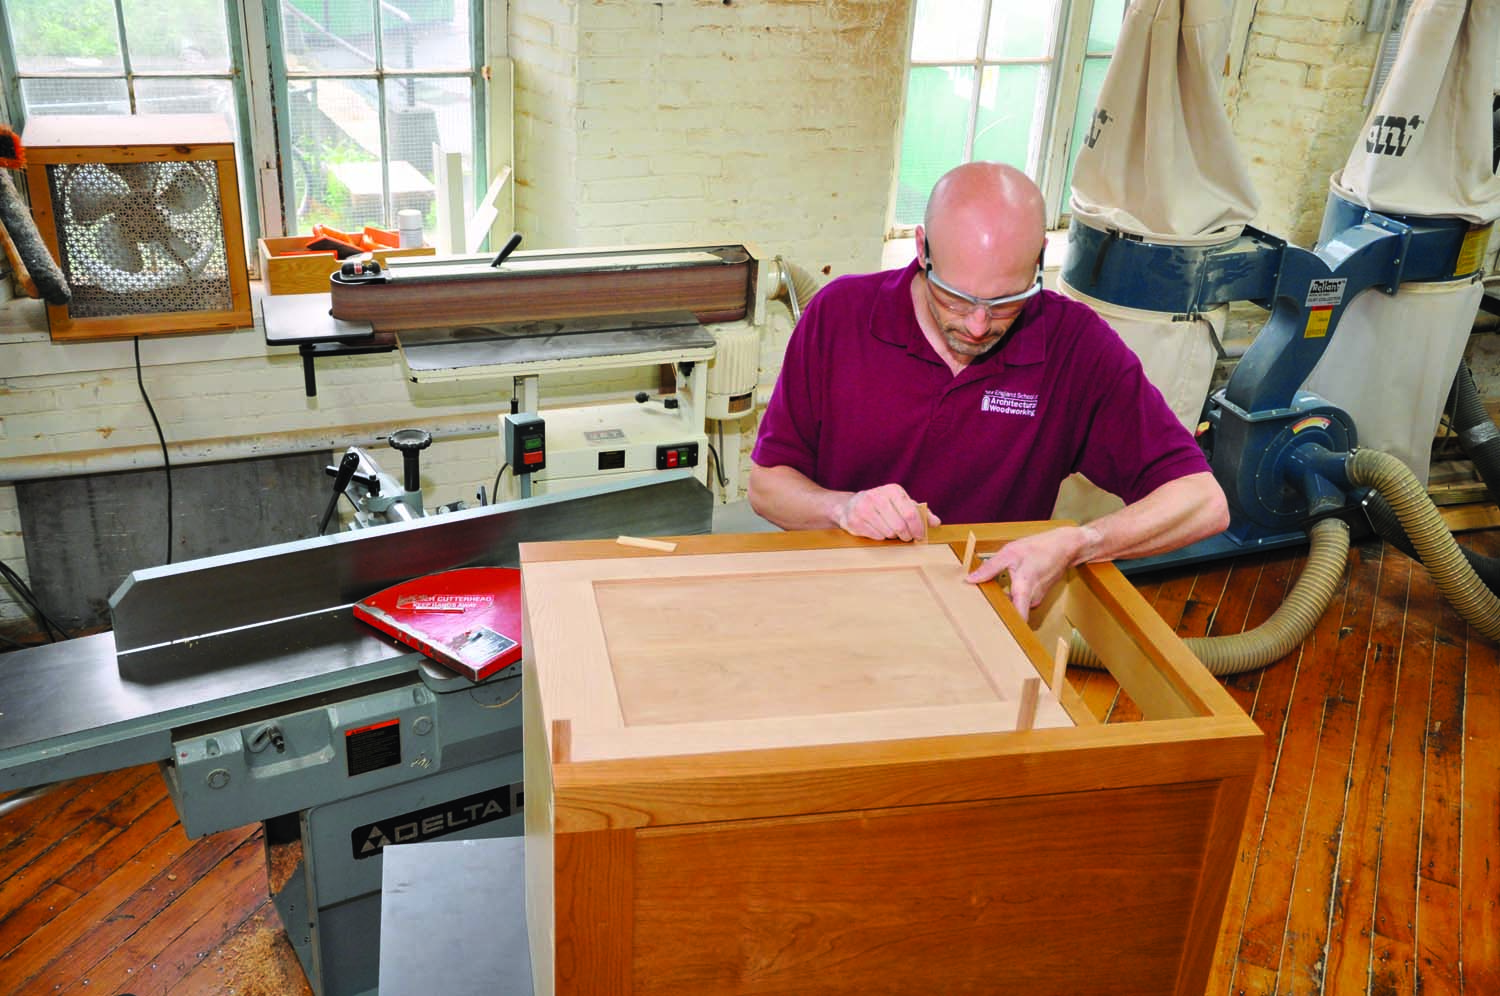
If you’ve ever installed a cabinet door using traditional butt hinges, you know what a pain in the butt they are to work with. That’s why Euro-style hinges have become so popular in the cabinet industry. Euro hinges allow you to quickly adjust the gaps around an inset door, compensate for any irregularities and re-adjust the gaps in the future if the doors sag or the cabinets settle. Some hinges even come with an integrated soft close feature, such as the Blum hinges shown below. Euro hinges are designed to work with the 32mm system, so if you follow the system rules for boring the mounting holes, your door installation will kick butt.
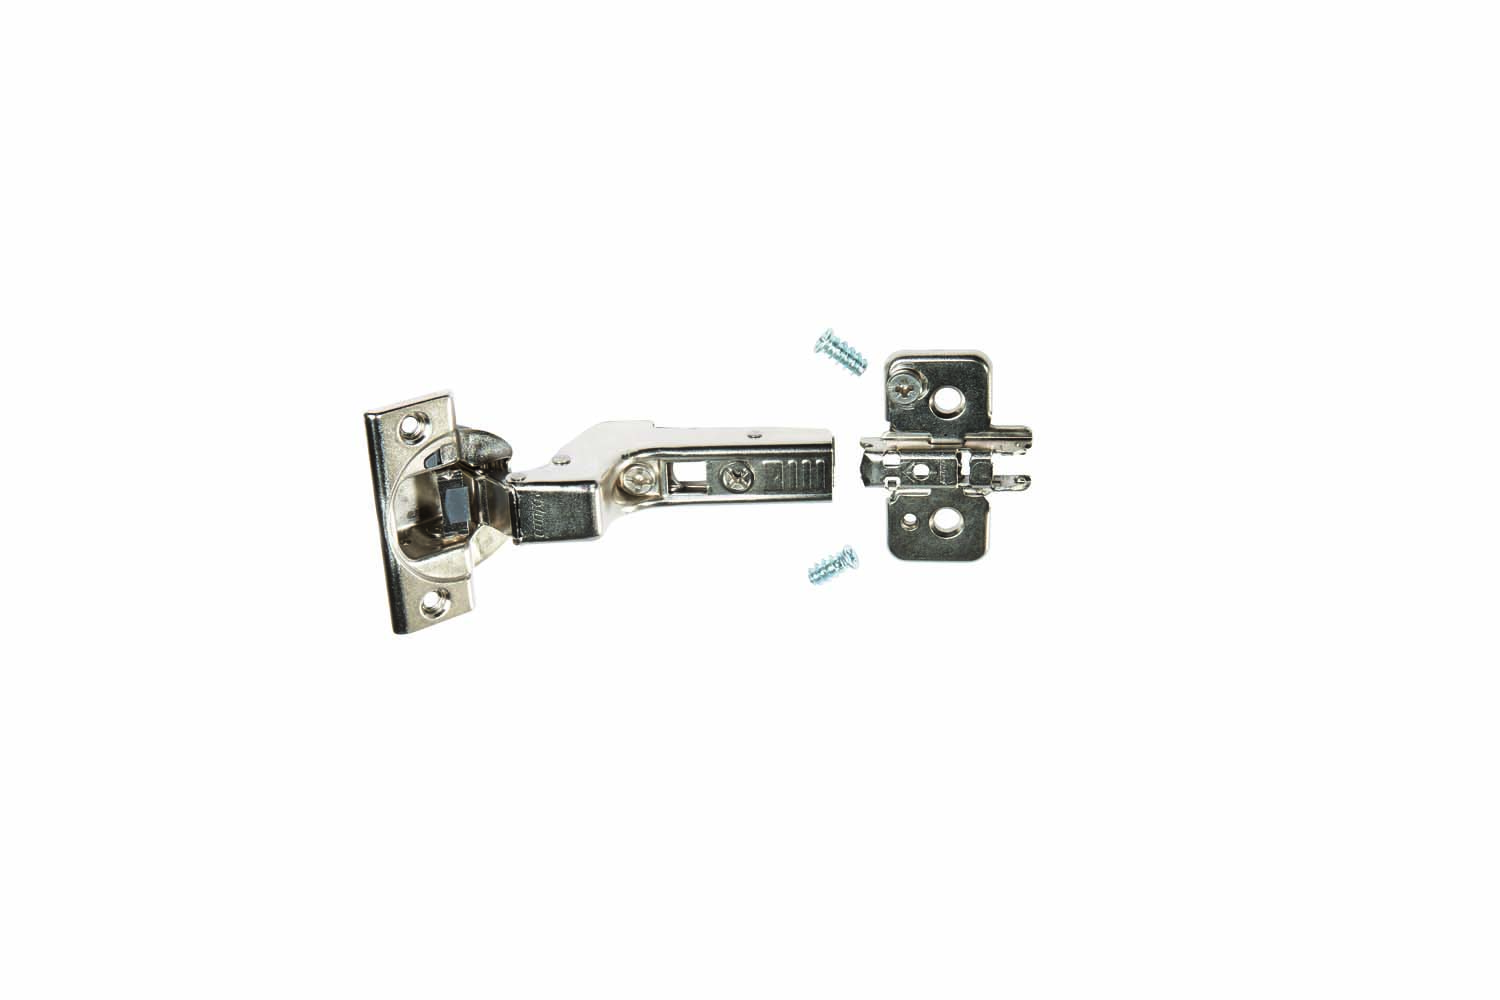
Two-part Euro-style hinges make it easy to install an inset door and adjust its fit in the opening. The hinge plates mount on the cabinet with Euro screws; the hinge cups mount on the door with #6 x 5/8″ flat-head screws. To install the door you just snap the hinge cups onto the hinge plates. Once the door is installed, adjustment screws on the hinge cup move the door up and down and side to side. An adjustment screw on the hinge plate moves the door in and out.
Also in this series: Kitchen Cabinet Essentials • How to Make a Cabinet Drawer Box • How to Install A Cabinet Drawer • How to Make a Cabinet Door • How to Install a Cabinet Door • Prefinishing Plywood
Fit the Door
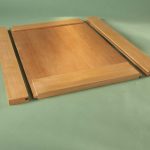
I always build inset doors to the same dimensions as the door openings and then trim them to fit, with even gaps all around. This helps to mitigate a few common issues. The ends of your glued-up doors may show joint misalignment and glue squeeze-out. Building the doors slightly oversize allows you to clean up the ends. More importantly, if the face frame openings aren’t perfectly square, the doors have extra material for trimming to match the out-of-square openings, so that the gaps are even. Trust me, everyone will notice if the gaps are uneven, but no one will notice if the door isn’t perfectly square. Industry standards allow gaps up to 1/8″, but I prefer smaller 3/32″ gaps.
Start by squaring the ends of the door, removing as little as possible from each end. Then trim the door to snugly fit the opening. First, joint one or both of its stiles until the door slips between the face frame’s stiles without binding. Then check the door’s fit: While holding one stile flush against the face frame, butt the door’s top edge against the face frame’s rail. If no gap appears, the door and opening are square.
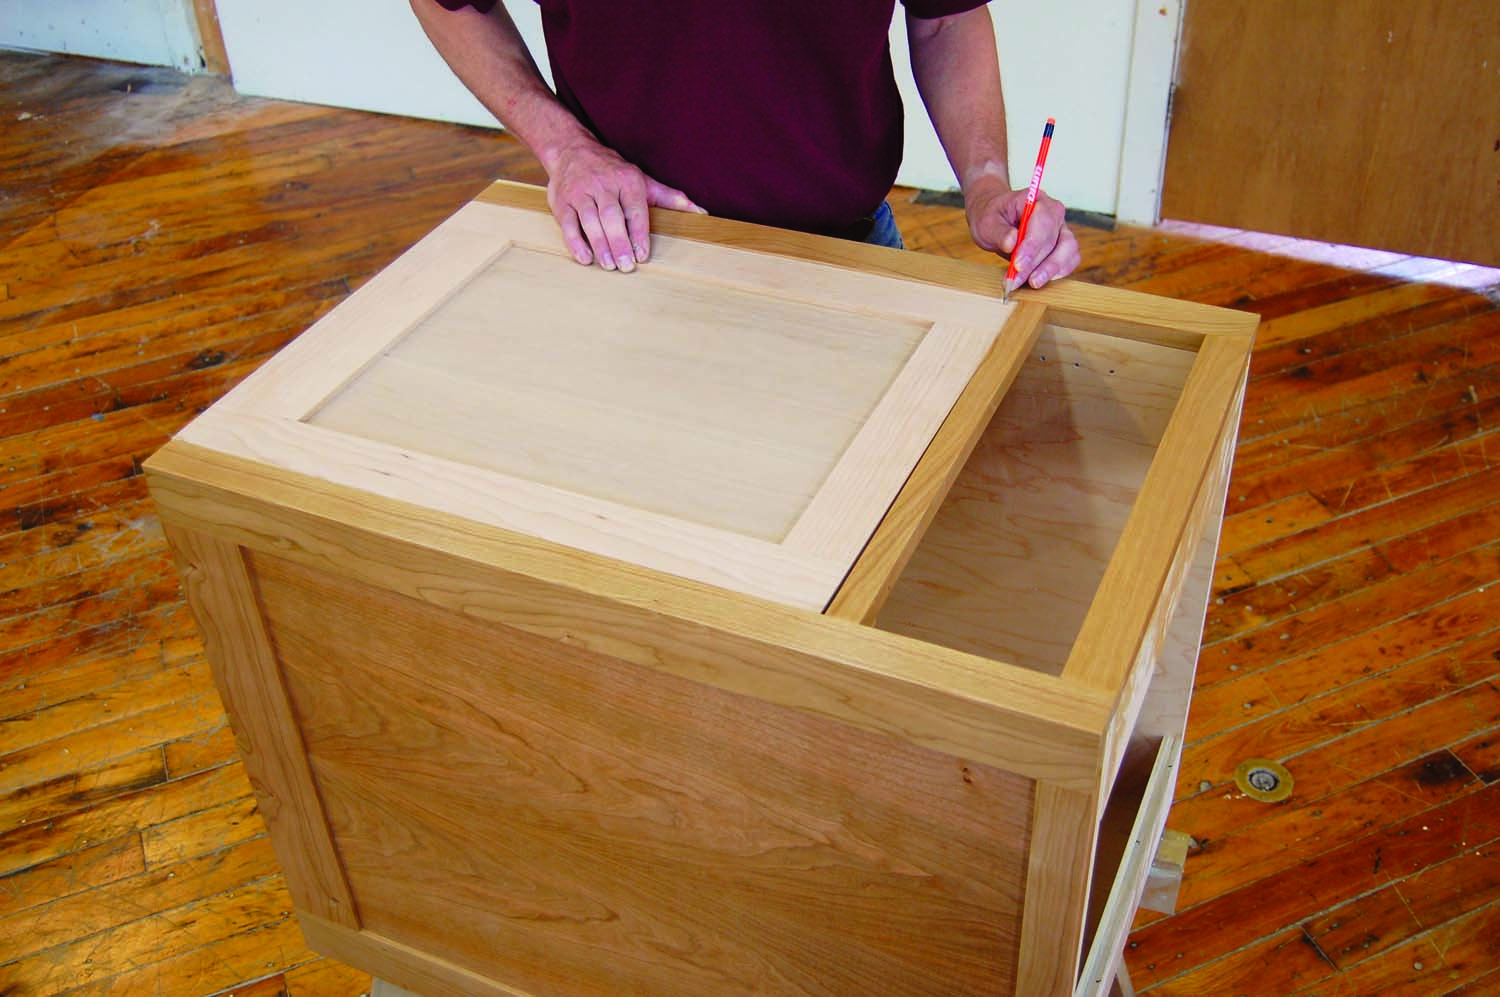
Photo 1. True an out-of-square door or face frame by tapering the door’s stile. In this case, making the stile narrower at the end being marked will eliminate the uneven gap at the top.
If an uneven gap appears—increasing in width from one corner to the other—you’ll need to trim the door to fit (Photo 1). Hold the door in position as before, with one stile against the face frame. Mark this stile for tapering. If the gap between the door and the rail appears above the stile, mark the taper to increase from 0″ at the top to the gap’s widest dimension at the bottom. If the gap appears above the opposite stile (as in the photo), lay out the taper in the opposite direction. For a gap that widens to more than 1/16″, taper both the stile and the door’s top end, removing one-half of the gap from each edge.
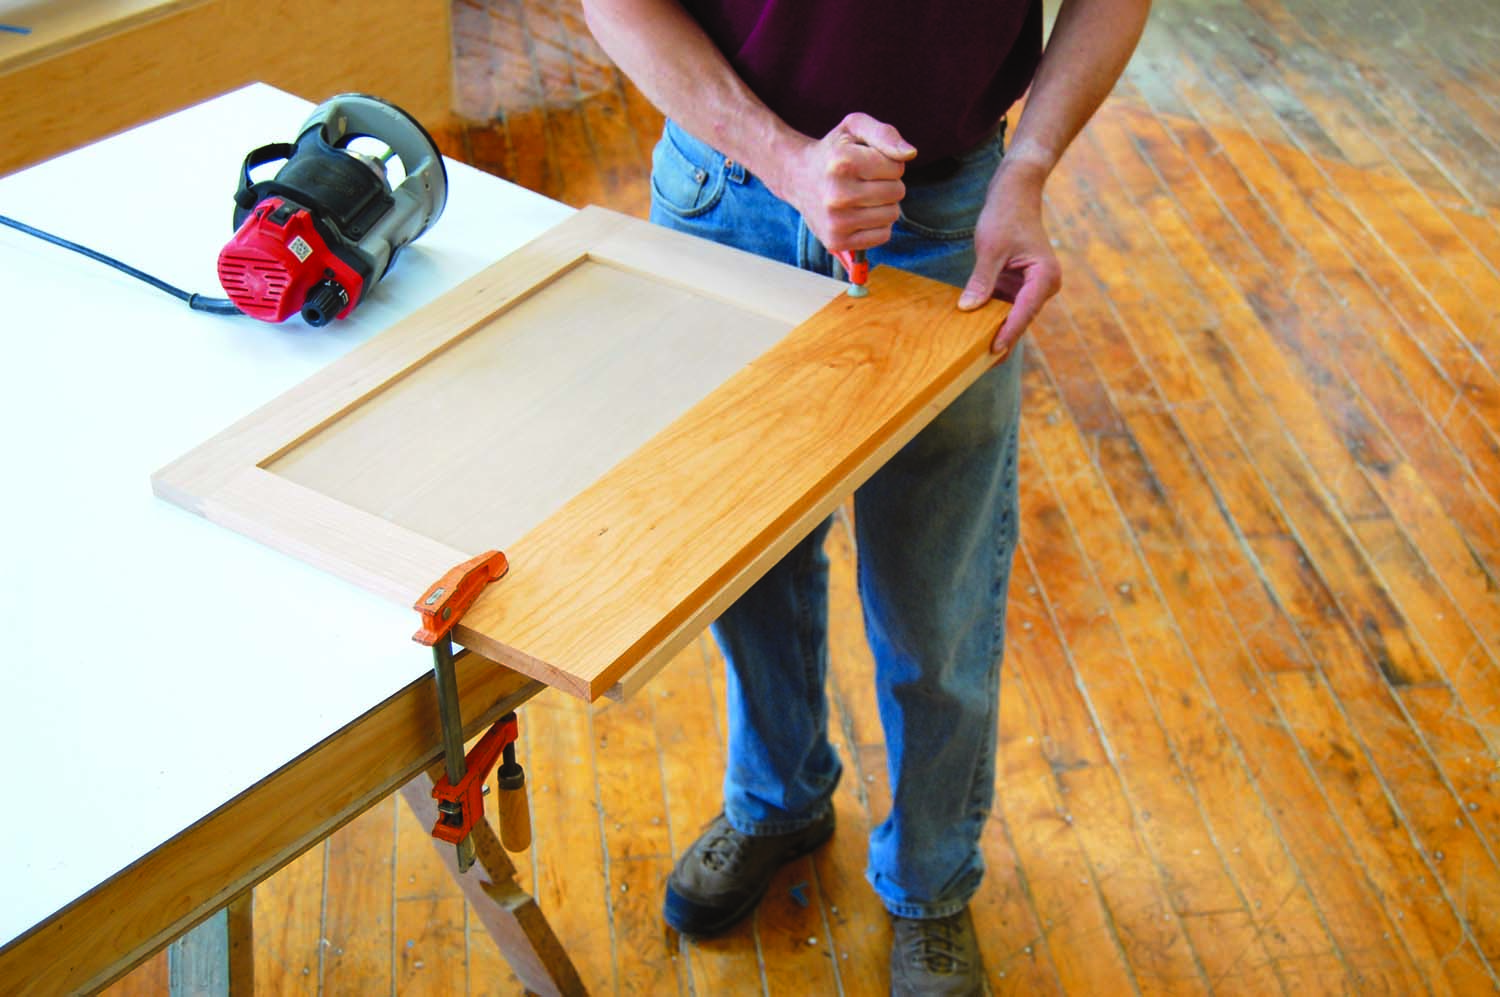
Photo 2. Taper the stile using a straight board and a flush-trim bit. Position the board so it’s offset by the width of the gap at the marked end and flush at the other end.
I use an edge sander to create the tapers, as is common in a production shop. But you can also cut them using a router with a flush-trim bit and a scrap board with a straight edge (Photo 2).
Once the door matches the opening, trim the door until all the gaps are 3/32″ wide. I use the jointer (set to remove 1/32″ or less) for trimming and 3/32″ thick spacers to verify that the doors are properly sized (see Lede Photo above).
Install the Hinge Plates
Euro hinges consist of a mounting plate (the “hinge plate”) and a hinge cup. Vertical adjustment is built into the hinge plate; side-to-side and in-and-out adjustments are built into the hinge cup. Hinge plates come in different thicknesses to allow “building out” the hinge if the inside of the cabinet is recessed behind the face frame. The construction method shown here allows using the standard (0) hinge plates, because the inside of the carcass is flush with the face frame. Mount the hinge plates in the appropriate 32mm system holes using 5mm x 13mm Euro screws. The 32mm system holes were drilled in the carcass sides prior to assembly; the Euro screws are designed to fit the system’s 5mm holes. Before mounting each hinge plate, make sure its vertical adjustment is centered.
Install the Hinge Cups
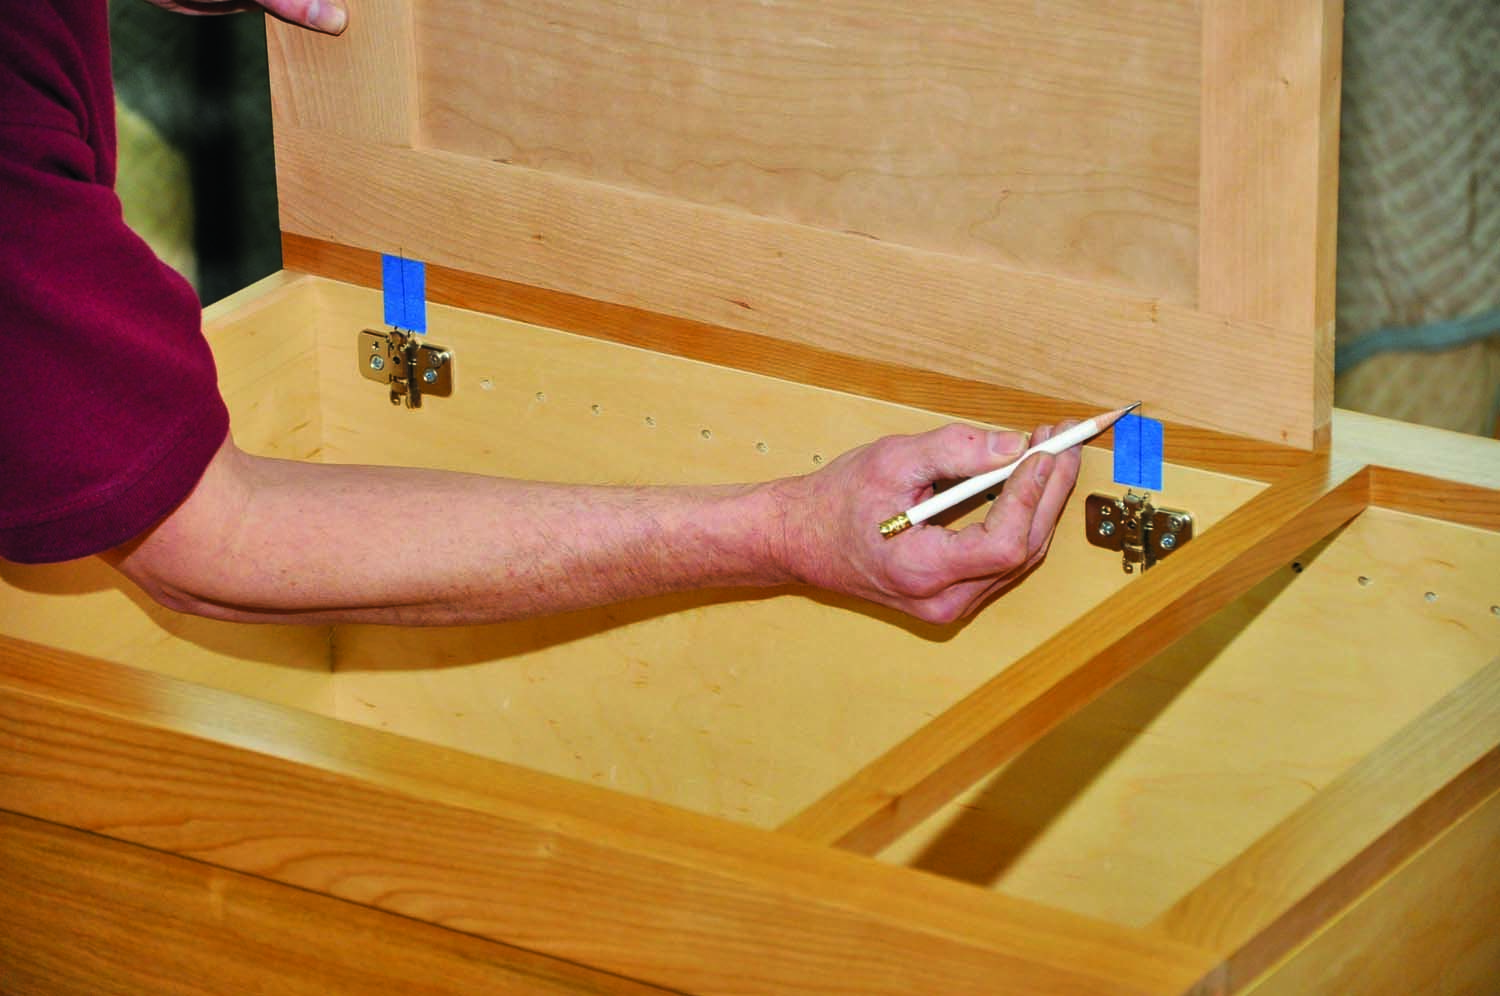
Photo 3. Locate drilling locations for the hinge cups on the door. Extend the hinge plate centerlines to the face frame. Then stand the door on edge, flush with the bottom of the face frame, to transfer the lines.
Most standard Euro hinge cups mount in a 35mm hole drilled into the door. This hole must be properly located for the hinge to function correctly and to ensure adequate adjustment in all directions. Use the center point of each hinge plate to transfer the hole locations to the door (Photo 3). Use a square to extend the line to the edge of the face frame stile. Make sure the door is flush with the bottom of the cabinet when you transfer the marks—this ensures the top gap will be correct. Use a square to extend the marks onto the door—they represent the center lines for drilling the hinge cup holes. To mark doors for top cabinets, simply center them between the face frame’s top and bottom rails.
Consult the hinge manufacturer’s instructions to determine the appropriate distance from the edge of the door to the edge of the hinge cup hole, based on the desired door gaps. Usually called the “tab,” this is the distance required to allow the hinge’s full adjustment. Note that this spec is measured to the edge of the hole, not to its center). For the Blum inset hinges shown here, the tab is 5mm.
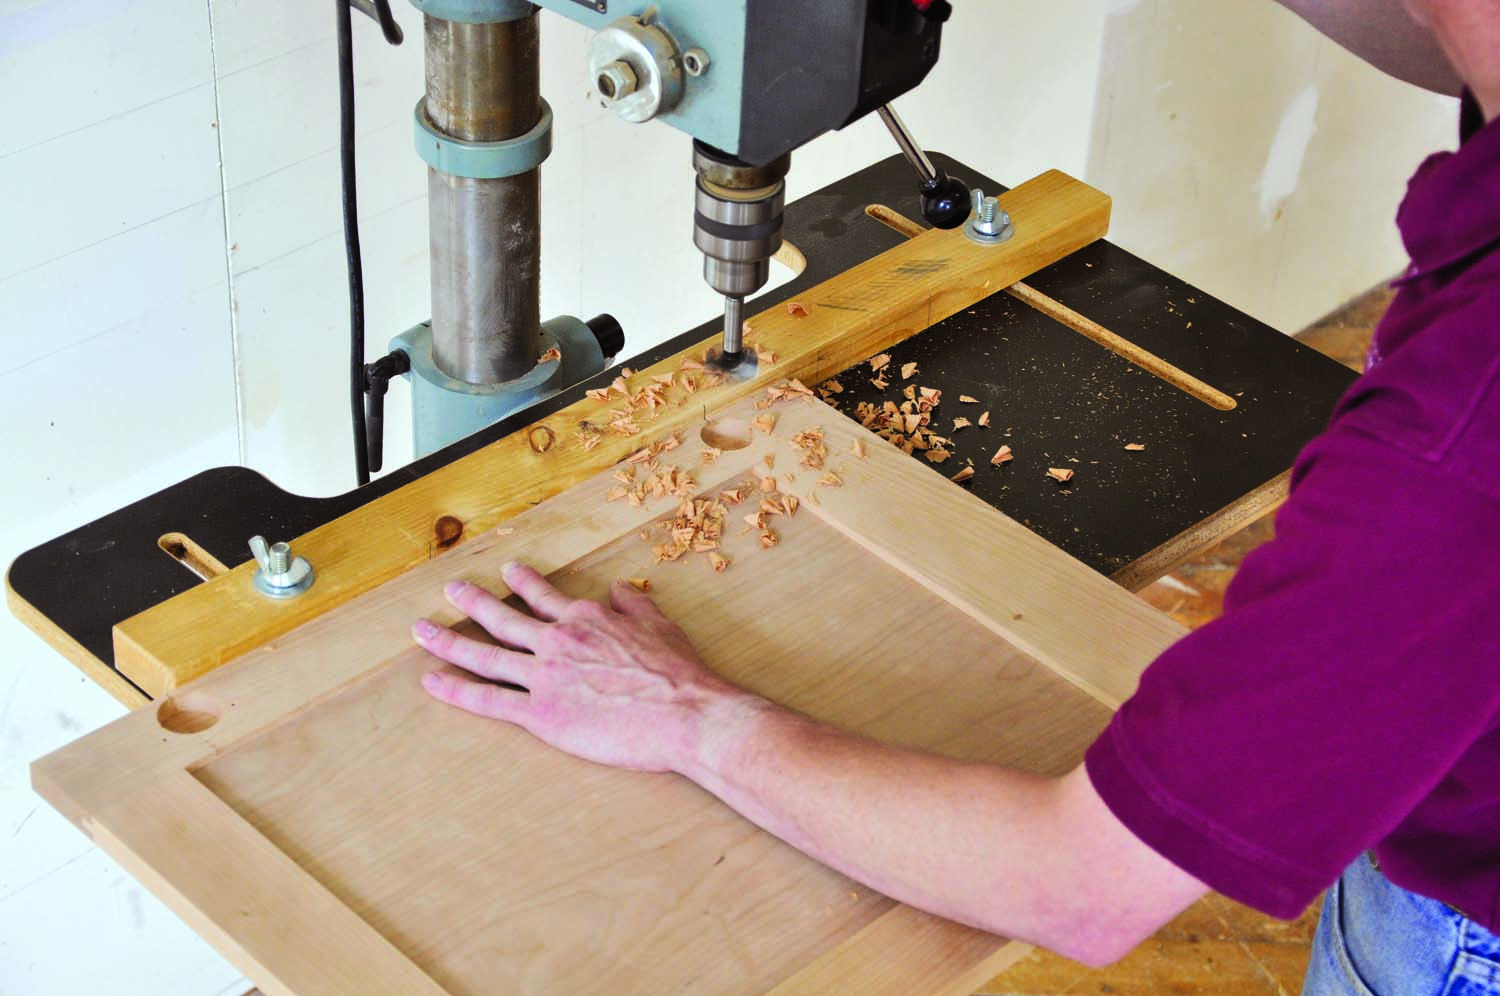
Photo 4. Drill holes in the door for the cup hinges. Align the lines you’ve drawn on the door with a line on the fence that marks the bit’s centerpoint
Install a 35 mm Forstner bit and set the fence the correct distance from the bit. Then index the fence at the bit’s center. With the machine off, lower the bit onto a piece of scrap until the bit’s center marks the wood. Without moving the scrap piece, use a square to transfer the mark to the fence (Photo 4). Now, simply line up the marks on the door with the index line on the fence and drill holes deep enough to fully seat the hinge cup (usually 1/2″ deep). I always drill a hole in a test piece, mount the hinge and test it on the cabinet to verify that there’s enough in/out and front/back adjustment before drilling the actual cabinet doors.
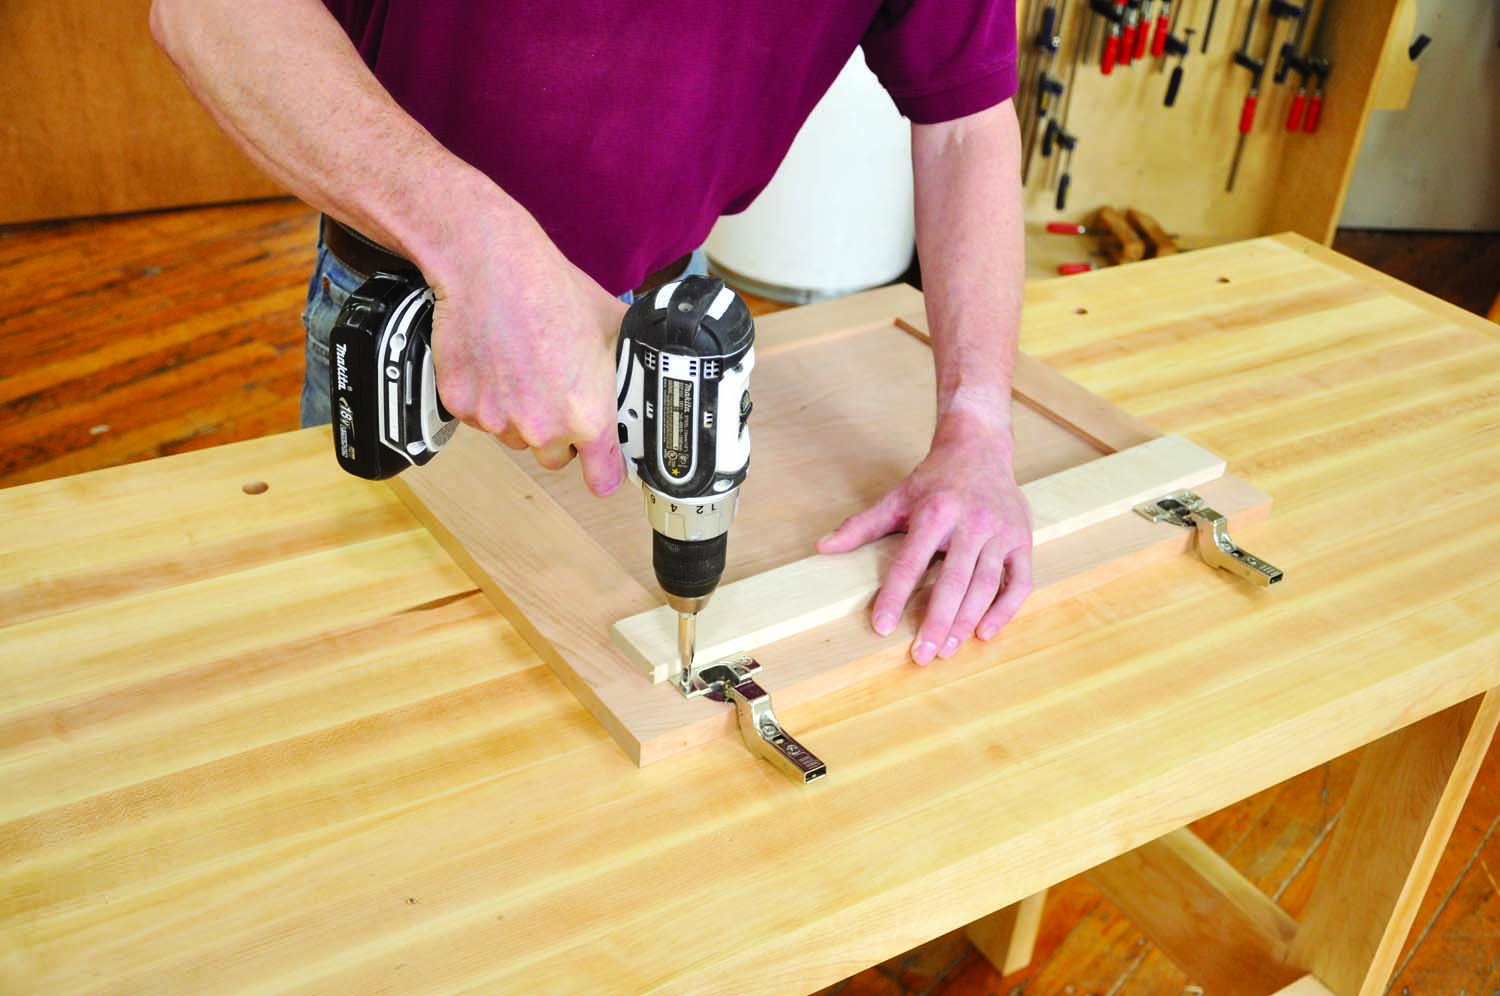
Photo 5. Install the hinge cups. Use a scrap board with a straight edge to align them parallel with the edge of the door.
After drilling the holes, mount the hinges using a straight piece of scrap wood to align them parallel to the edge of the door (Photo 5). Drill pilot holes for the #6 x 5/8″ mounting screws using a self-centering bit.
Mount the Door
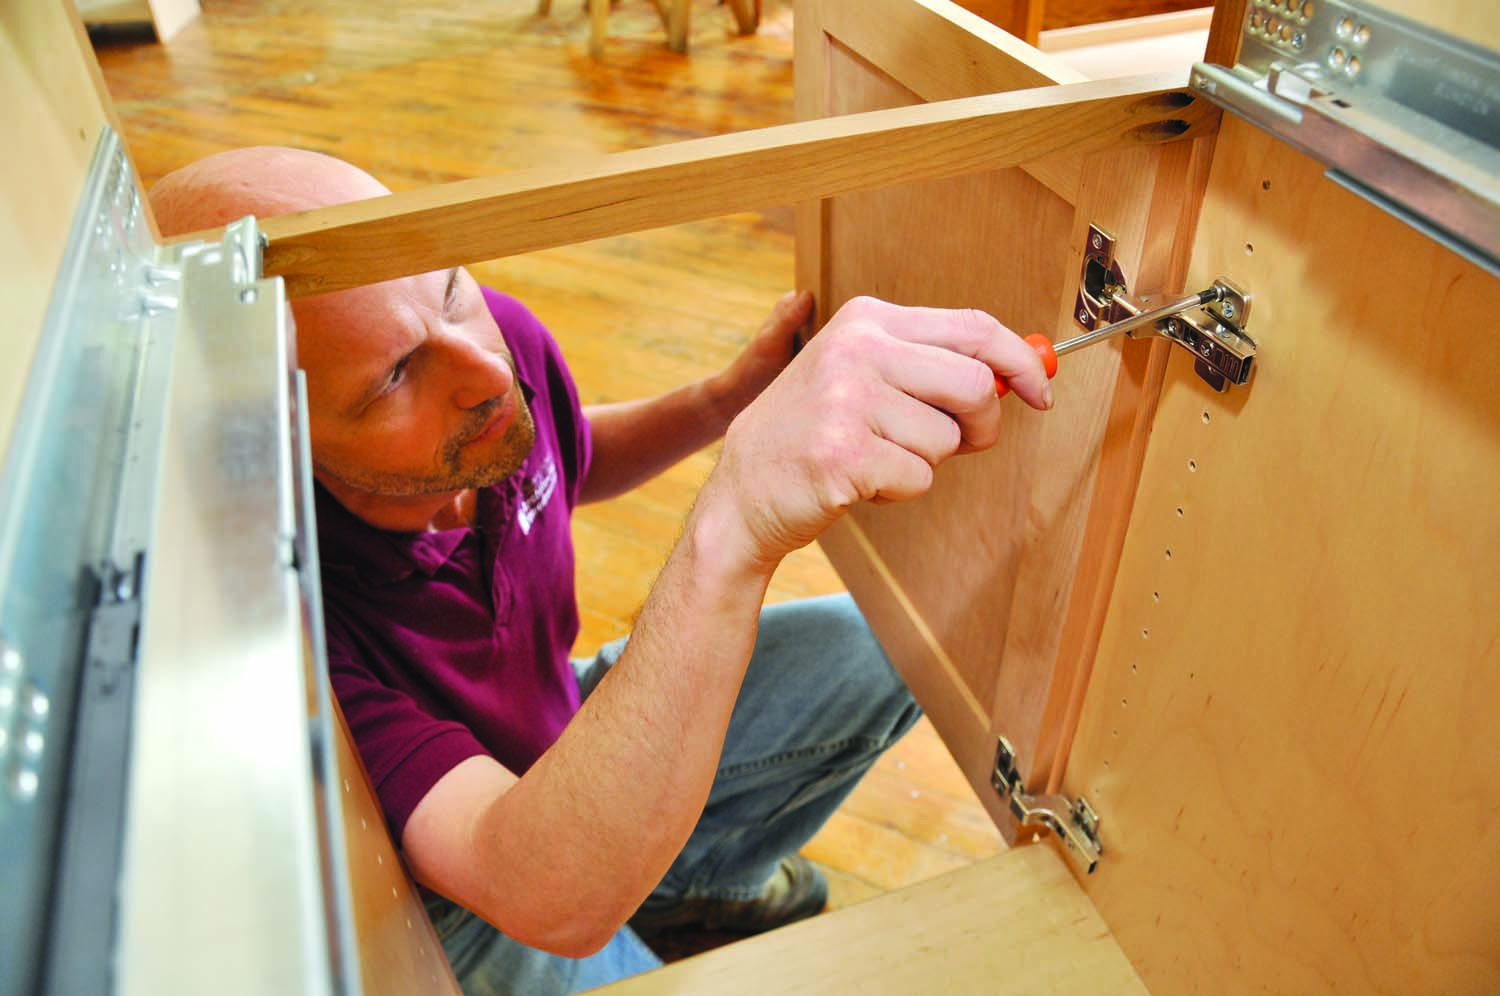
Photo 6. Fasten the door to the cabinet and adjust the fit. Screws on the hinge plate and hinge cup allow you to center the door in the opening by moving it in and out, up and down, and from side to side.
Clip the hinges onto the hinge plates and adjust the door’s fit (Photo 6). The up/down adjustment is on the hinge plate. The hinge plates shown here have a cam adjustment that moves the hinge up or down, so it’s easy to make fine adjustments Make sure to adjust both hinge plates. The side-to-side and in/out adjustments are on the hinge cup. Adjust as necessary until the gaps are even around the door and the door is flush with the face frame. The adjustment screws look like they have Philips heads, but they’re actually Posi-drive screws, so use a Posi-drive screwdriver to avoid stripping them.
Remove the hinge cups from the door for finishing. Mark the hinge cup and the hole in the door with the same number so that the hinge gets installed back in the same spot after finishing. This reduces the amount of re-adjustment you’ll have to do later.
Here are some supplies and tools we find essential in our everyday work around the shop. We may receive a commission from sales referred by our links; however, we have carefully selected these products for their usefulness and quality.