We may receive a commission when you use our affiliate links. However, this does not impact our recommendations.
 Heirloom Awl
 Heirloom Awl
Metal and wood are the basic ingredients in most woodworking tools. As woodworkers, we’re familiar with working wood, but what about metal? Actually, the level of metalworking required to make some woodworking tools is pretty basic. If you’ve never made your own tools, give this project a try. There’s something enormously satisfying about using a tool you made yourself.
 We chose the scratch awl for this article because it’s an everyday tool that’s easy to make. This project will teach you the basic principles of heat-treating steel and turning a wood handle with a metal ferrule. This awl will be the first milestone on your custom tool-making journey.
Note: This project involves metal grinding and working with an open flame, be sure to follow these basic safety guidelines:
- Thoroughly clean the work area of all wood shavings and dust before using the torch or grinding the steel.
- Keep a fire extinguisher on hand for emergencies.
- If possible, do the heat-treating outside.
- Wear eye protection for all grinding operations.
- Never use motor oil for the heat-treating process.
WHAT YOU WILL NEED:
- Fire extinguisher
- 1/8, 3/16 or 1/4” diameter drill rod in oil hardening steel
- Propane or Mapp gas torch
- Pint of olive oil
- Locking pliers
- 8-in. or 10-in. mill file
- Electric drill
- 10-in. Grinding disc mounted on 3/4-in. plywood or MDF backing.
- 2-in. x 2-in. x 4-in. piece of dry hardwood
- Copper plumbing coupling, brass or copper pipe, brass nut, or brass compression nut for the ferrule material
- Metal can with a lid
- Lathe tools: roughing gouge, detail gouge, parting tool, and optional skew chisel
- Scroll chuck • Sandpaper (usually 100, 150, 180 and 220)
- Jacobs style chuck for your lathe’s tailstock
- A drill bit that’s 1/64-in. larger than the drill rod
- Epoxy
- Optional; Tempilstik in 450 —500 degrees range
TURN THE HANDLE
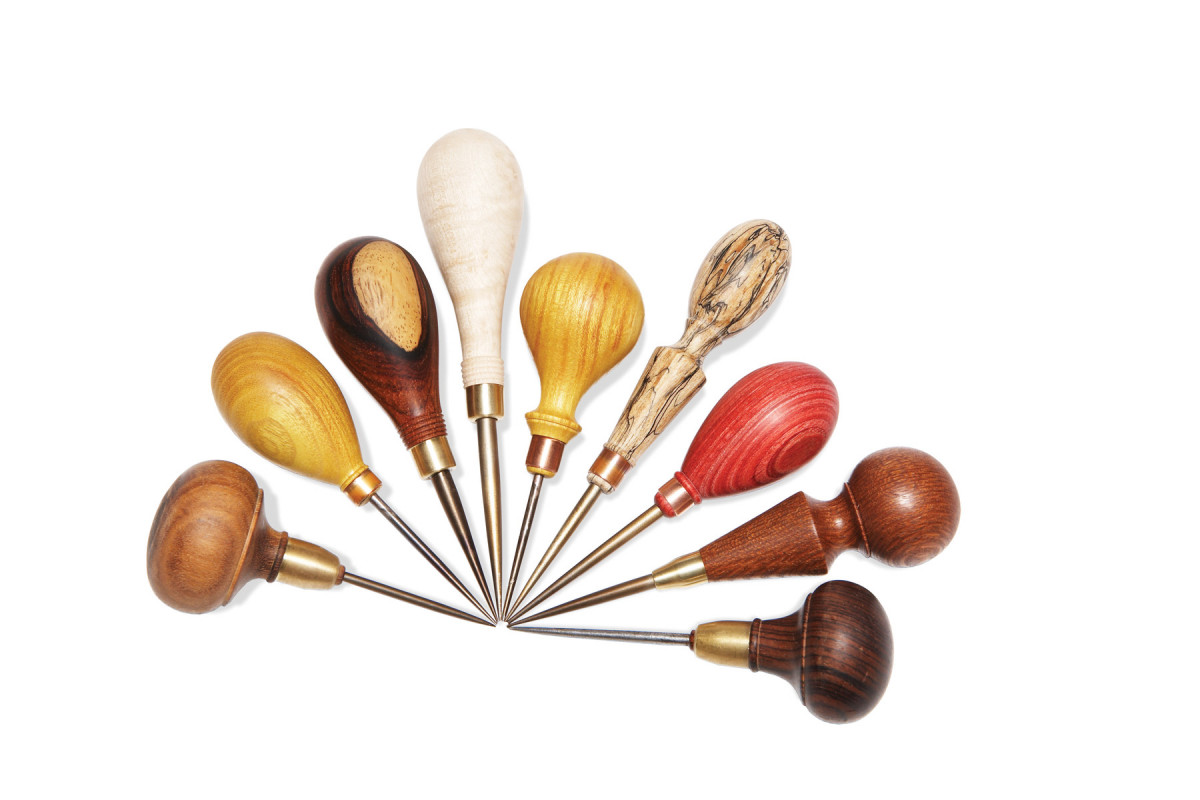
1. Round the handle blank and fit the ferrule on the end. You can use different materials for a ferrule; this one is a solid brass nut with a tapered end section.
Pick any strong hardwood for the handle: cherry, hard maple, oak, walnut, hickory, ash, rosewood, goncalo alves, purpleheart, etc. (Now, aren’t you glad you saved all those little pieces of really cool wood?) Determine the desired diameter and length of the handle. Be sure to allow for the length of the ferrule.
Mount the wood into the scroll chuck and create a cylinder with the roughing gouge.
With the parting tool, cut a small cylinder on the end to fit the metal ferrule (Photo 1). Take care to achieve a tight fit. The ferrule stock can be a copper coupling (1/4-in. to 1/2-in. depending on the look you desire), brass nuts, brass, or copper pipe. If you’re using a brass nut, simply thread it onto the wood.
2. Rough-in the basic shape of the handle with the detailing gouge. The shape and size of the handle are up to you.
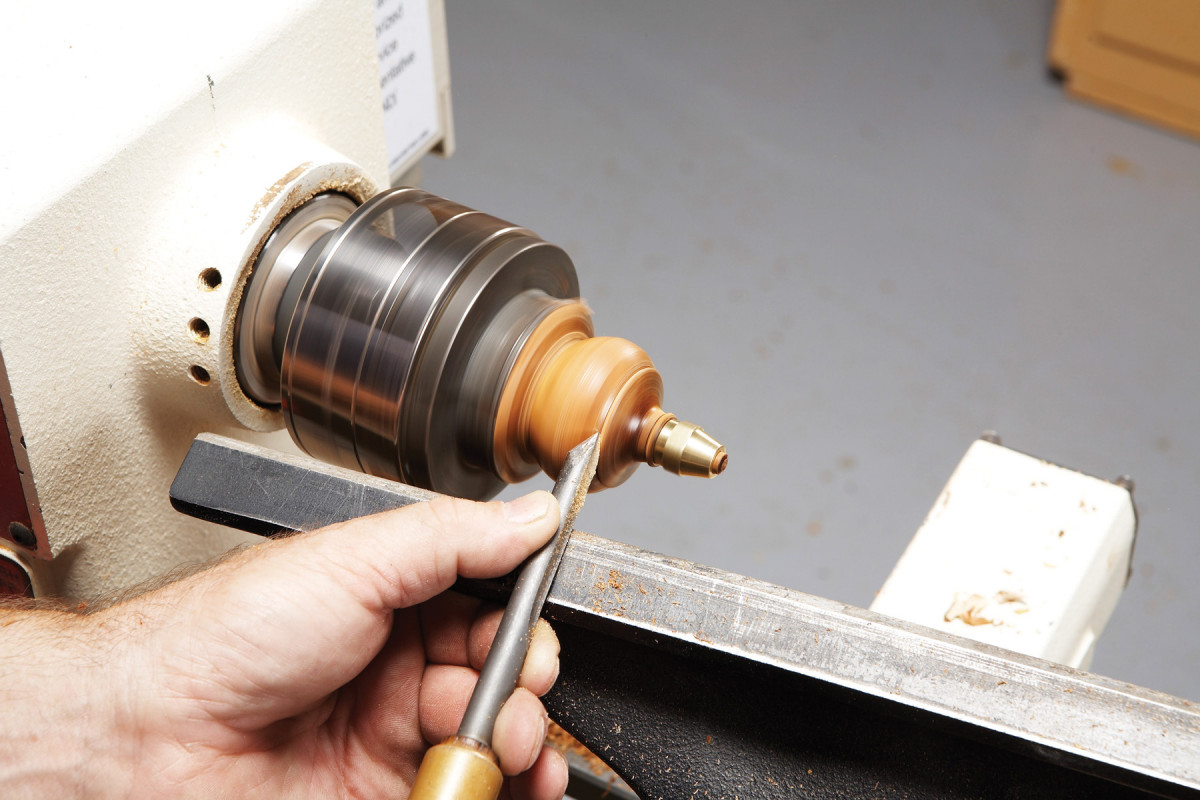
Shape the handle with the detail gouge or skew chisel (Photo 2). The possibilities are endless and depend on the handle style, the size of your hands, and whether the tool is meant for delicate or heavy service. I seldom make any two the same. Take the opportunity to add your own fine detailing to distinguish your awl from production versions. When satisfied with the shape, finish sand to 220-grit.
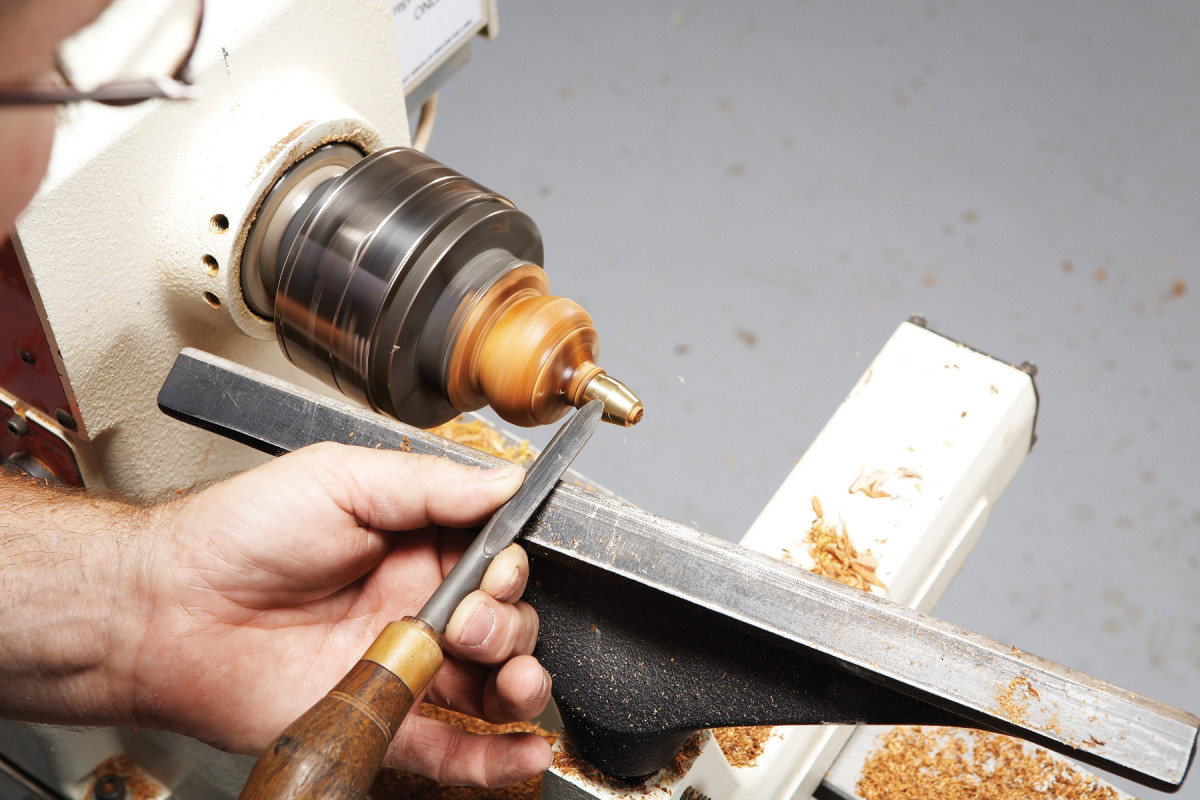
3. Turn away the flats of the nut and shape the ferrule with a detailing gouge. Cutting brass and copper on the lathe is similar to cutting wood. However, take light cuts.
Shape the ferrule with the gouge (Photo 3).
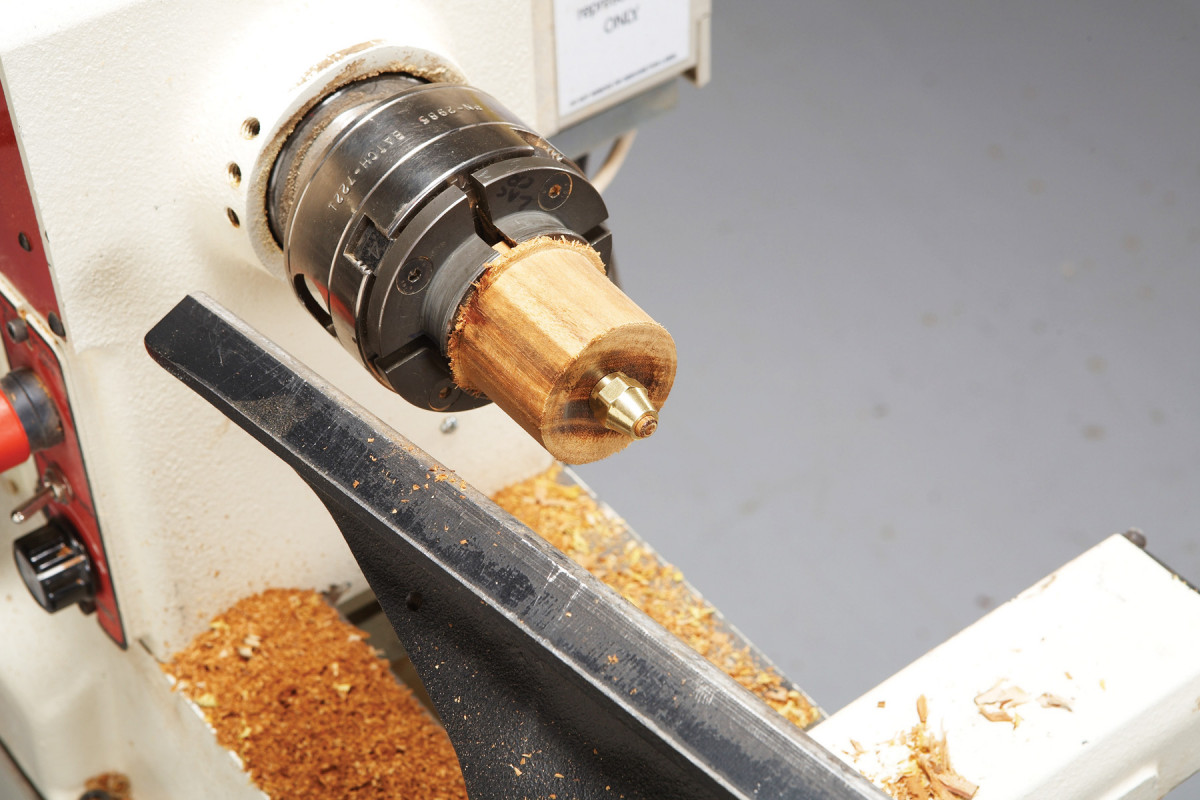
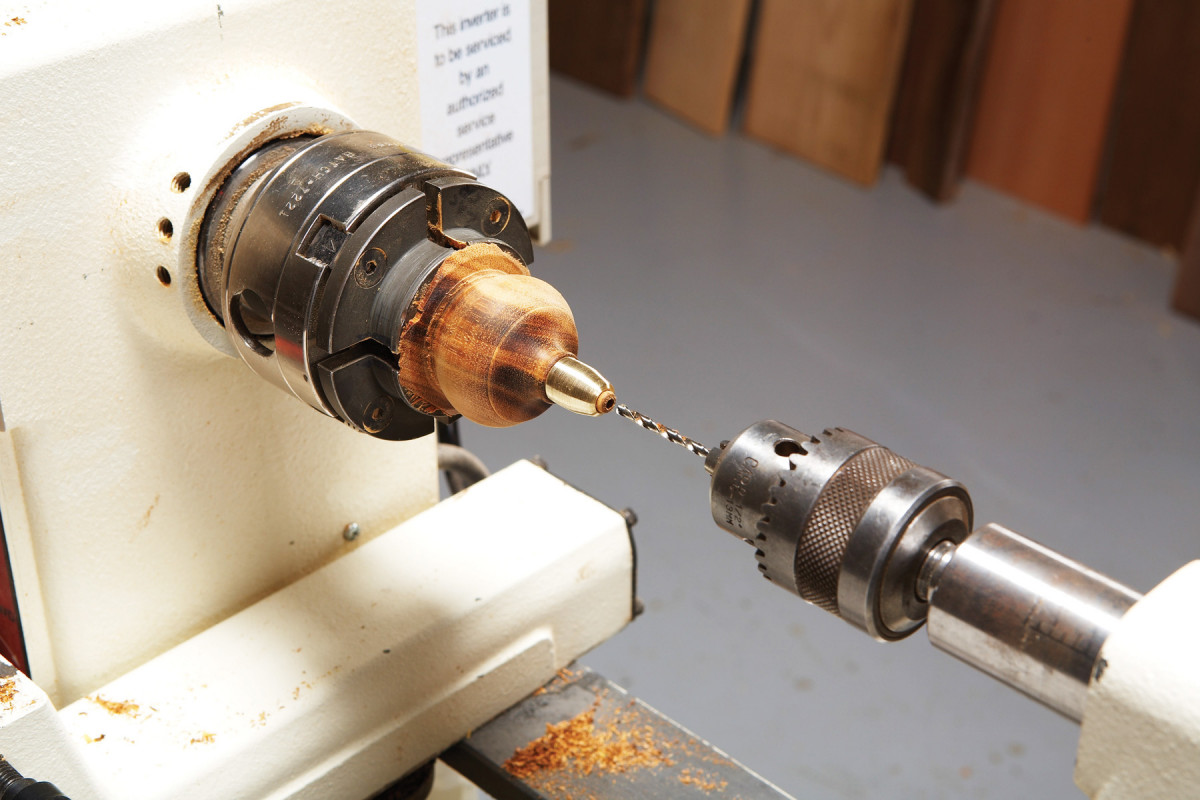
Use a Jacobs chuck to drill a 1-1/2-in. (minimum) deep hole for the steel shaft (Photo 4).
Part the handle off the chuck and hand sand the end. You can leave the handle unfinished or use a drying oil.
MAKE THE STEEL SHAFT
4. Drill the hole to accept the steel drill rod. Use bits 1/64-in. larger in diameter than the drill rod to allow room for the epoxy.
Drill rod is too soft to use as a tool. On the other hand, soft steel is easy to work so we’ll leave it that way for now and tackle the hardening later.

5. Make the awl’s steel shaft from a piece of drill rod. Cut it to length using a hacksaw.
Cut the drill rod with a hacksaw to the desired length of the awl shaft (Photo 5). I normally use 3- in. to 6-in. lengths. Choose a length and diameter that fits the desired look of the awl.
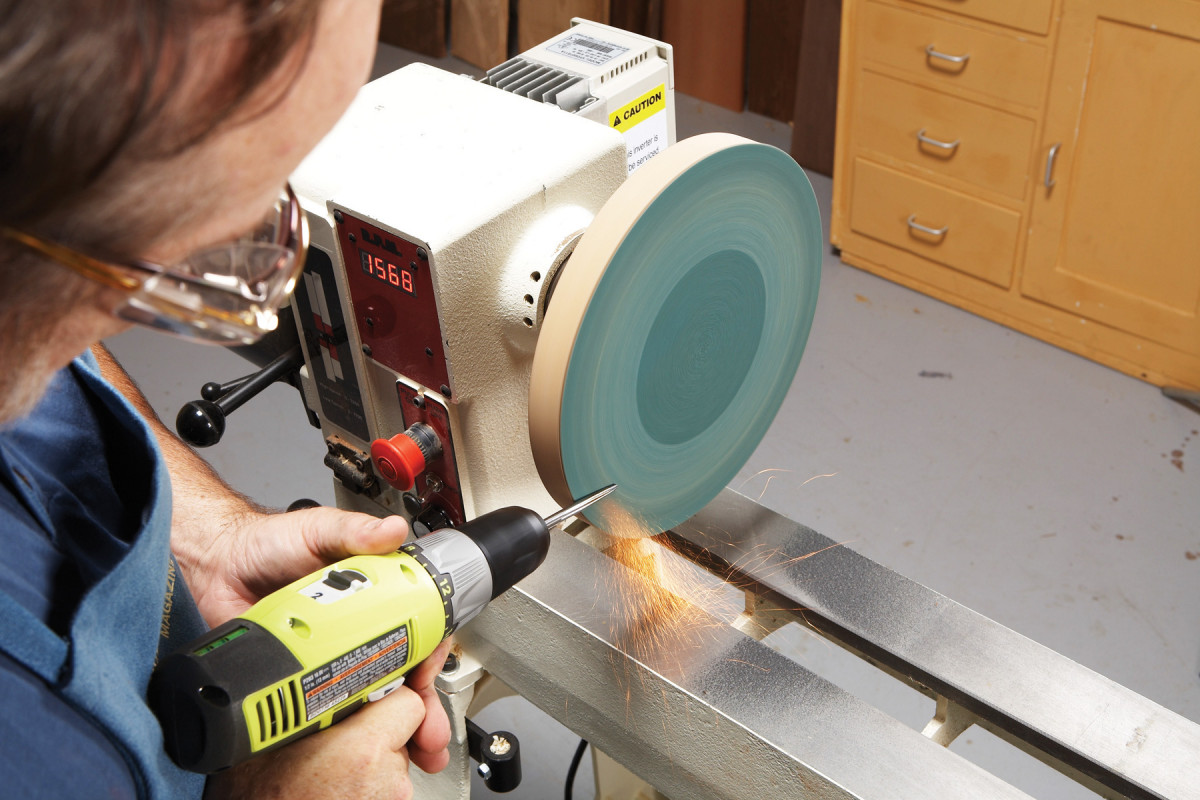
6. Shape a tapered point on the shaft using a drill and a lathe mounted abrasive disc. With the drill running, grind the point on the near lower quadrant of the spinning disc. Wear eye protection!
To shape the point on the business end of the shaft, first chuck it in a drill. Then, run the drill as you hold the shaft against a spinning lathe mounted grinding disc (Photo 6). Run the lathe at low to medium speed (400 to 800 rpm).
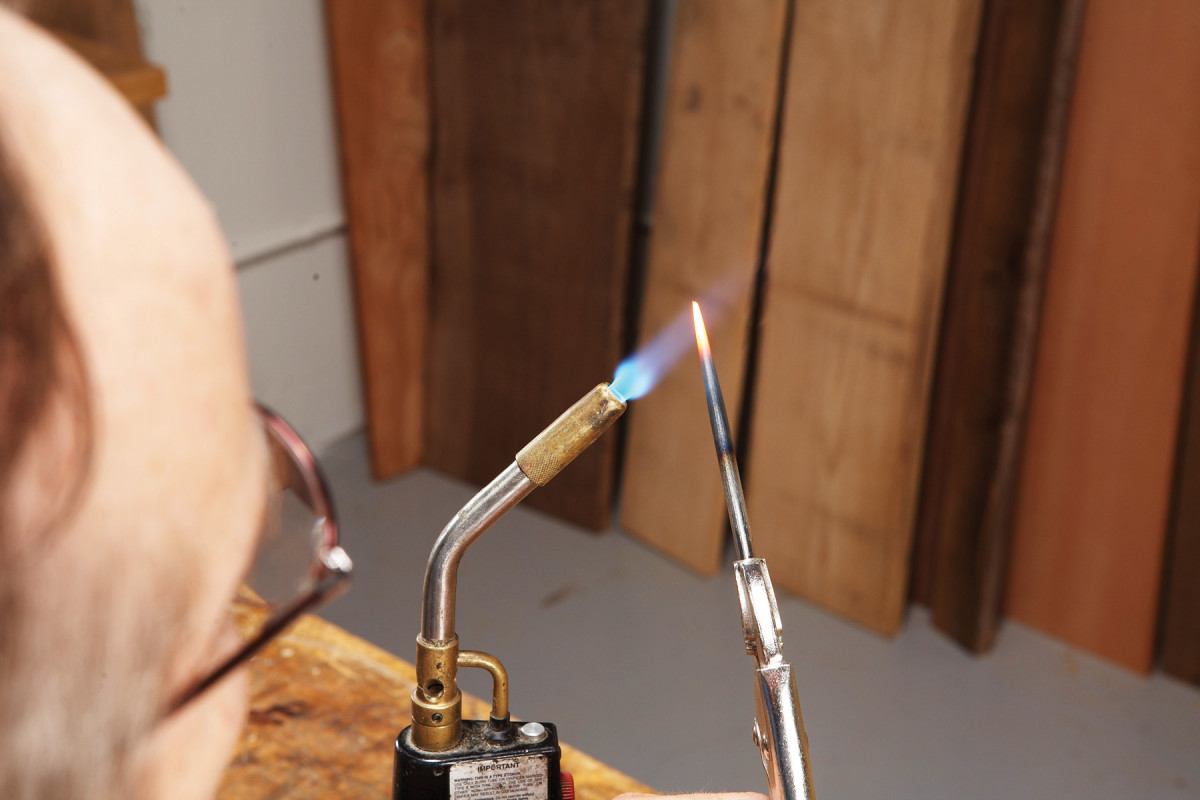
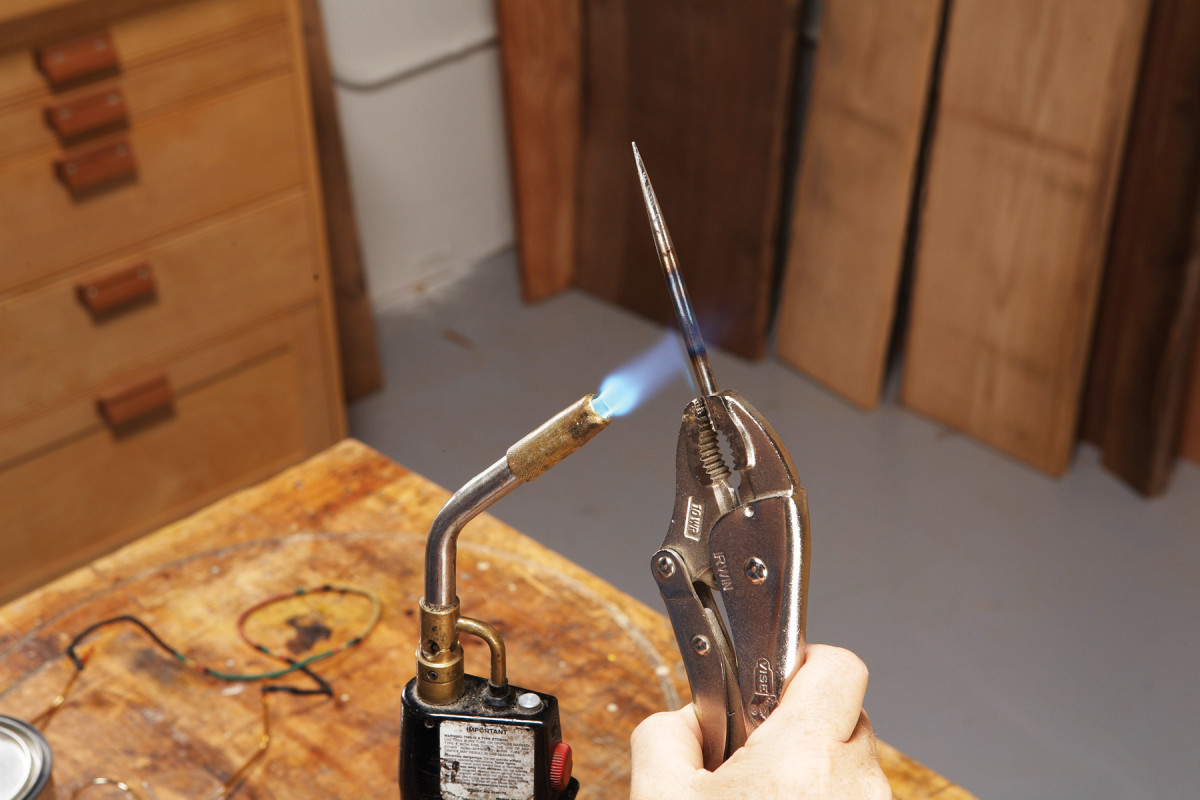
7. Harden the shaft by heating the pointed half to an even cherry-red color. Hold the shaft in a pair of locking pliers.
Don’t try and put a delicate point on the steel at the stage. It will just get burned off in the heat-treating process. And don’t worry if you “blue” the steel at this juncture as overheating is only a concern once the steel is heat-treated.
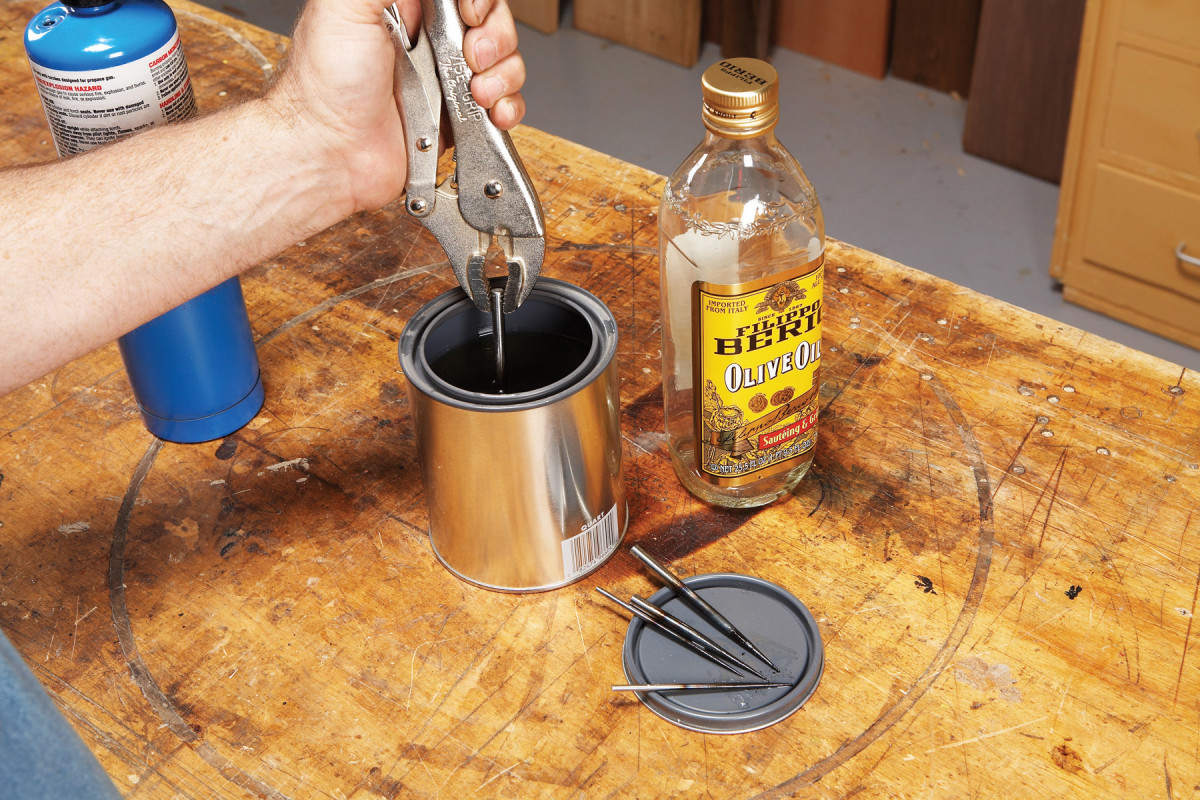
8. When the steel is evenly bright red from the point to the middle, quickly quench and stir it in a can of olive oil.
Get the torch and can of olive oil ready. With the shank held in a pair of locking pliers, fire-up the torch and apply heat to the steel. Twirl the rod as if you were slow cooking a marshmallow (Photo 7). Try for an even, bright cherry-red color from the middle to the point, then quickly dunk the hot steel into the olive oil and agitate rapidly for about 30 seconds (Photo 8).
Note: Never use motor oil for this as it gives off noxious fumes and can even ignite.
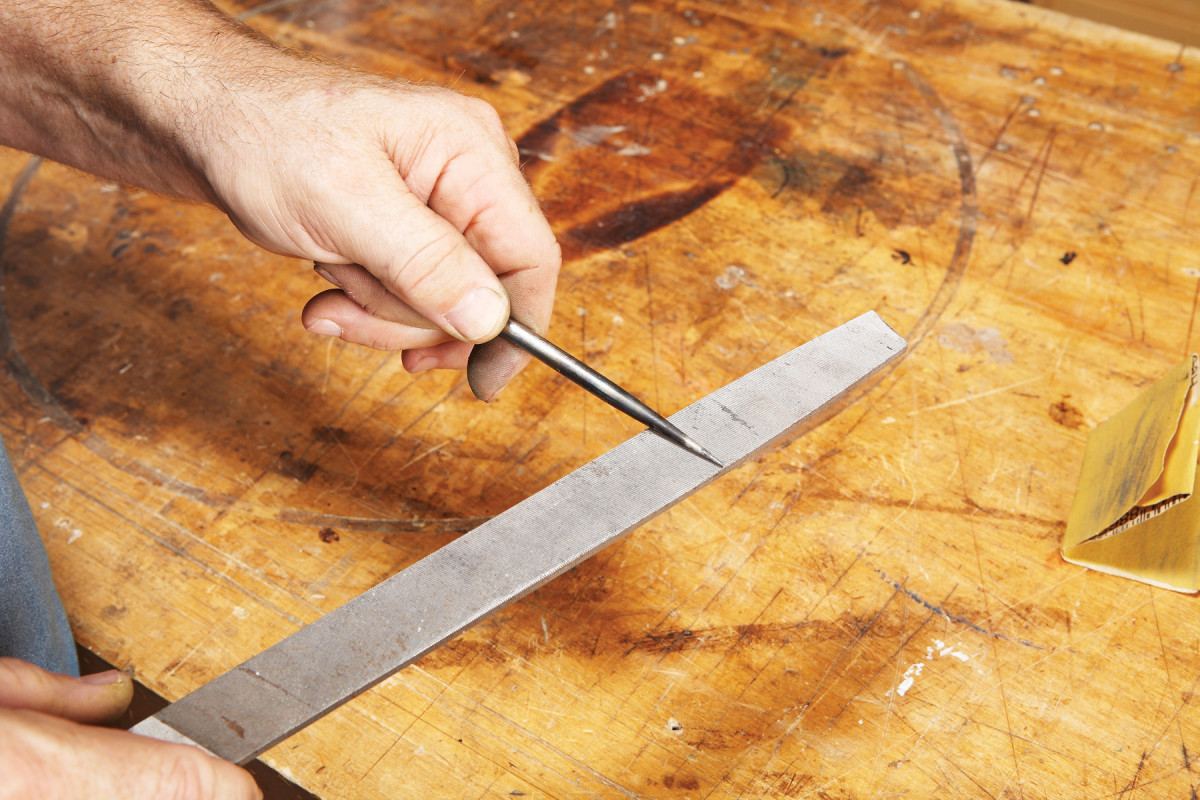
9. Test the hardness of the shaft by running it along a file. The hardened part should skate off the file, not bite in.
Use a mill file to test the shank tip hardness (Photo 9). If the steel does not pass the file test, reheat and quench again.
10. Sand the steel to a bright, clean surface with 220-grit paper. Wash it with soap and water to remove oil residue first.
Hand-sand the shaft to achieve a clean bright surface (Photo 10).
The second phase of heat-treating is called tempering. This is where the degree of final hardness is established. Tempering involves reheating the hardened area to a specific temperature, then quenching it immediately in water. The higher the temperature the softer the shaft will be. As the end user, you are free to determine the degree of hardness you want in your tool. You may want an awl that is very hard and can scratch deep lines in hard wood. The down side is a very hard shaft will have a brittle point that’s prone to breaking. At the other extreme you can temper the shaft so the point won’t break but it may bend so easily that the awl becomes useless. I suggest making a couple of awls, each tempered to different temperatures to see what best fits your needs.
The tempered “sweet spot” for my awls is a temperature around 450 to 500-degrees. There are three ways to achieve this:
11. Temper the shaft with a torch held just below the heat-treated area. Keep the flame there and rotate the shaft until the hardened area is a uniform dark gold or bronze color. Then, quickly quench it in water.
Heat the steel slowly with a torch well back of the hardened area (Photo 11). When the hardened area turns a gold or bronze color, quench immediately in water to stop the process.
Use a temperature-indicating substance such as Tempilstik. Choose a Tempilstik that fits your desired heat range. Rub the area around the point with the wax-like stick. Then, heat the shaft as described in option A. When the steel reaches the desired temperature, the Tempilstik will smoke and liquefy. At this point, quickly quench the shaft in water.
The easiest, but slowest method is to bake the steel in a conventional oven for about 30 minutes at 450-degrees. Be sure to preheat the oven and place the steel on a cookie sheet. Elevate the steel with rolled up pieces of aluminum foil so it will heat evenly. Remove the steel from the oven and let it cool. There’s no need to quench a shaft that’s been cooked in an oven.
WOOD + STEEL = AWL DONE
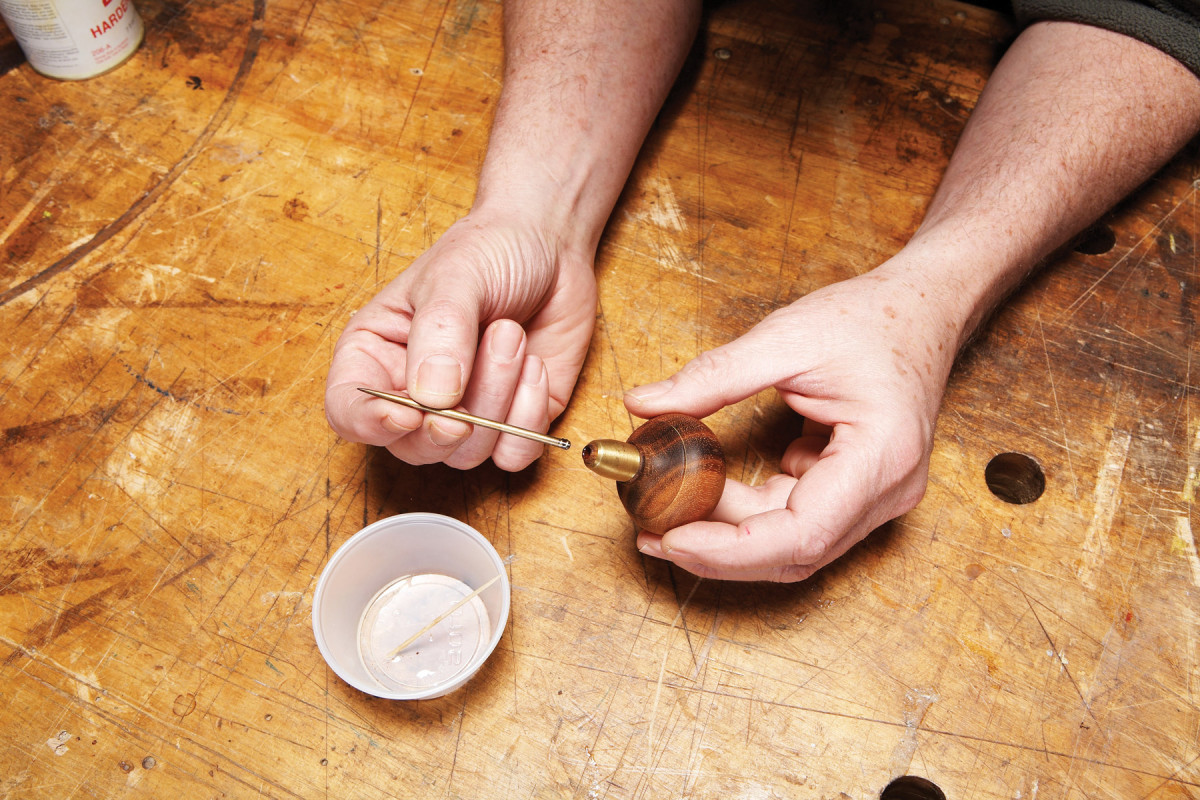
12. Set the shaft in the handle using a bit of slow set epoxy. Put the epoxy in the hole with a toothpick. Rotate the shaft a bit as you push it in to evenly distribute the epoxy.
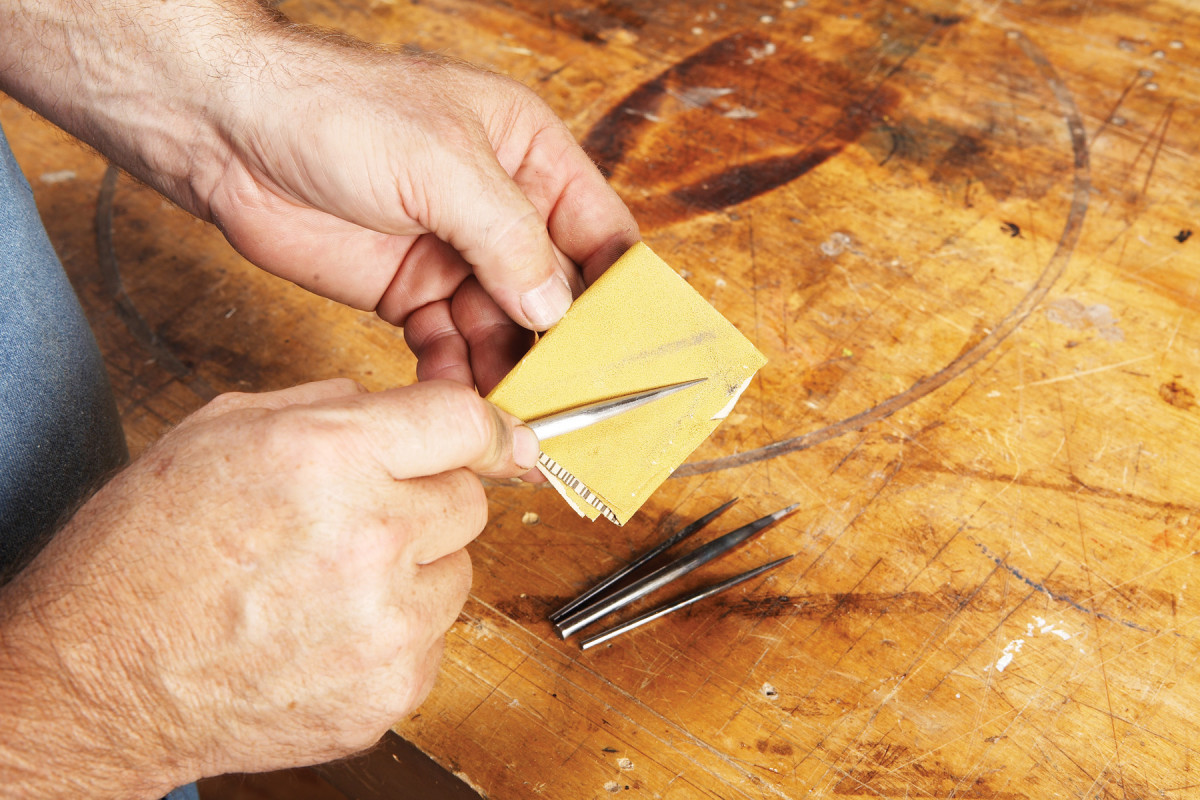
If you need a sharper point on the awl, place it back in the drill and lightly shape the tapered area on the disc mounted on the lathe (use a finer grit for this, such as a 150 or finer). Do this slowly, as bluing the point may make the tool too soft for your purposes.
Mount the steel in the handle (Photo 12). I put a small amount of epoxy down in the hole, and then push the handle down over the steel with the point in a scrap piece of wood. Use the awl for a while; you may find you want one harder or one more flexible—you decide based on your tempering temperatures.
Here are some supplies and tools we find essential in our everyday work around the shop. We may receive a commission from sales referred by our links; however, we have carefully selected these products for their usefulness and quality.