We may receive a commission when you use our affiliate links. However, this does not impact our recommendations.

The reciprocating motion of a pole lathe makes it possible.
My mind reels when trying to imagine what it would be like to be a woodworker in the era when the lathe was being developed. This was well over 3,000 years ago. Historians say the lathe is a direct descendant of the potter’s wheel, which was developed more than 7,000 years ago. And it was most likely inspired by the drop spindle, a simple tool for spinning raw wool into yarn that was in use 12,000 years ago.
I can’t help but be reminded of the concept of the Axis Mundi (or Cosmic Axis) when thinking about how these tools that involve an axis weighed upon the minds of the people using them. Staring at a spinning object for hours on end must have had a profound effect: a technological advance that both creates new objects never seen before, and does it through a process that also shapes the way we think and see the world.
Early lathes reciprocated, and so it was only a matter of time before craftsmen inspired by the motion of the pole lathe began to turn handled cups.
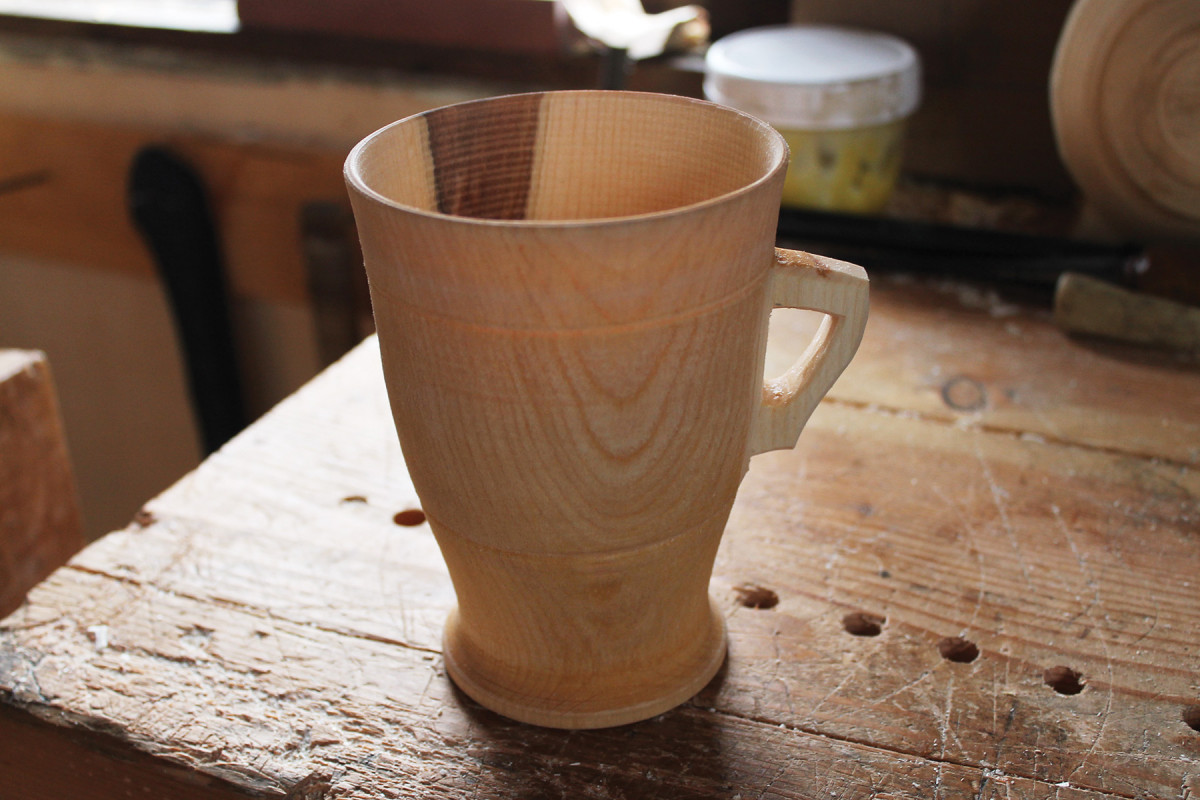
The Irish lamhog is one of the only examples of such a turned cup with an integral handle. It is a downward tapering vessel with a flared foot or base. It is turned end grain, which means the long fibers of the tree are running from the base to the tip of the cup and many, believe it or not, still with the pith in.
Lamhogs were made on pole lathes from the 16th century well into the 20th century and used as drinking vessels in inns and taverns in Ireland as well as exported to the west country of England.
These cups are a technical feat, and many of the examples we have today show very fine lines and sexy curves.
When the pole lathe was replaced by the continuous motion lathe, the form could not be made any longer so it fell into obscurity (though they show up every now and again on some of the online antique auction houses in England).
There is not a lot of information on these beautiful and skillfully made handled cups, save for limited mention in a few of the classic books on treen and a thesis study I’m still trying to track down.
Other Turned Handled Forms
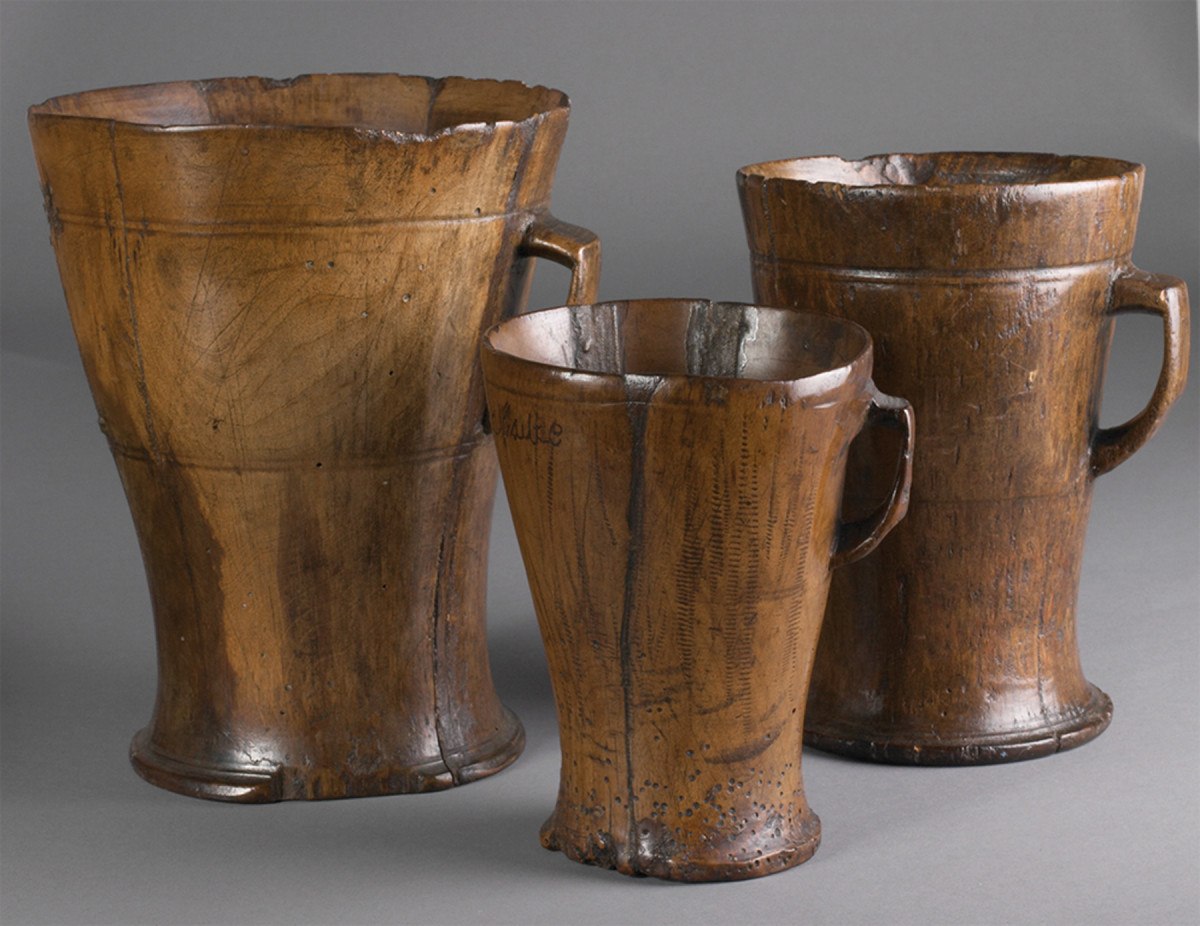
Lamhogs. A lamhog can only be turned on a reciprocating, or pole, lathe – the continuous motion of a modern electric lathe precludes an integral handle. These examples are from the 17th or 18th century.
Another type of handled drinking vessel, from Sweden, is called a snibbskål or “eared” bowl. Of this style, there are two types. Both are turned from tangential split wood, meaning the heart of the tree is parallel to the rim or base of the vessel.
One type of bowl is turned with a ring of wood that remains lower than the rim and is later removed, save for the handles at each side of the vessel. This type is fairly small with a truncated shape and upturned handles.
The other type has a ring of material that is left at the rim of the bowl and not turned at all. This actually leaves a square-shaped border of material when viewed from above. The protruding corners of this square act as handles that often times were carved to various shapes.
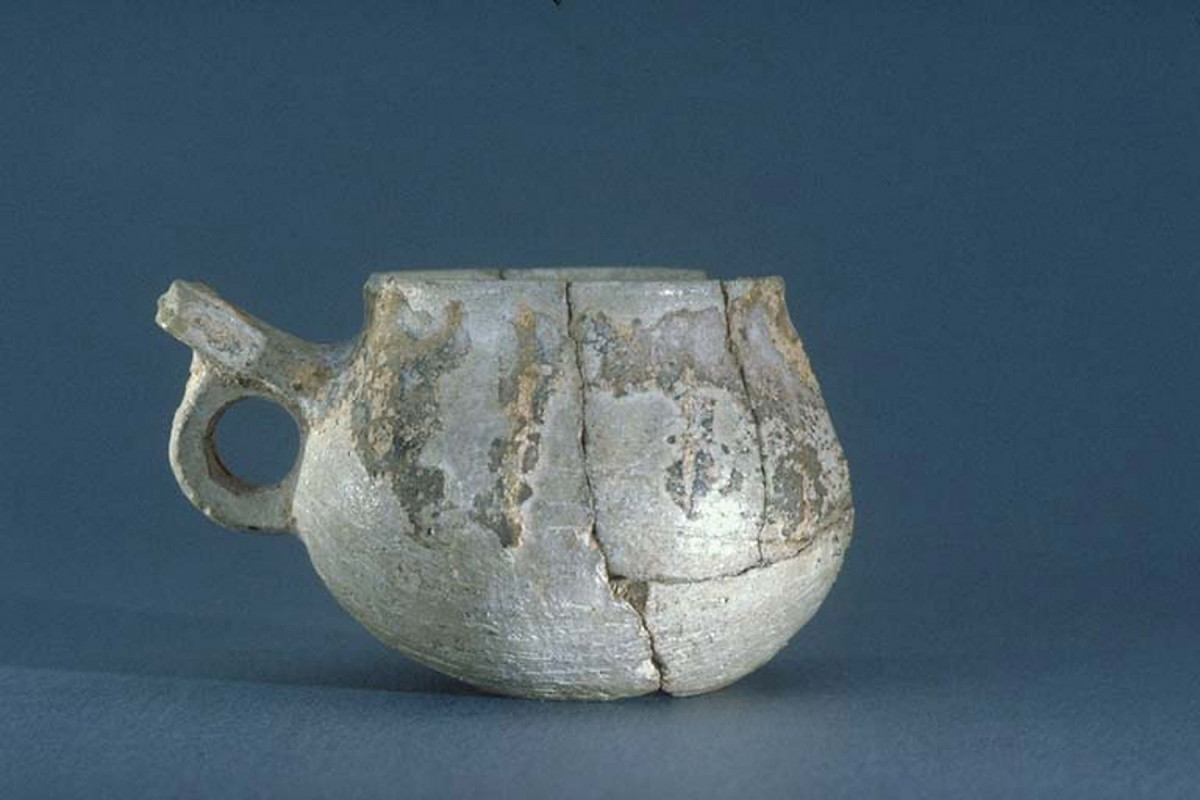
Swedish cup. This antique pottery cup from Gotland is the inspiration for one of the forms I’m turning these days.
I’ve always looked to the past for inspiration, for I find great comfort in the designs and techniques made by the crafts folk of long ago. These objects and their makers were a living part of the continuum of traditional skills. The ale bowls from Sweden and Norway, the end-grain cups turned by Viking craftsmen more than 1,000 years ago, the snibbskål and the lamhogs, all invite us to indulge, consider and create.
But it’s not only the wooden world that is inspiring, for much can be learned from pottery as well. There is one cup in particular, found on the island of Gotland in Sweden, that has inspired the handled mugs I’m turning these days. Its origins are within the 11th century and from the far East. It’s got a very sweet shape and beautiful handle.
Closer Connection
As a professional spoon carver, I was looking for something I could make a little faster than my hand-carved bowls to complement the spoons. I wasn’t interested in the electric lathe at all and had, at that point, turned only two bowls. The first was a plain hard maple bowl in my 8th-grade industrial arts class. The other was a poplar burl bowl on an old lathe I tried to resurrect.
After years of working with electric tools and machines in the building trades and boat shops, I wanted something different – something that connected me intimately to the wood. I’d come to understand through spoon carving and the greater green woodworking scene that hand tools had a different ethos and set a different pace. I was looking for that connection both physical and mental.
I began turning on the pole lathe and was hooked – and not because it was easy, for it was insanely difficult! The skill involved was immense, with having to stand on one leg and drive the lathe with the other – not to mention the almost seemingly infinite combination of cut positions. The traditional hook tools I needed had to be forged before I could even begin. It was a steep learning curve, and I had no one to teach me. It’s no wonder there are only a handful of professional full-time pole-lathe turners today. I often say it’s the hardest thing I’ve ever learned to do. But it’s a skill well worth learning.
These days, after years of practice and many hundreds of bowls, things are a bit different. I can now feel every cut in my hands, my legs…in my whole body, really. In many ways, the lathe is an extension of my body. When I make a cut, I can apply a large variety of direction, force and cutting angle with the tools. I can cut above or well below center. My leg on the treadle drives the speed and the force, both of which I can adjust within a second.
I like to say that the pole lathe has almost infinitely variable speed and infinitely variable torque. Of course this is all limited to the power and stamina that a body can apply, but within that context it’s true. I can slow the speed down within a second to make the cut at the rim of a bowl or speed up and add as much torque and power as I can muster to take the roughing-out cuts. I can add speed without power, and power without speed. When turning, the maker is connected to the workpiece in a very direct way, both physically and mentally.
The aesthetic of a pole-lathe-turned vessel is very pleasant. The lathe reciprocates back and forth so the cuts I make only happen when I push down, when the object being turned moves toward me. So on a subtle level the cuts taper in width from narrow to wide, then back to narrow as I make the cut, apply force, then pull the tool away for the return spin. Then I do it all over again, a few times every second.
This all adds up to an aesthetic that I’ve come to love and that can only be seen on objects that have been turned on reciprocating lathes or pole lathes. It’s a simple, ancient machine that embodies the handmade in both look and feel.
How a Pole Lathe Works
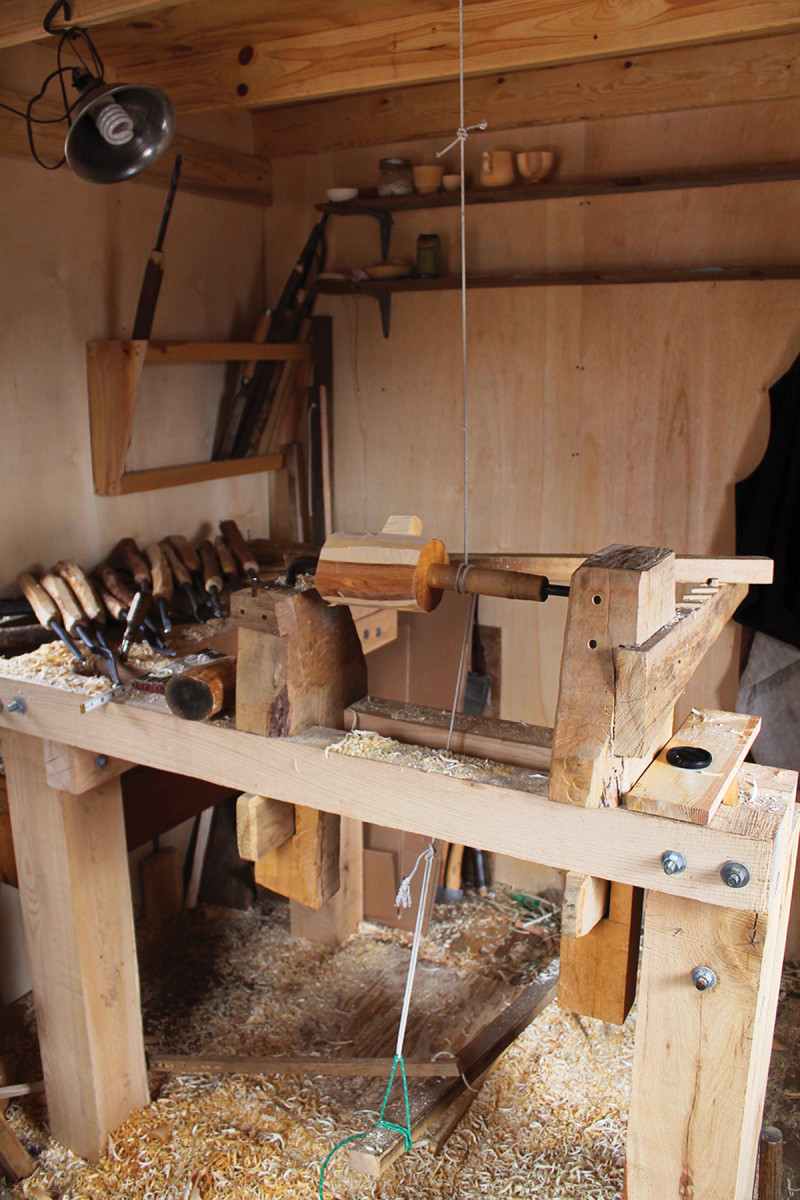
Pole lathe. The drive strap/cord is attached to the treadle below the lathe, wraps around the mandrel, then goes up to a dried conifer pole mounted in the rafters. When the treadle is depressed, the work moves toward the turner; let up and the pole above springs back and returns the work in the opposite direction.
On a pole lathe, everything is turned between centers, but there is not a live or powered center, so to speak; we use a mandrel. This is a cylinder with either spikes or a tenon that is attached to the bowl or cup blank. The drive strap that runs from the foot treadle to the pole above is wrapped around the mandrel. So one center holds the bowl or cup blank and the other center holds the end of the mandrel.
Different size mandrels can add more speed or more torque depending on their size, as well as the size of the object being turned.
Want to make your own pole lathe? Check out this article: Roy Underhill’s Double Spring Pole Lathe
When we push down with our leg on the treadle, the object on the lathe turns toward us. When we let up, the spring pole returns back in the reverse direction.
This reciprocating motion is also what allows pole lathe turners to turn objects with projections, meaning that with controlled foot-treadle movement we can turn up to a handle as the wood spins back and forth. It takes a lot of tool and foot-pedal control.
Hook Tools

One of the keys to pole lathe turning is to be able to forge your own hooks when needed. You’ll find several videos online that teach you how to forge your own, and it can be done in a backyard forge. Or make friends with a blacksmith.
Turn the Exterior
For green woodworkers and spoon carvers, the main tool for roughing is the axe. I use a hand-forged carving axe but any axe will do – as long as it’s sharp. When used with practice and skill, it’s an accurate and efficient tool.
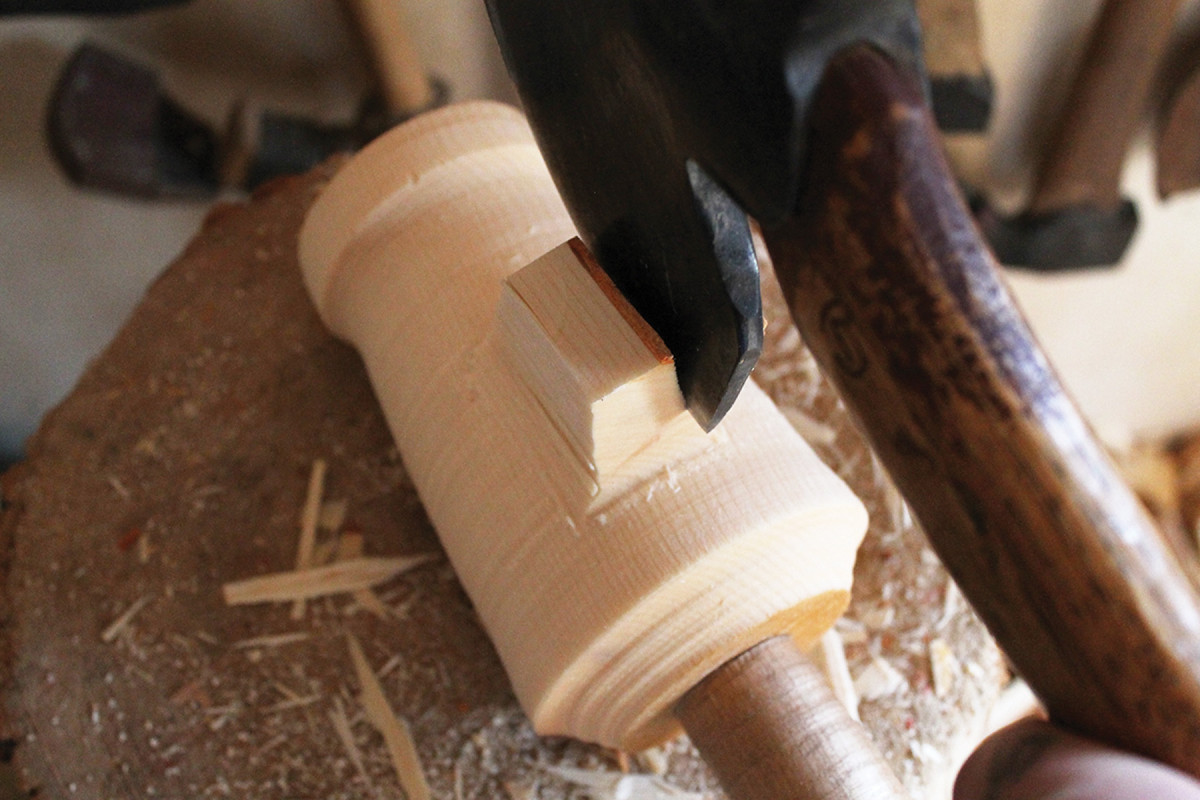
When I set out to make a handled cup or mug, I start with a green or fresh-felled piece of birch. I use birch because it’s the wood to which I have a lot of access. I cut a length from a log and proceed to axe out the blank, removing as much wood as I can before I mount it on the lathe.
Because of the top-to-bottom grain orientation on a cup blank, axing the handled area is easy; the tool cuts across the grain the way a pencil sharpener does.
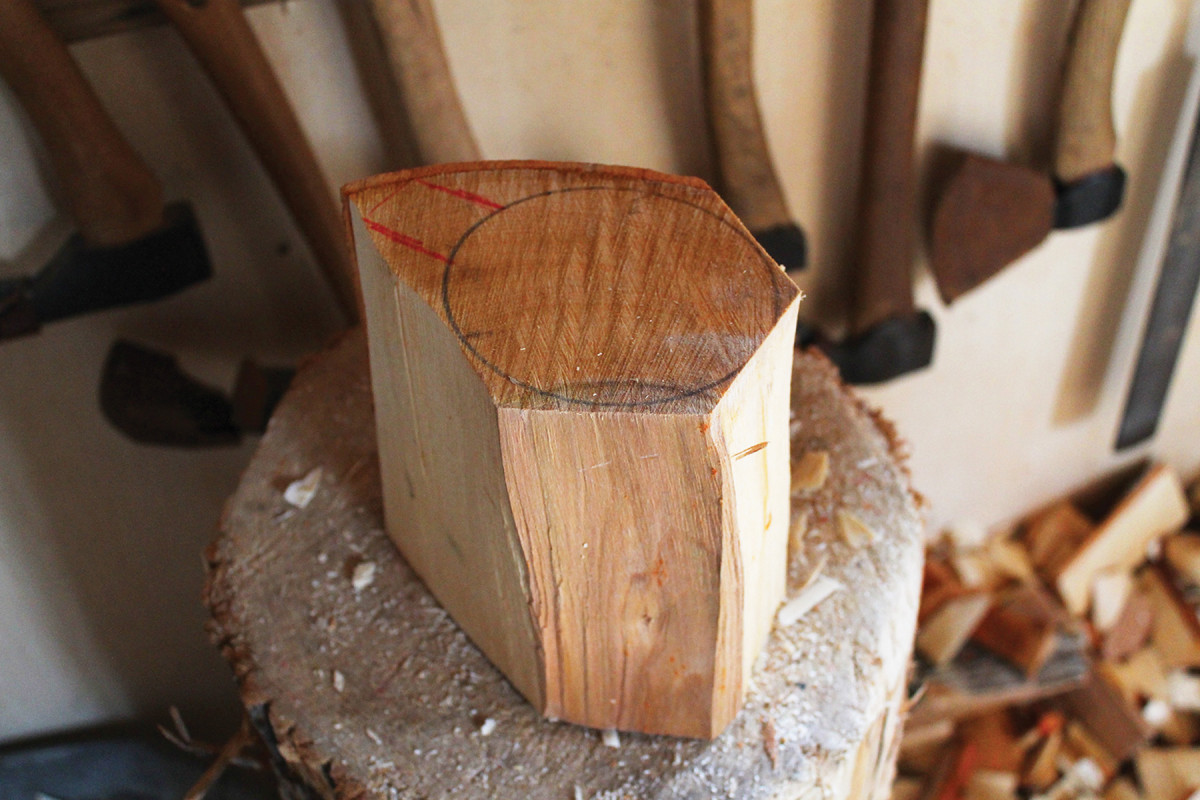
Blank. Controlled work with an axe removes the bulk of the material to form the cup blank.
After the roughed-out blank is ready with a rough projecting handle, drill a hole in the end of it and hammer on a tenon mandrel, mounting it to the lathe between centers.
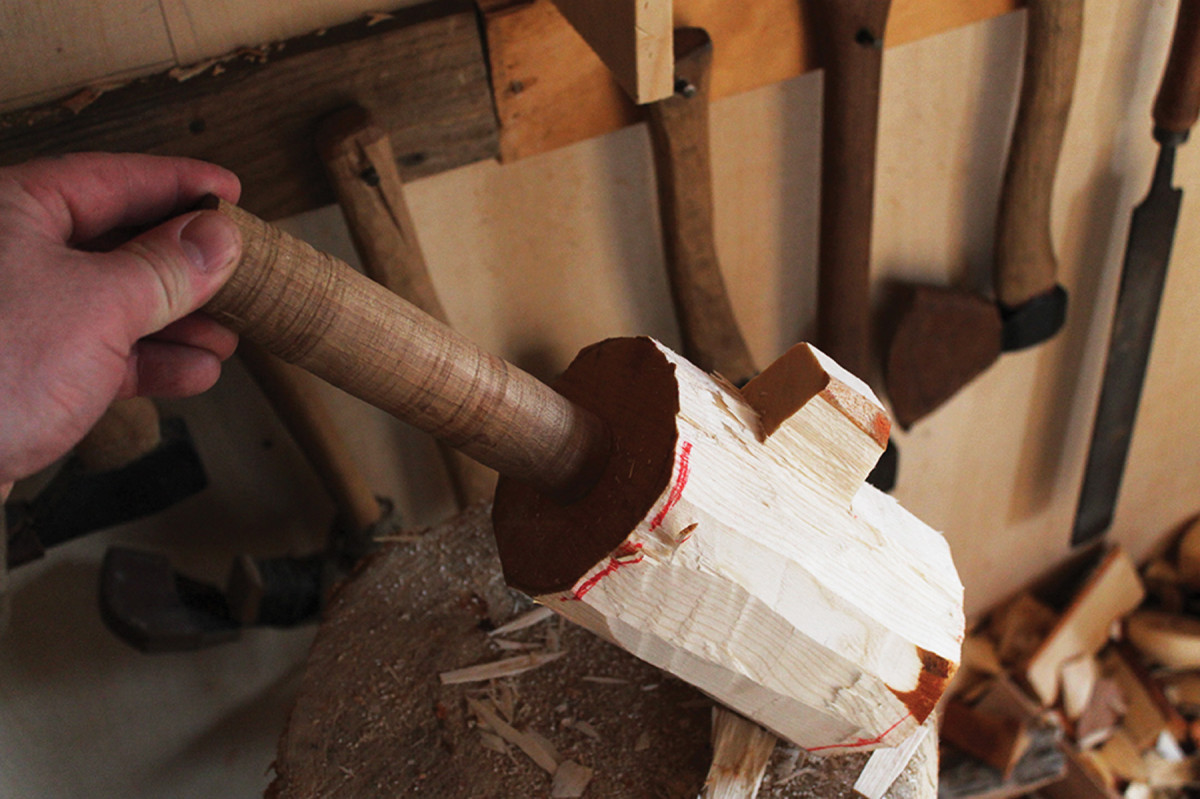
Mandrels. In the center of the blank’s top, use an auger bit to drill a hole deep enough to meet the shoulder of the tenoned mandrel (shown above). While evidence from a find at York reveals spike mandrels (shown below) were also commonly used, I find a tenoned mandrel works best in end grain, because any catch will grab and loosen a spike mandrel.

From here, the turning begins. First, use a large hook to turn the base up to the projecting handle, then turn the rim down to the handle. This initial turning is just rough shaping and getting below the axe cuts.
Rough-out No. 1. Mount the workpiece, then turn from the handle to the base and from the rim down to the top of the handle. This removes the bulk of the flats left by the axe.
If I’m turning a lamhog or a mug, I’ll try to cut toward the finished shape slightly. During this rough turning, I also have to decide on the size of the cup. Sometimes the axe cuts have limited its overall size.
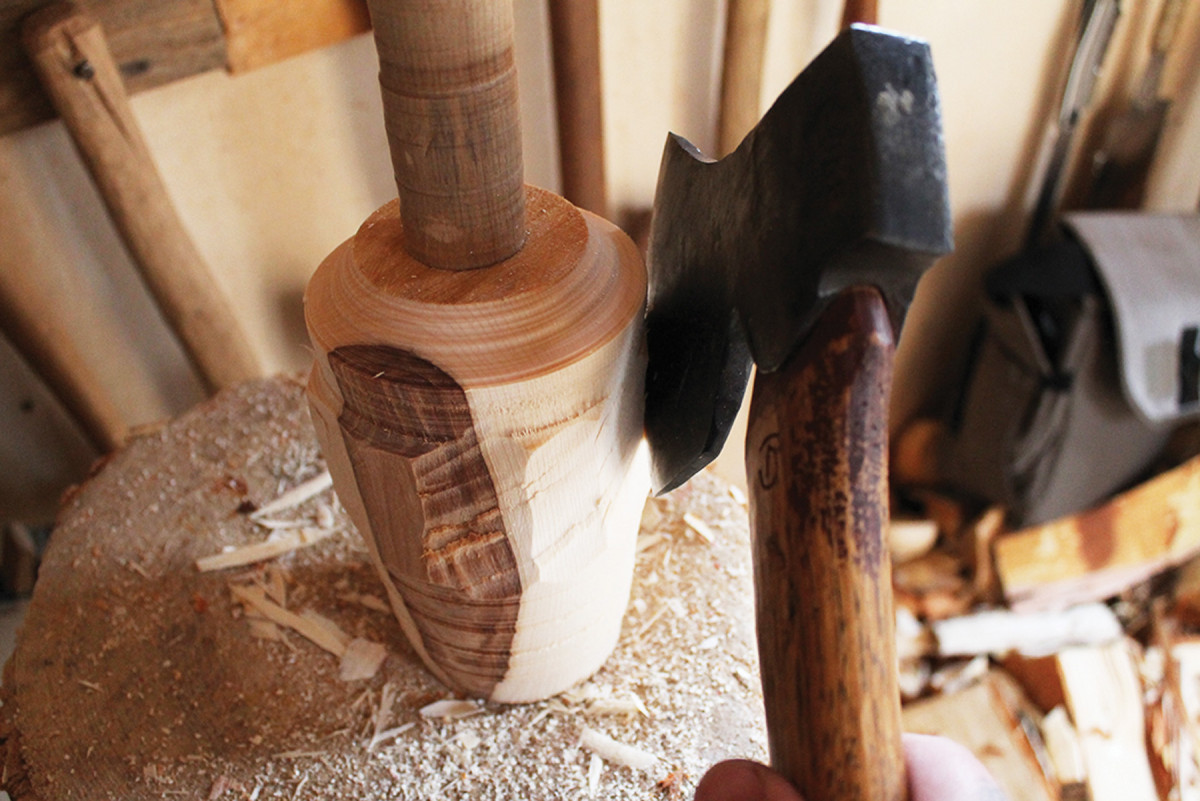
Trim. Use the axe to remove any remaining protrusions (except for the handle!) after your first roughing out.
After the first turning, take the cup off the lathe and axe off what’s protruding from the turned rim and base – save for the handle, of course. Take extra care not to hit the handle with the axe.
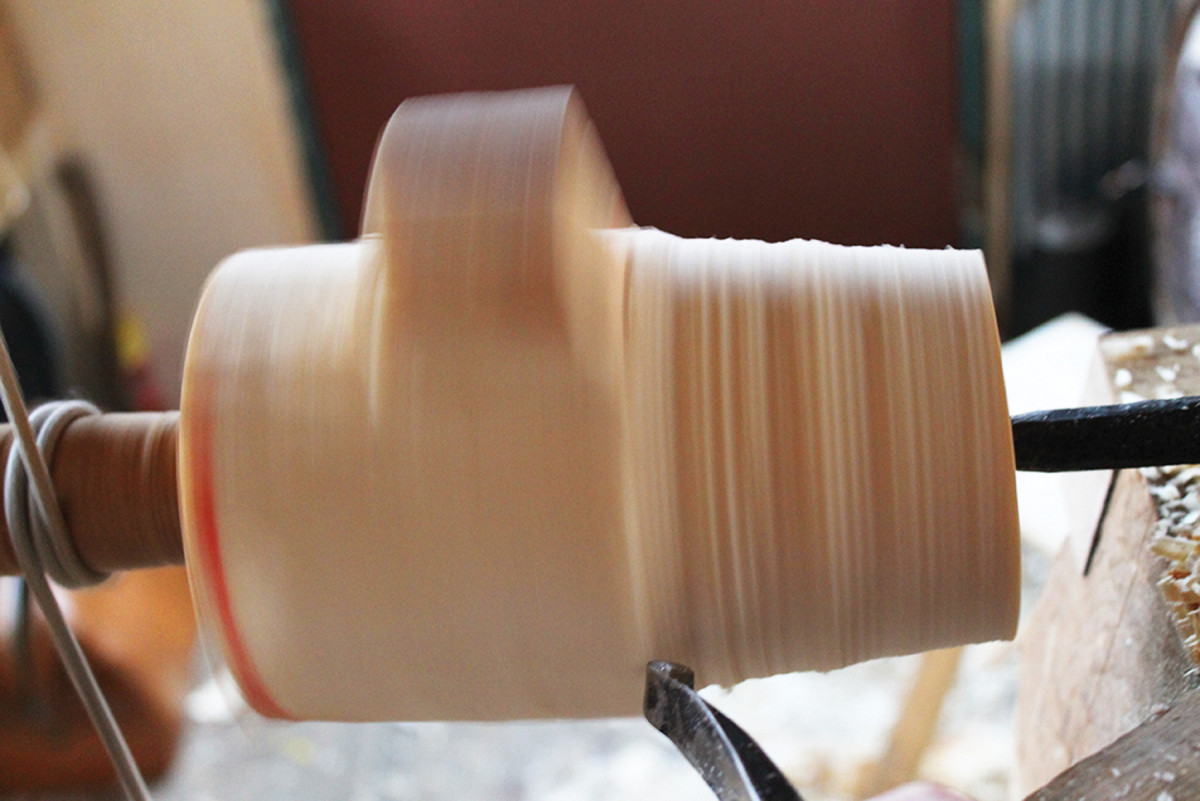
Rough-out No. 2. Here’s where the reciprocating motion of the pole lathe comes in. Turn the cup’s diameter at the handle area using controlled pumping on the treadle; the piece turns back and forth to the handle location. (Don’t worry if the tool bangs slightly against the handle each time.) But the reciprocation also means you’ll have to flip the workpiece on the lathe with every 1⁄4″ material you remove so that it doesn’t get too oval in shape.
After I’ve removed this extra material, it’s back on the lathe again. This time, turn what’s around the cup’s diameter at the handle area. This requires controlled pumping on the treadle and precise tool control. This turning blends the rim and base to a uniform shape. After the axe-hewn mid area is rough-turned, proceed to the desired finished shape.
Trim again. Before hollowing out the center, use the axe to refine the handle thickness and turn up to it.
 The trick when turning around the handle area is that the foot treadle needs to be set for a shortened movement. I’ve tried putting a block under the pedal and messed around with a few other ideas but, in the end and due to a little bit of slip with the drive strap, the best way is to simply set the handle in a certain spot in the rotation and use light-footed action. I usually just slightly bang the tool against the handle on each reciprocating cut.
Another variable is that, as the cut begins, it is shallow. As the cup turns, the cut gets slightly deeper. By the end of the partial rotation – when the tool stops at the handle – the cut is full depth. This actually creates an oval turning.
You can only go over the surface a few times before needing to flip the cup end for end and remount it between the centers. In this way, you turn the other side even, thus cutting the high spot down. The combination of flipping the cup and cutting in both directions turns a true cylinder. I find I’m limited to a depth of just over 1⁄4” or so before the oval shape begins to push the tool too much in and out of depth.
I realize this may be hard to follow and that until you’ve done it, it may not make much sense; but try it, and it will. Proceed until you have the desired shape and a true turned object.
Add a few final sweet cuts to the rim and cut in the base, then it’s time to turn the cup around and hollow the interior.
Turn the Interior

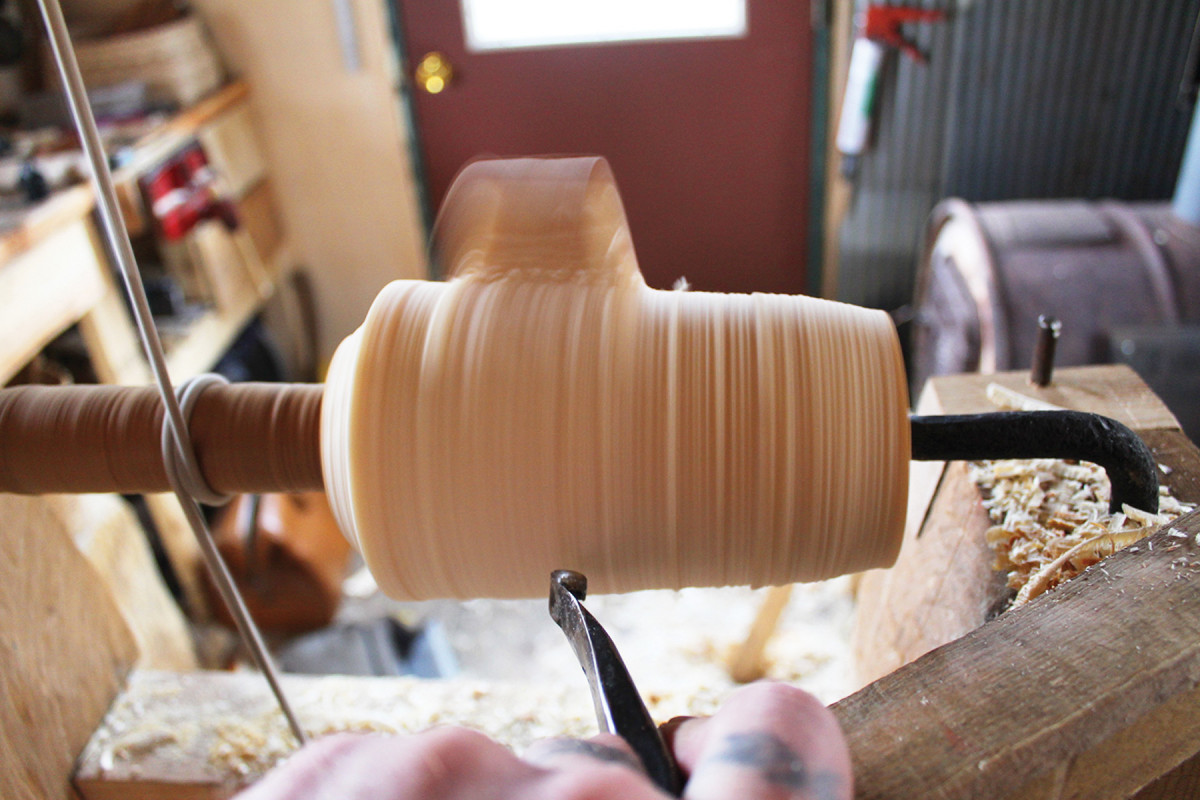
Close work. The mandrel makes it tricky to remove the interior waste. As the cut gets deeper, I change hooks. Lamhogs have very thin walls – too thick and drying becomes a challenge.
The inside is pretty tricky to turn. Because the mandrel must be mounted on the end, there is not much room for the tool to work. The mandrel and the hole needed to mount its tenon adds stress to what little wood is left after a slot is turned inside the cup. If the core side is cut too small, the pressure will split the core and the mandrel will move off its center – or worse, lose all grip. In that case, all the work on the outside will be for naught because the mandrel changes position, which causes the cup to turn on a different axis.
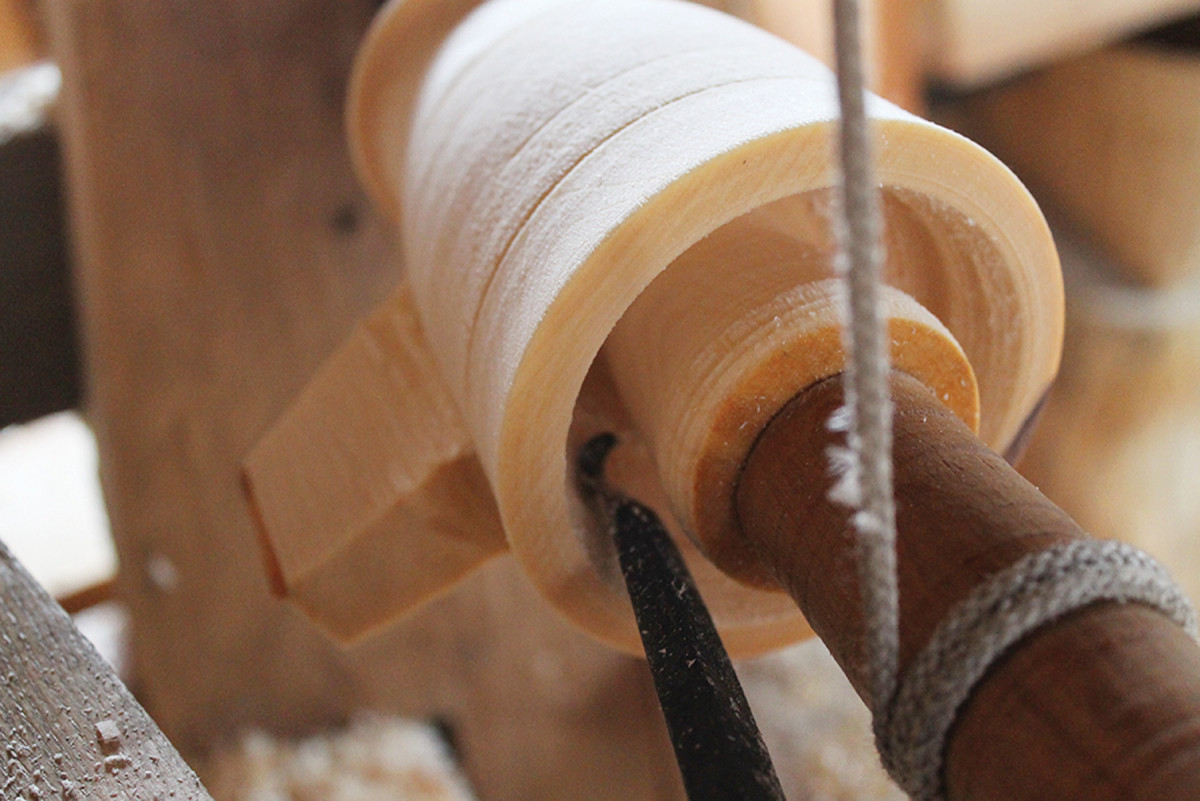
But if you cut too close to the core the mandrel will break free prematurely and ruin the cup.
I use hooks I’ve designed and forged for this tight job. I have just a touch of room to move the tool, so the edge angle is key. Because I’m cutting against end grain, the hooks need to have a bit of aggressiveness built into their edge.
As the slot grows deeper, I use a different hook that is designed to skew cut from the bottom of the slot to the rim. This cuts smooth and clean due to the grain and taper of the vessel. I work my way down deep into the cup with these two hooks. My lamhogs are about 5″-6″ deep.
Because the slot is not big enough to fit my fingers in, I learned to use the tool as if it was one of my own fingers so that I could feel the thickness of the side walls of the cup. Learning by feeling alone proved to be a very important skill. If the side walls of the cup are too thick, there won’t be enough flex in the sides to dry properly due to the differential rates of shrinkage between the walls and the base. When turning end-grain cups with the pith in this is important. I usually settle for about 1⁄2” to 3⁄8” thick at the base and 1⁄8” to 3⁄16” for the walls.
Finger substitute. With enough practice, a hook will become an extension of your finger; you’ll be able to feel when you’re at your desired thickness and depth. I shoot for walls of about 1⁄8″-3⁄16″, and a base that’s 1⁄2″-3⁄8″ thick.
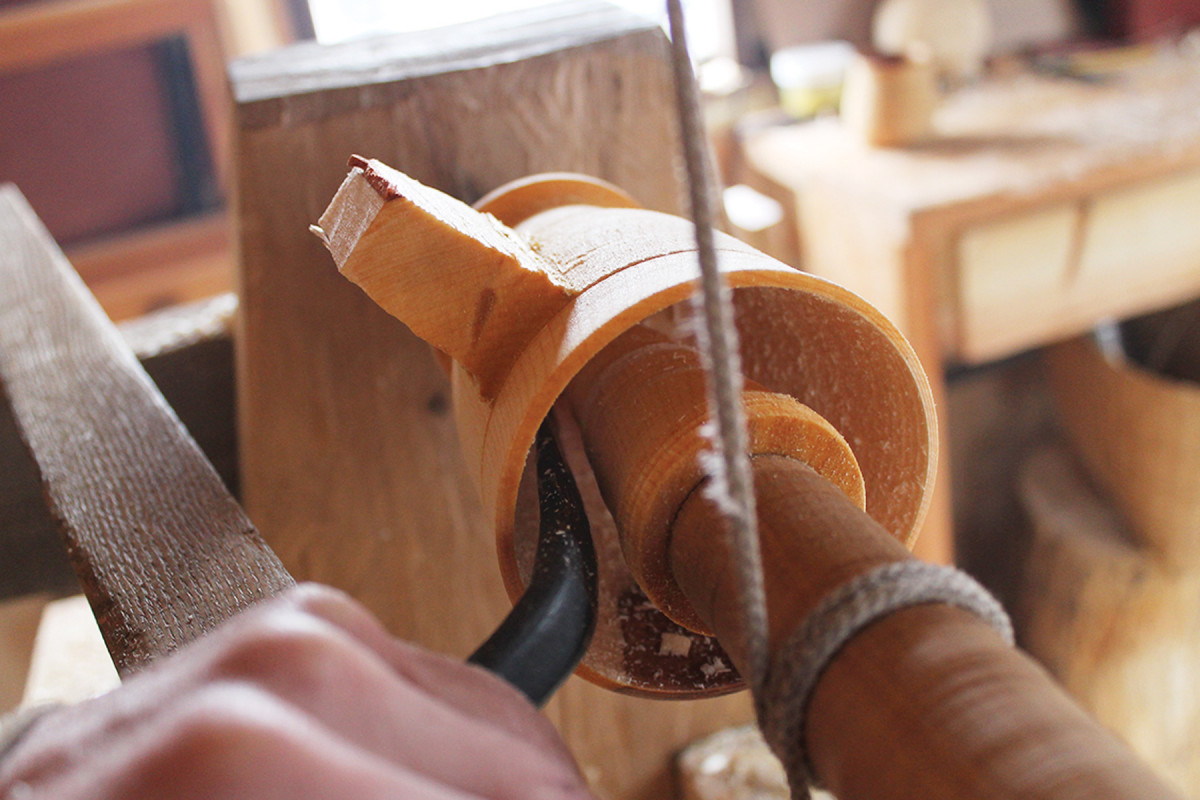
Once the inside is turned, the core needs to be severed in order to remove the mandrel. I use a different shaped hook for this. Once the core is removed, I use a cranked dogleg gouge to clean the remaining bit of the core flush and smooth on the inside bottom of the cup. I also cut and carve the outside base of the cup flush. I then take the cup to the bench to lay out and cut the handle.
After shaping the handle with a Sloyd knife, rub a touch of linseed oil and beeswax blend on the end grain of the base and set it to dry. This thick oil/wax blend slows down the drying of the outside of the cup base to allow for a little movement or flexibility as the cup’s sides contract and add pressure to the base.
After a week or so it’s dry, and ready for a thinner oil/wax bath and after that, ready for use.
Tradition & Today
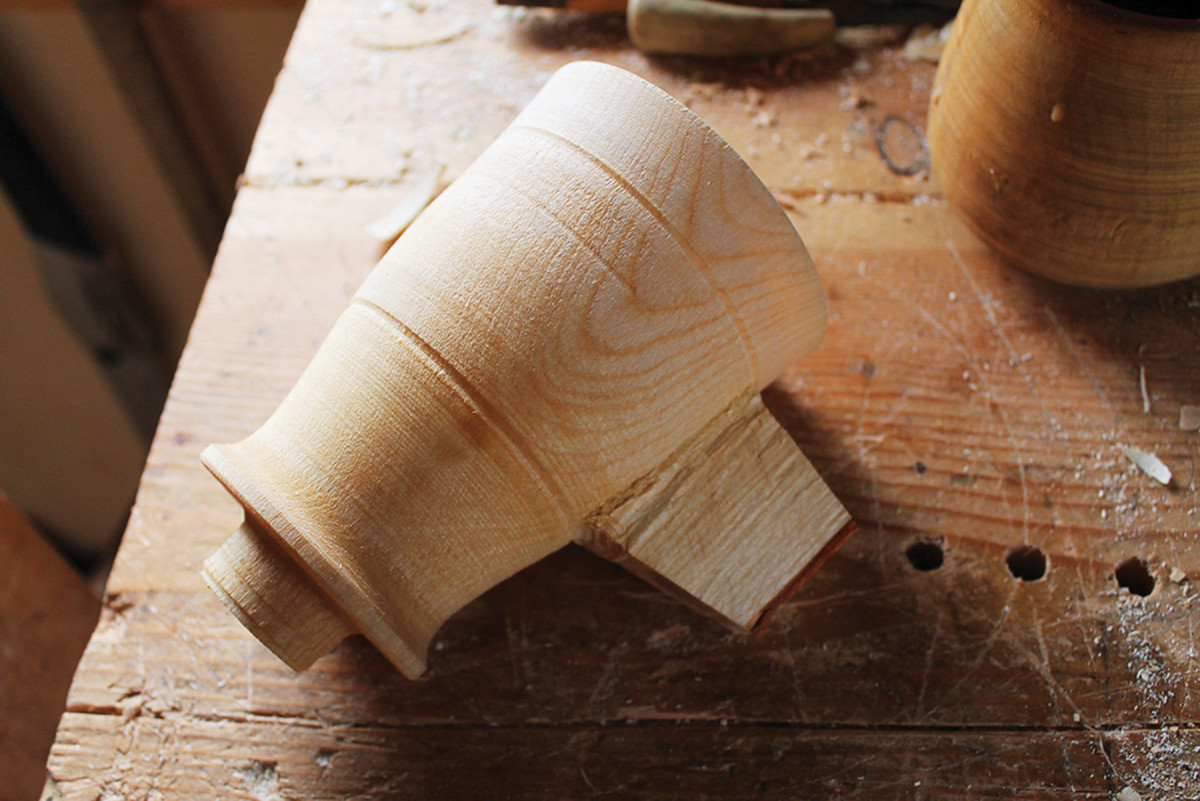
Off the lathe. Here’s the lamhog as it looks after removing it from the lathe and severing the core.
I hope I’ve given some context to the fact that the pole lathe is not some iconic outdated machine from the past, nor are the objects that can be made on it. I believe both have a place today. Wooden vessels are warm, quiet, clean and renewable. Wooden bowls and spoons have also come to be seen as the iconic symbols for the growing green woodworking scene and the wood culture renaissance. They are grounding.
Handle. A Sloyd knife is my tool of choice for carving the handle.
It’s tough to talk about, but setting a course to master a few simple tools takes a certain dedication that is fairly rare in the world we live in today – a world that’s full of overly complicated and over-engineered machines and devices (many of which are designed to make money rather than things). There is something enlivening and empowering about the other path, the path where we own a few simple tools and work toward developing the skills to use them well. Whether it be making spoons with axe and knife, a stick chair with riven and drawknifed parts or learning to turn on a simple wooden machine, there is great worth in the effort besides staring at the Axis Mundi for cosmic insight.
Bonus: Check out Jarrod Stone Dahl’s video on his YouTube channel — Wood Turning, Cutting Theory and Hook Tool Design
Here are some supplies and tools we find essential in our everyday work around the shop. We may receive a commission from sales referred by our links; however, we have carefully selected these products for their usefulness and quality.